Calendriers
Accessible avec votre compte informatique, le calendrier informatique de l'UNIL vous permet de facilement agender vos rendez-vous, inviter des collaborateurs ou partager vos calendriers avec d'autres membres de la communauté universitaire.
Doc publique
Documentation publique du service
FAQ Calendriers
Conseils de base sur Exchange
- outlook.office.com, "Microsoft Outlook" sur Windows et Mac, et "Calendrier" sur Mac sont les seules applications supportées par le Ci en ce qui concerne l'agenda Exchange. Pour une utilisation poussée, avec partage de calendrier, Apple Calendrier est déconseillé.
- N'utiliser qu'un seul calendrier personnel, celui nommé "Calendrier", pour y saisir ses évènements.
- Si un évènement est considéré comme privé, utiliser la case à cocher "Privé" disponible lors de la saisie de l'évènement.
- Ne pas afficher plus de 5 calendriers partagés dans l'application utilisée.
Partager son calendrier
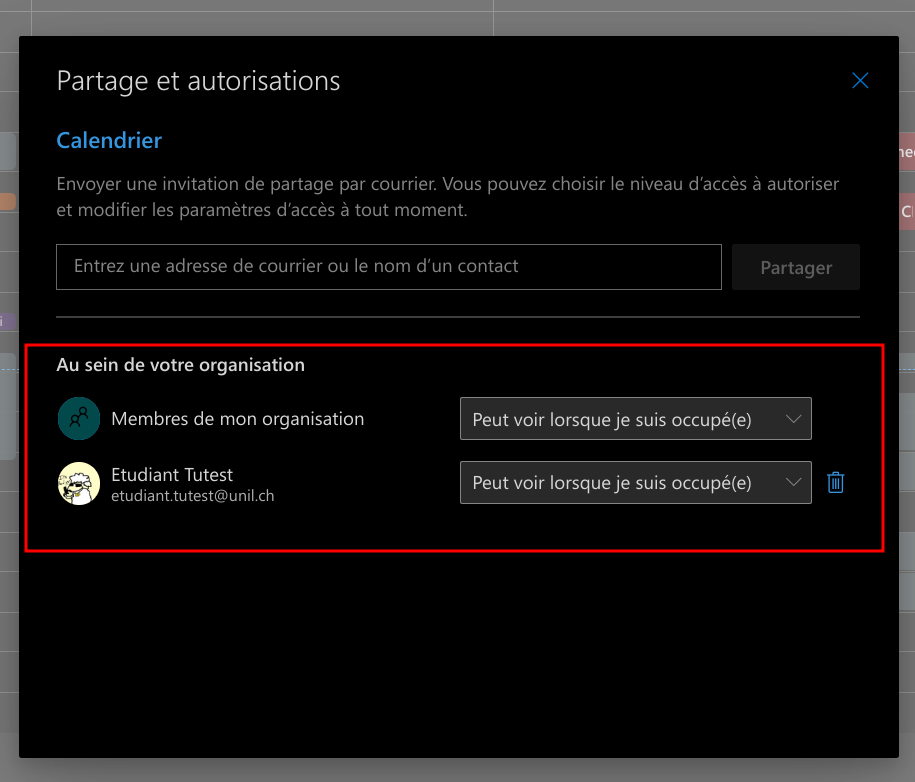
Choisir le type de partage adéquat
| Type de droits | Utilisation | Nom du partage sur Exchange |
|
Lecture |
Permet à la personne bénéficiaire du partage de lire les rendez-vous du calendrier partagé. Aucune saisie n'est possible. |
Tous les détails |
|
Lecture + écriture |
Permet à la personne bénéficiaire du partage de lire et de saisir des rendez-vous dans le calendrier partagé. A utiliser avec précaution, toute personne disposant de ce droit peut supprimer n’importe quel événement du calendrier sans que son titulaire principal n’en soit prévenu ! |
Editeur |
|
Contrôle total |
Permet à la personne bénéficiaire du partage un total contrôle du calendrier partagé (lecture et saisie des événements, réponse aux invitations, envoi d'invitations) N’utiliser que dans un seul et unique cas de figure : la délégation complète de la gestion d’un calendrier d’un directeur à son ou sa secrétaire personnel(le). |
Délégué |
NB: L'utilisateur remarquera probablement que deux types de partage sont encore disponibles sur Exchange, soit "Disponibilité uniquement" et "Détails limités". L'utilisation de ces deux types de partages n'est pas recommandée car ils ne sont pas gérés par les applications des ordinateurs Mac, majoritaires à l'UNIL.
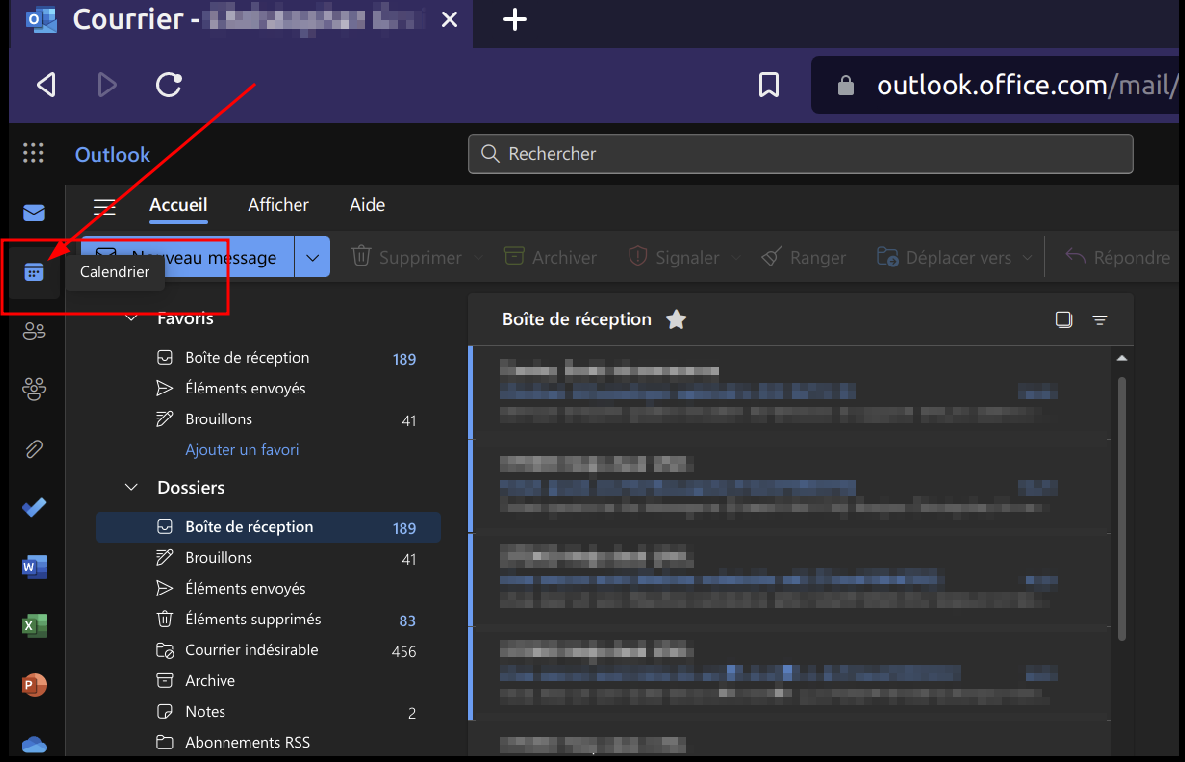
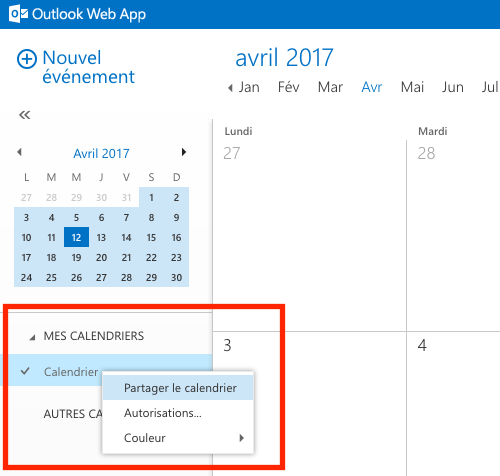
Partager son calendrier
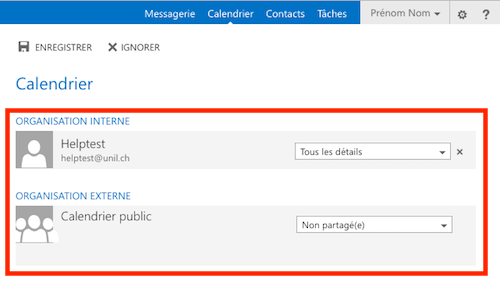
- Se connecter sur https://outlook.office.com avec ses identifiants UNIL

- Cliquer sur Calendrier

- Cliquer sur les trois points à droite du calendrier Calendrier et cliquer ensuite sur Partage et autorisations

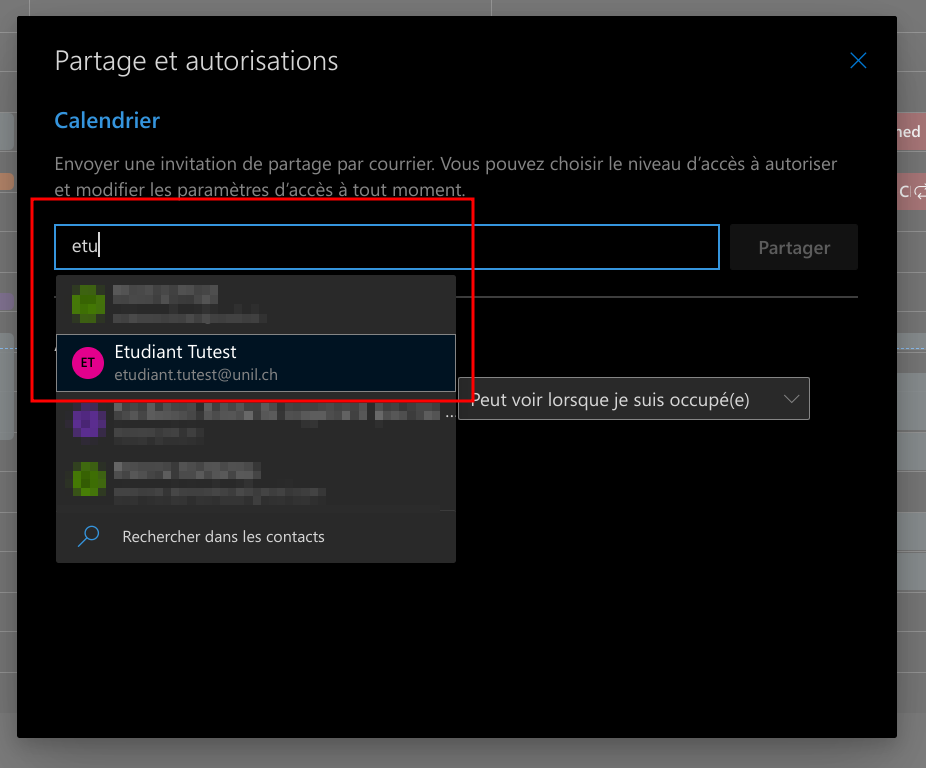
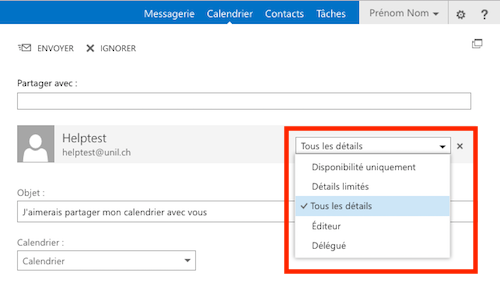
- Taper l'adresse de la personne avec qui on souhaite partager son calendrier. Si elle n'apparaît pas automatiquement, cliquer sur Rechercher dans les contacts

-
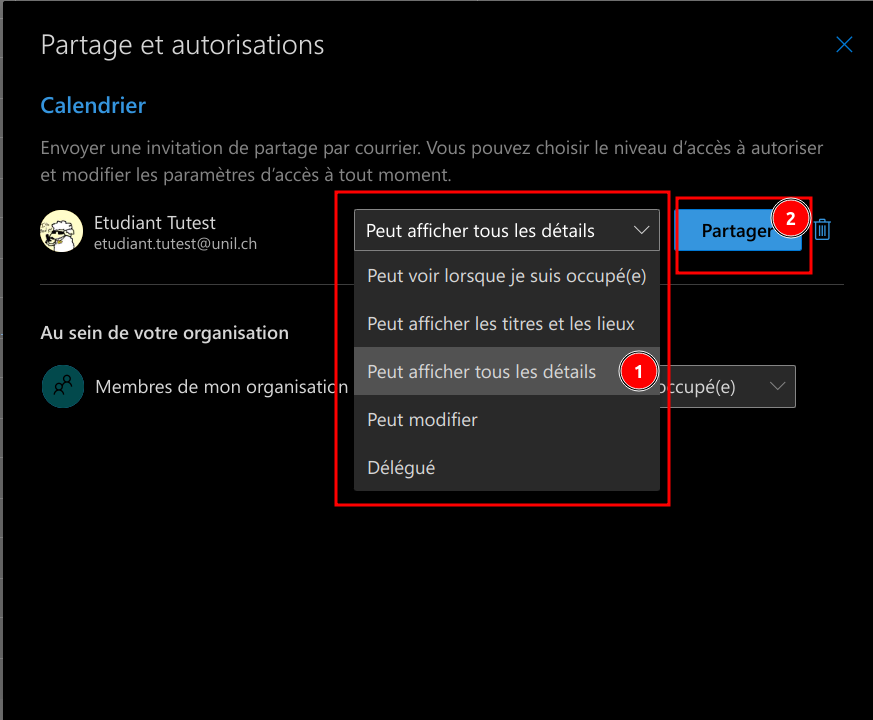
Sélectionner le type de partage souhaité (recommandé: Peut afficher tous les détails pour un accès en lecture) et ensuite cliquer sur Partager

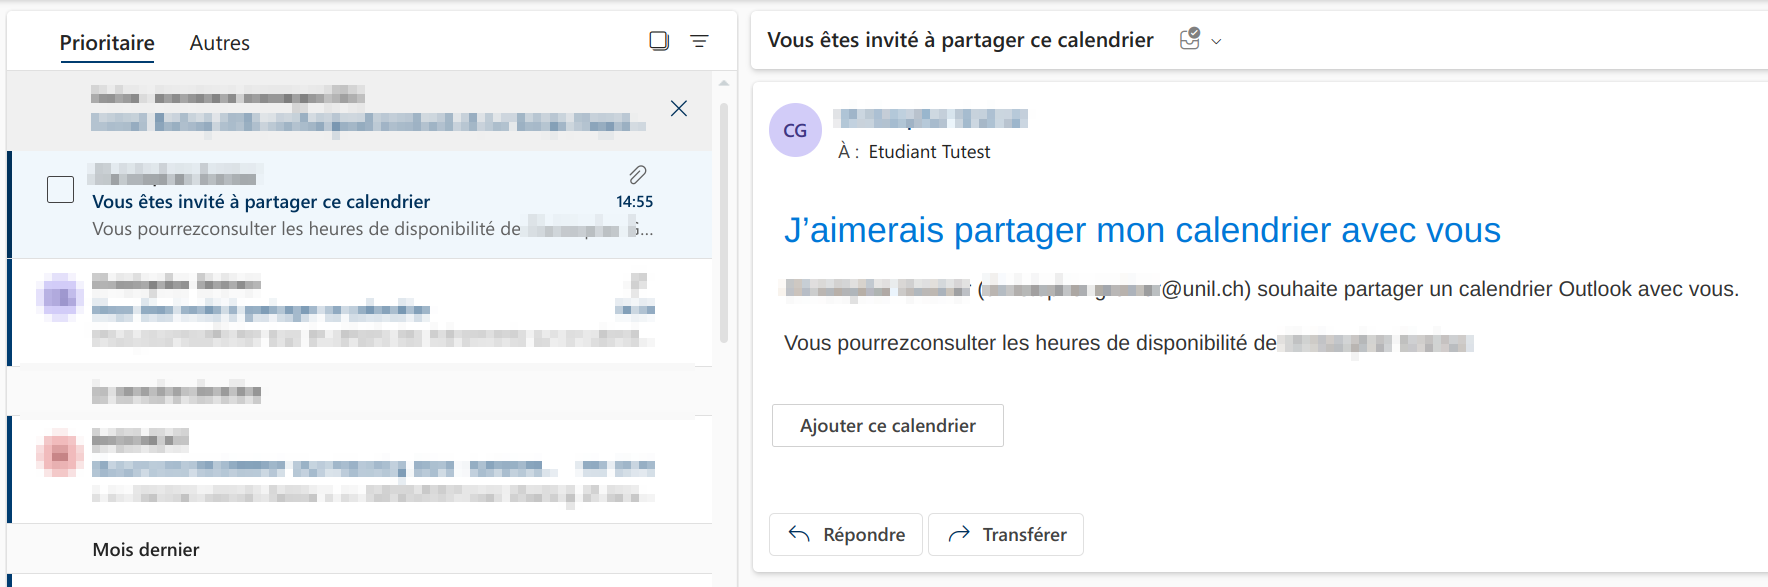
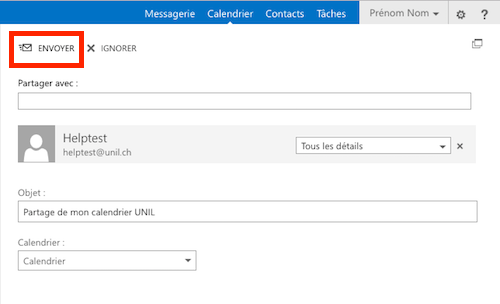
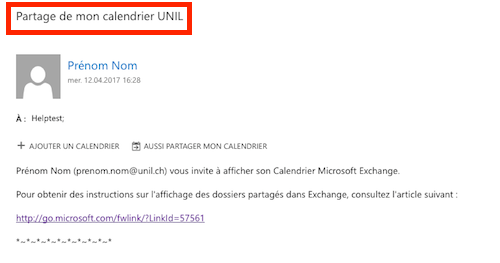
- La personne bénéficiaire du partage recevra alors un mail type, lui indiquant que vous avez partagé votre calendrier avec elle.

-
(optionnel) Vérifier les partages de son calendrier

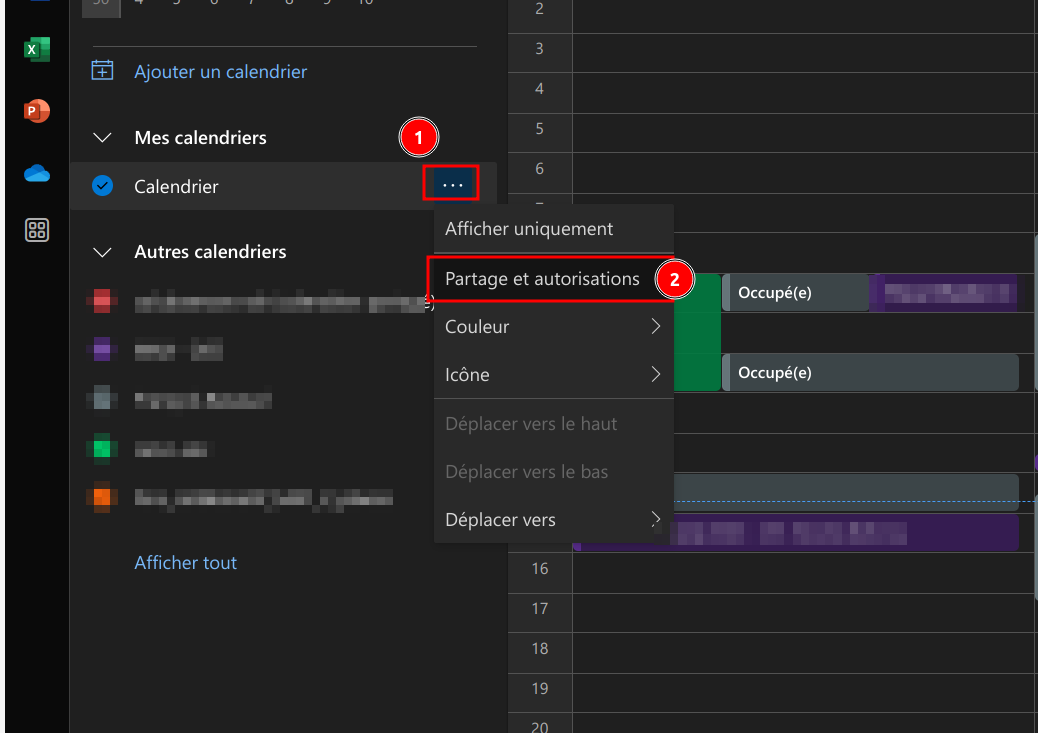
- Cliquer sur les trois points à droite du calendrier Calendrier et cliquer ensuite sur Partage et autorisations
- La liste des partages apparaît alors


Afficher un calendrier partagé
Web (outlook.office.com)
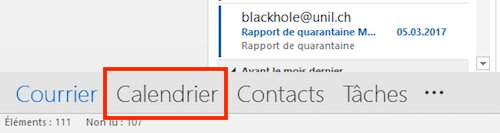
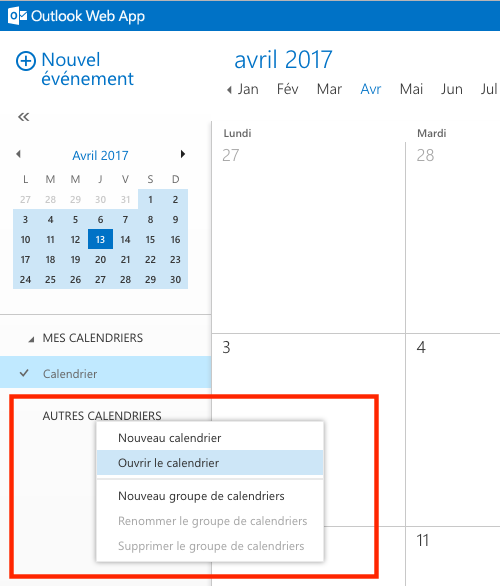
- Se connecter sur https://outlook.office.com avec ses identifiants UNIL
- Cliquer sur Calendrier
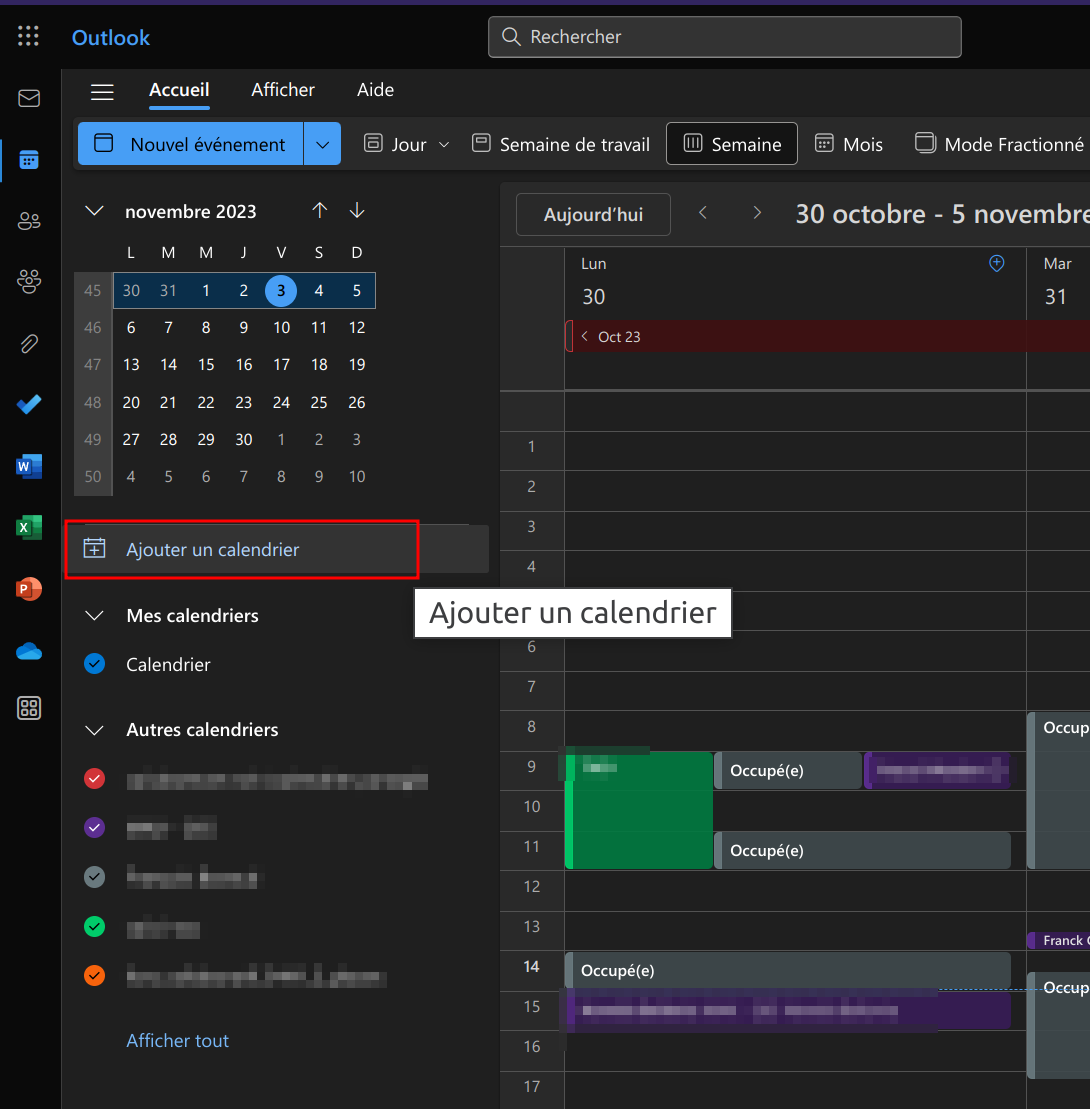
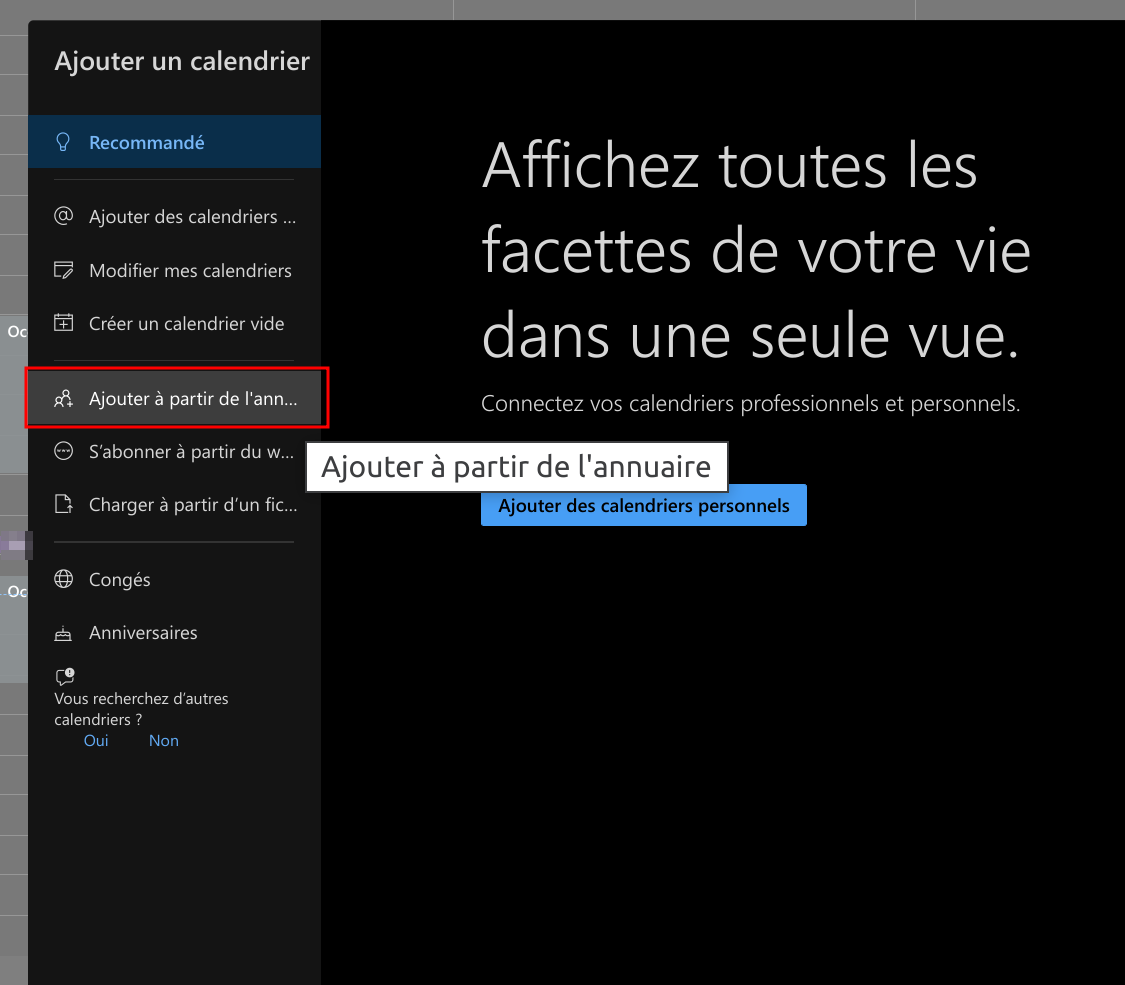
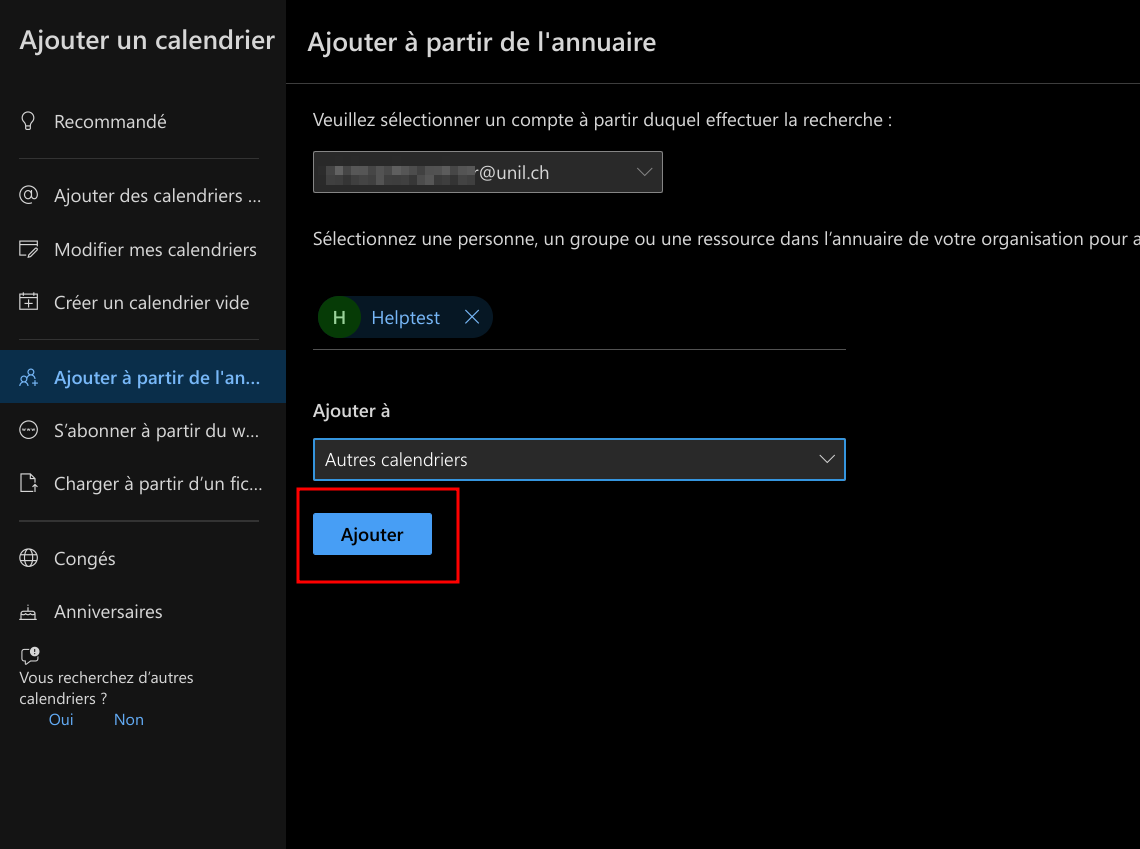
- Cliquer sur Ajouter un calendrier

- Choisir l'option Ajouter à partir de l'annuaire

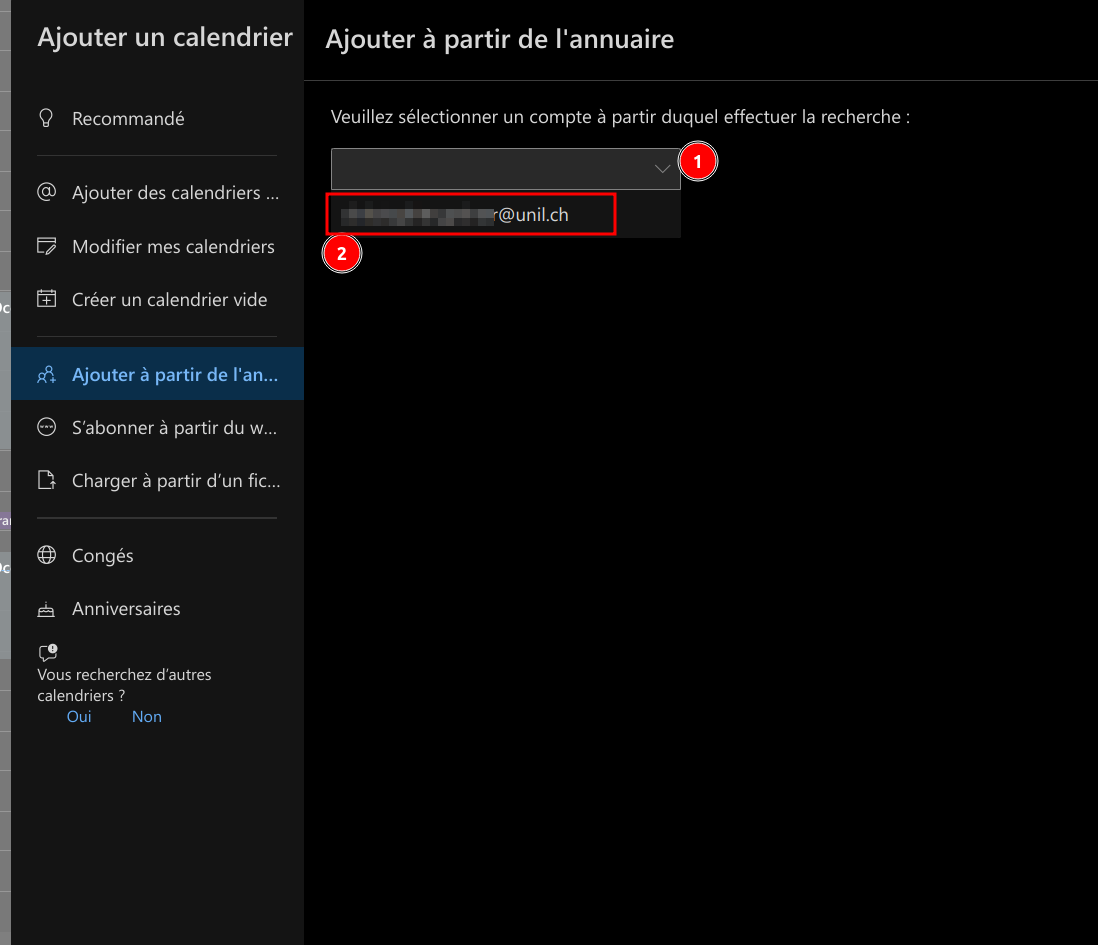
- Sélectionner votre compte

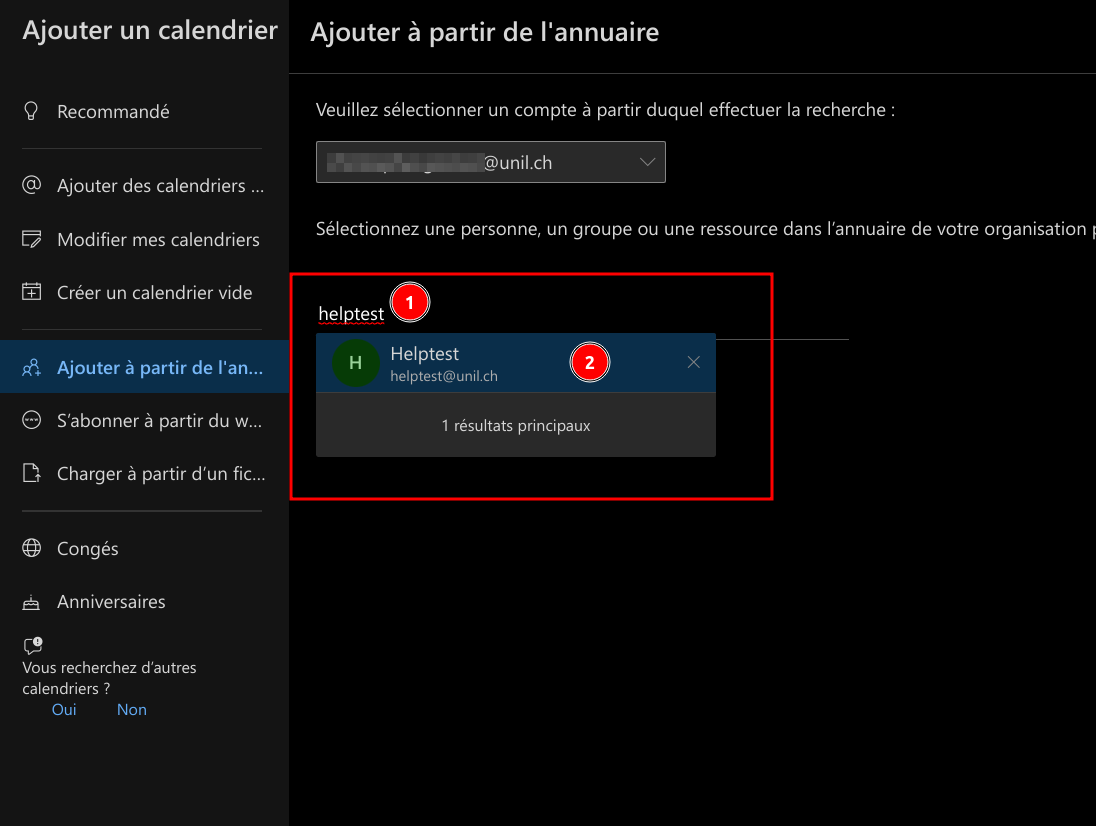
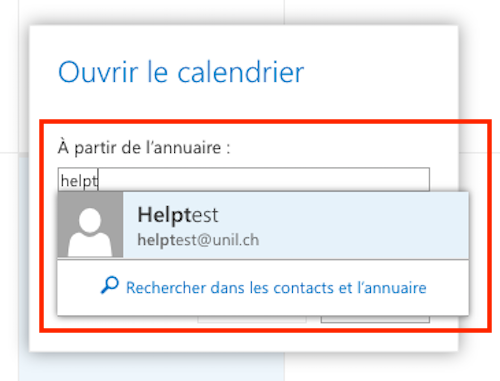
- Taper le nom du calendrier que vous souhaitez afficher.
NB: Dans le cas d'un calendrier de groupe (créé sur demande par le Ci), il est souvent nécessaire de précéder le nom du calendrier de la mention "cal." (exemple: cal.calendrier_de_groupe).
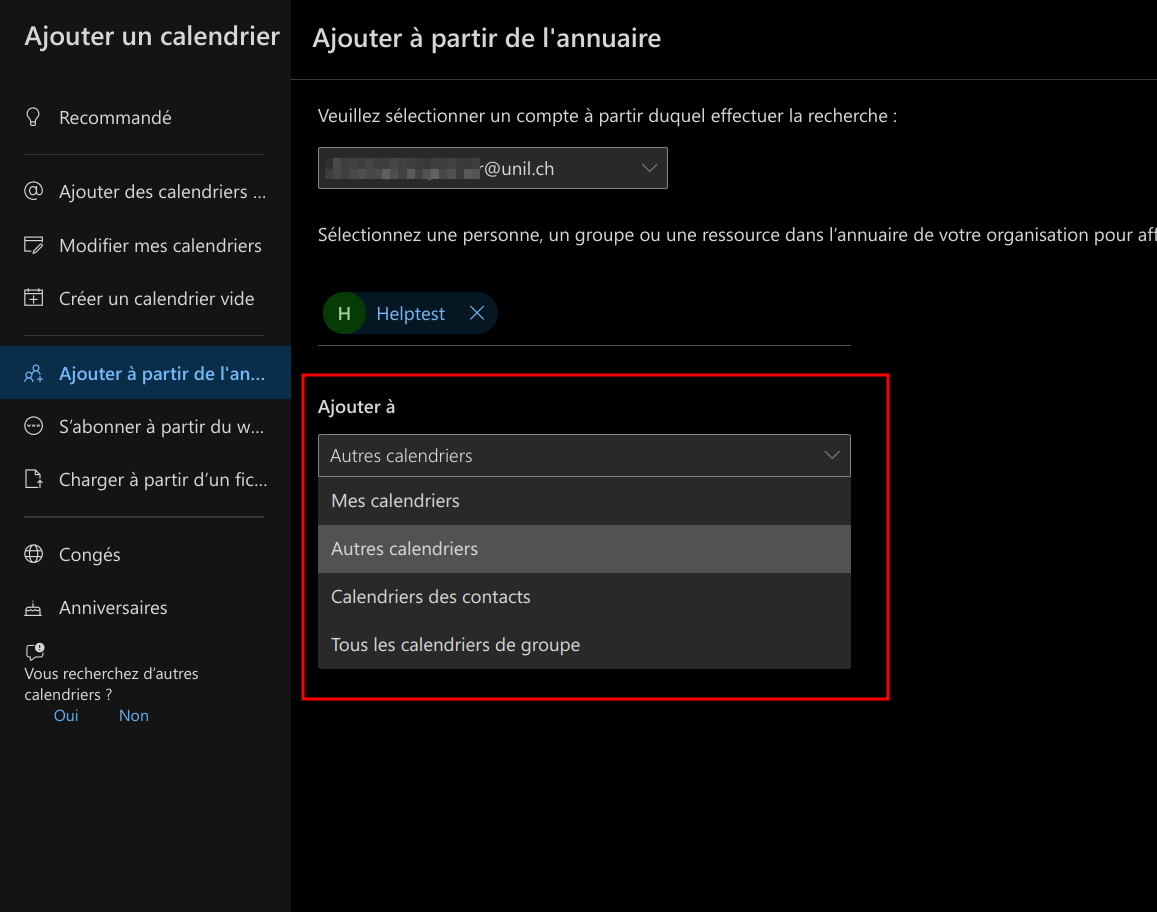
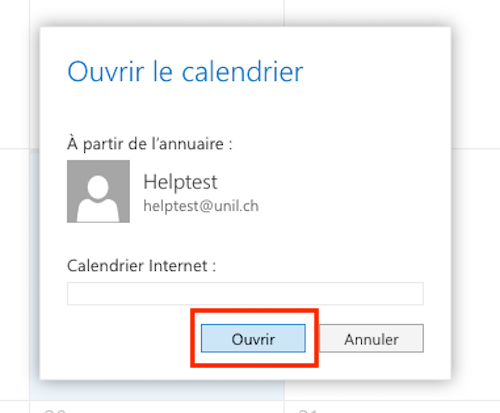
- Sélectionner dans quelle rubrique vous souhaitez faire apparaître le calendrier

- Enfin, cliquer sur Ajouter

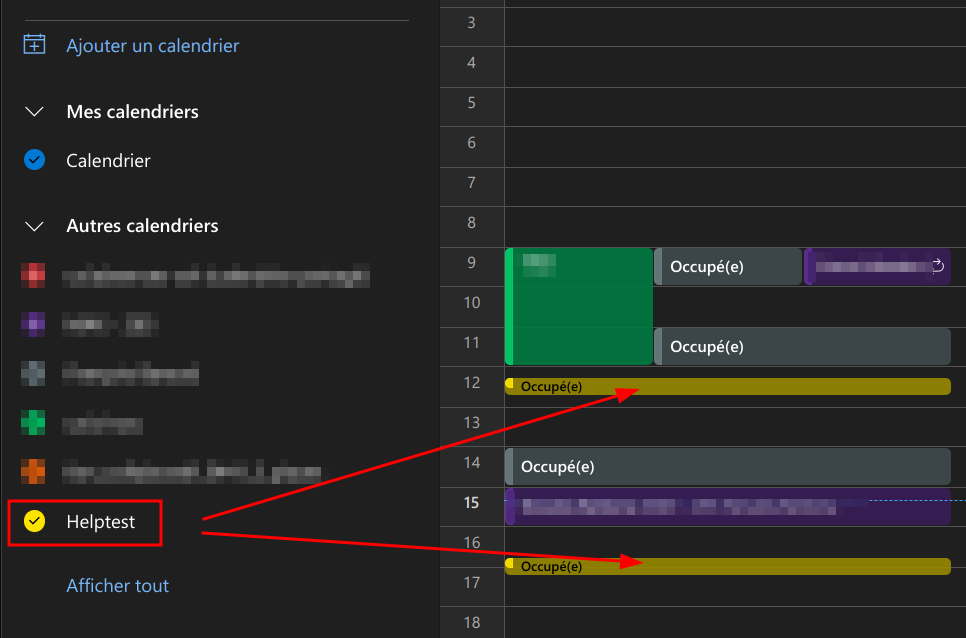
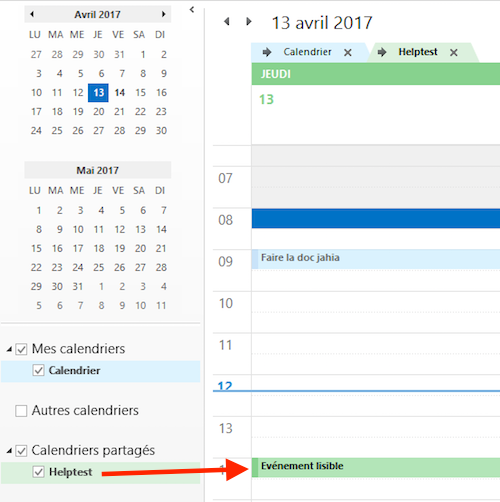
- Le calendrier apparaît alors sous la rubrique choisie. Dans l'exemple ci-dessous, le calendrier partagé par helptest est en jaune sous la rubrique Autres calendriers.

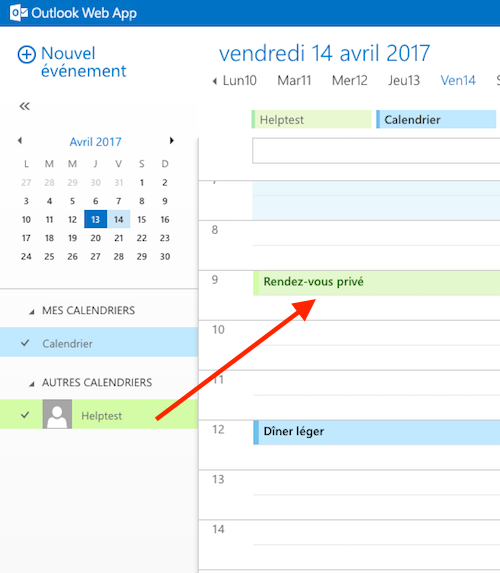
- L'exemple ci-dessous montre le rendu d'un évènement défini comme privé par l'utilisateur helptest dans son calendrier partagé. Seule la mention "Rendez-vous privé" est visible pour les bénéficiaires du partage.


Outlook
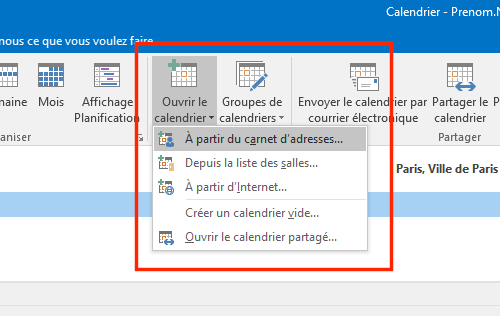
- Ouvrir le logiciel Microsoft Outlook

- Cliquer sur Calendrier

- Cliquer sur "Ouvrir le calendrier", puis sur "A partir du carnet d'adresses..."

- Taper le nom de la personne qui a partagé son calendrier, la sélectionner dans la liste, cliquer sur "Calendrier ->" puis sur OK.
NB: Dans le cas d'un calendrier de groupe (créé sur demande par le Ci), il est nécessaire de précéder le nom du calendrier de la mention "cal." (exemple: cal.calendrier_de_groupe).
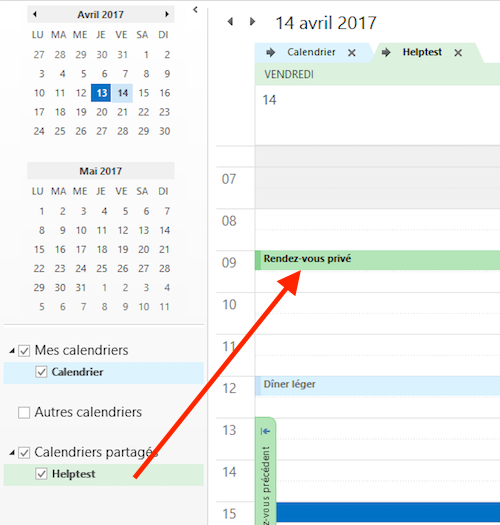
- Le calendrier apparaît alors sous la rubrique "Calendriers partagés". Dans l'exemple ci-dessous, le calendrier partagé par helptest est en vert.

- L'exemple ci-dessous montre le rendu d'un événement défini comme privé par l'utilisateur helptest dans son calendrier partagé. Seule la mention "Rendez-vous privé" est visible pour les bénéficiaires du partage.


Apple Calendrier
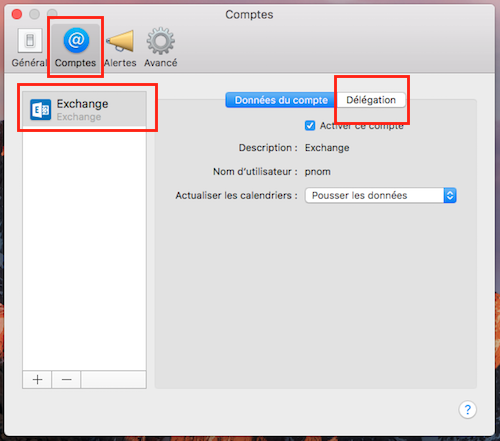
- Ouvrir le logiciel Calendrier

- (Optionnel) Cliquer sur "Calendriers" pour afficher la liste des calendriers

- Cliquer sur le menu "Calendrier", puis sur "Préférences"

- Cliquer sur "Comptes", puis sur "Exchange", puis sur "Délégation".

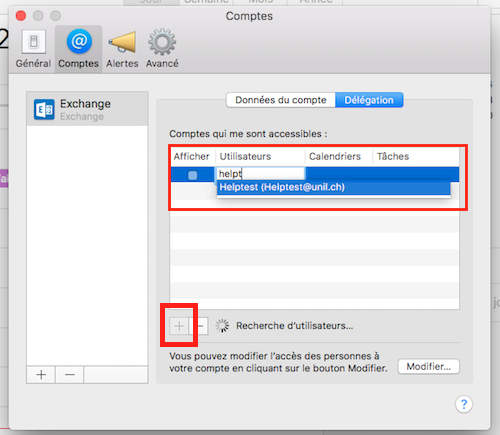
- Cliquer sur "+", puis taper le nom de la personne qui a partagé son calendrier. La sélectionner dans la liste qui s'affiche.
NB: Dans le cas d'un calendrier de groupe (créé sur demande par le Ci), il est nécessaire de précéder le nom du calendrier de la mention "cal." (exemple: cal.calendrier_de_groupe).
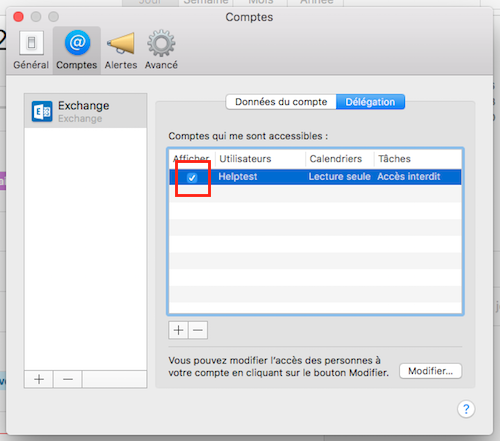
- Cocher la case "Afficher" et fermer la fenêtre

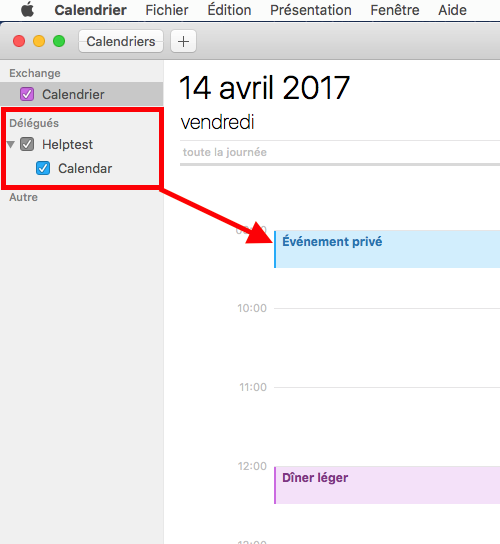
- Le calendrier apparaît alors sous la rubrique "Délégués". Dans l'exemple ci-dessous, le calendrier partagé par helptest est en bleu.

- L'exemple ci-dessous montre le rendu d'un événement défini comme privé par l'utilisateur helptest dans son calendrier partagé. Seule la mention "Evénement privé" est visible pour les bénéficiaires du partage.


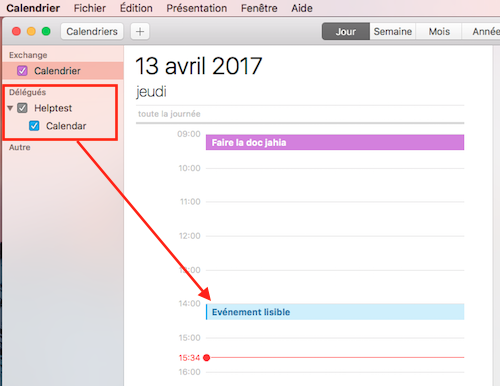
NB: L'affichage des événements privés d'un calendrier partagé ne fonctionne pas sur le système macOS Sierra (10.12.x) et plus récent. Veuillez utiliser l'assistant de planification, ou afficher le calendrier dans Outlook Online ou Outlook.
Créer une invitation
(IMPORTANT) Avant toute chose
La rubrique "Créer une invitation" explique comment créer une invitation à un rendez-vous en utilisant l'outil de calcul de disponibilité du serveur Microsoft Exchange de l'UNIL. Merci de faire attention aux bonnes pratiques suivantes:
- Toute personne ne renseigne pas forcément tous ses rendez-vous dans son Calendrier Exchange. Il se peut donc qu'une personne réponde négativement à une invitation quand bien même l'outil de disponibilité indique qu'elle est disponible à la date proposée.
- Si vous souhaitez inviter plus de 2 personnes à un rendez-vous, l'utilisation d'un outil de planification (type Doodle, Framadate, etc.) est vivement recommandée avant d'envoyer une invitation, afin de définir une date pertinente de rendez-vous.
- Si vous souhaitez inviter une ou deux personnes à un rendez-vous, l'utilisation d'un outil de planification n'est pas forcément nécessaire.
Web (outlook.office.com)
- Se connecter sur https://outlook.office.com avec ses identifiants UNIL

- Cliquer sur Calendrier

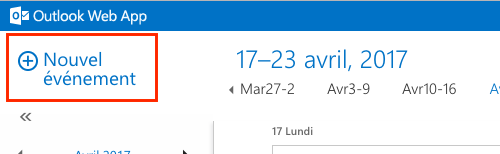
- Cliquer sur "Créer un événement"

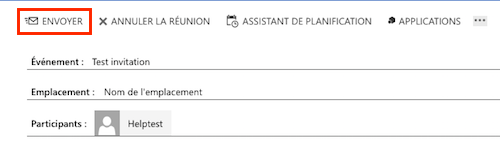
- Ajouter le nom de l'événement, l'emplacement (si disponible), le ou les participants, choisir une date et ajouter des notes (si souhaité).

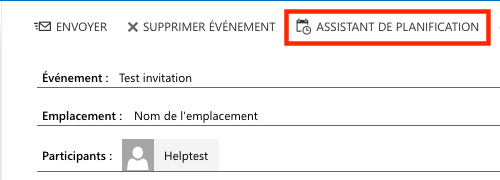
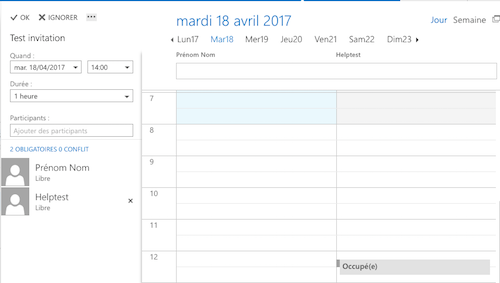
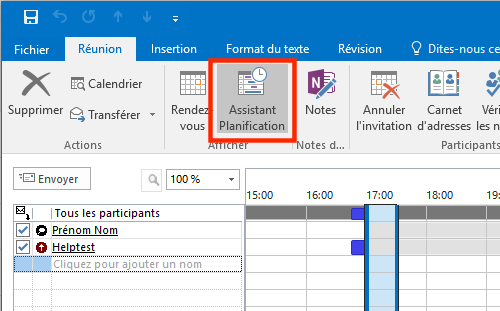
- (optionnel) Cliquer sur "Assistant de planification" pour vérifier les disponibilités

- (optionnel) Vérifier la disponibilité du ou des participants et modifier l'heure et/ou la date en fonction du résultat

- Cliquer sur Envoyer


Windows
- Ouvrir le logiciel Microsoft Outlook
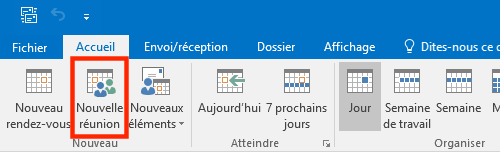
- Cliquer sur Calendrier
- Cliquer sur "Nouvelle réunion"

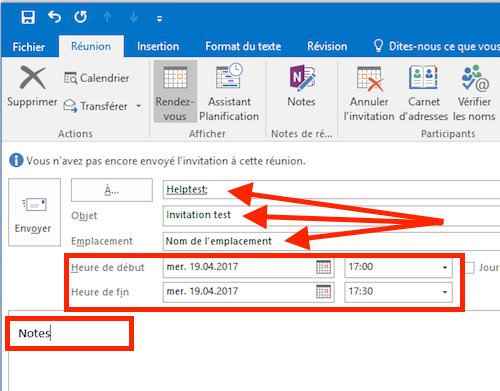
- Ajouter le nom de l'événement, l'emplacement (si disponible), le ou les participants, choisir une date et ajouter des notes (si souhaité).

- (optionnel) Cliquer sur "Assistant de planification" et vérifier la disponibilité du ou des participants et modifier l'heure et/ou la date en fonction du résultat

- Cliquer sur Envoyer


Mac
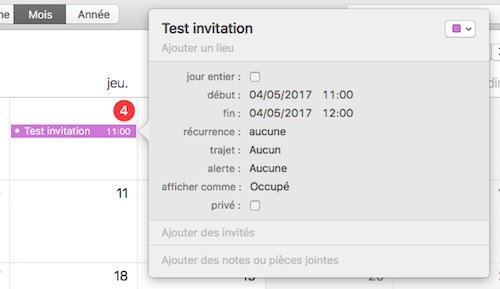
- Ouvrir le logiciel Calendrier
- Créer un événement par un simple double clic à la date souhaitée. Saisir le nom de l'événement et la date et l'heure.

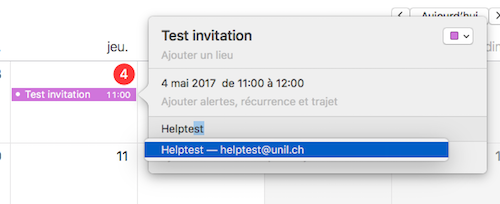
- Dans le champ "Ajouter des invités", saisir le nom de la ou des personnes invitée(s).

- (optionnel) Cliquer sur "Vérifier la disponibilité".

- (optionnel) Vérifier la disponibilité du ou des participants et modifier l'heure et/ou la date en fonction du résultat. Cliquer sur "horaire disponible suivant" pour laisser le système de calcul vous indiquer la prochaine date à laquelle tous les participants sont disponibles.

- Cliquer sur "Envoyer"


Événements corrompus dans le calendrier
Vérifier depuis Calendrier (Mac)
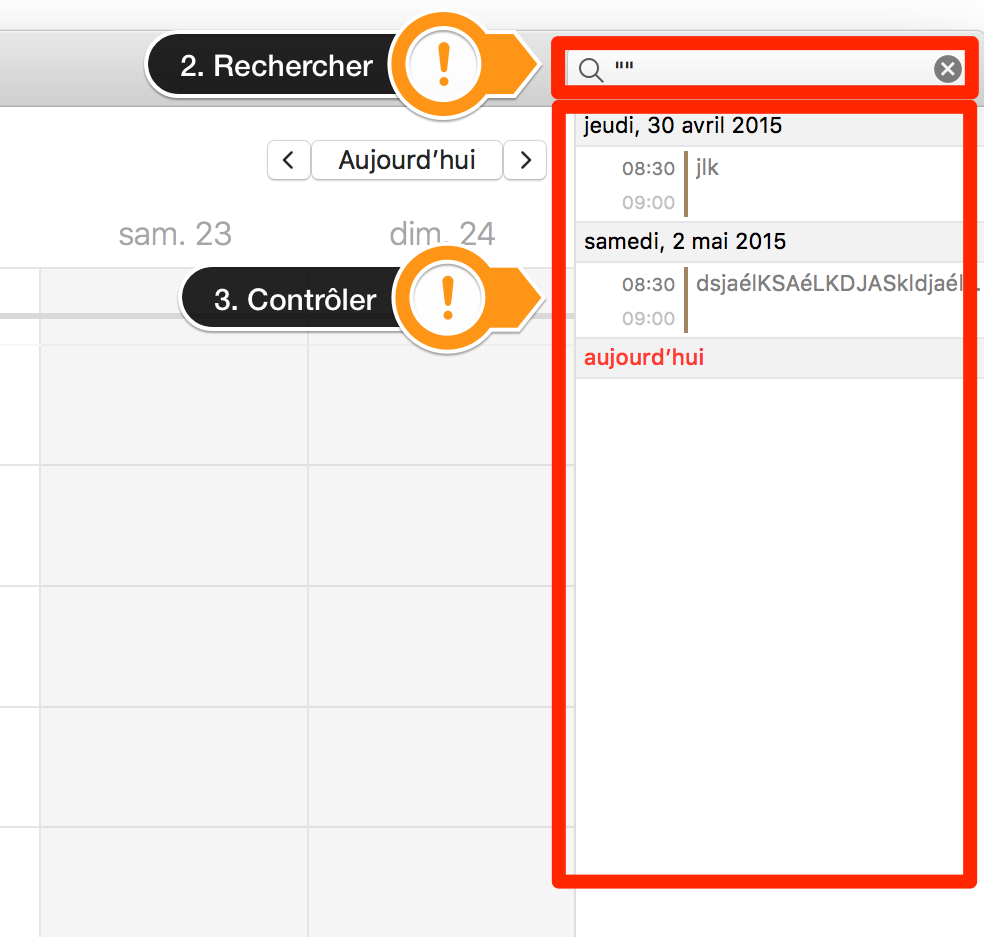
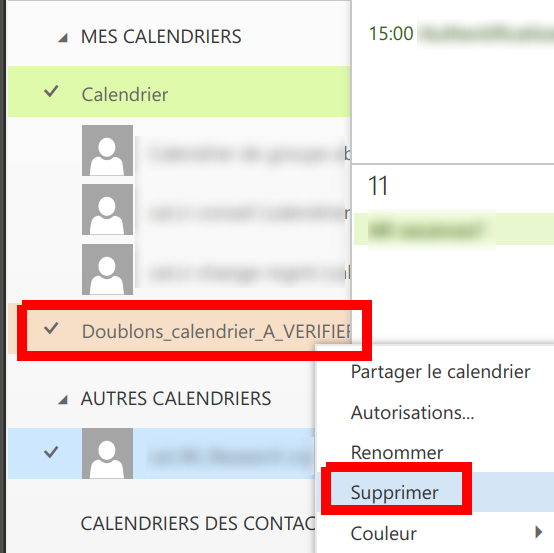
Si vous trouvez un calendrier appelé Doublons_calendrier_A_VERIFIER, c'est que notre système a constaté des événements corrompus dans votre calendrier Exchange. Ces événements peuvent poser problème lors du partage de votre calendrier avec d'autres utilisateurs: la synchronisation se bloque sur ses événements.
Nous avons déplacé les événements problématiques dans un calendrier séparé, appelé Doublons_calendrier_A_VERIFIER. Nous vous invitons à passer en revue ce calendrier afin de vous assurer que rien d'important n'ait été déplacé.
Afin d'effectuer ce contrôle le plus rapidement possible, vous pouvez :
- Sélectionner uniquement le calendrier Doublons_calendrier_A_VERIFIER

- Rechercher avec 2 guillemets "" qui permettent d'afficher la liste de tous les événements du calendrier
- Contrôler et recréer les événements importants dans le calendrier principal


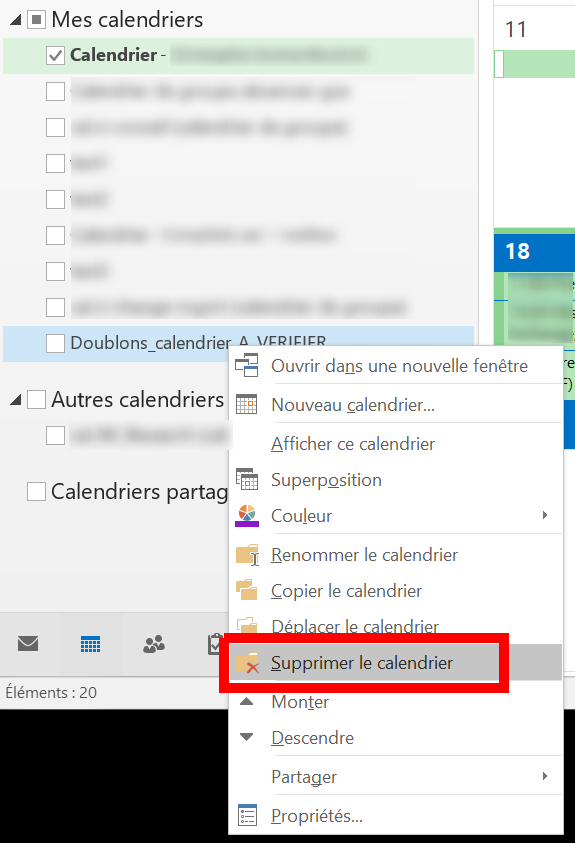
Une fois votre vérification terminée, vous pouvez effacer le calendrier Doublons_calendrier_A_VERIFIER en faisant un clic droit et Supprimer.

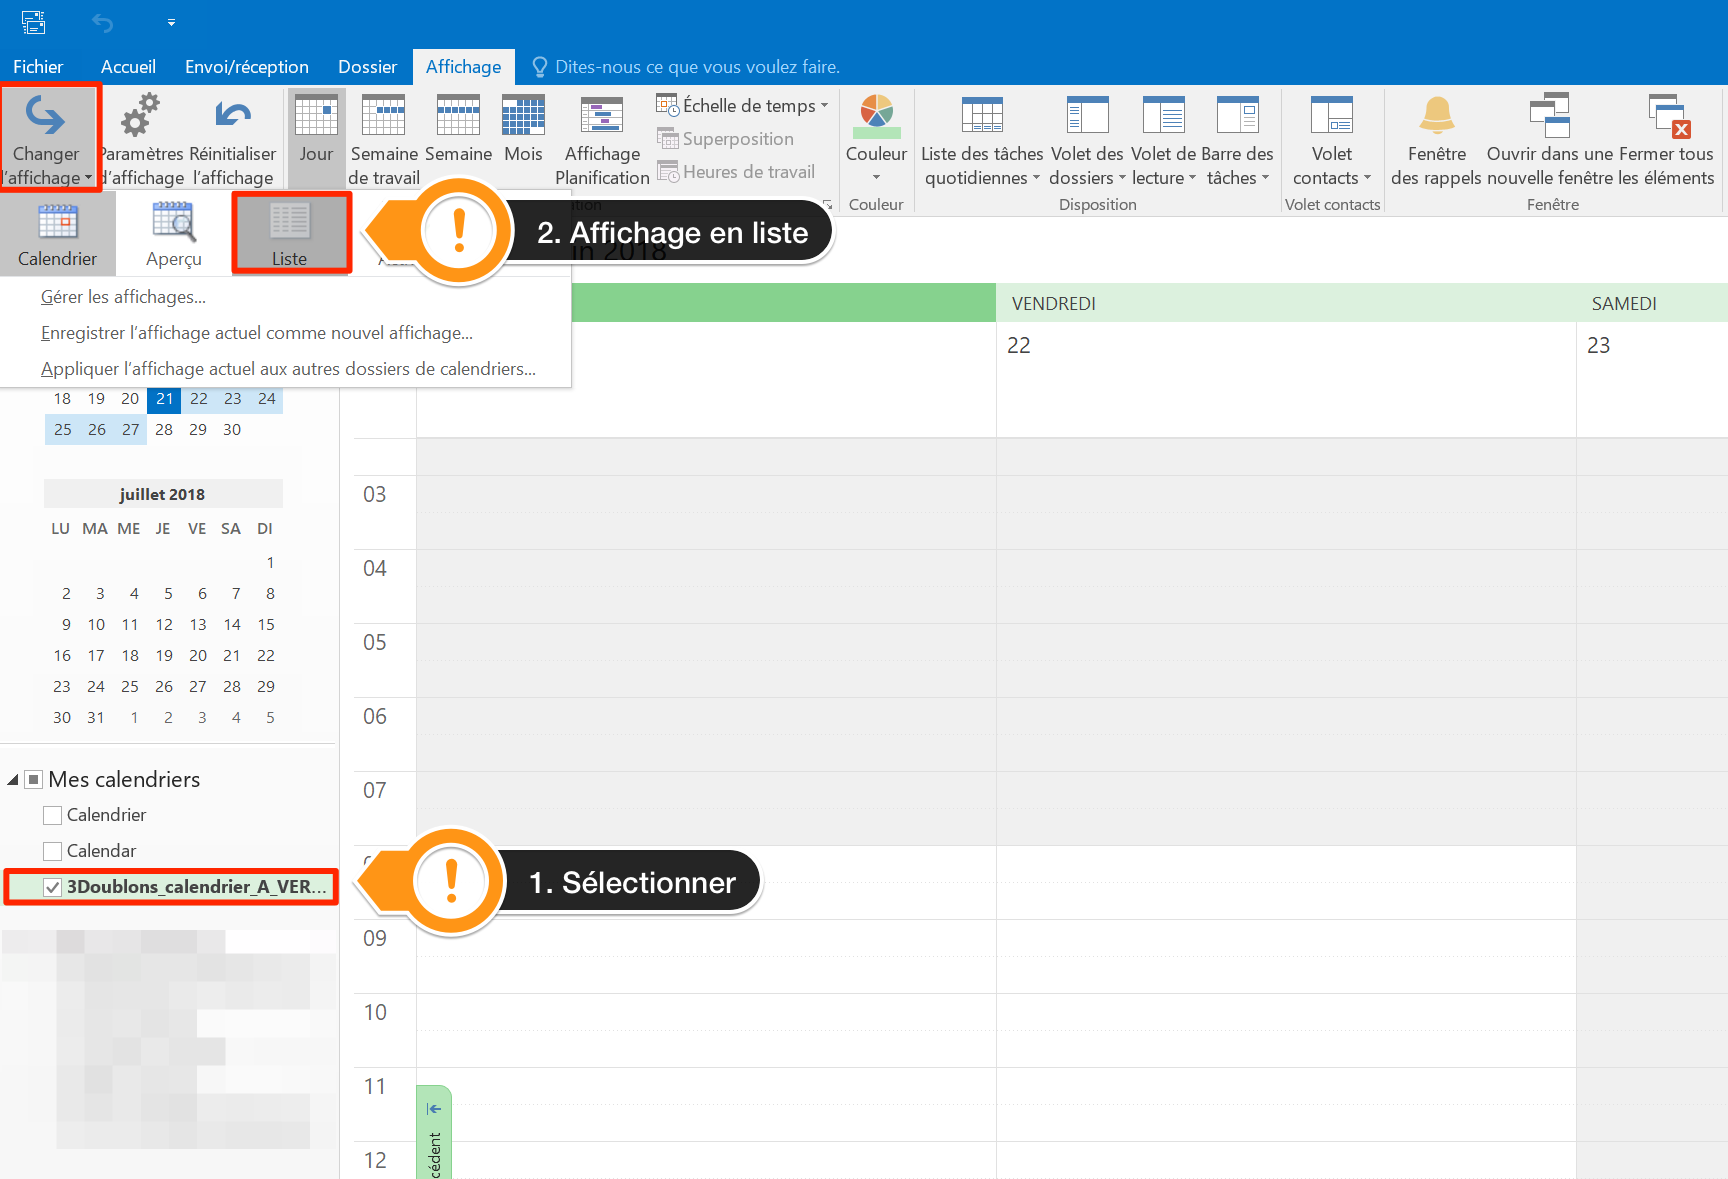
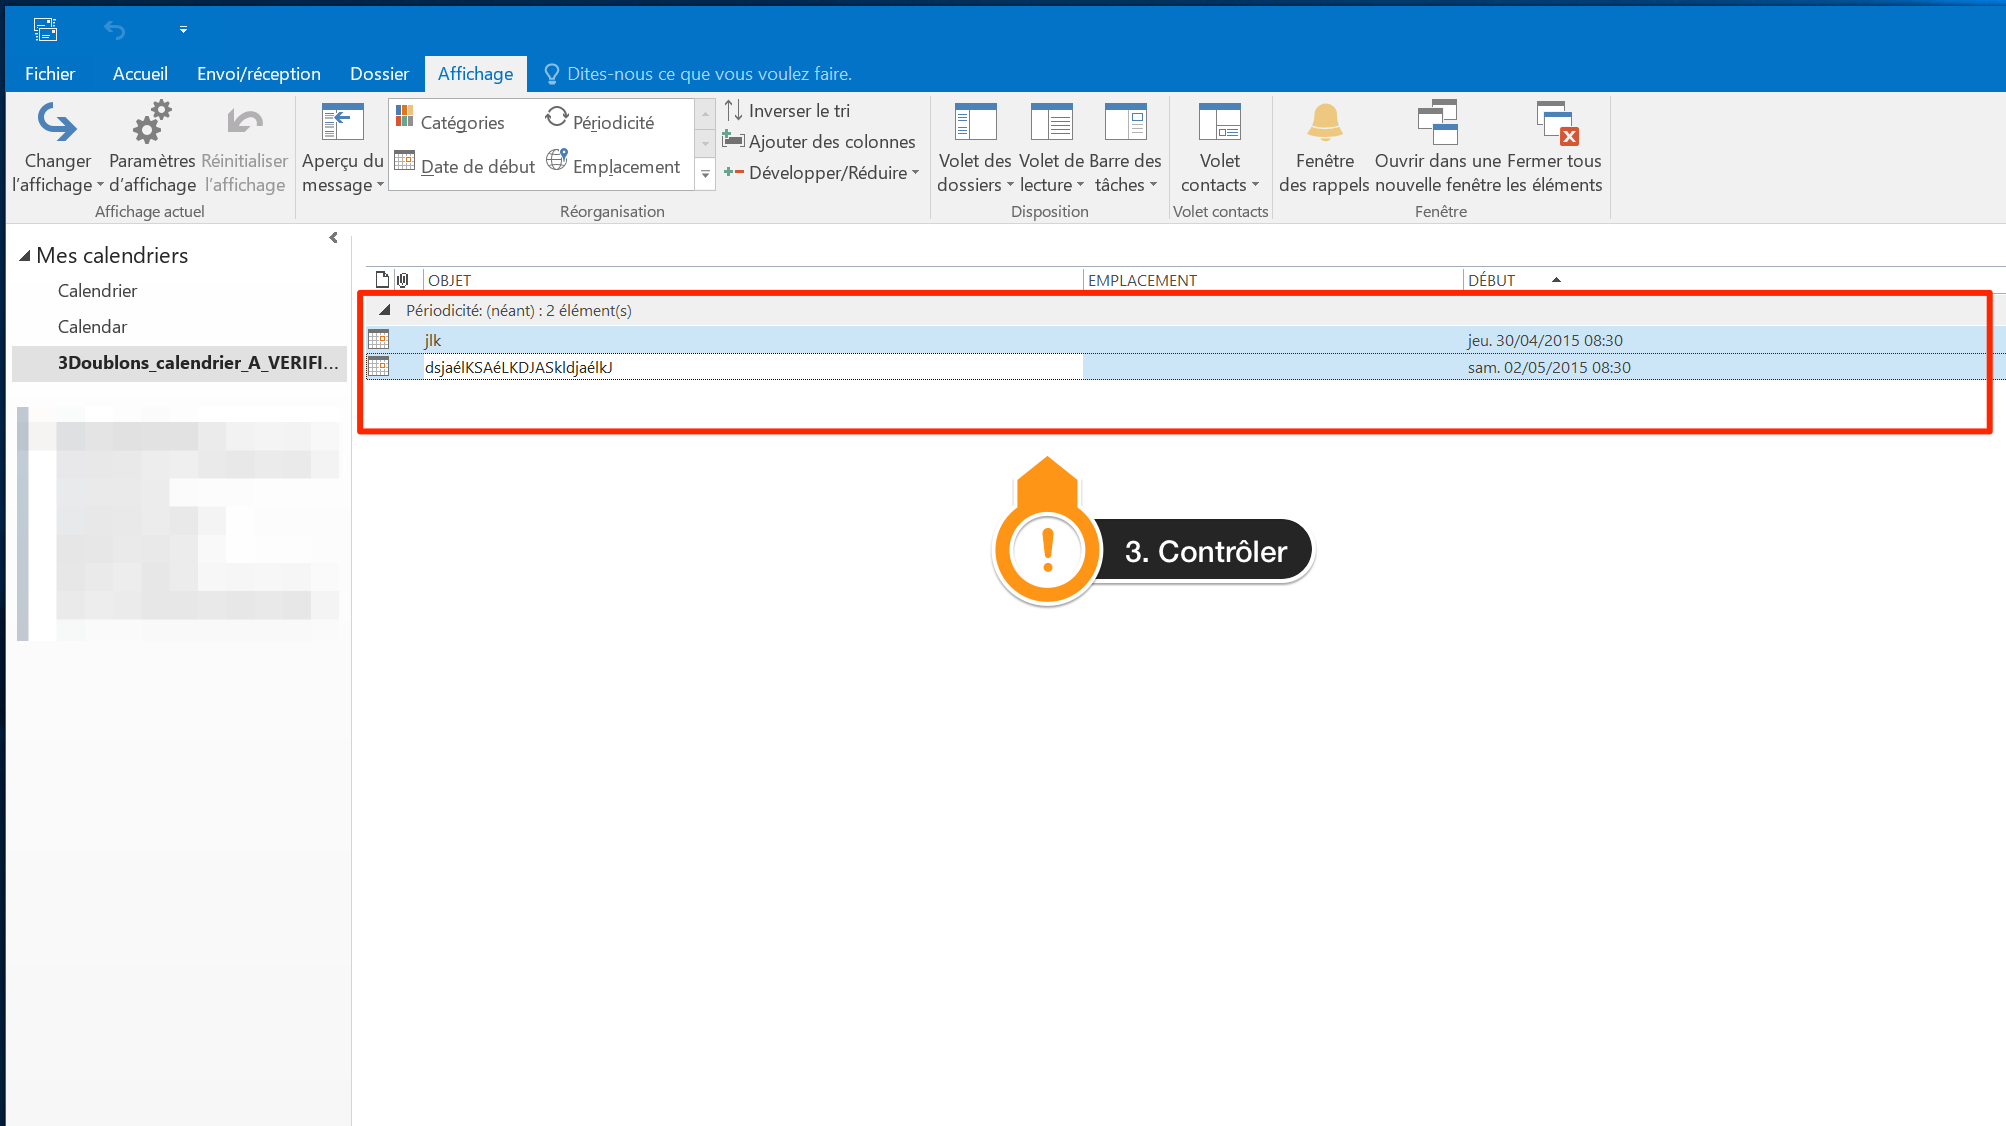
Vérifier depuis Outlook (Windows)
Si vous trouvez un calendrier appelé Doublons_calendrier_A_VERIFIER, c'est que notre système a constaté des événements corrompus dans votre calendrier Exchange. Ces événements peuvent poser problème lors du partage de votre calendrier avec d'autres utilisateurs: la synchronisation se bloque sur ses événements.
Nous avons déplacé les événements problématiques dans un calendrier séparé, appelé Doublons_calendrier_A_VERIFIER. Nous vous invitons à passer en revue ce calendrier afin de vous assurer que rien d'important n'ait été déplacé.
Afin d'effectuer ce contrôle le plus rapidement possible, vous pouvez :
- Sélectionner uniquement le calendrier Doublons_calendrier_A_VERIFIER
- Appuyer sur le bouton Changer l'affichage et choisir Liste

- Contrôler et recréer les événements importants dans le calendrier principal

Une fois terminé, vous pouvez ensuite effacer le calendrier Doublons_calendrier_A_VERIFIER en faisant clic droit et Supprimer le calendrier.
Vérifier depuis Outlook Online (web)
Si vous trouvez un calendrier appelé Doublons_calendrier_A_VERIFIER, c'est que notre système a constaté des événements corrompus dans votre calendrier Exchange. Ces événements peuvent poser problème lors du partage de votre calendrier avec d'autres utilisateurs: la synchronisation se bloque sur ses événements.
Nous avons déplacé les événements problématiques dans un calendrier séparé, appelé Doublons_calendrier_A_VERIFIER: pour le voir, loguez-vous sur https://outlook.office.com et cliquez sur l'onglet Calendrier.
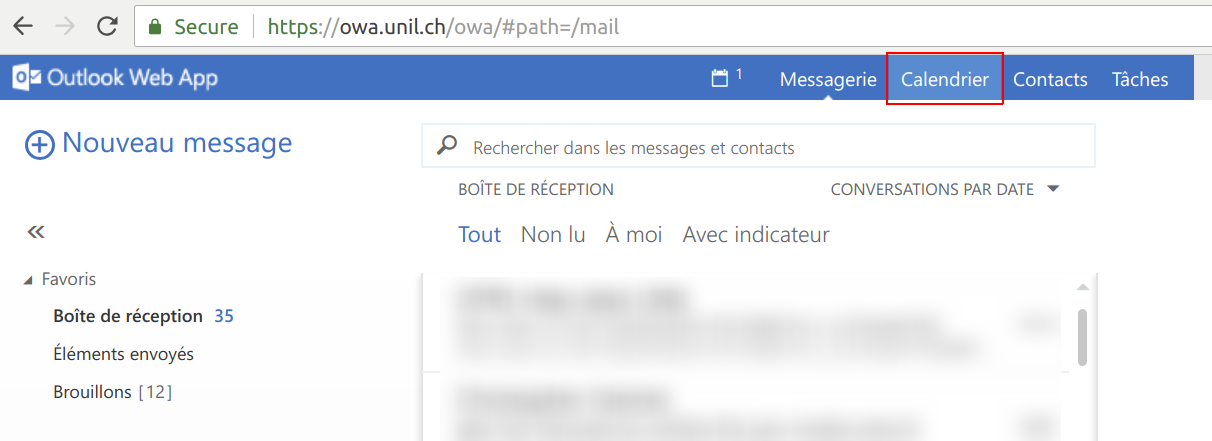
Nous vous invitons à passer en revue ce calendrier afin de vous assurer que rien d'important n'ait été déplacé et d'éventuellement recréer les événements dans votre calendrier principal. Vous pouvez ensuite effacer le calendrier Doublons_calendrier_A_VERIFIER en faisant clic droit et Supprimer.
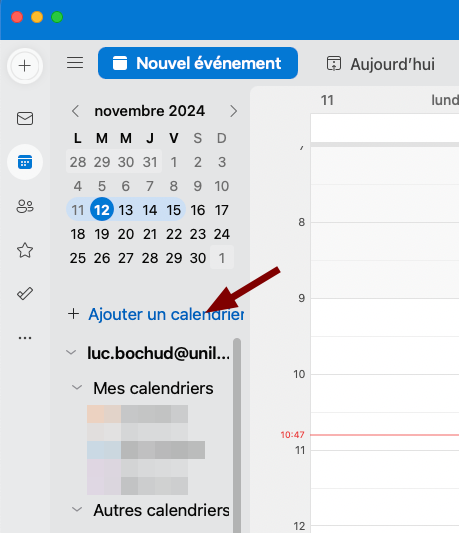
Ajout du calendrier académique
Vous pouvez ajouter le calendrier académique qui contient les dates et périodes importantes de l'année en suivant cette documentation.
Le calendrier est en lecture seule, vous ne pourrez pas ajouter ou supprimer des éléments de celui-ci.
Outlook web et Windows
L'ajout du calendrier sur la version web d'Outlook et sur la version Windows d'Outlook est similaire, vous pouvez suivre les étapes ci-dessous :
- Cliquer sur "Ajouter un calendrier".
- Sélectionner "Ajouter à partir de l'annuaire".
- Sélectionner votre compte dans la barre du haut.
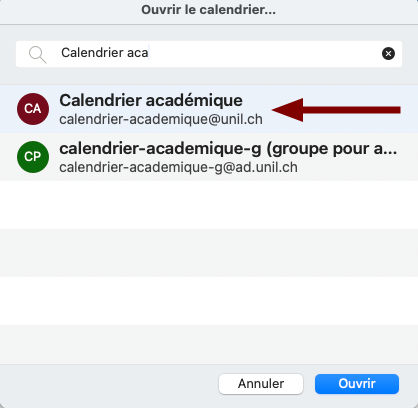
- Entrer le nom "Calendrier académique" dans la barre de recherche et cliquer dessus.
- Cliquer sur ajouter.

Outlook Mac
Les étapes suivantes concernent la version MacOs d'Outlook
- Cliquer sur "Ajouter un calendrier" dans la barre latérale.
- Entrer "Calendrier académique" dans le champ de recherche proposé.
- Sélectionner le calendrier dans la liste qui s'affiche.
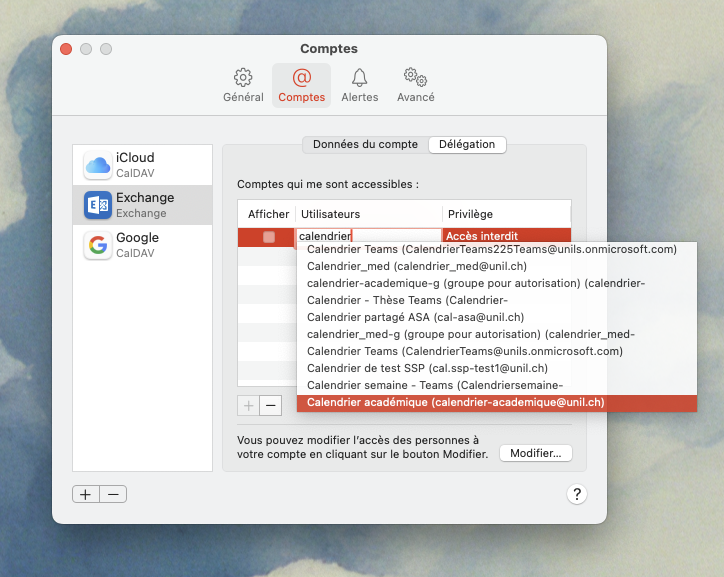
Calendrier Mac
Le Ci ne recommande pas l'utilisation de l'application Calendrier sur Mac, de nombreux bugs avec les calendriers UNIL ont pu être observés ces dernières années. Préférez l'utilisation d'Outlook.
- Ouvrez l'app Calendrier sur votre Mac.
- Cliquez sur Calendrier sur la barre du haut puis sur Réglage.
- Sélectionnez l'onglet Comptes puis Délégation.
- Cliquez sur le petit "+" et entrez le nom du calendrier voulu, ici Calendrier académique, sélectionnez le calendrier dans la liste déroulante et voilà, le calendrier est ajouté.
-

Public documentation
Calendars
Basic Exchange tips
- outlook.office.com, "Microsoft Outlook" on Windows and Mac,
and "Calendar" on Macare the only supported apps by the Centre informatique, regarding the use of the Exchange calendar. - Use only one calendar, the one named "Calendar", to enter your events
- If you consider an event as private, use the checkbox "Private" that will appear when creating the said event
- Do not display more than 5 shared calendars in the app you are using to display the Exchange calendar.
Sharing your calendar
-
Choose the appropriate type of share
| Type of permissions | Use | Name used on Exchange |
|
Read |
Gives the beneficiary rights to read events of the shared calendar. |
Full details |
|
Read + write |
Gives the beneficiary rights to read and write events in the shared calendar. Caution: every user with such rights could delete any event in the shared calendar without its owner knowing it. |
Editor |
|
Full access |
Gives the beneficiary full rights to control the shared calendar (read and write events, respond to invitations, send invitations) To be used in only one situation: complete delegation of a head of department's agenda to its secretary |
Delegate |
NB: Two more types of permissions are available in Exchange: ”Availability only" and ”Limited details". Using any of those two options is not recommended at the UNIL, as they are not correctly processed by mac computers.
-
Sharing your own calendar
- Connect to https://outlook.office.com
- Click on Calendar
- Right-click on the calendar named "Calendar" and click on "Share calendar"

- Start typing the name of the person you would like to share your calendar with. If it does not show automatically, use the "Search contacts and directory" button.

-
Select the type of share you would like to use (recommended: "Full details")

- (Optional) Once the share type is defined, you can can change the subject of the email sent to the beneficiary.

- Click on ”Send"

- The beneficiary of the shared calendar will receive a standard email, saying that the calendar has been shared with him/her.


-
(optional) Check permissions on the shared calendar
- Right-click on "Calendar" and click on "Permissions"

- Permissions list then appears


Display a shared calendar
Web (outlook.office.com)
- Connect to https://outlook.office.com with your UNIL username/password
- Click on ”Calendar"
- Right-click on "Other Calendars" and click on "Open calendar"

- Type in the name of the person who shared their calendar
Please note: In the case of a group calendar (created upon request by the Ci), it is necessary to precede the name of the calendar with the mention "cal." (Example: cal.name_of_group_calendar)
- Click on "Open"

- The shared calendar appears in the "Other calendars" section. In the example below, helptest's shared calendar is the green one.

- The example below shows how a private event displays in helptest's shared calendar. The beneficiary of the shared calendar will only see a "Private event" mention.

Windows
- Open Microsoft Outlook
- Click on Calendar
- Click on "Open calendar", then on "From Address Book..."
- Type the name of the person sharing their calendar, select them in the list, click on "Calendar" then on "OK".
Please note: In the case of a group calendar (created upon request by the Ci), it is necessary to precede the name of the calendar with the mention "cal." (Example: cal.name_of_group_calendar) - The shared calendar appears in the "Shared calendars" section. In the example below, helptest's shared calendar is the green one.
- The example below shows how a private event displays in helptest's shared calendar. The beneficiary of the shared calendar will only see a "Private event" mention.
Mac
- Open the Calendar app
- (Optional) Click on "Calendars" to display a list of all Calendars
- In the "Calendar" menu, click on "Preferences"
- Click on "Accounts", then on ”Exchange", then on "Delegation"
- Click on the "+" button, then start typing the name of the person who shared their calendar. Select the right name in the displayed list.
Please note: In the case of a group calendar (created upon request by the Ci), it is necessary to precede the name of the calendar with the mention "cal." (Example: cal.name_of_group_calendar) - Check the "Show" box and close the window.
- The shared calendar appears in the "Delegates" section. In the example below, helptest's shared calendar is the blue one.
- The example below shows how a private event displays in helptest's shared calendar. The beneficiary of the shared calendar will only see a "Private event" mention.
NB: Display of private events does not function starting from MacOS Sierra (10.12.x). Please use the "Scheduling assistant", or display the calendar in Outlook Online or Outlook.
Create an invitation
(IMPORTANT) Please read this
The "Create an invitation" section explains how to create an invitation to an event using Microsoft Exchange's scheduling assistant. Please consider the following "best practices":
- Not every user enters all their events in the Exchange calendar. This means that a user could easily decline an invitation even if the scheduling assistant shows that he or she is available at the time planned for the event
- Use a planning tool (such as Doodle, Framadate, etc.) when planning an event with more than 2 attendees. The goal is to set a relevant date for the event.
- With less than 2 attendees, the use of a planning tool might not be necessary
Web (outlook.office.com)
- Connect to https://outlook.office.com with your UNIL username/password
- Click on ”Calendar"
- Click on "New event"
- Add an event name, an event place (if known), the name of the attendees, choose a date and add notes (if wanted).
- (optional) Click on "Scheduling assistant" to check availability.
- (optional) Check availability of attendees and modify the date and/or hour of the event if needed.
- Click on "Send"
Windows
- Open Microsoft Outlook
- Click on "Calendar"
- Click on "New meeting"
- Add an event name, an event place (if known), the name of the attendees, choose a date and add notes (if wanted).
- (optional) Click on "Scheduling assistant", check availability of attendees and modify the date and/or hour of the event based on the results.
- Click on "Send"
Mac
- Open the Calendar app
- Create an event with a double-click at the planned date. Enter a name for the event and set the planned date and hour.
- In the "Add invitees" section, enter the name of the invitees.
- (optional) Click on "Check Availability...".
- (optional) Check availability of your invitees and modifiy planned date and/or hour of the meeting if needed. Click on "Next available time" if you want Exchange to search for the next availability shared by every invitee.
- Click on "Send"
Corrupt calendar events
Verify in Calendar (Mac)
If you find a calendar named Doublons_calendrier_A_VERIFIER, it means our monitoring has detected corrupt events in your Exchange calendar. These events can cause issues when sharing your calendar with other users: the synchronisation will fail on these items.
We moved these problematic items to a separate calendar named Doublons_calendrier_A_VERIFIER. Please take a while to go through these events to make sure nothing important was moved.
The quickest way to check is to:
- Select only the calendar named Doublons_calendrier_A_VERIFIER
- Search by entering two double quotes "". This will display all the calendar's events
- Check and recreate (do not copy!) important items to your main calendar if needed and not already present
Once finished, you can delete Doublons_calendrier_A_VERIFIER by right clicking and choosing Delete.
Verify in Outlook (Windows)
If you find a calendar named Doublons_calendrier_A_VERIFIER, it means our monitoring has detected corrupt events in your Exchange calendar. These events can cause issues when sharing your calendar with other users: the synchronisation will fail on these items.
We moved these problematic items to a separate calendar named Doublons_calendrier_A_VERIFIER. Please take a while to go through these events to make sure nothing important was moved.
The quickest way to check is to:
- Select only the calendar named Doublons_calendrier_A_VERIFIER
- Click on Change view and choose List
- Check and recreate (do not copy!) important events in your main calendar if needed
Once finished, you can delete the calendar by right clicking and choosing Delete the calendar.
Verify in Outlook Online (web)
If you find a calendar named Doublons_calendrier_A_VERIFIER, it means our monitoring has detected corrupt events in your Exchange calendar. These events can cause issues when sharing your calendar with other users: the synchronisation will fail on these items.
We moved these problematic items to a separate calendar named Doublons_calendrier_A_VERIFIER: to view it, log on to https://outlook.office.com and click on the Calendar tab.
Please take a while to go through these events to make sure nothing important was moved. You can then delete this calendar by right-clicking on it and choosing Delete.