Software
- DCSR Software Stack
- Old software stack
- R on the clusters
- Rstudio on the Curnagl cluster
- MATLAB on the clusters
- Using Conda and Anaconda
- Using Mamba to install Conda packages
- AlphaFold
- Alphafold 3
- CryoSPARC
- Compiling and running MPI codes
- Software local installation
- Rstudio on the Urblauna cluster
- DCSR GitLab service
- Running Busco
- SWITCHfilesender from the cluster
- Filetransfer from the cluster
- R on the clusters (old)
- Sandbox containers
- Course software for decision trees / random forests
- Course software for introductory deep learning
- JupyterLab on the curnagl cluster
- JupyterLab with C++ on the curnagl cluster
- Dask on curnagl
- Running the Isca framework on the cluster
- Running the MPAS framework on the cluster
- Run OpenFOAM codes on Curnagl
- Compiling software using cluster libraries
- Course software for Image Analysis with CNNs
- Course software for Text Analysis with LLMs
- Run MPI with containers
- Measuring job's CO2 footprint
DCSR Software Stack
What is it?
The DCSR provides a software environment including commonly used scientific tools and libraries. The software is optimised to make best use of the CPUs, GPUs and high speed Infiniband interconnect.
In order to create the environment we use the Spack package manager and Lmod.
For information on the deprecated Vital-IT software stack please see here.
Release and lifecycle
Each year we provide a new release of the software stack which fixes versions for key tools and libraries.
The following table list all the software stacks avaiable:
| Name | Date | Comments |
|---|---|---|
| Arolle | 2022 | SSL library incompatible with OS (after 2025 update) |
| 20240303 | 2024 | |
| 20240704 | 2024 | New stack based on Open MPI |
| 20241118 | 2025 | R is provided by r-light module which uses a container, remove of miniconda3 (license problems) |
Newer versions of tools may be made available during the year but the default versions will remain the default.
How to use it
The latest software stack is loaded by default. You just have to list the module using the module command:
module available
To load a given software:
module load python
If you want to change of software stack you have to use the command: dcsrsoft
dcsrsoft use arolle
Do not forge to do a module purge before changing software stack.
How to use it on jobs
You need to start your jobs with:
#!/bin/bash -l

#SBATCH ...

dcsrsoft use 20241118
You need to put the name of the stack you are using. If you want to know the name of the stack that it is currently used, you can type:
dcsrsoft show
Please keep in mind that old software stack would eventually removed. Therefore, you should migrate your script to the current software stack, if any problem arises please send us a ticket via: helpdesk@unil.ch ( with DCSR on the subject of the mail)
Common problems
SSL problem in old software stacks
If you observe one of the following errors:
ImportError: cannot import name 'HTTPSConnection' from 'http.client'
or
ImportError: cannot import name 'ssl' from 'urllib3.util.ssl_
You should do define the following environment variable:
export LD_LIBRARY_PATH=$LD_LIBRARY_PATH:/dcsrsoft/arolle_libs
Before executing your script
Old software stack
The old (Vital-IT) software stack can be accessed on Curnagl via the following commands
$ source /dcsrsoft/bin/use_old_software

##################################
#                                #
#  WARNING - USING OLD SOFTWARE  #
#                                #
##################################

$ module load Bioinformatics/Software/vital-it
Please note that the old stack is not updated, no new tools can be added and there is no guarantee that it will work.
R on the clusters
R is provided via the DCSR software stack
A tutorial video on using R on the cluster is available here.
Interactive mode
To load R:
$> module load r-light
$> R
# Then you can use R interactively
> ...
By default, you get the last version available (4.4.1 when this page is written). If you need an older version, you can list the available versions as follows:
$> module spider r-light
----------------------------------------------------------------------------
  r-light:
----------------------------------------------------------------------------
     Versions:
        r-light/3.6.3
        r-light/4.0.5
        r-light/4.1.3
        r-light/4.2.3
        r-light/4.3.3
        r-light/4.4.1
Then you can load a specific version:
$> module load r-light/4.0.5
$> R --version
R version 4.0.5 (2021-03-31) -- "Shake and Throw"
Batch mode
While using R in batch mode, you have to use Rscript to launch your script. Here is an example of sbatch script, run_r.sh:
#!/bin/bash

#SBATCH --time 00-00:20:00
#SBATCH --cpus-per-task 1
#SBATCH --mem 4G

module load r-light

Rscript my_r_script.R
Then, just submit the job to Slurm:
sbatch run_r.shPackage installation
A few core packages are installed centrally - you can see what is available by using the library() function. Given the number of packages and multiple versions available, other packages should be installed by the user.
Library relocation
By default, when you install R packages, R will try to install them in the central installation. Since this central installation is shared among all users on the cluster, it's obviously impossible to install directly your packages there. This is why this location is not writable and you will get this kind of message:
$> R
> install.packages("ggplot2")
Warning in install.packages("ggplo2t") :
  'lib = "/opt/R-4.4.1/lib/R/library"' is not writable
Would you like to use a personal library instead? (yes/No/cancel)
This is why you have to answer yes to this "Would you like to use a personal library instead?" question.
By default, this personal library is located in your home directory. On DCSR clusters, this home directory is pretty limited regarding the amount of data (50 GB at most) and the number of files (200'000 files at most) you can store. Installing R packages in your home directory could quickly fill all the available space. This is why your personal library should be relocated.
A good practice is to relocate your R library to a location in one of your work project. Let's consider your work project is located in /work/FAC/Lettres/GREAT/ulambda/default, you create a sub-directory inside, for instance /work/FAC/Lettres/GREAT/ulambda/default/RLIB_for_ursula. Then you have several options to tell R that you want to use this new personal library, but the easiest way is to define the R_LIBS_USER variable.
Thus, you can either add the following line in all your Slurm scripts (before R is invoked):
export R_LIBS_USER=/work/FAC/Lettres/GREAT/ulambda/default/RLIB_for_ursula
Rscript …
Or you can also define it in the ~/.Renviron. You just have to add the following line to the file:
R_LIBS_USER=/work/FAC/Lettres/GREAT/ulambda/default/RLIB_for_ursula
The second option using ~/.Renviron is probably cleaner but the first option is more versatile, especially if you want to use several personal libraries depending on different projects and requirements.
CRAN packages
Installing R packages from CRAN is pretty straightforward thanks to install.packages() function. For instance:
$> module load r-light
$> R
> install.packages(c("ggplot2", "dplyr"))
BioConductor packages
The first step is to install the BioConductor package manager, and then to install packages with BiocManager::install(). For instance:
$> module load r-light
$> R
> install.packages("BiocManager")
> BiocManager::install("biomaRt")
Github/development packages
To install packages from Github/Gitlab or random websites, you can use the devtools library as follows:
$> module load r-light
$> R
> library(devtools)
> install_github("N-SDM/covsel")
> install_url("https://cran.r-project.org/src/contrib/Archive/rgdal/rgdal_1.6-7.tar.gz")
Missing dependencies
In some cases, it's possible that package installation fails because of missing dependencies. In such case, please send us an email to helpdesk@unil.ch with the subject starting with "DCSR R package installation". And please provide us with the name of the package that you cannot install.
Rstudio on the Curnagl cluster
Rstudio can be run on the curnagl cluster from within a singularity container, with an interactive interface provided on the web browser of any given workstation.
Running interactively with Rstudio on the clusters is only meant for testing. Development must be carried out on the users workstations, and production runs must be accomplished from within R scripts/codes in batch mode.
The command Rstudio is now available in r-light module. You have to do a reservation first with Sinteractive, ask the right amount of resources and then launch the command 'Rstudio'.
Procedure
Sinteractive   # specify here the right amount of resources
module load r-light
Rstudio
The procedure below is now deprecated !!
Preparatory steps
- If the workstation is outside of the campus, first connect to the VPN
- Login to the cluster
- Create/choose a folder under the /scratch or the /work filesystems under your project (ex. /work/FAC/.../rstudio); this folder will appear as your HOME inside the Rstudio environment, and we will refer to it as ${WORK}
- (This step is optional and only applies if you need a R version not available in the r-light module) Create the singularity image inside the cluster (substitute ${WORK} appropriately):
This last step might take a while...[me@curnagl ~]$ module load singularityce [me@curnagl ~]$ singularity pull --dir="${WORK}" --name=rstudio-server.sif docker://rocker/rstudio
The batch script
Create a file rstudio-server.sbatch with the following contents (it must be on the cluster, but the exact location does not matter):
#!/bin/bash -l

#SBATCH --account ACCOUNT_NAME
#SBATCH --mail-type BEGIN
#SBATCH --mail-user <first.lastname>@unil.ch

#SBATCH --chdir ${WORK}
#SBATCH --job-name rstudio-server
#SBATCH --signal=USR2
#SBATCH --output=rstudio-server.job.%j
#SBATCH --partition interactive
#SBATCH --nodes 1
#SBATCH --ntasks 1
#SBATCH --cpus-per-task 1
#SBATCH --mem 8G
#SBATCH --time 01:59:59
#SBATCH --export NONE

set -e

RVERSION=4.4.1 #See module spider r-light to get all available versions
LOCAL_PORT=8787
RSTUDIO_CWD=$(pwd)
RSTUDIO_SIF="/dcsrsoft/singularity/containers/r-light.sif"

module load python singularityce

# Create temp directory for ephemeral content to bind-mount in the container
RSTUDIO_TMP=$(mktemp --tmpdir -d rstudio.XXX)

mkdir -p -m 700 \
        ${RSTUDIO_TMP}/run \
        ${RSTUDIO_TMP}/tmp \
        ${RSTUDIO_TMP}/var/lib/rstudio-server

mkdir -p ${RSTUDIO_CWD}/.R

cat > ${RSTUDIO_TMP}/database.conf <<END
provider=sqlite
directory=/var/lib/rstudio-server
END

# Set OMP_NUM_THREADS to prevent OpenBLAS (and any other OpenMP-enhanced
# libraries used by R) from spawning more threads than the number of processors
# allocated to the job.
#
# Set R_LIBS_USER to a path specific to rocker/rstudio to avoid conflicts with
# personal libraries from any R installation in the host environment

cat > ${RSTUDIO_TMP}/rsession.sh <<END
#!/bin/sh

export OMP_NUM_THREADS=${SLURM_CPUS_PER_TASK:-1}
export R_LIBS_USER=${RSTUDIO_CWD}/.R
export PATH=${PATH}:/usr/lib/rstudio-server/bin
exec rsession "\${@}"
END

chmod +x ${RSTUDIO_TMP}/rsession.sh

SINGULARITY_BIND+="${RSTUDIO_CWD}:${RSTUDIO_CWD},"
SINGULARITY_BIND+="${RSTUDIO_TMP}/run:/run,"
SINGULARITY_BIND+="${RSTUDIO_TMP}/tmp:/tmp,"
SINGULARITY_BIND+="${RSTUDIO_TMP}/database.conf:/etc/rstudio/database.conf,"
SINGULARITY_BIND+="${RSTUDIO_TMP}/rsession.sh:/etc/rstudio/rsession.sh,"
SINGULARITY_BIND+="${RSTUDIO_TMP}/var/lib/rstudio-server:/var/lib/rstudio-server,"
SINGULARITY_BIND+="/users:/users,/scratch:/scratch,/work:/work"
export SINGULARITY_BIND

# Do not suspend idle sessions.
# Alternative to setting session-timeout-minutes=0 in /etc/rstudio/rsession.conf
export SINGULARITYENV_RSTUDIO_SESSION_TIMEOUT=0

export SINGULARITYENV_USER=$(id -un)
export SINGULARITYENV_PASSWORD=$(openssl rand -base64 15)

# get unused socket per https://unix.stackexchange.com/a/132524
# tiny race condition between the python & singularity commands
readonly PORT=$(python -c 'import socket; s=socket.socket(); s.bind(("", 0)); print(s.getsockname()[1]); s.close()')
cat 1>&2 <<END
1. SSH tunnel from your workstation using the following command:

   ssh -n -N -J ${SINGULARITYENV_USER}@curnagl.dcsr.unil.ch -L ${LOCAL_PORT}:localhost:${PORT} ${SINGULARITYENV_USER}@${HOSTNAME}

   and point your web browser to http://localhost:${LOCAL_PORT}

2. log in to RStudio Server using the following credentials:

   user: ${SINGULARITYENV_USER}
   password: ${SINGULARITYENV_PASSWORD}

When done using RStudio Server, terminate the job by:

1. Exit the RStudio Session ("power" button in the top right corner of the RStudio window)
2. Issue the following command on the login node:

      scancel -f ${SLURM_JOB_ID}
END

singularity exec --home ${RSTUDIO_CWD} --cleanenv ${RSTUDIO_SIF} \
    /usr/lib/rstudio-server/bin/rserver --www-port ${PORT} \
            --auth-none=0 \
            --auth-pam-helper-path=pam-helper \
            --auth-stay-signed-in-days=30 \
            --auth-timeout-minutes=0 \
            --auth-encrypt-password=0 \
            --rsession-path=/etc/rstudio/rsession.sh \
            --server-user=${SINGULARITYENV_USER} \
            --rsession-which-r /opt/R-${RVERSION}/bin/R

SINGULARITY_EXIT_CODE=$?
echo "rserver exited $SINGULARITY_EXIT_CODE" 1>&2
exit $SINGULARITY_EXIT_CODE
You need to carefully replace, at the beginning of the file, the following elements:
- On line 3: ACCOUNT_NAME with the project id that was attributed to your PI for the given project
- On line 5: <first.lastname>@unil.ch with your e-mail address
- On line 7: ${WORK} must be replaced with the absolute path (ex. /work/FAC/.../rstudio) to the chosen folder you created on the preparatory steps
- On line 21: you can modify the R version. All available versions can be obtained from the following command
module spider r-light - On line 24: if (and only if) you went through the optional fourth preparatory step, then you need to redefine RSTUDIO_SIF so that the line reads RSTUDIO_SIF=${RSTUDIO_CWD}/rstudio-server.sif
Running Rstudio
Submit a job for running Rstudio from within the cluster with:
[me@curnagl ~]$ sbatch rstudio-server.sbatchYou will receive a notification by e-mail as soon as the job is running.
A new file ${WORK}/rstudio-server.job.### (with ### some given job id number) is then automatically created. Its contents will give you instructions on how to proceed in order to start a new Rstudio remote session from your workstation.
You will have 2h time to test your code.
MATLAB on the clusters
The full version of MATLAB is only installed on the login and interactive nodes so in order to run MATLAB jobs on the cluster you first need to compile your .m files then run them using the MATLAB runtime.
This is because the UNIL has a limited number of licences and with an HPC cluster it's easy to use them all.
The number of licences and available toolboxes is detailed here
Thankfully the compilation process isn't too complicated but there are a number of steps to follow and a few issues to be aware of.
Let's start with our MatrixCAB.m file
disp("Matrix A:");
A = [1, 2; 3, 4];
disp(A);

disp("Matrix B:");
B = [5, 6; 7, 8];
disp(B);

disp("Matrix C = A * B:");
C = A * B;
disp(C);
First of all we need to load the module that provides MATLAB
[ulambda@login ~]$ module load matlab
[ulambda@login ~]$ module list

Currently Loaded Modules:
  1) matlab/2021b
We now compile the MatrixCAB.m file with the mcc compiler which is now in the path.
$ mcc -v -m MatrixCAB.m

Compiler version: 8.1 (R2021b)
Dependency analysis by REQUIREMENTS.
Parsing file "/users/ulambda/MatrixCAB.m"
	(referenced from command line).
Generating file "/users/ulambda/readme.txt".
Generating file "MatrixCAB.sh".
The compiler documentation can be found at https://ch.mathworks.com/help/compiler/mcc.html
Note that there are now 3 new files:
readme.txt
run_MatrixCAB.sh
MatrixCAB
If we take a look at the last file we see that it's an executable file
$ file MatrixCAB
MatrixCAB: ELF 64-bit LSB executable, x86-64, version 1 (SYSV), dynamically linked (uses shared libs), for GNU/Linux 2.6.32, BuildID[sha1]=ad76a4654419e7968208a77a172f103afe2d77c2, stripped
The curious are welcome to look at the output from ldd which shows what the executable is linked to.
$ module load matlab-runtime
$ ldd MatrixCAB
The readme.txt explains in great detail how to run the compiled object and the run_MatrixCAB.sh script is for launching the job.
In order to make use of the executable we need to load the MATLAB runtime environment module
module load matlab-runtimePlease note that the runtime has to correspond to the version of mcc used to compile the .m file. Please see the following page for the corresponding runtime and compiler versions:
https://ch.mathworks.com/products/compiler/matlab-runtime.html
On the DCSR clusters the modules are configured to have the same version naming scheme:
matlab-runtime/2021b
matlab/2021b
The runtime module sets the MCR_PATH variable which is needed by the run_MatrixCAB.sh script.
To launch the compiled MatrixCAB object we need to put all the elements together:
sh run_MatrixCAB.sh $MCR_PATH
Obviously this should be done on a compute node using a job script:
#!/bin/bash

#SBATCH --time 00-00:05:00
#SBATCH --cpus-per-task 1
#SBATCH --mem 4000M

module load matlab-runtime/2021b

MATLAB_SCRIPT=MatrixCAB

sh run_$MATLAB_SCRIPT.sh $MCR_PATH

echo "Finished - next time I'll port my code to Julia"
Task farming with Matlab
When processing numerous Matlab jobs in parallel on the clusters, you will likely encounter stability issues with some jobs failing randomly, other hanging (see below the explanations from Matlab support). To solve the issue, you must set the MCR_CACHE_ROOT environment variable (see https://ch.mathworks.com/help/compiler_sdk/ml_code/mcr-component-cache-and-ctf-archive-embedding.html) in order that the same location (by default in your home directory) is not used by all jobs.
For job arrays, you can adopt the following:
#!/bin/bash

#SBATCH --array=1-5
#SBATCH --partition cpu
#SBATCH --mem=8G
#SBATCH --time=00:15:00

module load matlab-runtime/2021b

# Create a task-specific MCR_CACHE_ROOT directory

mcr_cache_root=/tmp/$USER/MCR_CACHE_ROOT_${SLURM_ARRAY_JOB_ID}_${SLURM_ARRAY_TASK_ID}
mkdir -pv $mcr_cache_root
export MCR_CACHE_ROOT=$mcr_cache_root

### YOUR MATLAB ANALYSIS HERE

MATLAB_SCRIPT=MatrixCAB

sh run_$MATLAB_SCRIPT.sh $MCR_PATH

###

# Tidy up the place
rm -rv $mcr_cache_root
Explanations from Matlab support
When running a MATLAB Compiler standalone executable, the MCR_CACHE_ROOT location is used by the standalone executable to extract the deployable archive into. As the name suggests, the extracted archive is cached in this location, meaning the archive is extracted the very first time you run the application and then for consecutive runs the already extracted data from the cache is used.
There are mechanisms in place which try to ensure that when you run multiple instances of the same application at the same time, you do not run into any concurrency issues with this cache (e.g. a second instance should not also try to extract the archive if the first instance was already in the process of doing this). However, there are some limitations to these mechanisms; they were designed to deal with concurrency issues which might occur if an interactive user would run a handful of concurrent instances of the application; when doing this interactively this implies that you are not starting all those instances at exactly the same point in time and there are at least a few seconds between starting each instance. If you are somehow starting a lot of instances at virtual the same time (through some shell script, or possible even some cluster scheduler), this mechanism may break down. The likelihood of running into issues increases even more if the cache is in located on a shared network drive, shared by multiple machines (which can definitely be the case for a home directory), and all these machines are running instances of the same application.
This is probably what you are running into then. Giving each instance its own cache location would prevent those issues altogether as there would be no concurrency in the first place.
Using Conda and Anaconda
Conda is a package manager system for Python and other tools and is widely used in some areas such as bioinformatics and data science. On personal computers it is a useful way to install a stack of tools.
The full documentation can be found at https://docs.conda.io/projects/conda/en/latest/user-guide/index.html
Warning: Conda can be used freely for research purposes but pay attention to never use the "default" channel since it is not free in a research context like UNIL (https://www.anaconda.com/blog/is-conda-free). As a replacement to "default" channel, please use "conda-forge". If you have any doubt about that please contact us at helpdesk@unil.ch (and start the subject with DCSR).
A tutorial video on using Conda on the cluster is available here.
Setting up Conda
First load the appropriate modules
dcsrsoft use 20241118
module load miniforge3/24.11.3-2
conda_init
Please ignore any messages about updating to a newer version of conda!
Configuring Conda
By default Conda will put everything including downloads in your home directory. Due to the limited space available this is probable not what you want.
We strongly recommend that you create a .condarc file in your home directory with the following options:
pkgs_dirs:
  - /work/path/to/my/project/space/conda_pkgs
auto_activate_base: false
channels:
  - conda-forge
where the path is the path to your project space on /work - we do not recommend installing things in /scratch as they might be automatically deleted.
You may also wish to add a non standard env_dirs
envs_dirs:
  - ~/myproject-envs
Please see the full condarc documentation for all the possible configuration options
https://docs.conda.io/projects/conda/en/latest/user-guide/configuration/use-condarc.html
Using Conda virtual environments
The basic commands for creating conda environments are:
Creation
conda create --name $MY_CONDA_ENV_NAMEActivation
conda activate $MY_CONDA_ENV_NAMEDeactivation
conda deactivateEnvironment in specific location
If you need to create an environment in a non standard location:
conda create --prefix $MY_CONDA_ENV_PATH

conda activate $MY_CONDA_ENV_PATH

conda deactivate
Installing packages
The base commands are:
conda search $PACKAGE_NAME
conda install $PACKAGE_NAME
Running Slurm jobs with conda
Since Conda needs some initialization before being used, a Sbatch script must explicitly ask to run bash in login mode. This can be performed by adding --login option to the shebang. Here is an example of Sbatch script using Conda:
#!/bin/bash --login

#SBATCH --time 00-00:05:00
#SBATCH --cpus-per-task 1
#SBATCH --mem 4G

dcsrsoft use 20241118
module load miniforge3
conda_init
conda activate $MY_CONDA_ENV_PATH
…
Using Mamba to install Conda packages
Mamba is an alternative to Conda package manager. The main advantage is its speed regarding dependency resolution.
Setting up Mamba
The proposed installation is based on micromamba and doesn't require any installation on the cluster. You just have to add the following line to your ~/.bashrc file:
export MAMBA_ROOT_PREFIX="/work/FAC/INSTITUTE/PI/PROJECT/mamba_root"Of course, replace /work/FAC/INSTITUTE/PI/PROJECT with the path corresponding to your project.
Then, you just have to load the module and run the initialization process with the following command:
module load micromamba
mamba_init
Finally, you have to logout from the cluster and the environment will be properly configured at the next login.
Using Mamba
Instead of using conda commands, you can replace conda with micromamba. For instance:
micromamba create --prefix ./my_mamba_env
micromamba activate ./my_mamba_env
micromamba install busco -c conda-forge -c bioconda
busco -v
micromamba deactivate
Restriction
You cannot use Mamba with virtual environment created previously with Conda. Such environments must be recreated.
AlphaFold
The project home page where you can find the latest information is at https://github.com/deepmind/alphafold
For details on how to run the model please see the Supplementary Information article
For some ideas on how to separate the CPU and GPU parts: https://github.com/Zuricho/ParallelFold.
Alternatively - check out what has already been calculated
Note on GPU usage
Whilst Alphafold makes use of GPUs for the inference part of the modelling, depending on the use case, this can be a small part of the running time as shown by the timings.json file that is produced for every run:
For the T1024 test case:
{
    "features": 6510.152379751205,
    "process_features_model_1_pred_0": 3.555035352706909,
    "predict_and_compile_model_1_pred_0": 124.84101128578186,
    "relax_model_1_pred_0": 25.707252502441406,
    "process_features_model_2_pred_0": 2.0465400218963623,
    "predict_and_compile_model_2_pred_0": 104.1096305847168,
    "relax_model_2_pred_0": 14.539108514785767,
    "process_features_model_3_pred_0": 1.7761900424957275,
    "predict_and_compile_model_3_pred_0": 82.07982850074768,
    "relax_model_3_pred_0": 13.683411598205566,
    "process_features_model_4_pred_0": 1.8073537349700928,
    "predict_and_compile_model_4_pred_0": 82.5819890499115,
    "relax_model_4_pred_0": 15.835367441177368,
    "process_features_model_5_pred_0": 1.9143474102020264,
    "predict_and_compile_model_5_pred_0": 77.47663712501526,
    "relax_model_5_pred_0": 14.72615647315979
}
That means that out of the ~2 hour run time 1h48 is spend running "classical" code (mostly hhblits) and only ~10 minutes is spent on the GPU.
As such do not request 2 GPUs as the potential speedup is negligible and this will block resources for other users
For multimer modelling the GPU part can take longer and depending on what you need it might be worth turning off relaxation. Always check the timings.json file to see where time is being spent!
If we look at the overall efficiency of the job using seff we see:
Nodes: 1
Cores per node: 24
CPU Utilized: 03:28:24
CPU Efficiency: 7.33% of 1-23:21:36 core-walltime
Job Wall-clock time: 01:58:24
Memory Utilized: 81.94 GB
Memory Efficiency: 40.97% of 200.00 GB
Reference databases
The reference databases needed for AlphaFold have been made available in /reference/alphafold so there is no need to download them - the directory name is the date on which the databases were downloaded.
$ ls /reference/alphafold/
20210719
20211104
20220414
20221206
New versions will be downloaded if required.
The versions correspond to:
20210719- Initial Alphafold 2.0 release20211104- 2.1 release with multimer data20220414- Updated weights20221206- Updated weights
Using containers
The Alphafold project recommend using Docker to run the code which works on cloud or personal resources but not when using shared HPC systems as administrative access (required for Docker) is obviously not permitted.
Singularity container
We provide Singularity image which can be used on the DCSR clusters and these can be found in /dcsrsoft/singularity/containers/
The currently available image is:
- alphafold-032e2f2.sif
When running the image directly it is necessary to provide all the paths to databases which is error prone and tedious.
$ singularity run /dcsrsoft/singularity/containers/alphafold-032e2f2.sif --helpshort
Full AlphaFold protein structure prediction script.
flags:

/app/alphafold/run_alphafold.py:
  --[no]benchmark: Run multiple JAX model evaluations to obtain a timing that excludes the compilation time, which should be more indicative of the time required for inferencing many proteins.
    (default: 'false')
  --bfd_database_path: Path to the BFD database for use by HHblits.
  --data_dir: Path to directory of supporting data.
  --db_preset: <full_dbs|reduced_dbs>: Choose preset MSA database configuration - smaller genetic database config (reduced_dbs) or full genetic database config  (full_dbs)
    (default: 'full_dbs')
  --fasta_paths: Paths to FASTA files, each containing a prediction target that will be folded one after another. If a FASTA file contains multiple sequences, then it will be folded as a multimer. Paths should be separated by commas. All FASTA paths must have a unique basename as the basename is used
    to name the output directories for each prediction.
    (a comma separated list)
  --hhblits_binary_path: Path to the HHblits executable.
    (default: '/opt/conda/bin/hhblits')
  --hhsearch_binary_path: Path to the HHsearch executable.
    (default: '/opt/conda/bin/hhsearch')
  --hmmbuild_binary_path: Path to the hmmbuild executable.
    (default: '/usr/bin/hmmbuild')
  --hmmsearch_binary_path: Path to the hmmsearch executable.
    (default: '/usr/bin/hmmsearch')
  --is_prokaryote_list: Optional for multimer system, not used by the single chain system. This list should contain a boolean for each fasta specifying true where the target complex is from a prokaryote, and false where it is not, or where the origin is unknown. These values determine the pairing
    method for the MSA.
    (a comma separated list)
  --jackhmmer_binary_path: Path to the JackHMMER executable.
    (default: '/usr/bin/jackhmmer')
  --kalign_binary_path: Path to the Kalign executable.
    (default: '/usr/bin/kalign')
  --max_template_date: Maximum template release date to consider. Important if folding historical test sets.
  --mgnify_database_path: Path to the MGnify database for use by JackHMMER.
  --model_preset: <monomer|monomer_casp14|monomer_ptm|multimer>: Choose preset model configuration - the monomer model, the monomer model with extra ensembling, monomer model with pTM head, or multimer model
    (default: 'monomer')
  --obsolete_pdbs_path: Path to file containing a mapping from obsolete PDB IDs to the PDB IDs of their replacements.
  --output_dir: Path to a directory that will store the results.
  --pdb70_database_path: Path to the PDB70 database for use by HHsearch.
  --pdb_seqres_database_path: Path to the PDB seqres database for use by hmmsearch.
  --random_seed: The random seed for the data pipeline. By default, this is randomly generated. Note that even if this is set, Alphafold may still not be deterministic, because processes like GPU inference are nondeterministic.
    (an integer)
  --small_bfd_database_path: Path to the small version of BFD used with the "reduced_dbs" preset.
  --template_mmcif_dir: Path to a directory with template mmCIF structures, each named <pdb_id>.cif
  --uniclust30_database_path: Path to the Uniclust30 database for use by HHblits.
  --uniprot_database_path: Path to the Uniprot database for use by JackHMMer.
  --uniref90_database_path: Path to the Uniref90 database for use by JackHMMER.
  --[no]use_precomputed_msas: Whether to read MSAs that have been written to disk. WARNING: This will not check if the sequence, database or configuration have changed.
    (default: 'false')

Try --helpfull to get a list of all flags.
To run the container - here we are using a GPU so the --nv flag must be used to make the GPU visible inside the container
module load singularity

singularity run --nv /dcsrsoft/singularity/containers/alphafold-032e2f2.sif <OPTIONS>
Helper Scripts
In order to make life simpler there is a wrapper script: run_alphafold_032e2f2.sh - this can be found at:
/dcsrsoft/singularity/containers/run_alphafold_032e2f2.sh
Please copy it to your working directory
$ bash /dcsrsoft/singularity/containers/run_alphafold_032e2f2.sh --help

Please make sure all required parameters are given
Usage: /dcsrsoft/singularity/containers/run_alphafold_032e2f2.sh <OPTIONS>
Required Parameters:
-d <data_dir>         Path to directory of supporting data
-o <output_dir>       Path to a directory that will store the results.
-f <fasta_paths>      Path to FASTA files containing sequences. If a FASTA file contains multiple sequences, then it will be folded as a multimer. To fold more sequences one after another, write the files separated by a comma
-t <max_template_date> Maximum template release date to consider (ISO-8601 format - i.e. YYYY-MM-DD). Important if folding historical test sets
Optional Parameters:
-g <use_gpu>          Enable NVIDIA runtime to run with GPUs (default: true)
-r <run_relax>        Whether to run the final relaxation step on the predicted models. Turning relax off might result in predictions with distracting stereochemical violations but might help in case you are having issues with the relaxation stage (default: true)
-e <enable_gpu_relax> Run relax on GPU if GPU is enabled (default: true)
-n <openmm_threads>   OpenMM threads (default: all available cores)
-a <gpu_devices>      Comma separated list of devices to pass to 'CUDA_VISIBLE_DEVICES' (default: 0)
-m <model_preset>     Choose preset model configuration - the monomer model, the monomer model with extra ensembling, monomer model with pTM head, or multimer model (default: 'monomer')
-c <db_preset>        Choose preset MSA database configuration - smaller genetic database config (reduced_dbs) or full genetic database config (full_dbs) (default: 'full_dbs')
-p <use_precomputed_msas> Whether to read MSAs that have been written to disk. WARNING: This will not check if the sequence, database or configuration have changed (default: 'false')
-l <num_multimer_predictions_per_model> How many predictions (each with a different random seed) will be generated per model. E.g. if this is 2 and there are 5 models then there will be 10 predictions per input. Note: this FLAG only applies if model_preset=multimer (default: 5)
-b <benchmark>        Run multiple JAX model evaluations to obtain a timing that excludes the compilation time, which should be more indicative of the time required for inferencing many proteins (default: 'false')
An example batch script using the helper script is:
#!/bin/bash

#SBATCH -c 24
#SBATCH -p gpu
#SBATCH --gres=gpu:1
#SBATCH --gres-flags=enforce-binding
#SBATCH --mem 200G
#SBATCH -t 6:00:00

module purge
module load singularityce

export SINGULARITY_BINDPATH="/scratch,/dcsrsoft,/users,/work,/reference"

bash /dcsrsoft/singularity/containers/run_alphafold_032e2f2.sh -d /reference/alphafold/20221206 -t 2022-12-06 -n 24 -g true -f ./T1024.fasta -o /scratch/ulambda/alphafold/runtest
Alphafold without containers
Fans of Conda may also wish to check out https://github.com/kalininalab/alphafold_non_docker. Just make sure to module load gcc miniconda3 rather than following the exact procedure!
Alphafold 3
Disclaimer: this page is provided for experimental support only!
Disclaimer 2: pay attention to the terms of use provided here!
The project home page where you can find the latest information there.
Using Alphafold 3 through a container
The Apptainer/Singularity container for Alphafold 3 is available at /dcsrsoft/singularity/containers/alphafold-v3.sif.
As stated on the Github page, it is possible to test Alphafold 3 with the following JSON input (named fold_input.json):
{
  "name": "2PV7",
  "sequences": [
    {
      "protein": {
        "id": ["A", "B"],
        "sequence": "GMRESYANENQFGFKTINSDIHKIVIVGGYGKLGGLFARYLRASGYPISILDREDWAVAESILANADVVIVSVPINLTLETIERLKPYLTENMLLADLTSVKREPLAKMLEVHTGAVLGLHPMFGADIASMAKQVVVRCDGRFPERYEWLLEQIQIWGAKIYQTNATEHDHNMTYIQALRHFSTFANGLHLSKQPINLANLLALSSPIYRLELAMIGRLFAQDAELYADIIMDKSENLAVIETLKQTYDEALTFFENNDRQGFIDAFHKVRDWFGDYSEQFLKESRQLLQQANDLKQG"
      }
    }
  ],
  "modelSeeds": [1],
  "dialect": "alphafold3",
  "version": 1
}
To ease the use of Alphafold 3, we have downloaded:
- the databases to
/reference/alphafold3/db - the model to
/reference/alphafold3/model
Here an example of Slurm job that can be used to run Alphafold 3 with the above JSON file:
#!/bin/bash -l

#SBATCH --time 2:00:00
#SBATCH --nodes 1
#SBATCH --ntasks 1
#SBATCH --partition gpu
#SBATCH --gres gpu:1
#SBATCH --gres-flags enforce-binding
#SBATCH --cpus-per-task 8
#SBATCH --mem=64G

dcsrsoft use 20241118
module load apptainer
export APPTAINER_BINDPATH="/scratch,/work,/users,/reference"

mkdir -p output
apptainer run --nv /dcsrsoft/singularity/containers/alphafold-v3.sif --json_path=fold_input.json --output_dir=output --model_dir=/reference/alphafold3/model --db_dir=/reference/alphafold3/db
CryoSPARC
First of all, if you plan to use CryoSPARC on the cluster, please contact us to get a port number (you will understand later why it's important).
CryoSPARC can be used on Curnagl and take benefit from Nvidia A100 GPUs. This page presents the installation in the /work storage location, so that it can be shared among the members of the same project. The purpose is to help you with installation, but in case of problem, don't hesitate to look at the official documentation.
1. Get a license
A free license can be obtained for non-commercial use from Structura Biotechnology.
You will receive an email containing your license ID. It is similar to:
235e3142-d2b0-17eb-c43a-9c2461c1234d
2. Prerequisites
Before starting the installation we suppose that:
- DCSR gave you the following port number: 45678
- you want to install Cryosparc to the following location: /work/FAC/FBM/DMF/ulambda/cryosparc
- your license ID is: 235e3142-d2b0-17eb-c43a-9c2461c1234d
Obviously you must not use those values and they must be modified.
3. Install CryoSPARC
First, connect to the Curnagl login node using your favourite SSH client and follow the next steps.
Define the 3 prerequisites variables
export LICENSE_ID="235e3142-d2b0-17eb-c43a-9c2461c1234d"
export CRYOSPARC_ROOT=/work/FAC/FBM/DMF/ulambda/cryosparc
export CRYOSPARC_PORT=45678
Create some directories and download the packages
mkdir -p $CRYOSPARC_ROOT
mkdir -p $CRYOSPARC_ROOT/database
mkdir -p $CRYOSPARC_ROOT/scratch
mkdir -p $CRYOSPARC_ROOT/curnagl_config
cd $CRYOSPARC_ROOT
curl -L https://get.cryosparc.com/download/master-latest/$LICENSE_ID -o cryosparc_master.tar.gz
curl -L https://get.cryosparc.com/download/worker-latest/$LICENSE_ID -o cryosparc_worker.tar.gz
tar xf cryosparc_master.tar.gz
tar xf cryosparc_worker.tar.gz
Create $CRYOSPARC_ROOT/curnagl_config/cluster_info.json
Use your favourite editor to fill the file with the following content:
{
"qdel_cmd_tpl": "scancel {{ cluster_job_id }}",
"worker_bin_path": "/work/FAC/FBM/DMF/ulambda/cryosparc/cryosparc_worker/bin/cryosparcw",
"title": "curnagl",
"cache_path": "/work/FAC/FBM/DMF/ulambda/cryosparc/scratch",
"qinfo_cmd_tpl": "sinfo --format='%.8N %.6D %.10P %.6T %.14C %.5c %.6z %.7m %.7G %.9d %20E'",
"qsub_cmd_tpl": "sbatch {{ script_path_abs }}",
"qstat_cmd_tpl": "squeue -j {{ cluster_job_id }}",
"cache_quota_mb": 1000000,
"send_cmd_tpl": "{{ command }}",
"cache_reserve_mb": 10000,
"name": "curnagl"
}
Pay attention to worker_bin_path and cache_path variables, they must be adapted to your setup. cache_reserve_mb and cache_quota_mb might have to be modified, depending on your needs.
Create $CRYOSPARC_ROOT/curnagl_config/cluster_script.sh
Use your favourite editor to fill the file with the following content:
#!/bin/bash
#SBATCH --job-name=cryosparc_{{ project_uid }}_{{ job_uid }}
#SBATCH --partition={{ "gpu" if num_gpu > 0 else "cpu" }}
#SBATCH --time=12:00:00
#SBATCH --output={{ job_log_path_abs }}
#SBATCH --error={{ job_log_path_abs }}
#SBATCH --nodes=1
#SBATCH --mem={{ (ram_gb*1024*2)|int }}M
#SBATCH --ntasks-per-node=1
#SBATCH --cpus-per-task={{ num_cpu }}
#SBATCH --gres=gpu:{{ num_gpu }}

srun {{ run_cmd }}
Install CryoSPARC master
cd $CRYOSPARC_ROOT/cryosparc_master
./install.sh --license $LICENSE_ID --hostname curnagl --dbpath $CRYOSPARC_ROOT/database --port $CRYOSPARC_PORT
At the end of the installation process, the installer asks you if you want to modify your ~/.bashrc file, please answer yes.
Start CryoSPARC and create a user
export PATH=$CRYOSPARC_ROOT/cryosparc_master/bin:$PATH
cryosparcm start
cryosparcm createuser --email "ursula.lambda@unil.ch" --password "ursulabestpassword" --username "ulambda" --firstname "Ursula" --lastname "Lambda"
Of course, when creating the user, you have to use appropriate information, the password shouldn't be your UNIL password.
Install CryoSPARC worker
First you have to connect to a GPU node:
Sinteractive -G1 -m8GOnce you are connected to the node:
export LICENSE_ID="235e3142-d2b0-17eb-c43a-9c2461c1234d"
export CRYOSPARC_ROOT=/work/FAC/FBM/DMF/ulambda/cryosparc
cd $CRYOSPARC_ROOT/cryosparc_worker
./install.sh --license $LICENSE_ID
At the end of the process, you can logout.
Configure the cluster workers
cd $CRYOSPARC_ROOT/curnagl_config
cryosparcm cluster connect
4. Connection to the web interface
You have to create a tunnel from your laptop to the Curnagl login node:
ssh -N -L 8080:localhost:45678 ulambda@curnagl.dcsr.unil.chPlease note that the port 45678 must be modified according to the one that DCSR gave you, and ulambda must be replaced with your UNIL login.
Then you can open a Web browser the following address: http://localhost:8080.

Here you have to use the credentials defined when you created a user.
5. Working with CryoSPARC
When you start working with CryoSPARC on Curnagl, you have to start it from the login node:
cryosparcm startWhen you have finished, you should stop CryoSPARC in order to avoid wasting resources on Curnagl login node:
cryosparcm stopCompiling and running MPI codes
$ wget https://raw.githubusercontent.com/mpitutorial/mpitutorial/gh-pages/tutorials/mpi-hello-world/code/mpi_hello_world.cCompiling with GCC
To compile the code, we first need to load the gcc and mvapich2 modules:
$ module load mvapich2 mpi_hello_world by compiling the source code mpi_hello_world.c:$ mpicc mpi_hello_world.c -o mpi_hello_worldmpicc tool is a wrapper around the gcc compiler that adds the correct options for linking MPI codes and if you are curious you can run mpicc -show to see what it does.run_mpi_hello_world.sh, where we ask to run a total of 4 MPI tasks with (at max) 2 tasks per node:#!/bin/bash
#SBATCH --time 00-00:05:00
#SBATCH --mem=2G
#SBATCH --ntasks 4
#SBATCH --ntasks-per-node 2
#SBATCH --cpus-per-task 1
module purge
module load gcc
module load mvapich2
module list
EXE=mpi_hello_world
[ ! -f $EXE ] && echo "EXE $EXE not found." && exit 1
srun $EXE$ sbatch run_mpi_hello_world.shUpon completion you should get something like:
...

Hello world from processor dna001.curnagl, rank 1 out of 4 processors
Hello world from processor dna001.curnagl, rank 3 out of 4 processors
Hello world from processor dna004.curnagl, rank 0 out of 4 processors
Hello world from processor dna004.curnagl, rank 2 out of 4 processors
It is important to check is that you have a single group of 4 processors and not 4 groups of 1 processor. If that's the case, you can now compile and run your own MPI application.
The important bit of the script is the srun $EXE as MPI jobs but be started with a job launcher in order to run multiple processes on multiple nodes.
Software local installation
This page gives an example of a local installation of a software, i.e. a software that will be only available to yourself. For simplicity we assume here that the software you want to install is available as a single binary file.
To be executed from anywhere the binary must be placed in a directory contained in your PATH environment variable. We use here a directory called "bin" in your home directory:
$ mkdir ~/binThen, edit your ~/.bashrc file to add the newly created directory to your search path by adding this line:
export PATH=~/bin:$PATH
Then reload your .bashrc to take into account this change:
$ source ~/.bashrcNow, you can simply copy your binary to ~/bin and it will be available from anywhere for execution:
$ cp /path/to/downloaded/my_binary ~/binFinally, make sure your binary is executable:
$ chmod +x ~/bin/my_binary
Rstudio on the Urblauna cluster
Rstudio can be run on the Urblauna cluster from within a singularity container, with an interactive interface provided on the web browser of a Guacamole session.
Running interactively with Rstudio on the clusters is only meant for testing. Development must be carried out on the users workstations, and production runs must be accomplished from within R scripts/codes in batch mode.
The command Rstudio is now available in r-light module. You have to do a reservation first with Sinteractive, ask the right amount of resources and then launch the command 'Rstudio'.
Procedure
Sinteractive   # specify here the right amount of resources
module load r-light
Rstudio
The procedure below is now deprecated !!
Preparatory steps on Curnagl side
A few operations have to be executed on the Curnagl cluster:
- Create a directory in your /work project dedicated to be used as an R library, for instance:
mkdir /work/FAC/FBM/DBC/mypi/project/R_ROOT - Optional : install required R packages, for instance
ggplot2module load gcc r export R_LIBS_USER=/work/FAC/FBM/DBC/mypi/project/R_ROOT R >>>install.packages("ggplot2")
The batch script
Create a file rstudio-server.sbatch with the following contents (it must be on the cluster, but the exact location does not matter):
#!/bin/bash -l

#SBATCH --account <<<ACCOUNT_NAME>>>
#SBATCH --job-name rstudio-server
#SBATCH --signal=USR2
#SBATCH --output=rstudio-server.job
#SBATCH --nodes 1
#SBATCH --ntasks 1
#SBATCH --cpus-per-task 1
#SBATCH --mem 8G
#SBATCH --time 02:00:00
#SBATCH --partition interactive
#SBATCH --export NONE

RLIBS_USER_DIR=<<<RLIBS_PATH>>>
RSTUDIO_CWD=~
RSTUDIO_SIF="/dcsrsoft/singularity/containers/rstudio-4.3.2.sif"

module load python singularityce
module load r
RLIBS_DIR=${R_ROOT}/rlib/R/library
module unload r


# Create temp directory for ephemeral content to bind-mount in the container
RSTUDIO_TMP=$(mktemp --tmpdir -d rstudio.XXX)

mkdir -p -m 700 \
        ${RSTUDIO_TMP}/run \
        ${RSTUDIO_TMP}/tmp \
        ${RSTUDIO_TMP}/var/lib/rstudio-server

mkdir -p ${RSTUDIO_CWD}/.R

cat > ${RSTUDIO_TMP}/database.conf <<END
provider=sqlite
directory=/var/lib/rstudio-server
END

# Set OMP_NUM_THREADS to prevent OpenBLAS (and any other OpenMP-enhanced
# libraries used by R) from spawning more threads than the number of processors
# allocated to the job.
#
# Set R_LIBS_USER to a path specific to rocker/rstudio to avoid conflicts with
# personal libraries from any R installation in the host environment

cat > ${RSTUDIO_TMP}/rsession.sh <<END
#!/bin/sh

export OMP_NUM_THREADS=${SLURM_CPUS_PER_TASK:-1}
export R_LIBS=${RLIBS_DIR}
export R_LIBS_USER=${RLIBS_USER_DIR}
export PATH=${PATH}:/usr/lib/rstudio-server/bin
exec rsession "\${@}"
END

chmod +x ${RSTUDIO_TMP}/rsession.sh

SINGULARITY_BIND+="${RSTUDIO_CWD}:${RSTUDIO_CWD},"
SINGULARITY_BIND+="${RSTUDIO_TMP}/run:/run,"
SINGULARITY_BIND+="${RSTUDIO_TMP}/tmp:/tmp,"
SINGULARITY_BIND+="${RSTUDIO_TMP}/database.conf:/etc/rstudio/database.conf,"
SINGULARITY_BIND+="${RSTUDIO_TMP}/rsession.sh:/etc/rstudio/rsession.sh,"
SINGULARITY_BIND+="${RSTUDIO_TMP}/var/lib/rstudio-server:/var/lib/rstudio-server,"
SINGULARITY_BIND+="/users:/users,/scratch:/scratch,/work:/work,/dcsrsoft"
export SINGULARITY_BIND

# Do not suspend idle sessions.
# Alternative to setting session-timeout-minutes=0 in /etc/rstudio/rsession.conf
export SINGULARITYENV_RSTUDIO_SESSION_TIMEOUT=0

export SINGULARITYENV_USER=$(id -un)
export SINGULARITYENV_PASSWORD=$(openssl rand -base64 15)

# get unused socket per https://unix.stackexchange.com/a/132524
# tiny race condition between the python & singularity commands
readonly PORT=$(python -c 'import socket; s=socket.socket(); s.bind(("", 0)); print(s.getsockname()[1]); s.close()')
cat 1>&2 <<END
1. open the Guacamole web browser to http://${HOSTNAME}:${PORT}

2. log in to RStudio Server using the following credentials:

   user: ${SINGULARITYENV_USER}
   password: ${SINGULARITYENV_PASSWORD}

When done using RStudio Server, terminate the job by:

1. Exit the RStudio Session ("power" button in the top right corner of the RStudio window)
2. Issue the following command on the login node:

      scancel -f ${SLURM_JOB_ID}
END

#singularity exec --env R_LIBS=${RLIBS_DIR} --home ${RSTUDIO_CWD} --cleanenv ${RSTUDIO_SIF} \
singularity exec --home ${RSTUDIO_CWD} --cleanenv ${RSTUDIO_SIF} \
    rserver --www-port ${PORT} \
            --auth-none=0 \
            --auth-pam-helper-path=pam-helper \
            --auth-stay-signed-in-days=30 \
            --auth-timeout-minutes=0 \
            --rsession-path=/etc/rstudio/rsession.sh \
            --server-user=${SINGULARITYENV_USER}

SINGULARITY_EXIT_CODE=$?
echo "rserver exited $SINGULARITY_EXIT_CODE" 1>&2
exit $SINGULARITY_EXIT_CODE
You need to carefully replace, at the beginning of the file, the following elements:
- On line 3: <<<ACCOUNT_NAME>>> with the project id that was attributed to your PI for the given project
- On line 14: <<<RLIBS_PATH>>> must be replaced with the absolute path (ex. /work/FAC/.../R_ROOT) to the chosen folder you created on the preparatory steps
Running Rstudio
Submit a job for running Rstudio from within the cluster with:
[me@urblauna ~]$ sbatch rstudio-server.sbatchOnce the job is running (you can check that with Squeue), a new file rstudio-server.job is then automatically created. Its contents will give you instructions on how to proceed in order to start a new Rstudio remote session from Guacamole.
In this script we have reserved 2 hours
DCSR GitLab service
What is it?
The DCSR hosted version control service (https://gitlab.dcsr.unil.ch) is primarily intended for the users of the "sensitive" data clusters which do not have direct internet access. It is not an official UNIL wide version control service!
It is accessible from both the sensitive data services and the UNIL network. From outside the UNIL network a VPN connection is required. It is open to all registered users of the DCSR facilities and is hosted on reliable hardware.
Should I use it?
If you are a user of the sensitive data clusters/services then the answer is yes.
For other users it may well be more convenient to use internet accessible services such as c4science.ch or GitHub.com as these allow for external collaborations and do not require VPN access or an account on the DCSR systems.
Running Busco
A Singularity container is available for version 4.0.6 of Busco. To run it, you need to proceed as follows:
$ module load singularityce
$ export SINGULARITY_BINDPATH="/scratch,/users,/work"
Some configuration files included in the container must be copied in a writable location. So create a directory in your /scratch, e.g. called "busco_config"
$ mkdir /path/to/busco_configThen we copy the stuff out of the container to the newly created directory:
$ singularity exec /dcsrsoft/singularity/containers/busco-4.0.6 cp -rv /opt/miniconda/config/. /path/to/busco_configNow we need to set the AUGUSTUS_CONFIG_PATH environment variable to the newly created and populated busco_config directory:
$ export AUGUSTUS_CONFIG_PATH=/path/to/busco_configFinally, you should now be able to run a test dataset from busco (see https://gitlab.com/ezlab/busco/-/tree/master/test_data/eukaryota):
$ curl -O https://gitlab.com/ezlab/busco/-/raw/master/test_data/eukaryota/genome.fnaAnd launch the analysis.
Note: in $AUGUSTUS_CONFIG_PATH you have a copy of the default config.ini used here, so you can copy, modify it and use it in the --config option in the following command:
$ singularity exec /dcsrsoft/singularity/containers/busco-4.0.6 busco --config /opt/miniconda/config/config.ini -i genome.fna -c 8 -m geno -f --out test_eukaryotaThen download the reference log:
curl -O https://gitlab.com/ezlab/busco/-/raw/master/test_data/eukaryota/expected_log.txtAnd compare to the one you generated.
SWITCHfilesender from the cluster
Switch Filesender
Filesender is a service provided by SWITCH to transfer files over http. Normally files are uploaded via a web browser but this is not possible from the DCSR clusters.
In order to avoid having to transfer the files to your local computer it is possible to use the Filesender command line tools as explained below
Configuring the CLI tools
Connect to https://filesender.switch.ch then go to the profile tab

Then click on "Create API secret" to generate a code that will be used to allow you to authenticate

This will generate a long string like
ab56bf28434d1fba1d5f6g3aaf8776e55fd722df205197
This code should never be shared
Then connect to Curnagl and run the following commands to download the CLI tool and the configuration
cd

mkdir ~/.filesender

wget https://filesender.switch.ch/clidownload.php -O filesender.py

wget https://filesender.switch.ch/clidownload.php?config=1 -O ~/.filesender/filesender.py.ini
You will then need to edit the ~/.filesender/filesender.py.ini file using your preferred tool
You need to enter your username as show in the Filesender profile and the API key that you generated
Note that at present, unlike the other Switch services this is not your EduID account!
[system]
base_url = https://filesender.switch.ch/filesender2/rest.php
default_transfer_days_valid = 20

[user]
username = Ursula.Lambda@unil.ch
apikey = ab56bf28434d1fba1d5f6g3aaf8776e55fd722df205197
Transferring files
Now that we have done this we can transfer files - note that the modules must be loaded in order to have a python with the required libraries.
[ulambda@login ~]$ module load gcc python

[ulambda@login ~]$ python3 filesender.py -p -r ethz.collaborator@protonmail.ch results.zip

Uploading: /users/ulambda/results.zip 0-5242880 0%
Uploading: /users/ulambda/results.zip 5242880-10485760 6%
Uploading: /users/ulambda/results.zip 10485760-15728640 11%
Uploading: /users/ulambda/results.zip 15728640-20971520 17%
Uploading: /users/ulambda/results.zip 20971520-26214400 23%
Uploading: /users/ulambda/results.zip 26214400-31457280 29%
Uploading: /users/ulambda/results.zip 31457280-36700160 34%
Uploading: /users/ulambda/results.zip 36700160-41943040 40%
Uploading: /users/ulambda/results.zip 41943040-47185920 46%
Uploading: /users/ulambda/results.zip 47185920-52428800 52%
Uploading: /users/ulambda/results.zip 52428800-57671680 57%
Uploading: /users/ulambda/results.zip 57671680-62914560 63%
Uploading: /users/ulambda/results.zip 62914560-68157440 69%
Uploading: /users/ulambda/results.zip 68157440-73400320 74%
Uploading: /users/ulambda/results.zip 73400320-78643200 80%
Uploading: /users/ulambda/results.zip 78643200-83886080 86%
Uploading: /users/ulambda/results.zip 83886080-89128960 92%
Uploading: /users/ulambda/results.zip 89128960-91575794 97%
Uploading: /users/ulambda/results.zip 91575794 100%
A mail will be sent to ethz.collaborator@protonmail.ch who can then download the file
Filetransfer from the cluster
filetransfer.dcsr.unil.ch
https://filetransfer.dcsr.unil.ch is a service provided by the DCSR to allow you to transfer files to and from external collaborators.
This is an alternative to SWITCHFileSender and the space available is 6TB with a maximum per user limit of 4TB - this space is shared between all users so it is unlikely that you will be able to transfer 4TB of data at once.
The filetransfer service is based on LiquidFiles and the user guide is available at https://man.liquidfiles.com/userguide.html
In order to transfer files to and from the DCSR clusters without using the web browser it is also possible to the API REST as explained below
Configuring the service
First you need to connect to the web interface at https://filetransfer.dcsr.unil.ch and connect using your UNIL username (e.g. ulambda for Ursula Lambda) and password. This is not your EduID password but rather the one you use to connect to the clusters.
Once connected go to settings (the cog symbol in the top right corner) then the API tab
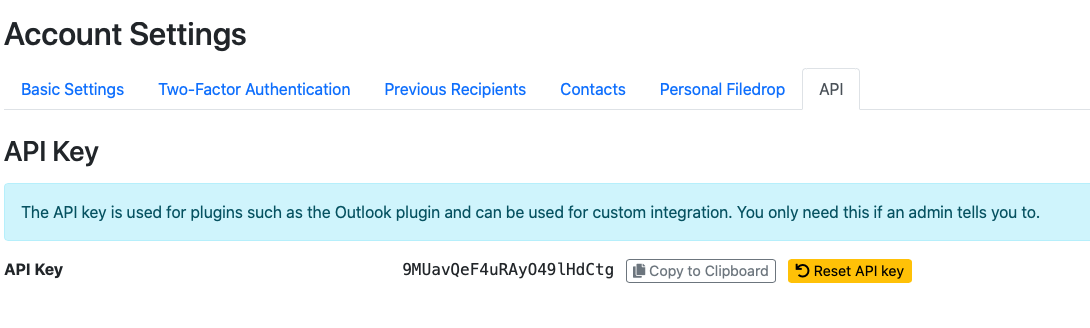
The API key is how you authenticate from the clusters and this secret should never be shared. It can be reset via the yellow button.
Transferring files from the cluster
To upload a file and create a file link:
module load liquidfiles
liquidfiles -k $APIKEY file_example_TIFF_.tiff
You can then connect to the web interface from you workstation to manage the files and send messages as required.
As preparing and uploading files can take a while we recommend that this is performed in a tmux session which means that even if your connection to the cluster is lost the process continues and you can reconnect.
Transferring large files
You follow the same procedure:
module load liquidfiles
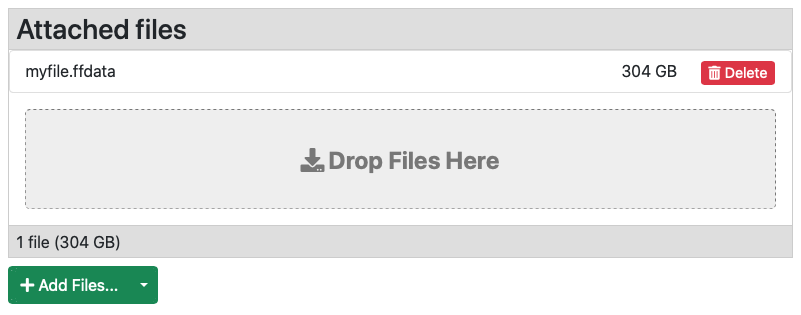
liquidfiles -k $APIKEY myfile.ffdata
The liquidfiles tool will chuck the file and it will send it to the server. Once all the chunks are uploaded the file will be assembled/processed and after a short while it will be visible in the web interface.
Here we see a previously uploaded file of 304 GB called myfile.ffdata
R on the clusters (old)
R is provided via the DCSR software stack
Interactive mode
To load R:
module load r
R
# Then you can use R interactively
> ...
Batch mode
While using R in batch mode, you have to use Rscript to launch your script. Here is an example of sbatch script, run_r.sh:
#!/bin/bash

#SBATCH --time 00-00:20:00
#SBATCH --cpus-per-task 1
#SBATCH --mem 4G

module load r

Rscript my_r_script.R
Then, just submit the job to Slurm:
sbatch run_r.shPackage installation
A number of core packages are installed centrally - you can see what is available by using the library() function. Given the number of packages and multiple versions available other packages should be installed by the user.
Installing R packages is pretty straightforward thanks to install.packages() function. However, be careful since it might fill your home directory very quickly. For big packages with large amount of dependencies, like adegenet for instance, you will probably reach the quota before the end of the installation. Here is a solution to mitigate that problem:
- Remove your current R library (or set up an alternate one as explained in the section Setting up an alternate personal library below):
rm -rf $HOME/R- Create a new library in your scratch directory (obviously modify the path according to your situation):
mkdir -p /work/FAC/FBM/DEE/my_py/default/jdoe/R- Create a symlink to locate the R library on the scratch dir:
cd $HOME
ln -s /work/FAC/FBM/DEE/my_py/default/jdoe/R- Install your R packages
Handling dependencies
Sometimes R packages depend on external libraries. For most of cases the library is already installed on the cluster you just need to load the module before trying to install the package from the R session.
If the installation of package is still failing you need to define the following variables. For example, if our package depend on gsl and mpfr libraries, we need to do the following:
module load gsl mpfr
export CPATH=$GSL_ROOT/include:$MPFR_ROOT/include
export LIBRARY_PATH=$GSL_ROOT/lib:$MPFR_ROOT/lib
Setting up an alternate personal library
If you want to set up an alternate location where to install R packages, you can proceed as follows:
mkdir -p ~/R/my_personal_lib2

# If you already have a ~/.Renviron file, make a backup
cp -iv ~/.Renviron ~/.Renviron_backup

echo 'R_LIBS_USER=~/R/my_personal_lib2' > ~/.Renviron
Then relaunch R. Packages will then be installed under ~/R/my_personal_lib2.
Sandbox containers
Container basics
For how to use Singularity/Apptainer containers please see our course at: http://dcsrs-courses.ad.unil.ch/r_python_singularity/r_python_singularity.html
Sandboxes
A container image (the .sif file) is read only and its contents cannot be changed which makes them perfect for distributing safe in the knowledge that they should run exactly as they were created.
Sometimes, especially when developing things, it's very useful to be able to interactively modify a container and this is what sandboxes are for.
Please be aware that anything done by hand is not reproducible so all steps should be transferred to the container definition file.
Creating and modifying a sandbox
Note that the steps here should be run on the cluster login node (curnagl.dcsr.unil.ch) as it is currently the only machine with the configuration in place to allow containers to be built.
To start you need a basic definition file - this can be an empty OS or something more complicated that already has some configuration.
In the following example we will use a definition that installs the latest version of R. We will then try and install extra packages before creating the immutable SIF image.
Here's our file which we save as newR.def
Bootstrap: docker
From: ubuntu:20.04

%post
  apt update
  apt install -y locales gnupg-agent
  sed -i '/^#.* en_.*.UTF-8 /s/^#//' /etc/locale.gen
  sed -i '/^#.* fr_.*.UTF-8 /s/^#//' /etc/locale.gen
  locale-gen

  # install two helper packages we need
  apt install -y --no-install-recommends software-properties-common dirmngr

  # add the signing key (by Michael Rutter) for these repos
  wget -qO- https://cloud.r-project.org/bin/linux/ubuntu/marutter_pubkey.asc | tee -a /etc/apt/trusted.gpg.d/cran_ubuntu_key.asc

  apt-key adv --keyserver hkp://keyserver.ubuntu.com:80 --recv-keys 51716619E084DAB9

  # add the R 4.0 repo from CRAN -- adjust 'focal' to 'groovy' or 'bionic' as needed
  add-apt-repository "deb https://cloud.r-project.org/bin/linux/ubuntu $(lsb_release -cs)-cran40/"

  apt install -y --no-install-recommends r-base
Create the sandbox
Change to your scratch space /scratch/username and:
$ module load singularityce

$ singularity build --fakeroot --sandbox newR newR.def

WARNING: The underlying filesystem on which resides "/scratch/username/myR" won't allow to set ownership, as a consequence the sandbox could not preserve image's files/directories ownerships
INFO:    Starting build...
Getting image source signatures
Copying blob d7bfe07ed847 [--------------------------------------] 0.0b / 0.0b
Copying config 2772dfba34 done
..
..
..
Processing triggers for libc-bin (2.31-0ubuntu9.9) ...
Processing triggers for systemd (245.4-4ubuntu3.17) ...
Processing triggers for mime-support (3.64ubuntu1) ...
INFO:    Creating sandbox directory...
INFO:    Build complete: myR
This will create a directory called newR which is the writable container image. Have a look inside and see what there is!
Run and edit the image
Before running the container we need to set up the filesystems that will be visible inside - here we want /users and /scratch to be visible
$ export SINGULARITY_BINDPATH="/users,/scratch"

$ mkdir newR/users
$ mkdir newR/scratch
Now we launch the image with an interactive shell
$ singularity shell --writable --fakeroot newR/

Singularity>
On the command line we can then work interactively with the image.
As we are going to be installing R packages we know that we need some extra tools:
Singularity> apt-get install make gcc g++ gfortranNow we can launch R and install some packages
Singularity> R

R version 4.2.1 (2022-06-23) -- "Funny-Looking Kid"
Copyright (C) 2022 The R Foundation for Statistical Computing
Platform: x86_64-pc-linux-gnu (64-bit)
..

> install.packages('tibble')
Installing package into ‘/usr/local/lib/R/site-library’
(as ‘lib’ is unspecified)
also installing the dependencies ‘glue’, ‘cli’, ‘utf8’, ‘ellipsis’, ‘fansi’, ‘lifecycle’, ‘magrittr’, ‘pillar’, ‘rlang’, ‘vctrs’

trying URL 'https://cloud.r-project.org/src/contrib/glue_1.6.2.tar.gz'
Content type 'application/x-gzip' length 106510 bytes (104 KB)
==================================================
downloaded 104 KB

..
..

** testing if installed package can be loaded from final location
** testing if installed package keeps a record of temporary installation path
* DONE (tibble)
Keep iterating until things are correct but don't forget to write down all the steps and transfer then to the definition file to allow for future reproducible builds.
Sandbox to SIF
$ singularity build --fakeroot R-4.2.1-production.sif newR/You will now have a SIF file that can be used in the normal way
$ singularity run R-4.2.1-production.sif R

R version 4.2.1 (2022-06-23) -- "Funny-Looking Kid"
Copyright (C) 2022 The R Foundation for Statistical Computing
Platform: x86_64-pc-linux-gnu (64-bit)
..

>
Remember that files on /scratch will be automatically deleted if there isn't enough free space so save your definitions in a git repository and move the SIF images to your project space in /work
Course software for decision trees / random forests
In the practicals, we will use only a small dataset and we will need only little computation power and memory ressources. You can therefore do the practicals on various computing platforms. However, since the participants may use various types of computers and softwares, we recommend to use the UNIL JupyterLab to do the practicals.
- JupyterLab: Working on the cloud is convenient because the installation of the Python and R packages is already done and you will be working with a Jupyter Notebook style even if you use R. Note, however, that the UNIL JupyterLab will only be active during the course and for one week following its completion, so in the long term you should use either your laptop or Curnagl. Access requires that you connect either via the eduroam Wi-Fi with your UNIL account or through the UNIL VPN. This point is especially crucial for researchers from the CHUV.
- Laptop: This is good if you want to work directly on your laptop, but you will need to install the required libraries on your laptop. Warning: We will give general instructions on how to install the libraries on your laptop but it is sometimes tricky to find the right library versions and we will not be able to help you with the installation. The installation should take about 15 minutes.
- Curnagl: This is efficient if you are used to work on a cluster or if you intend to use one in the future to work on large projects. If you have an account you can work on your /scratch folder or ask us to be part of the course project but please contact us at least a week before the course. If you do not have an account to access the UNIL cluster Curnagl, please contact us at least a week before the course so that we can give you a temporary account. The installation should take about 15 minutes. Note that it is also possible to use JupyterLab on Curnagl: see https://wiki.unil.ch/ci/books/high-performance-computing-hpc/page/jupyterlab-on-the-curnagl-cluster
If you choose to work on the UNIL JupyterLab, then you do not need to prepare anything since all the necessary libraries will already be installed on the UNIL JupyterLab. In all cases, you will receive a guest username during the course, so you will be able to work on the UNIL JupyterLab.
Otherwise, if you prefer to work on your laptop or on Curnagl, please make sure you have a working installation before the day of the course as on the day we will be unable to provide any assistance with this.
If you have difficulties with the installation on Curnagl we can help you so please contact us before the course at helpdesk@unil.ch with subject: DCSR ML course.
On the other hand, if you are unable to install the libraries on your laptop, we will unfortunately not be able to help you (there are too many particular cases), so you will need to use the UNIL Jupyter Lab during the course.
Before the course, we will send you all the files that are needed to do the practicals.
JupyterLab
Here are some instructions for using the UNIL JupyterLab to do the practicals.
Access requires that you connect either via the eduroam Wi-Fi with your UNIL account or through the UNIL VPN.
This point is especially crucial for researchers from the CHUV.
The webpage's link will be given during the course.
Enter the login and password that you have received during the course. Due to a technical issue, you may receive a warning message "Your connection is not private". This is OK. So please proceed by clicking on the advanced button and then on "Proceed to dcsrs-jupyter.ad.unil.ch (unsafe)".
Python
Click on the "Cours ML" (or "ML") square button in the Notebook panel.
Copy / paste the commands from the html practical file to the Jupyter Notebook.
To execute a command, click on "Run the selected cells and advance" (the right arrow), or SHIFT + RETURN.
When you have finished the practicals, select File / Log out.
R
Click on the "Cours ML" (or "ML R") square button in the Notebook panel.
Copy / paste the commands from the html practical file to the Jupyter Notebook.
To execute a command, click on "Run the selected cells and advance" (the right arrow), or SHIFT + RETURN.
When you have finished the practicals, select File / Log out.
Laptop
You may need to install development tools including a C and Fortran compiler (e.g. Xcode on Mac, gcc and gfortran on Linux, Visual Studio on Windows).
Python installation
Here are some instructions for installing decision tree and random forest libraries on your laptop. You need Python >= 3.7.
For Mac and Linux
We will use a terminal to install the libraries.
Let us create a virtual environment. Open your terminal and type:
python3 -m venv mlcourse

source mlcourse/bin/activate

pip3 install scikit-learn pandas matplotlib graphviz seaborn
You can terminate the current session:
deactivate

exit
TO DO THE PRACTICALS (today or another day):
You can use any Python IDE (e.g. Jupyter Notebook or PyCharm), but you need to launch it after activating the virtual environment. For example, for Jupyter Notebook:
source mlcourse/bin/activate

pip3 install notebook

jupyter notebook
For Windows
If you do not have Python installed, you can use either Conda: https://docs.conda.io/en/latest/miniconda.html or Python official installer: https://www.python.org/downloads/windows/
Let us create a virtual environment. Open your terminal and type:
C:\Users\user>python -m venv mlcourse

C:\Users\user>mlcourse\Scripts\activate.bat

(mlcourse) C:\Users\user>

(mlcourse) C:\Users\user>pip3 install scikit-learn pandas matplotlib graphviz seaborn
You can terminate the current session:
(mlcourse) C:\Users\user>deactivate

C:\Users\user>
TO DO THE PRACTICALS (today or another day):
You can use any Python IDE (e.g. Jupyter Notebook or PyCharm), but you need to launch it after activating the virtual environment. For example, for Jupyter Notebook:
C:\Users\user>mlcourse\Scripts\activate.bat

(mlcourse) C:\Users\user>pip3 install notebook

(mlcourse) C:\Users\user>jupyter notebook
Information: Use Control-C to stop this server.
R installation
Here are some instructions for installing decision tree and random forest libraries on your laptop.
You need R >= 4.0. Run R in your terminal or launch RStudio.
For Windows users, you can download R here: https://cran.r-project.org/bin/windows/base/
REMARK: The R libraries will be installed in your home directory. To allow it, you must answer yes to the questions:
Would you like to use a personal library instead? (yes/No/cancel) yes
Would you like to create a personal library to install packages into? (yes/No/cancel) yes
And select Switzerland for the CRAN mirror.
install.packages("rpart")

install.packages("rpart.plot")

install.packages("randomForest")

install.packages("tidyverse")
The installation of "tidyverse" may lead to some conflicts, but do not worry you should be able to do the practicals fine.
You can terminate the current R session:
q()Save workspace image? [y/n/c]: n
TO DO THE PRACTICALS (today or another day):
Simply run R in your terminal or launch RStudio.
Curnagl
For the practicals, it will be convenient to be able to copy/paste text from a web page to the terminal on Curnagl. So please make sure you can do it before the course. You also need to make sure that your terminal has a X server.
For Mac users, download and install XQuartz (X server): https://www.xquartz.org/
For Windows users, download and install MobaXterm terminal (which includes a X server). Click on the "Installer edition" button on the following webpage: https://mobaxterm.mobatek.net/download-home-edition.html
For Linux users, you do not need to install anything.
Python installation
Here are some instructions for installing decision tree and random forest libraries on the UNIL cluster called Curnagl. Open a terminal on your laptop and type (if you are located outside the UNIL you will need to activate the UNIL VPN):
ssh -Y < my unil username >@curnagl.dcsr.unil.chHere and in what follows we added the brackets < > to emphasize the username, but you should not write them in the command. Enter your UNIL password.
For Windows users with the MobaXterm terminal: Launch MobaXterm, click on Start local terminal and type the command ssh -Y < my unil username >@curnagl.dcsr.unil.ch. Enter your UNIL password. Then you should be on Curnagl. Alternatively, launch MobaXterm, click on the session icon and then click on the SSH icon. Fill in: remote host = curnagl.dcsr.unil.ch, specify username = < my unil username >. Finally, click ok, enter your password. If you have the question "do you want to save password ?" Say No if your are not sure. Then you should be on Curnagl.
See also the documentation: https://wiki.unil.ch/ci/books/high-performance-computing-hpc/page/ssh-connection-to-dcsr-cluster
cd /scratch/< my unil username >

or

cd /work/TRAINING/UNIL/CTR/rfabbret/cours_hpc/
mkdir < my unil username >
cd < my unil username >
For convenience, you will install the libraries from the frontal node to do the practicals. Note however that it is normally recommended to install libraries from the interactive partition by using (Sinteractive -m 4G -c 1).
module load python/3.12.1

python -m venv mlcourse

source mlcourse/bin/activate

pip install scikit-learn pandas matplotlib graphviz seaborn
You can terminate the current session:
deactivate

exit
TO DO THE PRACTICALS (today or another day):
ssh -Y < my unil username >@curnagl.dcsr.unil.ch

cd /scratch/< my unil username >

or

cd /work/TRAINING/UNIL/CTR/rfabbret/cours_hpc/< my unil username >
For convenience, you will work directly on the frontal node to do the practicals. Note however that it is normally not allowed to work directly on the frontal node, and you should use (Sinteractive -m 4G -c 1).
module load python/3.12.1

source mlcourse/bin/activate

python
R installation
Here are some instructions for installing decision tree and random forest libraries on the UNIL cluster called Curnagl. Open a terminal on your laptop and type (if you are located outside the UNIL you will need to activate the UNIL VPN):
ssh -Y < my unil username >@curnagl.dcsr.unil.chHere and in what follows we added the brackets < > to emphasize the username, but you should not write them in the command. Enter your UNIL password.
For Windows users with the MobaXterm terminal: Launch MobaXterm, click on Start local terminal and type the command ssh -Y < my unil username >@curnagl.dcsr.unil.ch. Enter your UNIL password. Then you should be on Curnagl. Alternatively, launch MobaXterm, click on the session icon and then click on the SSH icon. Fill in: remote host = curnagl.dcsr.unil.ch, specify username = < my unil username >. Finally, click ok, enter your password. If you have the question “do you want to save password ?” Say No if your are not sure. Then you should be on Curnagl.
See also the documentation: https://wiki.unil.ch/ci/books/high-performance-computing-hpc/page/ssh-connection-to-dcsr-cluster
cd /scratch/< my unil username >

or

cd /work/TRAINING/UNIL/CTR/rfabbret/cours_hpc/
mkdir < my unil username >
cd < my unil username >
For convenience, you will install the libraries from the frontal node to do the practicals. Note however that it is normally recommended to install libraries from the interactive partition by using (Sinteractive -m 4G -c 1).
module load r-light/4.4.1

R
REMARK: The R libraries will be installed in your home directory. To allow it, you must answer yes to the questions:
Would you like to use a personal library instead? (yes/No/cancel) yes
Would you like to create a personal library to install packages into? (yes/No/cancel) yes
And select Switzerland for the CRAN mirror.
install.packages("rpart")

install.packages("rpart.plot")

install.packages("randomForest")

install.packages("tidyverse")
The installation of "tidyverse" may lead to some conflicts, but do not worry you should be able to do the practicals fine.
You can terminate the current R session:
q()Save workspace image? [y/n/c]: n
TO DO THE PRACTICALS (today or another day):
ssh -Y < my unil username >@curnagl.dcsr.unil.ch

cd /scratch/my unil username >

or

cd /work/TRAINING/UNIL/CTR/rfabbret/cours_hpc/< my unil username >
For convenience, you will work directly on the frontal node to do the practicals. Note however that it is normally not allowed to work directly on the frontal node, and you should use (Sinteractive -m 4G -c 1).
module load r-light/4.4.1

R
Course software for introductory deep learning
In the practicals, we will use only a small dataset and we will need only little computation power and memory ressources. You can therefore do the practicals on various computing platforms. However, since the participants may use various types of computers and softwares, we recommend to use the UNIL JupyterLab to do the practicals.
- JupyterLab: Working on the cloud is convenient because the installation of the Python and R packages is already done and you will be working with a Jupyter Notebook style even if you use R. Note, however, that the UNIL JupyterLab will only be active during the course and for one week following its completion, so in the long term you should use either your laptop or Curnagl. Access requires that you connect either via the eduroam Wi-Fi with your UNIL account or through the UNIL VPN. This point is especially crucial for researchers from the CHUV.
- Laptop: This is good if you want to work directly on your laptop, but you will need to install the required libraries on your laptop. Warning: We will give general instructions on how to install the libraries on your laptop but it is sometimes tricky to find the right library versions and we will not be able to help you with the installation. The installation should take about 15 minutes.
- Curnagl: This is efficient if you are used to work on a cluster or if you intend to use one in the future to work on large projects. If you have an account you can work on your /scratch folder or ask us to be part of the course project but please contact us at least a week before the course. If you do not have an account to access the UNIL cluster Curnagl, please contact us at least a week before the course so that we can give you a temporary account. The installation should take about 15 minutes. Note that it is also possible to use JupyterLab on Curnagl: see https://wiki.unil.ch/ci/books/high-performance-computing-hpc/page/jupyterlab-on-the-curnagl-cluster
If you choose to work on the UNIL JupyterLab, then you do not need to prepare anything since all the necessary libraries will already be installed on the UNIL JupyterLab. In all cases, you will have access to the UNIL JupyterLab.
Otherwise, if you prefer to work on your laptop or on Curnagl, please make sure you have a working installation before the day of the course as on the day we will be unable to provide any assistance with this.
If you have difficulties with the installation on Curnagl we can help you so please contact us before the course at helpdesk@unil.ch with subject: DCSR ML course.
On the other hand, if you are unable to install the libraries on your laptop, we will unfortunately not be able to help you (there are too many particular cases), so you will need to use the UNIL Jupyter Lab during the course.
Before the course, we will send you all the files that are needed to do the practicals.
JupyterLab
Here are some instructions for using the UNIL JupyterLab to do the practicals.
Access requires that you connect either via the eduroam Wi-Fi with your UNIL account or through the UNIL VPN.
This point is especially crucial for researchers from the CHUV.
The webpage's link will be given during the course.
Enter the login and password that you have received during the course. Due to a technical issue, you may receive a warning message "Your connection is not private". This is OK. So please proceed by clicking on the advanced button and then on "Proceed to dcsrs-jupyter.ad.unil.ch (unsafe)".
Python
You can work on Open On Demand or on a Server:
- On Open On Demand: Fill in the form as shown in the lecture's slides.
- On a Server: Click on the "ML" square button in the Notebook panel.
Copy / paste the commands from the html practical file to the Jupyter Notebook.
To execute a command, click on "Run the selected cells and advance" (the right arrow), or SHIFT + RETURN.
When using TensorFlow, you may receive a warning
2022-09-22 11:01:12.232756: W tensorflow/stream_executor/platform/default/dso_loader.cc:64] Could not load dynamic library 'libcudart.so.11.0'; dlerror: libcudart.so.11.0: cannot open shared object file: No such file or directory
2022-09-22 11:01:12.232856: I tensorflow/stream_executor/cuda/cudart_stub.cc:29] Ignore above cudart dlerror if you do not have a GPU set up on your machine.
You should not worry. By default, TensorFlow is trying to use GPUs and since there are no GPUs, it writes a warning and decides to use CPUs (which is enough for our course).
When you have finished the practicals, select File / Log out.
R
You can work on Open On Demand or on a Server:
On Open On Demand: Fill in the form as shown in the lecture's slides.
On a Server: Click on the "ML R" square button in the Notebook panel.
Copy / paste the commands from the html practical file to the Jupyter Notebook.
To execute a command, click on "Run the selected cells and advance" (the right arrow), or SHIFT + RETURN.
When using TensorFlow, you may receive a warning
2022-09-22 11:01:12.232756: W tensorflow/stream_executor/platform/default/dso_loader.cc:64] Could not load dynamic library 'libcudart.so.11.0'; dlerror: libcudart.so.11.0: cannot open shared object file: No such file or directory
2022-09-22 11:01:12.232856: I tensorflow/stream_executor/cuda/cudart_stub.cc:29] Ignore above cudart dlerror if you do not have a GPU set up on your machine.
You should not worry. By default, TensorFlow is trying to use GPUs and since there are no GPUs, it writes a warning and decides to use CPUs (which is enough for our course).
When you have finished the practicals, select File / Log out.
Laptop
You may need to install development tools including a C and Fortran compiler (e.g. Xcode on Mac, gcc and gfortran on Linux, Visual Studio on Windows).
Python installation
Here are some instructions for installing Keras with TensorFlow at the backend (for Python3), and other libraries, on your laptop. You need Python >= 3.8.
For Linux
We will use a terminal to install the libraries.
Let us create a virtual environment. Open your terminal and type:
python3 -m venv mlcourse

source mlcourse/bin/activate

pip3 install tensorflow scikit-learn scikeras eli5 pandas matplotlib notebook keras-tuner
You may need to choose the right library versions, for example tensorflow==2.12.0
To check that Tensorflow was installed:
python3 -c "import tensorflow; print(tensorflow.version.VERSION)"There might be a warning message (see above) and the output should be something like "2.12.0".
You can terminate the current session:
deactivate

exit
TO DO THE PRACTICALS (today or another day):
You can use any Python IDE (e.g. Jupyter Notebook or PyCharm), but you need to launch it after activating the virtual environment. For example, for Jupyter Notebook:
source mlcourse/bin/activate

jupyter notebook
For Mac
We will use a terminal to install the libraries.
Let us create a virtual environment. Open your terminal and type:
python3 -m venv mlcourse

source mlcourse/bin/activate

pip3 install tensorflow-macos==2.12.0 scikit-learn==1.2.2 scikeras eli5 pandas matplotlib notebook keras-tuner
If you receive an error message such as:
ERROR: Could not find a version that satisfies the requirement tensorflow-macos (from versions: none)
ERROR: No matching distribution found for tensorflow-macos
Then, try the following command:
SYSTEM_VERSION_COMPAT=0 pip3 install tensorflow-macos==2.12.0 scikit-learn==1.2.2 scikeras eli5 pandas matplotlib notebook keras-tunerIf you have a Mac with M1 or more recent chip (if you are not sure have a look at "About this Mac"), you can also install the tensorflow-metal library to accelerate training on Mac GPUs (but this is not necessary for the course):
pip3 install tensorflow-metalTo check that Tensorflow was installed:
python3 -c "import tensorflow; print(tensorflow.version.VERSION)"There might be a warning message (see above) and the output should be something like "2.12.0".
You can terminate the current session:
deactivate

exit
TO DO THE PRACTICALS (today or another day):
You can use any Python IDE (e.g. Jupyter Notebook or PyCharm), but you need to launch it after activating the virtual environment. For example, for Jupyter Notebook:
source mlcourse/bin/activate

jupyter notebook
For Windows
If you do not have Python installed, you can use either Conda: https://docs.conda.io/en/latest/miniconda.html (see the instructions here: https://conda.io/projects/conda/en/latest/user-guide/install/windows.html) or Python official installer: https://www.python.org/downloads/windows/
We will use a terminal to install the libraries.
Let us create a virtual environment. Open your terminal and type:
python3 -m venv mlcourse

source mlcourse/bin/activate

pip3 install tensorflow scikit-learn scikeras eli5 pandas matplotlib notebook keras-tuner
You may need to choose the right library versions, for example tensorflow==2.12.0
To check that Tensorflow was installed:
python -c "import tensorflow; print(tensorflow.version.VERSION)"There might be a warning message (see above) and the output should be something like "2.12.0".
You can terminate the current session:
deactivateTO DO THE PRACTICALS (today or another day):
You can use any Python IDE (e.g. Jupyter Notebook or PyCharm), but you need to launch it after activating the virtual environment. For example, for Jupyter Notebook:
mlcourse\Scripts\activate.bat

jupyter notebook
R installation
Here are some instructions for installing Keras with TensorFlow at the backend, and other libraries, on your laptop. The R keras is actually an interface to the Python Keras. In simple terms, this means that the keras R package allows you to enjoy the benefit of R programming while having access to the capabilities of the Python Keras package.
You need R >= 4.0 and Python >= 3.8.
REMARK: The R libraries will be installed in your home directory. To allow it, you must answer yes to the questions:
Would you like to use a personal library instead? (yes/No/cancel) yes
Would you like to create a personal library to install packages into? (yes/No/cancel) yes
And select Switzerland for the CRAN mirror.
For Mac, Windows and Linux
Run the following commands on your terminal:
cd ~

ls .virtualenvs

# Create this directory only if you receive an error message
# saying that this directory does not exist
mkdir .virtualenvs
Then
cd ~/.virtualenvs

python3 -m venv r-reticulate

source r-reticulate/bin/activate

# For Windows and Linux
pip3 install tensorflow scikit-learn scikeras eli5 pandas matplotlib notebook keras-tuner

# For Mac
pip3 install tensorflow-macos==2.12.0 scikit-learn==1.2.2 scikeras eli5 pandas matplotlib notebook keras-tuner

deactivate
You must name the environment 'r-reticulate' as otherwise it wont be able to find it.
You may need to choose the right library versions, for example tensorflow==2.12.0
Run R in your terminal and type
install.packages("keras")

install.packages("reticulate")

install.packages("ggplot2")

install.packages("ggfortify")
To check that Keras was properly installed:
library(keras)

library(tensorflow)

is_keras_available(version = NULL)
There might be a warning message (see above) and the output should be something like "TRUE".
You can terminate the current R session:
q()Save workspace image? [y/n/c]: n
TO DO THE PRACTICALS (today or another day):
Then you can either run R in your terminal or launch RStudio.
Curnagl
For the practicals, it will be convenient to be able to copy/paste text from a web page to the terminal on Curnagl. So please make sure you can do it before the course. You also need to make sure that your terminal has a X server.
For Mac users, download and install XQuartz (X server): https://www.xquartz.org/
For Windows users, download and install MobaXterm terminal (which includes a X server). Click on the "Installer edition" button on the following webpage: https://mobaxterm.mobatek.net/download-home-edition.html
For Linux users, you do not need to install anything.
When testing if TensorFlow was properly installed (see below) you may receive a warning
2022-03-16 12:15:00.564218: W tensorflow/stream_executor/platform/default/dso_loader.cc:64] Could not load dynamic library 'libcudart.so.11.0'; dlerror: libcudart.so.11.0: cannot open shared object file: No such file or directory; LD_LIBRARY_PATH: /dcsrsoft/spack/hetre/v1.2/spack/opt/spack/linux-rhel8-zen2/gcc-9.3.0/python-3.8.8-tb3aceqq5wzx4kr5m7s5m4kzh4kxi3ex/lib:/dcsrsoft/spack/hetre/v1.2/spack/opt/spack/linux-rhel8-zen2/gcc-9.3.0/tcl-8.6.11-aonlmtcje4sgqf6gc4d56cnp3mbbhvnj/lib:/dcsrsoft/spack/hetre/v1.2/spack/opt/spack/linux-rhel8-zen2/gcc-9.3.0/tk-8.6.11-2gb36lqwohtzopr52c62hajn4tq7sf6m/lib:/dcsrsoft/spack/hetre/v1.2/spack/opt/spack/linux-rhel8-zen/gcc-8.3.1/gcc-9.3.0-nwqdwvso3jf3fgygezygmtty6hvydale/lib64:/dcsrsoft/spack/hetre/v1.2/spack/opt/spack/linux-rhel8-zen/gcc-8.3.1/gcc-9.3.0-nwqdwvso3jf3fgygezygmtty6hvydale/lib
2022-03-16 12:15:00.564262: I tensorflow/stream_executor/cuda/cudart_stub.cc:29] Ignore above cudart dlerror if you do not have a GPU set up on your machine.
You should not worry. By default, TensorFlow is trying to use GPUs and since there are no GPUs, it writes a warning and decides to use CPUs (which is enough for our course).
Python installation
Here are some instructions for installing Keras with TensorFlow at the backend (for Python3), and other libraries, on the UNIL cluster called Curnagl. Open a terminal on your laptop and type (if you are located outside the UNIL you will need to activate the UNIL VPN):
ssh -Y < my unil username >@curnagl.dcsr.unil.chHere and in what follows we added the brackets < > to emphasize the username, but you should not write them in the command. Enter your UNIL password.
For Windows users with the MobaXterm terminal: Launch MobaXterm, click on Start local terminal and type the command ssh -Y < my unil username >@curnagl.dcsr.unil.ch. Enter your UNIL password. Then you should be on Curnagl. Alternatively, launch MobaXterm, click on the session icon and then click on the SSH icon. Fill in: remote host = curnagl.dcsr.unil.ch, specify username = < my unil username >. Finally, click ok, enter your password. If you have the question "do you want to save password ?" Say No if your are not sure. Then you should be on Curnagl.
See also the documentation: https://wiki.unil.ch/ci/books/high-performance-computing-hpc/page/ssh-connection-to-dcsr-cluster
cd /scratch/< my unil username >

or

cd /work/TRAINING/UNIL/CTR/rfabbret/cours_hpc
mkdir < my unil username >
cd < my unil username >
For convenience, you will install the libraries from the frontal node to do the practicals. Note however that it is normally recommended to install libraries from the interactive partition by using (Sinteractive -m 4G -c 1).
git clone https://git.dcsr.unil.ch/ML-Courses/DL_INTRO.git

module load python/3.10.13

python -m venv mlcourse

source mlcourse/bin/activate

pip install -r DL_INTRO/requirements.txt
To check that TensorFlow was installed:
python -c 'import tensorflow; print(tensorflow.version.VERSION)'There might be a warning message (see above) and the output should be something like "2.9.2".
You can terminate the current session:
deactivate

exit
TO DO THE PRACTICALS (today or another day):
ssh -Y < my unil username >@curnagl.dcsr.unil.ch

cd /scratch/< my unil username >

or

cd /work/TRAINING/UNIL/CTR/rfabbret/cours_hpc/< my unil username >
For convenience, you will work directly on the frontal node to do the practicals. Note however that it is normally not allowed to work directly on the frontal node, and you should use (Sinteractive -m 4G -c 1).
module load python/3.10.13

source mlcourse/bin/activate

python
R installation
Here are some instructions for installing Keras with TensorFlow at the backend, and other libraries, on the UNIL cluster called Curnagl. The R keras is actually an interface to the Python Keras. In simple terms, this means that the keras R package allows you to enjoy the benefit of R programming while having access to the capabilities of the Python Keras package. Open a terminal on your laptop and type (if you are located outside the UNIL you will need to activate the UNIL VPN):
ssh -Y < my unil username >@curnagl.dcsr.unil.chHere and in what follows we added the brackets < > to emphasize the username, but you should not write them in the command. Enter your UNIL password.
For Windows users with the MobaXterm terminal: Launch MobaXterm, click on Start local terminal and type the command ssh -Y < my unil username >@curnagl.dcsr.unil.ch. Enter your UNIL password. Then you should be on Curnagl. Alternatively, launch MobaXterm, click on the session icon and then click on the SSH icon. Fill in: remote host = curnagl.dcsr.unil.ch, specify username = < my unil username >. Finally, click ok, enter your password. If you have the question “do you want to save password ?” Say No if your are not sure. Then you should be on Curnagl.
See also the documentation: https://wiki.unil.ch/ci/books/high-performance-computing-hpc/page/ssh-connection-to-dcsr-cluster
cd ~

module load python/3.10.13 r-light/4.4.1

git clone https://git.dcsr.unil.ch/ML-Courses/DL_INTRO.git

cd ~/.virtualenvs

python -m venv r-reticulate

source r-reticulate/bin/activate

pip install -r ~/DL_INTRO/requirements.txt
For convenience, you will install the libraries from the frontal node to do the practicals. Note however that it is normally recommended to install libraries from the interactive partition by using (Sinteractive -m 4G -c 1).
REMARK: The R libraries will be installed in your home directory. To allow it, you must answer yes to the questions:
Would you like to use a personal library instead? (yes/No/cancel) yes
Would you like to create a personal library to install packages into? (yes/No/cancel) yes
And select Switzerland for the CRAN mirror.
R

install.packages("keras")

install.packages("ggplot2")

install.packages("ggfortify")
To check that Keras was properly installed:
library(keras)

library(tensorflow)

is_keras_available(version = NULL)
There might be a warning message (see above) and the output should be something like "TRUE".
You can terminate the current R session:
q()Save workspace image? [y/n/c]: n
TO DO THE PRACTICALS (today or another day):
ssh -Y < my unil username >@curnagl.dcsr.unil.chFor convenience, you will work directly on the frontal node to do the practicals. Note however that it is normally not allowed to work directly on the frontal node, and you should use (Sinteractive -m 4G -c 1).
cd ~

module load python/3.10.13 r-light/4.4.1

R
JupyterLab on the curnagl cluster
JupyterLab can be run on the curnagl cluster for testing purposes, only as an intermediate step in the porting of applications from regular workstations to curnagl.
The installation is made inside a python virtual environment, and this tutorial covers the installation of the following kernels: IPyKernel (python), IRKernel (R), IJulia (julia), MATLAB kernel (matlab), IOctave (octave), stata_kernel (stata) and sas_kernel (sas).
If the workstation is outside of the campus, first connect to the VPN.
Creating the virtual environment
First create/choose a folder ${WORK} under the /scratch or the /work filesystems under your project (ex. WORK=/work/FAC/.../my_project). The following needs to be run only once on the cluster (preferably on an interactive computing node):
module load gcc python
python -m venv ${WORK}/jlab_venv
${WORK}/jlab_venv/bin/pip install jupyterlab ipykernel numpy matplotlib
The IPyKernel is automatically available. The other kernels need to be installed according to your needs.
Installing the kernels
Each time you start a new session on the cluster, remember to define the variable ${WORK} according to the path you chose when creating the virtual environment.
IRKernel
module load gcc r
export R_LIBS_USER=${WORK}/jlab_venv/lib/Rlibs
mkdir -p ${R_LIBS_USER}
echo "install.packages('IRkernel', repos='https://stat.ethz.ch/CRAN/', lib=Sys.getenv('R_LIBS_USER'))" | R --no-save
source ${WORK}/jlab_venv/bin/activate
echo "IRkernel::installspec()" | R --no-save
deactivate
IJulia
module load gcc julia
export JULIA_DEPOT_PATH=${WORK}/jlab_venv/lib/Jlibs
julia -e 'using Pkg; Pkg.add("IJulia")'
MATLAB kernel
${WORK}/jlab_venv/bin/pip install matlab_kernel matlabengine==9.11.19IOctave
${WORK}/jlab_venv/bin/pip install octave_kernel
echo "c.OctaveKernel.plot_settings = dict(backend='gnuplot')" > ~/.jupyter/octave_kernel_config.py
stata_kernel
module load stata-se
${WORK}/jlab_venv/bin/pip install stata_kernel
${WORK}/jlab_venv/bin/python -m stata_kernel.install
sed -i "s/^stata_path = None/stata_path = $(echo ${STATA_SE_ROOT} | sed 's/\//\\\//g')\/stata-se/" ~/.stata_kernel.conf
sed -i 's/stata_path = \(.*\)stata-mp/stata_path = \1stata-se/' ~/.stata_kernel.conf
sas_kernel
module load sas
${WORK}/jlab_venv/bin/pip install sas_kernel
sed -i "s/'\/opt\/sasinside\/SASHome/'$(echo ${SAS_ROOT} | sed 's/\//\\\//g')/g" ${WORK}/jlab_venv/lib64/python3.9/site-packages/saspy/sascfg.py
Running JupyterLab
Before running JupyterLab, you need to start an interactive session!
SinteractiveTake note of the name of the running node, that you will later need. On curnagl, you can type:
hostnameIf you didn't install all of the kernels, the corresponding lines should be ignored in the commands below. The execution order is important, in the sense that loading the gcc module should always be done before activating virtual environments.
# Load python
module load gcc python

# IOctave (optional)
module load octave gnuplot

# IRKernel (optional)
export R_LIBS_USER=${WORK}/jlab_venv/lib/Rlibs

# IJulia (optional)
export JULIA_DEPOT_PATH=${WORK}/jlab_venv/lib/Jlibs

# JupyterLab environment
source ${WORK}/jlab_venv/bin/activate

# Launch JupyterLab (on the shell a link that can be copied on the browser will appear)
cd ${WORK}
jupyter-lab

deactivate
Before you can copy and paste the link into your favorite browser, you will need to establish an SSH tunnel to the interactive node. From a UNIX-like workstation, you can establish the SSH tunnel to the curnagl node with the following command (replace <username> with your user name, and <hostname> with the name of the node you obtained above, and the <port> number is obtained from the link, it is typically 8888):
ssh -n -N -J <username>@curnagl.dcsr.unil.ch -L <port>:localhost:<port> <username>@<hostname>You will be prompted for your password. When you have finished, you can close the tunnel with Ctrl-C.
Note on Python/R/Julia modules and packages
The modules you install manually from JupyterLab in Python, R or Julia end up inside the JupyterLab virtual environment (${WORK}/jlab_venv). They are hence isolated and independent from your Python/R/Julia instances outside of the virtual environment.
JupyterLab with C++ on the curnagl cluster
JupyterLab can be run on the curnagl cluster for testing purposes, only as an intermediate step in the porting of applications from regular workstations to curnagl.
This tutorial intends to setup JupyterLab on the cluster together with the support for the C++ programming language, through the xeus-cling kernel. Besides the IPyKernel kernel for the python language, which is natively supported, we will also provide the option to install support for the following kernels: IRKernel (R), IJulia (julia), MATLAB kernel (matlab), IOctave (octave), stata_kernel (stata) and sas_kernel (sas).
These instructions are hence related to the JupyterLab on the curnagl cluster tutorial, but the implementation is very different because a JIT compiler is necessary in order to interactively process C++ code. Instead of using a python virtual environment in order to isolate and install JupyterLab, the kernels and the corresponding dependencies, we use micromamba.
Setup of the micromamba virtual environment
First create/choose a folder ${WORK} under the /scratch or the /work filesystems under your project (ex. WORK=/work/FAC/.../my_project). The following needs to be run only once on the cluster (preferably on an interactive computing node):
module load gcc python
export MAMBA_ROOT=/dcsrsoft/spack/external/micromamba
export MAMBA_ROOT_PREFIX="${WORK}/micromamba"
eval "$(${MAMBA_ROOT}/micromamba shell hook --shell=bash)"
micromamba create -y --prefix ${WORK}/jlab_menv python==3.9.13 jupyterlab ipykernel numpy matplotlib xeus-cling -c conda-forge
The IPyKernel and the xeus-cling kernel for handling C++ are now available. The other kernels need to be installed according to your needs.
Installing the optional kernels
Each time you start a new session on the cluster, remember to define the variable ${WORK} according to the path you chose when creating the virtual environment.
IRKernel
module load gcc r
export R_LIBS_USER=${WORK}/jlab_menv/lib/Rlibs
mkdir ${R_LIBS_USER}
echo "install.packages('IRkernel', repos='https://stat.ethz.ch/CRAN/', lib=Sys.getenv('R_LIBS_USER'))" | R --no-save
export MAMBA_ROOT=/dcsrsoft/spack/external/micromamba
export MAMBA_ROOT_PREFIX="${WORK}/micromamba"
eval "$(${MAMBA_ROOT}/micromamba shell hook --shell=bash)"
echo "IRkernel::installspec()" | micromamba run --prefix ${WORK}/jlab_menv R --no-save
IJulia
module load gcc julia
export JULIA_DEPOT_PATH=${WORK}/jlab_menv/lib/Jlibs
julia -e 'using Pkg; Pkg.add("IJulia")'
MATLAB kernel
${WORK}/jlab_menv/bin/pip install matlab_kernel matlabengine==9.11.19IOctave
${WORK}/jlab_menv/bin/pip install octave_kernel
echo "c.OctaveKernel.plot_settings = dict(backend='gnuplot')" > ~/.jupyter/octave_kernel_config.py
stata_kernel
module load stata-se
${WORK}/jlab_menv/bin/pip install stata_kernel
${WORK}/jlab_menv/bin/python -m stata_kernel.install
sed -i "s/^stata_path = None/stata_path = $(echo ${STATA_SE_ROOT} | sed 's/\//\\\//g')\/stata-se/" ~/.stata_kernel.conf
sed -i 's/stata_path = \(.*\)stata-mp/stata_path = \1stata-se/' ~/.stata_kernel.conf
sas_kernel
module load sas
${WORK}/jlab_menv/bin/pip install sas_kernel
sed -i "s/'\/opt\/sasinside\/SASHome/'$(echo ${SAS_ROOT} | sed 's/\//\\\//g')/g" ${WORK}/jlab_venv/lib64/python3.9/site-packages/saspy/sascfg.py
Running JupyterLab
Before running JupyterLab, you need to start an interactive session!
SinteractiveTake note of the name of the running node, that you will later need. On curnagl, you can type:
hostnameIf you didn't install all of the kernels, the corresponding lines should be ignored in the commands below. The execution order is important, in the sense that loading the gcc module should always be done before activating virtual environments.
# Load python and setup the environment for micromamba to work
module load gcc python
export MAMBA_ROOT=/dcsrsoft/spack/external/micromamba
export MAMBA_ROOT_PREFIX="${WORK}/micromamba"
eval "$(${MAMBA_ROOT}/micromamba shell hook --shell=bash)"

# IOctave (optional)
module load octave gnuplot

# IRKernel (optional)
export R_LIBS_USER=${WORK}/jlab_menv/lib/Rlibs

# IJulia (optional)
export JULIA_DEPOT_PATH=${WORK}/jlab_menv/lib/Jlibs

# Launch JupyterLab (on the shell a link that can be copied on the browser will appear)
cd ${WORK}
micromamba run --prefix ${WORK}/jlab_menv jupyter-lab
Before you can copy and paste the link into your favorite browser, you will need to establish an SSH tunnel to the interactive node. From a UNIX-like workstation, you can establish the SSH tunnel to the curnagl node with the following command (replace <username> with your user name, and <hostname> with the name of the node you obtained above, and the <port> number is obtained from the link, it is typically 8888):
ssh -n -N -J <username>@curnagl.dcsr.unil.ch -L <port>:localhost:<port> <hostname>You will be prompted for your password. When you have finished, you can close the tunnel with Ctrl-C.
Note on Python/R/Julia modules and packages
The modules you install manually from JupyterLab in Python, R or Julia end up inside the JupyterLab virtual environment (${WORK}/jlab_menv). They are hence isolated and independent from your Python/R/Julia instances outside of the virtual environment.
Dask on curnagl
In order to use Dask in Curnagl you have to use the following packages:
- dask
- dask-jobqueue
Note: please make sure to use version 2022.11.0 or later. Previous versions have some bugs on worker-nodes that make them very slow when using several threads.
Dask makes easy to parallelize computations, you can run computational intensive methods on parallel by assigning those computations to different CPU resources.
For example:
def cpu_intensive_method(x, y , z):
    # CPU computations
    return x + 1


futures = []
for x,y,z in zip(list_x, list_y, list_z):
	future = client.submit(cpu_intensive_method, x, y, z)
    futures.append(future)

result = client.gather(futures)
This documentation proposes two types of use:
- LocalCluster: this mode is very simple and can be used to easily parallelize computations by submitting just one job in the cluster. This is a good starting point
- SlurmCluster: this mode handle more parallelisim by distributing work on several machines. It can handle load and submit automatically new jobs for increasing paralellisim
Local cluster
Python script looks like:
import dask
from dask.distributed import Client, LocalCluster

def compute(x):
  ""CPU demanding code"


if __name__ == "__main__":

	cluster = LocalCluster()
	client = Client(address=cluster)
    parameters = [1, 2, 3, 4]
    for x in parameters:
      future = client.submit(inc, x)
      futures.append(future)

    result = client.gather(futures)
Call to LocalCluster and Client should be put inside the block if __name__ == "__main__". For more information, you can check the following link: https://docs.dask.org/en/stable/scheduling.html
The method LocalCluster() will deploy N workers, each worker using T threads such that NxT is equal to the number of cores reserved by SLURM. Dask will balance the number of workers and the number of threads per worker, the goal is to take advantage of GIL free workloads such as Numpy and Pandas.
SLURM script:
#SBATCH --job-name dask_job
#SBATCH --ntasks 16
#SBATCH -N 1
#SBATCH --partition cpu
#SBATCH --cpus-per-task 1
#SBATCH --time 01:00:00
#SBATCH --output=dask_job-%j.out
#SBATCH --error=dask_job%j.error


python script.py
Make sure to include the parameter -N 1 otherwise SLURM will allocate tasks on different nodes and it will make Dask local cluster fail. You should adapt the parameter --ntasks, as we are using just one machine we can choose between 1 and 48. Just have in mind that the smallest the number the faster your job will start. You can choose to run with less processes but for a longer time.
Slurm cluster
The python script can be launched directly from the frontend but you need to keep you session open with tools such as tmux or screen otherwise your jobs will be cancelled.
In your Python script you should put something like:
import dask
from dask.distributed import Client
from dask_jobqueue import SLURMCluster

def compute(x):
  ""CPU demanding code"


if __name__ == "__main__":

	cluster = SLURMCluster(cores=8, memory="40GB")
    client = Client(cluster)

    cluster.adapt(maximum_jobs=5, interval="10000 ms")
    for x in parameters:
      future = client.submit(inc, x)
      futures.append(future)

    result = client.gather(futures)
In this case DASK will launch jobs with 8 cores and 40GB of memory. The parameters memory and cores are mandatory. There are two methods to launch jobs: adapt and scale. adapt will launch/kill jobs by taking into account the load of your computation and how many computations in parallel you can run. You can put a limit on the number of jobs that will be launched. The parameter interval is necessary and needs to be set to 10000 ms to avoid killing jobs too early.
scale will create a static infrastructure composed of a fix number of jobs, specified with the parameters jobs. Example
scale(jobs=10)
This will launch 10 jobs independent from the load and the amount of computation you generate.
Some facts about Slurm jobs and DASK
You need to have in mind that the computation will depend on the availability of resources, if jobs are not running your computation will not start. So if you think that your computation is stuck, please verify first that jobs have been submitted and that they are running using the command: squeue -u $USER.
By default the walltime is set to 30 min, you can use the parameter: walltime if you think that each individual computation will last more than the default time.
Slurm files will be generated under the same directory where you launch your python command.
Jobs will killed by Dask when there is no more computation to be done. If you see the message:
slurmstepd: error: *** JOB 25260254 ON dna051 CANCELLED AT 2023-03-01T11:00:19 ***
It is completely normal and it does not mean that there was an error in your computation.
Optimal number of workers
Both LocalCluster or SLURMCluster, will automatically balance the number of workers and the number of threads per worker. You can choose the number of workers using the parameter n_workers. If most of the computation relies on Numpy or Pandas, it is preferable to have only one worker n_workers=1. If most of the computation is pure Python code you should use as much workers as possible. Example:
Local cluster:
LocalCluster(n_workers=int(os.environ['SLURM_NTASKS']))
Slurm cluster:
SLURMCluster(cores=8, memory="40GB", n_workers=8)
Example
Here, it is an example code which illustrates the use of Dask. The code runs 40 multiplications of random matrices of size NXN, each computation returns the sum of all the elements of the result matrix:
import os
import time
import numpy as np
from dask.distributed import Client, LocalCluster
from dask_jobqueue import SLURMCluster

SIZE = 9192

def compute(tag):
    np.random.seed(tag)
    A = np.random.random((SIZE,SIZE))
    B = np.random.random((SIZE,SIZE))
    start = time.time()
    C = np.dot(A,B)
    end = time.time()
    elapsed = end-start
    return elapsed, np.sum(C)

if __name__ == "__main__":

#    cluster = LocalCluster(n_workers=int(os.environ['SLURM_NTASKS']))
    cluster = SLURMCluster(memory="40GB", n_workers=8)
    client = Client(cluster)

    cluster.adapt(maximum_jobs=5, interval="10000 ms")
    N_ITER = 40

    futures = []
    for i in range(N_ITER):
        future = client.submit(compute, i)
        futures.append(future)

    results = client.gather(futures)
    print(results)
Running the Isca framework on the cluster
Isca is a framework for the idealized modelling of the global circulation of planetary atmospheres at varying levels of complexity and realism. The framework is an outgrowth of models from GFDL designed for Earth's atmosphere, but it may readily be extended into other planetary regimes.
Installation
First of all define a folder ${WORK} on the /work or the /scratch filesystem (somewhere where you have write permissions):
export WORK=/work/FAC/...
mkdir -p ${WORK}
Load the following relevant modules and create a python virtual environment:
dcsrsoft use arolle

module load gcc/10.4.0
module load mvapich2/2.3.7
module load netcdf-c/4.8.1-mpi
module load netcdf-fortran/4.5.4
module load python/3.9.13

python -m venv ${WORK}/isca_venv
Install the required python modules:
${WORK}/isca_venv/bin/pip install dask f90nml ipykernel Jinja2 numpy pandas pytest sh==1.14.3 tqdm xarrayDownload and install the Isca framework:
cd ${WORK}
git clone https://github.com/ExeClim/Isca
cd Isca/src/extra/python
${WORK}/isca_venv/bin/pip install -e .
Patch the Isca makefile:
sed -i 's/-fdefault-double-8$/-fdefault-double-8 \\\n -fallow-invalid-boz -fallow-argument-mismatch/' ${WORK}/Isca/src/extra/python/isca/templates/mkmf.template.gfortCreate the environment file for curnagl:
cat << EOF > ${WORK}/Isca/src/extra/env/curnagl-gfortran
echo Loading basic gfortran environment

# this defaults to ia64, but we will use gfortran, not ifort
export GFDL_MKMF_TEMPLATE=gfort

export F90=mpifort
export CC=mpicc
EOF
Compiling and running the Held-Suarez dynamical core test case
Compilation takes place automatically at runtime. After logging in to the cluster, create a SLURM script file start.sbatch with the following contents:
#!/bin/bash -l

#SBATCH --account ACCOUNT_NAME
#SBATCH --mail-type ALL
#SBATCH --mail-user <first.lastname>@unil.ch

#SBATCH --chdir ${WORK}
#SBATCH --job-name isca_held-suarez
#SBATCH --output=isca_held-suarez.job.%j

#SBATCH --partition cpu

#SBATCH --nodes 1
#SBATCH --ntasks 1
#SBATCH --cpus-per-task 16
#SBATCH --mem 8G
#SBATCH --time 00:29:59
#SBATCH --export ALL

dcsrsoft use arolle

module load gcc/10.4.0
module load mvapich2/2.3.7
module load netcdf-c/4.8.1-mpi
module load netcdf-fortran/4.5.4

WORK=$(pwd)

export GFDL_BASE=${WORK}/Isca
export GFDL_ENV=curnagl-gfortran
export GFDL_WORK=${WORK}/isca_work
export GFDL_DATA=${WORK}/isca_gfdl_data

export C_INCLUDE_PATH=${NETCDF_C_ROOT}/include
export LIBRARY_PATH=${NETCDF_C_ROOT}/lib

sed -i "s/^NCORES =.*$/NCORES = $(echo ${SLURM_CPUS_PER_TASK:-1})/" ${GFDL_BASE}/exp/test_cases/held_suarez/held_suarez_test_case.py

${WORK}/isca_venv/bin/python $GFDL_BASE/exp/test_cases/held_suarez/held_suarez_test_case.py
You need to carefully replace, at the beginning of the file, the following elements:
- On line 3: ACCOUNT_NAME with the project id that was attributed to your PI for the given project
- On line 5: <first.lastname>@unil.ch with your e-mail address (or double-comment that line with an additional '#' if you don't wish to receive e-mail notifications about the status of the job)
- On line 7: ${WORK} must be replaced with the absolute path (ex. /work/FAC/.../isca) to the chosen folder you created on the installation steps
- On line 15-17: you can adjust the number of CPUs, the memory and the time for the job (the present values are appropriate for the default Held-Suarez example)
Then you can simply start the job:
sbatch start.sbatchRunning the MPAS framework on the cluster
The Model for Prediction Across Scales (MPAS) is a collaborative project for developing atmosphere, ocean and other earth-system simulation components for use in climate, regional climate and weather studies.
Compilation
First of all define a folder ${WORK} on the /work or the /scratch filesystem (somewhere where you have write permissions):
export WORK=/work/FAC/...
mkdir -p ${WORK}
Load the following relevant modules:
module load gcc/11.4.0
module load mvapich2/2.3.7-1
module load parallel-netcdf/1.12.3
module load parallelio/2.6.2

export PIO=$PARALLELIO_ROOT
export PNETCDF=$PARALLEL_NETCDF_ROOT
Download the MPAS framework:
cd ${WORK}
git clone https://github.com/MPAS-Dev/MPAS-Model --depth 1 --branch $(curl -sL https://api.github.com/repos/MPAS-Dev/MPAS-Model/releases/latest | grep -i "tag_name" | awk -F '"' '{print $4}')
This is going to download the source code of the latest release of MPAS. The last version that was successfully tested on the curnagl cluster with the present instructions is v8.1.0 and future versions might need some adjustments to compile and run.
Patch the MPAS Makefile:
sed -i 's/-ffree-form/-ffree-form -fallow-argument-mismatch/' ${WORK}/MPAS-Model/Makefile
sed -i 's/ mpi_f08_test//' ${WORK}/MPAS-Model/Makefile
This is going to force MPAS to use the old MPI wrapper for Fortran 90. When compiling with GCC older than version 12.0, a bug in the C binding interoperability feature (https://gcc.gnu.org/bugzilla/show_bug.cgi?id=104100) used by the MPI wrapper for Fortran 2008 breaks the code. If you are compiling with GCC 12.0 or newer, you do not need to patch and the new wrapper will be successfully used.
Compile:
cd ${WORK}/MPAS-Model

make gfortran CORE=init_atmosphere AUTOCLEAN=true PRECISION=single OPENMP=true USE_PIO2=true
make gfortran CORE=atmosphere AUTOCLEAN=true PRECISION=single OPENMP=true USE_PIO2=true
Running a basic global simulation
Here we aim at running a basic global simulation, just to test that the framework runs. we need to proceed in three steps:
- Process time-invariant fields, which will be interpolated into a given mesh, this step produces a "static" file
- Interpolating time-varying meteorological and land-surface fields from intermediate files (produced by the
ungrib component of the WRF Pre-processing System), this step produces an "init" file - Run the basic simulation
Create the run folder and link to the binary files
cd ${WORK}
mkdir -p run
cd run
ln -s ${WORK}/MPAS-Model/init_atmosphere_model
ln -s ${WORK}/MPAS-Model/atmosphere_model
Get the mesh files
cd ${WORK}
wget https://www2.mmm.ucar.edu/projects/mpas/atmosphere_meshes/x1.40962.tar.gz
wget https://www2.mmm.ucar.edu/projects/mpas/atmosphere_meshes/x1.40962_static.tar.gz
cd run
tar xvzf ../x1.40962.tar.gz
tar xvzf ../x1.40962_static.tar.gz
Create the configuration files for the "static" run
The namelist.init_atmosphere file:
cat << EOF > ${WORK}/run/namelist.init_atmosphere
&nhyd_model
config_init_case = 7
/
&data_sources
config_geog_data_path = '${WORK}/WPS_GEOG/'
config_landuse_data = 'MODIFIED_IGBP_MODIS_NOAH'
config_topo_data = 'GMTED2010'
config_vegfrac_data = 'MODIS'
config_albedo_data = 'MODIS'
config_maxsnowalbedo_data = 'MODIS'
/
&preproc_stages
config_static_interp = true
config_native_gwd_static = true
config_vertical_grid = false
config_met_interp = false
config_input_sst = false
config_frac_seaice = false
/
EOF
The streams.init_atmosphere file:
cat << EOF > ${WORK}/run/streams.init_atmosphere
<streams>
<immutable_stream name="input"
                  type="input"
                  precision="single"
                  filename_template="x1.40962.grid.nc"
                  input_interval="initial_only" />

<immutable_stream name="output"
                  type="output"
                  filename_template="x1.40962.static.nc"
                  packages="initial_conds"
                  output_interval="initial_only" />
</streams>
EOF
Proceed to the "static" run
You will need to make sure that the folder ${WORK}/WPS_GEOG exists and contains all the appropriate data.
First create a start_mpas_init.sbatch file (carefully replace on line #4 ACCOUNT_NAME by your actual project name and on line #6 appropriately type your e-mail address, or double-comment with an additional # if you don't wish to receive job notifications):
cat << EOF > ${WORK}/run/start_mpas_init.sbatch
#!/bin/bash -l

#SBATCH --account ACCOUNT_NAME
#SBATCH --mail-type ALL
#SBATCH --mail-user <first.lastname>@unil.ch

#SBATCH --chdir ${WORK}/run
#SBATCH --job-name mpas_init
#SBATCH --output=mpas_init.job.%j

#SBATCH --partition cpu

#SBATCH --nodes 1
#SBATCH --ntasks 1
#SBATCH --cpus-per-task 1
#SBATCH --mem 8G
#SBATCH --time 00:59:59
#SBATCH --export ALL

module load gcc/11.4.0
module load mvapich2/2.3.7-1
module load parallel-netcdf/1.12.3
module load parallelio/2.6.2

export PIO=\$PARALLELIO_ROOT
export PNETCDF=\$PARALLEL_NETCDF_ROOT
export LD_LIBRARY_PATH=\$PARALLELIO_ROOT/lib:\$PARALLEL_NETCDF_ROOT/lib:\$LD_LIBRARY_PATH

srun ./init_atmosphere_model
EOF
Now start the job with sbatch start_mpas_init.sbatch and at the end of the run, make sure that the log file ${WORK}/run/log.init_atmosphere.0000.out displays no error.
Create the configuration files for the "init" run
The namelist.init_atmosphere file:
cat << EOF > ${WORK}/run/namelist.init_atmosphere
&nhyd_model
config_init_case = 7
config_start_time = '2014-09-10_00:00:00'
/
&dimensions
config_nvertlevels = 55
config_nsoillevels = 4
config_nfglevels = 38
config_nfgsoillevels = 4
/
&data_sources
config_met_prefix = 'GFS'
config_use_spechumd = false
/
&vertical_grid
config_ztop = 30000.0
config_nsmterrain = 1
config_smooth_surfaces = true
config_dzmin = 0.3
config_nsm = 30
config_tc_vertical_grid = true
config_blend_bdy_terrain = false
/
&preproc_stages
config_static_interp = false
config_native_gwd_static = false
config_vertical_grid = true
config_met_interp = true
config_input_sst = false
config_frac_seaice = true
/
EOF
The streams.init_atmosphere file:
cat << EOF > ${WORK}/run/streams.init_atmosphere
<streams>
<immutable_stream name="input"
                  type="input"
                  filename_template="x1.40962.static.nc"
                  input_interval="initial_only" />

<immutable_stream name="output"
                  type="output"
                  filename_template="x1.40962.init.nc"
                  packages="initial_conds"
                  output_interval="initial_only" />
</streams>
EOF
Proceed to the "init" run
Just start again the job with sbatch start_mpas_init.sbatch and at the end of the run, make sure that the log file ${WORK}/run/log.init_atmosphere.0000.out displays no error.
Create the configuration file for the global simulation
The namelist.atmosphere file:
cat << EOF > ${WORK}/run/namelist.atmosphere
&nhyd_model
    config_time_integration_order = 2
    config_dt = 720.0
    config_start_time = '2014-09-10_00:00:00'
    config_run_duration = '0_03:00:00'
    config_split_dynamics_transport = true
    config_number_of_sub_steps = 2
    config_dynamics_split_steps = 3
    config_h_mom_eddy_visc2 = 0.0
    config_h_mom_eddy_visc4 = 0.0
    config_v_mom_eddy_visc2 = 0.0
    config_h_theta_eddy_visc2 = 0.0
    config_h_theta_eddy_visc4 = 0.0
    config_v_theta_eddy_visc2 = 0.0
    config_horiz_mixing = '2d_smagorinsky'
    config_len_disp = 120000.0
    config_visc4_2dsmag = 0.05
    config_w_adv_order = 3
    config_theta_adv_order = 3
    config_scalar_adv_order = 3
    config_u_vadv_order = 3
    config_w_vadv_order = 3
    config_theta_vadv_order = 3
    config_scalar_vadv_order = 3
    config_scalar_advection = true
    config_positive_definite = false
    config_monotonic = true
    config_coef_3rd_order = 0.25
    config_epssm = 0.1
    config_smdiv = 0.1
/
&damping
    config_zd = 22000.0
    config_xnutr = 0.2
/
&limited_area
    config_apply_lbcs = false
/
&io
    config_pio_num_iotasks = 0
    config_pio_stride = 1
/
&decomposition
    config_block_decomp_file_prefix = 'x1.40962.graph.info.part.'
/
&restart
    config_do_restart = false
/
&printout
    config_print_global_minmax_vel = true
    config_print_detailed_minmax_vel = false
/
&IAU
    config_IAU_option = 'off'
    config_IAU_window_length_s = 21600.
/
&physics
    config_sst_update = false
    config_sstdiurn_update = false
    config_deepsoiltemp_update = false
    config_radtlw_interval = '00:30:00'
    config_radtsw_interval = '00:30:00'
    config_bucket_update = 'none'
    config_physics_suite = 'mesoscale_reference'
/
&soundings
    config_sounding_interval = 'none'
/
EOF
The streams.atmosphere file:
cat << 'EOF' > ${WORK}/run/streams.atmosphere
<streams>
<immutable_stream name="input"
                  type="input"
                  filename_template="x1.40962.init.nc"
                  input_interval="initial_only" />

<immutable_stream name="restart"
                  type="input;output"
                  filename_template="restart.$Y-$M-$D_$h.$m.$s.nc"
                  input_interval="initial_only"
                  output_interval="1_00:00:00" />

<stream name="output"
        type="output"
        filename_template="history.$Y-$M-$D_$h.$m.$s.nc"
        output_interval="6:00:00" >
</stream>

<stream name="diagnostics"
        type="output"
        filename_template="diag.$Y-$M-$D_$h.$m.$s.nc"
        output_interval="3:00:00" >
</stream>

<immutable_stream name="iau"
                  type="input"
                  filename_template="x1.40962.AmB.$Y-$M-$D_$h.$m.$s.nc"
                  filename_interval="none"
                  packages="iau"
                  input_interval="initial_only" />

<immutable_stream name="lbc_in"
                  type="input"
                  filename_template="lbc.$Y-$M-$D_$h.$m.$s.nc"
                  filename_interval="input_interval"
                  packages="limited_area"
                  input_interval="none" />

</streams>
EOF
Run the whole simulation
You will need to copy relevant data to the run folder:
cp ${WORK}/MPAS-Model/{GENPARM.TBL,LANDUSE.TBL,OZONE_DAT.TBL,OZONE_LAT.TBL,OZONE_PLEV.TBL,RRTMG_LW_DATA,RRTMG_SW_DATA,SOILPARM.TBL,VEGPARM.TBL} ${WORK}/run/.Then create a start_mpas.sbatch file (carefully replace on line #4 ACCOUNT_NAME by your actual project name and on line #6 appropriately type your e-mail address, or double-comment with an additional # if you don't wish to receive job notifications):
cat << EOF > ${WORK}/run/start_mpas.sbatch
#!/bin/bash -l

#SBATCH --account ACCOUNT_NAME
#SBATCH --mail-type ALL
#SBATCH --mail-user <first.lastname>@unil.ch

#SBATCH --chdir ${WORK}/run
#SBATCH --job-name mpas_init
#SBATCH --output=mpas_init.job.%j

#SBATCH --partition cpu

#SBATCH --nodes 1
#SBATCH --ntasks 1
#SBATCH --cpus-per-task 16
#SBATCH --mem 8G
#SBATCH --time 00:59:59
#SBATCH --export ALL

module load mvapich2/2.3.7-1
module load parallel-netcdf/1.12.3
module load parallelio/2.6.2

export PIO=\$PARALLELIO_ROOT
export PNETCDF=\$PARALLEL_NETCDF_ROOT
export LD_LIBRARY_PATH=\$PARALLELIO_ROOT/lib:\$PARALLEL_NETCDF_ROOT/lib:\$LD_LIBRARY_PATH

srun ./atmosphere_model
EOF
Now start the job with sbatch start_mpas.sbatch and at the end of the run, make sure that the log file ${WORK}/run/log.atmosphere.0000.out displays no error.
Run OpenFOAM codes on Curnagl
Script to run OpenFOAM code
You are using OpenFOAM on your computer and you need more ressources. Let’s go on Curnagl!
OpenFOAM is usually using MPI. Here is a bash script to run your parallelized OpenFOAM code. NTASKS should be replaced by the number of processors you want to use in your OpenFOAM code. It is good practice to put your OpenFOAM code in a bash file instead of calling OpenFOAM commands right into the sbatch file.
For instance, create openfoam.sh in which you call your OpenFOAM code (replace commands with yours):
!/bin/bash
# First command
decomposepar ...
# Second command, if you are using a parallel command, CALL IT WITH SRUN COMMAND
srun snappyHexMesh -parallel ...
Then, create a sbatch file to run your OpenFOAM bash file on Curnagl:
#!/bin/bash -l

#SBATCH --job-name openfoam
#SBATCH --output openfoam.out

#SBATCH --partition cpu
#SBATCH --nodes 1
#SBATCH --ntasks NTASKS
#SBATCH --cpus-per-task 1
#SBATCH --mem 8G
#SBATCH --time 00:30:00
#SBATCH --export NONE

module purge
module load gcc/10.4.0 mvapich2/2.3.7 openfoam/2206

export SLURM_EXPORT_ENV=ALL

# RUN YOUR BASH OPENFOAM CODE HERE
bash ./openfoam.sh
Please note that running your parallelized OpenFOAM code should not be performed via mpirun but srun. For a complete MPI overview on Curnagl, please refer to compiling and running MPI codes wiki.
How do I transfer my OpenFOAM code to Curnagl ?
You can upload your OpenFOAM code thanks to FileZilla or copy and paste data to the cluster thanks to the scp command.
Example: I want to copy test.py to Curnagl. I run the following command:
scp test.py <username>@curnagl.dcsr.unil.ch:/YOUR_PATH_ON_CURNAGL
Where YOUR_PATH_ON_CURNAGL is something like /users/username/work/my_folder.
In these commands, do not forget to change <username> with yours.
This transfer can be done for any file type: .py, .csv, .h, images...
To copy a folder, use the command scp -r.
For more details, refer to transfer files to/from Curnagl wiki.
Compiling software using cluster libraries
If you see the following error when compiling a code on the cluster:
fatal error: XXXX.h: No such file or directory That means that the software you are trying to compile needs a specific header file provided by a third party library. In order to use a third party library, the compiler mainly needs two things:
- a header file XXXX.h
- the binary of the library: XXXXX.so
By default in Linux systems, those files are located in default paths as: /usr, /lib, etc.. There are two ways to tell the compiler where to look for those files: Makefile or using compiler variables.
Makefile
Makefiles provide the following Variables :
- CFLAGS
- CXXFLAGS
- FFLAGS
- LDFLAGS
The three first variables are used to pass extra options to a specific compiler and language, c, c++ and fortran respectively. The last variable is meant to be used to pass the option -L -l which are used by the linker.
Example
CFLAGS+= -I/usr/local/cuda/include
LDFLAGS+= -L/usr/local/cuda/lib -lcudnn
Here we will tell the compiler where to find the include files and the location of libraries. Those variables should already be present on the makefile and used on the compilation process.
GCC Variables
if you are using GCC, you can use the following Variables :
- CPATH
- LIBRARY_PATH
CPATH=/usr/local/cuda/include
LIBRARY_PATH=/usr/local/cuda/lib
This would have the same result as modifying the variable on the Makefile. This procedure is very useful in case you do not have access to the Makefile or Makefile variables are not used during compilation.
Using cluster libraries
On the cluster, libraries are provided by modules which means that you need to tell the compiler to look for headers files and binary files in special locations. The procedure is the following:
- load the library: module load XXX
- find the name of the ROOT variable by executing: module show XXX
- Use that variable on the CFLAFGS and LDFLAGS definition
Example
$ module load cuda
$ module show cuda
----------------------------------------------------------------------------------------------------------------------------------------------------------------------------------------------------------------------------------
   /dcsrsoft/spack/arolle/v1.0/spack/share/spack/lmod/Zen2-IB/Core/cuda/11.6.2.lua:
----------------------------------------------------------------------------------------------------------------------------------------------------------------------------------------------------------------------------------
whatis("Name : cuda")
whatis("Version : 11.6.2")
whatis("Target : zen")
whatis("Short description : CUDA is a parallel computing platform and programming model invented by NVIDIA. It enables dramatic increases in computing performance by harnessing the power of the graphics processing unit (GPU).")
help([[CUDA is a parallel computing platform and programming model invented by
NVIDIA. It enables dramatic increases in computing performance by
harnessing the power of the graphics processing unit (GPU). Note: This
package does not currently install the drivers necessary to run CUDA.
These will need to be installed manually. See:
https://docs.nvidia.com/cuda/ for details.]])
depends_on("libxml2/2.9.13")
prepend_path("LD_LIBRARY_PATH","/dcsrsoft/spack/arolle/v1.0/spack/opt/spack/linux-rhel8-zen/gcc-8.4.1/cuda-11.6.2-rswplbcorqlt6ywhcnbdisk6puje4ejf/lib64")
prepend_path("PATH","/dcsrsoft/spack/arolle/v1.0/spack/opt/spack/linux-rhel8-zen/gcc-8.4.1/cuda-11.6.2-rswplbcorqlt6ywhcnbdisk6puje4ejf/bin")
prepend_path("CMAKE_PREFIX_PATH","/dcsrsoft/spack/arolle/v1.0/spack/opt/spack/linux-rhel8-zen/gcc-8.4.1/cuda-11.6.2-rswplbcorqlt6ywhcnbdisk6puje4ejf/")
setenv("CUDA_HOME","/dcsrsoft/spack/arolle/v1.0/spack/opt/spack/linux-rhel8-zen/gcc-8.4.1/cuda-11.6.2-rswplbcorqlt6ywhcnbdisk6puje4ejf")
setenv("CUDA_ROOT","/dcsrsoft/spack/arolle/v1.0/spack/opt/spack/linux-rhel8-zen/gcc-8.4.1/cuda-11.6.2-rswplbcorqlt6ywhcnbdisk6puje4ejf")
You can observe that there is the variable CUDA_ROOT which is the one that should be used.
export CFLAGS="-I$CUDA_ROOT/include"
LDFLAGS+= -L$(CUDA_ROOT)/lib64/stubs -L$(CUDA_ROOT)/lib64/ -lcuda -lcudart -lcublas -lcurand
This is quite a complex example, sometimes you only need -L$(XXX_ROOT)/lib.
Course software for Image Analysis with CNNs
You can do the practicals on various computing platforms. However, since the participants may use various types of computers and softwares, we recommend to use the UNIL JupyterLab to do the practicals.
- JupyterLab: Working on the cloud is convenient because the installation of the Python packages is already done and you will be working with a Jupyter Notebook style. Note, however, that the UNIL JupyterLab will only be active during the course and for one week following its completion, so in the long term you should use either your laptop or Curnagl. Access requires that you connect either via the eduroam Wi-Fi with your UNIL account or through the UNIL VPN. This point is especially crucial for researchers from the CHUV.
- Laptop: This is good if you want to work directly on your laptop, but you will need to install the required libraries on your laptop. Warning: We will give general instructions on how to install the libraries on your laptop but it is sometimes tricky to find the right library versions and we will not be able to help you with the installation. The installation should take about 15 minutes.
- Curnagl: This is efficient if you are used to work on a cluster or if you intend to use one in the future to work on large projects. If you have an account you can work on your /scratch folder or ask us to be part of the course project but please contact us at least a week before the course. If you do not have an account to access the UNIL cluster Curnagl, please contact us at least a week before the course so that we can give you a temporary account. The installation should take about 15 minutes. Note that it is also possible to use JupyterLab on Curnagl: see https://wiki.unil.ch/ci/books/high-performance-computing-hpc/page/jupyterlab-on-the-curnagl-cluster
If you choose to work on the UNIL JupyterLab, then you do not need to prepare anything since all the necessary libraries will already be installed on the UNIL JupyterLab. In all cases, you will receive a guest username during the course, so you will be able to work on the UNIL JupyterLab.
Otherwise, if you prefer to work on your laptop or on Curnagl, please make sure you have a working installation before the day of the course as on the day we will be unable to provide any assistance with this.
If you have difficulties with the installation on Curnagl we can help you, so please contact us before the course at helpdesk@unil.ch with subject: DCSR ML course.
On the other hand, if you are unable to install the libraries on your laptop, we will unfortunately not be able to help you (there are too many particular cases), so you will need to use the UNIL Jupyter Lab during the course.
Before the course, we will send you all the files that are needed to do the practicals.
JupyterLab
Here are some instructions for using the UNIL JupyterLab to do the practicals.
Access requires that you connect either via the eduroam Wi-Fi with your UNIL account or through the UNIL VPN.
This point is especially crucial for researchers from the CHUV.
The webpage's link will be given during the course.
Enter the login and password that you have received during the course.
Image Classification
We have already prepared your workspace, including the data and notebook. However, in case there is a problem, you can follow the following instructions.
Click again on the same button "New Folder" and name it "images".
Double click on the "images" folder that you have just created.
Click on the folder logo (just on top of "Name") to come out of the "images" folder.
Double click on the "models" folder and then click on the button "Upload Files" to upload all the "models.keras" and "models.npy" files that are included in the "models" directory you have received for this course.
Click on the folder logo (just on top of "Name") to come out of the "models" folder.
To work with the html file "Convolutional_Neural_Networks.html":
- Click on the "CNN" square button in the Notebook panel
- Copy / paste the commands from the html practical file to the Jupyter Notebook
To work with the notebook "Convolutional_Neural_Networks.ipynb":
- Upload the notebook "Convolutional_Neural_Networks.ipynb"
- Double click on "Convolutional_Neural_Networks.ipynb"
- Change the "ipykernel" (top right button "Python 3 ipykernel") to CNN
In the practical code (i.e. the Python code in the html or ipynb file), the following paths were set:
platform = "jupyter"
PATH_IMAGES = "./images"
PATH_MODELS = "./models"
To execute a command, click on "Run the selected cells and advance" (the right arrow), or SHIFT + RETURN.
When using TensorFlow, you may receive a warning
2022-09-22 11:01:12.232756: W tensorflow/stream_executor/platform/default/dso_loader.cc:64] Could not load dynamic library 'libcudart.so.11.0'; dlerror: libcudart.so.11.0: cannot open shared object file: No such file or directory
2022-09-22 11:01:12.232856: I tensorflow/stream_executor/cuda/cudart_stub.cc:29] Ignore above cudart dlerror if you do not have a GPU set up on your machine.
You should not worry. By default, TensorFlow is trying to use GPUs and since there are no GPUs, it writes a warning and decides to use CPUs (which is enough for our course).
When you have finished the practicals, select File / Log out.
Image Segmentation
Now click on the "ImageProcessing" square button in the Notebook panel.
Copy / paste the commands from the html practical file to the Jupyter Notebook.
To execute a command, click on "Run the selected cells and advance" (the right arrow), or SHIFT + RETURN.
Laptop
You may need to install development tools including a C and Fortran compiler (e.g. Xcode on Mac, gcc and gfortran on Linux, Visual Studio on Windows).
Image Classification
Please decide in which folder (or path) you want to do the practicals and go there:
cd THE_PATH_WHERE_I_DO_THE_PRACTICALSThen you need to create two folders:
mkdir images
mkdir models
Please copy/paste the three images (car.jpeg, frog.jpeg and ship.jpeg) that are included in the folder "images" you have received for this course in the "images" folder. And also copy/paste all the "models.keras" and "models.npy" files that are included in "models" directory you have received for this course.
In the practical code (i.e. the Python code in the html file), you will need to set the paths as follows:
platform = "laptop"
PATH_IMAGES = "./images"
PATH_MODELS = "./models"
Here are some instructions for installing Keras with TensorFlow at the backend (for Python3), and other libraries, on your laptop. You need Python >= 3.8.
For Linux
We will use a terminal to install the libraries.
Let us create a virtual environment. Open your terminal and type:
python3 -m venv mlcourse

source mlcourse/bin/activate

pip3 install tensorflow tf-keras-vis scikit-learn matplotlib numpy h5py notebook
You may need to choose the right library versions, for example tensorflow==2.12.0
To check that Tensorflow was installed:
python3 -c "import tensorflow; print(tensorflow.version.VERSION)"There might be a warning message (see above) and the output should be something like "2.12.0".
You can terminate the current session:
deactivate

exit
TO DO THE PRACTICALS (today or another day):
You can use any Python IDE (e.g. Jupyter Notebook or PyCharm), but you need to launch it after activating the virtual environment. For example, for Jupyter Notebook:
source mlcourse/bin/activate

jupyter notebook
For Mac
We will use a terminal to install the libraries.
Let us create a virtual environment. Open your terminal and type:
python3 -m venv mlcourse

source mlcourse/bin/activate

pip3 install tensorflow-macos==2.12.0 tf-keras-vis scikit-learn matplotlib numpy h5py notebook
If you receive an error message such as:
ERROR: Could not find a version that satisfies the requirement tensorflow-macos (from versions: none)
ERROR: No matching distribution found for tensorflow-macos
Then, try the following command:
SYSTEM_VERSION_COMPAT=0 pip3 install tensorflow-macos==2.12.0 scikit-learn==1.2.2 scikeras eli5 pandas matplotlib notebook keras-tunerIf you have a Mac with M1 or more recent chip (if you are not sure have a look at "About this Mac"), you can also install the tensorflow-metal library to accelerate training on Mac GPUs (but this is not necessary for the course):
pip3 install tensorflow-metalTo check that Tensorflow was installed:
python3 -c "import tensorflow; print(tensorflow.version.VERSION)"There might be a warning message (see above) and the output should be something like "2.12.0".
You can terminate the current session:
deactivate

exit
TO DO THE PRACTICALS (today or another day):
You can use any Python IDE (e.g. Jupyter Notebook or PyCharm), but you need to launch it after activating the virtual environment. For example, for Jupyter Notebook:
source mlcourse/bin/activate

jupyter notebook
For Windows
If you do not have Python installed, you can use either Conda: https://docs.conda.io/en/latest/miniconda.html (see the instructions here: https://conda.io/projects/conda/en/latest/user-guide/install/windows.html) or Python official installer: https://www.python.org/downloads/windows/
We will use a terminal to install the libraries.
Let us create a virtual environment. Open your terminal and type:
python3 -m venv mlcourse

source mlcourse/bin/activate

pip3 install tensorflow tf-keras-vis scikit-learn matplotlib numpy h5py notebook
You may need to choose the right library versions, for example tensorflow==2.12.0
To check that Tensorflow was installed:
python -c "import tensorflow; print(tensorflow.version.VERSION)"There might be a warning message (see above) and the output should be something like "2.12.0".
You can terminate the current session:
deactivateTO DO THE PRACTICALS (today or another day):
You can use any Python IDE (e.g. Jupyter Notebook or PyCharm), but you need to launch it after activating the virtual environment. For example, for Jupyter Notebook:
mlcourse\Scripts\activate.bat

jupyter notebook
Image Segmentation
This part of the course must be done on the UNIL Jupyter Lab but some instructions on how to install the libraries on your laptop will be given at the end of the course.
Curnagl
For the practicals, it will be convenient to be able to copy/paste text from a web page to the terminal on Curnagl. So please make sure you can do it before the course. You also need to make sure that your terminal has a X server.
For Mac users, download and install XQuartz (X server): https://www.xquartz.org/
For Windows users, download and install MobaXterm terminal (which includes a X server). Click on the "Installer edition" button on the following webpage: https://mobaxterm.mobatek.net/download-home-edition.html
For Linux users, you do not need to install anything.
When testing if TensorFlow was properly installed (see below) you may receive a warning
2022-03-16 12:15:00.564218: W tensorflow/stream_executor/platform/default/dso_loader.cc:64] Could not load dynamic library 'libcudart.so.11.0'; dlerror: libcudart.so.11.0: cannot open shared object file: No such file or directory; LD_LIBRARY_PATH: /dcsrsoft/spack/hetre/v1.2/spack/opt/spack/linux-rhel8-zen2/gcc-9.3.0/python-3.8.8-tb3aceqq5wzx4kr5m7s5m4kzh4kxi3ex/lib:/dcsrsoft/spack/hetre/v1.2/spack/opt/spack/linux-rhel8-zen2/gcc-9.3.0/tcl-8.6.11-aonlmtcje4sgqf6gc4d56cnp3mbbhvnj/lib:/dcsrsoft/spack/hetre/v1.2/spack/opt/spack/linux-rhel8-zen2/gcc-9.3.0/tk-8.6.11-2gb36lqwohtzopr52c62hajn4tq7sf6m/lib:/dcsrsoft/spack/hetre/v1.2/spack/opt/spack/linux-rhel8-zen/gcc-8.3.1/gcc-9.3.0-nwqdwvso3jf3fgygezygmtty6hvydale/lib64:/dcsrsoft/spack/hetre/v1.2/spack/opt/spack/linux-rhel8-zen/gcc-8.3.1/gcc-9.3.0-nwqdwvso3jf3fgygezygmtty6hvydale/lib
2022-03-16 12:15:00.564262: I tensorflow/stream_executor/cuda/cudart_stub.cc:29] Ignore above cudart dlerror if you do not have a GPU set up on your machine.
You should not worry. By default, TensorFlow is trying to use GPUs and since there are no GPUs, it writes a warning and decides to use CPUs (which is enough for our course).
Image Classification
Here are some instructions for installing Keras with TensorFlow at the backend (for Python3), and other libraries, on the UNIL cluster called Curnagl. Open a terminal on your laptop and type (if you are located outside the UNIL you will need to activate the UNIL VPN):
ssh -Y < my unil username >@curnagl.dcsr.unil.chHere and in what follows we added the brackets < > to emphasize the username, but you should not write them in the command. Enter your UNIL password.
For Windows users with the MobaXterm terminal: Launch MobaXterm, click on Start local terminal and type the command ssh -Y < my unil username >@curnagl.dcsr.unil.ch. Enter your UNIL password. Then you should be on Curnagl. Alternatively, launch MobaXterm, click on the session icon and then click on the SSH icon. Fill in: remote host = curnagl.dcsr.unil.ch, specify username = < my unil username >. Finally, click ok, enter your password. If you have the question "do you want to save password ?" Say No if your are not sure. Then you should be on Curnagl.
See also the documentation: https://wiki.unil.ch/ci/books/high-performance-computing-hpc/page/ssh-connection-to-dcsr-cluster
You can do the practicals in your /scratch directory or on the course group "cours_hpc" if you have asked us in advanced:
cd /scratch/< my unil username >

or

cd /work/TRAINING/UNIL/CTR/rfabbret/cours_hpc
mkdir < my unil username >
cd < my unil username >
You need to make two directories:
mkdir images

mkdir models
Clone the following git repos:
git clone https://c4science.ch/source/CNN_Classification.gitCopy the images from CNN_Classification to images:
cp CNN_Classification/*jpeg imagesYou also need to upload all the "models.keras" and "models.npy" files that are included in the "models" directory you have received for this course, and move them to the "models" folder on Curnagl.
Let us install libraries from the interactive partition:
Sinteractive -m 10G -G 1

module load python/3.10.13 cuda/11.8.0 cudnn/8.7.0.84-11.8

python -m venv mlcourse

source mlcourse/bin/activate

pip install -r CNN_Classification/requirements.txt
To check that TensorFlow was installed:
python -c 'import tensorflow; print(tensorflow.version.VERSION)'There might be a warning message (see above) and the output should be something like "2.9.1".
You can terminate the current session:
deactivate

exit
TO DO THE PRACTICALS (today or another day):
ssh -Y < my unil username >@curnagl.dcsr.unil.ch

cd /scratch/< my unil username >

or

cd /work/TRAINING/UNIL/CTR/rfabbret/cours_hpc/< my unil username >
You can do the practicals on the interactive partition:
Sinteractive -m 10G -G 1

module load python/3.10.13 cuda/11.8.0 cudnn/8.7.0.84-11.8

source mlcourse/bin/activate

python
In the practical code (i.e. the Python code in the html file), you will need to set the paths as follows:
platform = "curnagl"
PATH_IMAGES = "./images"
PATH_MODELS = "./models"
Image Segmentation
On demand. If you work in a project in which you need to use Curnagl to do segmentations, please contact us.
Course software for Text Analysis with LLMs
You can do the practicals on various computing platforms. However, since the participants may use various types of computers and softwares, we recommend to use the UNIL JupyterLab to do the practicals.
- JupyterLab: Working on the cloud is convenient because the installation of the Python packages is already done and you will be working with a Jupyter Notebook style. Note, however, that the UNIL JupyterLab will only be active during the course and for one week following its completion, so in the long term you should use either your laptop or Curnagl. Access requires that you connect either via the eduroam Wi-Fi with your UNIL account or through the UNIL VPN. This point is especially crucial for researchers from the CHUV.
- Laptop: This is good if you want to work directly on your laptop, but you will need to install the required libraries on your laptop. Warning: We will give general instructions on how to install the libraries on your laptop but it is sometimes tricky to find the right library versions and we will not be able to help you with the installation. The installation should take about 15 minutes.
- Curnagl: This is efficient if you are used to work on a cluster or if you intend to use one in the future to work on large projects. If you have an account you can work on your /scratch folder or ask us to be part of the course project but please contact us at least a week before the course. If you do not have an account to access the UNIL cluster Curnagl, please contact us at least a week before the course so that we can give you a temporary account. The installation should take about 15 minutes. Note that it is also possible to use JupyterLab on Curnagl: see https://wiki.unil.ch/ci/books/high-performance-computing-hpc/page/jupyterlab-on-the-curnagl-cluster
If you choose to work on the UNIL JupyterLab, then you do not need to prepare anything since all the necessary libraries will already be installed on the UNIL JupyterLab. In all cases, you will have access to the UNIL JupyterLab.
Otherwise, if you prefer to work on your laptop or on Curnagl, please make sure you have a working installation before the day of the course as on the day we will be unable to provide any assistance with this.
If you have difficulties with the installation on Curnagl we can help you, so please contact us before the course at helpdesk@unil.ch with subject: DCSR ML course.
On the other hand, if you are unable to install the libraries on your laptop, we will unfortunately not be able to help you (there are too many particular cases), so you will need to use the UNIL Jupyter Lab during the course.
Before the course, we will send you all the files that are needed to do the practicals.
JupyterLab
Here are some instructions for using the UNIL JupyterLab to do the practicals.
Access requires that you connect either via the eduroam Wi-Fi with your UNIL account or through the UNIL VPN.
This point is especially crucial for researchers from the CHUV.
The webpage's link will be given during the course.
Enter the login and password corresponding to your UNIL credentials.
Fill in the form as shown in the lecture's slides.
We have already prepared your workspace, including the data and notebook.
Double click on "Transformers_with_Hugging_Face.ipynb"
Change the "ipykernel" (top right button "Python 3 ipykernel") to LLM
In the notebook, check that
platform = "jupyter"
To execute a command, click on "Run the selected cells and advance" (the right arrow), or SHIFT + RETURN.
When you have finished the practicals, select File / Log out.
Laptop
You may need to install development tools including a C and Fortran compiler (e.g. Xcode on Mac, gcc and gfortran on Linux, Visual Studio on Windows).
Please decide in which folder (or path) you want to do the practicals, go there and copie the notebook there:
cd THE_PATH_WHERE_I_DO_THE_PRACTICALSIn the notebook, set
platform = "laptop"
Here are some instructions for installing PyTorch and other libraries on your laptop. You need Python >= 3.8.
For Linux
We will use a terminal to install the libraries.
Let us create a virtual environment. Open your terminal and type:
python3 -m venv mlcourse

source mlcourse/bin/activate

pip3 install torch torchvision torchinfo transformers accelerate datasets sentencepiece pandas scikit-learn matplotlib sacremoses notebook ipywidgets gdown wget
You may need to choose the right library versions
To check that PyTorch was installed:
python3 -c "import torch; print(torch.__version__)"There might be a warning message (see above) and the output should be something like "2.3.0".
You can terminate the current session:
deactivate

exit
TO DO THE PRACTICALS (today or another day):
You can use any Python IDE (e.g. Jupyter Notebook or PyCharm), but you need to launch it after activating the virtual environment. For example, for Jupyter Notebook:
source mlcourse/bin/activate

jupyter notebook
For Mac
We will use a terminal to install the libraries.
Let us create a virtual environment. Open your terminal and type:
python3 -m venv mlcourse

source mlcourse/bin/activate

pip3 install torch torchvision torchinfo transformers accelerate datasets sentencepiece pandas scikit-learn matplotlib sacremoses notebook ipywidgets gdown wget
You may need to choose the right library versions
To check that PyTorch was installed:
python3 -c "import torch; print(torch.__version__)"There might be a warning message (see above) and the output should be something like "2.3.0".
You can terminate the current session:
deactivate

exit
TO DO THE PRACTICALS (today or another day):
You can use any Python IDE (e.g. Jupyter Notebook or PyCharm), but you need to launch it after activating the virtual environment. For example, for Jupyter Notebook:
source mlcourse/bin/activate

jupyter notebook
For Windows
If you do not have Python installed, you can use either Conda: https://docs.conda.io/en/latest/miniconda.html (see the instructions here: https://conda.io/projects/conda/en/latest/user-guide/install/windows.html) or Python official installer: https://www.python.org/downloads/windows/
We will use a terminal to install the libraries.
Let us create a virtual environment. Open your terminal and type:
python3 -m venv mlcourse

source mlcourse/bin/activate

pip3 install torch torchvision torchinfo transformers accelerate datasets sentencepiece pandas scikit-learn matplotlib sacremoses notebook ipywidgets gdown wget
You may need to choose the right library versions
To check that PyTorch was installed:
python3 -c "import torch; print(torch.__version__)"There might be a warning message (see above) and the output should be something like "2.3.0".
You can terminate the current session:
deactivateTO DO THE PRACTICALS (today or another day):
You can use any Python IDE (e.g. Jupyter Notebook or PyCharm), but you need to launch it after activating the virtual environment. For example, for Jupyter Notebook:
mlcourse\Scripts\activate.bat

jupyter notebook
Curnagl
For the practicals, it will be convenient to be able to copy/paste text from a web page to the terminal on Curnagl. So please make sure you can do it before the course. You also need to make sure that your terminal has a X server.
For Mac users, download and install XQuartz (X server): https://www.xquartz.org/
For Windows users, download and install MobaXterm terminal (which includes a X server). Click on the "Installer edition" button on the following webpage: https://mobaxterm.mobatek.net/download-home-edition.html
For Linux users, you do not need to install anything.
Here are some instructions for installing PyTorch and other libraries on the UNIL cluster called Curnagl. Open a terminal on your laptop and type (if you are located outside the UNIL you will need to activate the UNIL VPN):
ssh -Y < my unil username >@curnagl.dcsr.unil.chHere and in what follows we added the brackets < > to emphasize the username, but you should not write them in the command. Enter your UNIL password.
For Windows users with the MobaXterm terminal: Launch MobaXterm, click on Start local terminal and type the command ssh -Y < my unil username >@curnagl.dcsr.unil.ch. Enter your UNIL password. Then you should be on Curnagl. Alternatively, launch MobaXterm, click on the session icon and then click on the SSH icon. Fill in: remote host = curnagl.dcsr.unil.ch, specify username = < my unil username >. Finally, click ok, enter your password. If you have the question "do you want to save password ?" Say No if your are not sure. Then you should be on Curnagl.
See also the documentation: https://wiki.unil.ch/ci/books/high-performance-computing-hpc/page/ssh-connection-to-dcsr-cluster
You can do the practicals in your /scratch directory or on the course group "cours_hpc" if you have asked us in advanced:
cd /scratch/< my unil username >

or

cd /work/TRAINING/UNIL/CTR/rfabbret/cours_hpc
mkdir < my unil username >
cd < my unil username >
Clone the following git repos:
git clone https://git.dcsr.unil.ch/ML-Courses/llm_course.gitLet us install libraries from the interactive partition:
Sinteractive -m 10G -G 1

module load python/3.11.7

python -m venv mlcourse

source mlcourse/bin/activate

pip install -r llm_course/requirements_gpu.txt --extra-index-url https://download.pytorch.org/whl/cu128
To check that PyTorch was installed:
python3 -c "import torch; print(torch.__version__)"There might be a warning message (see above) and the output should be something like "2.10.0".
You can terminate the current session:
deactivate

exit
TO DO THE PRACTICALS (today or another day):
ssh -Y < my unil username >@curnagl.dcsr.unil.ch

cd /scratch/< my unil username >

or

cd /work/TRAINING/UNIL/CTR/rfabbret/cours_hpc/< my unil username >
You can do the practicals on the interactive partition:
Sinteractive -m 10G -G 1

module load python/3.11.7

source mlcourse/bin/activate

python
In the practical code (i.e. the Python code in the html file), you will need to set the paths as follows:
platform = "curnagl"
During the practicals, if you receive an error message "Disk quota exceeded", you will need to make some space in your home directory. For example, by deleting .cache.
Run MPI with containers
Simple test
Simple container with ucx and openmpi.
Bootstrap: docker
From: debian:trixie

%environment
    export LD_LIBRARY_PATH=/usr/local/lib

%post
	apt-get update && apt-get install -y build-essential wget rdma-core libibverbs-dev
	wget https://github.com/openucx/ucx/releases/download/v1.18.1/ucx-1.18.1.tar.gz
	tar xzf ucx-1.18.1.tar.gz
	cd ucx-1.18.1
	mkdir build
	cd build
	../configure --prefix=/opt/
	make -j4
	make install
	cd ..
	export OPENMPI_VERSION="4.1.6"
	export OPENMPI_MAJOR_VERSION="v4.1"
	export OPENMPI_MAKE_OPTIONS="-j4"
	mkdir -p /openmpi-src
	cd /openmpi-src
	wget https://download.open-mpi.org/release/open-mpi/${OPENMPI_MAJOR_VERSION}/openmpi-${OPENMPI_VERSION}.tar.gz \
      	&& tar xfz openmpi-${OPENMPI_VERSION}.tar.gz
	cd openmpi-${OPENMPI_VERSION} && ./configure --with-ucx=/opt --without-verbs
	make all ${OPENMPI_MAKE_OPTIONS}
	make install
	cd /
	rm -rf /openmpi-src
To build it:
singularity build -f openmpitest.sif openmpi.def
Then we compile an MPI application inside the container. For example osu-benchmarks.
wget https://mvapich.cse.ohio-state.edu/download/mvapich/osu-micro-benchmarks-7.5-1.tar.gz
tar -xvf osu-micro-benchmarks-7.5-1.tar.gz
singularity shell openmpitest.sif
cd osu-micro-benchmarks-7.5-1
./configure CC=/usr/local/bin/mpicc CXX=/usr/local/bin/mpicxx --prefix=/scratch/$USER/osu_install
make install
Then you can use the following job:
#!/bin/bash

#SBATCH -N 2
#SBATCH -n 2
#SBATCH -o mpi-%j.out
#SBATCH -e mpi-%j.err

module purge
module load singularityce
module load openmpi
export PMIX_MCA_psec=native
export PMIX_MCA_gds=^ds12

export SINGULARITY_BINDPATH=/scratch

srun --mpi=pmix singularity run openmpitest.sif /scratch/$user/osu_install/libexec/osu-micro-benchmarks/mpi/collective/osu_alltoall
Some possible errors
if the option --mpi=mpix is not used, you will have the following error:
[dna067:2560172] OPAL ERROR: Unreachable in file pmix3x_client.c at line 111
--------------------------------------------------------------------------
The application appears to have been direct launched using "srun",
but OMPI was not built with SLURM's PMI support and therefore cannot
execute. There are several options for building PMI support under
SLURM, depending upon the SLURM version you are using:

  version 16.05 or later: you can use SLURM's PMIx support. This
  requires that you configure and build SLURM --with-pmix.

  Versions earlier than 16.05: you must use either SLURM's PMI-1 or
  PMI-2 support. SLURM builds PMI-1 by default, or you can manually
  install PMI-2. You must then build Open MPI using --with-pmi pointing
  to the SLURM PMI library location.

Please configure as appropriate and try again.
By default OpenMPI 4.x will try to use PMIx client v3. The intialisation does not success bacuase there is no PMIx server initialized. mpirun takes care of initializing an embedded PMIx server.
Psec error
You can also have this error:
A requested component was not found, or was unable to be opened.  This
means that this component is either not installed or is unable to be
used on your system (e.g., sometimes this means that shared libraries
that the component requires are unable to be found/loaded).  Note that
PMIX stopped checking at the first component that it did not find.

Host:      dna075
Framework: psec
Component: munge
Here, the application will run. This is related to the PMIX_SECURITY_MODE. When srun is executed, it will setup previous variable to: munge,native. To verify it:
srun --mpi=pmix env | grep PMIX_SECURITY
PMIX_SECURITY_MODE=munge,native
Which means that munge protocol will be used for authentication.
As the PMIx library on the container (client side) does not have that component, it will failed but it will then use the native component. You can read here for more explanations. You have to use export PMIX_MCA_psec=native to avoid this message.
gds error
You can also see this error:
[dna075:373342] PMIX ERROR: ERROR in file gds_ds12_lock_pthread.c at line 168
This is an OpenPMIx bug related to the 'Generalized DataStore for storing job-level and other data' component. You can blacklist it by setting: export PMIX_MCA_gds=^ds12.
This is fixed in OpenMPI 5
Running OpenMPI 5.0
This works, there is no any compatibilty problem with the host version. If you want to test, set the version of OpenMPI to 5.0.7. Other versions have problems to compile.
Running a container from dockerhub
This section explains how to run a thirdparty container that you cannot edit and it is based on another MPI distribution.
Let's take for example the openfoam container, which is based on MPICH. To build the container:
singularity build openfoam.sif docker://quay.io/pawsey/openfoamlibrary:v2312-rocm5.4-gcc
This container provides: mpich 3.4.3 and the osu benchmarks. The osu benchmarks will help us to measure the performance of the MPI library and compare it with the native MPI library installed on the cluster.
If we try to execute the osu benchmarks from the container, we get:
srun -n 2 singularity exec openfoam.sif osu_alltoall
This test requires at least two processes
This test requires at least two processes
srun: error: dna066: tasks 0-1: Exited with exit code 1
This means that the binary is not able to initialize the MPI layer and just one instance is launched. Let's try to launch it with PMIx:
srun --mpi=pmix -n 2 singularity exec openfoam.sif osu_alltoall
This test requires at least two processes
This test requires at least two processes
srun: error: dna066: tasks 0-1: Exited with exit code 1
We get the same error, probably because MPICH does not support PMIx protocol. Let's try with pmi2:
srun --mpi=pmi2 -n 2 singularity exec openfoam.sif osu_alltoall

# OSU MPI All-to-All Personalized Exchange Latency Test v7.3
# Datatype: MPI_CHAR.
# Size       Avg Latency(us)
1                       2.52
2                       2.44
4                       2.56
8                       2.45
16                      2.45
32                      2.52
This works but it has some overhead compare to the MPI installed natively. The other problem is that in a multinode configuration the overhead is high:
#!/bin/bash

#SBATCH -N 2
#SBATCH -n 2

module load singularityce

srun --mpi=pmi2 -n 2 singularity exec openfoam.sif osu_alltoall
# OSU MPI All-to-All Personalized Exchange Latency Test v7.3
# Datatype: MPI_CHAR.
# Size       Avg Latency(us)
1                      48.89
2                      44.16
4                      44.73
8                      49.08
16                     50.07
32                     48.33
Using wi4mpi
Wi4mpi is a tool that allows us to translate calls between different MPI implementations. The idea here is to be able to use the OpenMPI installed natively on the cluster. The following job slurm is used:
#!/bin/bash

#SBATCH -N 1
#SBATCH -n 2

module load singularityce
module load openmpi wi4mpi
export SINGULARITY_BINDPATH=/dcsrsoft
export WI4MPI_FROM=MPICH
export WI4MPI_TO=OMPI
export WI4MPI_RUN_MPI_C_LIB=${OPENMPI_ROOT}/lib/libmpi.so
export WI4MPI_RUN_MPI_F_LIB=${OPENMPI_ROOT}/lib/libmpi_mpifh.so
export WI4MPI_RUN_MPIIO_C_LIB=${WI4MPI_RUN_MPI_C_LIB}
export WI4MPI_RUN_MPIIO_F_LIB=${WI4MPI_RUN_MPI_F_LIB}
export SINGULARITYENV_LD_PRELOAD=${WI4MPI_ROOT}/libexec/wi4mpi/libwi4mpi_${WI4MPI_FROM}_${WI4MPI_TO}.so:${WI4MPI_RUN_MPI_C_LIB}

srun --mpi=pmix -n 2 singularity exec openfoam.sif osu_alltoall
Result:
You are using Wi4MPI-3.6.4 with the mode preload From MPICH To OMPI

# OSU MPI All-to-All Personalized Exchange Latency Test v7.3
# Datatype: MPI_CHAR.
# Size       Avg Latency(us)
1                       0.77
2                       1.00
4                       0.81
8                       0.93
16                      0.98
First, you can notice that now it works with PMIx and that the peformance is much better than before. We have still some errors/warnings:
A requested component was not found, or was unable to be opened.  This
means that this component is either not installed or is unable to be
used on your system (e.g., sometimes this means that shared libraries
that the component requires are unable to be found/loaded).  Note that
PMIx stopped checking at the first component that it did not find.

Host:      dna065
Framework: psec
Component: munge
--------------------------------------------------------------------------
[1752250146.039806] [dna065:2110525:0]     ucp_context.c:1177 UCX  WARN  network device 'mlx5_2:1' is not available, please use one or more of: 'ens1f1'(tcp), 'ib0'(tcp), '
lo'(tcp)
[1752250146.049910] [dna065:2110525:0]     ucp_context.c:1177 UCX  WARN  network device 'mlx5_2:1' is not available, please use one or more of: 'ens1f1'(tcp), 'ib0'(tcp), '
lo'(tcp)
[1752250146.039795] [dna065:2110526:0]     ucp_context.c:1177 UCX  WARN  network device 'mlx5_2:1' is not available, please use one or more of: 'ens1f1'(tcp), 'ib0'(tcp), '
:
As we have seen before, the first error can be fixed using the following variable:
export PMIX_MCA_psec=native
The second error is related with the infiniband dectection. The UCX libray is linked to some libraries that are not available in the container. We can try to mount those libraries on the container:
export SINGULARITY_BINDPATH=/dcsrsoft,/lib64/libibverbs.so.1:/lib/x86_64-linux-gnu/libibverbs.so.1,/lib64/libmlx5.so.1:/lib/x86_6
4-linux-gnu/libmlx5.so.1,/lib64/librdmacm.so.1:/lib/x86_64-linux-gnu/librdmacm.so.1,/lib64/libnl-route-3.so.200:/lib/x86_64-linux-gnu/libnl-route-3.so.200
If we try again, we should see this:
[dna066:1443708] mca_base_component_repository_open: unable to open mca_pmix_s1: libpmi.so.0: cannot open shared object file: No such file or directory (ignored)
[dna066:1443711] mca_base_component_repository_open: unable to open mca_pmix_s1: libpmi.so.0: cannot open shared object file: No such file or directory (ignored)
[dna066:1443708] mca_base_component_repository_open: unable to open mca_pmix_s2: libpmi2.so.0: cannot open shared object file: No such file or directory (ignored)
[dna066:1443711] mca_base_component_repository_open: unable to open mca_pmix_s2: libpmi2.so.0: cannot open shared object file: No such file or directory (ignored)
You are using Wi4MPI-3.6.4 with the mode preload From MPICH To OMPI

# OSU MPI All-to-All Personalized Exchange Latency Test v7.3
# Datatype: MPI_CHAR.
# Size       Avg Latency(us)
1                       0.67
2                       0.67
4                       0.66
8                       0.68
16                      0.66
32                      0.74
64                      0.76
128                     1.05
256                     1.03
The peformance was improved. If we try multinode now:
# OSU MPI All-to-All Personalized Exchange Latency Test v7.3
# Datatype: MPI_CHAR.
# Size       Avg Latency(us)
1                       1.64
2                       2.15
4                       1.63
8                       1.61
16                      1.71
32                      1.70
64                      2.25
128                     2.14
We have around 40x of improvement.
Measuring job's CO2 footprint
There are three main ways in which the use of the HPC clusters can be more taxing for the environment than it needs to be:
- by using more of the cluster RAM (Random Allocated Memory) than needed for your calculations (i.e., the "job" you submit to the cluster),
- by having your submitted jobs crash
- by requesting more cores (i.e., computing units) for a job than needed.
These all imply waste of energy. To help minimize them, the GreenAlgorithms4HPC package was installed on the clusters. It can estimate the carbon output and energy consumption of the user, either for a particular job run on the clusters, or over a time period that you specify. In addition, it can also measure how much memory is being used for the jobs, compared to how much is actually required to run the job.
Green Algorithms
The methodolgy is based on Green Algorithms developed by Loïc Lannelongue. He developed the package GreenAlgorithms4HPC which is a plugin to process the accounting information of a cluster HPC in order to provide an estimation of CO2 footprint.
How to use it
You need to load the following module:
module load ga4hpc
And then you can check your CO2 footprint for a period of time:
green_hpc -S 2025-11-24 -E 2025-11-25
The following output is generated:
        #################################
        #                               #
        #  Carbon footprint on curnagl  #
        #       - user: cruiz1 -        #
        #   (2025-11-24 / 2025-11-25)   #
        #################################


              --------------
             |   51 gCO2e   |
              --------------

    ...This is equivalent to:
         - 0.055 tree-months
         - driving 0.29 km
         - 0.0 flights between Paris and London
You can also get an estimation for a particular job:
green_hpc -S 2025-11-24 -E 2025-11-25 --filterJobIDs 41694290
In oder to have information about jobs running in the same day, you should put the day after in the
-Eparameter.
There are several options to filter jobs that you can check with:
green_hpc -h
How precise is the estimation?
The power usage is based on the TDP (Termal Desing Power) information provided by the manufacturer. This value is a limit of the power comsomption a CPU, GPU could have. The power consumption is estimated as follows:
Power consumption = time * (resources 1 * TDP + resources_2* TPD + ...)
Assumpions and limitations
- Resources are assumed to be used at a 100%. This may lead to slightly overestimated carbon footprints, although the order of magnitude is probably correct.
- Conversely, the wasted energy due to memory overallocation may be largely underestimated, as the information needed is not always logged.
- Only the carbon imprint of cluster use is measured, not the impact of cooling the computers down, or of building the facilities. The estimation does not take into account neither the CO2 produced during manufacturing.
Results of some tests:
| config | appli | GA mesured | real |
|---|---|---|---|
| cpu 48 cores | cpu benchmark NAS | 0.343 | 0.3017 |
| 2 gpu A100 | julia heat equation | 0.355 | 0.350 |
| 2 gpu A100 | LLM inference | 0.376 | 0.234 |