Using the Clusters
An introductory tutorial video on using HPC clusters is available here.
- How to run a job on Curnagl
- What projects am I part of and what is my default account?
- Providing access to external collaborators
- Requesting and using GPUs
- How do I run a job for more that 3 days?
- Access NAS DCSR from the cluster
- SSH connection to DCSR cluster
- Checkpoint SLURM jobs
- Urblauna access and data transfer
- Job Templates
- Urblauna Guacamole / RDP issues
- Transfer files to/from Curnagl
- Transfert S3 DCSR to other support
How to run a job on Curnagl
Overview
Suppose that you have finished writing your code, say a python code called <my_code.py>, and you want to run it on the cluster Curnagl. You will need to submit a job (a bash script) with information such as the number of CPUs you want to use and the amount of RAM memory you will need. This information will be processed by the job scheduler (a software installed on the cluster) and your code will be executed. The job scheduler used on Curnagl is called SLURM (Simple Linux Utility for Resource Management). It is a free open-source software used by many of the world’s computer clusters.
An introductory tutorial video on using HPC clusters is available here.
The partitions
The clusters contain several partitions (sets of compute nodes dedicated to different means). To list them, type
sinfo
As you can see, there are three partitions:
- cpu - this is the main partition and includes the majority of the compute nodes
- gpu - this partition contains the GPUs equipped nodes
- interactive - this partition allows rapid access to resources but comes with a number of restrictions
Each partition is associated with a submission queue. A queue is essentially a waiting line for your compute job to be matched with an available compute resource. Those resources become available once a compute job from a previous user is completed.
Note that the nodes may be in different states: idle=not used, alloc=used, down=switch off, etc. Depending on what you want to do, you should choose the appropriate partition/submission queue.
The sbatch script
To execute your python code on the cluster, you need to make a bash script, say my_script.sh, specifying the information needed to run your python code (you may want to use nano, vim or emacs as an editor on the cluster). Here is an example:
#!/bin/bash -l
#SBATCH --job-name my_code
#SBATCH --output my_code.out
#SBATCH --partition cpu
#SBATCH --cpus-per-task 8
#SBATCH --mem 10G
#SBATCH --time 00:30:00
module load python
python3 /PATH_TO_YOUR_CODE/my_code.py
Here we have used the command module load python before python3 /PATH_TO_YOUR_CODE/my_code.py to load some libraries and to make several programs available.
To display the list of available modules or to search for a package:
module avail
module spider package_name
For example, to load bowtie2:
module load bowtie2/2.4.2
To display information of the sbatch command, including the SLURM options:
sbatch --help
sbatch --usage
Finally, you submit the bash script as follows:
sbatch my_script.sh
We recommend to store the above bash script and your python code in your home folder, and to store your main input data in your work space. The data may be read from your python code.
To show the state (R=running or PD=pending) of your jobs, type:
Squeue
If you realize that you made a mistake in your code or in the SLURM options, you may cancel it:
scancel JOBID
An interactive session
Often it is convenient to work interactively on the cluster before submitting a job. I remind you that when you connect to the cluster you are actually located at the front-end machine and you must NOT run any code there. Instead you should connect to a node by using the Sinteractive command as shown below.
[ulambda@login ~]$ Sinteractive -c 1 -m 8G -t 01:00:00
interactive is running with the following options:
-c 1 --mem 8G -J interactive -p interactive -t 01:00:00 --x11
salloc: Granted job allocation 172565
salloc: Waiting for resource configuration
salloc: Nodes dna020 are ready for job
[ulambda@dna020 ~]$ hostname
dna020.curnagl
You can then run your code.
Hint: If you are having problems with a job script then copy and paste the lines one at a time from the script into an interactive session - errors are much more obvious this way.
You can see the available options by passing the -h option.
[ulambda@login1 ~]$ Sinteractive -h
Usage: Sinteractive [-t] [-m] [-A] [-c] [-J]
Optional arguments:
-t: time required in hours:minutes:seconds (default: 1:00:00)
-m: amount of memory required (default: 8G)
-A: Account under which this job should be run
-R: Reservation to be used
-c: number of CPU cores to request (default: 1)
-J: job name (default: interactive)
-G: Number of GPUs (default: 0)
To logout from the node, simply type:
exit
Embarrassingly parallel jobs
Suppose you have 14 image files in path_to_images and you want to process them in parallel by using your python code my_code.py. This is an example of embarrassingly parallel programming where you run 14 independent jobs in parallel, each with a different image file. One way to do it is to use a job array:
#!/bin/bash -l
#SBATCH --job-name my_code
#SBATCH --output=my_code_%A_%a.out
#SBATCH --partition cpu
#SBATCH --cpus-per-task 8
#SBATCH --mem 10G
#SBATCH --time 00:30:00
#SBATCH --array=0-13
module load python/3.9.13
FILES=(/path_to_configurations/*)
python /PATH_TO_YOUR_CODE/my_code.py ${FILES[$SLURM_ARRAY_TASK_ID]}
The above allocations (for example time=30 minutes) is applied to each individual job in your array.
Similarly, if your script takes integer parameters to control a simulation. You can do something like:
#!/bin/bash -l
#SBATCH --account project_id
#SBATCH --mail-type ALL
#SBATCH --mail-user firstname.surname@unil.ch
#SBATCH --job-name my_code
#SBATCH --output=my_code_%A_%a.out
#SBATCH --partition cpu
#SBATCH --cpus-per-task 8
#SBATCH --mem 10G
#SBATCH --time 00:30:00
#SBATCH --array=0-13
module load python/3.9.13
ARGS=(0.1 2.2 3.5 14 51 64 79.5 80 99 104 118 125 130 100)
python /PATH_TO_YOUR_CODE/my_code.py ${ARGS[$SLURM_ARRAY_TASK_ID]}
Another way to run embarrassingly parallel jobs is by using one-line SLURM commands. For example, this may be useful if you want to run your python code on all the files with bam extension in a folder:
for file in `ls *.bam`
do
sbatch --job-name my_code --output my_code-%j.out --partition cpu
--ntasks 1 --cpus-per-task 8 --mem 10G --time 00:30:00
--wrap "module load gcc/9.3.0 python/3.8.8; python /PATH_TO_YOUR_CODE/my_code.py $file" &
done
MPI jobs
Suppose you are using MPI codes locally and you want to launch them on Curnagl.
The below example is a slurm script running an MPI code mpicode (which can be either of C, python, or fortran type...) on one single node (i.e. --nodes 1) using NTASKS cores without using multi-threading (i.e. --cpus-per-task 1). In this example, the memory required is 32Gb in total. To run an MPI code, the loading modules is mvapich2 only. You must add needed modules (depending on your code).
Instead of mpirun command, you must use srun command, which is the equivalent command to run MPI codes on a cluster. To know more about srun, go through srun --help documentation.
#!/bin/bash -l
#SBATCH --account project_id
#SBATCH --mail-type ALL
#SBATCH --mail-user firstname.surname@unil.ch
#SBATCH --chdir /scratch/<your_username>/
#SBATCH --job-name testmpi
#SBATCH --output testmpi.out
#SBATCH --partition cpu
#SBATCH --nodes 1
#SBATCH --ntasks NTASKS
#SBATCH --cpus-per-task 1
#SBATCH --mem 32G
#SBATCH --time 01:00:00
module purge
module load openmpi
srun mpicode
For a complete MPI overview on Curnagl, please refer to compiling and running MPI codes
How to measure job efficiency
If you want to verify if you are runnig with the right amount of CPU cores, you can use Seffi command.
In order to use this tool, a passwordless SSH connection should be created with the following procedure:
- Create a pair of SSH keys
ssh-keygen -t ed25519 -P '' - Put the public key into your
authorized_keysfile:cat ~/.ssh/id_ed25519.pub >> ~/.ssh/authorized_keys
To execute it, we perform the following:
$ ./Seffi 57000094
Job ID: 57000094
State: RUNNING
Cores: 1
CPU Efficiency: 0.20%
Job Wall-clock time: 00:00:47
Memory Efficiency 0.25% of 8 GB
This command has almost the same output as seff command. seff command can only be used once the job has ended.
If you see a CPU utilisation lower than 80% and you are using several CPU-cores, consider to lower the number of CPU-cores you are using.
Good practice
- Put your file and data in the scratch and work folders only during the analyses that you are currently doing
- Do not keep important results in the scratch, but move them in the NAS data storage
- Clean your scratch folder after your jobs are finished, especially the large files
- Regularly clean your scratch folder for any unnecessary files
What projects am I part of and what is my default account?
In order to find out what projects you are part of on the clusters then you can use the Sproject tool:
$ Sproject
The user ulambda ( Ursula Lambda ) is in the following project accounts
ulambda_default
ulambda_etivaz
ulambda_gruyere
Their default account is: ulambda_defaultIf Sproject is called without any arguments then it tells you what projects/accounts you are in.
To find out what projects other users are in you can call Sproject with the -u option
$ Sproject -u nosuchuser
The user nosuchuser ( I really do not exist ) is in the following project accounts
..
..
Providing access to external collaborators
In order to allow non UNIL collaborators to use the HPC clusters there are three steps which are detailed below.
Please note that the DCSR does not accredit external collaborators as this is a centralised process.
The procedures for different user groups are explained at https://www.unil.ch/ci/ui
- The external collaborator must first obtain an EduID via www.eduid.ch
- The external collaborator must ask for a UNIL account using this form. The external collaborator must give the name of the PI in the form (The PI is "sponsoring" the account)
- Once the demand has been validated, the PI to whom the external collaborator is connected must use this application to add the collaborator into the appropriate project. Log into the application if necessary on the top right, and click on the "Manage members list / Gérer la liste de membres" icon for your project. The usernames always have 8 characters (e.g. Greta Thunberg username would be: gthunber)
- The external collaborator needs to use the UNIL VPN:
The external collaborator on the VPN can then login to the HPC cluster as if he was inside the UNIL.
Requesting and using GPUs
Both Curnagl and Urblauna have nodes with GPUs.
You can find a detailed description of Curnagl GPUs here and Urblauna GPUs here
An introductory tutorial video on using HPC clusters is available here.
Requesting GPUs
In order to access the GPUs they need to be requested via SLURM as one does for other resources such as CPUs and memory.
The flag required is --gres=gpu:1 for 1 GPU per node, you can use any number between 1 and N (--gres=gpu:N). Please check cluster documentation.
An example job script is as follows:
#!/bin/bash -l
#SBATCH --cpus-per-task 12
#SBATCH --mem 64G
#SBATCH --time 12:00:00
# GPU partition request only for Curnagl
#SBATCH --partition gpu
#SBATCH --gres gpu:1
#SBATCH --gres-flags enforce-binding
# Set up my modules
module purge
module load my list of modules
module load cuda
# Check that the GPU is visible
nvidia-smi
# Run my GPU enable python code
python mygpucode.py
If the #SBATCH --gres gpu:1 is omitted then no GPUs will be visible even if they are present on the compute node.
If you request one GPU it will always be seen as device 0.
The #SBATCH --gres-flags enforce-binding option ensures that the CPUs allocated will be on the same PCI bus as the GPU(s) which greatly improves the memory bandwidth. This may mean that you have to wait longer for resources to be allocated but it is strongly recommended.
Using CUDA
In order to use the CUDA toolkit there is a module available
module load cuda
This loads the nvcc compiler and CUDA libraries. There is also a cudnn module for the DNN tools/libraries
Containers and GPUs
Singularity containers can make use of GPUs but in order to make them visible to the container environment an extra flag "--nv" must be passed to Singularity
module load singularity
singularity run --nv mycontainer.sif
The full documentation is at https://sylabs.io/guides/3.5/user-guide/gpu.html
you can find here, examples of using GPUs from containers.
How do I run a job for more that 3 days?
The simple answer is that you can't without special authorisation. Please do not submit such jobs and ask for a time extension!
If you think that you need to run for longer than 3 days then please do the following:
Contact us via helpdesk@unil.ch and explain what the problem is.
We will then get in touch with you to analyse your code and suggest performance or workflow improvements to either allow it to complete within the required time or to allow it to be run in steps using checkpoint/restart techniques.
Recent cases involve codes that were predicted to take months to run now finishing in a few days after a bit of optimisation.
If the software cannot be optimised, there is the possibility of using a checkpoint mechanism. More information is available on the checkpoint page
Access NAS DCSR from the cluster
The NAS is available from the login node only under /nas. The folder hierarchy is:
/nas/FAC/<your_faculty>/<your_department>/<your_PI>/<your_project>Cluster -> NAS
To copy a file to the NAS:
cp /path/to/file /nas/FAC/<your_faculty>/<your_department>/<your_PI>/<your_project>To copy a folder to the NAS:
cp -r /path/to/folder /nas/FAC/<your_faculty>/<your_department>/<your_PI>/<your_project>For more complex operations, consider using rsync. For the documentation see the man page:
man rsyncor check out this link.
NAS -> cluster
As above, just swapping the source and destination:
cp /nas/FAC/<your_faculty>/<your_department>/<your_PI>/<your_project>/file /path/to/destcp -r /nas/FAC/<your_faculty>/<your_department>/<your_PI>/<your_project>/folder /path/to/destSSH connection to DCSR cluster
This page presents how to connect to DCSR cluster depending on your operating system.
Linux
SSH is always installed by most commons Linux distributions, so no extra package should be installed.
Connection with a password
To connect using a password, just run the following command:
ssh username@curnagl.dcsr.unil.ch
Of course, replace username in the command line with your UNIL login, and use your UNIL password.
Note: In terminals there is nothing written on screen while you type in password fields. This is normal and a security measure to prevent leaking the length of your password. Just type your password blindly and validate with Enter.
The first time you try to connect to an unknown remote computer via SSH, you will have to acknowledge the identity of the remote by typing "yes". Do not do this on insecure networks like free WIFI hotspots.
Connection with a key
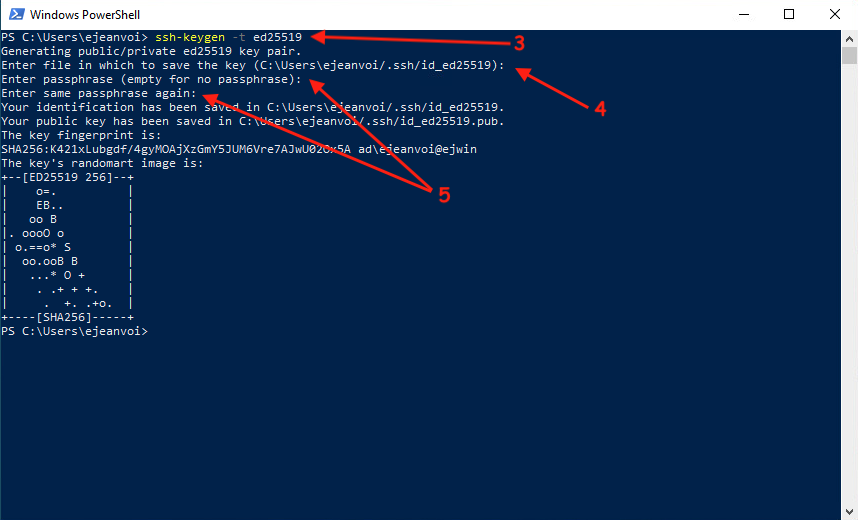
To connect with a key, you first have to generate the pair of keys on your laptop.
By default, it suggests you to create the private key to ~/.ssh/id_ed25519 and the public key to ~/.ssh/id_ed25519.pub. You can hit "Enter" when the question is asked if you don't use any other key. Otherwise, you can choose another path, for instance: ~/.ssh/id_dcsr_cluster like in the example below.
Then, you have to enter a passphrase (twice). This is optional but you are strongly encouraged to choose a strong passphrase.
This can be done as follows:
$ ssh-keygen -t ed25519
Generating public/private ed25519 key pair.
Enter file in which to save the key (/home/ejeanvoi/.ssh/id_ed25519):/home/ejanvoi/.ssh/id_dcsr_cluster
Enter passphrase (empty for no passphrase):
Enter same passphrase again:
Your identification has been saved in /home/ejeanvoi/.ssh/id_dcsr_cluster
Your public key has been saved in /home/ejeanvoi/.ssh/id_dcsr_cluster.pub
The key fingerprint is:
SHA256:8349RPk/2AuwzazGul4ki8xQbwjGj+d7AiU3O7JY064 ejeanvoi@archvm
The key's randomart image is:
+--[ED25519 256]--+
| |
| . |
| + . . |
| ..=+o o |
| o=+S+ o . . |
| =*+oo+ * . .|
| o *=..oo Bo .|
| . . o.o.oo.+o.|
| E..++=o oo|
+----[SHA256]-----+
Once the key is created, you have to copy the public to the cluster. This can be done as follows:
[ejeanvoi@archvm ~]$ ssh-copy-id -i /home/ejeanvoi/.ssh/id_dcsr_cluster.pub ejeanvoi@curnagl.dcsr.unil.ch
/usr/bin/ssh-copy-id: INFO: Source of key(s) to be installed: "/home/ejeanvoi/.ssh/id_dcsr_cluster.pub"
/usr/bin/ssh-copy-id: INFO: attempting to log in with the new key(s), to filter out any that are already installed
/usr/bin/ssh-copy-id: INFO: 1 key(s) remain to be installed -- if you are prompted now it is to install the new keys
ejeanvoi@curnagl.dcsr.unil.ch's password:
Number of key(s) added: 1
Now try logging into the machine, with: "ssh 'ejeanvoi@curnagl.dcsr.unil.ch'" and check to make sure that only the key(s) you wanted were added.
Thanks to -i option, you can specify the path to the private key, here we use /home/ejeanvoi/.ssh/id_dcsr_cluster.pub to comply with the beginning of the example. You are asked to enter you UNIL password to access the cluster, and behind the scene, the public key will be automatically copied to the cluster.
Finally, you can connect to the cluster using you key, and that time, you will be asked to enter the passphrase of the key (and not the UNIL password):
[ejeanvoi@archvm ~]$ ssh -i /home/ejeanvoi/.ssh/id_dcsr_cluster ejeanvoi@curnagl.dcsr.unil.ch
Enter passphrase for key '.ssh/id_dcsr_cluster':
Last login: Fri Nov 26 10:25:05 2021 from 130.223.6.87
[ejeanvoi@login ~]$
Remote graphical interface
To visualize a graphical application running from the cluster, you have to connect using -X option:
ssh -X username@curnagl.dcsr.unil.ch
macOS
Like Linux, SSH has a native support in macOS, so nothing special has to be installed, excepted for the graphical part.
Connection with a password
This is similar to the Linux version described above.
Connection with a key
This is similar to the Linux version described above.
Remote graphical interface
To enable graphical visualization over SSH, you have to install an X server. Most common one is XQuartz, it can be installed like any other .dmg application.
Then, you have to add the following line at the beginning of the ~/.ssh/config file (if the file doesn't exist, you can create it):
XAuthLocation /opt/X11/bin/xauth
Finally, just add -X flag to the ssh command and run your graphical applications:
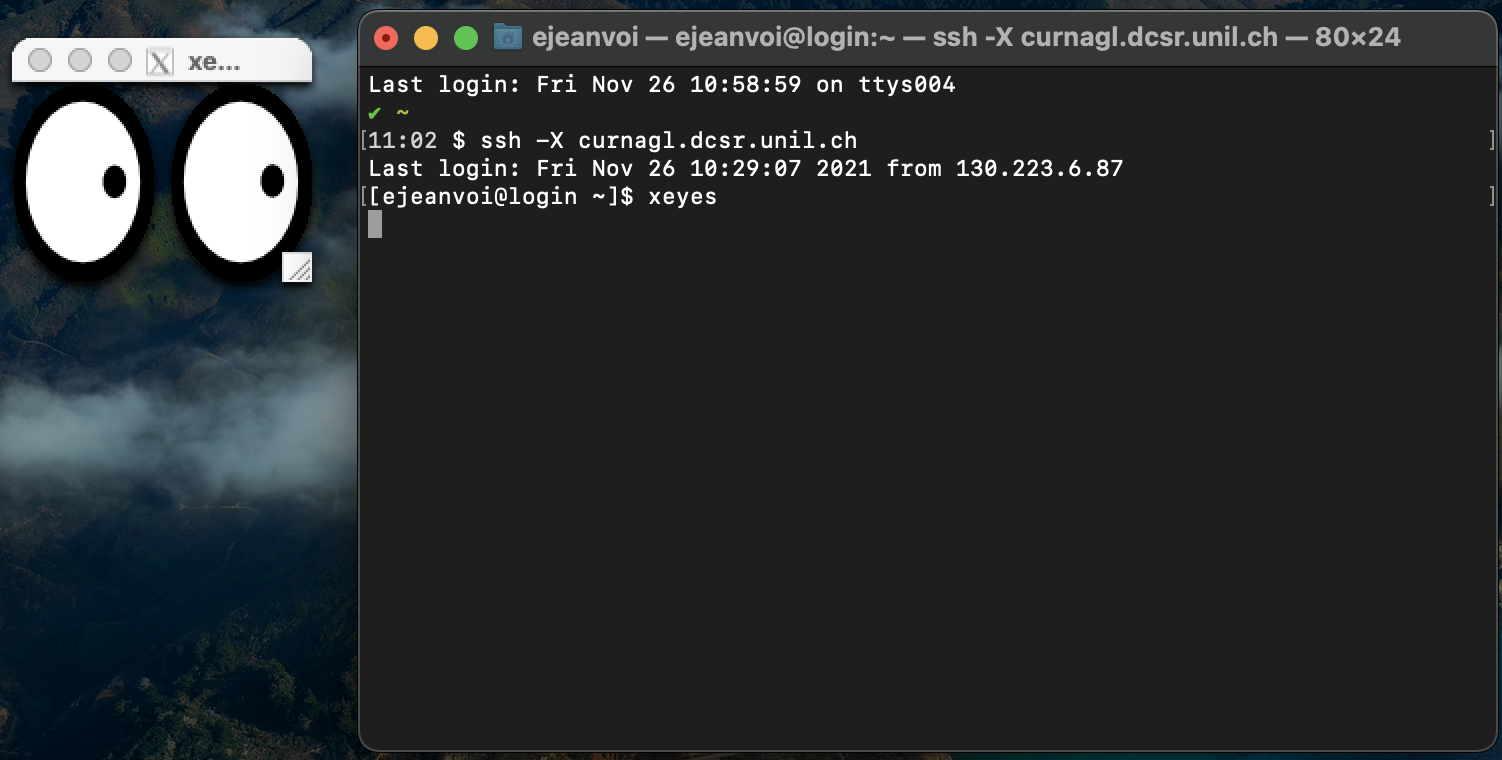
Windows
To access the DCSR clusters from a Windows host, you have to use an SSH client.
Several options are available:
- Putty
- MobaXterm
- SSH from PowerShell
- SSH from Windows Subsystem for Linux
We present here only MobaXterm (since it's a great tool that also allows to transfer files with a GUI) and the PowerShell options. For both options, we'll see how to connect through SSH with a password and with a key.
MobaXterm
Connection with a password
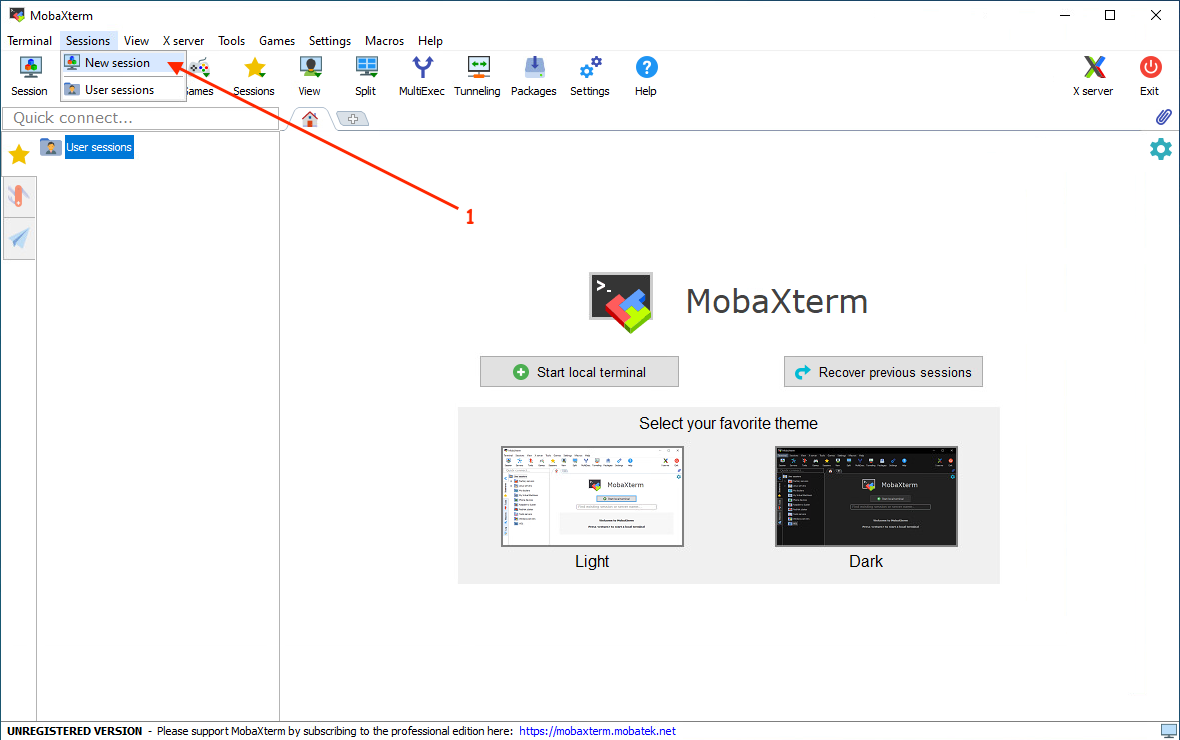
After opening MobaXterm, you have to create a new session:
Then you have to configure the connection:

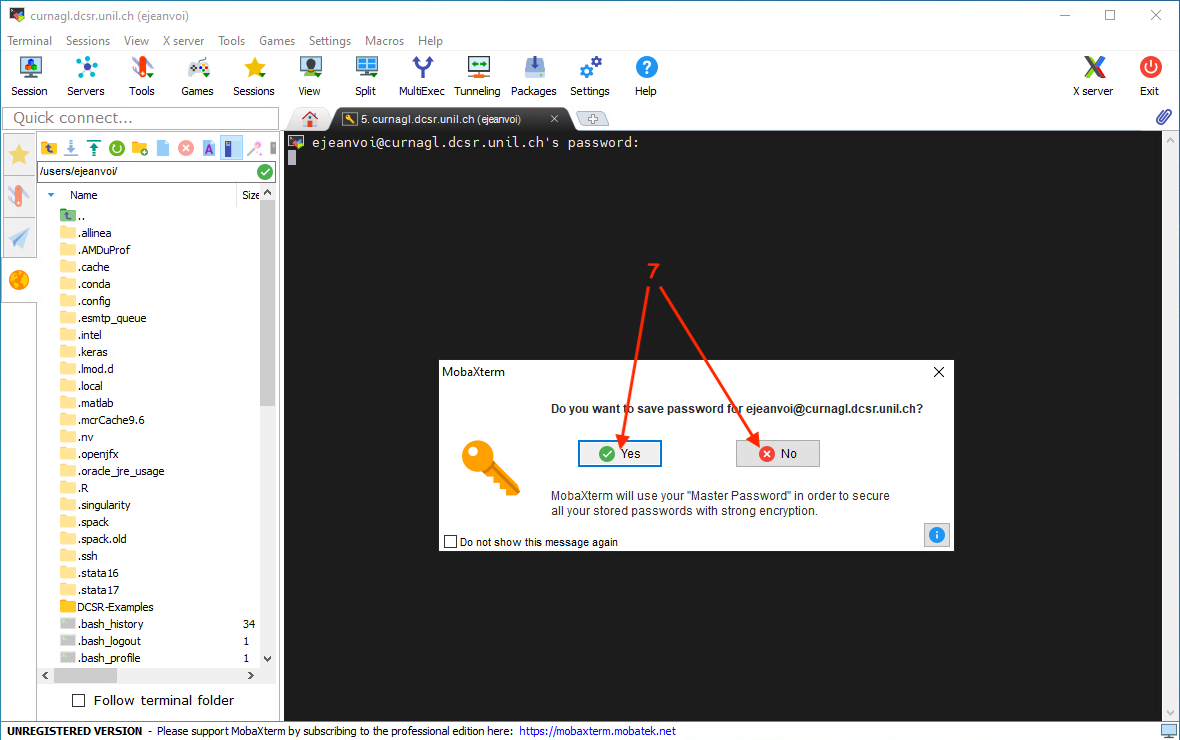
Then you can choose to save or not your password in MobaXterm:
Finally, you are connected to Curnagl:

You can see, on the left panel, a file browser. This represents your files on the cluster and it can be used to edit small text files, or to download/upload files to/from your laptop.
Connection with a key
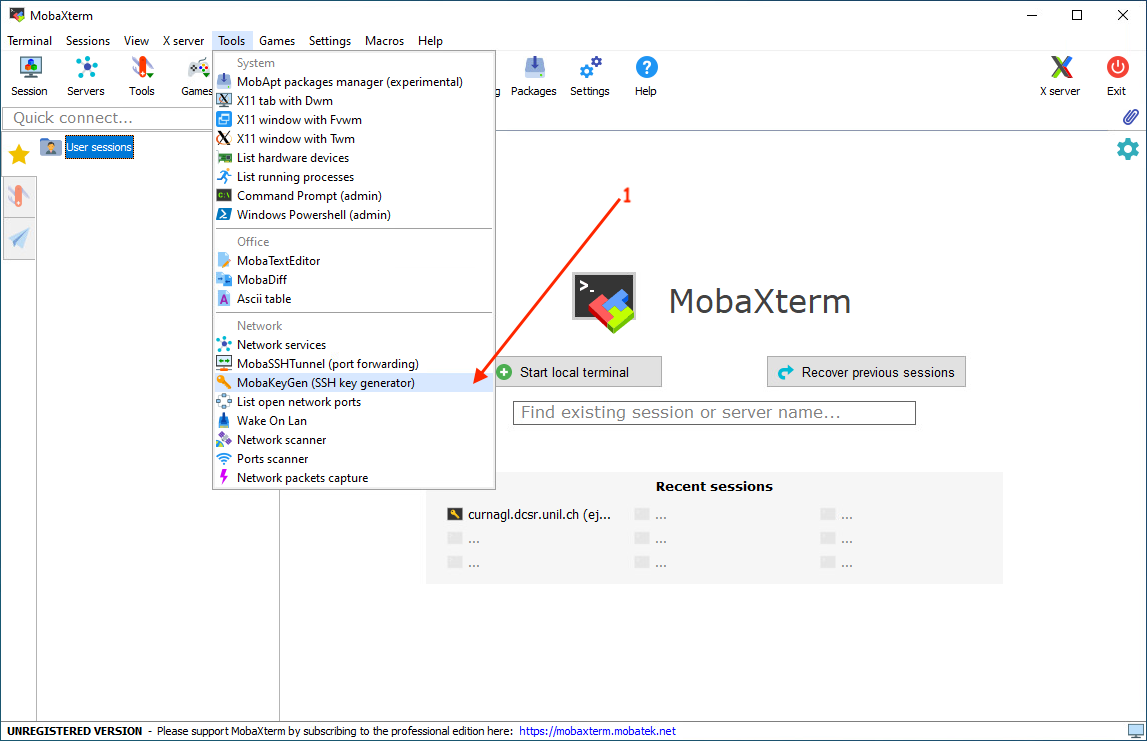
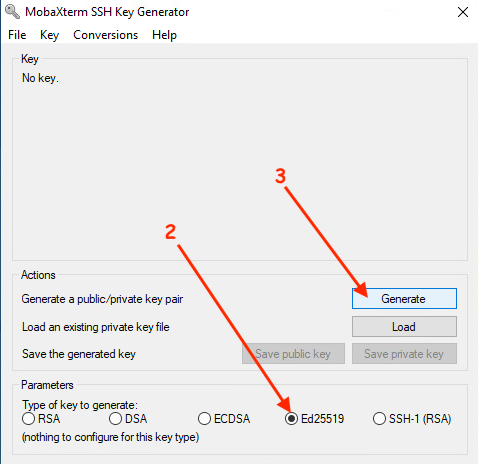
First you have to create a key:
A new windows is opened, there you can choose the kind of key (Ed25519 is a good choice):
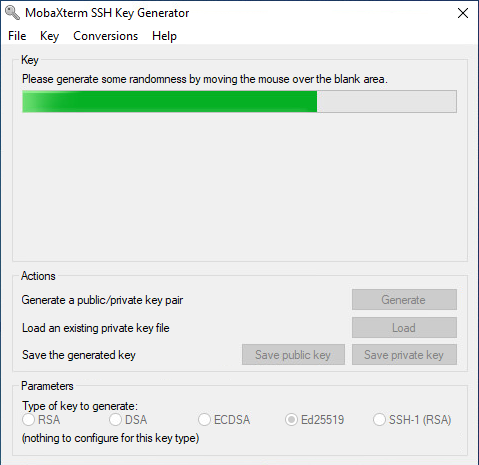
While the key generation, you have to move the mouse over the window to create entropy:
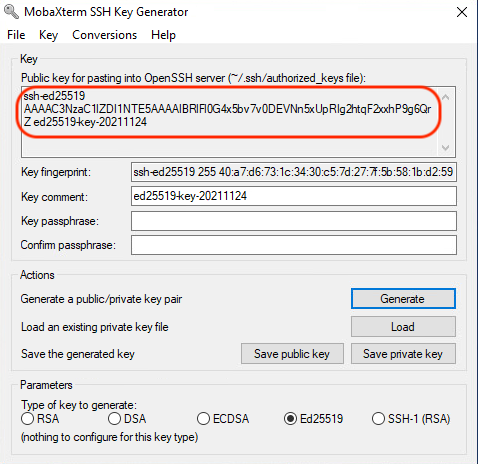
When the key is generated, copy the public key into a text document:
Then, choose a passphrase (very important to protect your private key), and save the private key in your computer:
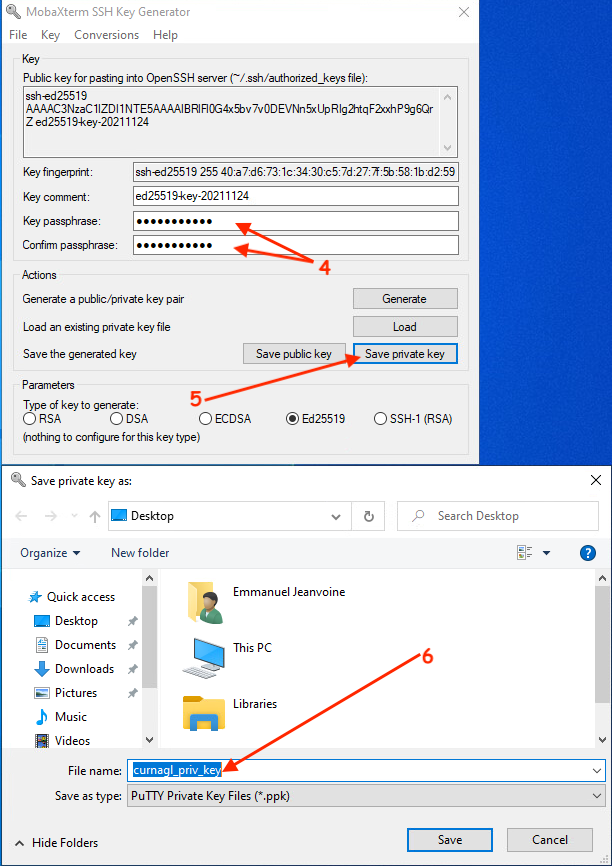
Once the private key is saved, you can create a new SSH session that uses a private key:
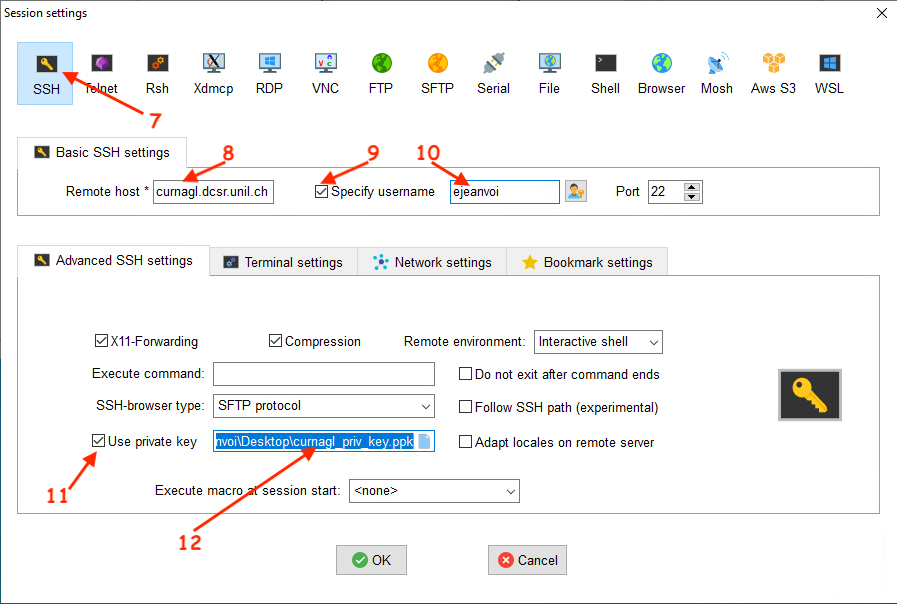
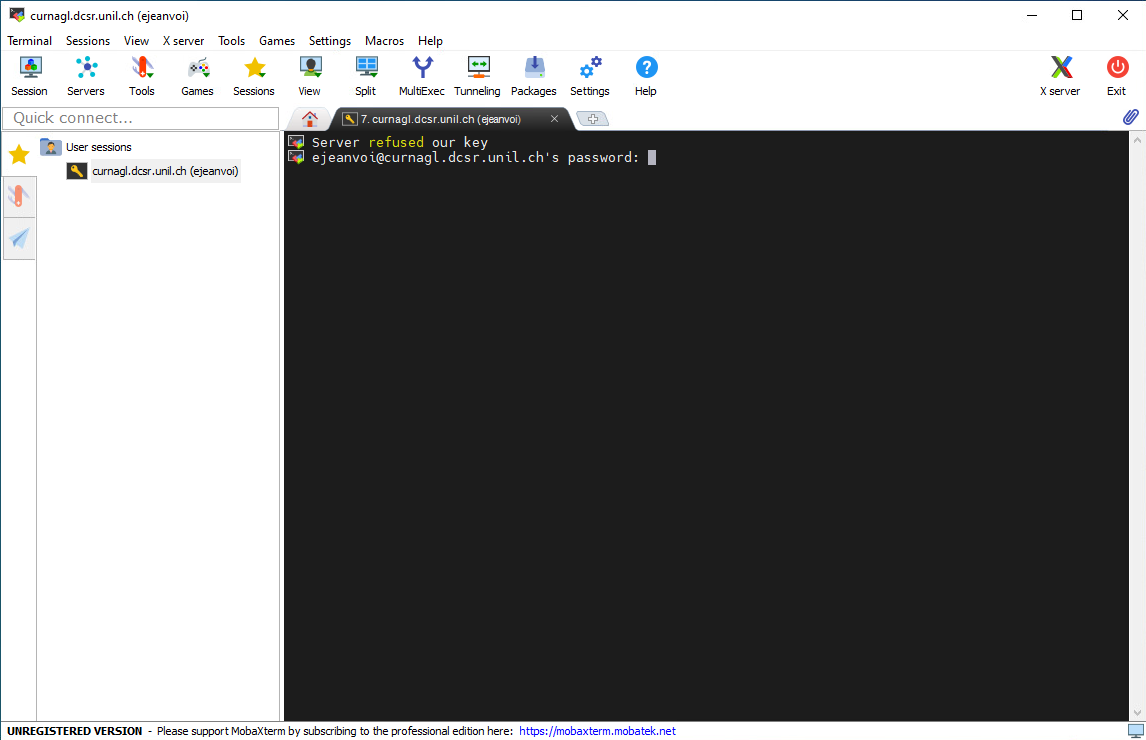
The first time you will connect, you will be prompted to enter the password of your UNIL account:
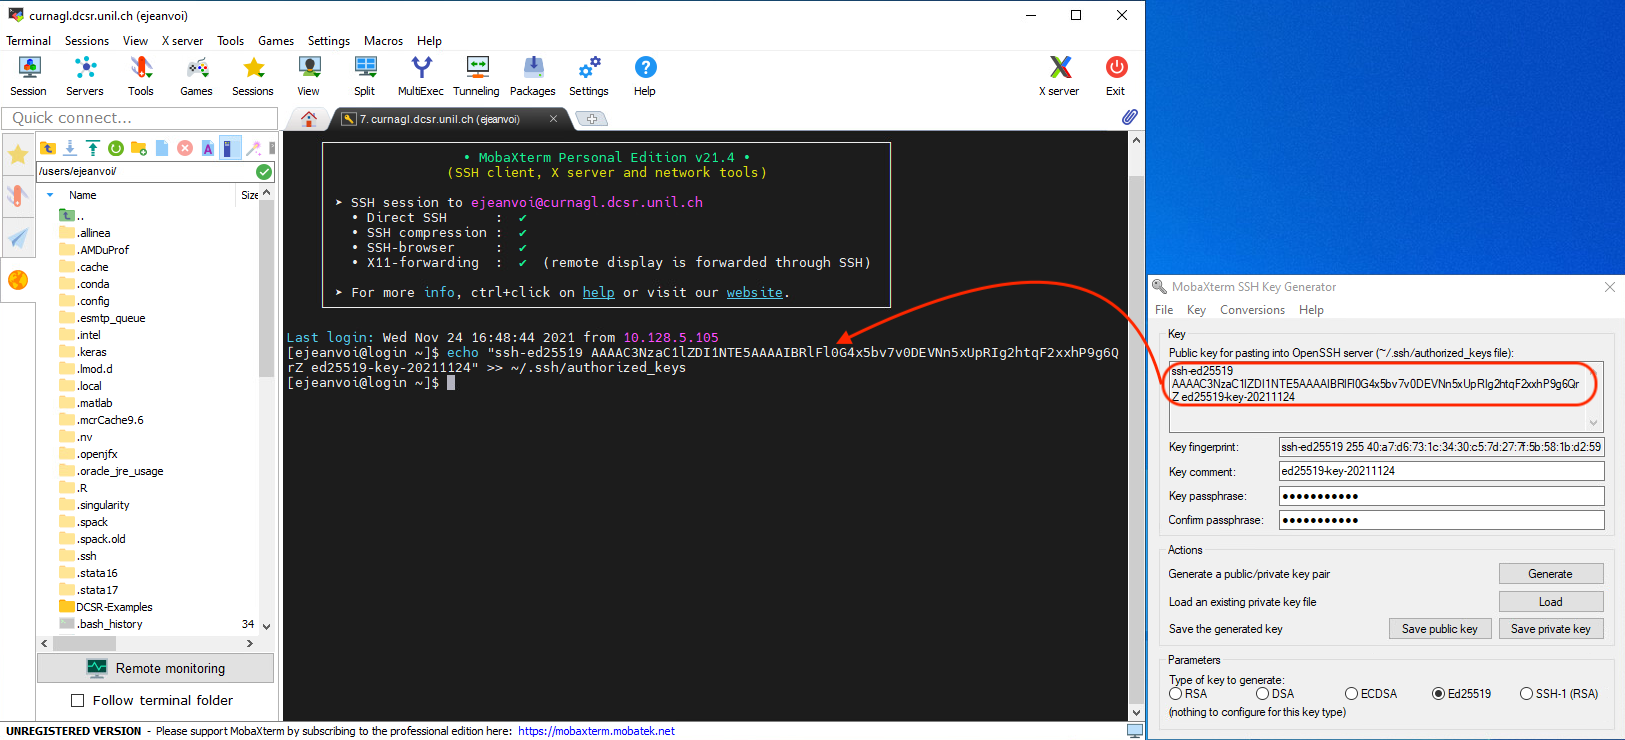
Once connected to the cluster, put the content of you public key at the end of a file called ~/.ssh/authorized_keys. This can be done using that command:
echo "PUBLIC_KEY" >> ~/.ssh/authorized_keys
(of course replace PUBLIC_KEY in the previous command with the value of you public key pasted in a text file)
If needed, create the .ssh directory with this command:
mkdir .ssh && chmod -R 700 .ssh
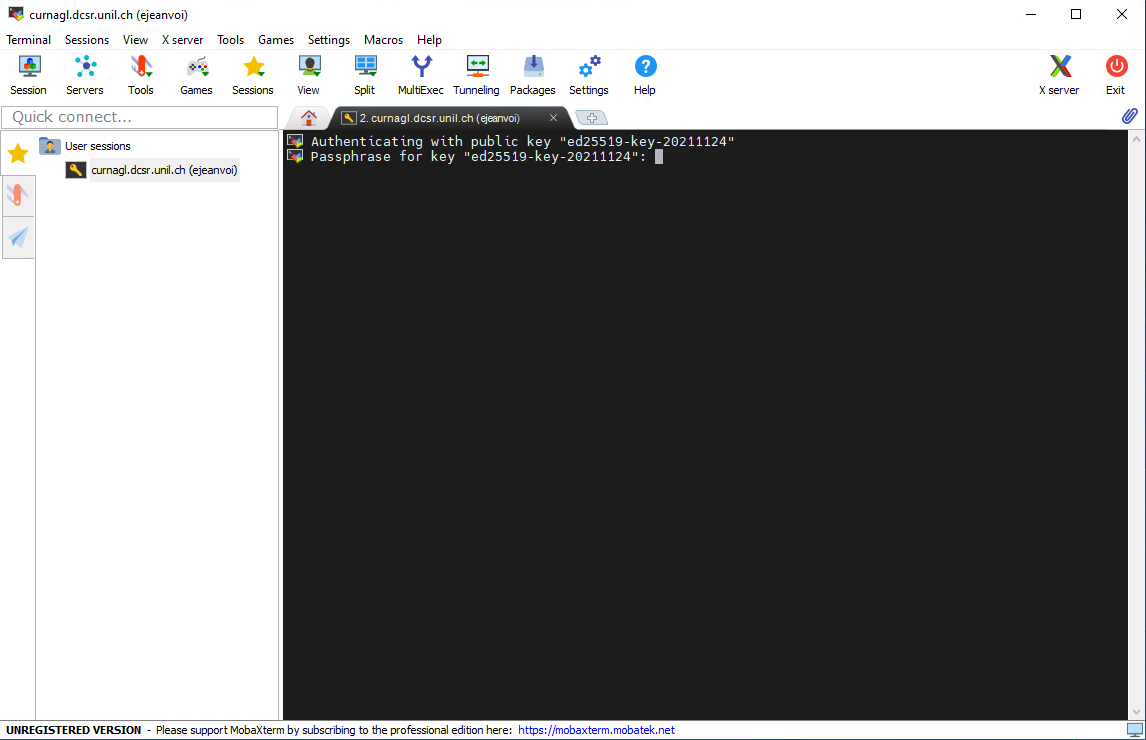
And the next time you will connect, you will be prompted to enter the SSH key passphrase, and not the UNIL account password:
Remote graphical interface
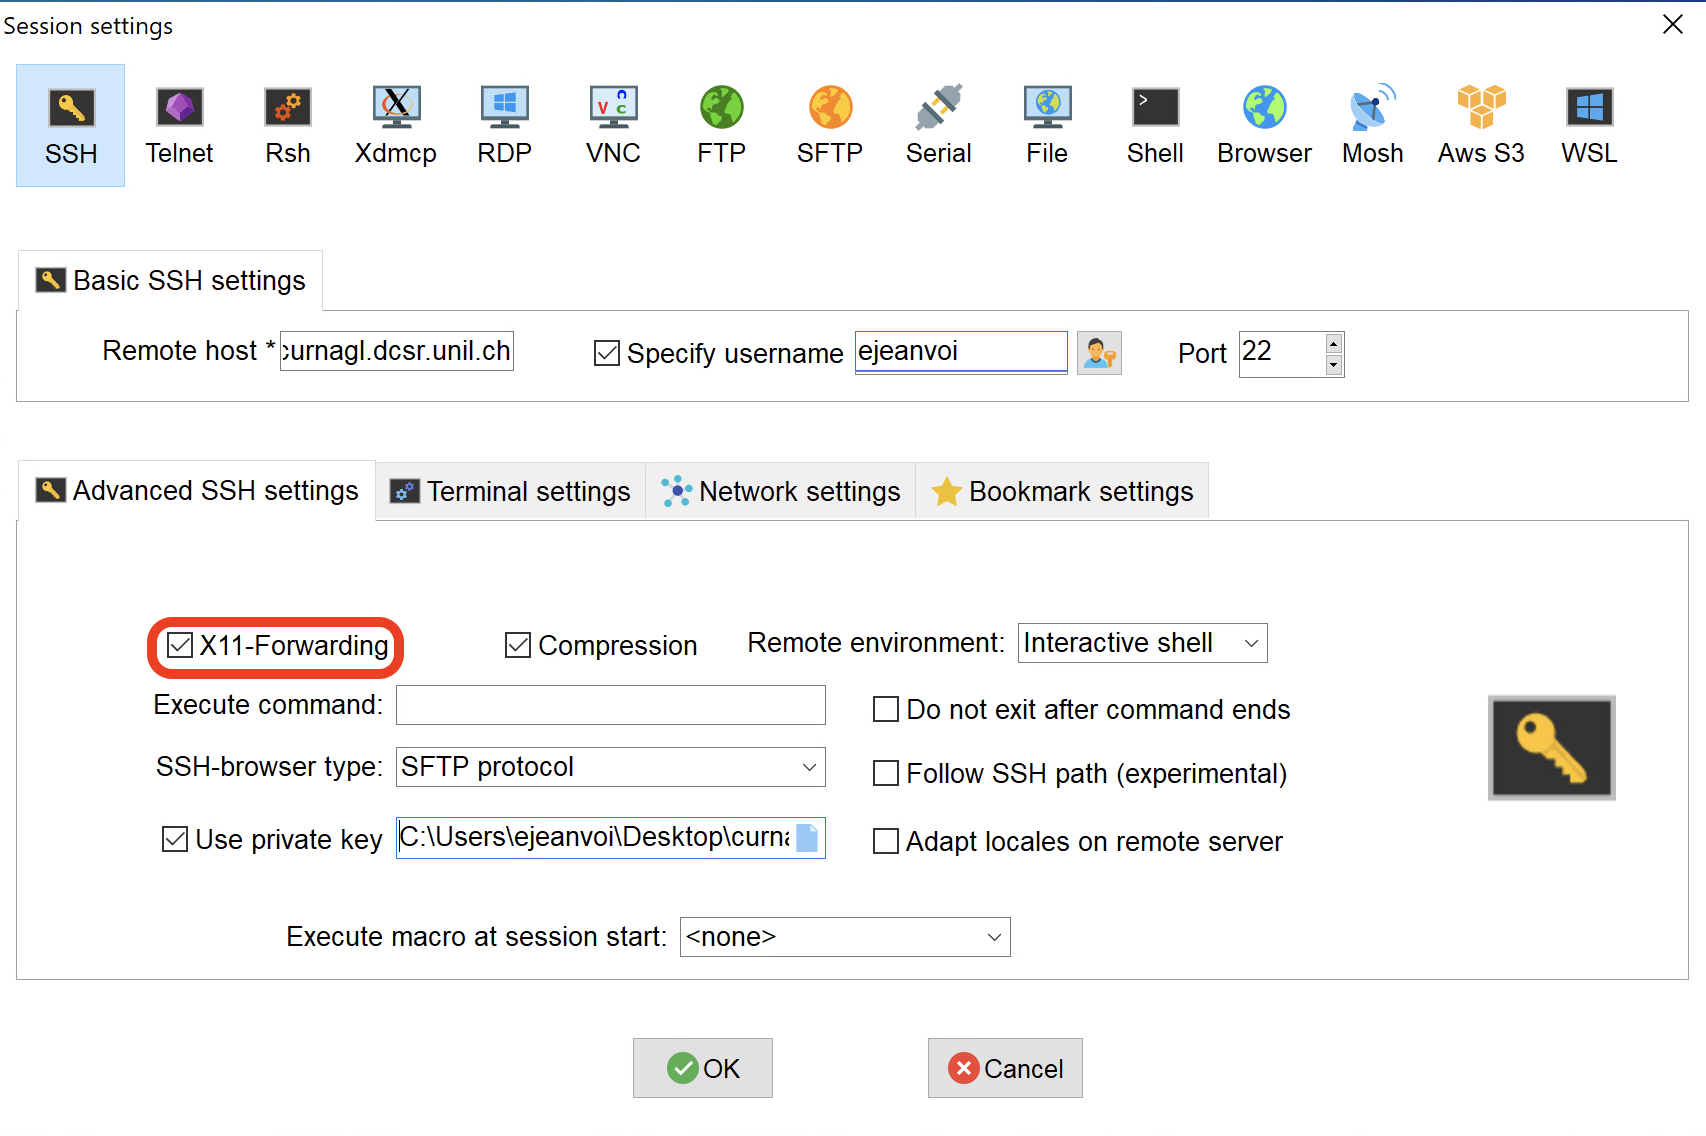
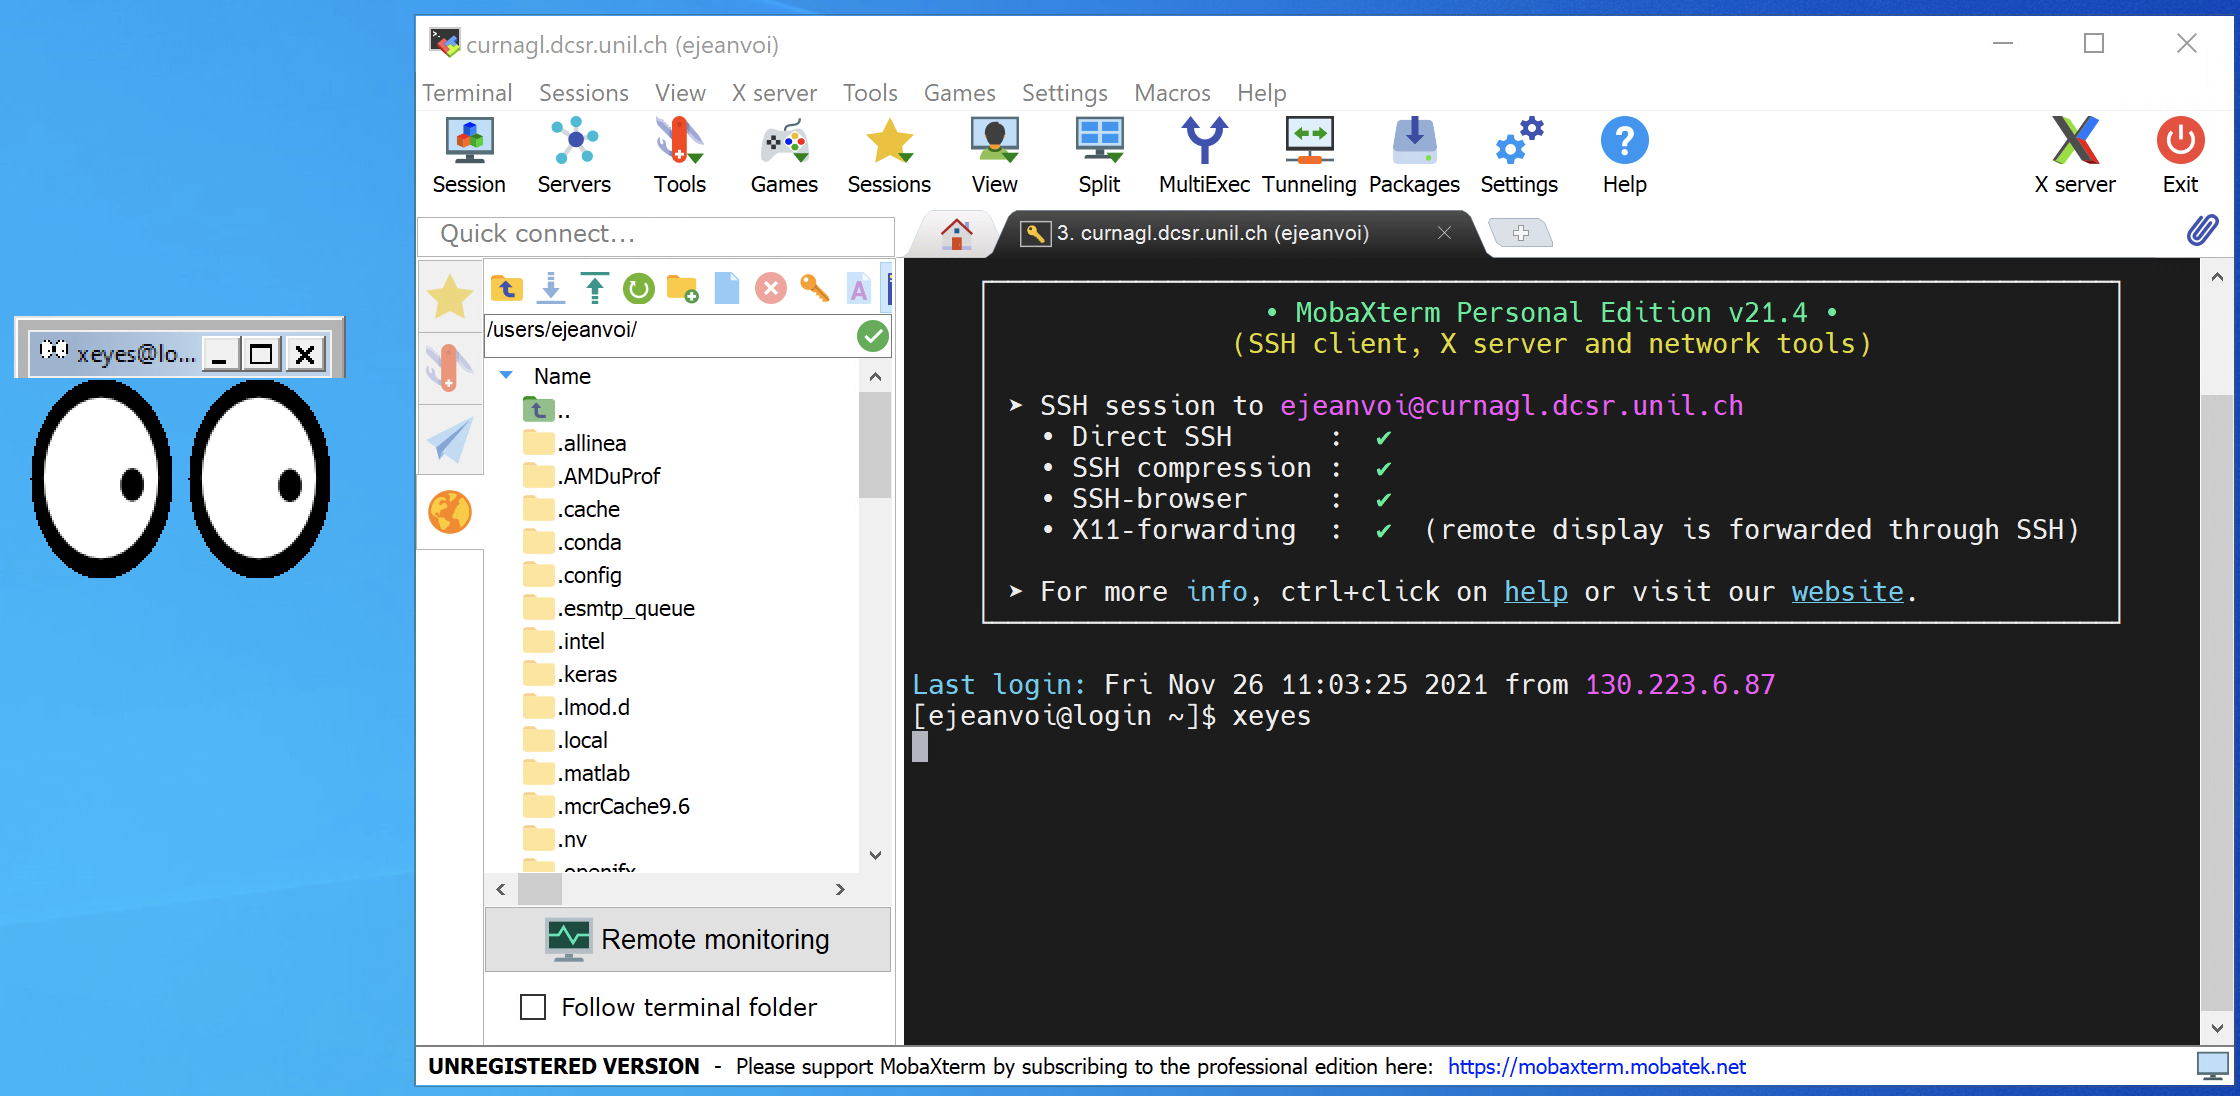
With MobaXterm, it's very easy to use a remote graphical interface. You just have to pay attention to check the "X11-Forwarding" option when you create the session (it should be checked by default):
And then, once connected, you can run any graphical application:
SSH from PowerShell
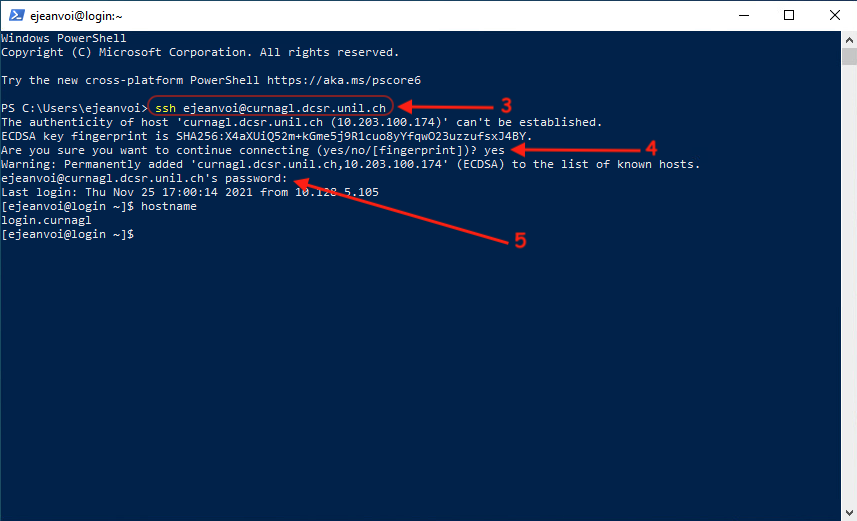
Connection with a password
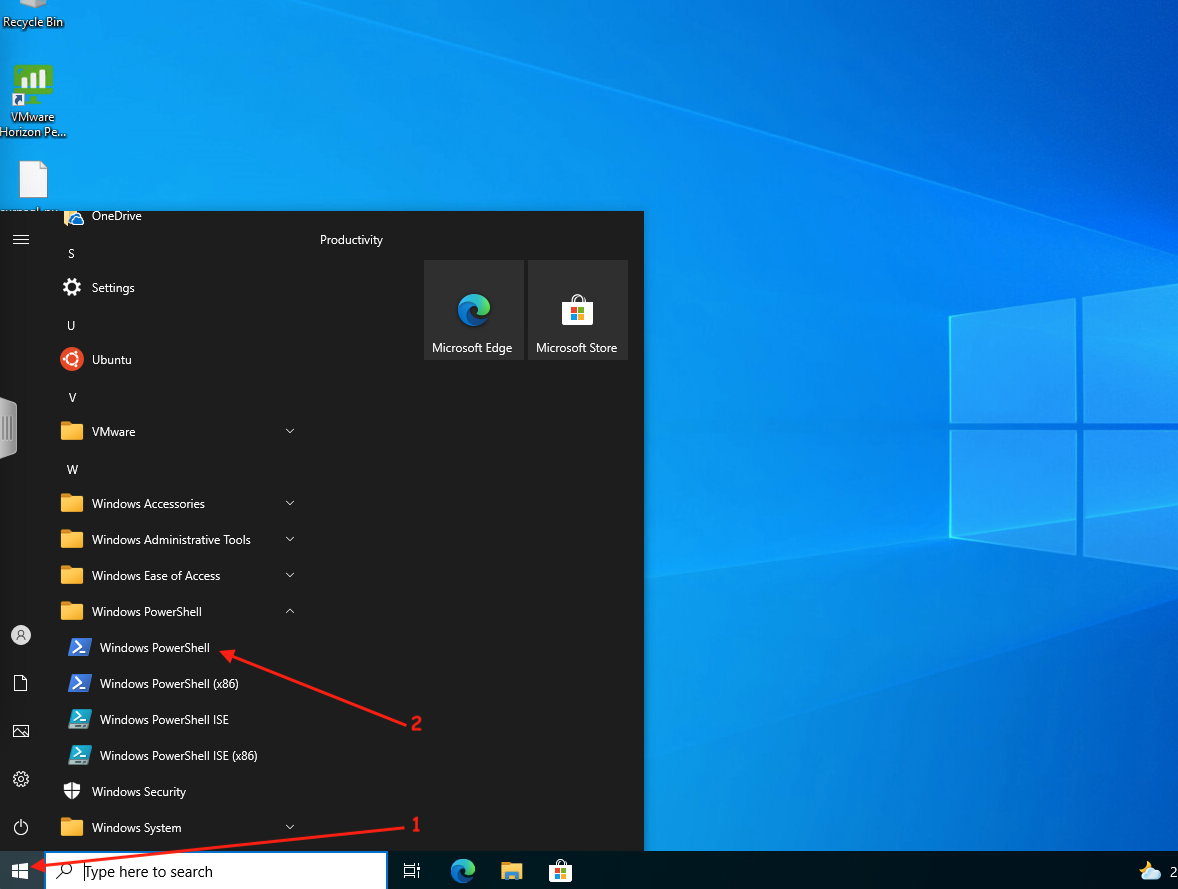
First, you have to run Windows PowerShell:

Once the terminal is here, you can just run the following command, add Curnagl to the list of known hosts, and enter your password (UNIL account):
ssh username@curnagl.dcsr.unil.ch
Connection with a key
First you have to open Windows Powershell:
Then you have to generate the key with the following command:
ssh-keygen -t ed25519
You can accept the default name for the key (just hit Enter), and then you have to choose a passphrase:
Then you have to print the content of the public key, to connect on Curnagl using the password method (with UNIL password, and to execute the following command:
echo "PUBLIC_KEY" >> ~/.ssh/authorized_keys
(of course replace PUBLIC_KEY in the previous command with the value of you public key pasted from the terminal)
If needed, create the .ssh directory with this command:
mkdir .ssh && chmod -R 700 .ssh
Once this is done, you can exit the session, and connect again. This time the passphrase of the SSH key will be asked instead of your UNIL account password:

Checkpoint SLURM jobs
Introduction
As you probably noticed, execution time for jobs in DCSR clusters is limited to 3 days. For those jobs that take more than 3 days and cannot be optimized or divided up into smaller jobs, DCSR's clusters provide a Checkpoint mechanism. This mechanism will save the state of application in disk, resubmit the same job, and restore the state of the application from the point at which it was stopped. The checkpoint mechanism is based on CRIU which uses low level operating system mechanisms, so in theory it should work for most of the applications.
How to use it
First, you need to do the following modifications to your job script:
- You need to source the script /dcsrsoft/spack/external/ckptslurmjob/scripts/ckpt_methods.sh
- Use launch_app to call your application
- (optional) add --error and --output to slurm parameters. This will create two separate files for standard output and standard error. If you need to process the output of your application, you are encouraged to add these parameters, otherwise you will see some errors or warnings from the checkpoint mechanism. If your application generates custom output files, you do not need these options.
- make sure to change requested time by 12h
The script below summarize those changes:
#!/bin/sh
#SBATCH --job-name job1
#SBATCH --cpus-per-task 4
#SBATCH --partition cpu
#SBATCH --time 12:00:00
#SBATCH --mem=16G
#SBATCH --error job1-%j.error
#SBATCH --output job1-%j.out
source /dcsrsoft/spack/external/ckptslurmjob/scripts/ckpt_methods.sh
launch_app $APP
the --time parameter does not limit the duration of the job but It will be used to create the checkpoint. For example for a --time 12:00:00 , after 12 hours the job will be checkpointed and it will be rescheduled some minutes later. The checkpoint uses low level Operating System mechanism so it should work for most of applications, however, there coud be some error with some exotic applications. That is why it is good to check the job after the first checkpointing (12 hours), so as to know if the application is compatible with checkpointing.
Launching the job
Sbatch job.sh
Make sure to use Sbatch and not sbatch. Additionally to the out and error files produced by SLURM, the execution of the job will generate:
- checkpoint-JOB_ID.log: checkpoint log
- checkpoint-JOB_ID: application checkpoint files. Please do not delete this directory until your job has finished otherwise the job will fail.
Make sure not to use the option
#SBATCH --export NONEin your jobs
Job examples:
#!/bin/sh
#SBATCH --job-name job1
#SBATCH --cpus-per-task 1
#SBATCH --partition cpu
#SBATCH --time 12:00:00
#SBATCH --mem=16G
source /dcsrsoft/spack/external/ckptslurmjob/scripts/ckpt_methods.sh
launch_app ../pi_css5 400000000
Tensorflow:
#!/bin/sh
#SBATCH --job-name job1
#SBATCH --cpus-per-task 4
#SBATCH --partition cpu
#SBATCH --time 12:00:00
#SBATCH --mem=16G
export OMP_NUM_THREADS=4
source ../tensorflow_env/bin/activate
source /dcsrsoft/spack/external/ckptslurmjob/scripts/ckpt_methods.sh
launch_app python run_tensorflow.py
Samtools:
#!/bin/sh
#SBATCH --job-name job1
#SBATCH --cpus-per-task 1
#SBATCH --partition cpu
#SBATCH --time 12:00:00
#SBATCH --mem=16G
module load gcc samtools
source /dcsrsoft/spack/external/ckptslurmjob/scripts/ckpt_methods.sh
launch_app samtools sort /users/user1/samtools/HG00154.mapped.ILLUMINA.bwa.GBR.low_coverage.20101123.bam -o sorted_file.bam
Complex job scripts
If your job script look like this:
#!/bin/sh
#SBATCH --job-name job1
#SBATCH --cpus-per-task 1
#SBATCH --partition cpu
#SBATCH --time 12:00:00
#SBATCH --mem=16G
module load gcc samtools
source /dcsrsoft/spack/external/ckptslurmjob/scripts/ckpt_methods.sh
command_1
command_2
command_3
command_4
launch_app command_n
Only the command_n will be checkpointed. The rest of the commands will be executed each time the job is restored. This can be a problem in the following cases:
- command_1, command_2 ... take a considerable amount time to execute
- command_1, command_2 generate input for command_n. This will make the checkpoint fail if the input file differs in size
For those cases, we suggest to wrap all those commands inside a shell script and checkpoint the given shell script.
command_1
command_2
command_3
command_4
command_n
and make the script executable:
chmod +x ./script.sh
job example:
#!/bin/sh
#SBATCH --job-name job1
#SBATCH --cpus-per-task 1
#SBATCH --partition cpu
#SBATCH --time 12:00:00
#SBATCH --mem=16G
module load gcc samtools
source /dcsrsoft/spack/external/ckptslurmjob/scripts/ckpt_methods.sh
launch_app ./script.sh
Make sur to not redirect standard output on your commands, for example,
command > file. If you want to do this, you have to put the command in a different script
Custom location for log and checkpoint files
If you want checkpoints logs and files to be located in a different directory, you can use the following variable:
export CKPT_DIR='ckpt-files'
Be sure to define it either in your shell before submitting the job or in the job script before loading ckpt_methods.sh script. Here below, an example:
#!/bin/sh
#SBATCH --job-name ckpt-test
#SBATCH --cpus-per-task 1
#SBATCH --time 00:05:00
module load python
export CKPT_DIR='ckpt-files'
source /dcsrsoft/spack/external/ckptslurmjob/scripts/ckpt_methods.sh
launch_app python app.py
Email notifications
If you use the options --mail-user and --mail-type on your job you could receive a lot of notifications. The job will be go thorought the normal job cycle start and end several times. So, you will end up with a lot of notification which depends on the walltime of your job.
You can reduce this notifications with:
--mail-type END,FAIL
Resume a failed checkpoint
If for whatever reason the jobs stoped, you can try to reuse the checkpoint created by adding the following variable at your job script:
CKPT_FILES=checkpoint-55214091
You have to change the previous value by the name of the checkpoint directory created by the failed job. Example of the whole job script:
#!/bin/sh
#SBATCH --job-name ckpt-test
#SBATCH --cpus-per-task 1
#SBATCH --time 00:05:00
export CKPT_FILES=checkpoint-55214091
source /dcsrsoft/spack/external/ckptslurmjob/scripts/ckpt_methods.sh
module load python
launch_app python app.py
The slurm output file will be the one that belongs to the previous failed job. The new job will have an empty slurm output.
Applications based on r-light module
r-light module provides R and Rscript commands in different versions using a container. If your job depends on this module you should replace Rscript by the whole singulairity command. Let's suppose you have the following script:
#!/bin/bash -l
#SBATCH --job-name r-job
#SBATCH --cpus-per-task 1
#SBATCH --time 00:05:00
source /dcsrsoft/spack/external/ckptslurmjob/scripts/ckpt_methods.sh
module load r-light
launch_app Rscript test.R
In order to know the whole singularity command, you need to type which Rscript, which will produce the followin output:
Rscript ()
{
singularity exec /dcsrsoft/singularity/containers/r-light.sif /opt/R-4.4.1/bin/Rscript "$@"
}
You copy paste that into your job like this:
#!/bin/bash
#SBATCH --job-name ckpt-test
#SBATCH --cpus-per-task 1
#SBATCH --time 00:05:00
source /dcsrsoft/spack/external/ckptslurmjob/scripts/ckpt_methods.sh
module load r-light
launch_app singularity exec /dcsrsoft/singularity/containers/r-light.sif /opt/R-4.4.1/bin/Rscript test.R
Java applications
In order to checkpoint java applications, we have to use two parameters for launching the application:
-XX:-UsePerfData
This will deactivate the creation of the directory /tmp/hsperfdata_$USER, otherwise it will make the checkpoint restoration fail
-XX:+UseSerialGC
This will enable the Serial Garbage collector which deactivates the parallel garbage collector. The parallel garbage collector generates a GC thread per thread of computation. Thus, making the restoration of checkpoint more difficult due to the large number of threads.
Snakemake
versoin => 8
You need to install a new SLURM plugin that we develop to support checkpoint:
pip install git+https://git.dcsr.unil.ch/Scientific-Computing/snakemake-executor-plugin-slurm
Then you need to activate it and choose a checkpoint frequency in secs, something like:
snakemake --jobs 2 --executor slurm --slurm-checkpoint
The checkpoint will be done 30 minutes before the job ends and the job will be requeued for execution.
(Deprecated) versoins < 8
In order to use the checkpoint mechanism with snakemake, you need to adapt the SLURM profile used to submit jobs into the cluster. Normally the SLURM profile define the following options:
- cluster: slurm-submit.py (This script is used to send jobs to SLURM)
- cluster-status: "slurm-status.py" (This script is used to parse jobs status from slurm)
- jobscript: "slum-jobscript.sh" (Template used for submitting snakemake commands as job scripts)
We need to modify how jobs are launched to slurm, the idea is to wrap snakemake jobscript into another job. This will enable us to checkpoint all processes launched by snakemake.
The procedure consist in the following steps (the following steps are based on the slurm plugin provided here: https://github.com/Snakemake-Profiles/slurm)
Create checkpoint script
Please create the following script and call it job-checkpoint.sh:
#!/bin/bash
source /dcsrsoft/spack/external/ckptslurmjob/scripts/ckpt_methods.sh
launch_app $1
make it executable: chmod +x job-checkpoint.sh. This script should be placed at the same directory as the other slurm scripts used.
Modify slurm-scripts
We need to modify the sbatch command used. Normally a jobscript is passed as a parameter, we need to pass our aforementioned script first and pass the snakemake jobscript as a parameter, as shown below (lines 6 and 9):
def submit_job(jobscript, **sbatch_options):
"""Submit jobscript and return jobid."""
options = format_sbatch_options(**sbatch_options)
try:
# path of our checkpoint script
jobscript_ckpt = os.path.join(os.path.dirname(__file__),'job-checkpoint.sh')
# we tell sbatch to execute the chekcpoint script first and we pass
# jobscript as a parameter
cmd = ["sbatch"] + ["--parsable"] + options + [jobscript_ckpt] + [jobscript]
res = sp.check_output(cmd)
except sp.CalledProcessError as e:
raise e
# Get jobid
res = res.decode()
try:
jobid = re.search(r"(\d+)", res).group(1)
except Exception as e:
raise e
return jobid
Ideally, we need to pass extra options to sbatch in order to control output and error files:
sbatch_options = { "output" : "{rule}_%j.out", "error" : "{rule}_%j.error"}
This is necessary to isolate errors and warnings raised by the checkpoint mechanism into an error file (as explained at the beginning of this page). This is only valid for the official slurm profile as it will treat snakemake wildcards defined in Snakefile (e.g rule).
Export necessary variables
You still need to export some variables before launching snakemake:
export SBATCH_OPEN_MODE="append"
export SBATCH_SIGNAL=B:USR1@1800
snakemake --profile slurm-chk/ --verbose
With this configuration, the checkpoint will start 30 min before the end of the job.
Limitations
- It does not work for MPI and GPU applications
- The application launched should be composed of only one command with its arguments. If you need complex workflows wrapt the code inside a script.
Urblauna access and data transfer
Data Transfer
An SFTP server allows you to import and export data.
From Laptop to Urblauna
Here is the procedure to transfer a file, say mydata.txt, from your Laptop to Urblauna.
From your Laptop:
cd path_to_my_data
sftp <username>@u-sftp.dcsr.unil.ch
You will be prompted for your password and the two factor authentication code as for an SSH connection to Urblauna.
sftp> put mydata.txt
sftp> exit
Your file "mydata.txt" will be in /scratch/username/.
Data is copied to/from your scratch directory ( /scratch/username ) and once there it should be moved to the appropriate storage space such as /data or /archive - please remember that the scratch space is automatically cleaned up.
From Urblauna to Laptop
Here is the procedure to transfer a file, say mydata.txt, from Urblauna to your Laptop.
Log into Urblauna and type:
cp path_to_my_data /scratch/username/
From your Laptop:
sftp <username>@u-sftp.dcsr.unil.ch
You will be prompted for your password and the two factor authentication code as for an SSH connection to Urblauna.
sftp> get mydata.txt
sftp> exit
Your file "mydata.txt" will be in your current working directory.
Job Templates
Here you can find example job script templates for a variety of job types
- Single-threaded tasks
- Array jobs
- Multi-threaded tasks
- MPI tasks
- Hybrid MPI/OpenMP tasks
- GPU tasks
- MPI+GPU tasks
You can copy and paste the examples to use as a base - don't forget to edit the account and e-mail address as well as which software you want to use!
For all the possible things you can ask for see the official documentation
Single threaded tasks
Here we want to use a tool that cannot make use of more than one CPU at a time.
The important things to know are:
- How long do I expect the job to run for?
- How much memory do I think I need?
- Do I want e-mail notifications?
- What modules (or other software) do I need to load?
#!/bin/bash
#SBATCH --cpus-per-task 1
#SBATCH --partition cpu
#SBATCH --mem 8G
#SBATCH --time 12:00:00
#SBATCH --account ulambda_gruyere
#SBATCH --mail-type END,FAIL
#SBATCH --mail-user ursula.lambda@unil.ch
# Load the required software: e.g.
# module purge
# module load gcc
Array jobs
Here we want to run an array job where there are N almost identical jobs that differ only in the input parameters.
In this example we use 1 CPU per task but you can obviously use more (see the multi-threaded task example)
See our introductory course for more details
The important things to know are:
- How long do I expect each individual job to run for?
- How much memory do I think I need per individual job?
- How many array elements do I have?
- How am I going to prepare my inputs for the elements?
- Do I want e-mail notifications?
- What modules (or other software) do I need to load?
#!/bin/bash
#SBATCH --cpus-per-task 1
#SBATCH --mem 8G
#SBATCH --partition cpu
#SBATCH --time 12:00:00
#SBATCH --array=1-100
#SBATCH --account ulambda_gruyere
#SBATCH --mail-type END,FAIL
#SBATCH --mail-user ursula.lambda@unil.ch
# Extract the parameters from a file (one line per job array element)
INPUT=$(sed -n ${SLURM_ARRAY_TASK_ID}p in.list)
# Load the required software: e.g.
# module purge
# module load gcc
Multi-threaded tasks
Here we want to use a tool that makes use of more than one CPU at a time.
The important things to know are:
- How long do I expect the job to run for?
- How much memory do I think I need?
- How many cores can the task use efficiently?
- How do I tell the code how many cores/threads it should use?
- Do I want e-mail notifications?
- What modules (or other software) do I need to load?
Note that on the DCSR clusters the variable OMP_NUM_THREADS is set to the same value as cpus-per-task but here we set it explicitly as an example
#!/bin/bash
#SBATCH --cpus-per-task 8
#SBATCH --mem 64G
#SBATCH --partition cpu
#SBATCH --time 12:00:00
#SBATCH --account ulambda_gruyere
#SBATCH --mail-type END,FAIL
#SBATCH --mail-user ursula.lambda@unil.ch
# Set the number of threads for OpenMP codes
export OMP_NUM_THREADS=$SLURM_CPUS_PER_TASK
# Load the required software: e.g.
# module purge
# module load gcc
MPI tasks
Here we want to use code that uses MPI to allow for distributed memory parallel calculations.
The important things to know are:
- How mank ranks (MPI tasks) do I want to run?
- How does my code performance scale as I increase the number of ranks?
- How much memory do I think I need per rank?
- How long do I expect the job to run for?
- Do I want e-mail notifications?
- What modules (or other software) do I need to load?
Here we give the example of a code that we know runs efficiently with ~100 ranks so we choose 96 as this completely fills two compute nodes.
With MPI tasks always choose a number of tasks that entirely fills nodes: 48 / 96 / 144 / 192 etc - this is where the --ntasks-per-node directive is useful.
As we know that we are using the entire node it makes sense to ask for all the memory even if we don't need it.
#!/bin/bash
#SBATCH --nodes 2
#SBATCH --ntasks-per-node 48
#SBATCH --cpus-per-task 1
#SBATCH --mem 500G
#SBATCH --partition cpu
#SBATCH --time 12:00:00
#SBATCH --account ulambda_gruyere
#SBATCH --mail-type END,FAIL
#SBATCH --mail-user ursula.lambda@unil.ch
# Load the required software: e.g.
# module purge
# module load gcc mvapich2
# MPI codes must be launched with srun
srun mycode.x
Hybrid MPI/OpenMP tasks
Here we want to run a hybrid MPI/OpenMP code where each MPI rank uses OpenMP for shared memory parallelisation.
Based on the code and the CPU architecture we know that 12 threads per rank is efficient - always run tests to find the best ratio of threads per rank!
The important things to know are:
- How mank ranks (MPI tasks) do I want to run?
- How does my code performance scale as I increase the number of ranks and threads per rank?
- How much memory do I think I need per rank (taking into account OpenMP?
- How long do I expect the job to run for?
- Do I want e-mail notifications?
- What modules (or other software) do I need to load?
#!/bin/bash
#SBATCH --nodes 2
#SBATCH --ntasks-per-node 4
#SBATCH --cpus-per-task 12
#SBATCH --mem 500G
#SBATCH --partition cpu
#SBATCH --time 12:00:00
#SBATCH --account ulambda_gruyere
#SBATCH --mail-type END,FAIL
#SBATCH --mail-user ursula.lambda@unil.ch
# Load the required software: e.g.
# module purge
# module load gcc mvapich2
# Set the number of threads for the OpenMP tasks (12 in this case)
export OMP_NUM_THREADS=$SLURM_CPUS_PER_TASK
# MPI codes must be launched with srun
srun mycode.x
GPU tasks
Here we want to run a code that makes use of one GPU and one CPU core - some codes are able to use multiple GPUs and CPU cores but please check how the performance scales!
The important things to know are:
- How mank GPUs do I need (1 or 2)
- How does my code performance scale as I increase the number GPUs?
- How much memory do I think I need for the CPU part of the job.
- How long do I expect the job to run for?
- Do I want e-mail notifications?
- What modules (or other software) do I need to load?
Note the use of the --gres-flags enforce-binding directive to ensure that the CPU part of the code is on the same bus as the GPU used so as to maximise memory bandwidth.
In this example we run 2 tasks per node over 4 nodes for a total of 8 ranks and 8 GPUs.
#!/bin/bash
#SBATCH --cpus-per-task 1
#SBATCH --mem 500G
#SBATCH --partition gpu
#SBATCH --time 12:00:00
#SBATCH --gres gpu:1
#SBATCH --gres-flags enforce-binding
#SBATCH --account ulambda_gruyere
#SBATCH --mail-type END,FAIL
#SBATCH --mail-user ursula.lambda@unil.ch
# Load the required software: e.g.
# module purge
# module load gcc cuda
MPI+GPU tasks
Here we have a code that used MPI for distributed memory parallelisation with one GPU per rank for computation.
The important things to know are:
- How mank GPUs per rank do I need (probably 1)
- How does my code performance scale as I increase the number ranks?
- How much memory do I think I need for the CPU part of the job.
- How long do I expect the job to run for?
- Do I want e-mail notifications?
- What modules (or other software) do I need to load?
Note the use of the --gres-flags enforce-binding directive to ensure that the CPU part of the code is on the same bus as the GPU used so as to maximise memory bandwidth.
In this example we run 2 tasks per node over 4 nodes for a total of 8 ranks and 8 GPUs.
#!/bin/bash
#SBATCH --nodes 4
#SBATCH --ntasks-per-node 2
#SBATCH --cpus-per-task 8
#SBATCH --mem 500G
#SBATCH --partition gpu
#SBATCH --time 12:00:00
#SBATCH --gpus-per-task 1
#SBATCH --gres-flags enforce-binding
#SBATCH --account ulambda_gruyere
#SBATCH --mail-type END,FAIL
#SBATCH --mail-user ursula.lambda@unil.ch
# Load the required software: e.g.
# module purge
# module load gcc mvapich2 cuda
# MPI codes must be launched with srun
srun mycode.x
Urblauna Guacamole / RDP issues
Resolving connnection problems
There can sometimes be communication issues between the web based RDP service (Guacamole) and the RDP client on the login node.
If you are continuously redirected to the page in the image below then you will need to clean up the processes on the login node.
To do so connect using SSH to u-ssh.dcsr.unil.ch and run the following commands making sure to replace the username ulambda with your own username and the session ids with those returned by the command:
$ loginctl list-sessions | grep ulambda | grep c[1-9]
c3 123456 ulambda
c13 123456 ulambda
$ loginctl terminate-session c3 c13
You will then be able to reconnect via u-web.dcsr.unil.ch
Transfer files to/from Curnagl
There are two main optinos to transfer data to/from Curnagl:
- If you are familiar with the terminal use:
scpcommand - If you are familiar with graphich interfaces, use: FileZilla
scp command
scp <FILE_TO_COPY> <FOLDER_WHERE_YOU_PASTE_IT>
scp –r <FOLDER_TO_COPY> <FOLDER_WHERE_YOU_PASTE_IT>
The latter command refers to a folder transfer. To transfer a folder, add the recursive option –r after scp.
From your own computer to the cluster
Nothing better than an example to understand this command. Suppose you have a file (of any type) called tutorial on your own computer. Here are the steps to copy this file to Curnagl cluster:
-
Open a first terminal:
- Linux: open a terminal in the folder where is the file tutorial , or open a terminal and then use
cdcommand to go to the right place. - Mac: type terminal in the search field, choose 'terminal', then use cd command to go to the right place.
- Windows: type cmd in the menu, choose Command prompt or Powershell, then use cd command to go to the right place.
- Linux: open a terminal in the folder where is the file tutorial , or open a terminal and then use
-
Open a second terminal. Connect to Curnagl with the
sshcommand you are used to.
This step is not mandatory but it allows you to get the path where you want to paste tutorial. One tip: in case the path where you want to paste tutorial is very long (e.g.
/users/<username>/<project>/<sub_project>/<sub_sub_project>/<sub_sub_sub_project>) or simply to avoid mistakes when writting the path: usepwdcommand in the right folder on this second terminal connected to Curnagl, copy the whole path and paste it to the end of thescpcommand (see below).
Open two shell interfaces/terminals: first one where the current path is on your own/local laptop, the second one where you are logged on Curnagl frontend.
- Let's copy/paste
tutorialfile to/users/<username>/<project>on Curnagl, with<username>as your personal username and<project>as the directory wheretutorialshould be pasted. On the first terminal, with your working directory being the one wheretutorialis located, run the following command (it will ask for your password):
scp tutorial <username>@curnagl.dcsr.unil.ch:/users/<username>/<project>`
You can check either the copy/paste performed well or not: use
lscommand on Curnagl and check either if tutorial file is there or not.
From the cluster to your own computer
Only step 3 changes:
scp <username>@curnagl.dcsr.unil.ch:/users/<username>/<project>/tutorial .
In case you do not want to paste it in the current folder (that is for what . stands for at the end of the above command line), simply replace . with the correct path.
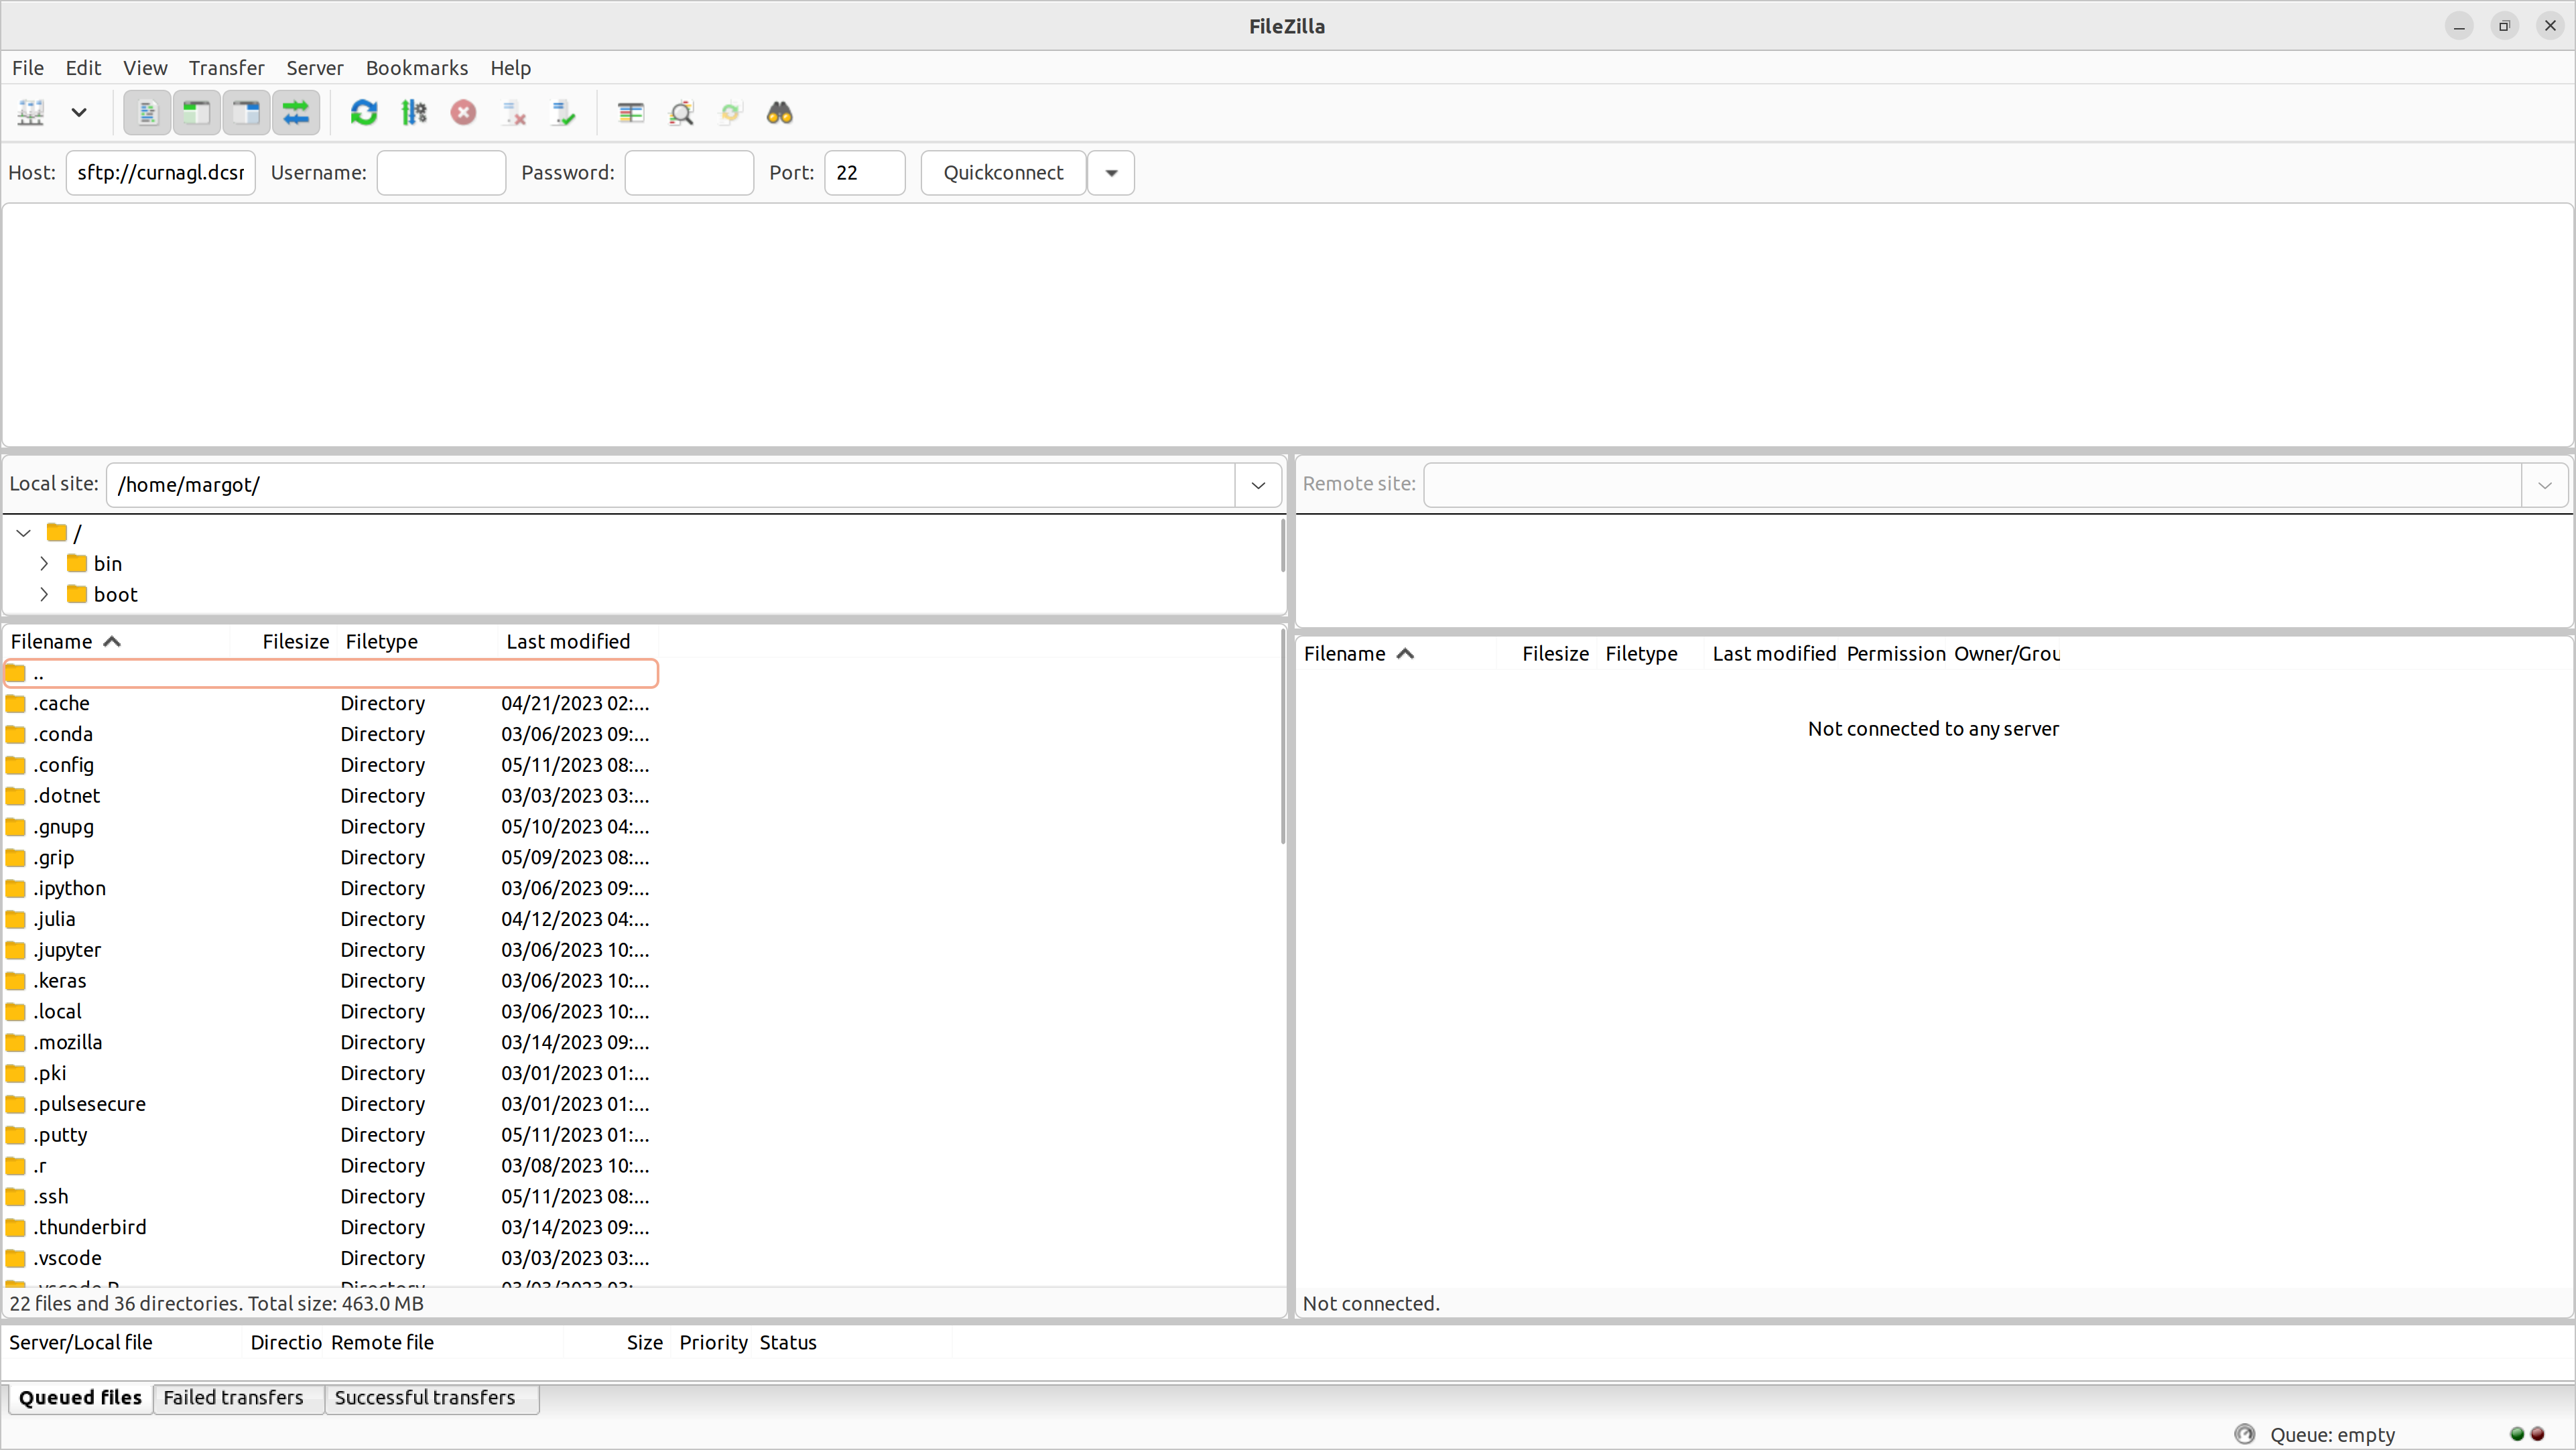
Second option: Filezilla
First, you must install FileZilla on your computer. Please refer to: https://filezilla-project.org/ (install client version, more documentation on https://wiki.filezilla-project.org/Client_Installation).
Here are the steps to transfer data to/from Curnagl with FileZilla:
- Open FileZilla. Performa a quick connection to Curnagl. Fill in
Hostwith:sftp://curnagl.dcsr.unil.ch
- Then fill in
Username,Password, andPortwith 22. Click onQuickconnect. Refer to the screeshot below.
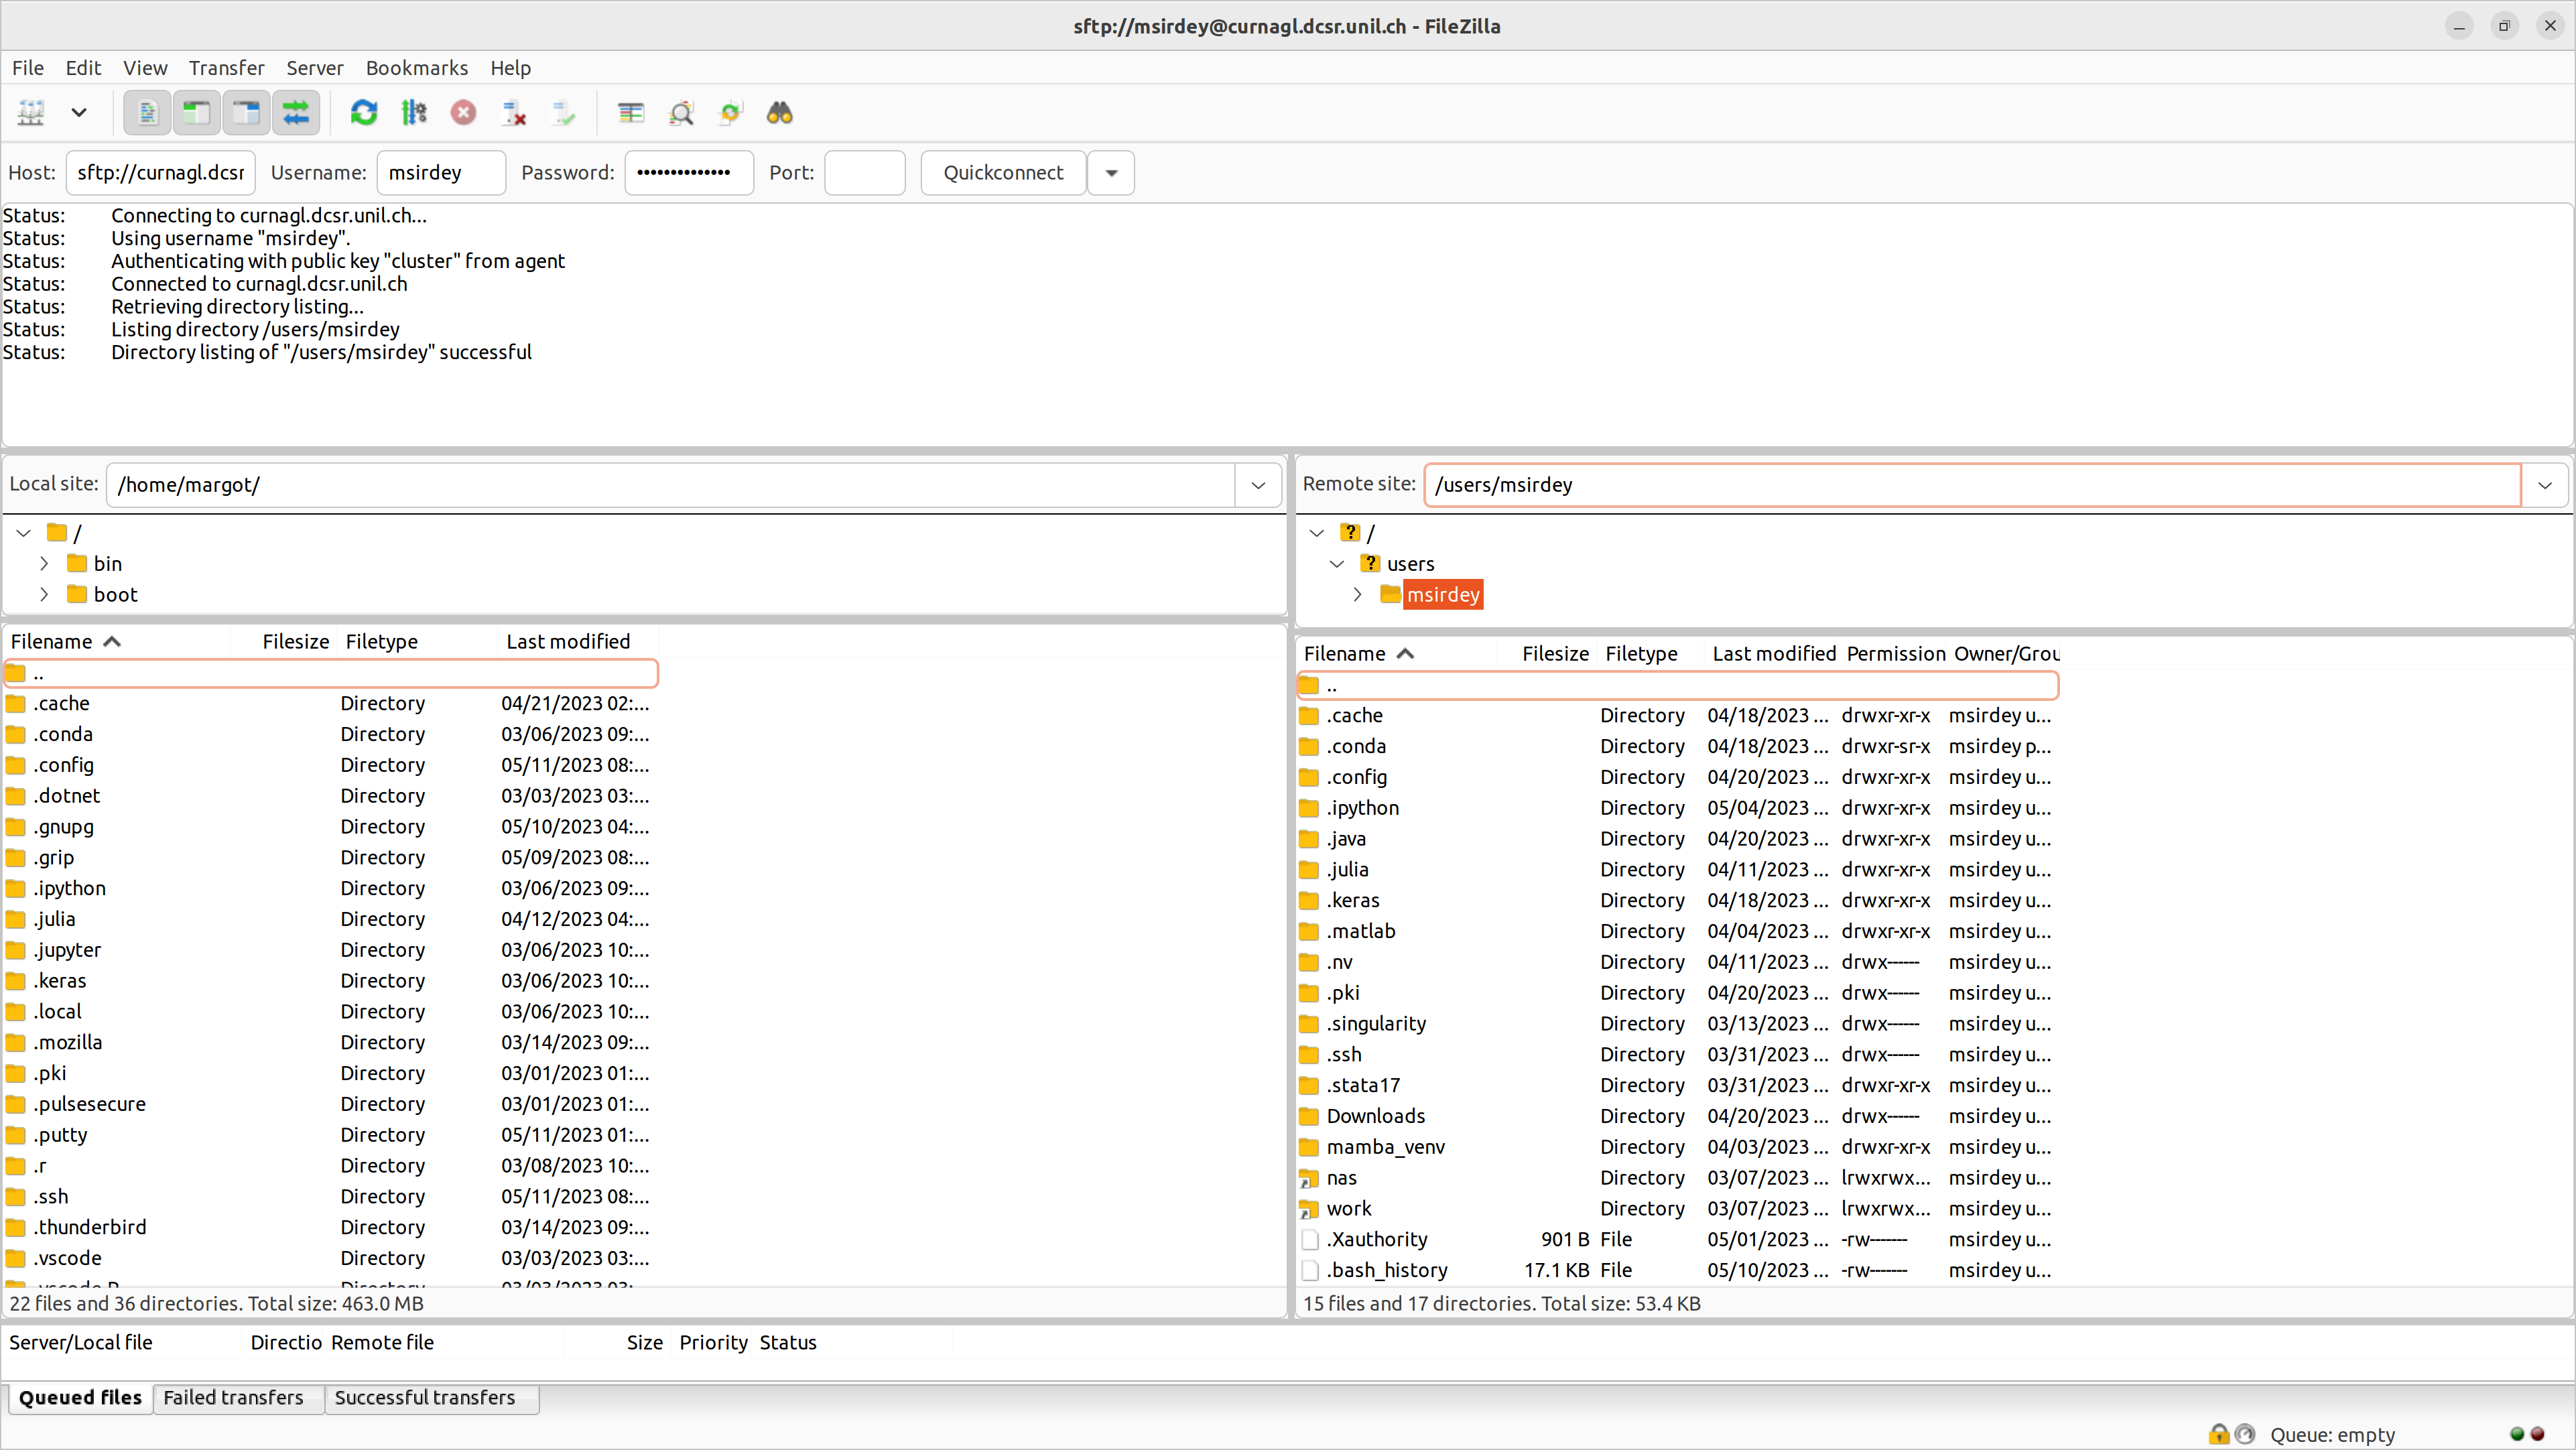
You have the remote site window on the right.click and move file/folder from the left window (local site) to the right window (remote site). Inversely, to transfer data from Curnagl: click and move file/folder from the right window (remote) to the left window (local site).
Instead of
/home/margot/on the left local site (respectively/users/msirdey/on the right remote site), you should see your own path on your computer (respectively on Curnagl).
FileZilla keeps remote sites in memory. For future transfers, click on the arrow on the right of
Quickconnectand choosesftp://curnagl.dcsr.unil.ch.
Transfert S3 DCSR to other support
Data in the S3 DCSR should be transfert to another file system as soon as possible. There is no backup for S3 data. This documentation describes the transfert using Curnagl cluster and the rclone command.
Introduction
What is S3?
Amazon S3 (Simple Storage Service) is a scalable object storage service used for storing and retrieving any amount of data at any time. It organizes data into containers called “buckets.” Each bucket can store an unlimited number of objects, which are the fundamental entities stored in S3.
Understanding S3 Bucket Structure:
- Buckets: These are the top-level containers in S3. Each bucket has a unique name and is used to store objects.
- Objects: These are the files stored in a bucket. Each object is identified by a unique key (or ID) within the bucket.
- Object Keys: While S3 does not have a traditional file system hierarchy, it uses a flat namespace. The / character in object keys is used to simulate a directory structure, making it easier to organize and manage objects. However, these are not actual directories but part of the object’s key. S3 Endpoint Access
Accessing S3 is similar to accessing any other web service over HTTP, which most users are already familiar with. The endpoint URL follows the same structure as a typical web address, making it straightforward to understand and use.
An S3 endpoint address typically looks like this: https://dnsname.com/bucket-name/object-key
- Endpoint: https://dnsname.com
- Bucket Name: bucket-name
- Object Key: object-key
For example, if you have a bucket named my-bucket and an object with the key folder1/file.txt, the S3 URL would be: https://dnsname.com/my-bucket/folder1/file.txt
IAM Key Pairs
To access and manage your S3 resources securely, you will use IAM (Identity and Access Management) key pairs instead of a traditional login and password. An IAM key pair consists of an Access Key ID and a Secret Access Key. These keys are used to authenticate your requests to AWS services. • Access Key ID: This is similar to a username. • Secret Access Key: This is similar to a password and should be kept secure.
Unlike a traditional login and password, different IAM key pairs can be attached to different sets of permissions defined in their policy files. These policies control what actions the keys are allowed to perform, enhancing security by ensuring that each key pair has only the necessary permissions for its intended tasks.
Requirements
- Have an account in the cluster
- Enough space in NAS or work to transfert the data
Rclone configuration
Use a text editor to create a configuration file in your home directory. Be sure to replace the S3 server name and the cryptographic key values with the ones sent in the email S3 form DCSR.
mkdir -p ~/.config/rclone
nano ~/.config/rclone/rclone.conf
The configuration file should look like this :
[s3-dci-ro]
type = s3
provider = Other
access_key_id = T******************M
secret_access_key = S**************************************i
region =
endpoint = https://scl-s3.unil.ch
For many different S3 tools, the pair of authentication/cryptographic keys have different names. For Rclone, they are named access_key_id and secret_access_key. Corresponding respectively to Access key and Private key in the mail sent by DCSR.
Next, secure your key file:
chmod 600 ~/.config/rclone/rclone.conf
Now, s3-dci-ro is a S3 configured connection alias that you can use in Rclone without repeating the connection information in the CLI.
s3-dci-ro: In this connection alias, the cryptographic keys are assigned to a user attached to a read-only policy on the S3 cluster. This prevents you from modifying or accidentally deleting your source data when using this connection alias.
Use Rclone in CLI on the Curnagl front node
List the content of your bucket named "bucket1" (This command only show the directories.).
rclone lsd s3-dci-ro:bucket1
rclone lsd s3-dci-ro:bucket1/dir1
You can use rclone lsf command to list the file and the folders.
Within an S3 cluster, all entities are represented as URLs that point to specific objects. These objects are stored uniformly, without any inherent hierarchical structure. The concept of "folders" does not truly exist. However, by convention, the "/" character in the Object IDs (the URLs) is interpreted as a folder delimiter by the S3 client application. Consequently, the "ls" command essentially performs a filtering and sorting operation on information stored at the same level. This approach does not scale well, hence, it is not advisable to execute an "ls" command on a significantly large number of files or objects.
The differents ways to do a listing of files and folders on S3 with Rclone are described on the following pages:
The command rclone copy -v can be utilized to copy all files from a source folder to a destination folder. It's important to note that rclone does not duplicate the initial folder, but only its file contents into the destination folder. Furthermore, rclone does not recopy a file if it already exists in the destination, allowing for the resumption of an interrupted copy operation.
When launching a copy operation in the background with an ampersand & or a screen/tmux, it is recommended to use a log file with the verbosity set to -v. This log file will collect information about the copied files, errors, and provide a status update every minute on the amount of data copied so far.
Here is an example of a command to copy a subset of your data from your DCI S3 bucket to an LTS sub-folder on the Isilon NAS of the DCSR. Please substitute the paths to be relevant for your use case.
rclone copy -v --log-file=$log_file.log $connection_alias:$bucket/$path $NAS_PATH
You need to adapt the following parameters:
$log file: path to the rclone log file$connection_alias: connection alias (e.g., s3-dci-ro)$bucket: S3 bucket name sent by email$path: directory path you whant to access inside the bucket$NAS_PATH: This is your destination folder path on the DCSR NAS
It should give you something like:
rclone copy -v --log-file=./rclone_to_LTS.log s3-dci-ro:bucket/dir1/dir2 /nas/FAC/Faculty/Unit/PI/project/LTS/project_toto
If the copy operation is expected to take an extended period of time, and you need to disconnect your terminal sessions, you can execute the Rclone commands within a tmux session. Tmux is available on the Curnagle cluster. More information here on its usage.
To monitor the copy process and identify potential errors, you can view the progress of the copy operation by opening the Rclone log file using the Linux "tail" command:
tail -f rclone_to_LTS.log
Every minute, a consolidated status of the transfer will be displayed in the logs. You can exit the tail command by pressing CTRL+C.
Upon completion of the transfer, a summary of the copy process, including any errors, will be available at the end of the log file. It is recommended to verify that there are no errors for each copy session.
Job script template to perform copy
To transfer data from the S3 storage cluster to the /scratch/... or /work/... directory on Curnagl, you will need to modify the rclone_ro_s3_copy.sh SLURM submission file shown here.
#!/bin/bash -l
#SBATCH --mail-user $user.name@unil.ch
#SBATCH --job-name rclone_copy
#SBATCH --time 1-00:00:00
#SBATCH --mail-type ALL
#SBATCH --output %x-%j.out
#SBATCH --cpus-per-task 4
#SBATCH --mem 1G
#SBATCH --export NONE
## Name of your S3 Bucket (sent by email from DCSR)
S3_BUCKET_NAME=""
# Path to the source folder within the S3 bucket to be replicated by rclone
# (only de content of this folder will be coipied in the destination, not the folder itself !)
IN_BUCKET_SOURCE_PATH=""
# Path to the destination folder in which the data wil be copied
DESTINATION_PATH=""
# Do not change the code after this line
mkdir -p $DESTINATION_FOLDER_PATH
rclone copy -v --log-file=$SLURM_JOB_NAME.log --max-backlog=1000 s3-dci-ro:$S3_BUCKET_NAME/$IN_BUCKET_SOURCE_PATH $DESTINATION_PATH
You should edit the previous file with your real email account and you should put a value for the S3_BUCKET_NAME, IN_BUCKET_SOURCE_PATH and DESTINATION_PATH variables.
Submit it from the front node of the Curnagl cluster with the sbatch command:
sbatch rclone_ro_s3_copy.sh
Please refrain from running more than one copy job at a time, either to the NAS or the HPC storage, as the IOPS on the storage systems on both the source and destination are limited resources.
Transfert file from cluster to S3
If you want to put thing on the S3, you should use the following command:
rclone copy -v /nas/FAC/Faculty/Unit/PI/project/LTS/project_toto s3-dci-ro:bucket/dir1/dir2 --s3-no-check-bucket
it is important to not forget the option
--s3-no-check-bucket
Performance expected
These are some measures taken on 18/09/2025.
From S3 to NAS
Directory with several fies:
Transferred: 18.210 GiB / 18.210 GiB, 100%, 11.818 KiB/s, ETA 0s
Transferred: 9 / 9, 100%
Elapsed time: 3m47.2s
From /work to S3
One big file:
Transferred: 2.830 GiB / 2.830 GiB, 100%, 161.094 MiB/s, ETA 0s
Transferred: 1 / 1, 100%
Elapsed time: 18.9s
Directory with several files, 20GB:
Transferred: 18.358 GiB / 18.358 GiB, 100%, 197.257 MiB/s, ETA 0s
Transferred: 2093 / 2093, 100%
Elapsed time: 1m33.8s