# FAQ
### Where can I see the amount of free space on my mailbox?
The info is available in Outlook Online (web)
Mailbox storage information is not available on the desktop apps. It is only available via a Web browser.
1. Connect to *Outlook Online* here: [https://outlook.office.com](https://outlook.office.com)
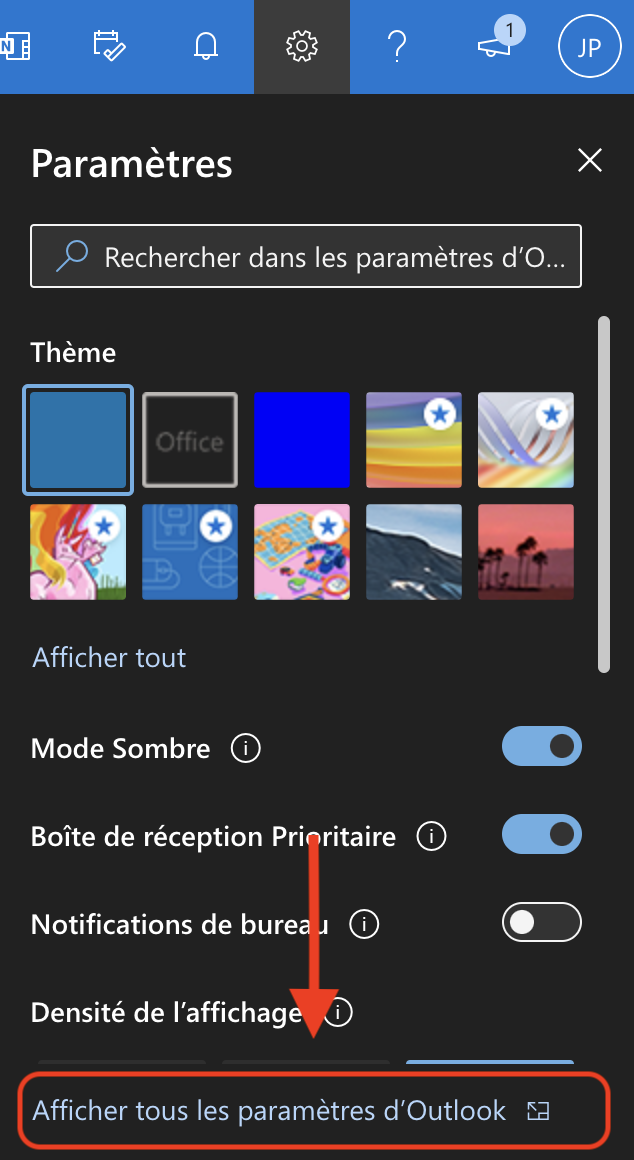
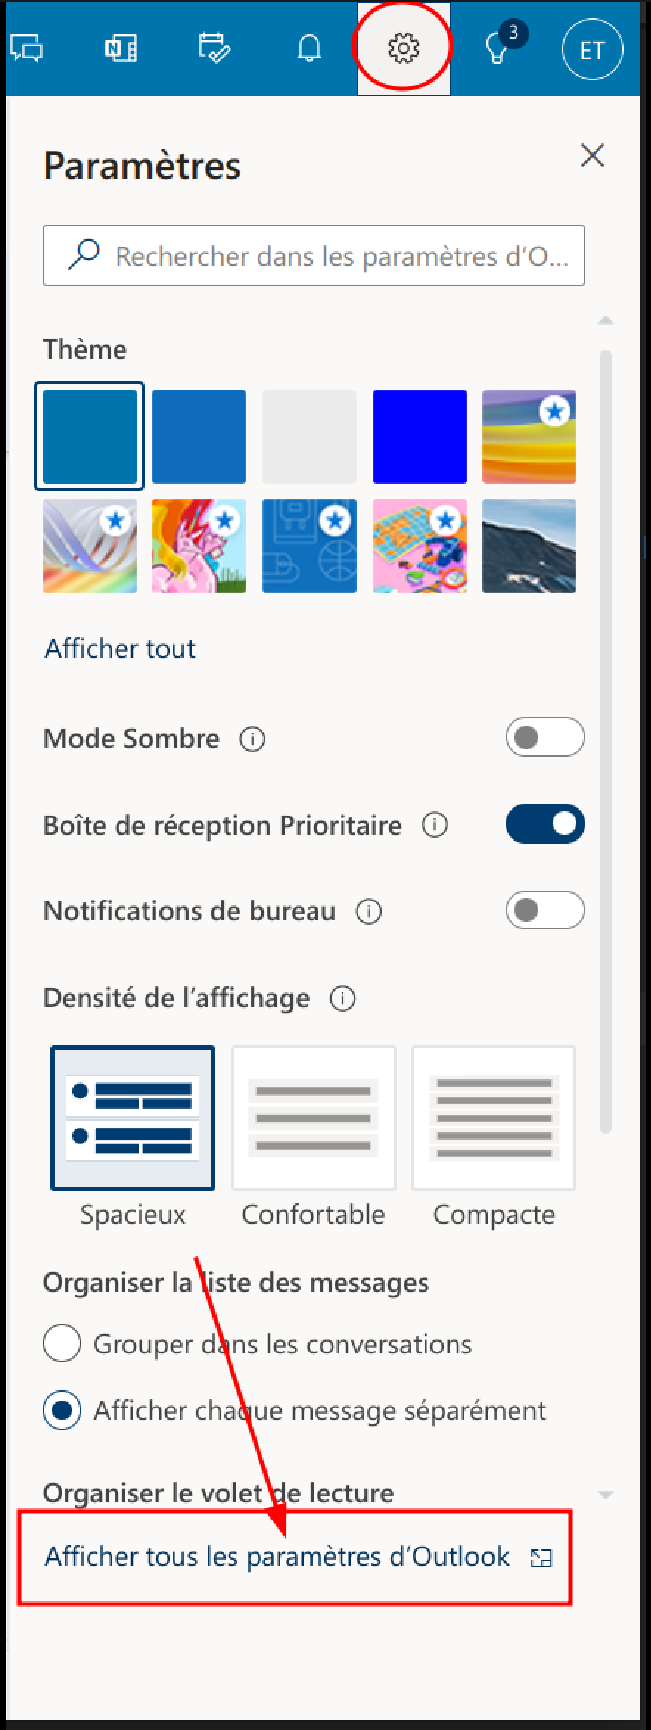
2. Click on the gears in the top right, then on *Show all Outlook Parameters*
[](https://wiki.unil.ch/ci/uploads/images/gallery/2022-03/image-1648044350893-56-58.png)
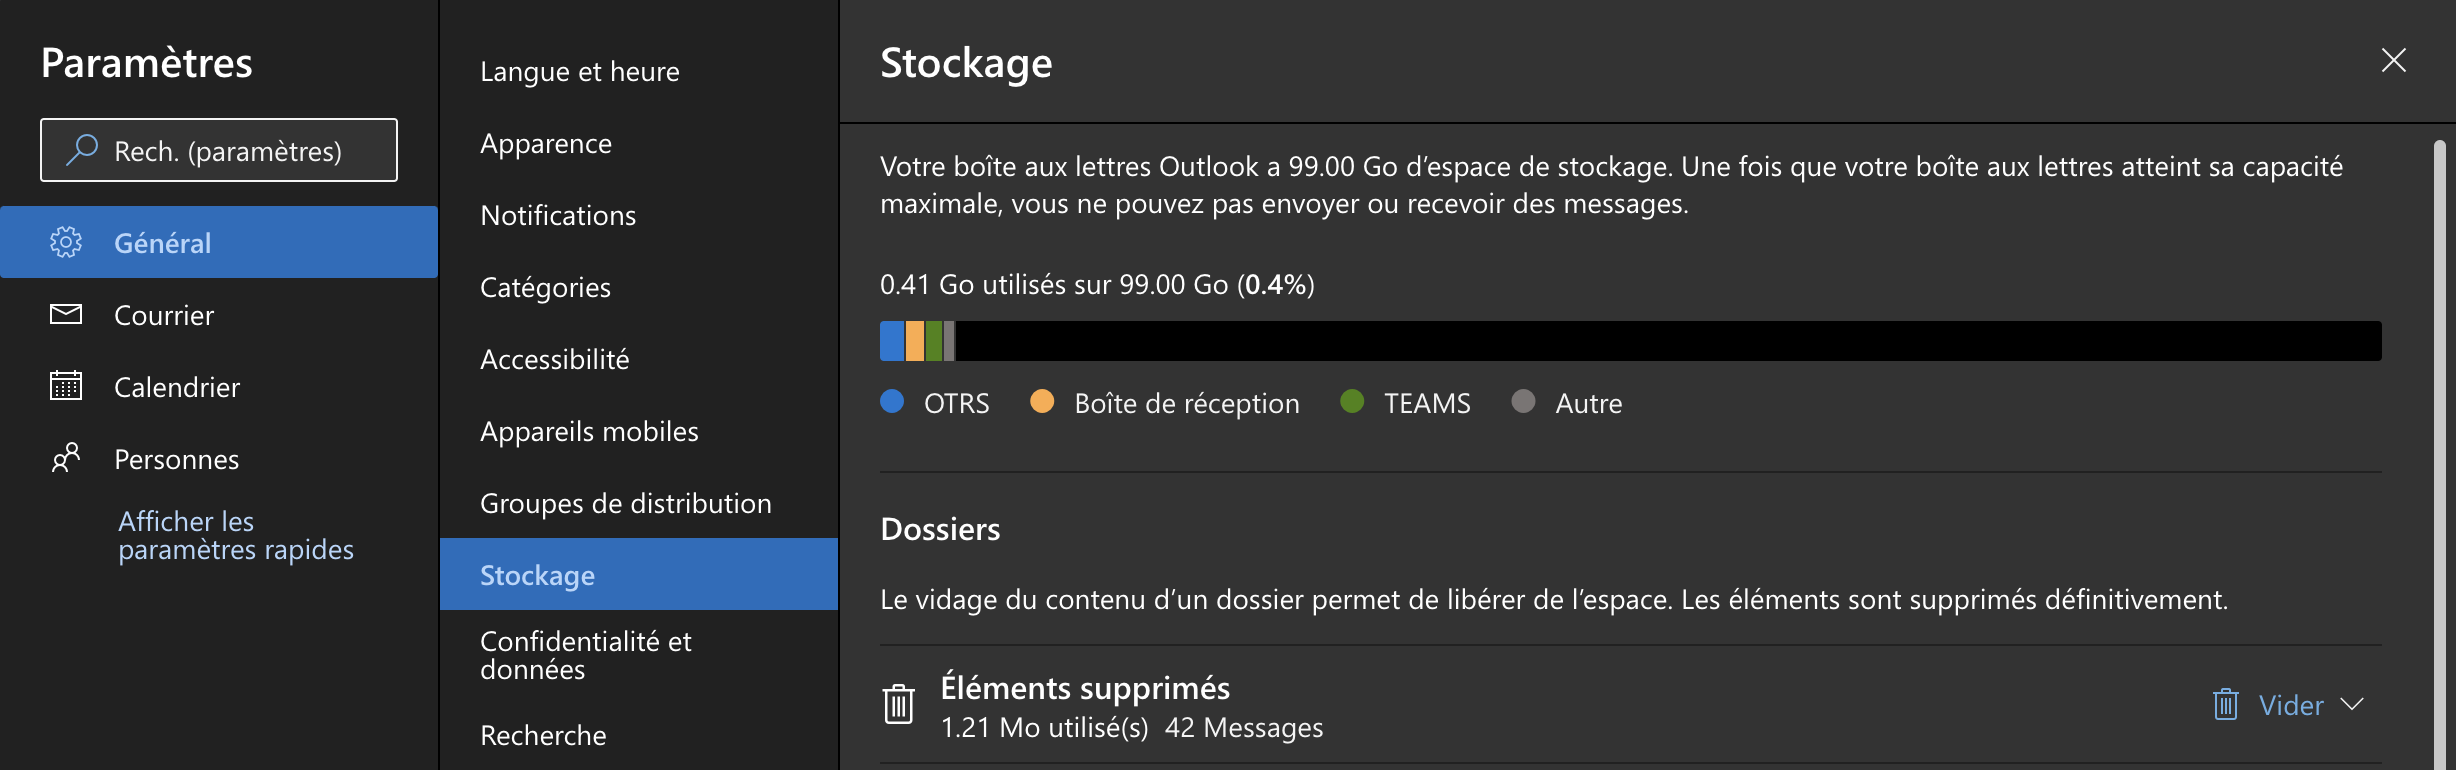
3. Go to the *General* tab, then *Storage*
You can set an automatic reply in Outlook Online (web)
1. Connect to *Outlook Online* here: [https://outlook.office.com](https://outlook.office.com)
2. Once connected, click on the gear on the top right of the window then click on *Show all Outlook settings*
[](https://wiki.unil.ch/ci/uploads/images/gallery/2023-03/am7image.png)
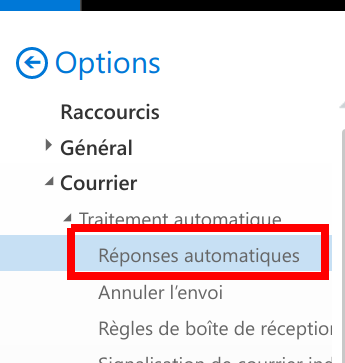
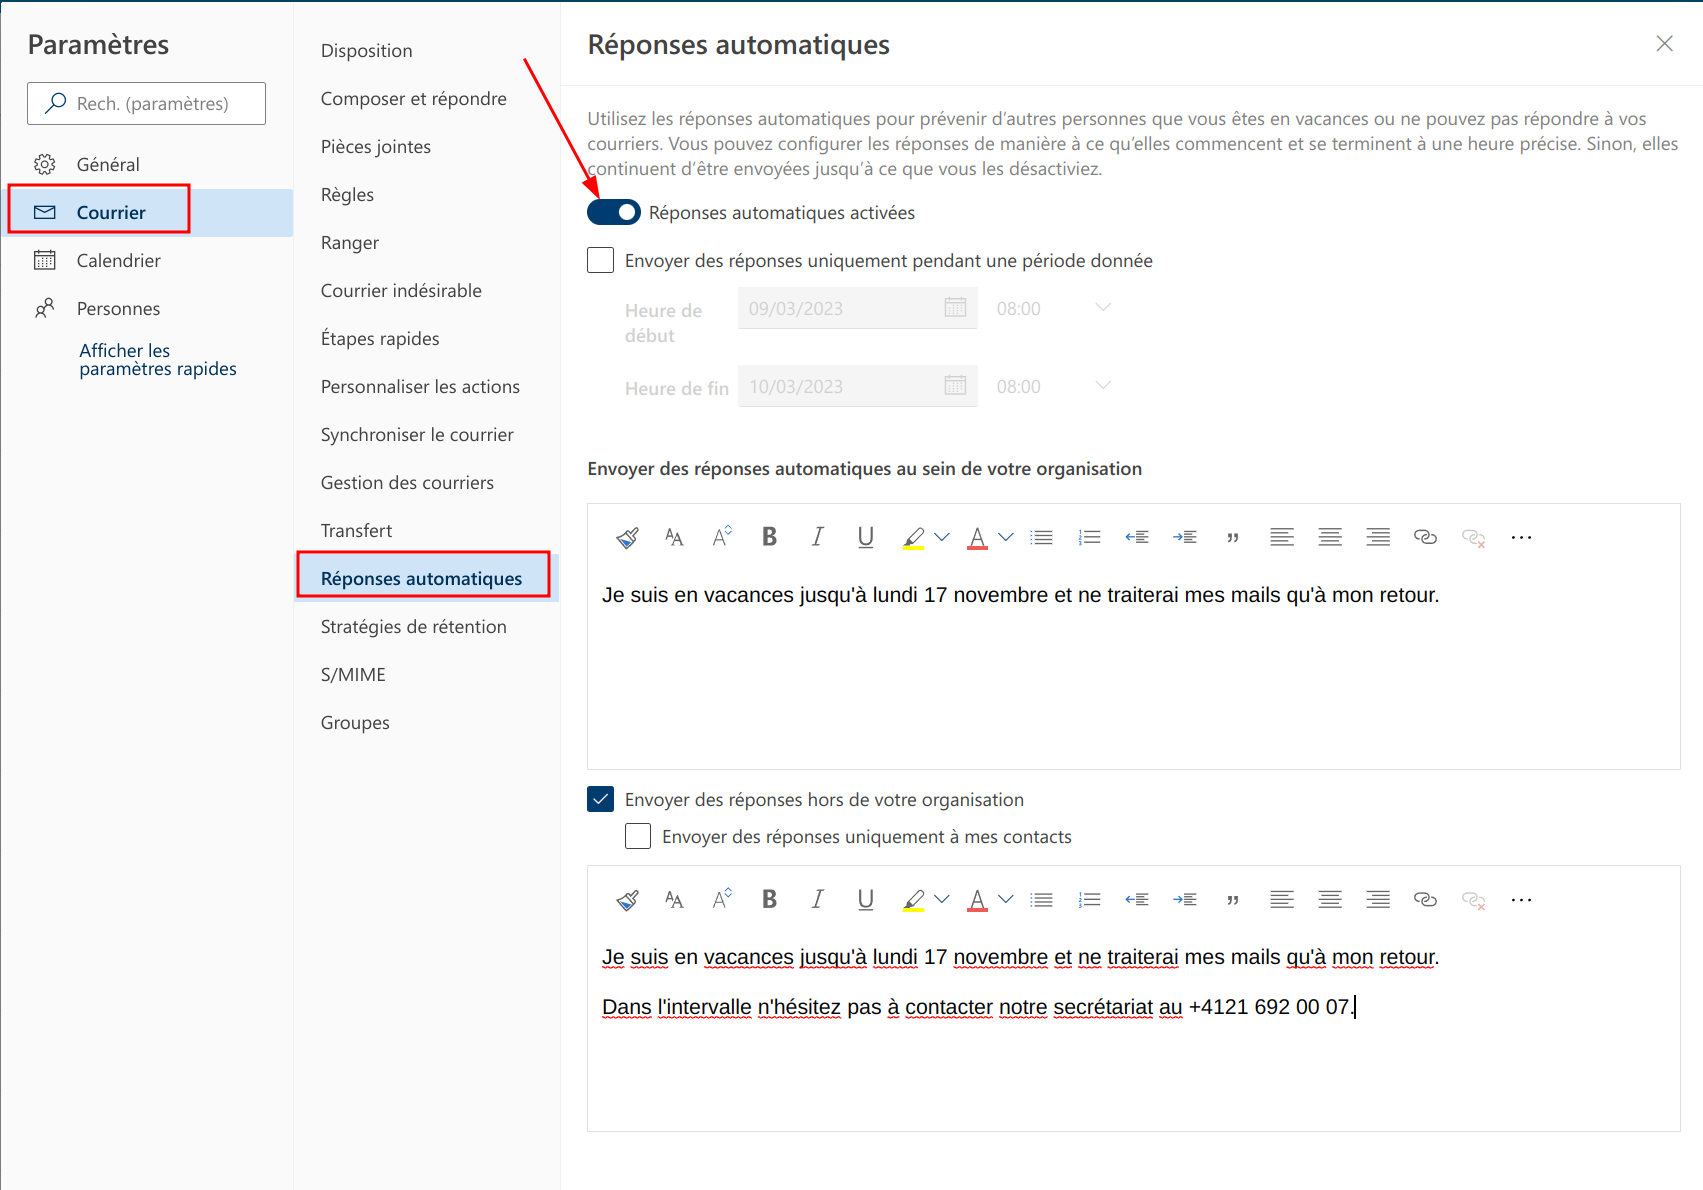
3. Go to *Mails*, then *Automatic treatment* and finally *Automatic replies.*
[](https://wiki.unil.ch/ci/uploads/images/gallery/2019-10/owa_oof1.png)
4. Turn on *Automatic replies enabled*
[](https://wiki.unil.ch/ci/uploads/images/gallery/2023-03/aB5image.png)
You need two entries: one for Unil members, and one for people that are not Unil members. To do so, select *Send replies to people that are not in your organization* and add another automatic reply there.
[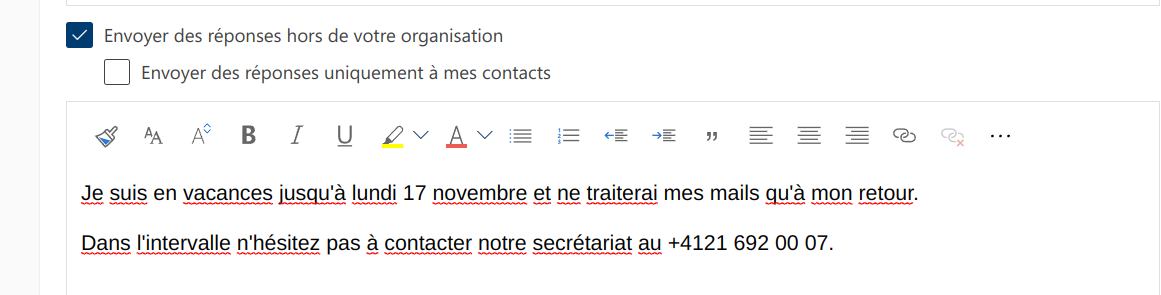](https://wiki.unil.ch/ci/uploads/images/gallery/2023-03/4Mximage.png)
Don't forget to disable automatic replies when you're back!
The setting is available in Outlook Online (web)
By redirecting your Unil emails to your private, external mailbox, **you are trusting external entities** with their contents. Therefore, **the Centre Informatique does not provide any kind of support for external email providers and will not and cannot be held responsible for any prejudice and damage caused by the use of the aforementioned external email providers.**
**If you are employed by the university, using an external service may go against the [internal UNIL directives](https://www.unil.ch/interne/files/live/sites/interne/files/textes-leg/6-inf/dir6-9-fichiers-info3.pdf).**
For students only!
*Outlook Online* provides various options to either redirect all or some of your incoming emails. These options can all be set in the *Outlook Online* settings.
1. Connect to *Outlook Online* here: [https://outlook.office.com](https://outlook.office.com)
2. Once connected, click on the gear on the top right of the window then click on *Show all Outlook settings*
[](https://wiki.unil.ch/ci/uploads/images/gallery/2023-03/BLYimage.png)
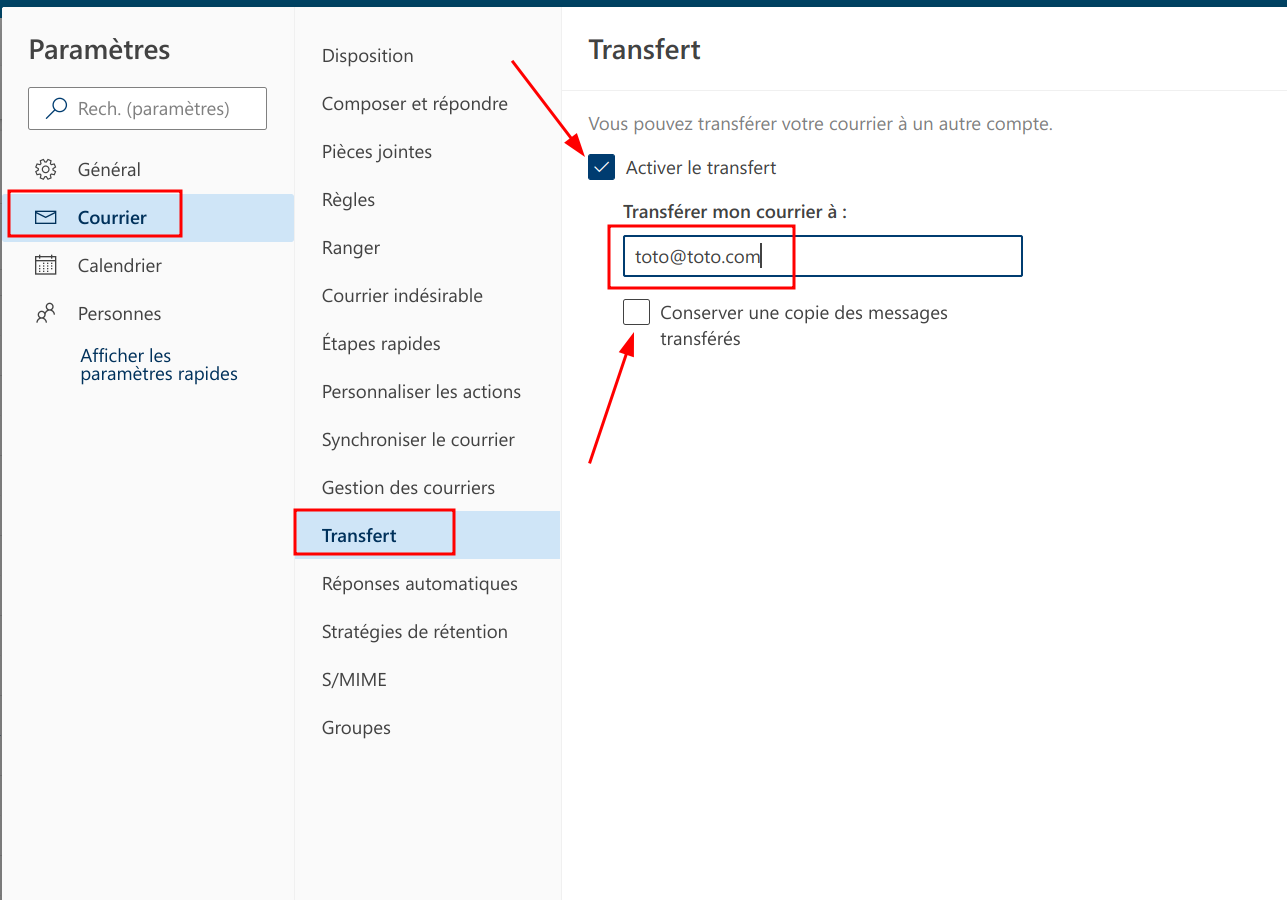
3. Go to the *Mail* tab, then *Transfert* and tick *Enable transfer.* Enter the email address you would like the emails to be transferred to.
We advise users to also tick the option to keep a copy of the transferred emails to ensure that they do not lose emails in case they get bounced by the second mailbox.
[](https://wiki.unil.ch/ci/uploads/images/gallery/2023-03/UmGimage.png)
Just click the "Cci" label when you're writing your email in Outlook Online (web)
1. Connect to *Outlook Online* here: [https://outlook.office.com](https://outlook.office.com)
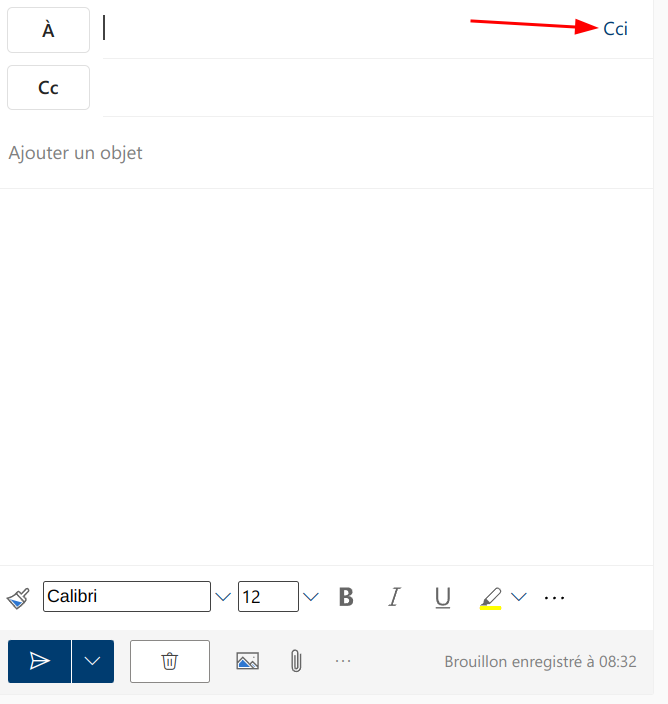
2. Select *New email*
3. You can now click on the *Cci* label
[](https://wiki.unil.ch/ci/uploads/images/gallery/2023-03/DU3image.png)
4. If you would like to always have the *Cci* field displayed, you can enable the option in your *Outlook Online* settings.
[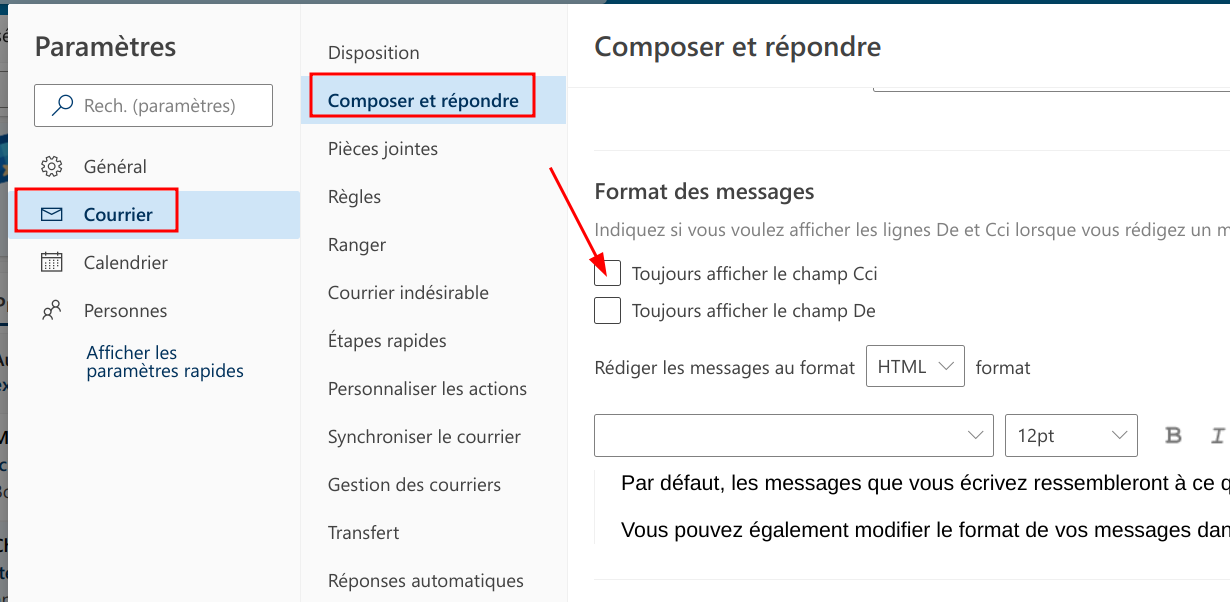](https://wiki.unil.ch/ci/uploads/images/gallery/2023-03/fH5image.png)
**If you have opened a suspicious email or entered your credentials on a website you find suspicious, please change both your edu-ID and Unil passwords immediately. If you do not know how, call or email us.**
It is now better to [send us suspicious emails as attached files](https://wiki.unil.ch/ci/books/antispam-et-s%C3%A9curit%C3%A9-messagerie/page/faq#bkmrk-j%27ai-re%C3%A7u-un-spam-ou) to instead of the headers
Via outlook.office.com
If you notice that a suspicious or fraudulent email has reached your mailbox, you may send it to us as an email attachment and we'll then be able to better tailor our anti-spam filters. While we used to ask for them in the past, headers are no longer necessary or efficient — we are therefore only keeping the documentation here for general information should you ever need to access an email's headers for another purpose.
1. Connect to *Outlook Online* here: [https://outlook.office.com](https://outlook.office.com)
2. Select the suspicious email
3. Click on the `…` next to the smiley on the top right of the email, and go to *Display > Show email details*
[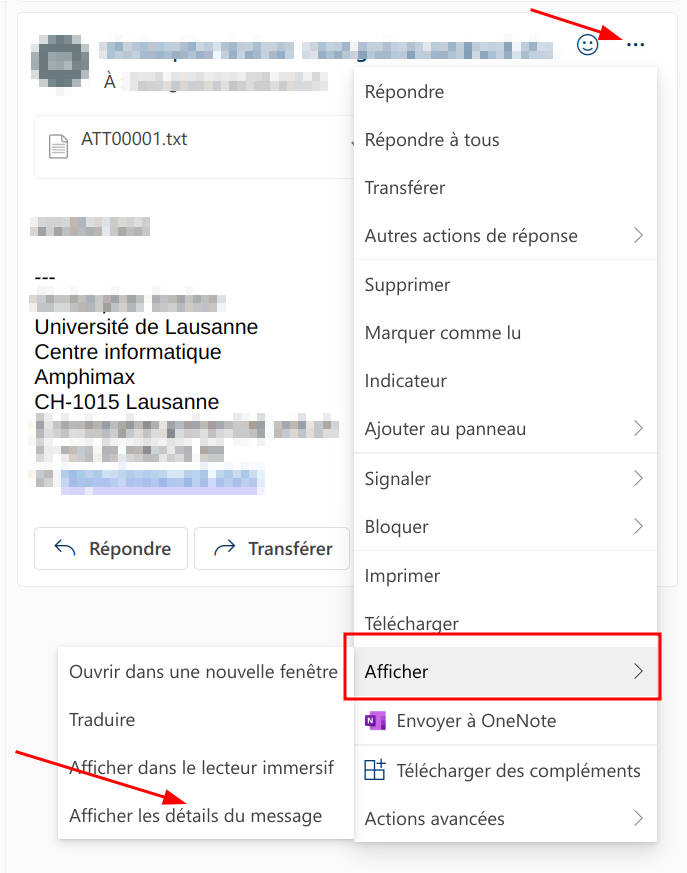](https://wiki.unil.ch/ci/uploads/images/gallery/2023-03/6Ilimage.png)
Via les réglages Outlook Online (site web)
1. Connect to *Outlook Online* here: [https://outlook.office.com](https://outlook.office.com)
2. Select *New email*
3. Click on `…`
[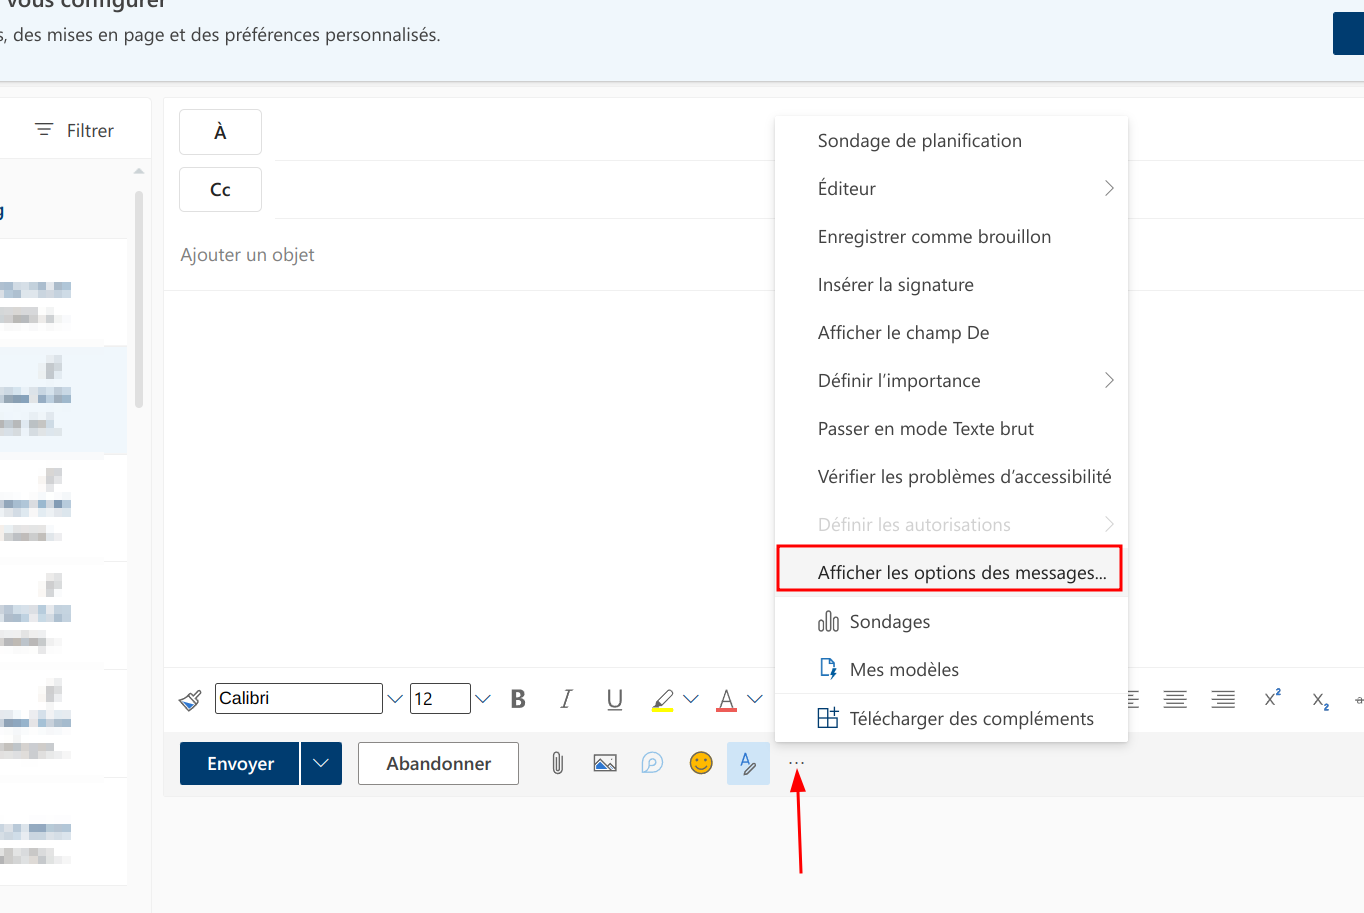](https://wiki.unil.ch/ci/uploads/images/gallery/2023-03/qzpimage.png)
4. Select *Show message options…*
5. Tick the options you'd like to use
- **Read confirmation** : the recipient can confirm that they have read your email if they're using a compatible application
- **Reception confirmation** : you will get a confirmation that the recipient has received your email if they're using a compatible application, but you will not know whether or not they've read it
[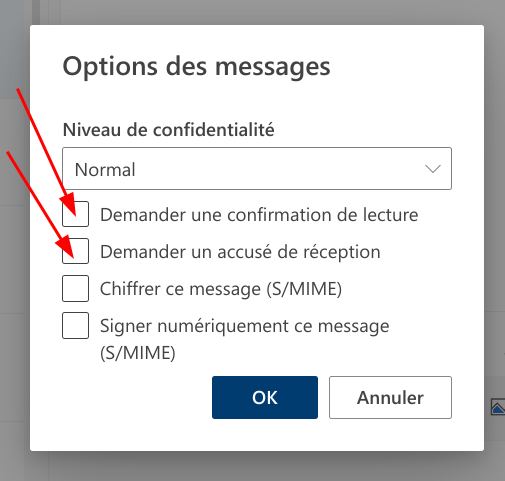](https://wiki.unil.ch/ci/uploads/images/gallery/2023-03/ShLimage.png)
These options are application-dependent. Thus, they are not a sure way of knowing whether your recipient has actually received or read the email you've sent them.
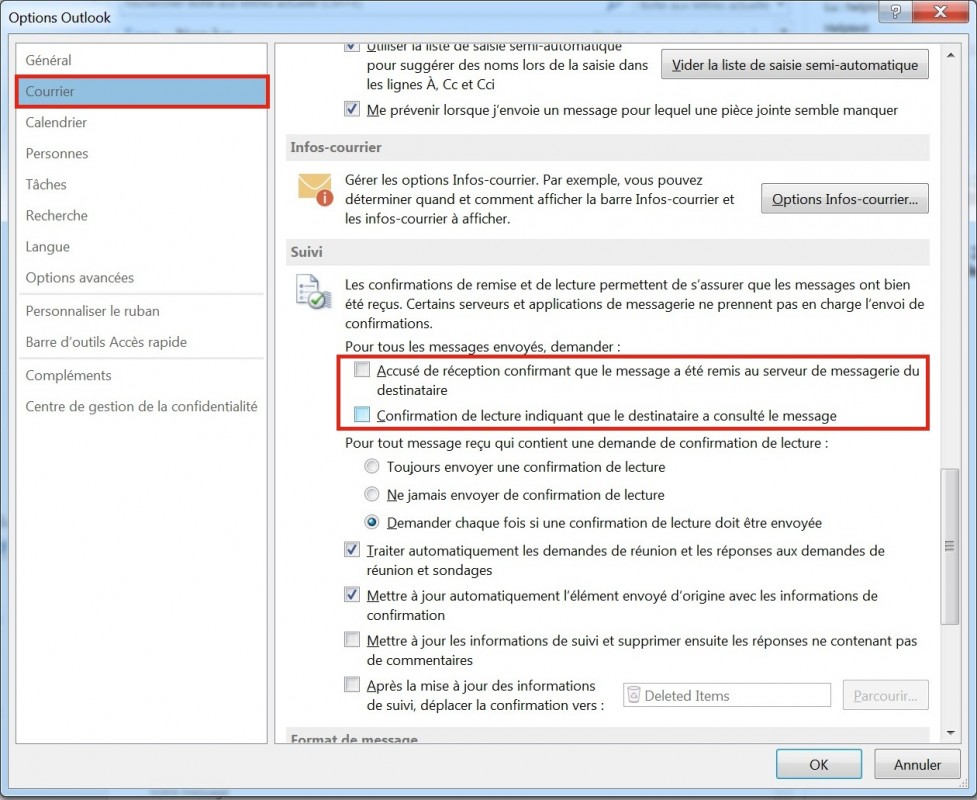
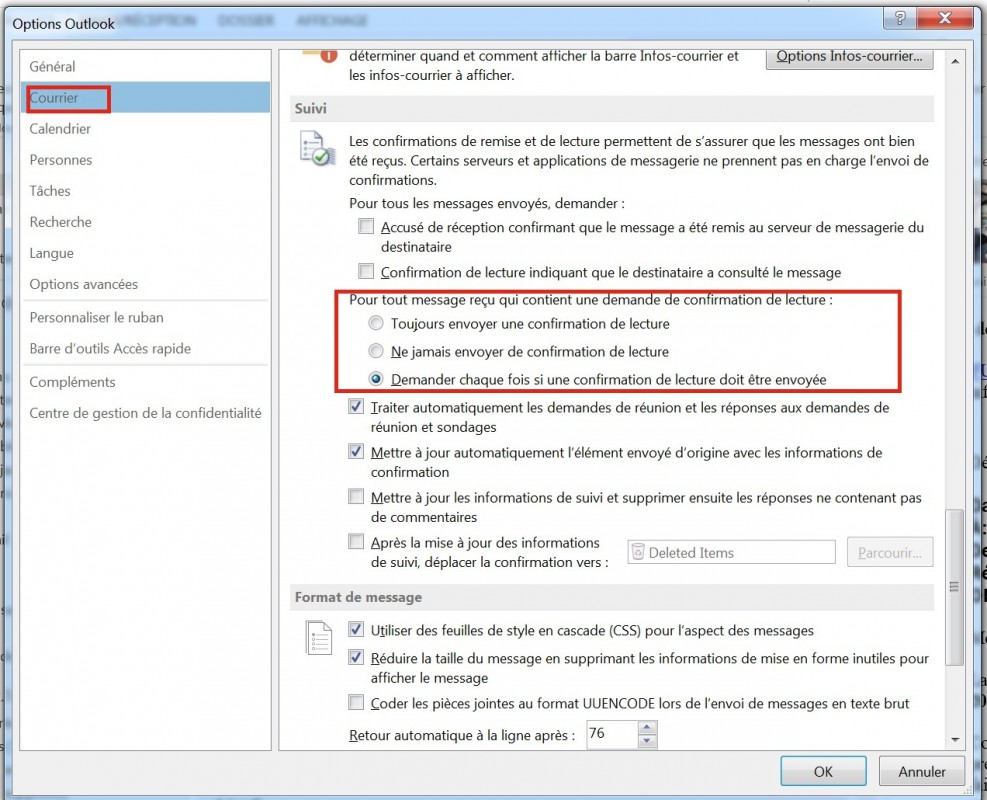
In the Outlook for Windows options
1. On Windows, launch *Microsoft Outlook*
2. In a new email, select *Options* then tick the confirmation types you desire

3. If you would like to generally get confirmations, navigate to *File > Options*
4. In *emails* go to *tracking* and tick the options that you would like to enable.
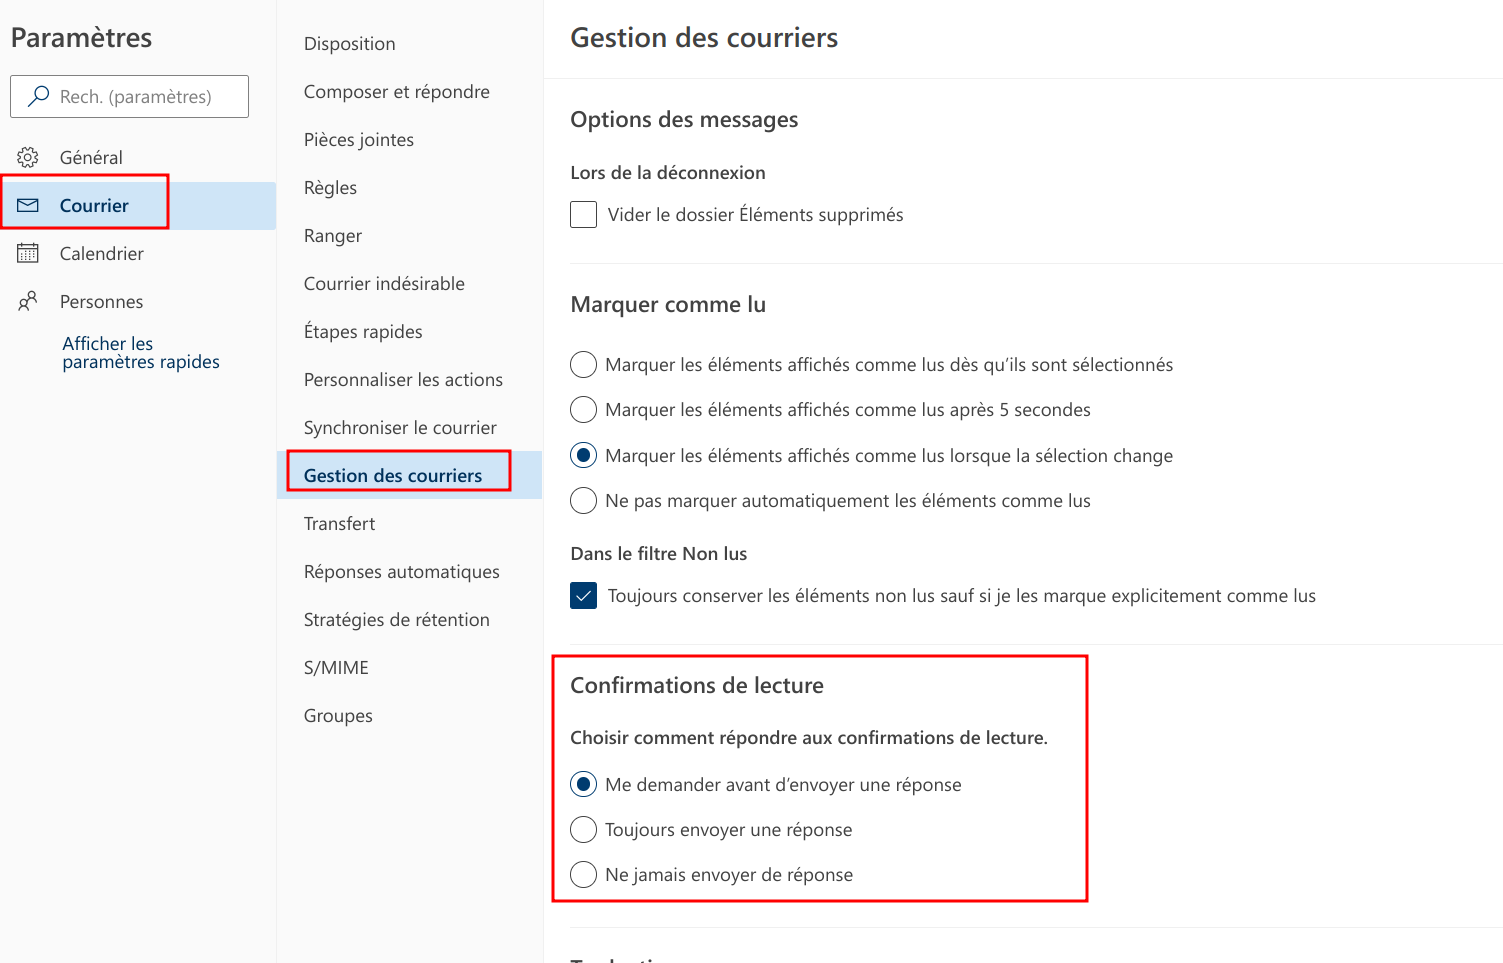
In the Outlook Online (web) settings
1. Click on the gear icon on the top right of your *Outlook Online* window, then select *Show all Outlook settings*
[](https://wiki.unil.ch/ci/uploads/images/gallery/2023-03/BLYimage.png)
2. Find the *Read receipts* option in the settings and select the one you would like to enable
[](https://wiki.unil.ch/ci/uploads/images/gallery/2023-03/2JFimage.png)
In the options on Outlook for Windows
1. Go to *File > Options*
2. In emails, go to *tracking* and select the option you would like to enable
By default, the *Mail* app on iOS only downloads a limited amount of emails onto your phone's mailbox. If you would like to have access to older emails, you will have to change the *Mail* app's settings.
Via les réglages mail sur iOS
1. Go to *Settings*
2. Go to *Mail 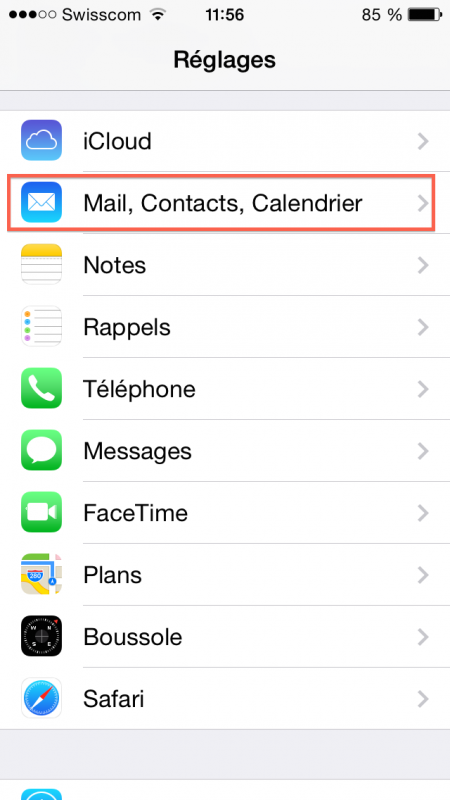*
3. Select your Unil *Exchange* account
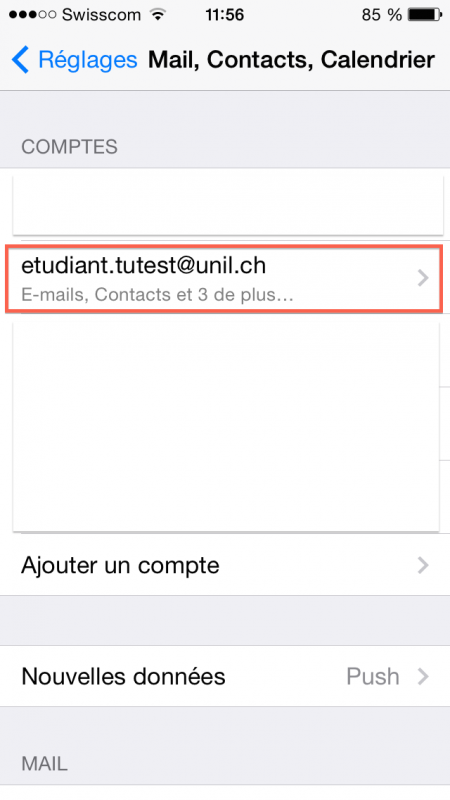
4. Select *E-mails to synchronise*
*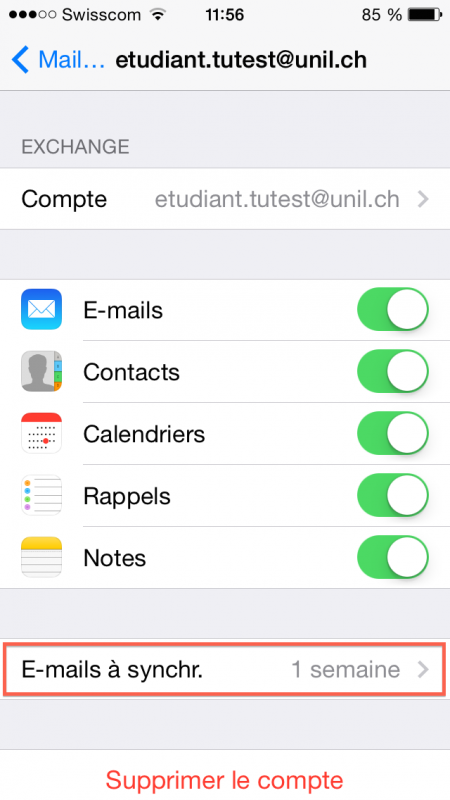*
5. Pick the option that fits your use case
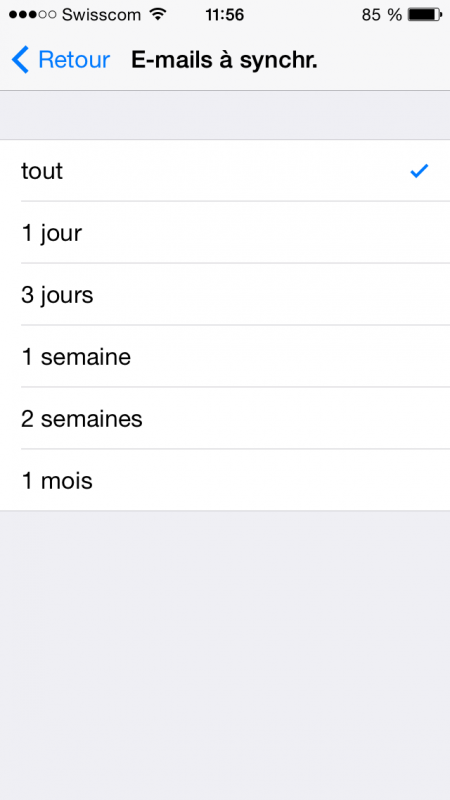
6. Done!
This option only works on the *Outlook* apps and web-app.
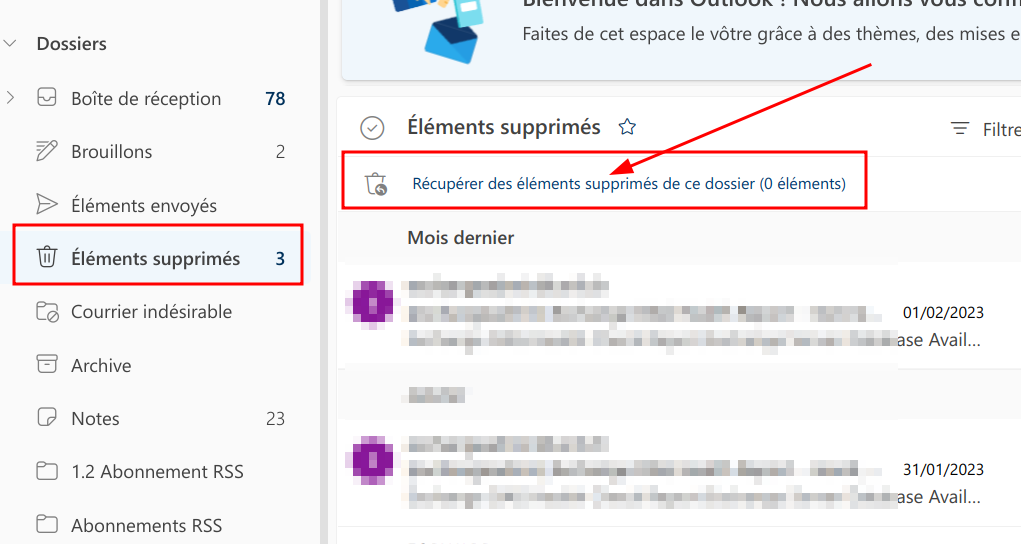
Via the Deleted items on Onlook Online (web)
1. Go to your *Deleted items* folder
2. Select *Recover deleted items...*
[](https://wiki.unil.ch/ci/uploads/images/gallery/2023-03/E8Ximage.png)
3. Select the emails you'd like to recover, then click on Restore
[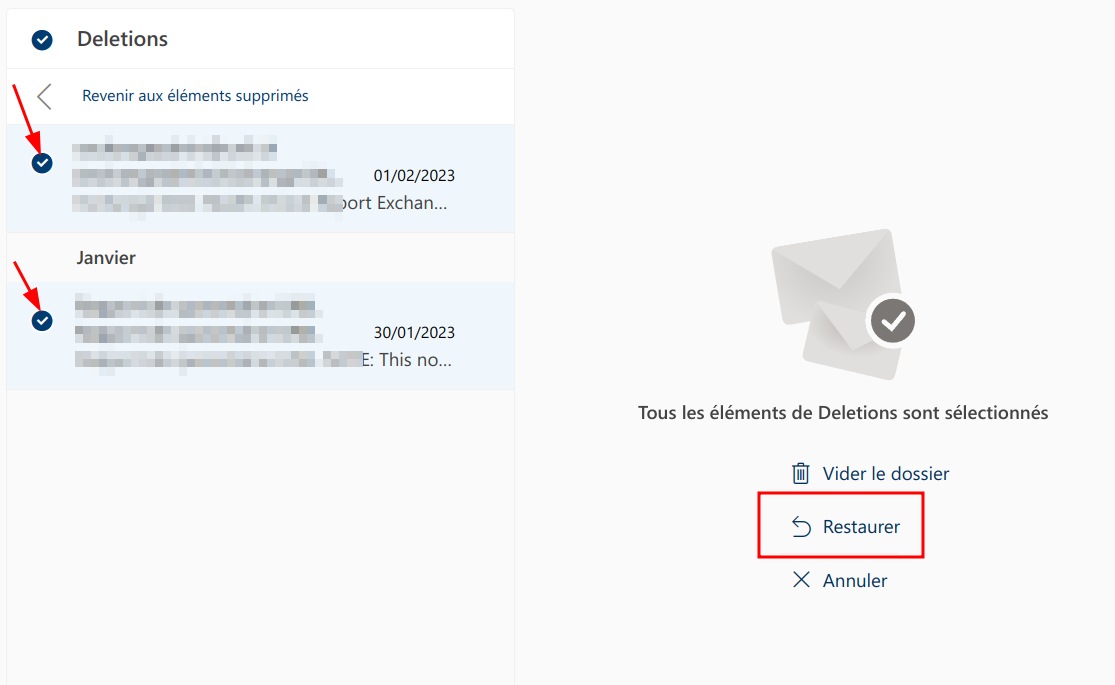](https://wiki.unil.ch/ci/uploads/images/gallery/2023-03/jNMimage.png)
Via the Deleted items in Outlook for Windows
1. Go to your *Deleted items* folder
2. Select *Recover items recently removed from this folder*
[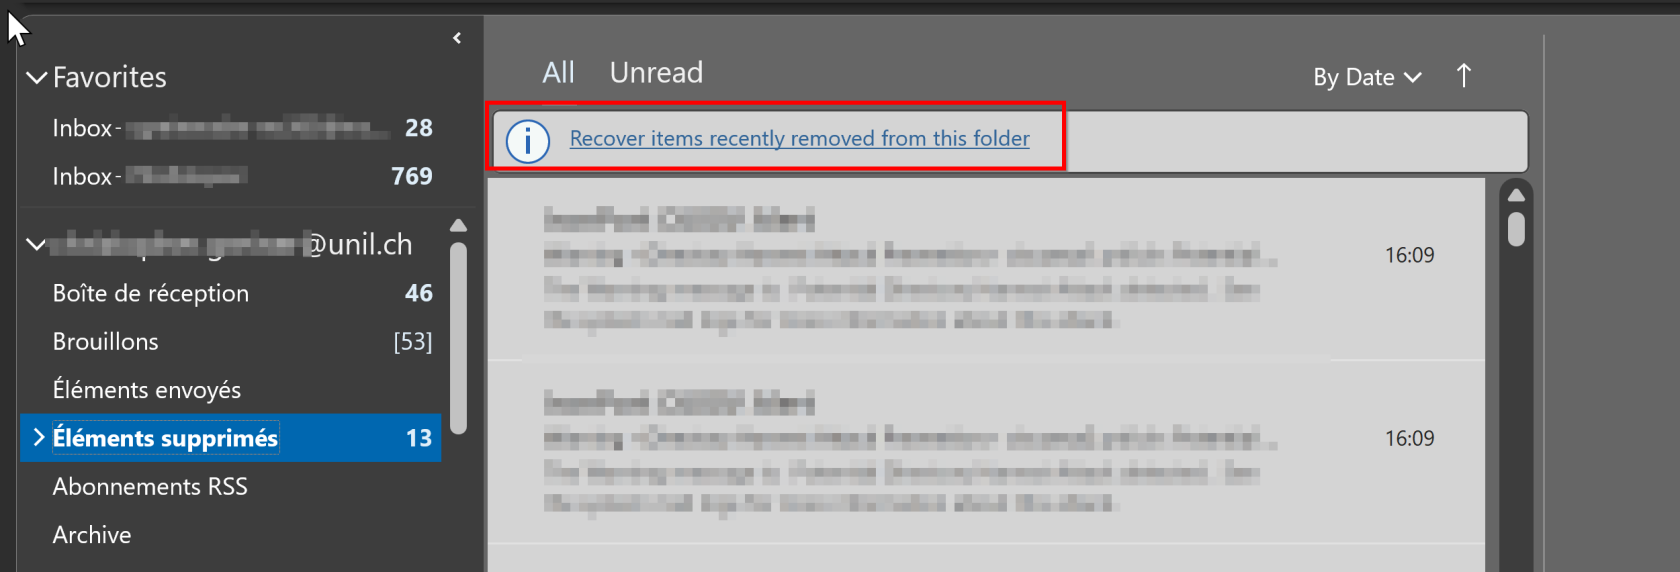](https://wiki.unil.ch/ci/uploads/images/gallery/2023-03/ylQimage.png)
3. Select the emails you'd like to recover, then check that *Restore Selected Items* is ticked and click on *Ok*
[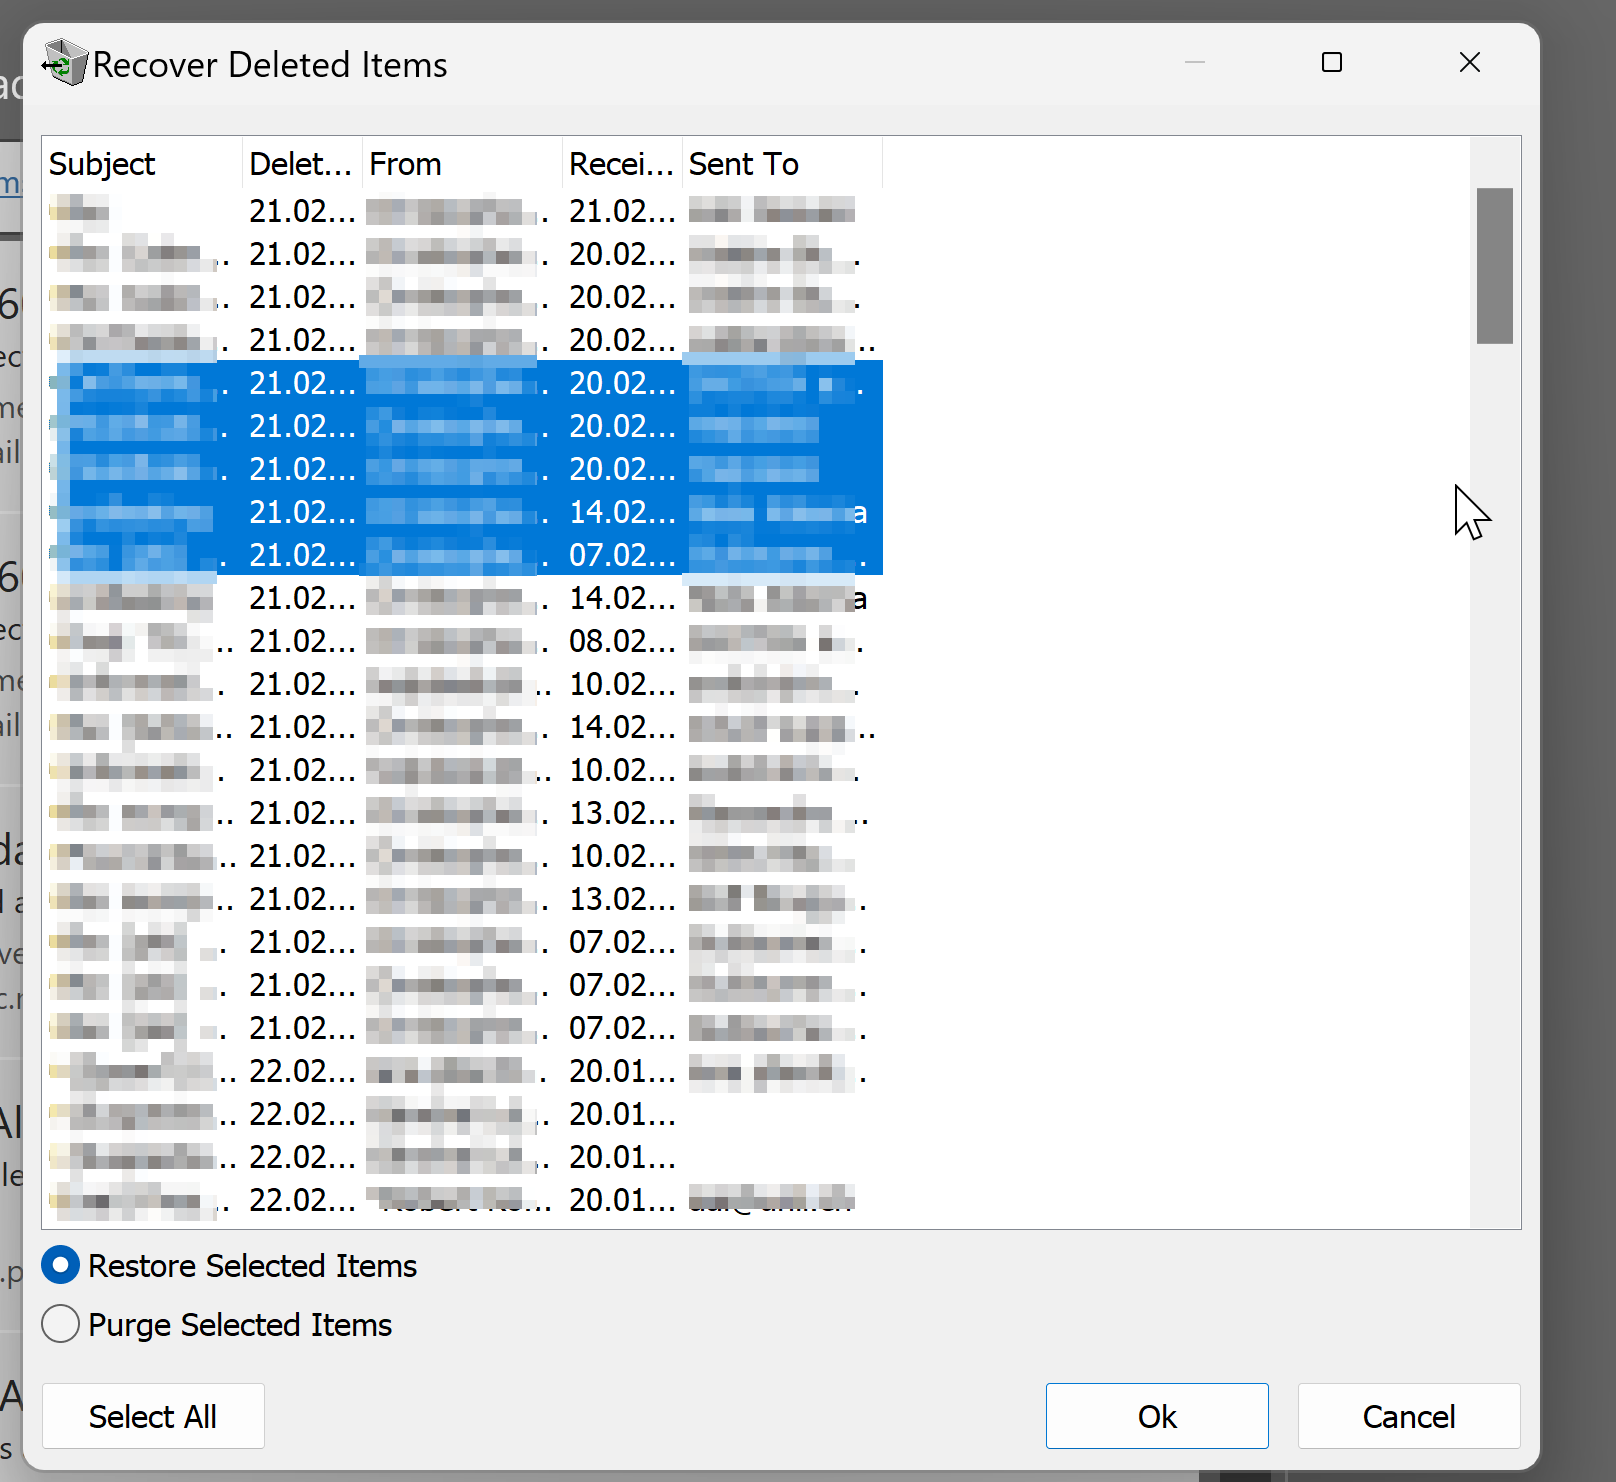](https://wiki.unil.ch/ci/uploads/images/gallery/2023-03/8b7image.png)
We recommend using *Outlook Online* ([https://outlook.office.com](https://outlook.office.com)) on Linux.
- The easiest way to access your Unil email, calendar, and other *Exchange* features is through the web interface [outlook.office.com](https://outlook.office.com).
- Some [generic settings](https://wiki.unil.ch/ci/link/301#bkmrk-autres) are available if you'd like to set up an email-only client.
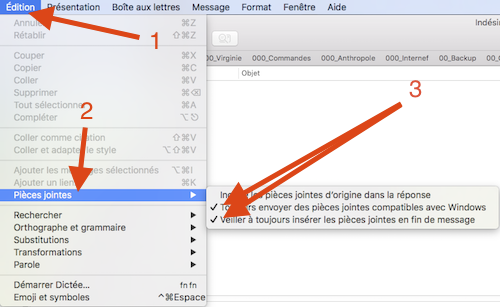
In Apple Mail, go to the Attachment options under the Edition top menu bar entry.
There is a known issue with recipients not receiving the full email when the sender is using an older version of *Apple Mail*.
This issue occurs when an attachment is located before some of the email's content, making the *Exchange* server think that the attachment signals the end of the email's main body of text and thus disregarding everything after it.
To avoid this issue, you can:
1. In the *Mail* app for macOS, go to *Edition*
2. Select *Attachments*
3. Tick the options *Always send Windows compatible attachments* and *Ensure that the attachments are always at the end of the email*
Via the Outlook Online options (web)
After following these steps, the *Deleted items* folder of your mailbox will empty itself when you log out of *Outlook Online* or close the browser window you're using to access it.
1. Connect to *Outlook Online* here: [https://outlook.office.com](https://outlook.office.com)
2. Click on the gear icon on the top right, then *Options*
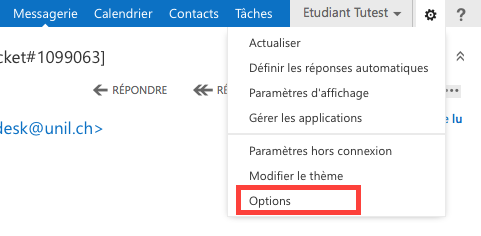
3. Navigate to *Emails* then *Automatic transfer*
4. Tick the box next to *Empty Deleted items folder when I log out* and click on *Save [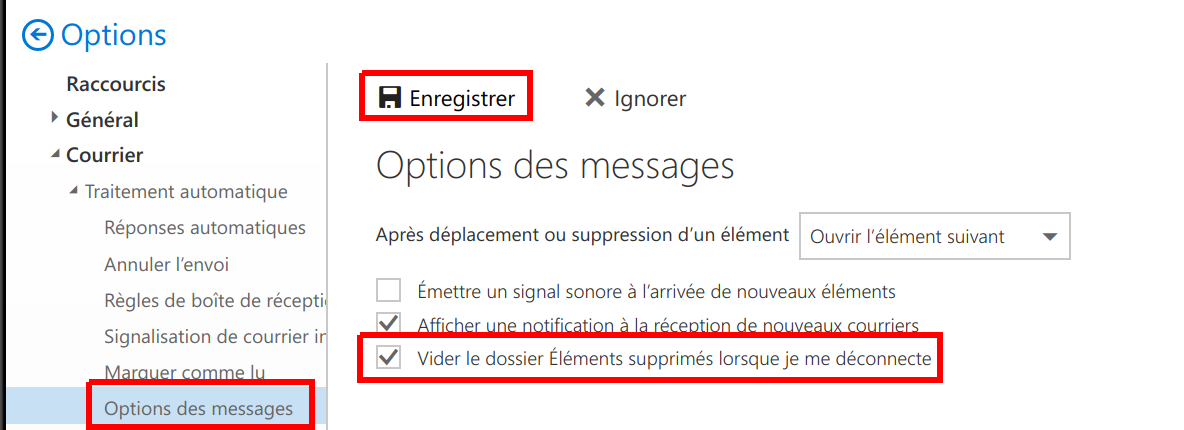](https://wiki.unil.ch/ci/uploads/images/gallery/2019-11/vider_poubelle_OWA.png)*
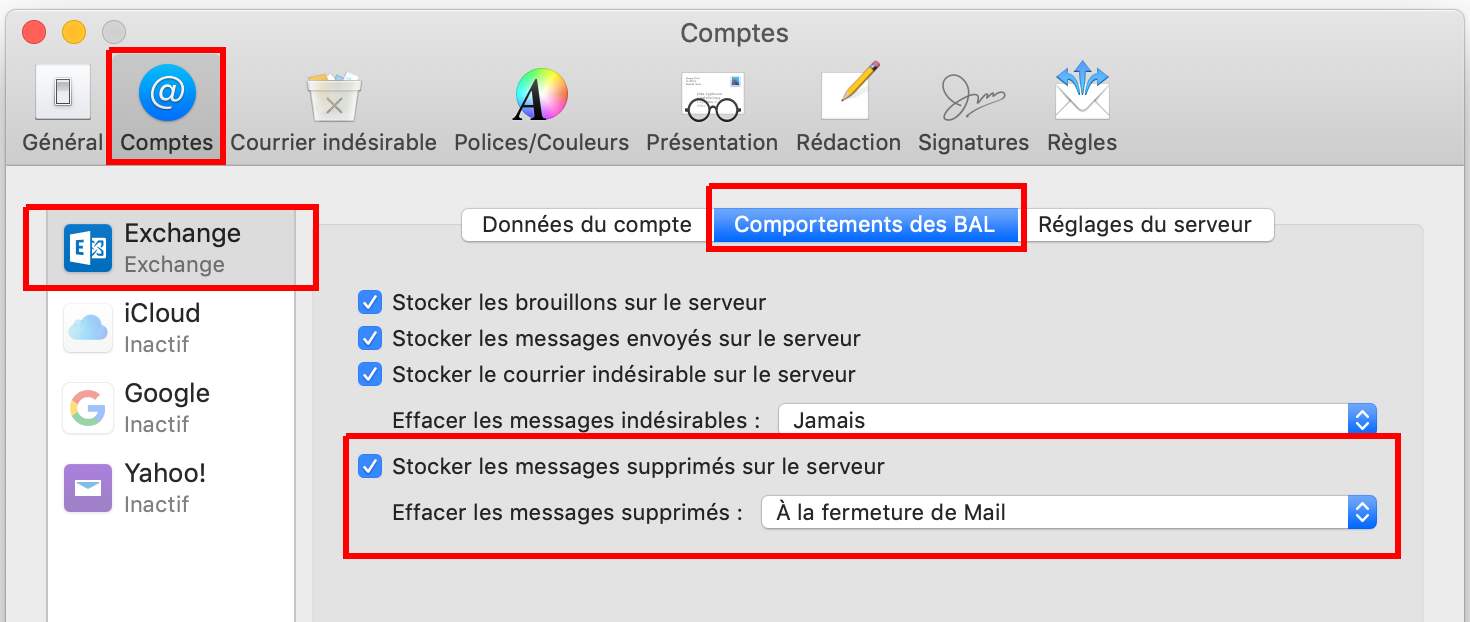
In Apple Mail, in the app's settings
1. In the *Mail* menu on the top left of the screen, select *Preferences…*
2. Go to the *Accounts* tab
3. Select your Unil account, then the *Mailbox Behaviors* tab
4. Ensure that *Store deleted items on the server* is ticked
5. Next to *Erase deleted items*, select *When closing Mail*
[](https://wiki.unil.ch/ci/uploads/images/gallery/2019-11/mail_corbeille.png)
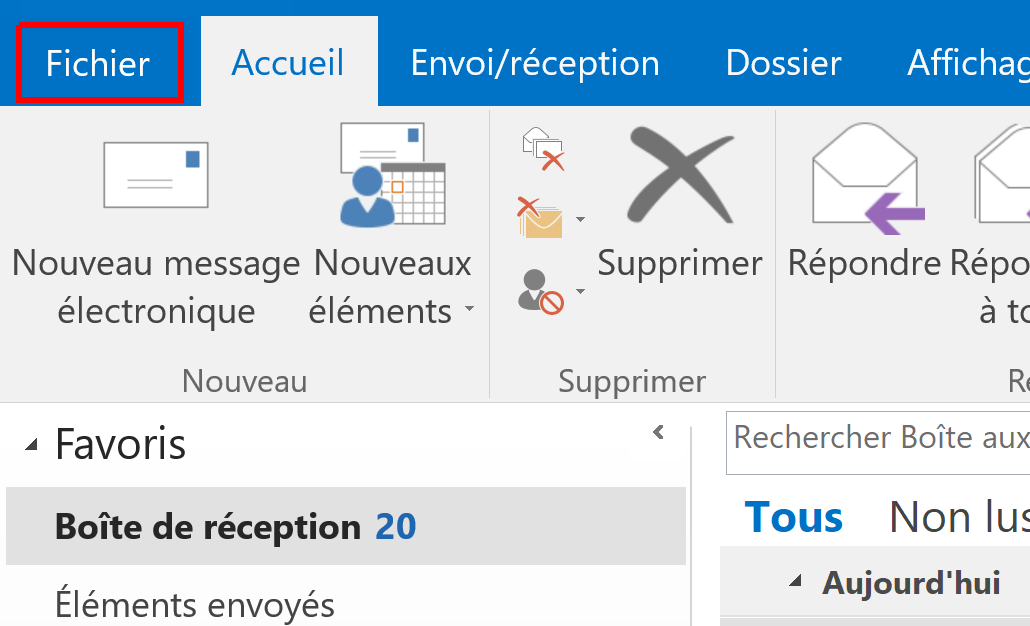
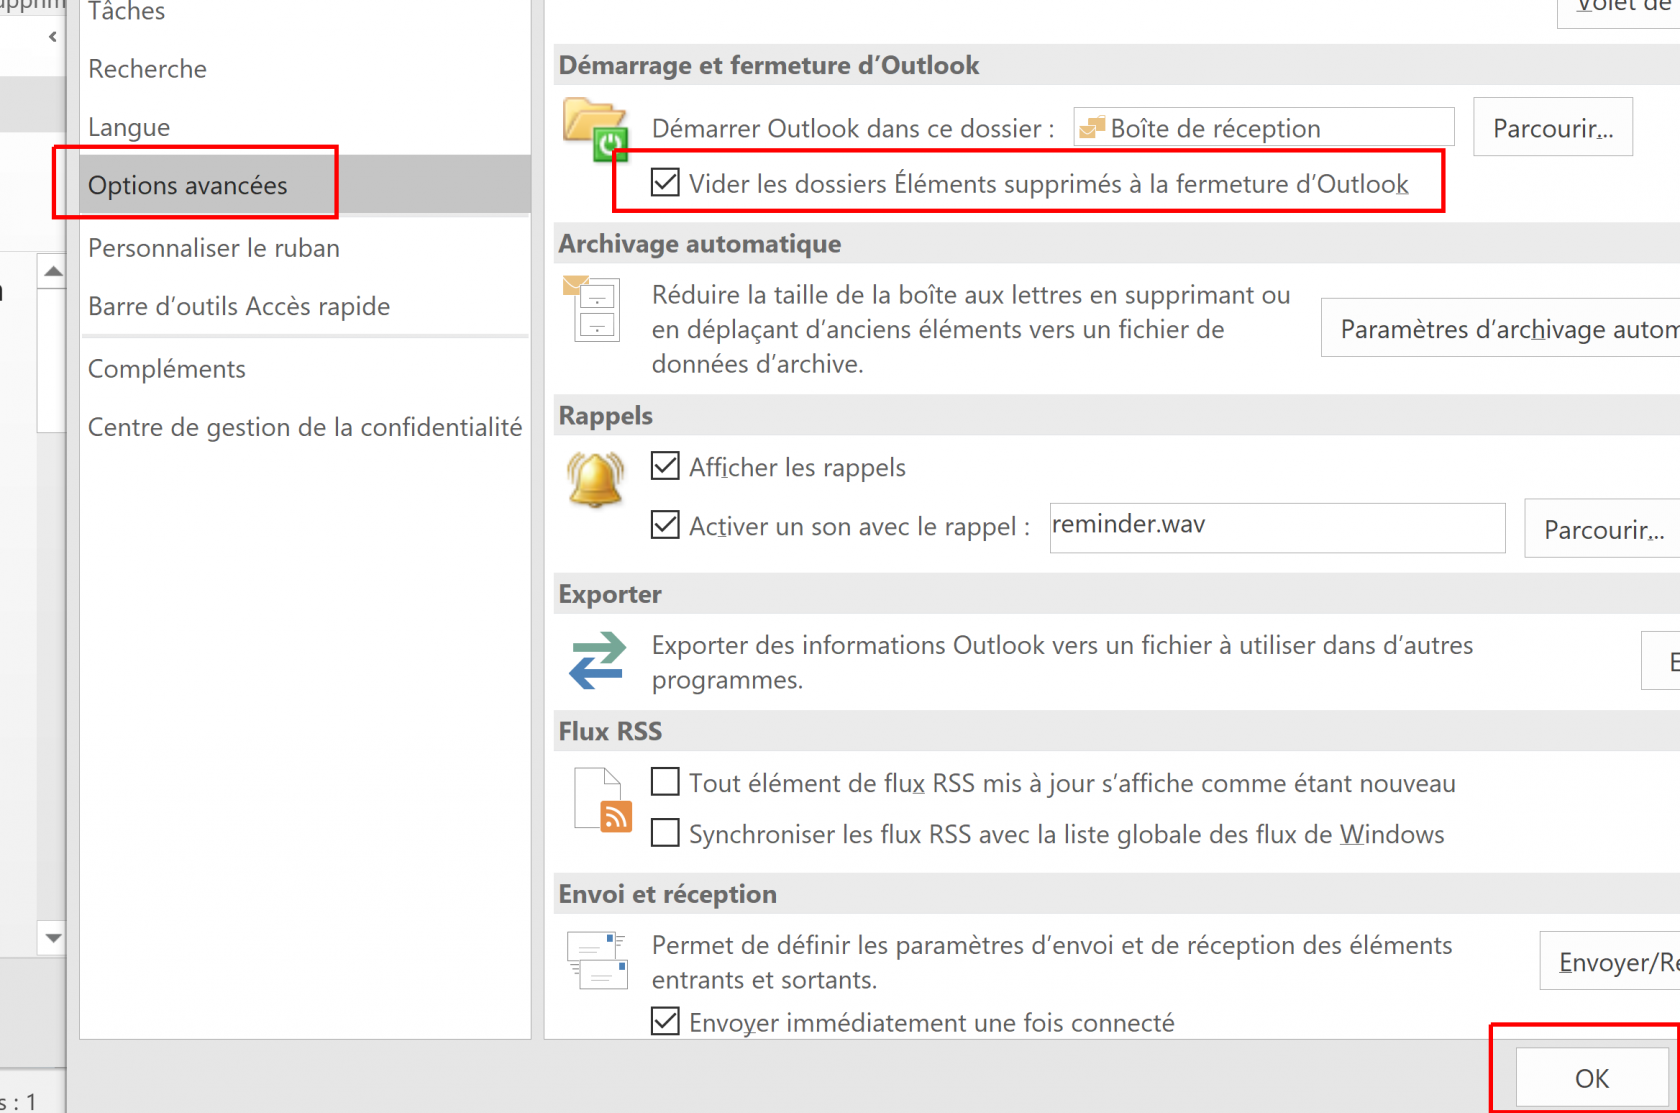
In Outlook for Windows, in the settings
1. Go to *File*
[](https://wiki.unil.ch/ci/uploads/images/gallery/2019-11/Outlook_vider_poubelle_1.png)
2. Then *Options*
[](https://wiki.unil.ch/ci/uploads/images/gallery/2019-11/Outlook_vider_poubelle_2.png)
3. Under *Advanced options*, tick *Empty Deleted items when closing Outlook*
*[](https://wiki.unil.ch/ci/uploads/images/gallery/2019-11/Outlook_vider_poubelle_3.png)*
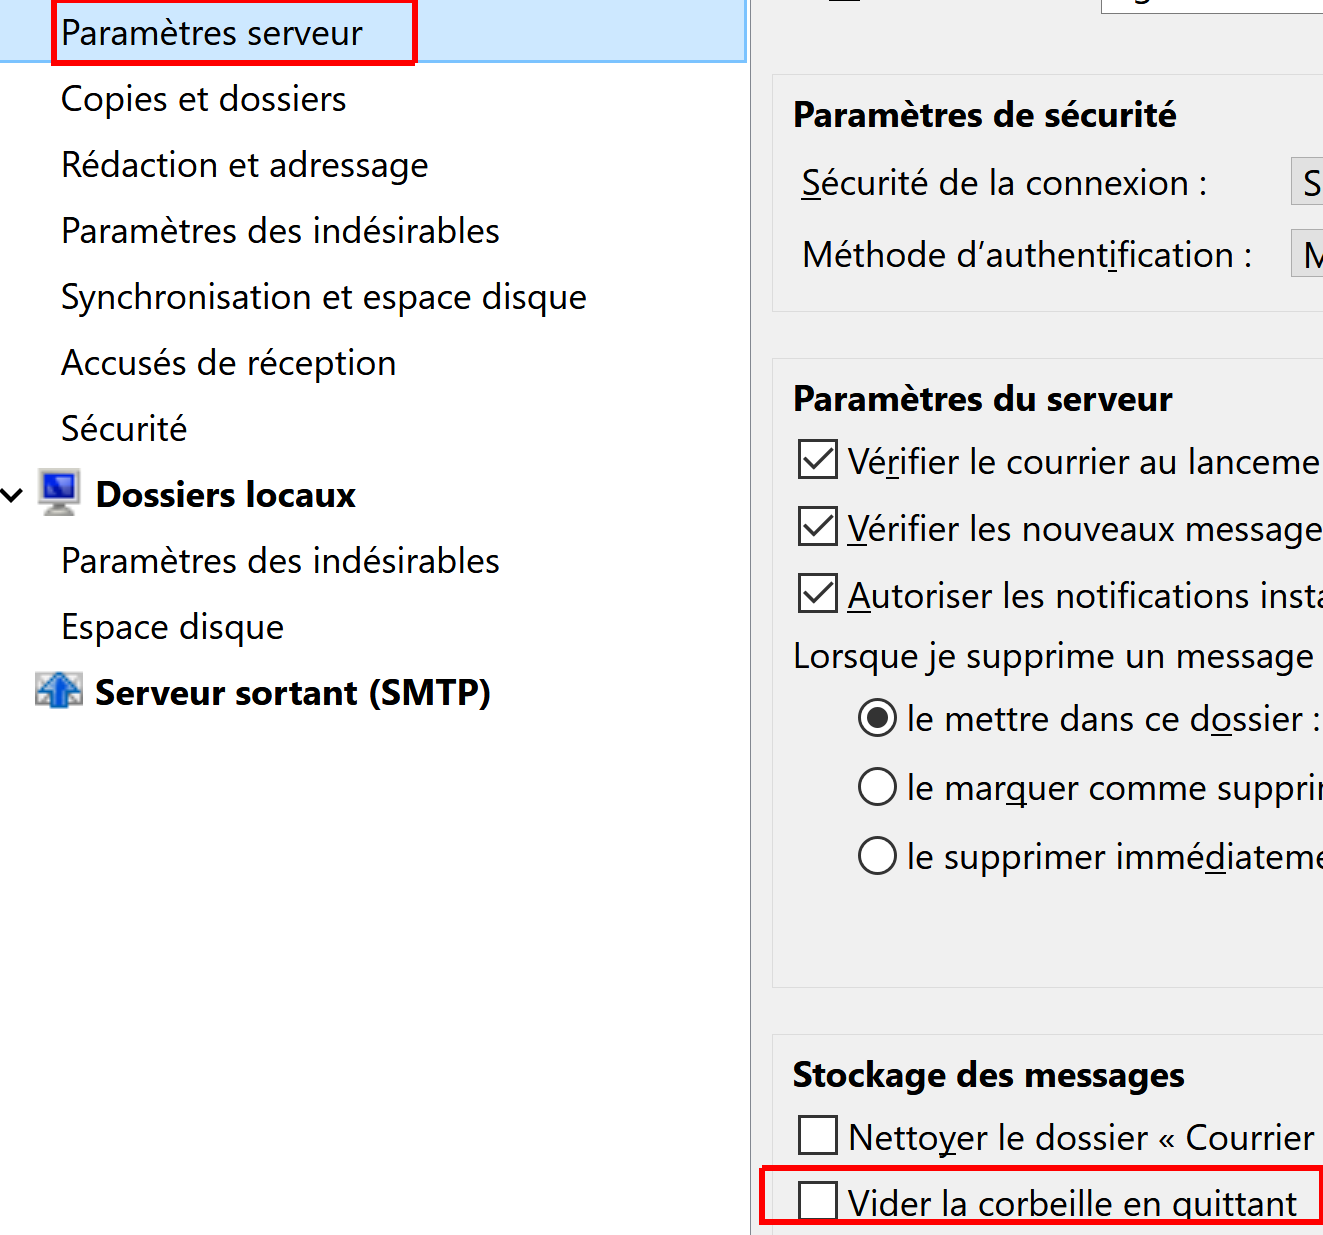
In Thunderbird, in the settings
1. In the *Settings* menu, select *Account Setting*s *[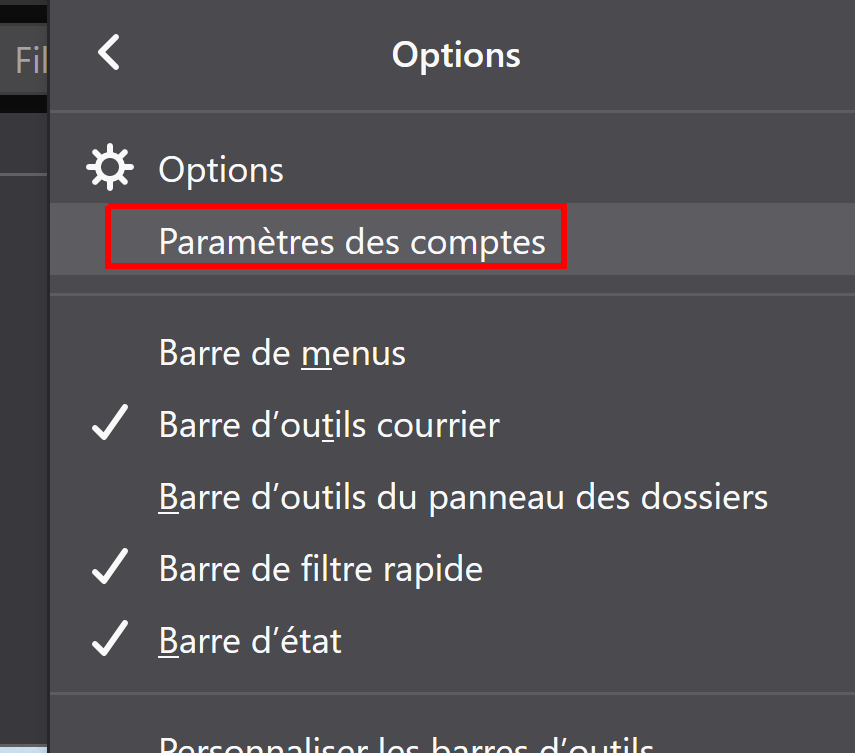](https://wiki.unil.ch/ci/uploads/images/gallery/2019-11/vider_poubelle_tbird_1.png)*
2. Select your Unil account and go to *Server settings*, tick *Empty trash when quitting*
*[](https://wiki.unil.ch/ci/uploads/images/gallery/2019-11/vider_poubelle_tbird_2.png)*
Yes, via the retention strategies in Outlook Online (web)
If you'd like the *Deleted items* folder to empty itself on another schedule than the default 30-days, you can change the *retention strategies* in *Outlook Online*.
These options only apply to the user-created folders inside your mailbox on *Outlook Online*, and will therefore not be applied to the default folders
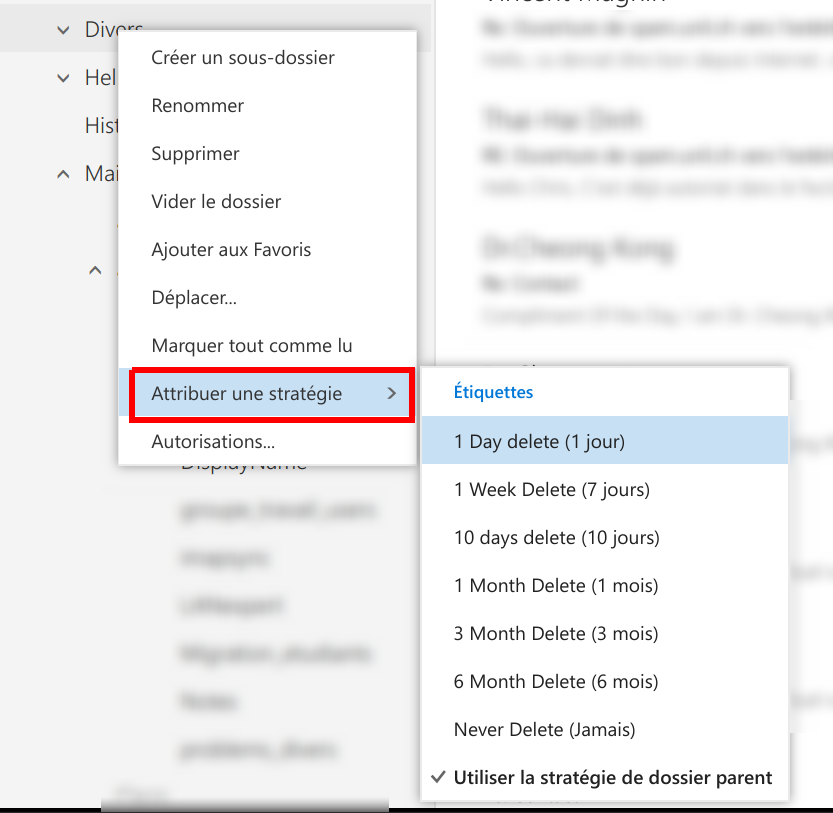
1. Connect to *Outlook Online* here: [https://outlook.office.com](https://outlook.office.com)
2. Right-click the folder that you would like to apply custom retention strategies to
3. Select *Attribute strategy* and select the one that suits your use case best.
[](https://wiki.unil.ch/ci/uploads/images/gallery/2019-11/strategie_retention_OWA.png)
Via Outlook Online (web), in the Options
1. Connect to *Outlook Online* here: [https://outlook.office.com](https://outlook.office.com)
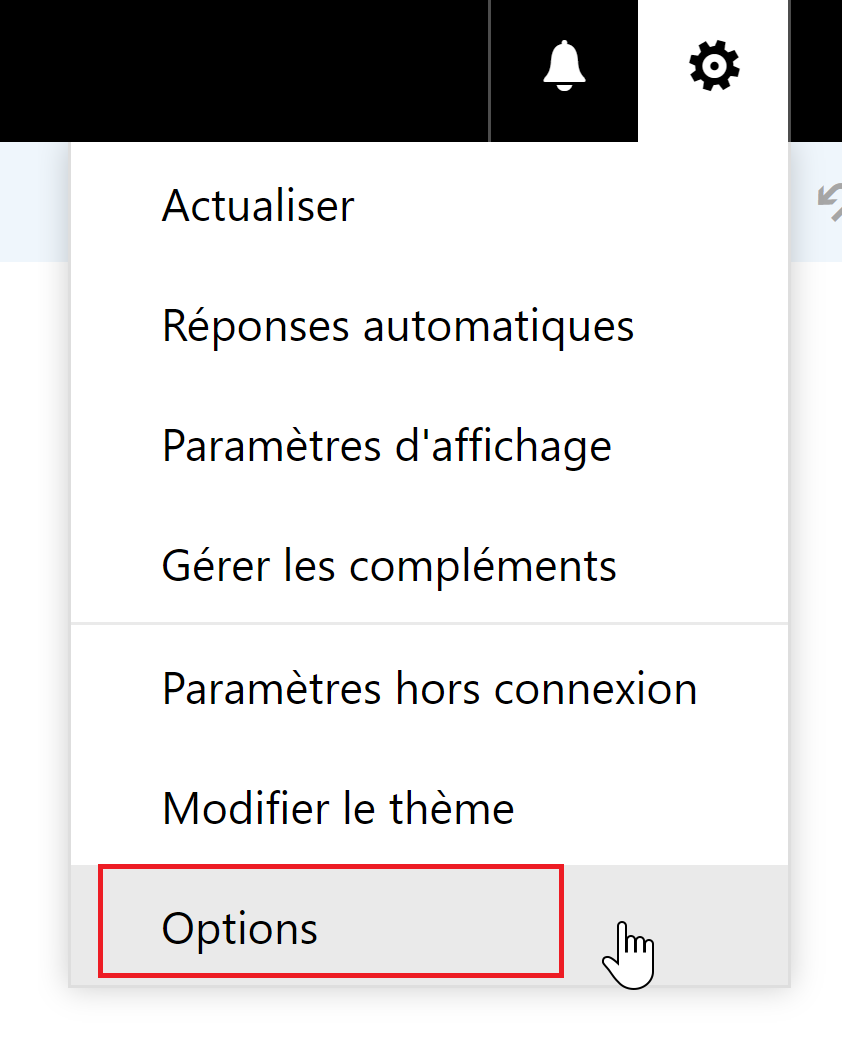
2. Select the gear icon on the top right, then click *Options*
[](https://wiki.unil.ch/ci/uploads/images/gallery/2020-04/image-1587468827861.png)
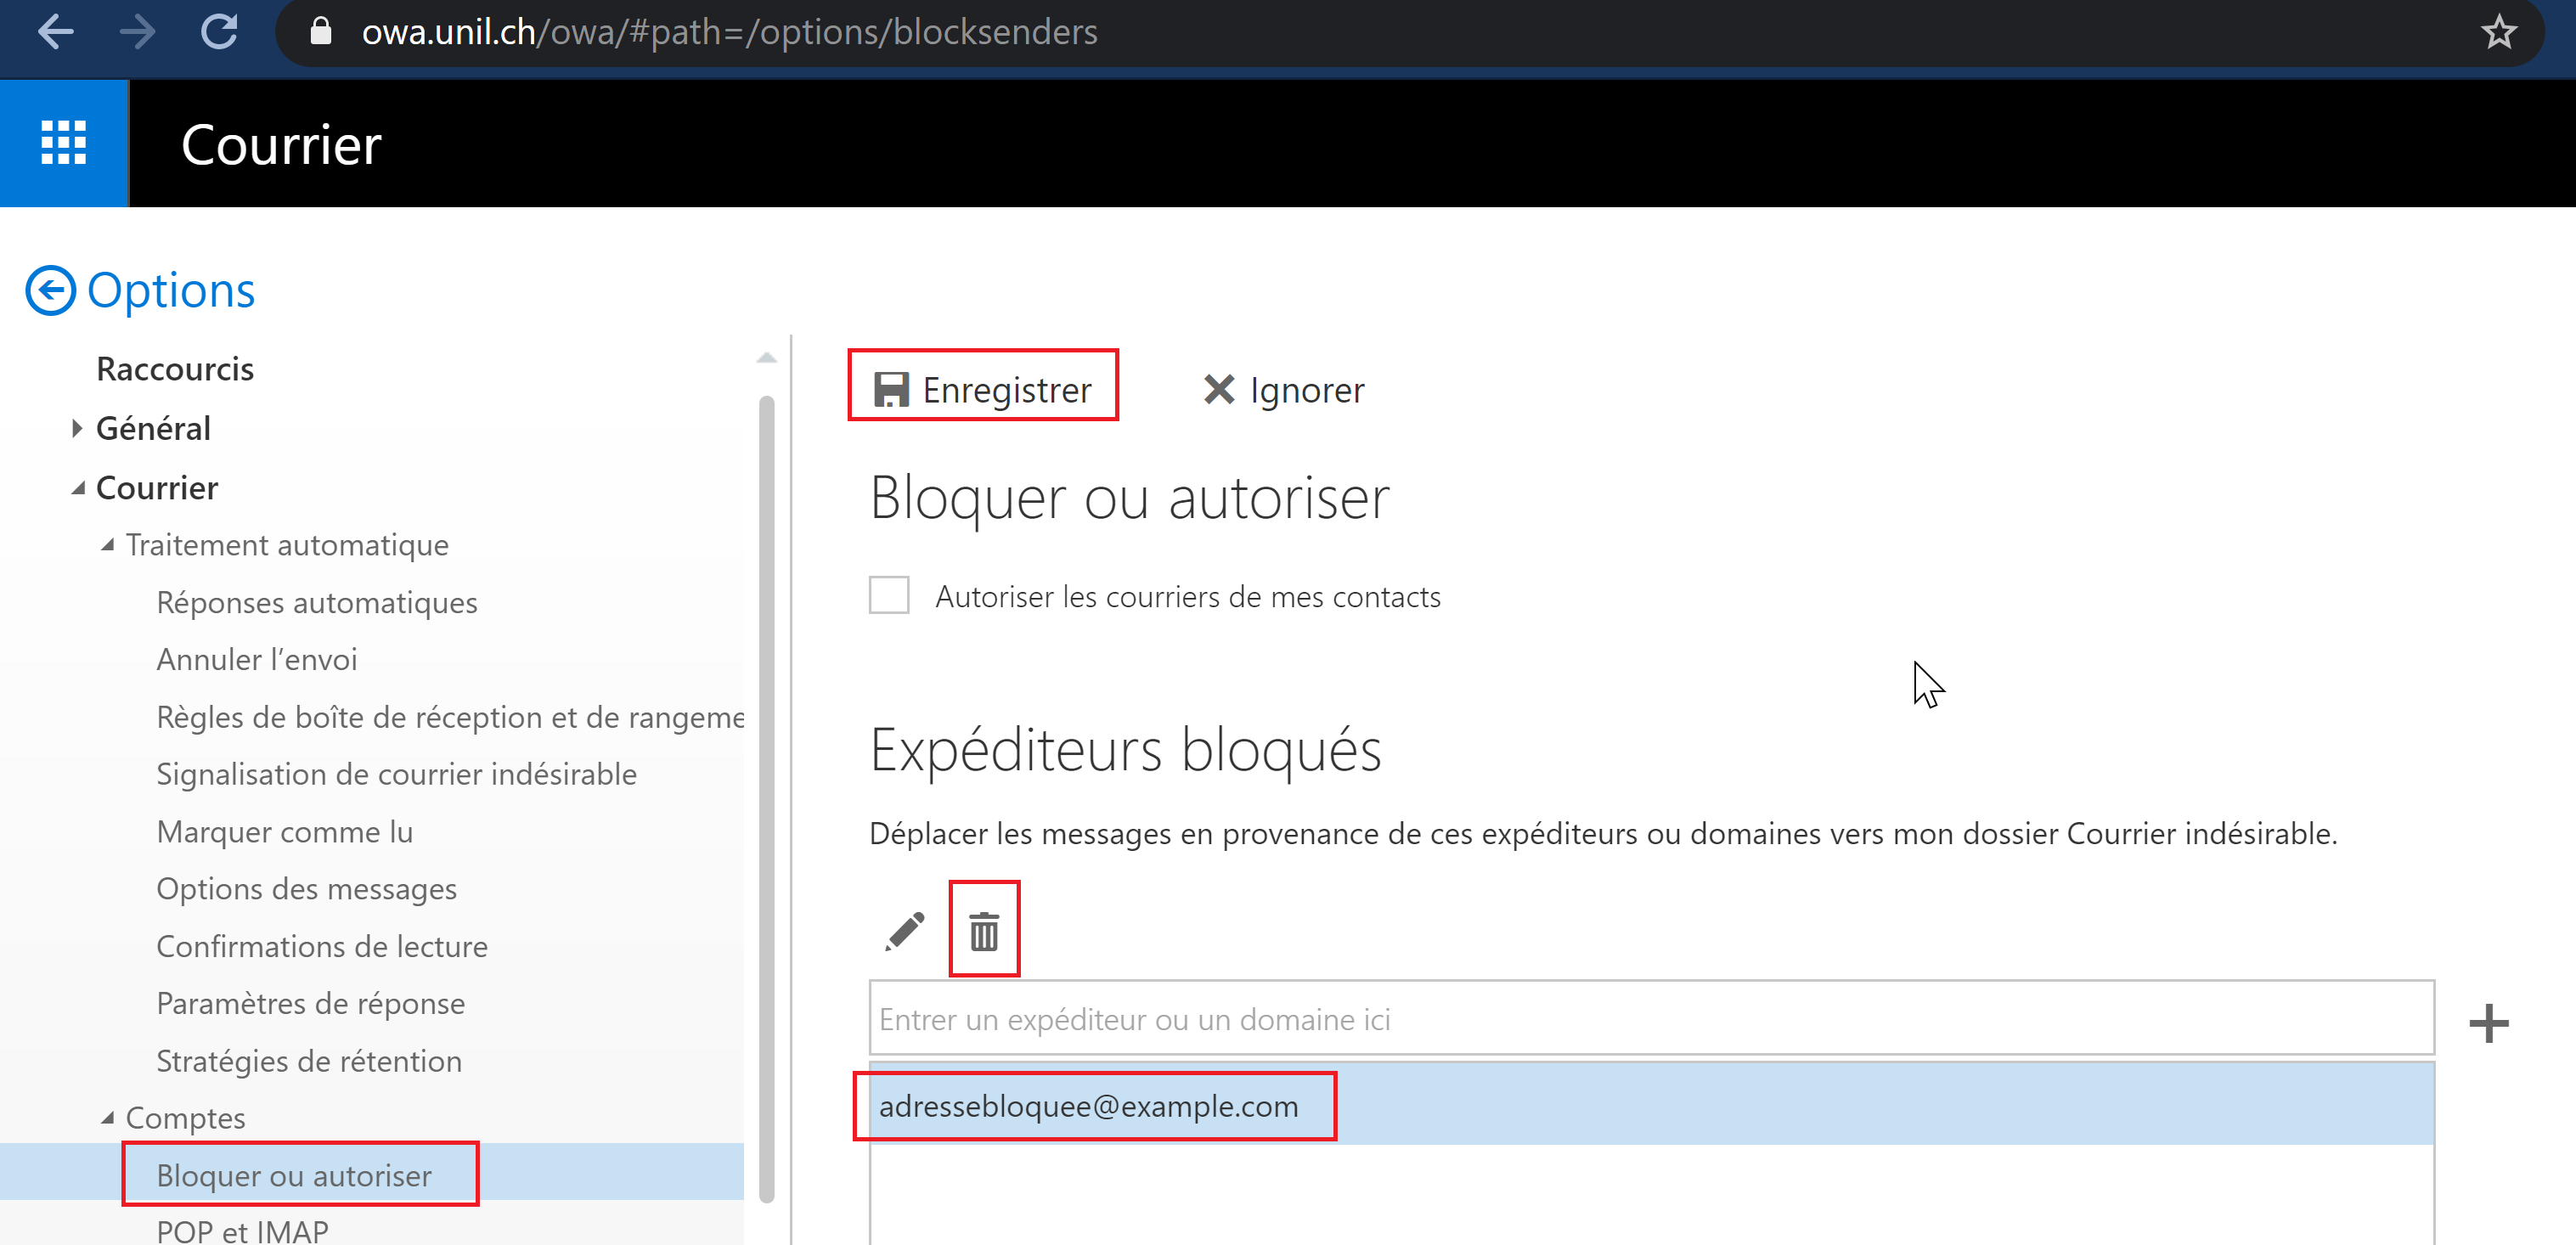
3. Navigate to the appropriate section by going: *Emails > Accounts > Block and authorize*, then scroll down to *Blocked senders.* You may now select the senders you would like to remove from your blocklist, then clock on the trascan icon and click *Save* to save your changes.
[](https://wiki.unil.ch/ci/uploads/images/gallery/2020-04/image-1587468857090.png)
Via the Apple Mail Settings, in the application
On older versions of *Apple Mail* for macOS 10.5 and below, erroneous credentials may end up sending a deluge of error messages towards our servers. It would therefore be advised to remove the Unil account from your saved *Mail* accounts.
1. In the *Mail* app for macOS, go to *Settings* then *Accounts*
2. Select the Unil account, and click on `-`
If the Unil account is used by other apps, you may have to go and remove it in *System Preferences* > *Internet accounts*.
**No.** A Unil account and its associated mailboxes are closed six months after the end of the person's [studies](https://www.unil.ch/ci/ui/unil-etu) or [contract](https://www.unil.ch/ci/ui/unil-empl). **It is very important that you save all the emails you would like to keep before your mailbox is closed.**
All Unil mailboxes are dependent on their respective Unil accounts. Thus, when a Unil account is closed, the mailbox associated is closed as well. This is why we strongly advise you to inform the people contacting you via your Unil email and provide them with another address at which they may reach you, and also save all the emails you'd like to keep. Accesses are closed six months after the end of a person's contract or studies.
If you've graduated from Unil, you may be eligible to an [ALUMNIL](https://www.unil.ch/graduatecampus/home/menuinst/carriere-avec-doctorat/reseau-alumnil.html) email. This is not a full maybox, but only a redirection towards an email address of your choosing.