# MyUNIL and NewsUNIL (EN)
Concerns the following services: News and events (MyUNIL), Access and view your course documents (MyUNIL), View your course and exam timetables (MyUNIL), View your academic curriculum (MyUNIL), View your administrative data (MyUNIL).
([Version française disponible ici](https://wiki.unil.ch/ci/books/myunil-et-newsunil))
# Welcome to MyUNIL
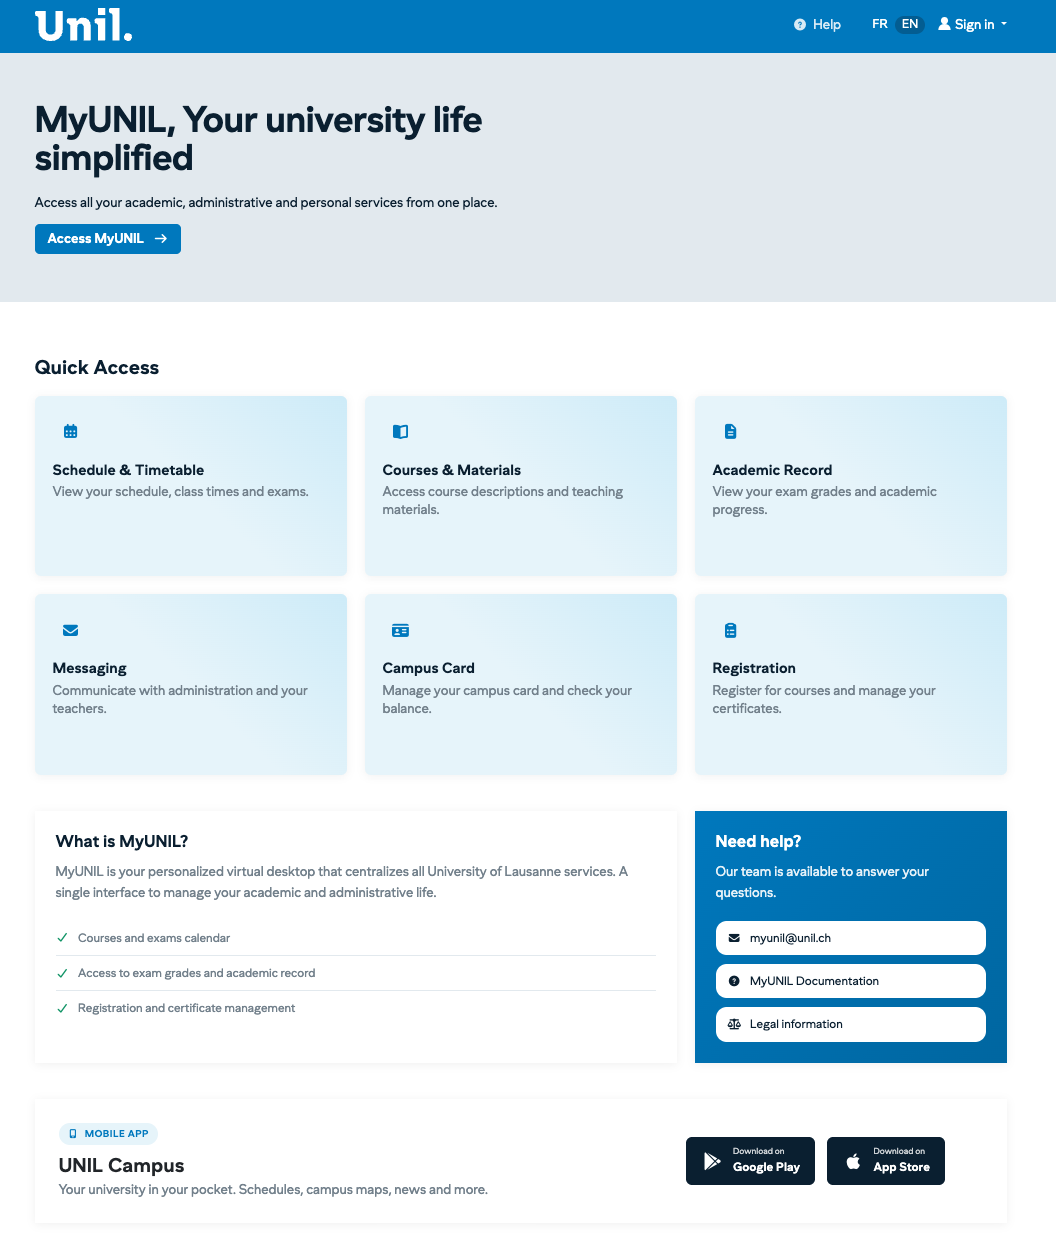
MyUNIL is your personal virtual office at the University of Lausanne. Accessible from any device connected to the Internet, this portal centralises all the tools and information essential to your university life.
> **Portal Access**
> [https://my.unil.ch](https://my.unil.ch)
---
[](https://wiki.unil.ch/ci/uploads/images/gallery/2026-01/I1Ncapture-decran-2026-01-29-a-16-24-41.png)
## What is MyUNIL?
MyUNIL is an adaptive and personalised web portal that offers unified access to various university information sources and services. It allows you to interact with your academic and administrative content from a single, intuitive environment.
The portal is available 24/7, except for announced or accidental service interruptions.
---
## Main Features
MyUNIL gives you access to the following tools:
Feature
Description
**Agenda**
View your course and exam timetables. Synchronise them with your smartphone or Google Calendar.
**Messaging**
Access your university emails directly from the portal.
**Course Documents**
View course materials made available by your lecturers.
**Academic Record**
View your curriculum, exam results and grade reports.
**Administrative Data**
Access your enrolment certificates and personal information.
**Campuscard**
Manage your campus card: top-up, block/unblock.
**News**
Stay informed about university events and news.
---
## How to Log In
Authentication on MyUNIL uses the SWITCH edu-ID system:
1. Go to https://my.unil.ch
2. Click on the button corresponding to your situation:
- **UNIL users**: if you have a UNIL account
3. Enter your edu-ID credentials (email address and password)
4. Validate two-factor authentication if it is enabled
> ⚠️ **Security Advice**
> To ensure the security of your data, remember to log out after each use, particularly on a shared computer.
---
## Discovering the Interface
The MyUNIL interface is designed to be intuitive and efficient. Here are the main elements:
### User Space
The UNIL logo is located at the top left. Your avatar, located at the top of the screen, gives access to your personal information and logout.
### Navigation Bar
The main navigation consists of pictograms accompanied by labels. It is divided into two parts: personal tools (on the left) and UNIL services (on the right).
### Search and Help
A search engine is available at the top right. Links to help and contact are also accessible from this area.
### Filters and Actions
Each application has a filter and action bar allowing you to act on the displayed content. The action buttons on the right allow you to perform specific operations depending on the tool being used.
---
## Who is MyUNIL for?
MyUNIL is intended for the entire university community:
- **Students**: access your courses, timetables, results and administrative documents
- **Lecturers and teachers**: manage your course spaces and share documents with your classes
- **Administrative and technical staff**: view your salary and administrative data
---
## Need Help?
If you encounter difficulties or have questions about using MyUNIL, several resources are available to you:
- **Online documentation**: consult the IT Centre wiki
- **Contact**: myunil@unil.ch
- **Integrated help**: use the "Aide" (Help) link available in the portal interface
---
*This documentation is part of the official user help for the MyUNIL portal.*
*University of Lausanne – IT Centre*
# The first steps
Understanding MyUNIL
# First steps in MyUNIL
# The Dashboard
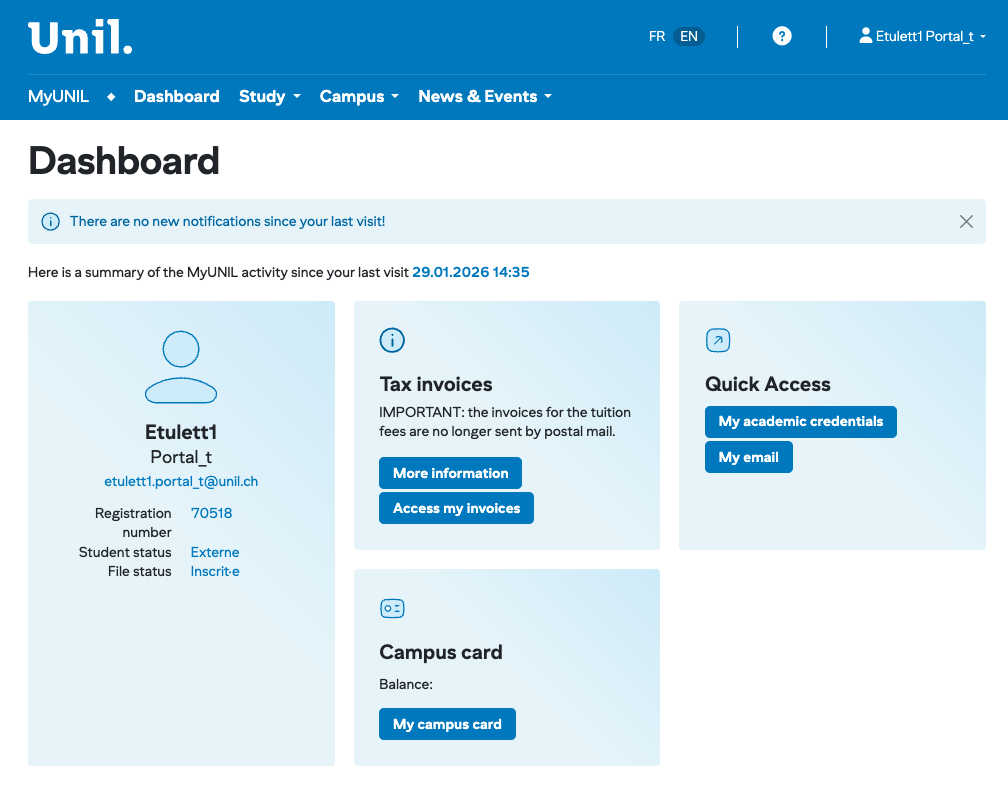
The dashboard is the homepage of MyUNIL. It provides you with a personalised overview of your university activity and quick access to the most frequently used features.
> **Access**: Menu **MyUNIL → Tableau de bord**
> **URL**: https://my.unil.ch
---
[](https://wiki.unil.ch/ci/uploads/images/gallery/2026-01/capture-decran-2026-01-29-a-15-00-21.png)
## The Navigation Bar
At the top of the screen, the blue navigation bar allows you to access the different sections of MyUNIL:
Menu
Description
**Dashboard**
Homepage with an overview of your activity
**Study**
Access to courses, documents, timetables and academic results
**Work**
Salary data and certificates
**Campus**
Information and services related to campus life
**News & Events**
Events, news and university calendar
---
## Elements in the Top Right Corner
Several elements are permanently accessible in the top right corner of the screen:
### Language Selector (FR / EN)
Allows you to switch the interface between French and English.
### Help Button (?)
Provides access to documentation and support resources.
### User Menu
By clicking on your name, a dropdown menu appears with the following options:
- **Your email address** — displayed for information purposes
- **Mes données administratives** — direct access to your personal information
- **Fermer la session** — secure logout from the portal
---
## The Notifications Area
Below the navigation bar, an information area indicates whether new notifications are available since your last visit. A summary of your MyUNIL activity is also displayed with the date and time of your last login.
> *Example: "Voici un résumé de l'activité MyUNIL depuis votre dernière visite le 29.01.2026 10:55"*
---
## Dashboard Widgets
The dashboard displays several widgets (panels) that give you a quick overview of your information and direct access to key features.
### User Profile Widget
Located on the left, this widget displays your personal information:
- Your surname and first name
- Your status (e.g.: Portal\_t for test account)
- Your university email address
- Your registration number
- Your student status (e.g.: External, Regular)
- Your file status (e.g.: Registered)
### Tuition Fees Widget
This widget informs you about your semester tuition fee invoices. Two buttons are available:
- **Plus d'informations** — to find out more about university fees
- **Accéder à mes factures** — to view and download your invoices
> ⚠️ **Important**
> Semester tuition fee invoices are no longer sent by post. View them directly from this widget or in the dedicated section.
### Campus Card Widget
This widget displays your campus card balance and allows you to access its management. Click on **Ma campus card**to:
- Check your current balance
- Top up your card
- Block or unblock your card if lost
### Quick Access Widget
Located on the right, this widget offers shortcuts to the most frequently used features:
- **Mes attestations d'études** — download your enrolment certificates
- **Ma boîte email** — access your university mailbox directly
---
## Interface Summary
Area
Content
Possible Actions
Header
UNIL logo, navigation, language, help, profile
Navigate, change language, log out
Notifications
Messages and activity summary
View updates
Profile
Personal information
View your status
Invoices
Semester fees
View and download
Campus card
Card balance
Manage your campus card
Quick access
Main shortcuts
Certificates, emails
---
## Tips for Use
- Check your dashboard regularly so you don't miss any important notifications.
- Verify your file status, particularly during the registration period.
- Remember to download your tuition fee invoices as soon as they are available.
- Don't forget to log out after using a shared computer.
---
*This documentation is part of the official user help for the MyUNIL portal.*
*University of Lausanne – IT Centre*
# Study - View your academic documents
# Access and print your certificate of registration and semester bills
Students can access and print their academic credentials from the “My Profile” application in the user menu.
### Access to user profile
[](https://wiki.unil.ch/ci/uploads/images/gallery/2026-01/yGlcapture-decran-2026-01-29-a-16-35-23.png)
1. Click on the user menu choose the submenu “My administrative data”
### Administrative data and attestations
[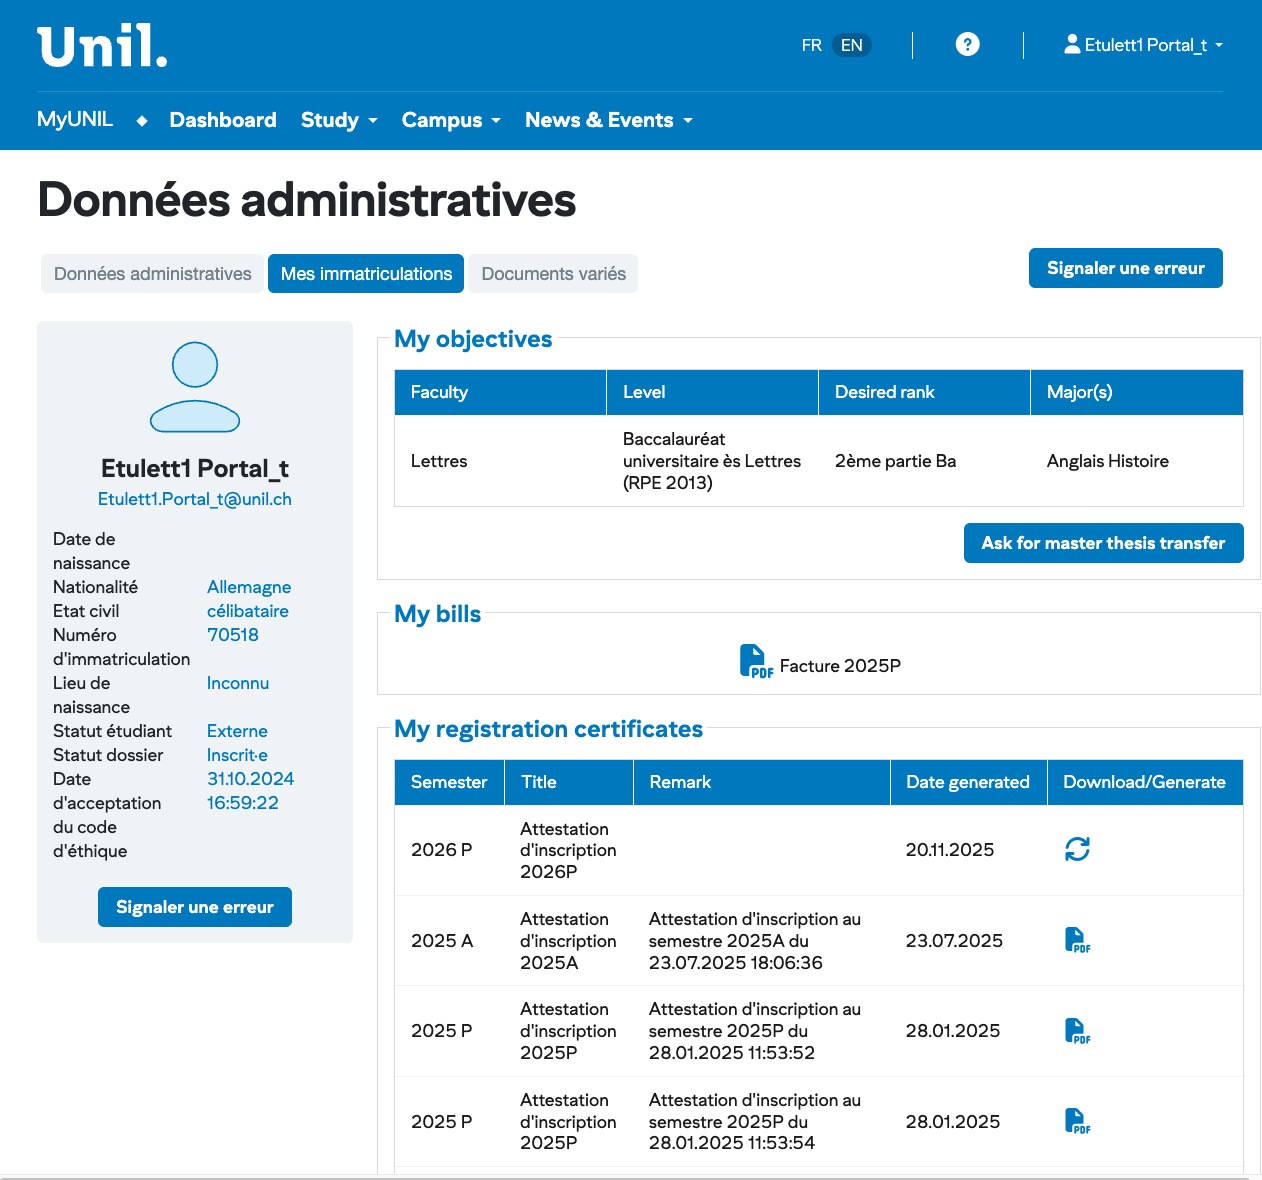](https://wiki.unil.ch/ci/uploads/images/gallery/2026-01/capture-decran-2026-01-29-a-16-36-04.png)
The administrative data of the user are displayed on this page. For students, their registrations, as well as their registration certificates for the various semesters are also listed.
1. PDF of the certificate of the current semester
2. Access to the objectives and the list of all registration certificates
If the registration certificate of the current semester is not present at the left panel, you can generate it at anytime from the list of all registration certificates.
### Registrations and list of all certificates
[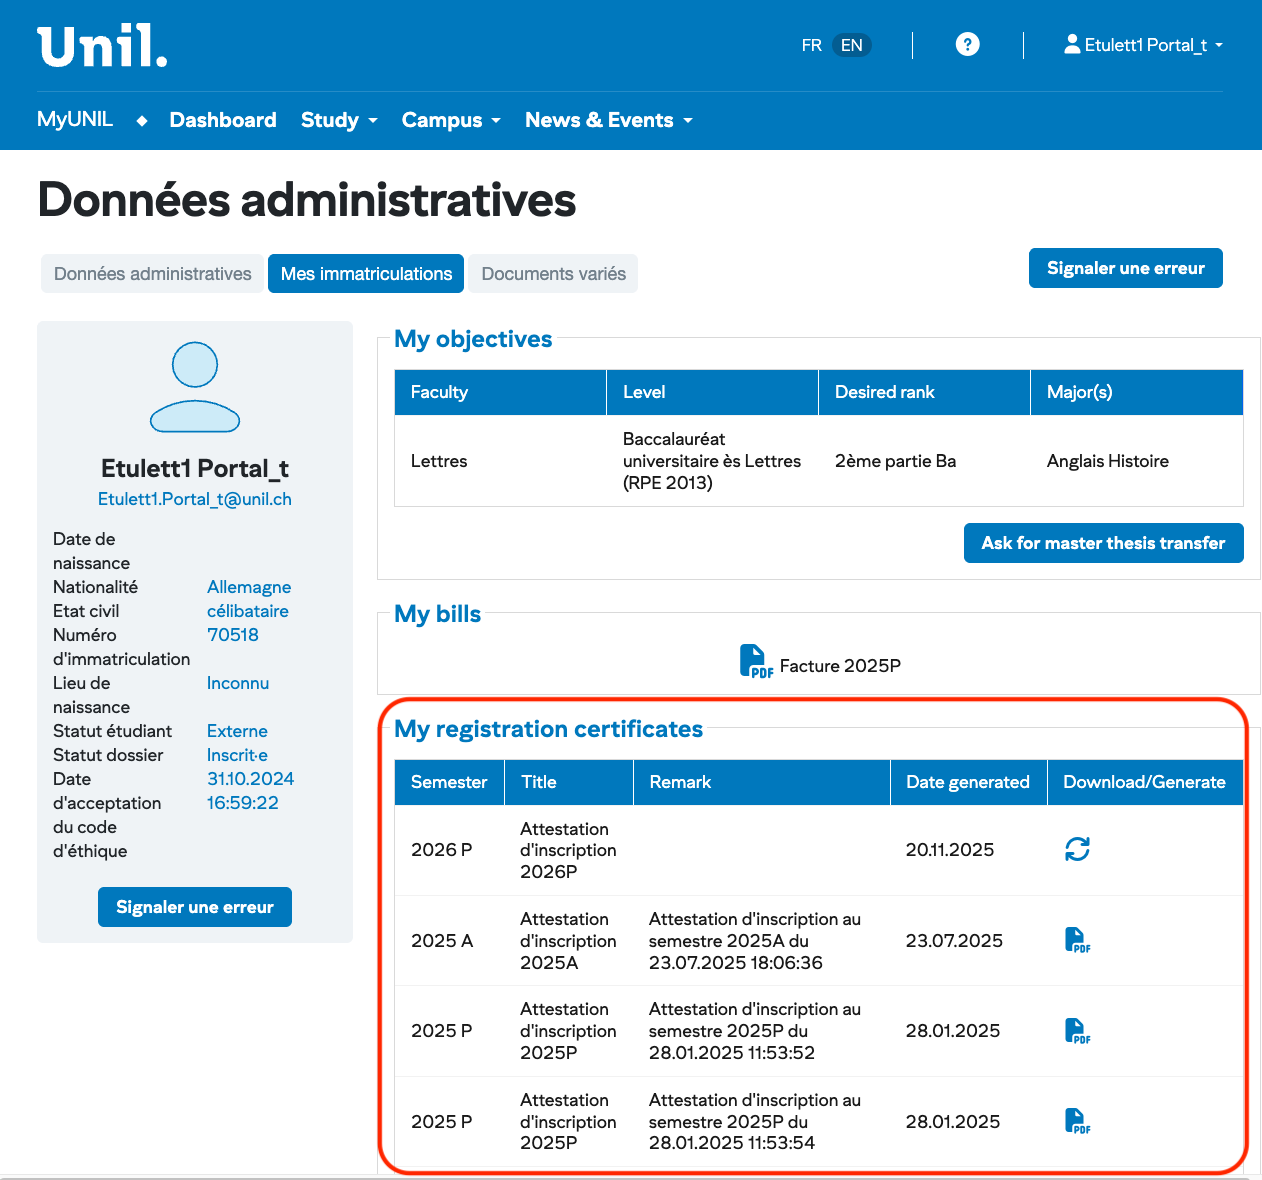](https://wiki.unil.ch/ci/uploads/images/gallery/2026-01/sU5capture-decran-2026-01-29-a-16-36-04.png)
- PDF of the certificate of the current semester
- List of all registration certificates with download and/or generation
As all registration certificates of all semesters are listed here, yon can generate them again after some changes about cursus, postal address…
If the certificate of the current semester is not present at the left panel, you can generate it at anytime from the list of all registration certificates.
### Access your invoices
The students have to download their invoices for the tution fees directly from their "MyUNIL" profile.
- After logging into your profile, click on the avatar or profile picture and select the "My Administrative Data" submenu
- To access your registration fee, click on 'My Registrations'. The invoices for registration fees will be available under the 'My bills' section, directly under 'My Objectives'.
[](https://wiki.unil.ch/ci/uploads/images/gallery/2026-01/pSpcapture-decran-2026-01-29-a-16-36-04.png)
All registration bills of all semesters are listed here.
# Study - Access and view your course documents
Through the MyUNIL portal, teachers can make course materials available and students can access them. The Moodle service also allows this.
(Version française disponible [ici](https://wiki.unil.ch/ci/books/myunil-et-newsunil/chapter/etudier-mettre-a-disposition-et-voir-vos-documents-de-cours "Mettre à disposition et voir vos documents de cours - Documentation publique"))
# Access to course material
Students can access all course documents filed by the teacher if they use MyUNIL for the management of course materials.
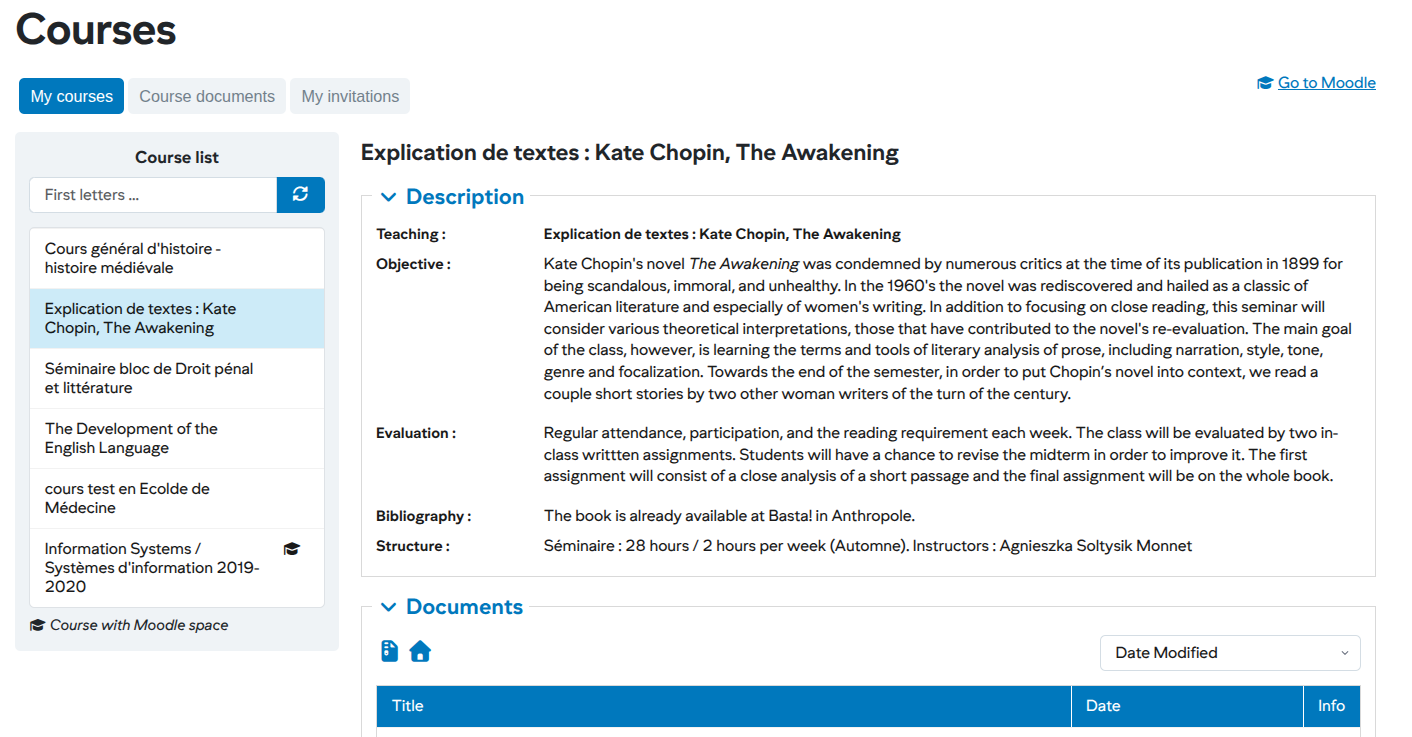
#### Access to course documents from the “Courses” application
##### Access from course list
1. Select course on the list on the left
2. The documents will appear in the “Documents” section to the right of the interface
3. On peut à l'aide des icônes :
- [](https://wiki.unil.ch/ci/uploads/images/gallery/2026-01/GaEimage.png)Download folder as compressed file
- [](https://wiki.unil.ch/ci/uploads/images/gallery/2026-01/Hi4image.png)Share bookmark of this course page
- [](https://wiki.unil.ch/ci/uploads/images/gallery/2026-01/rHVimage.png)Share link of documents of this course
##### Search for course documents
[](https://wiki.unil.ch/ci/uploads/images/gallery/2026-01/cPnimage.png)
By selecting the “Course Documents” tab, students have access to a search in course documents (**Documents** tab)
1. Search term
2. Access to advanced search
3. Result of the research. Access to the course space by clicking on the detail icon
4. Possibility of research in these courses or in the courses of the whole faculty
5. Allow to filter courses by date
6. Allow to define the language of the search term and possibly restrict the search to the exact term
7. Allow to view the contents of this directory (the icon [](https://wiki.unil.ch/ci/uploads/images/gallery/2025-08/aw1image.png) allows to share the link to the documents in this directory)
##### Search for course documents from a faculty
[](https://wiki.unil.ch/ci/uploads/images/gallery/2026-01/tlEimage.png)
By selecting the “Course Documents” tab, students have access to a search in course documents of a faculty (**Teaching** tab)
#### Accessing course documents from the “Calendar” application
[](https://wiki.unil.ch/ci/uploads/images/gallery/2026-01/DP5image.png)
1. Access course documents from the link. The user is redirected to the “Courses” application and the file space is automatically displayed
[](https://wiki.unil.ch/ci/uploads/images/gallery/2026-01/pawimage.png)
# Add course documents
Teachers and student assistants with a proxy for a course can at any time add documents to a course space
#### Select a course
[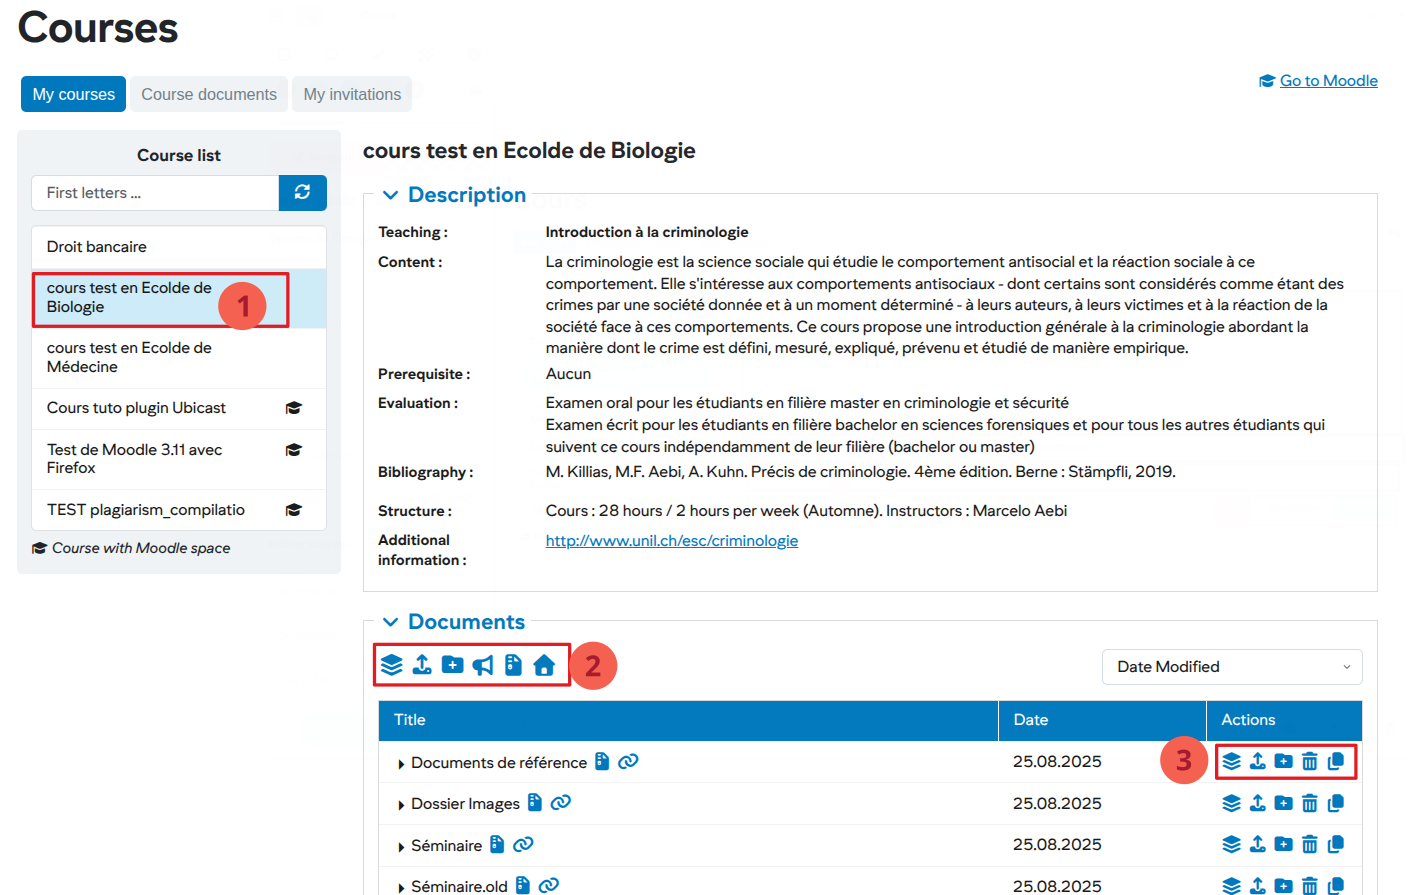](https://wiki.unil.ch/ci/uploads/images/gallery/2026-01/sHqimage.png)
1. Choose from the course list a course for which you want to add documents
2. Add a document or directory to the root of the document system in the selected course
- - [](https://wiki.unil.ch/ci/uploads/images/gallery/2026-01/mRZimage.png) Upload multiple documents
- [](https://wiki.unil.ch/ci/uploads/images/gallery/2026-01/Lwbimage.png) Upload a document
- [](https://wiki.unil.ch/ci/uploads/images/gallery/2026-01/rRuimage.png) Add a directory
- [](https://wiki.unil.ch/ci/uploads/images/gallery/2026-01/Z8eimage.png)Communicate by email with the students of this course
- [](https://wiki.unil.ch/ci/uploads/images/gallery/2026-01/GaEimage.png)Download folder as compressed file
- [](https://wiki.unil.ch/ci/uploads/images/gallery/2026-01/Hi4image.png)Share bookmark of this course page
3. Add a document or directory to a specific directory
- [](https://wiki.unil.ch/ci/uploads/images/gallery/2026-01/mRZimage.png)Upload multiple documents
- [](https://wiki.unil.ch/ci/uploads/images/gallery/2026-01/Lwbimage.png)Upload a document
- [](https://wiki.unil.ch/ci/uploads/images/gallery/2026-01/rRuimage.png)Add a directory
- [](https://wiki.unil.ch/ci/uploads/images/gallery/2026-01/XhQimage.png)Delete a file or a directory
- [](https://wiki.unil.ch/ci/uploads/images/gallery/2026-01/bSUimage.png)Copy a file or a directory into an other directory
#### Add a course document
[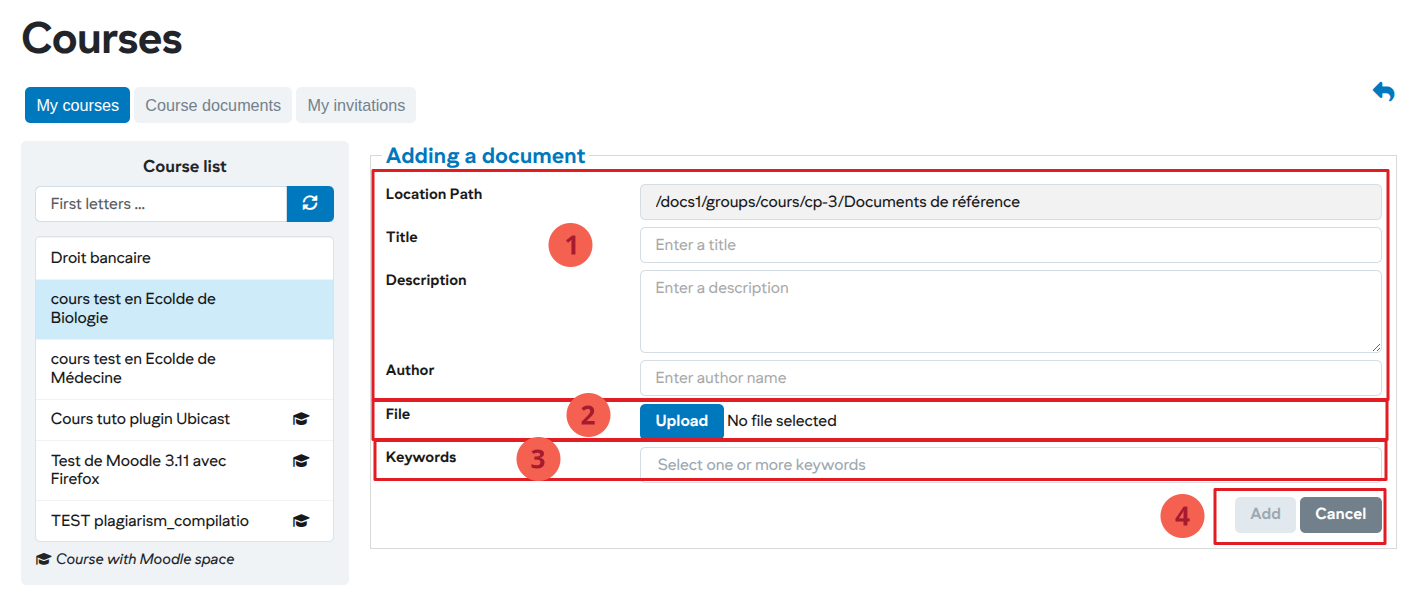](https://wiki.unil.ch/ci/uploads/images/gallery/2026-01/oFmimage.png)
1. Enter document information
2. Upload the file
3. Add the keywords. These keywords will be used to find them in the search for documents
4. Validate the addition of document
Note: when adding multiple documents, the title and description cannot be provided, and only five documents can be uploaded at a time.
# Access a Moodle course space
Students can access their Moddle course space from the “Course” application. Courses with open course space in Moddle are indicated by a specific icon.
####
Access the Moodle space of a course
[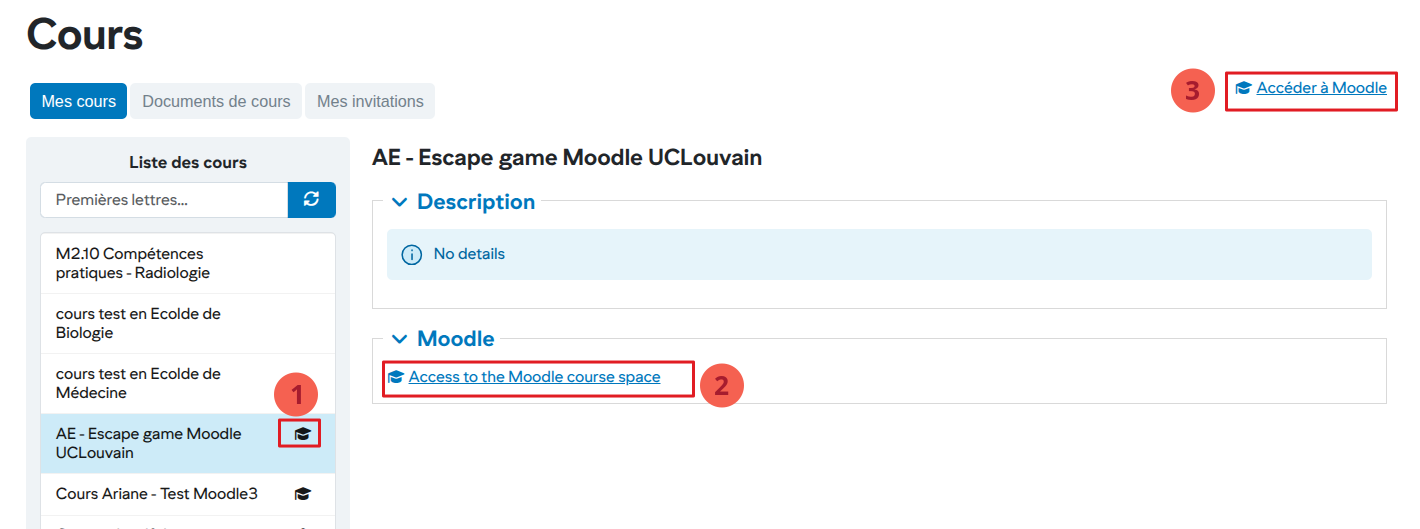](https://wiki.unil.ch/ci/uploads/images/gallery/2026-01/9xMimage.png)
1. In the left menu, all courses with an open Moodle space are indicated by the icon
2. After selecting a course from the list on the left, access to the corresponding Moodle space is displayed
3. General access to Moodle
# Study - View your course and exam timetable
# Access and synchronize calendars (courses, exams)
# The Academic Calendar
The calendar is the central tool for viewing your course timetables and exam dates. It provides a consolidated view of your university schedule.
> **Access**: Menu **Study → Calendar**
> **URL**: [https://my.unil.ch/calendar](https://my.unil.ch/calendar)
---
[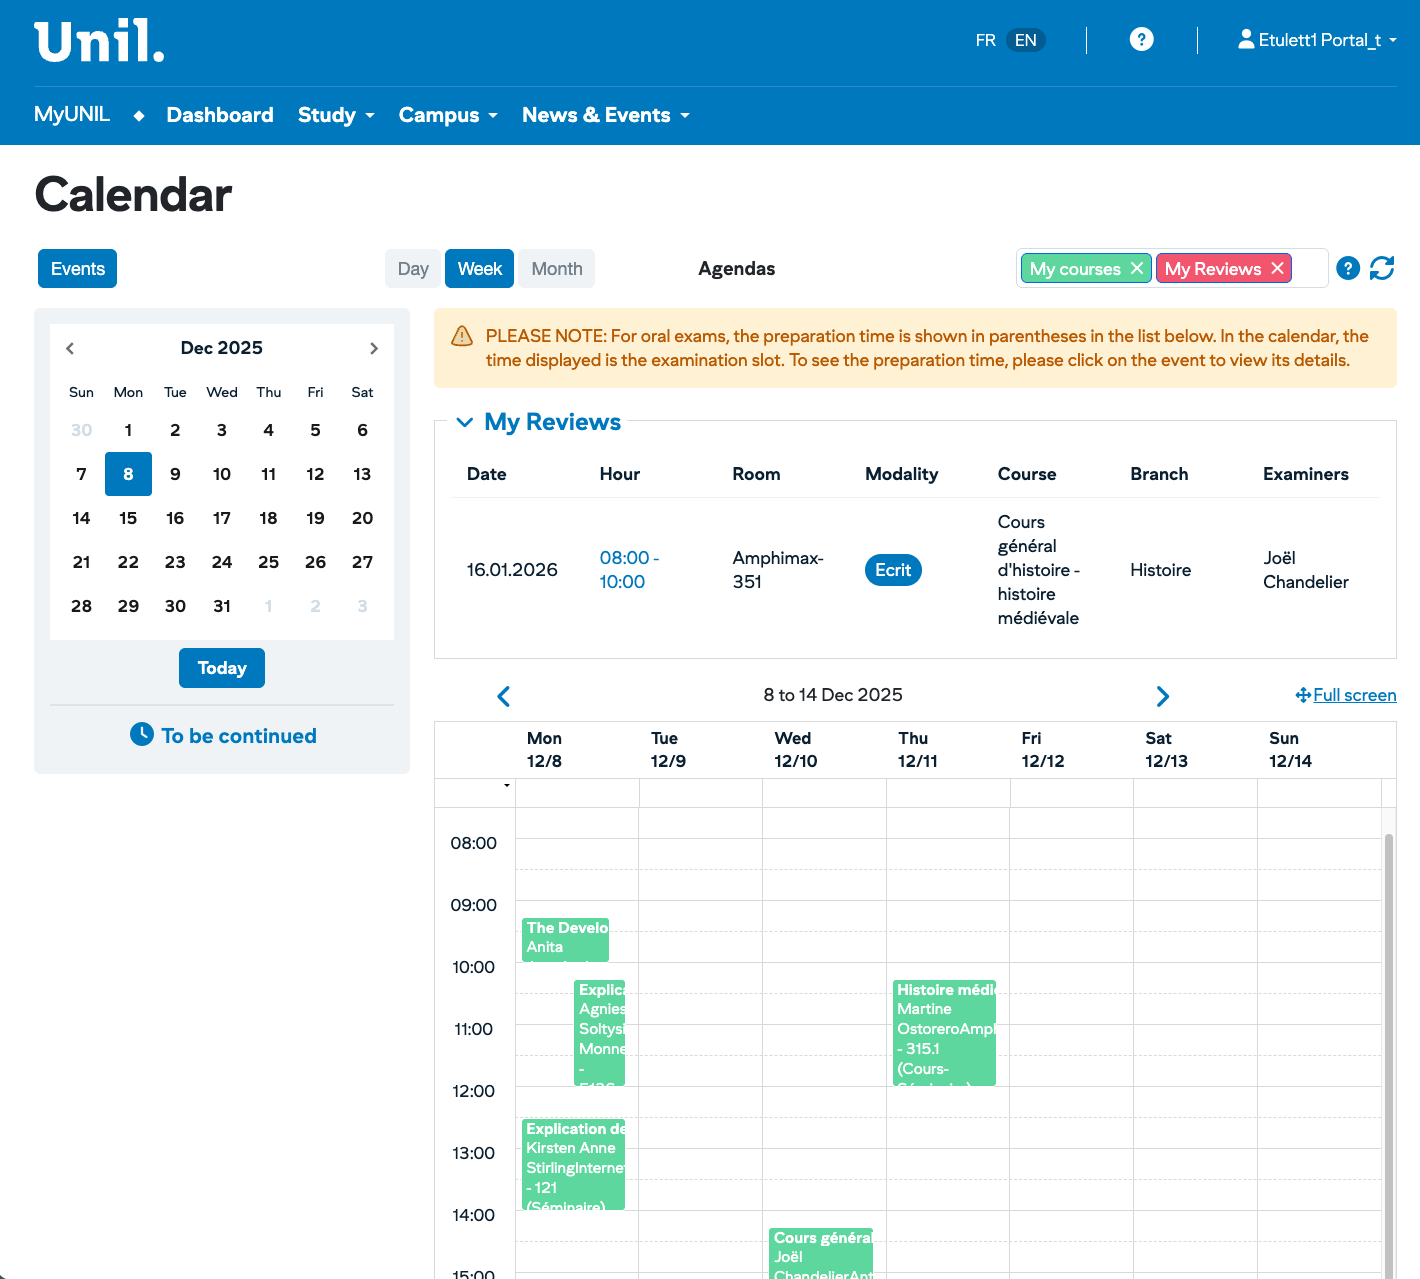](https://wiki.unil.ch/ci/uploads/images/gallery/2026-01/capture-decran-2026-01-29-a-16-51-22.png)
## Accessing the Calendar
From the navigation bar, click on the **Étudier** menu to display the following options:
Option
Description
**Calendar**
Displays your course timetables and exams
---
## Interface Elements
### Top Toolbar
The toolbar at the top of the calendar allows you to customise the display:
#### Agenda Button
Located on the left, the **Agenda** button provides access to your personal diary.
#### Display Modes
Two buttons allow you to change the calendar view:
- **Week** — displays the selected week (default view)
- **Month** — displays the full month
#### Agenda Filters
On the right, coloured labels allow you to filter the events displayed:
Label
Colour
Description
**My exams**
Red
Shows or hides your exams
**My courses**
Green
Shows or hides your courses
Click on the cross (×) of a label to hide the corresponding category. Click again to show it.
---
## The Mini-Calendar
On the left side of the screen, a mini-calendar allows you to navigate quickly:
- Use the **<** and **>** arrows to change month
- Click on a date to display the corresponding week
- Today's date is highlighted (blue circle)
- The **Aujourd'hui** button returns to the current date
### "À suivre" Section
Below the mini-calendar, the **À suivre** (Coming up) section displays your upcoming important events.
---
## The Exam List
At the top of the main area, the **Mes examens** section displays the list of your exams in table format:
Column
Description
**Date**
Exam date (e.g.: 16.01.2026)
**Heure**
Time slot (e.g.: 08:00 - 10:00)
**Salle**
Exam location (e.g.: Amphimax-351)
**Modalité**
Exam type: Écrit (Written), Oral, etc.
**Cours**
Name of the course concerned
**Branche**
Subject area (e.g.: Histoire)
**Examinateurs**
Name of the examiner(s)
> ⚠️ **Warning — Oral Exams**
> For oral exams, the preparation time is shown in brackets in the list. In the calendar, it is the examination time that is displayed. To find out the preparation time, click on the event to view the details.
---
## The Weekly View
The lower part displays your timetable in a weekly grid format:
### Navigation
- Use the **<** and **>** arrows to move to the previous or next week
- The period displayed is shown in the centre (e.g.: "15 au 21 déc. 2025")
- Click on **+ Plein écran** to enlarge the view
### Grid Structure
Element
Description
**Columns**
Days of the week (Mon. to Sun.) with date
**Rows**
Time slots (from 09:00 to 18:00 and beyond)
**Coloured blocks**
Events (courses or exams)
### Event Blocks
Each event appears as a coloured block containing:
- The name of the course or exam
- The name of the lecturer
- The location (building and room)
- The type (Cours, Séminaire, etc.)
**Colour code:**
Colour
Meaning
**Green**
Courses and seminars
**Red**
Exams
Click on a block to display the full details of the event.
---
## Advanced Features
### Full Screen Display
Click on **+ Plein écran** (top right of the grid) to enlarge the calendar for better visibility.
### Synchronisation with External Tools
Your course and exam calendars can be synchronised with:
- Your smartphone (iOS and Android)
- Google Calendar
- Outlook
- Other applications compatible with iCal format
To configure synchronisation, check your diary settings.
[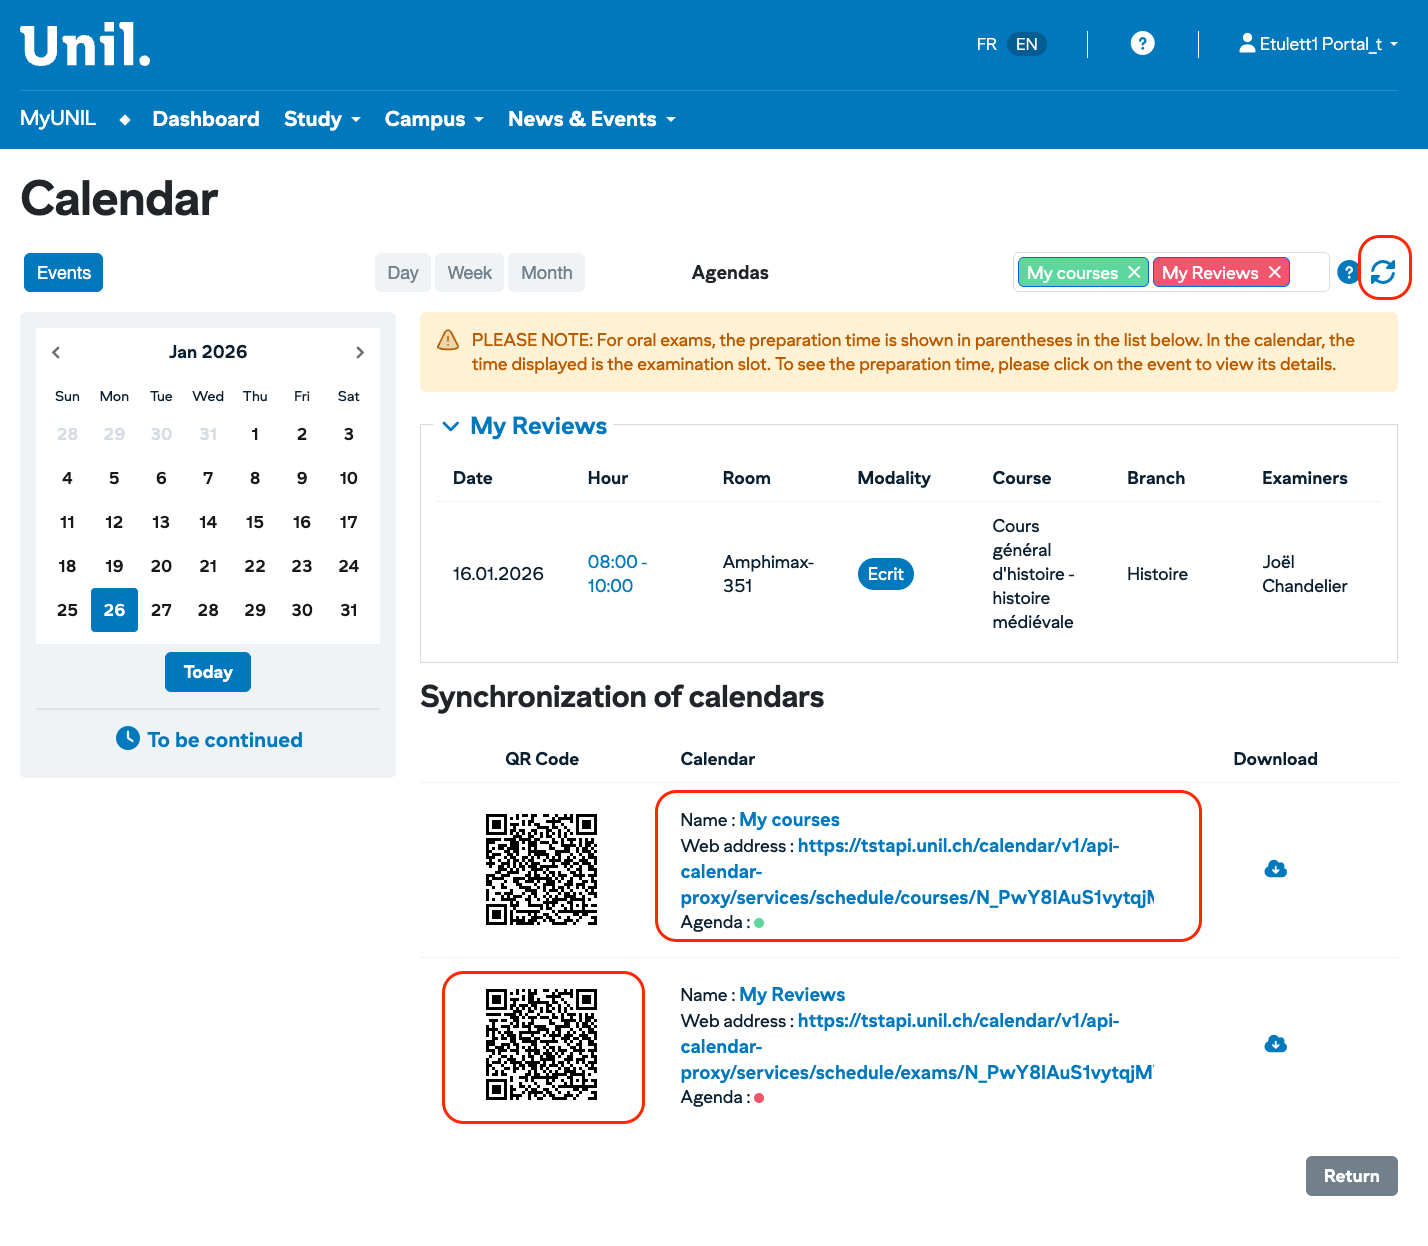](https://wiki.unil.ch/ci/uploads/images/gallery/2026-01/capture-decran-2026-01-29-a-16-54-27.png)
##### Apple Calendar
1. Copy the synchronization address
2. Open calendar application
3. File -> Calendar Subscription
4. Paste the address into the Calendar URL field
5. Configure the calendar name and color
1. Copy the synchronization address via the QR-Code
2. Go to Settings -> Calendar -> Accounts
3. Add new account -> Select type “Other”
4. Add a calendar with subscription
5. Paste the link in the server field
##### Google agenda
1. Sign in Google Calendar
2. Go to the menu of “Other Agendas”
3. Add URL
4. Paste link in field
[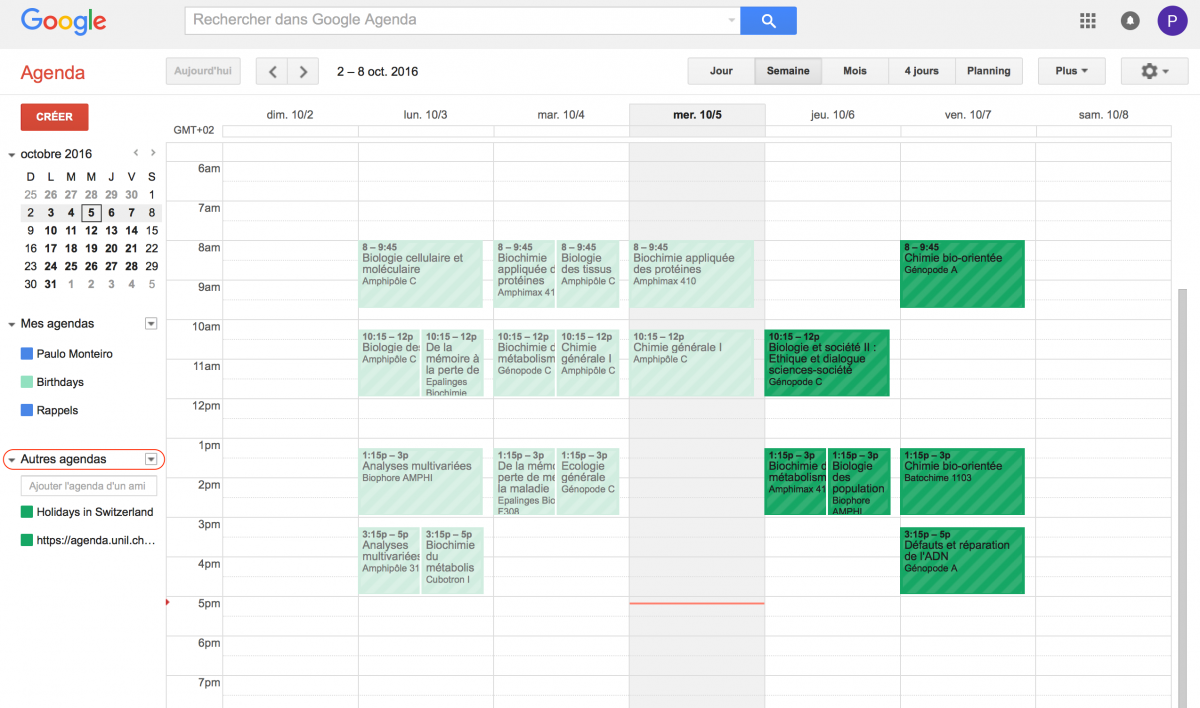](https://wiki.unil.ch/ci/uploads/images/gallery/2023-08/google-agenda.png)
Google Calendar results
### Contextual Help
Click on the **?** button (to the right of the agenda filters) to access the calendar's contextual help.
---
## Interface Summary
Area
Function
Toolbar
Change view, filter agendas
Mini-calendar
Quick navigation by date
Exam list
Summary table of exams
Weekly grid
Timetable visualisation
Event blocks
Course and exam details
---
## Tips for Use
- Check your calendar regularly to verify any changes to times or rooms.
- Use the filters to display only courses or exams according to your needs.
- For oral exams, make sure to note the preparation time as well as the examination time.
- Synchronise your calendar with your smartphone to receive reminders.
- During exam periods, carefully check the rooms allocated to you.
---
*This documentation is part of the official user help for the MyUNIL portal.*
*University of Lausanne – IT Centre*
# Study - See your academic curriculum
# Access to your curriculum and results
Students can access a synopsis of their academic “Cursus” as well as the corresponding PVs.
#### “Curriculum” Application
[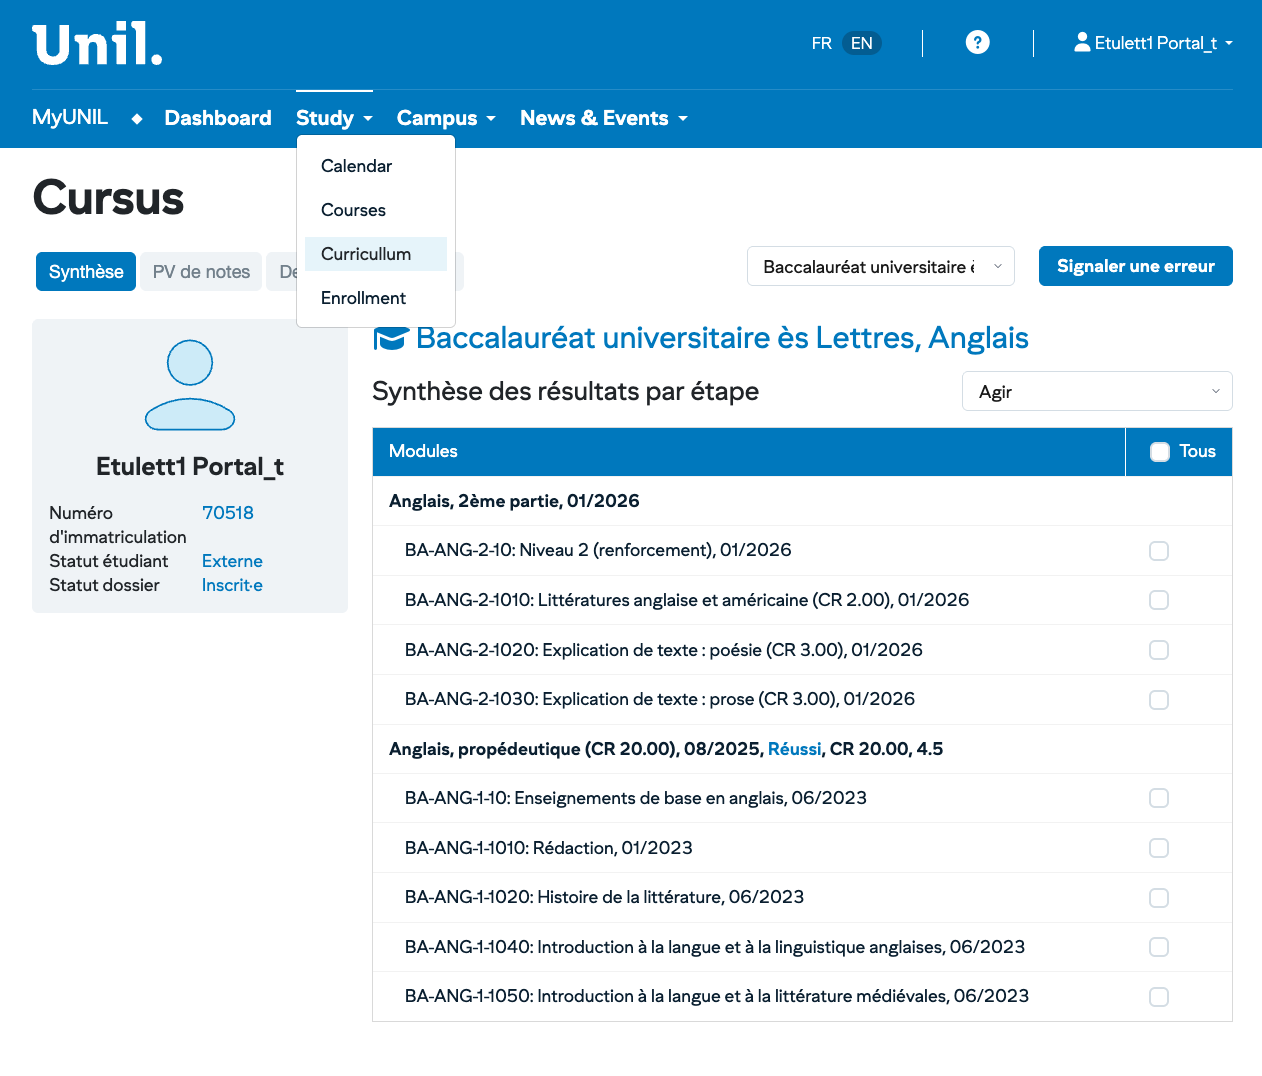](https://wiki.unil.ch/ci/uploads/images/gallery/2026-01/capture-decran-2026-01-29-a-16-43-27.png)
- Access to the history of results, Validation Tracking, last exams
- Choice of steps to be detailed
- Choice of type of detail: exams or classes
- Choice of objectives
- Access to a global view of the curriculum
# Work - My salary data
# My salary and certificates data
# Salary Data
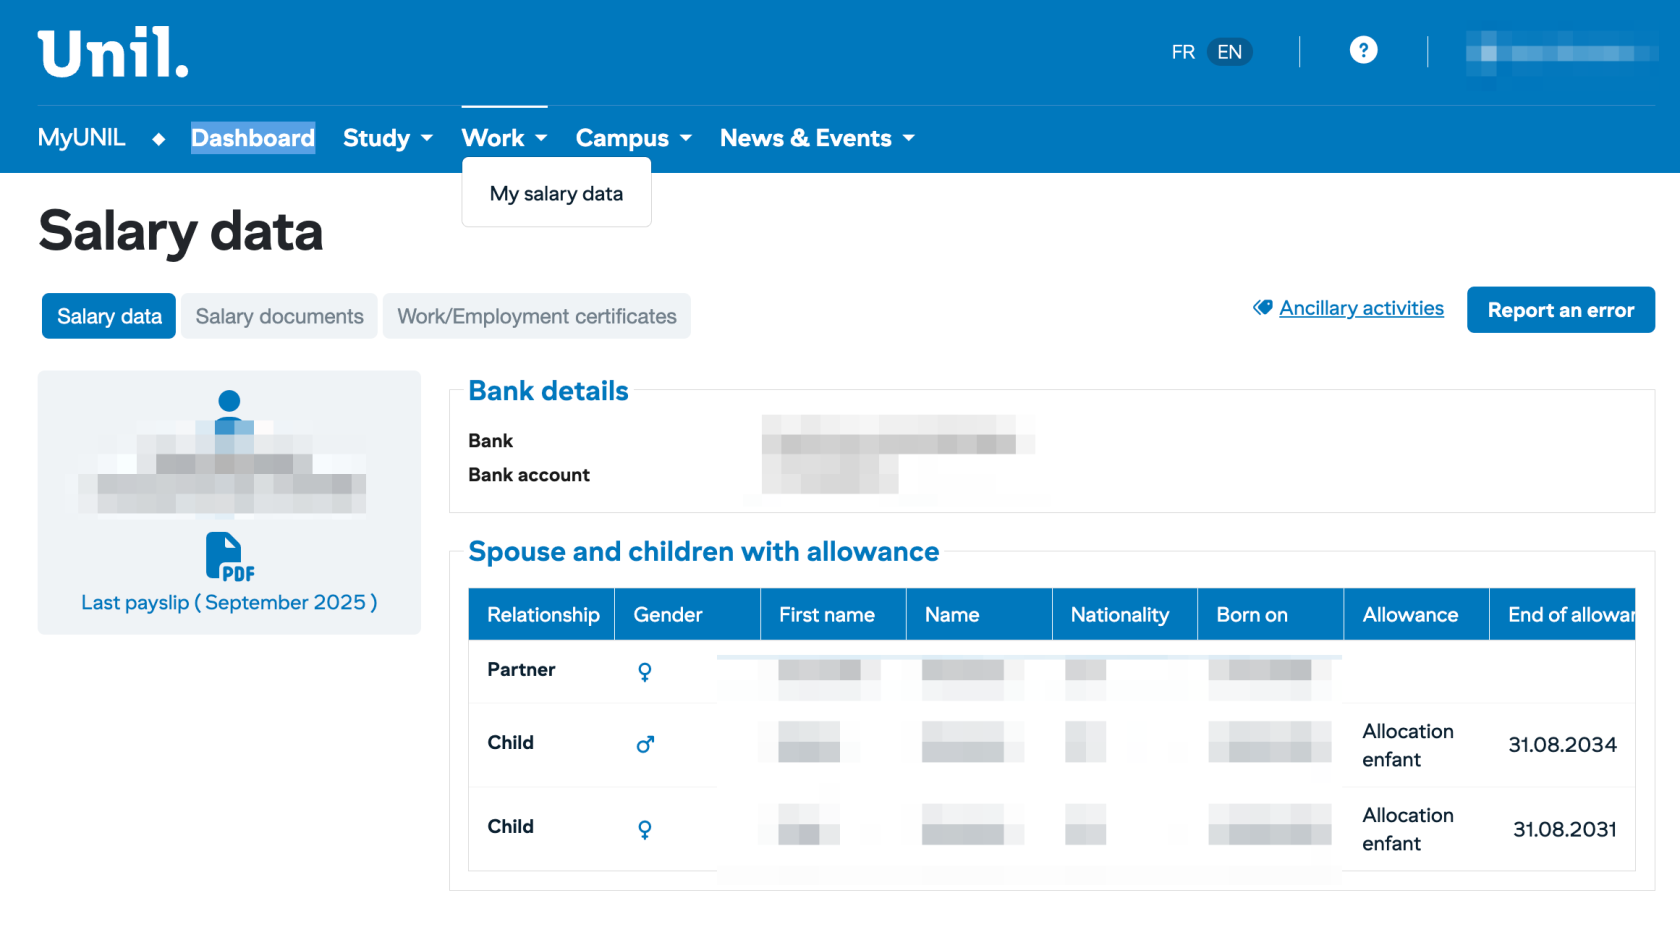
The Salary Data section allows you to view all information related to your employment at UNIL: pay slips, bank details, family information and work certificates.
> **Access**: Menu **Work → My salary data**
> **Audience**: [https://my.unil.ch/employeedata/](https://my-tst.unil.ch/employeedata/)
---
[](https://wiki.unil.ch/ci/uploads/images/gallery/2026-01/capture-decran-2026-01-29-a-15-43-36.png)
## Accessing Salary Data
From the navigation bar, click on the **Travailler** menu and then select **Mes données salariales**.
> ℹ️ **Note**
> This section is only visible to staff members who have an employment contract with the University of Lausanne.
---
## Available Tabs
The Salary Data page is organised into three main tabs:
Tab
Description
**Salary data**
General information, bank details and family situation
**Salary documents**
Monthly pay slips and annual salary certificates
**Certificates**
Official documents relating to your employment
---
## Données salariales Tab
This tab displays your personal information related to your employment.
### Latest Pay Slip
On the left, a thumbnail displays a preview of your latest pay slip with the period concerned (e.g.: "der. bulletin (septembre 2025)").
Click on the PDF icon to download the document.
### Bank Details (Coordonnées bancaires)
This section displays your bank details registered for salary payments:
Field
Description
**Bank**
Name of your bank
**Bank acunt**
Your account IBAN number
### Spouse and Children with Allowances (Conjoint·e et enfants avec allocation)
If you receive family allowances, this section displays information about your family situation in table format:
Column
Description
**Relation**
Type of relationship (Conjoint = Spouse, Enfant = Child)
**Sexe**
Gender (♀ or ♂)
**Prénom**
First name
**Nom**
Surname
**Nationalité**
Country of nationality
**Né(e) le**
Date of birth
**Autorisation de majoration**
Type of allowance (e.g.: Allocation enfant = Child allowance)
**Fin des alloc.**
End date of allowances
---
## Documents de salaire Tab
This tab allows you to access all your salary documents.
### Pay Slips
Monthly pay slips are available in PDF format. They contain details of your remuneration:
- Gross salary
- Deductions (AVS, LPP, withholding tax, etc.)
- Any allowances
- Net salary
### Annual Salary Certificates
Annual salary certificates are made available at the beginning of the year for the previous tax year. These documents are required for your tax return.
---
## Certificats/attestations de travail Tab
This tab provides access to official documents relating to your employment:
- Work certificates
- Employment attestations
- Other HR documents
---
## Available Actions
### Secondary Activities (Activités accessoires)
The **Activités accessoires** link (top right) allows you to declare or view your professional activities carried out outside UNIL, in accordance with legal obligations.
### Report an Error (Signaler une erreur)
If you notice an error in your salary data, click on the **Signaler une erreur** button (top right) to contact the Human Resources Department.
> ⚠️ **Important**
> If there is an error in your bank details, report it immediately to avoid any salary payment problems.
---
## Interface Summary
Area
Content
Possible Actions
Salary data tab
Personal and family information
View, download latest pay slip
Salary documents tab
Pay slips and certificates
Download PDFs
Certificates tab
Official HR documents
Download documents
Ancillary activities
External activities declaration
View, declare
Report an error
HR contact
Send a correction request
---
## Tips for Use
- Download and keep your pay slips each month.
- Retrieve your annual salary certificate as soon as it is available for your tax return.
- Regularly check that your bank details are correct.
- In case of a change in family situation (birth, marriage, etc.), contact the Human Resources Department to update your information.
- Report any errors found on your documents immediately.
---
## Confidentiality
Your salary data is strictly confidential and accessible only by yourself and the authorised university services (Human Resources Department, Financial Service).
Remember to log out after viewing, particularly on a shared computer.
---
*This documentation is part of the official user help for the MyUNIL portal.*
*University of Lausanne – IT Centre*
# Campus - Campuscard and PrintUNIL
# Campuscard and PrintUNIL
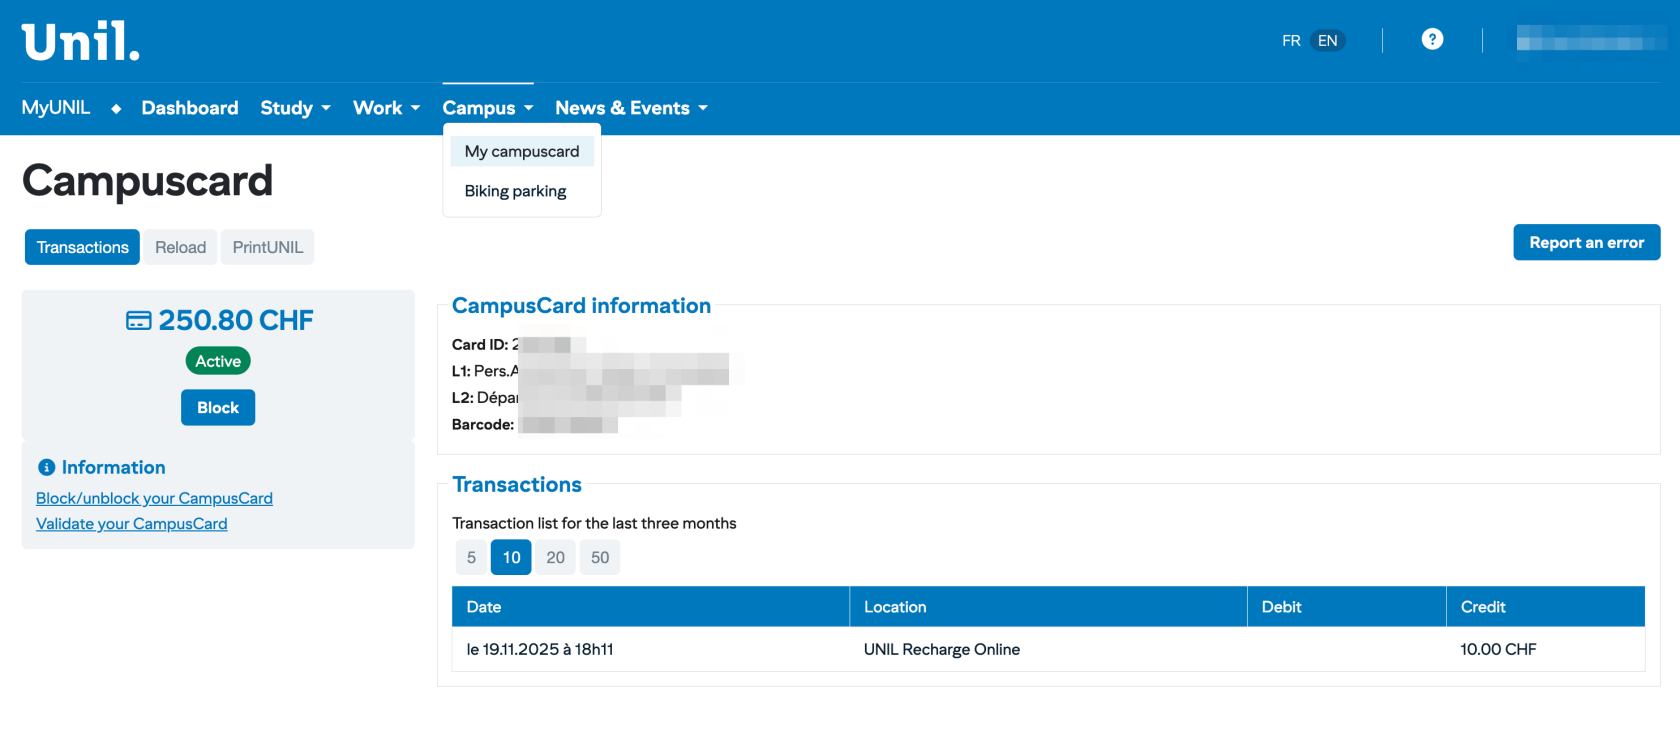
The CampusCard is your multi-function card at the University of Lausanne. It allows you to access buildings, pay on campus and use printing services.
> **Access**: Menu **Campus → My campuscard**
> **URL**: [https://my.unil.ch/campuscard](https://my.unil.ch/campuscard)
---
[](https://wiki.unil.ch/ci/uploads/images/gallery/2026-01/pUfcapture-decran-2026-01-29-a-15-37-11.png)
## Accessing Your CampusCard Management
From the navigation bar, click on the **Campus** menu to display the following options:
Option
Description
**My campuscard**
Management of your campus card (balance, top-up, blocking)
**My Biking parking**
Management of your bicycle parking subscription
---
## Available Tabs
The CampusCard page is organised into three tabs:
Tab
Description
**Transactions**
Transaction history and card information
**Top-up**
Top up your card balance
**PrintUNIL**
Management of your printing credit
---
## Transactions Tab
This tab displays your card information and transaction history.
### Balance and Card Status
On the left, you can see:
- **Current balance**: amount available on your card (e.g.: 250.80 CHF)
- **Status**: card state (Actif = Active or Bloqué = Blocked)
- **Bloquer button**: allows you to block your card if lost or stolen
> ⚠️ **Warning**
> The total balance (after top-up) must not exceed the maximum amount of **300 CHF**.
### Information
Below the balance, the **Informations** section offers useful links:
- **Block and Unblock CampusCard**: instructions for managing blocking
- **Validate your CampusCard**: card validation procedure
### CampusCard informations
This section displays the technical data of your card:
Field
Description
**Card ID**
Unique identifier of your card
**L1**
Line 1 - Personal information
**L2**
Line 2 - Department or affiliation
**Code barre**
Card barcode number
### Transaction History
The **Transactions** table displays the list of your transactions for the last three months:
Column
Description
**Date**
Date and time of the transaction
**Lieu**
Point of sale or service used
**Débit**
Amount debited (expense)
**Crédit**
Amount credited (top-up)
#### Filter the Display
Use the **5**, **10**, **20**, **50** buttons to choose the number of transactions displayed per page.
#### Transaction Examples
Type
Displayed Location
Online top-up
UNIL Recharge Online
Cafeteria
Cafeteria name
Vending machine
Machine name
Printing
PrintUNIL
---
## Top-up Tab
This tab allows you to top up your CampusCard balance online.
### Top-up Methods
You can top up your card:
- **Online**: by bank card directly from MyUNIL
- **On site**: at top-up terminals on campus
- **In cash**: at certain points of sale
### Online Top-up Procedure
1. Click on the **Recharger** tab
2. Enter the desired amount
3. Proceed with bank card payment
4. The credit is added immediately to your balance
> ℹ️ **Reminder**
> The maximum authorised balance is 300 CHF. Check your current balance before topping up.
---
## PrintUNIL Tab
This tab allows you to manage your printing credit for the PrintUNIL service.
### What is PrintUNIL?
PrintUNIL is the University of Lausanne's printing service. It allows you to print, photocopy and scan documents on the campus multifunction printers.
### Features
From this tab, you can:
- Check your PrintUNIL balance
- Top up your printing credit
- View your printing history
> ℹ️ **Note**
> Prices may vary. Check the IT Centre website for current prices.
### Using the Printers
1. Send your document to print from your computer
2. Go to a campus multifunction printer
3. Identify yourself with your CampusCard
4. Select and start your print job
---
## Blocking and Unblocking Your CampusCard
### In Case of Loss or Theft
If you lose your card or it is stolen:
1. Log in to MyUNIL immediately
2. Go to **Campus → Ma campuscard**
3. Click on the **Block** button
4. Your card is immediately deactivated
> ⚠️ **Important**
> Block your card as soon as possible to prevent any fraudulent use of your balance.
### Unblocking Your Card
If you find your card after blocking it:
1. Go to **Campus → My campuscard**
2. Click on the Unblock button
3. Your card is reactivated
### Obtaining a New Card
In case of permanent loss, contact the relevant service to obtain a new CampusCard. Replacement fees may apply.
---
## Report an Error
If you notice an error in your transactions or card information, click on the **Signaler une erreur** button (top right) to contact support.
---
## Interface Summary
Area
Content
Possible Actions
Balance
Available amount
View
Status
Card state
Block/Unblock
Card information
Technical data
View
Transactions
3-month history
View, filter
Recharger
Add credit
Pay online
PrintUNIL
Printing credit
View, top up
---
## Tips for Use
- Check your balance regularly to avoid unpleasant surprises.
- Block your card immediately if lost or stolen.
- Top up your card before it is empty to avoid inconvenience.
- Keep your CampusCard in good condition; it contains a sensitive electronic chip.
- For PrintUNIL, remember to check your credit before starting large print jobs.
---
## CampusCard Uses
Your CampusCard allows you to:
- **Access buildings**: secure doors, laboratories
- **Pay on campus**: cafeterias, vending machines, library
- **Print and photocopy**: PrintUNIL service
- **Borrow books**: university libraries
- **Access bicycle parking**: parking subscription
---
*This documentation is part of the official user help for the MyUNIL portal.*
*University of Lausanne – IT Centre*
# NewsUNIL - Public documentation
Public documentation of the “news and events (MyUNIL)” service.
The [NewsUNIL](https://my.unil.ch/news/) management interface available in MyUNIL enables UNIL faculties and departments to quickly create, publish or propose news and events relating to their departments. Depending on their affiliation, articles are automatically published on the various UNIL websites, as well as on the [News](https://www.unil.ch/news/en/home/unil.html) and [Events](https://www.unil.ch/events/en/home/unil.html) portals.(Version française disponible [ici](https://wiki.unil.ch/ci/books/myunil-et-newsunil/chapter/actualites-et-evenements-documentation-publique))
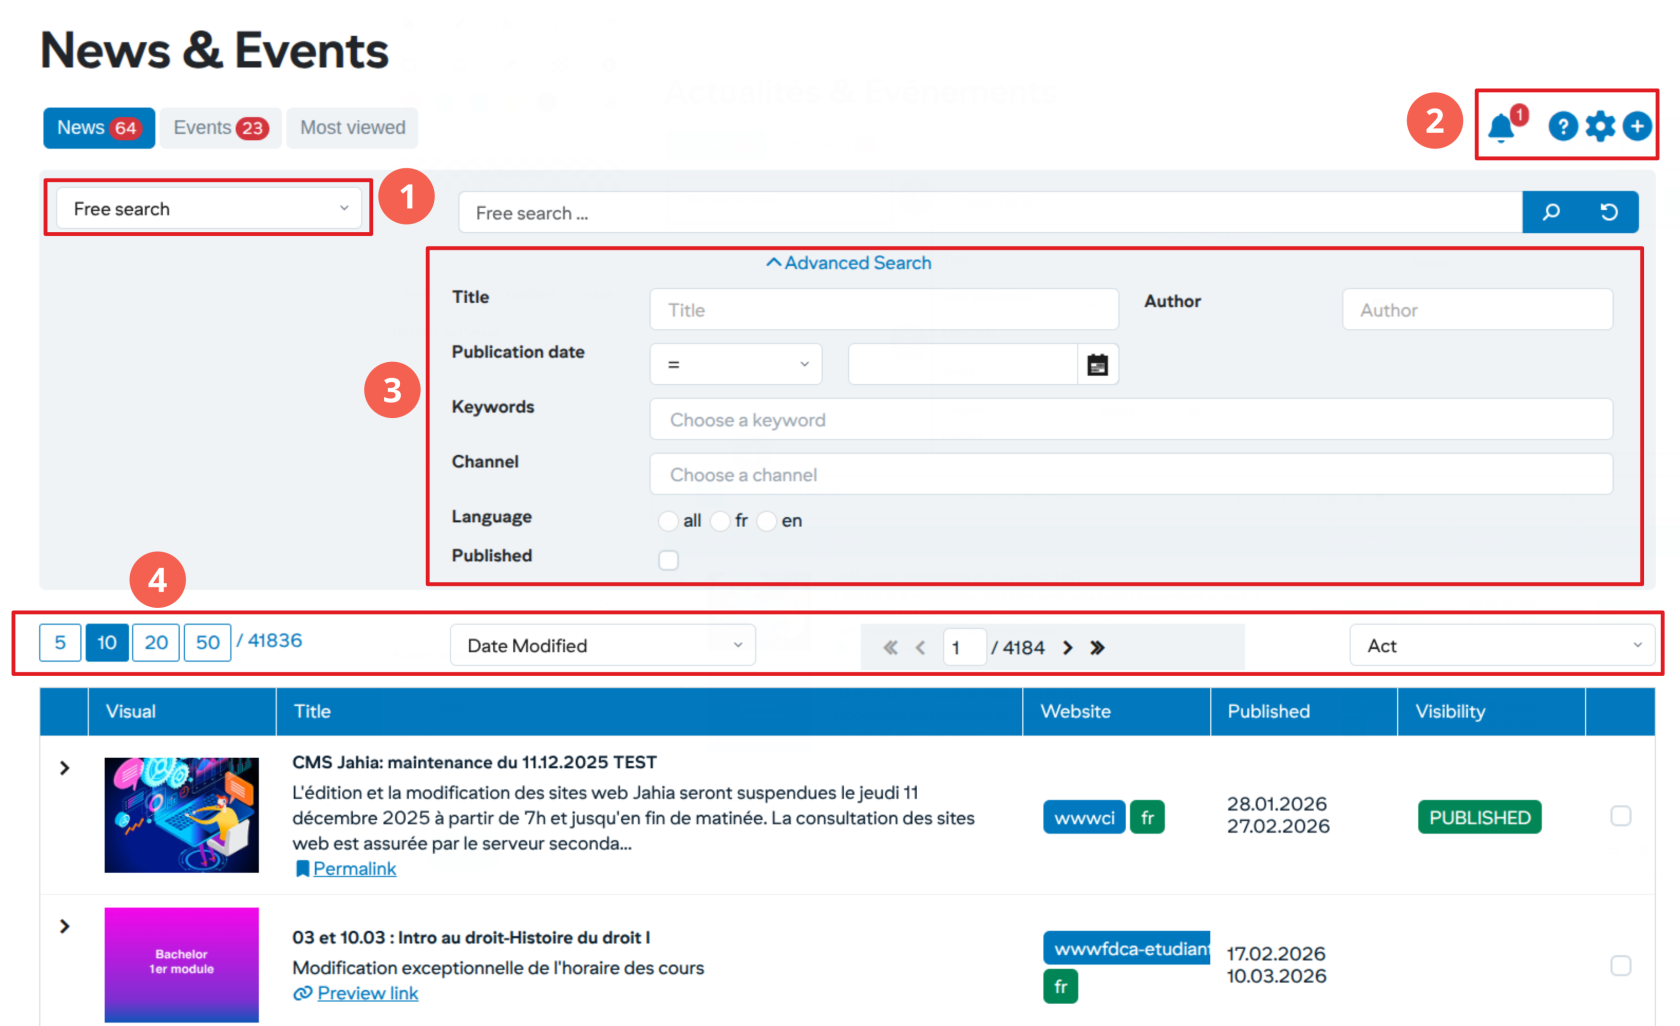
# News and events management inteface
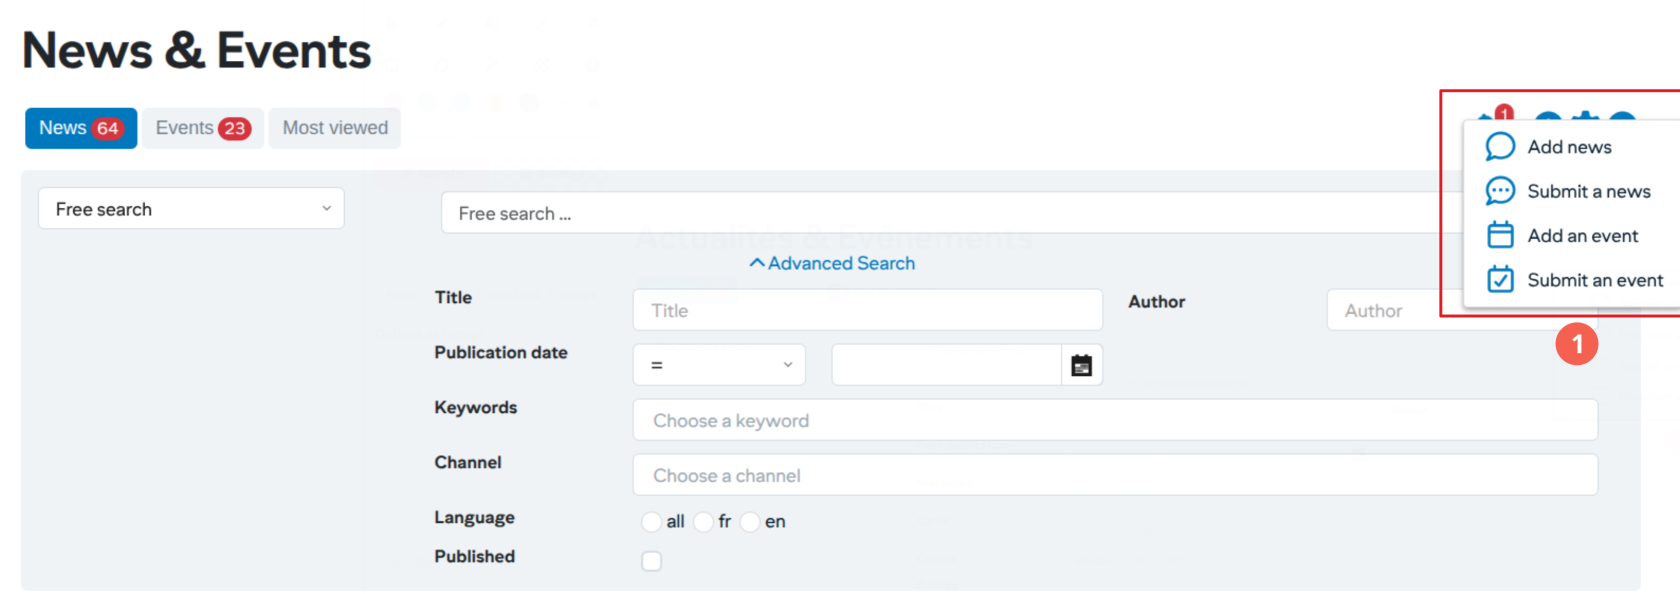
**1. List of predefined searches**
Each user has a list of predefined searches based on their profile. These searches are:
- My News/Events: list of news/events entered by the user
- My subscriptions: list of news/events from channels to which I have subscribed
- My validations: list of items awaiting validation
- My channels: list of items published in channels for which the user is a validator
**2. General actions**
Each user has actions based on his/her profile. These actions are:
- Subscribe to news channels
- Add items (news, events)
**3. Advanced search**
An advanced search is available by default.
**4. Navigation**
Users can filter and sort search results according to their needs.
Validators can also launch grouped actions on search results. These actions are: Delete/Relay/Propose selected list.
[](https://wiki.unil.ch/ci/uploads/images/gallery/2026-01/AIRimage.png)
# Adding news or events
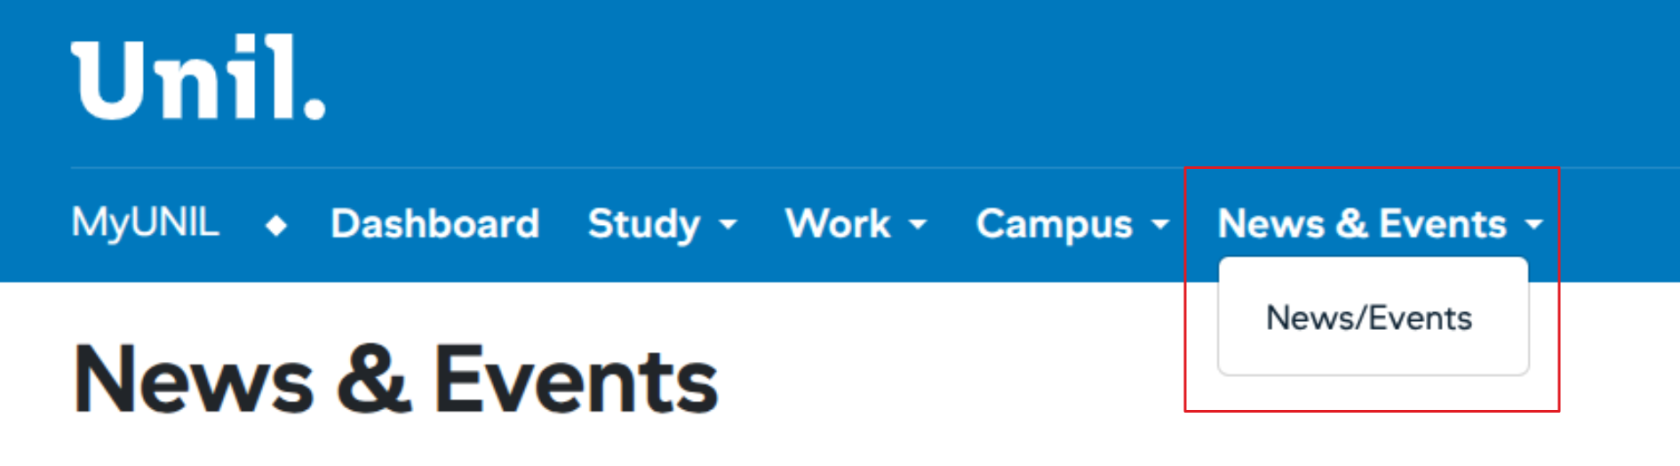
Users with a write-right in one of the news channels can access news management from the “News / Events” tab
[](https://wiki.unil.ch/ci/uploads/images/gallery/2026-01/U6nimage.png)
### Ajouter une actualité/événement
[](https://wiki.unil.ch/ci/uploads/images/gallery/2026-01/N9limage.png)
1. To add a news item simply click on the + button in the action area
1. Stages of the input workflow
1. **Informations**: Entering general information
2. **Contents**: Entering news content
3. **Images/Videos**: Addition of the mandatory image and a possible illustrative video
4. **Links/Files:** Adding specific links or documents
5. **Publication:** Preview the object before publishing and add keywords
6. **Sharing:** Sharing on social networks or proposal to other channels
2. Actions to move around in the workflow
3. Cancel the entry
#### Post a news
[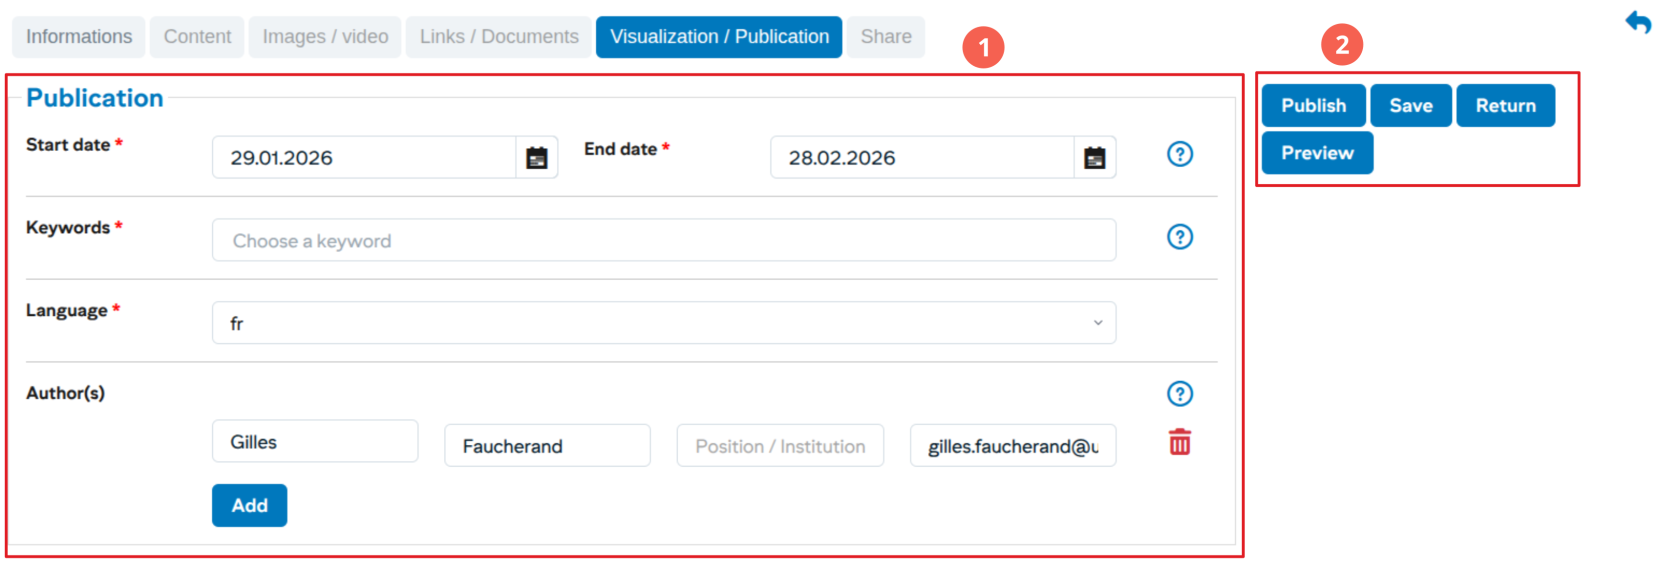](https://wiki.unil.ch/ci/uploads/images/gallery/2026-01/OD5image.png)
1. Entering publication information (dates, keywords, authors and language)
2. Actions (with possible preview before publication)
# Editing/Deleting news or events
From the news details, the user can edit/delete/copy a news item at any time.
[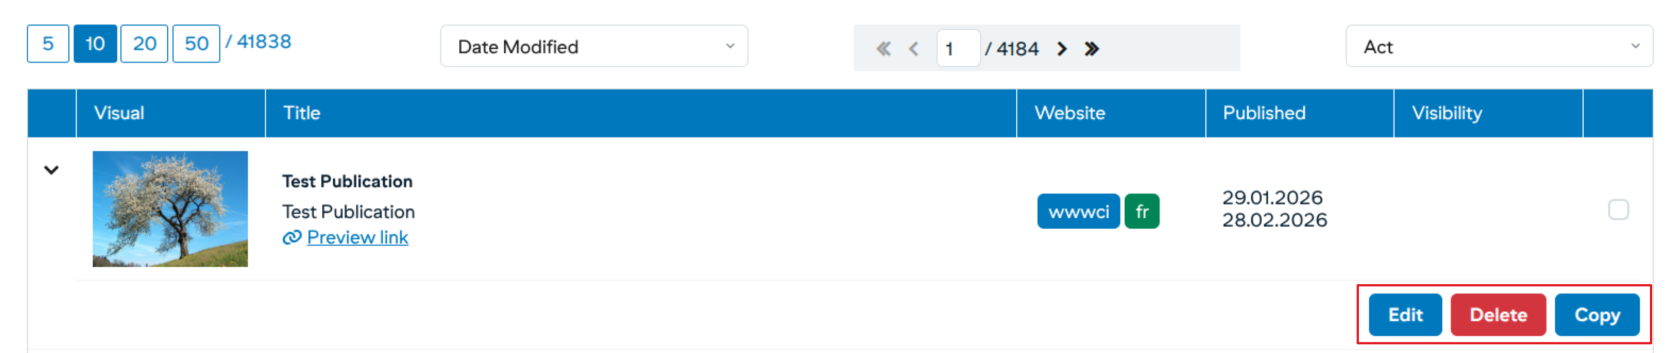](https://wiki.unil.ch/ci/uploads/images/gallery/2026-01/bIkimage.png)
# Editing news/event content
**Actions**
Users can add multiple text blocks and images. After editing, you can delete or sort the blocks at any time using the buttons to the right of the blocks:
[](https://wiki.unil.ch/ci/uploads/images/gallery/2026-01/kV0image.png)
**Blocks**
At the bottom, a toolbar lets you add different types of content:
[](https://wiki.unil.ch/ci/uploads/images/gallery/2026-01/ROVimage.png)
Respectively: text block, image block, gallery block, video block, podcast block and quote block.
- **Text block**: the user can use several formatting tools directly in the text
[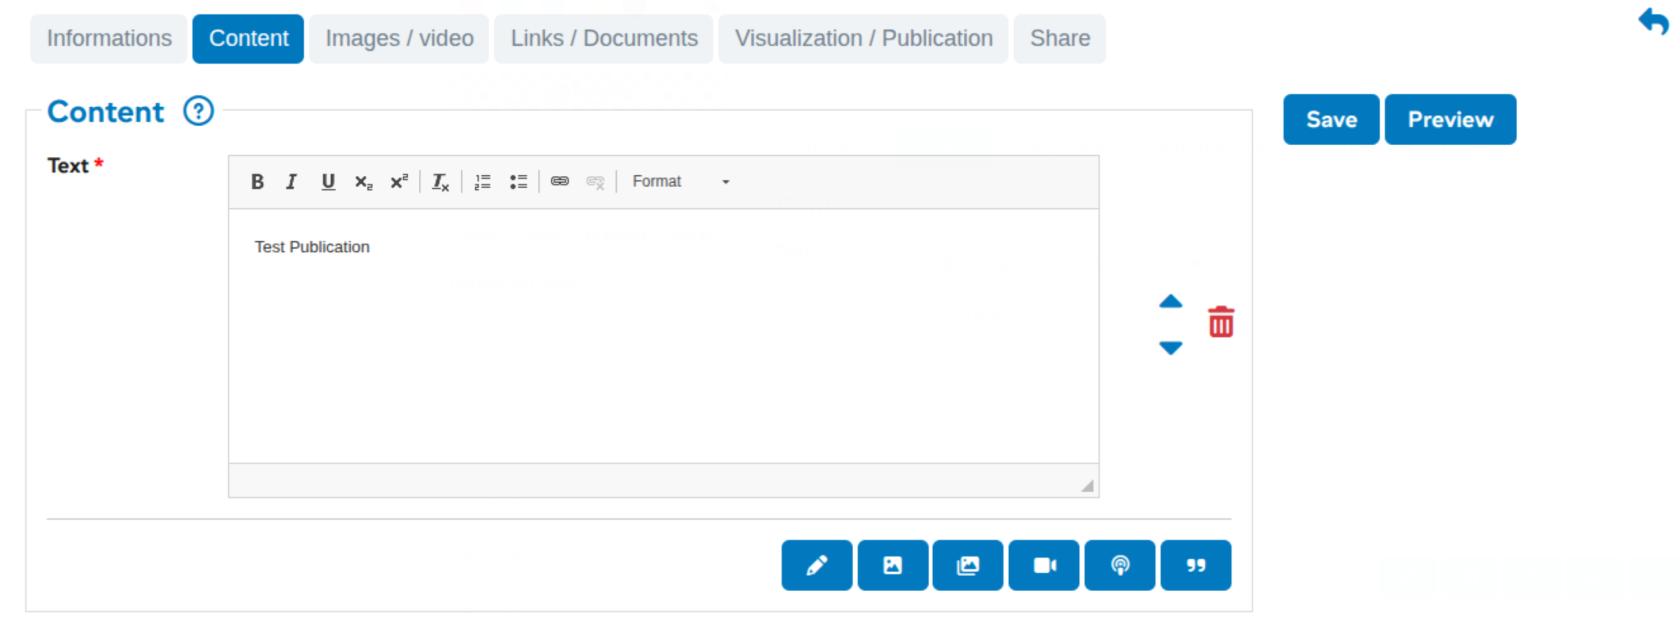](https://wiki.unil.ch/ci/uploads/images/gallery/2026-01/cbJimage.png)
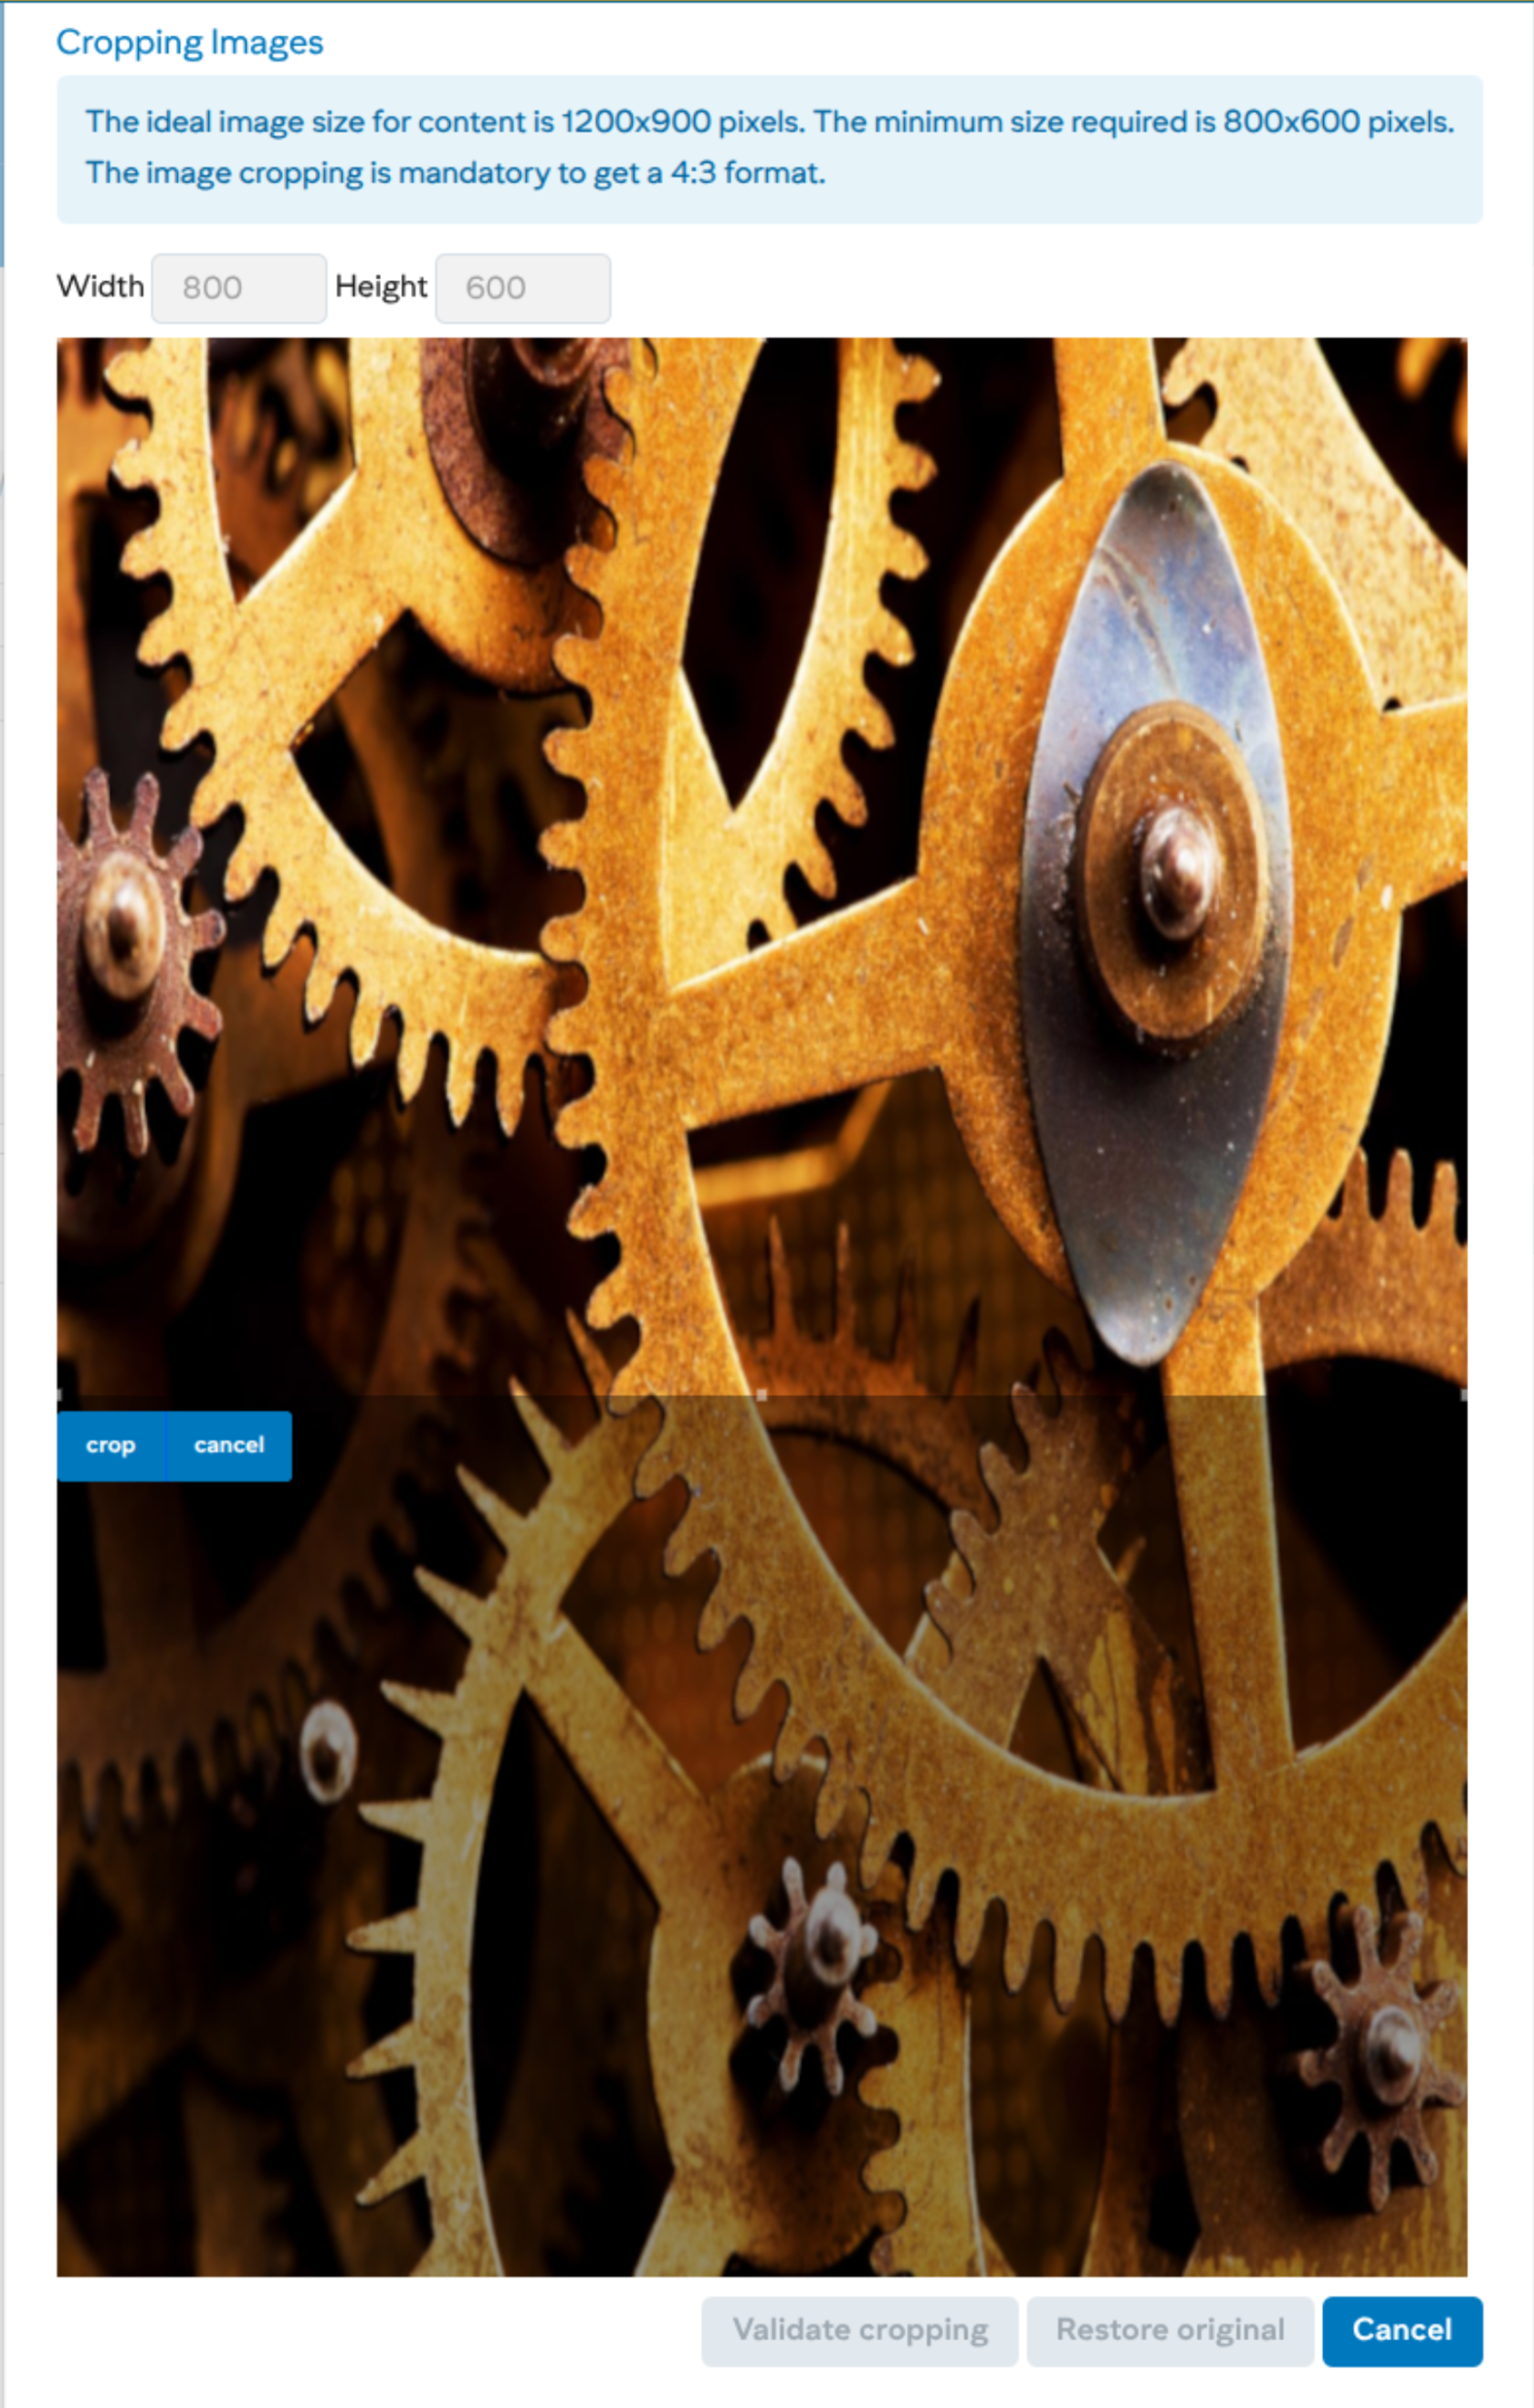
- **Image block**: users can add an image in 4:3 format, which requires cropping. The rectangular area can be adjusted with the mouse to preview the crop. Click on the crop button and then click on the Validate crop button to add the image to the content.
[](https://wiki.unil.ch/ci/uploads/images/gallery/2026-01/M65image.png)
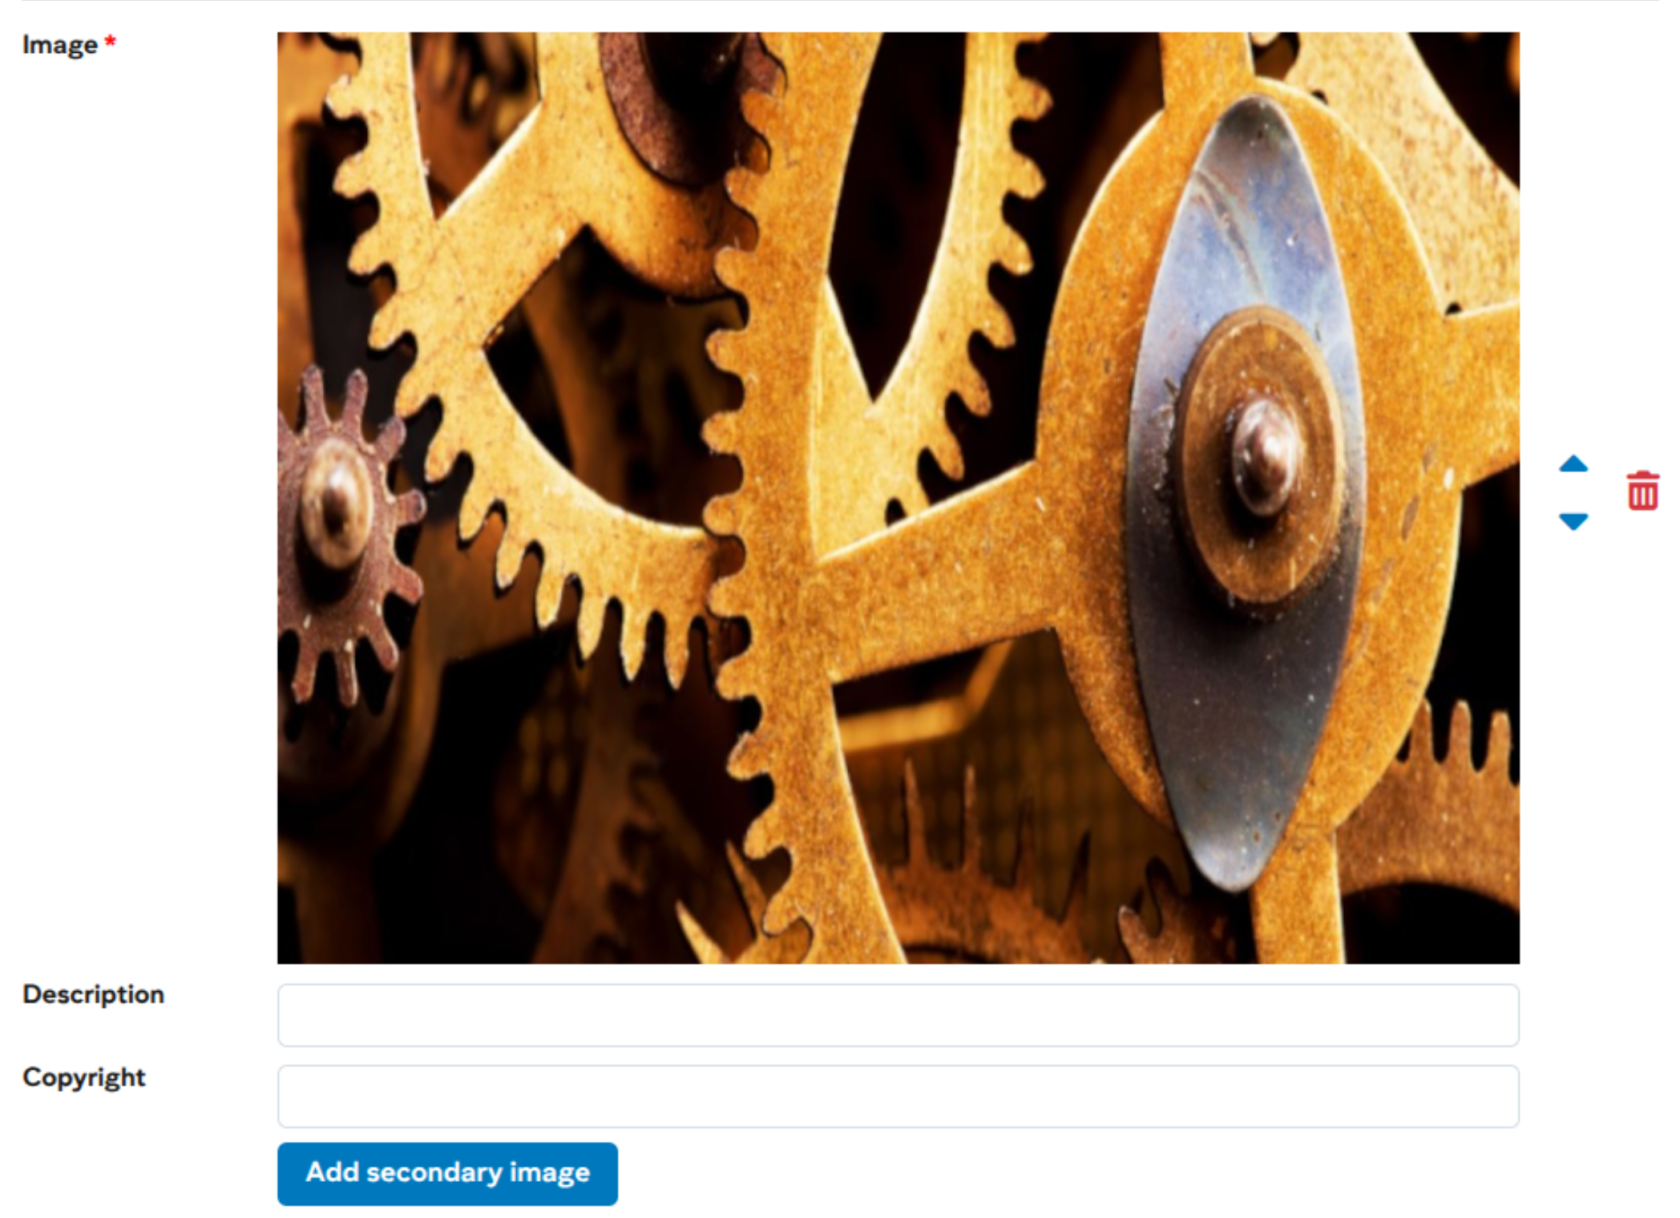
Once the first image has been added, it is possible to add a second using the *Add secondary image* button, in which case the two images will be displayed side by side:
[](https://wiki.unil.ch/ci/uploads/images/gallery/2026-01/v7yimage.png)
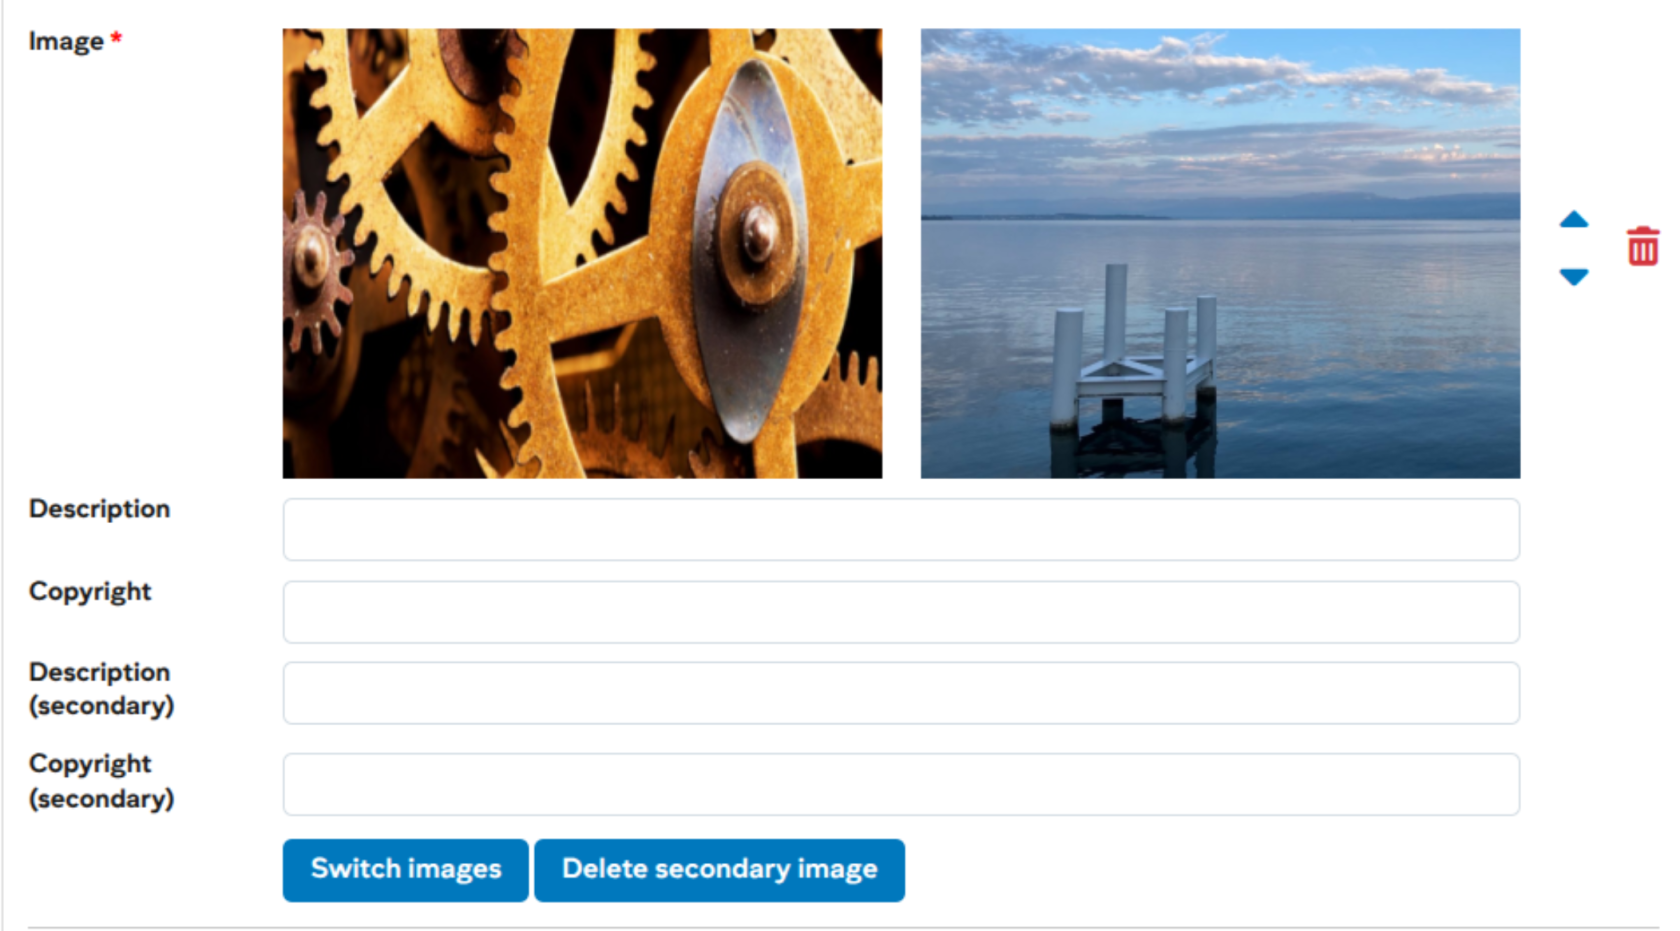
You can then manage the presentation of these two images using the S*witch images* and *Delete secondary image* buttons:
[](https://wiki.unil.ch/ci/uploads/images/gallery/2026-01/Z80image.png)
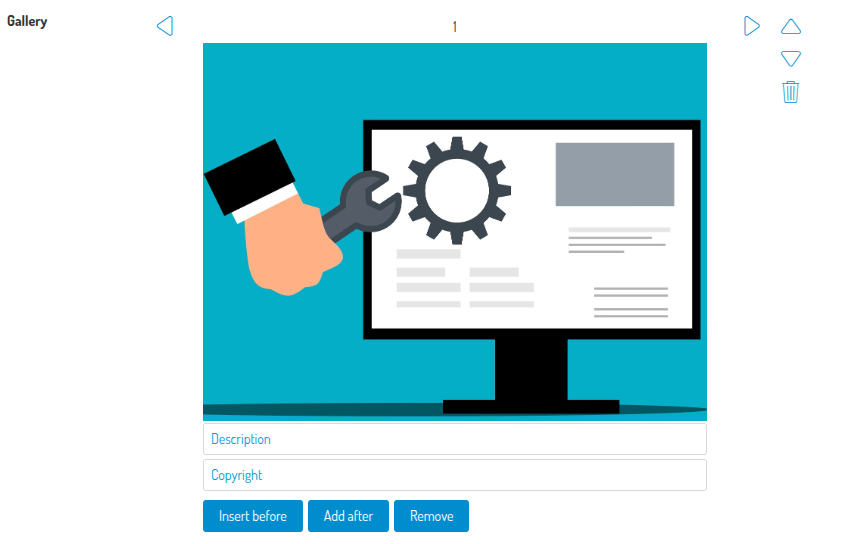
- **Gallery block** : unlike the image block, the user can add multiple images (with the same rules for size). You can then manage the addition/deleion of other images using the *Insert before*, *Add after* and *Remove* buttons.
[](https://wiki.unil.ch/ci/uploads/images/gallery/2025-04/I9simage.png)
- **Video block**: adds a video with the same rules as the [main video](https://wiki.unil.ch/ci/books/myunil-and-newsunil-en/page/add-a-video-to-news-and-events).
[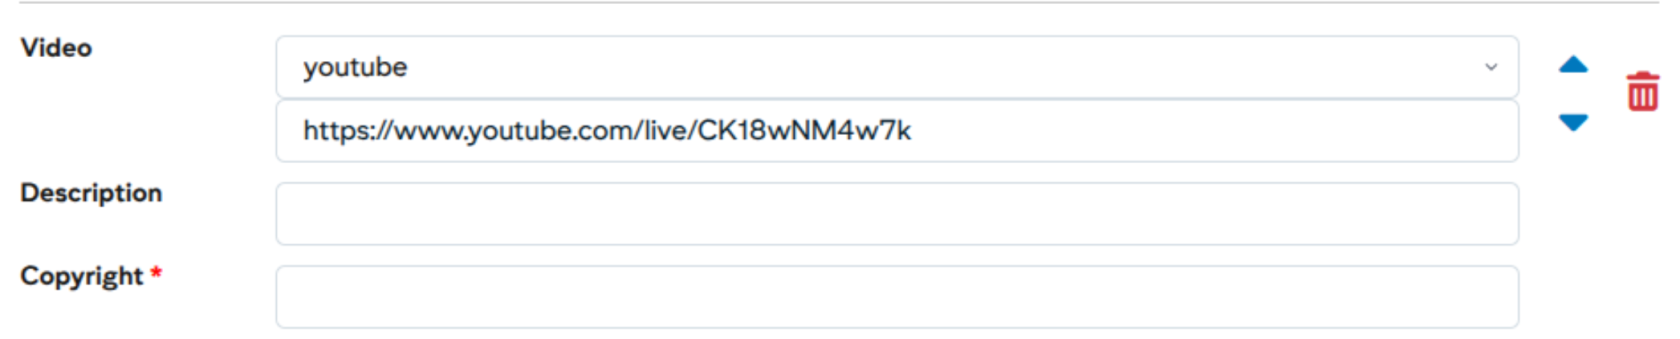](https://wiki.unil.ch/ci/uploads/images/gallery/2026-01/kb4image.png)
- **Podcast block**: adds a podcast to the content (embedded player). Supported formats are :
- RTS: **https://www.rts.ch/play/embed/?urn=urn:rts:audio:...**
- Podcastics: podcast **identifier** for simple player or playlist player
[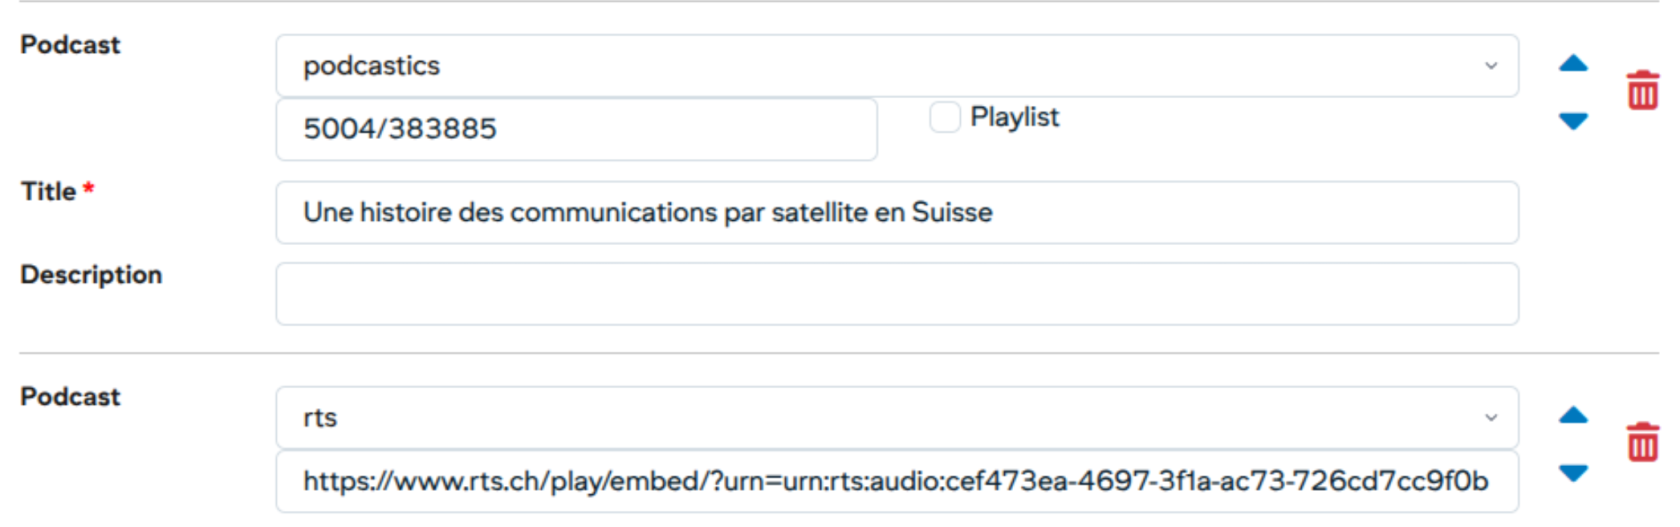](https://wiki.unil.ch/ci/uploads/images/gallery/2026-01/Hbiimage.png)
- **Quote block**: allows you to quote a person. The minimum requirement is the quotation itself, the name and function of the person. Optionally, you can add a title and an external link with its label.
[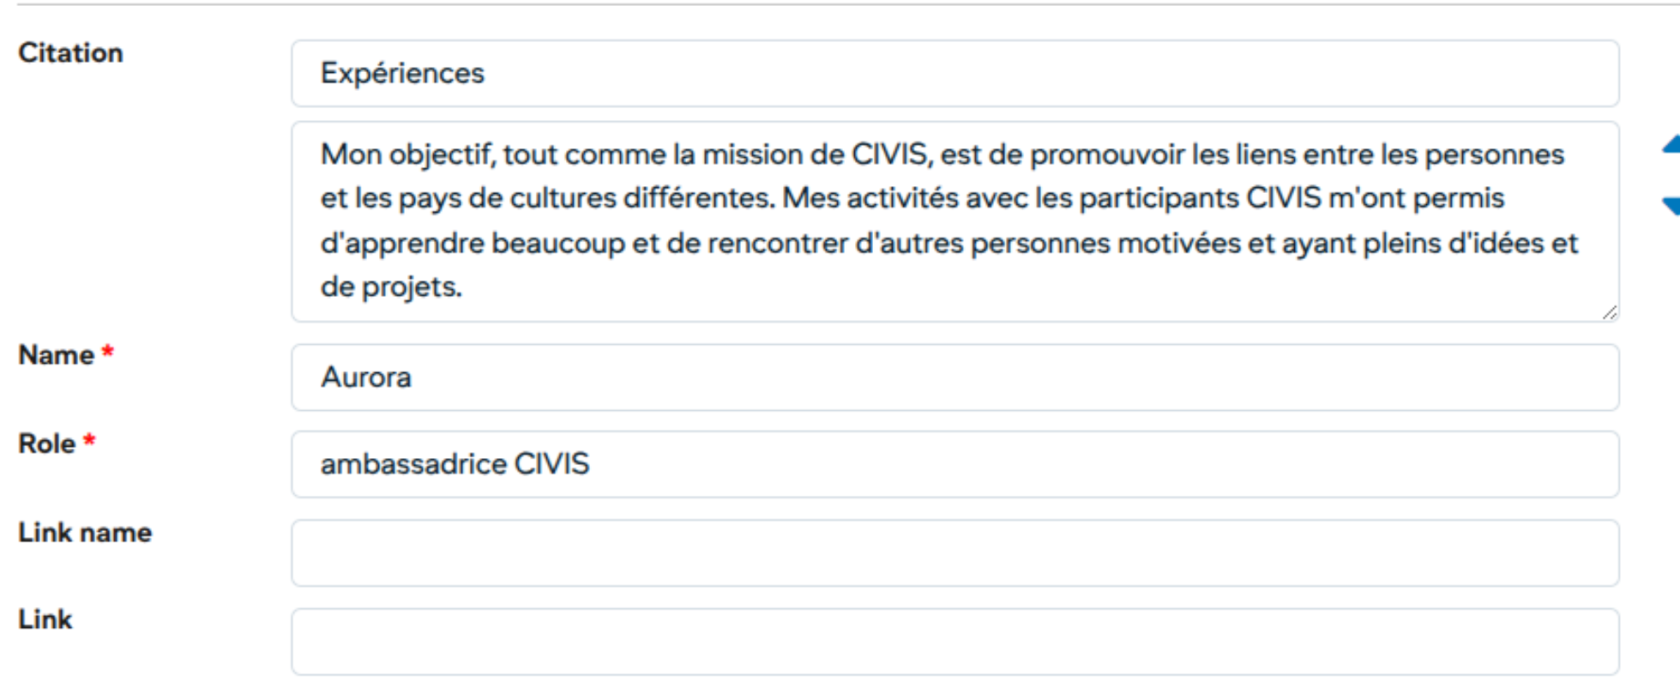](https://wiki.unil.ch/ci/uploads/images/gallery/2026-01/g42image.png)
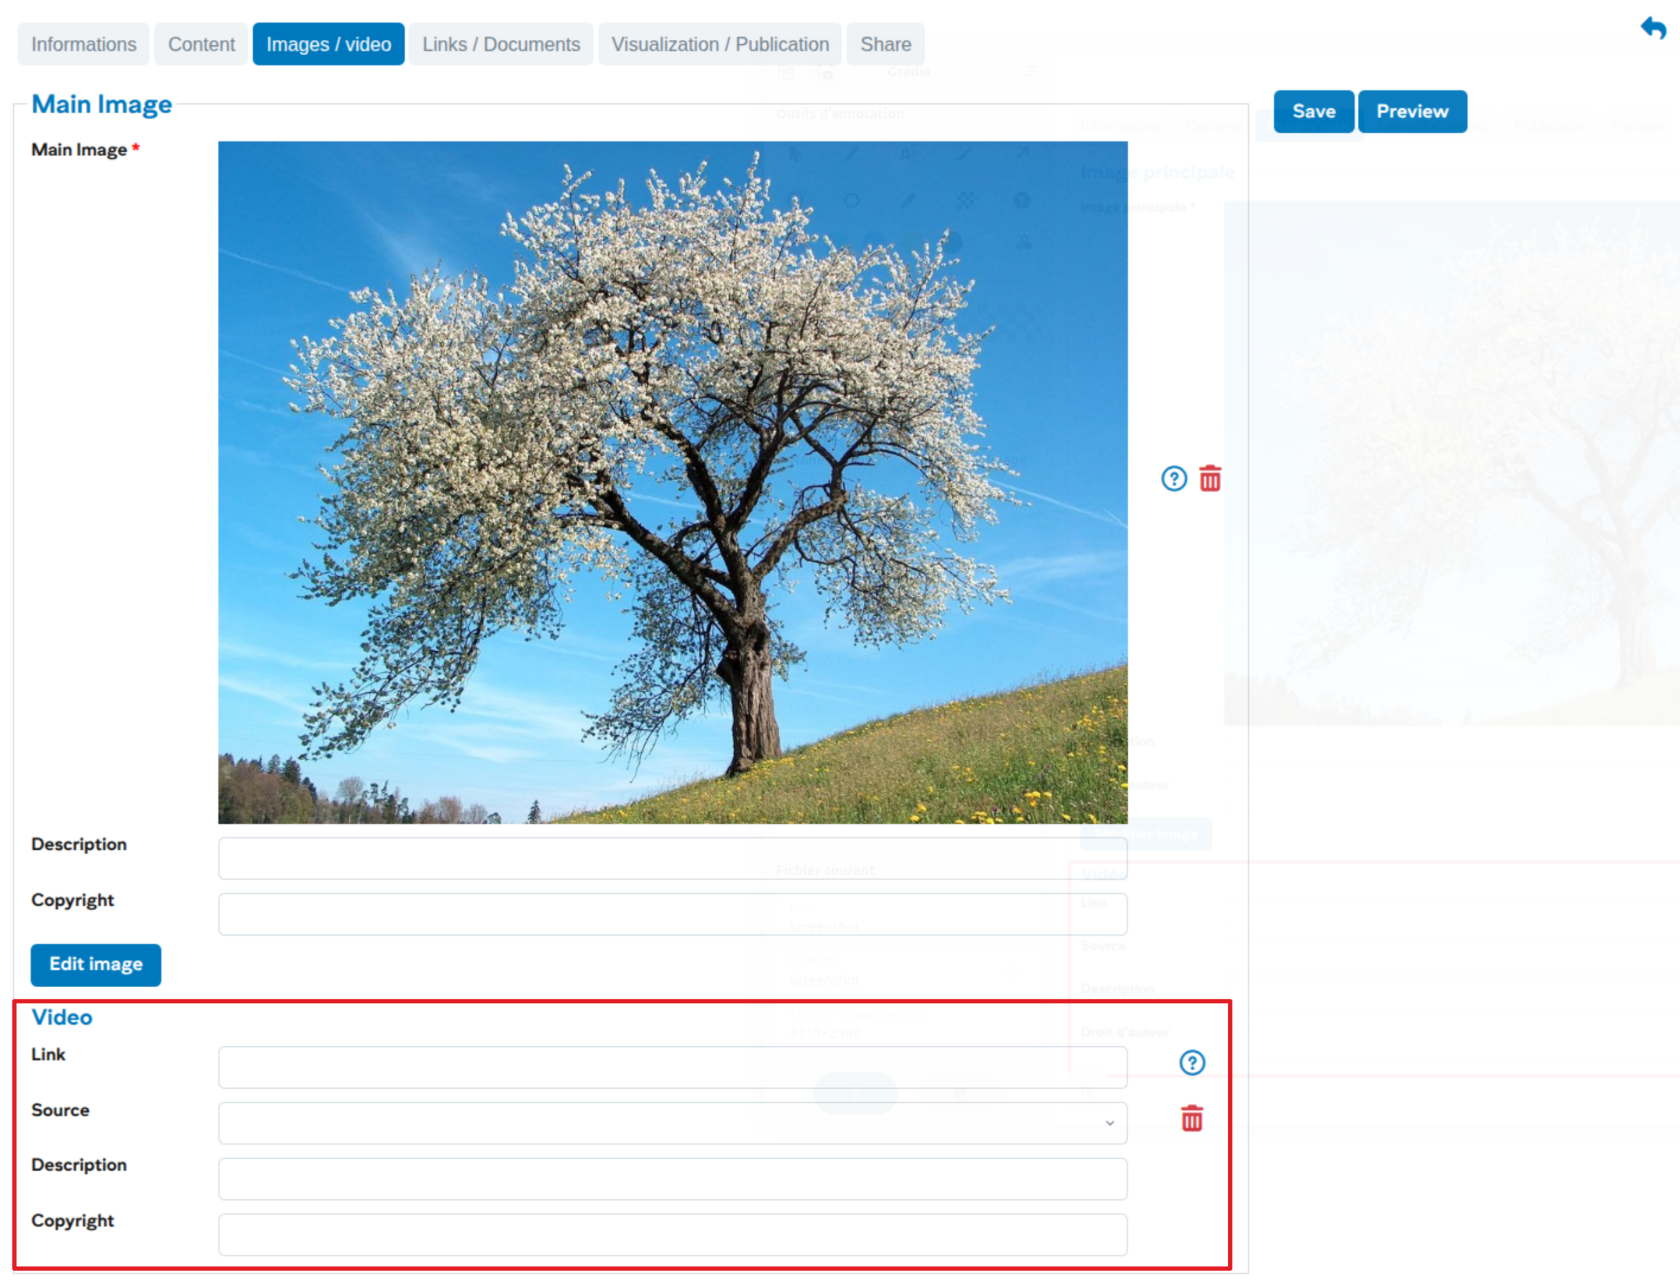
# Add an image to a news and events
Users can add an image and a thumbnail to illustrate a news/events item.
- the thumbnail (mandatory for news items) will appear in the news/events list on the [MyUnil](https://my.unil.ch/news/) site and on the [L'ACTU](https://news.unil.ch/) or [L'AGENDA](https://agenda.unil.ch/recherche) sites, as well as on the central [UNIL](https://www.unil.ch/index.html) site
- the main image will be placed at the very beginning of the content when viewed
#### Workflow step: Images / video
[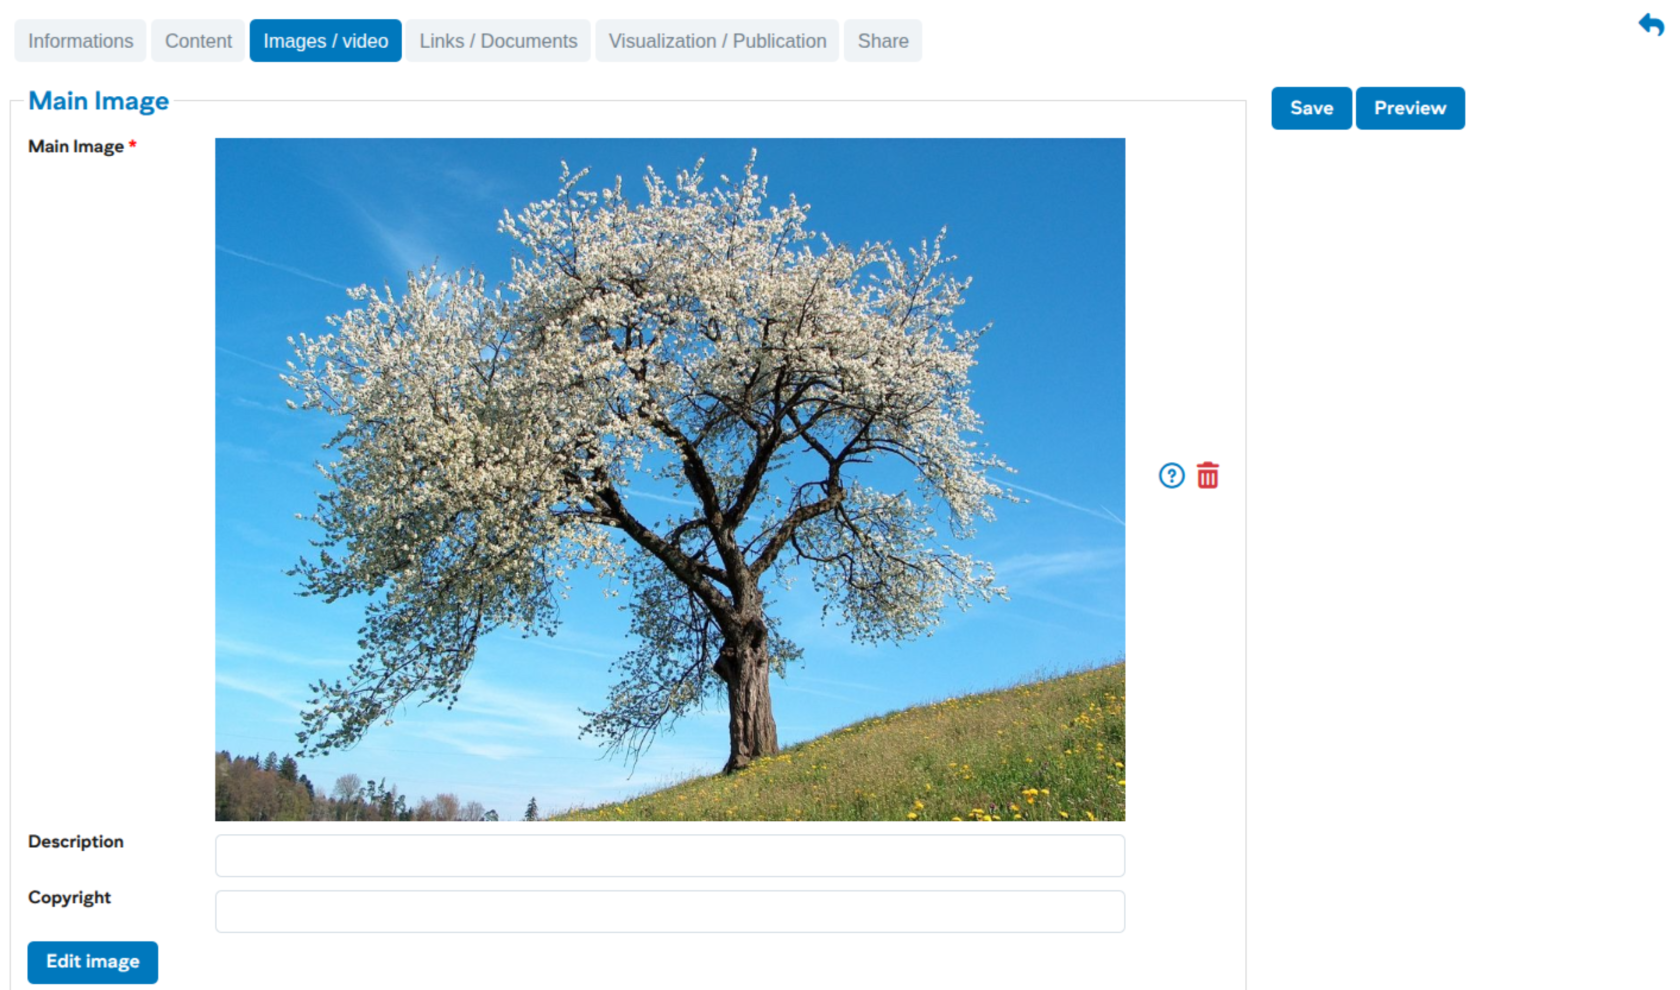](https://wiki.unil.ch/ci/uploads/images/gallery/2026-01/NOaimage.png)
As with adding images to the content, it is essential to crop the image to the correct format before usage ([see here for cropping](https://wiki.unil.ch/ci/books/myunil-and-newsunil-en/page/editing-newsevent-content)).
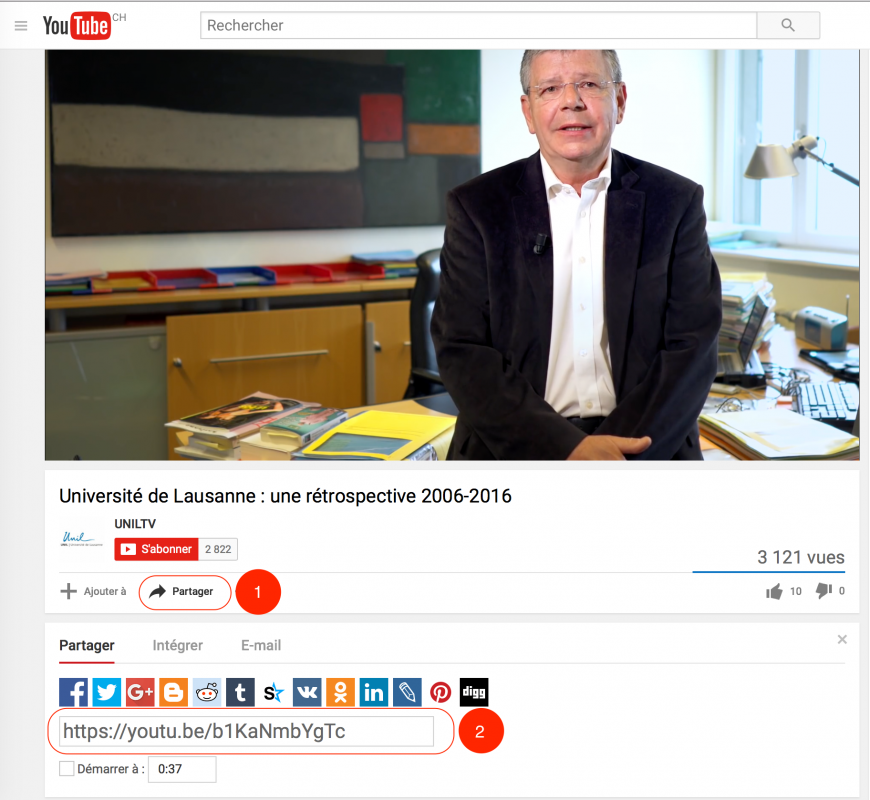
# Add a video to news and events
Users can add a video to illustrate a news / event. This video will take the place of the main image.
#### Workflow step: Images / video
[](https://wiki.unil.ch/ci/uploads/images/gallery/2026-01/wZrimage.png)
Several sources are available, and the links are generally obtained from the sharing buttons of the respective platforms and must follow these forms:
- REC Unil : **https://rec.unil.ch/permalink/...**
- RTS : **https://www.rts.ch/play/embed?urn=urn:rts:video:...** (use the value of attribute "src" from the "Embed" sharing)
- Youtube : **https://youtu.be/...** for a video or **https://youtube.com/playlist?list=...** for a series of videos
- Vimeo : **https://vimeo.com/...**
- HVA : **https://av.unil.ch/hva/...**
#### Example of adding a Youtube video
[](https://wiki.unil.ch/ci/uploads/images/gallery/2023-08/newsunil-video-youtube.png)
1. Click on the sharing link in Youtube
2. Copy the generic link of the video
# Add documents to news or events
When entering news, it is now possible to add documents directly in the news / event. The addition is done from the “Links / documents” workflow step.
1. Sharing news or events with another channel of the UNIL
# Validate news or events
Users with write permissions in a channel have access to the validation of the different objects in their channel. Each news / event is assigned a status. Here is the list of existing statuses in the new system NewsUNIL:
- **To validate**: Default status, the news is awaiting publication and does not appear in the websites.
- **Proposed**: Status of an object proposed by another channel, or submitted by a person who does not have write rights in the channel
- **Online**: Status after publication, appears on the various services (websites, public research, L’ACTU, L’AGENDA)
- **Offline**: Status applies after the end of publication date for news. For events, the date of the event is applied.
**Validation of a news**
[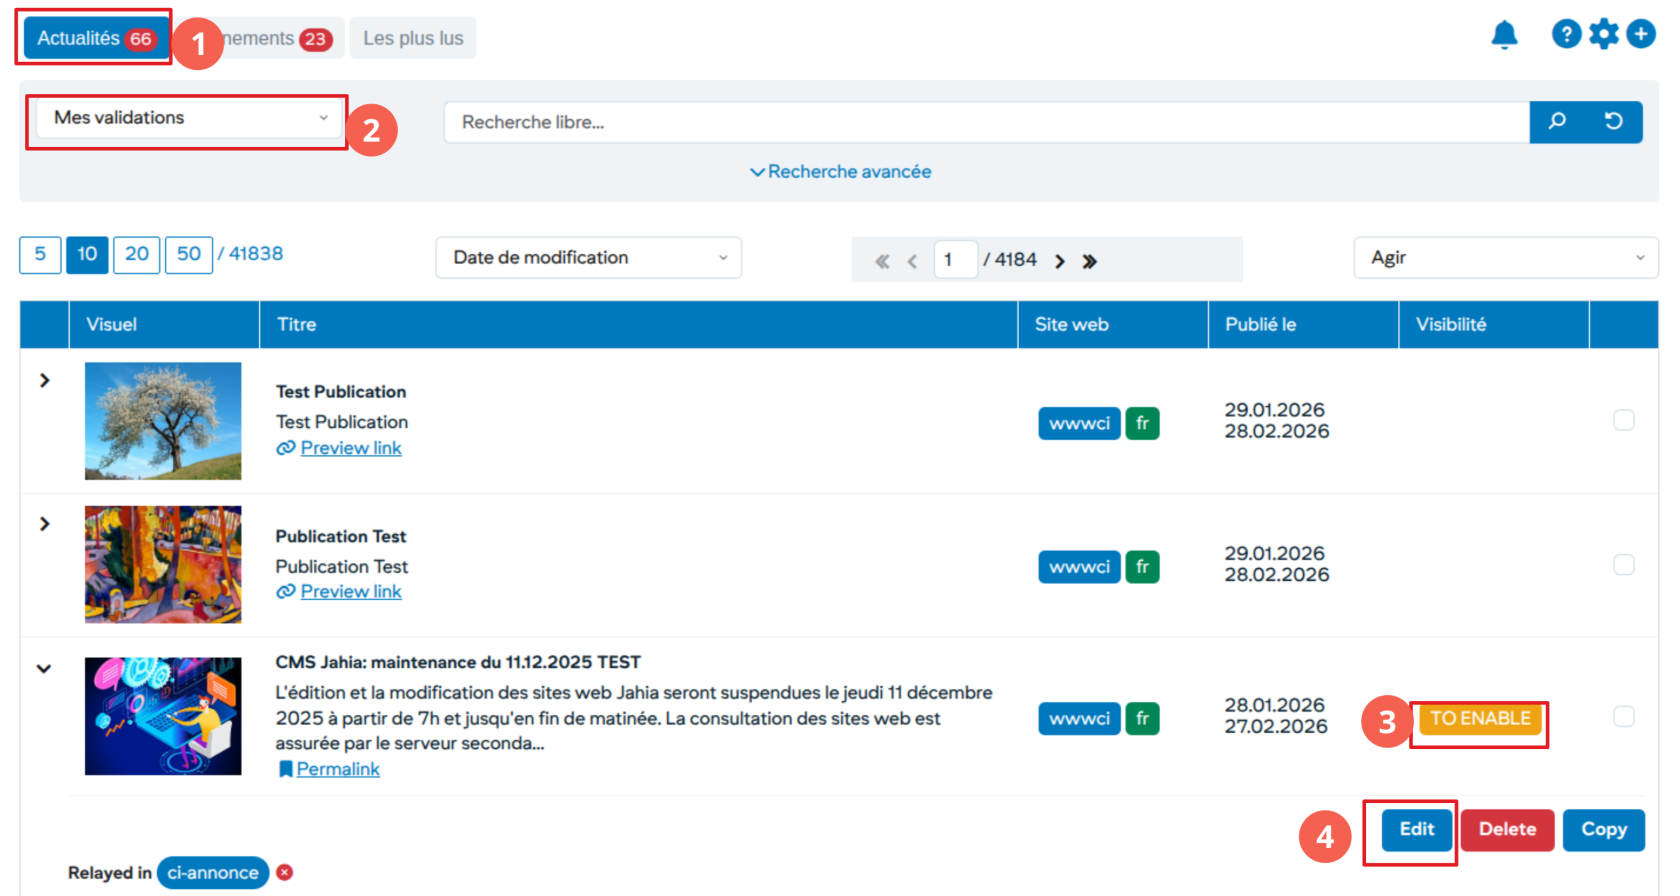](https://wiki.unil.ch/ci/uploads/images/gallery/2026-01/YMJimage.png)
1. A pellet indicates the number of items awaiting validation
2. In the predefined lists, choose the menu “My validations”
3. Status of item: TO VALIDATE or PROPOSED
4. Show details to access the validation. Click the “Edit” button and choose the “View / Publish”
#### Validate an item with a status: TO VALIDATE
[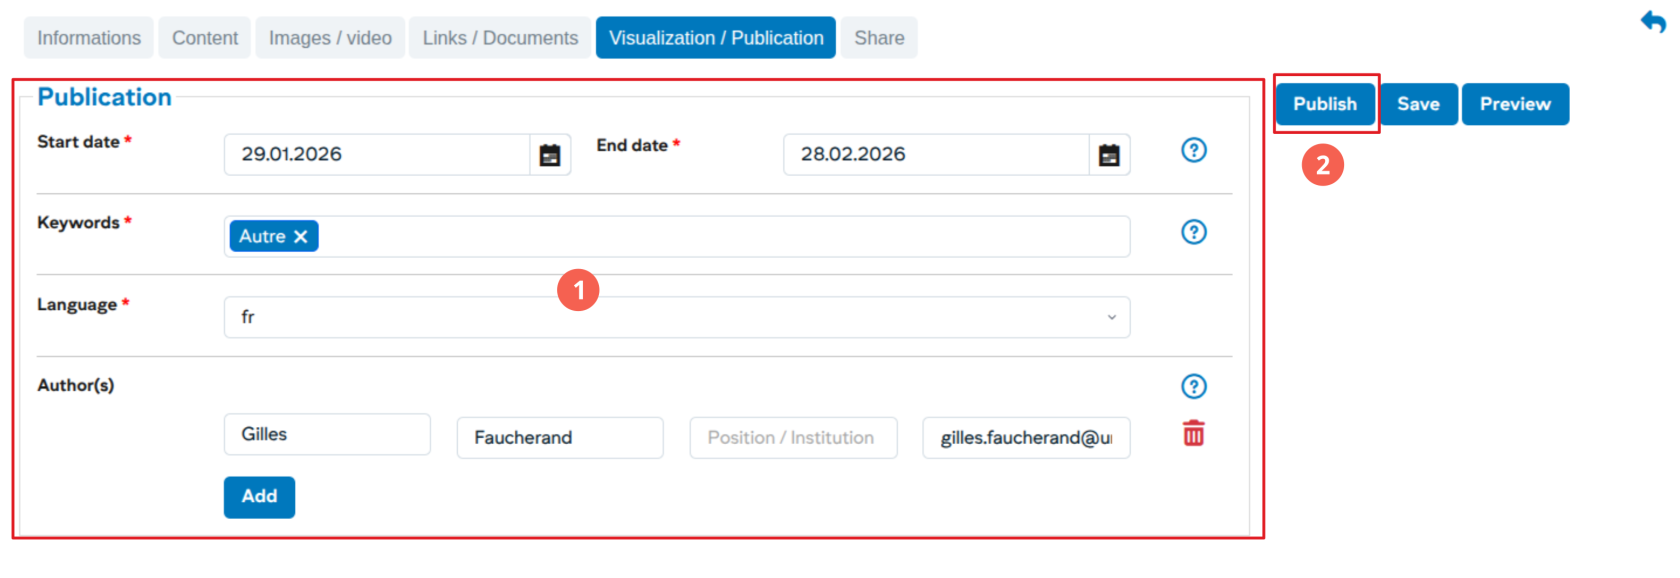](https://wiki.unil.ch/ci/uploads/images/gallery/2026-01/oyMimage.png)
1. Publication Information
2. Click on “Publish” to publish the item
#### Accept rejecting an item with a status: PROPOSED
[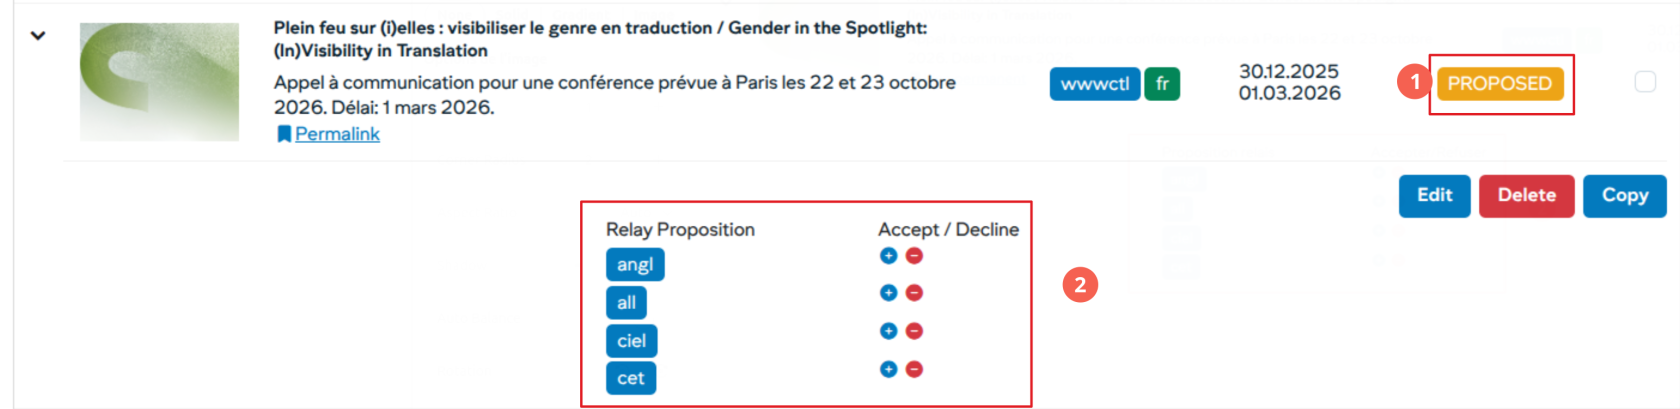](https://wiki.unil.ch/ci/uploads/images/gallery/2026-01/hICimage.png)
1. Status: PROPOSED
2. Show detail allows you to view the item
# Relay news or events
Any element can be relayed at any time by the user in a channel for which it has write rights.
#### News search to relay
1. Select the elements to be relayed
2. Choose the option “Relay”
#### Validation of the relay
[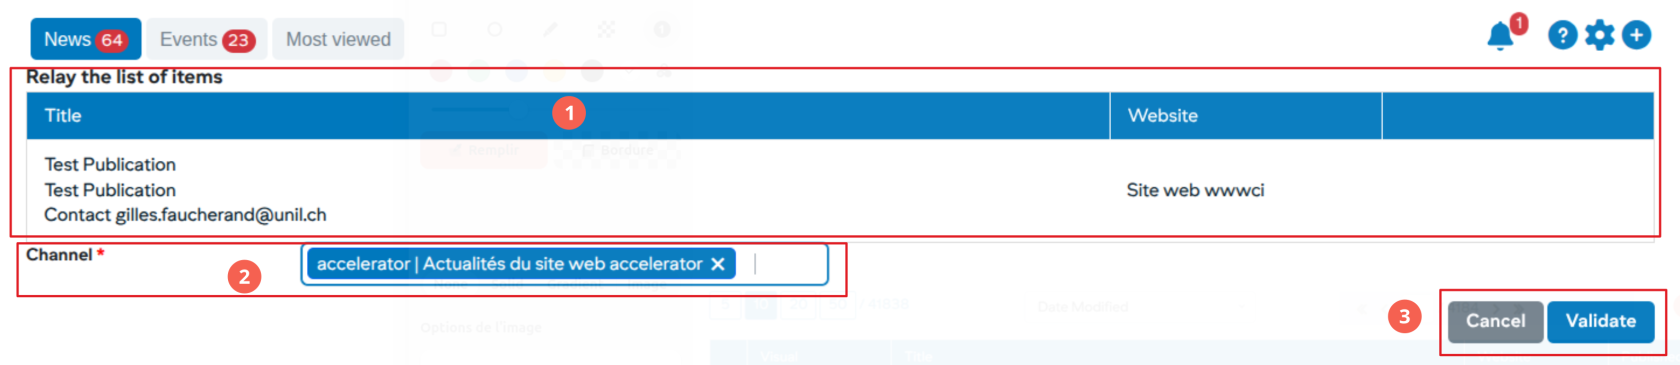](https://wiki.unil.ch/ci/uploads/images/gallery/2026-01/XRUimage.png)
1. List of elements to be relayed
2. Choose the channel (s) in which to relay the elements
3. Validate relays
After this step, the validated elements will be visible in the channels with an “R” status corresponding to the relay.
# Submit news or events
A user with write rights on a channel can at any time offer these items with an “ONLINE” status to other channels.
1. The news to be proposed must have an “PUBLISHED” status
2. Select items **Propose**
**Validate the proposals**
[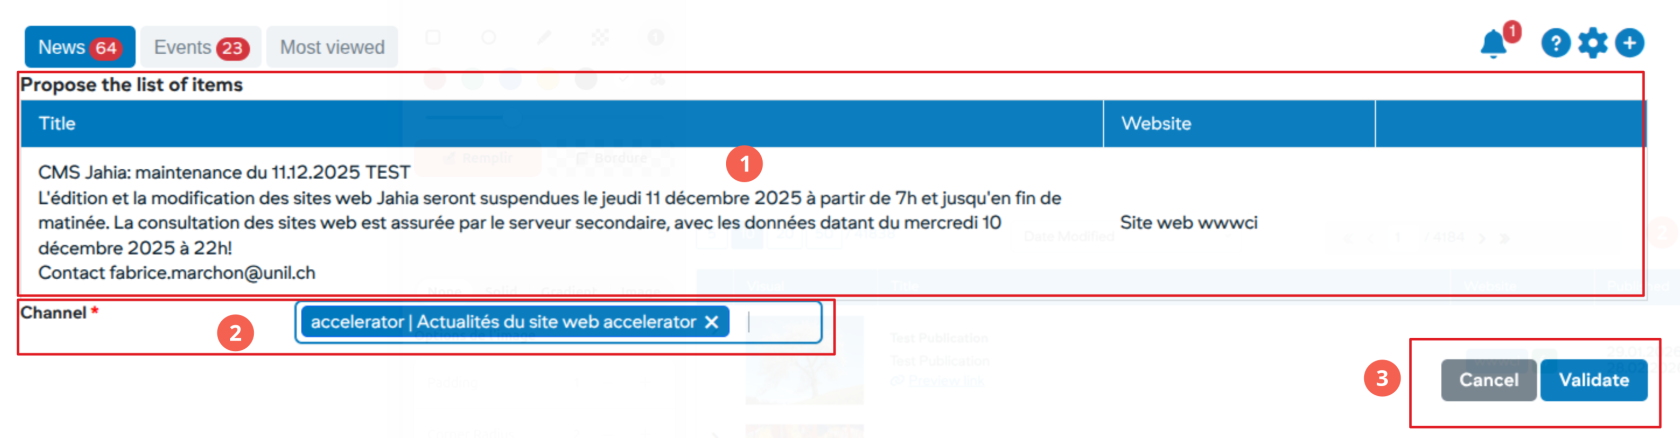](https://wiki.unil.ch/ci/uploads/images/gallery/2026-01/S1simage.png)
1. List of elements to propose
2. Choosing the channels to propose
3. Validate these elements
#### Proposal of a news / event by a user without writing rights
Any user with access to MyUNIL has the possibility to propose a news / event to any channel of the system.
[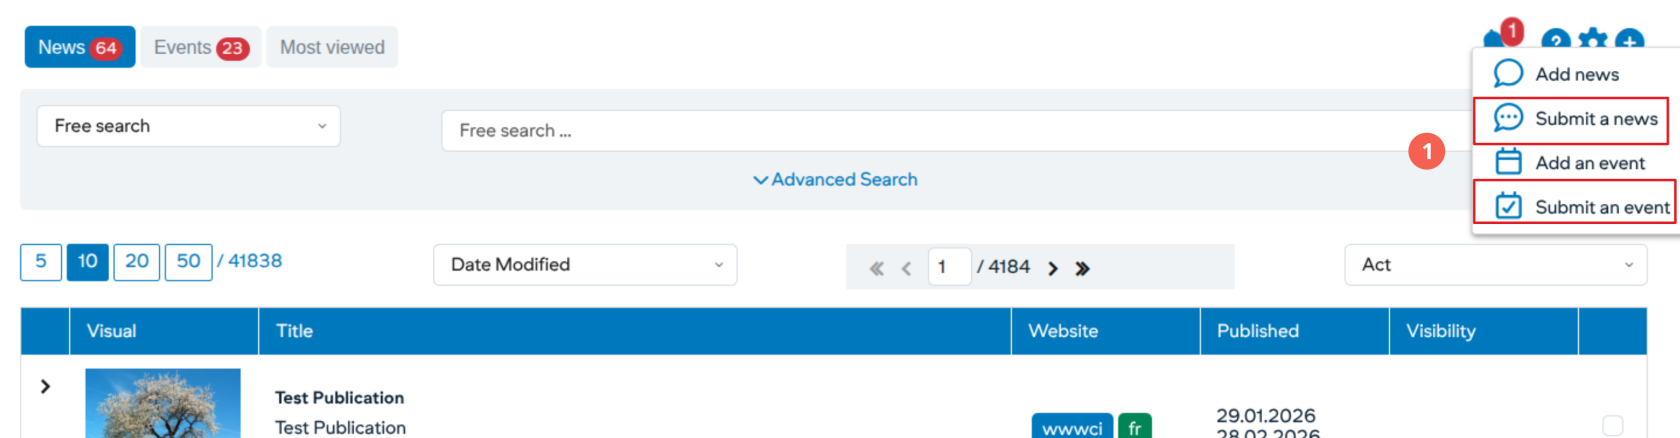](https://wiki.unil.ch/ci/uploads/images/gallery/2026-01/n3Iimage.png)
1. Go to the actions section and click on the + button to propose an element to a news channel
2. The item can then be published by a user with write access to that channel
If the person who posted the news item or event wishes to edit it after publication, they cannot do so directly but must send the changes to a user with write access.
# Subscribe to a new or event channel
Any member of the academic community may subscribe to news / events channels. The items published in these channels will then appear directly in the notifications of the “What’s New?” Application.
#### Preference Management
[](https://wiki.unil.ch/ci/uploads/images/gallery/2026-01/cwSimage.png)
#### Subscribe to one or more channels
[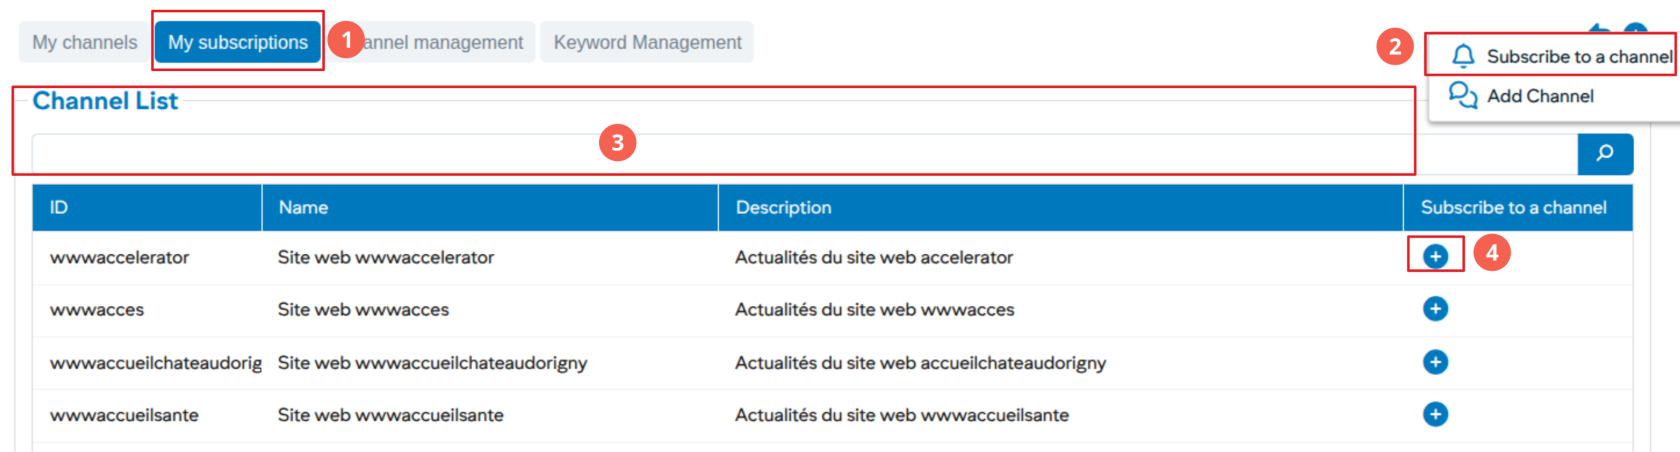](https://wiki.unil.ch/ci/uploads/images/gallery/2026-01/ZjUimage.png)
1. Choose the “My subscriptions” tab
2. Click on more to subscribe
3. Searching through existing channels
4. Subscribe to the channel by clicking on +
# Adding keywords (faculty web site validators)
Users with write permissions in faculty channels as well as UNICOM users will be able to add keywords to allow news and events ranking
#### Preference Management
[](https://wiki.unil.ch/ci/uploads/images/gallery/2026-01/80rimage.png)
1. Click on the preferences management icon
#### Add a keyword
[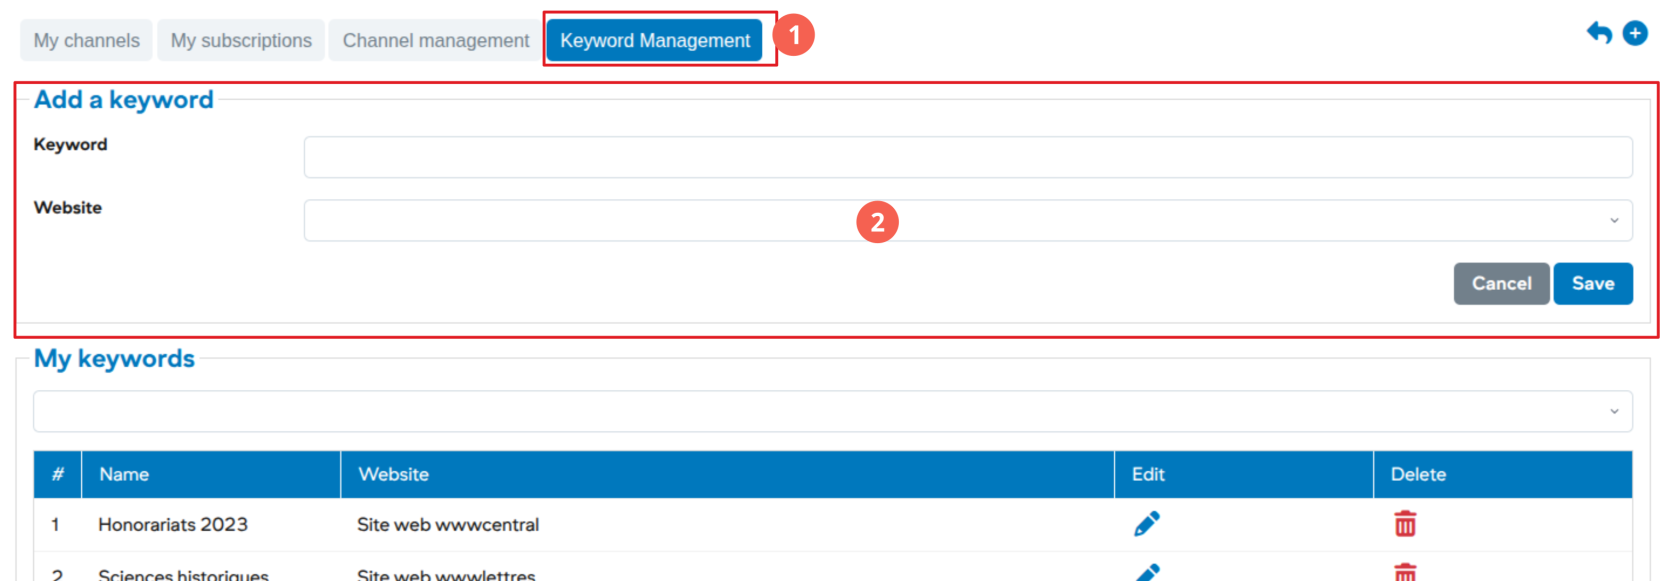](https://wiki.unil.ch/ci/uploads/images/gallery/2026-01/ZKIimage.png)
1. Go to keyword management
2. Enter the new keyword and save
***Once added to the system, the new keyword can be used by all channels.***
# Help in french
# Help - My UNIL et NewsUNIL - in french
[https://wiki.unil.ch/ci/books/myunil-et-newsunil](https://wiki.unil.ch/ci/books/myunil-et-newsunil)
# Study - Enrolment
# Transfer bachelor/master
## Table of Contents
1. [Access the Bachelor/Master transfer service](https://wiki.unil.ch/ci/link/2236#bkmrk-1.-acc%C3%A9der-au-servic)
- [Bachelor/Master transfer contract](https://wiki.unil.ch/ci/link/2236#bkmrk-page-contrat)
- [Invoice/Payment](https://wiki.unil.ch/ci/link/2236#bkmrk-page-facture)
- [Summary page](https://wiki.unil.ch/ci/link/2236#bkmrk-page-r%C3%A9sum%C3%A9)
2. [Creation of the transfer request](https://wiki.unil.ch/ci/link/2236#bkmrk-2.-creation-of-the-t)
3. [Modify the priority order of your choices](https://wiki.unil.ch/ci/link/2236#bkmrk-3.-modify-the-priori)
4. [Confirm the transfer request](https://wiki.unil.ch/ci/link/2236#bkmrk-4.-confirm-the-trans)
---
[](https://wiki.unil.ch/ci/uploads/images/gallery/2026-02/fB0image.png)
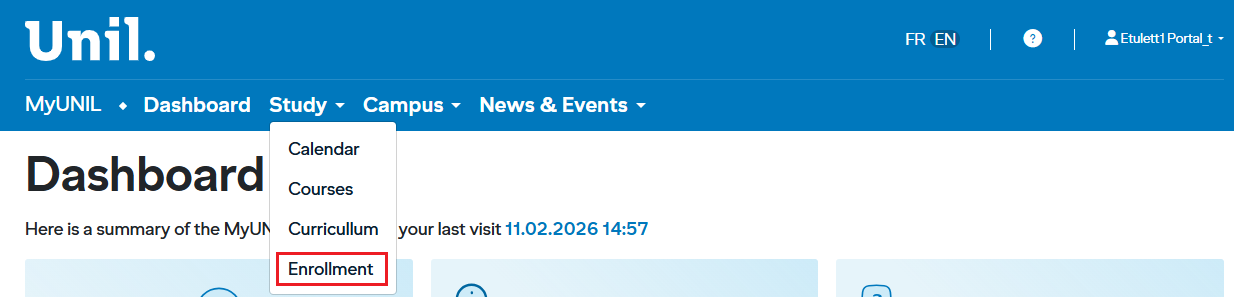
## 1. Access the Bachelor/Master transfer service
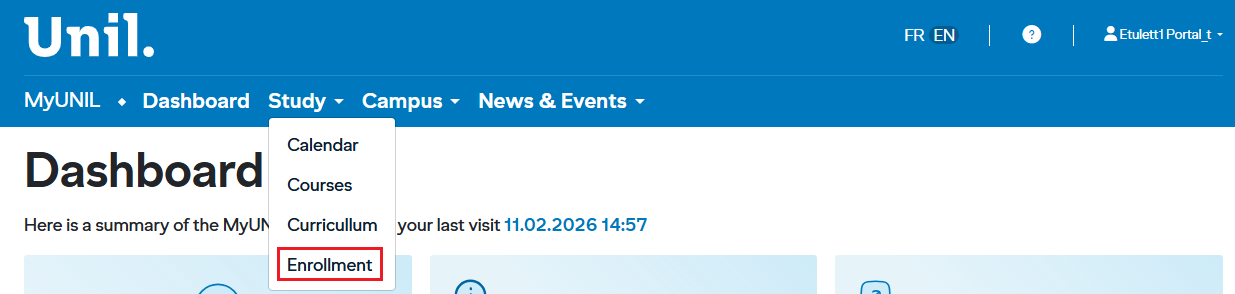
Log in to **MyUNIL** and select **Enrollment** from the navigation menu. The main page shows the available services in a table with the following columns:
[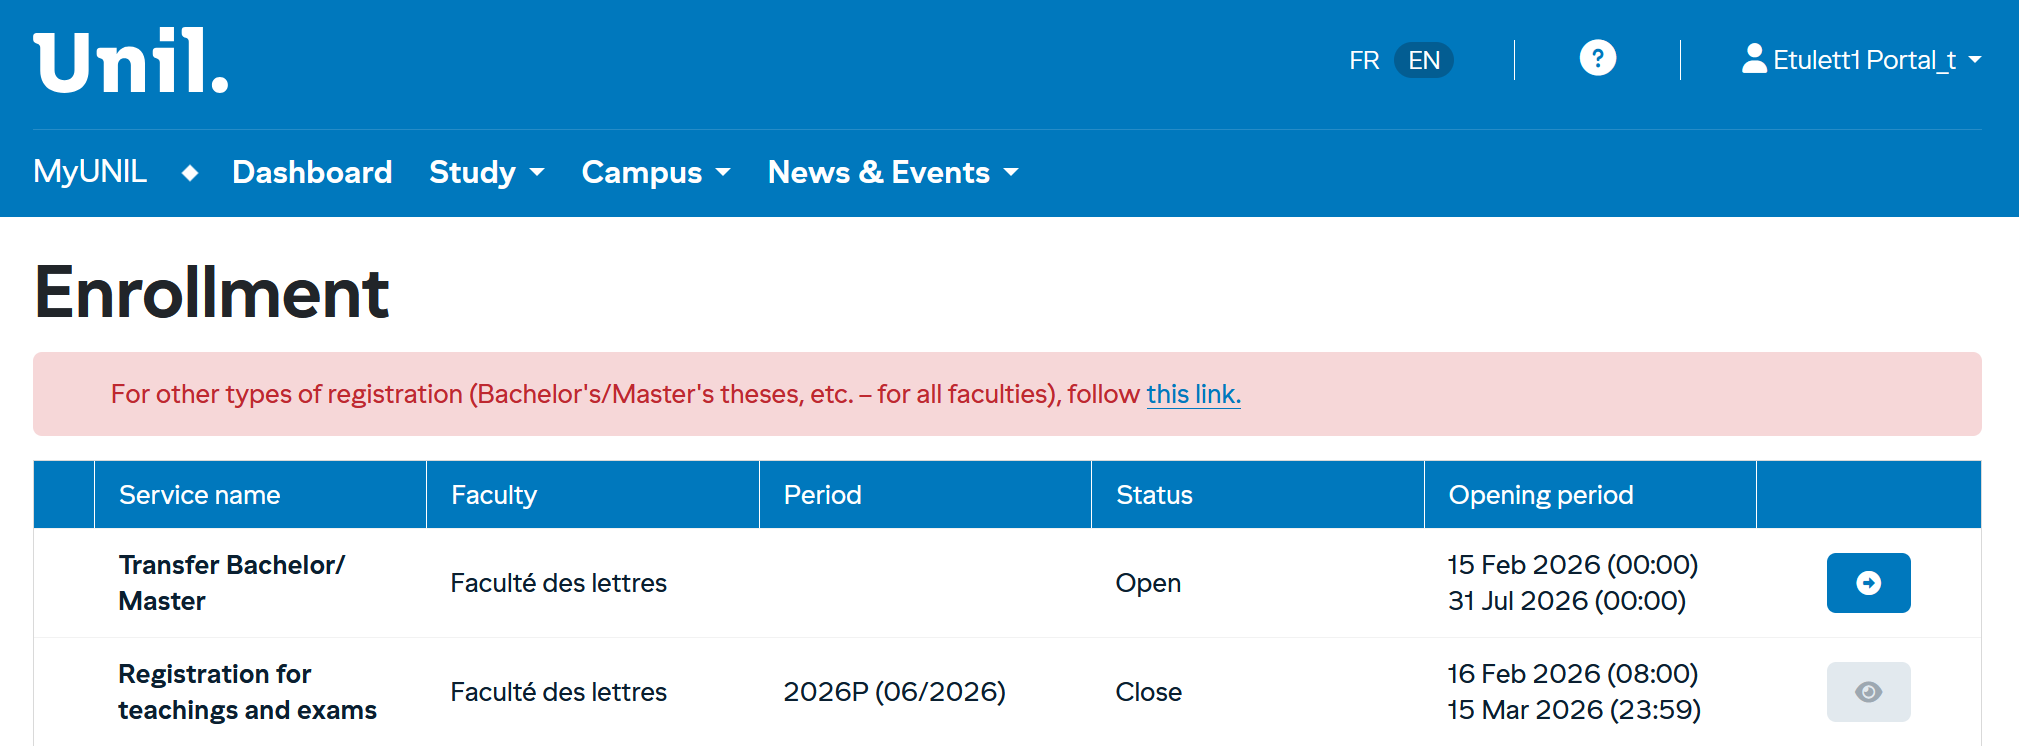](https://wiki.unil.ch/ci/uploads/images/gallery/2026-02/crWimage.png)
Column
Description
**Service Name**
Type of operation (registration or withdrawal)
**Faculty**
Your affiliated faculty (e.g., School of Criminal Sciences)
**Period**
The relevant semester (e.g., 2025A for the winter 2026 session)
**Status**
Indicates whether the service is **Open** or **Closed**
**Opening Period**
The exact dates during which the service is accessible
Click the blue icon on the right side of the **«** **Transfer Bachelor/Master »** row to start your registration.
**Button states :**
The button can appear in different states depending on the current status.
Each state determines which actions are available to the user.
👁️ **Greyed-out eye** — Registration closed
No action is available.
➡️ **Active arrow** — Registration open
Registration is available.
##### There are three possible views that may be displayed: the Contract page, the Invoice page, and the Summary page :
- ##### Contract page
A **contract** will be presented to you. Please read it carefully, as it outlines your obligations. The key points are as follows :
[](https://wiki.unil.ch/ci/uploads/images/gallery/2026-02/WcNimage.png)
- ##### Invoice page
Payment information may be displayed on this page.
[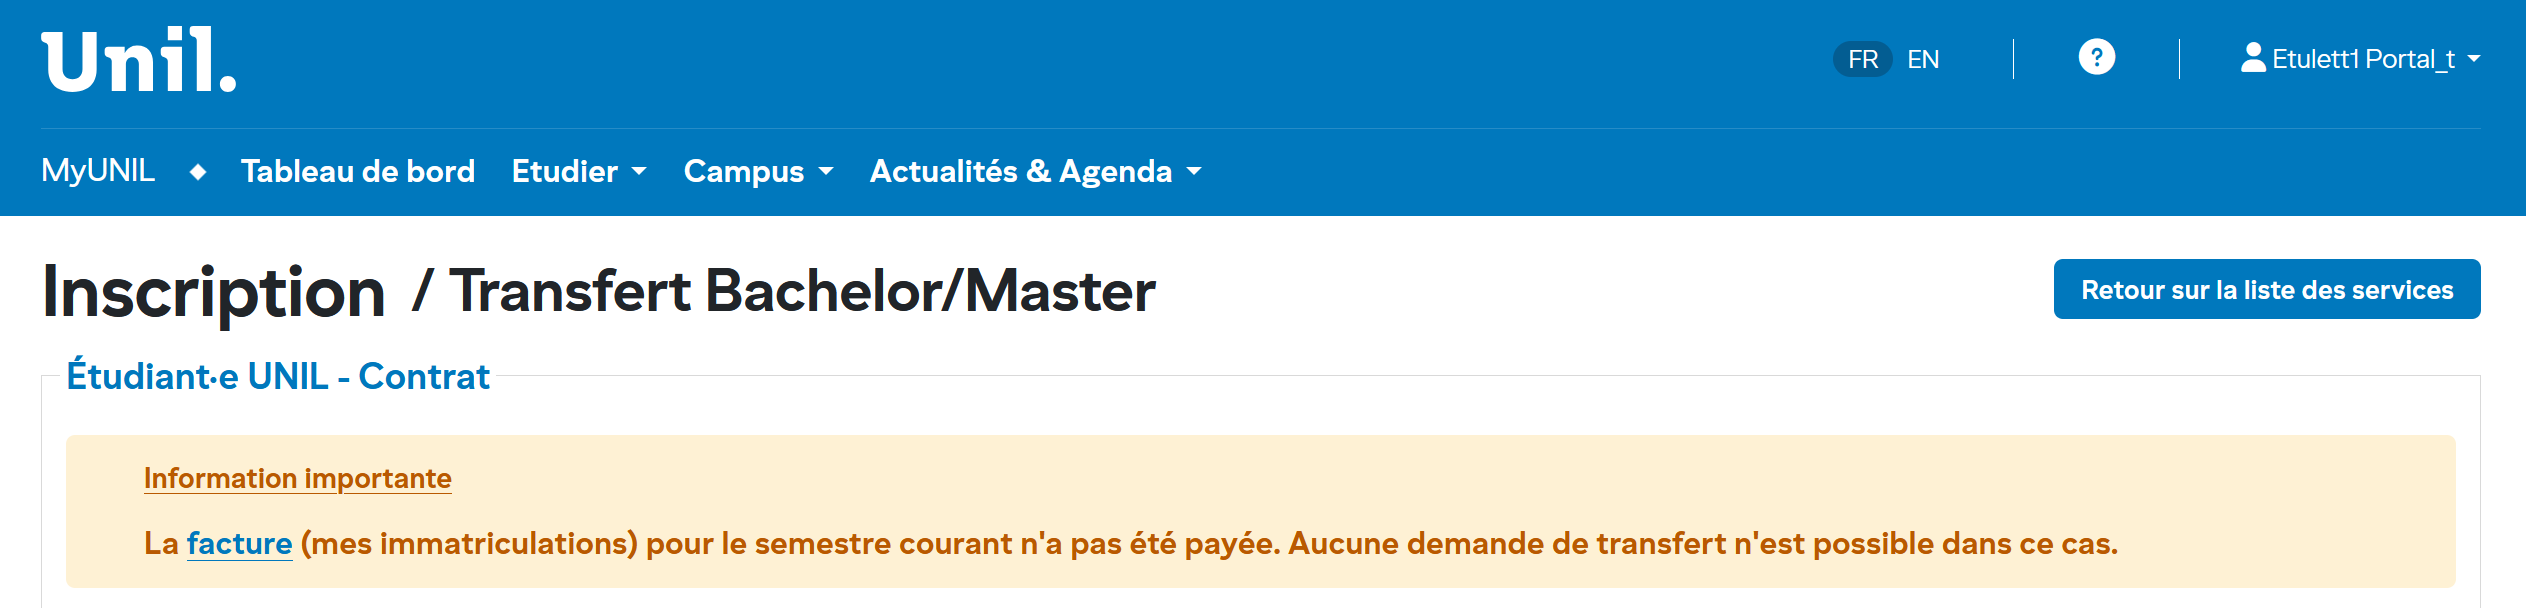](https://wiki.unil.ch/ci/uploads/images/gallery/2026-02/NYiimage.png)
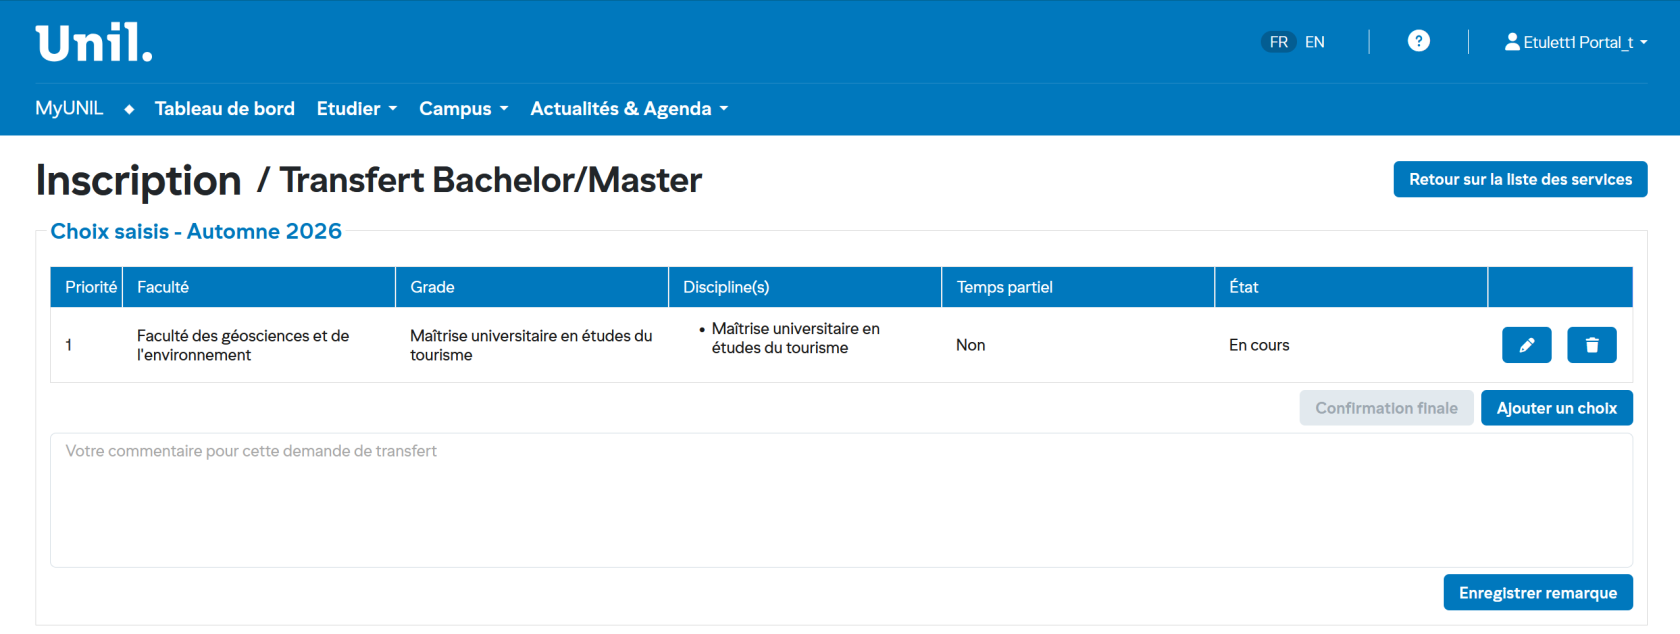
- ##### Summary page
This summary page is displayed once you have submitted at least one transfer request.
[](https://wiki.unil.ch/ci/uploads/images/gallery/2026-02/1jgimage.png)
---
## 2. Creation of the transfer request
**1.** Enter your program of study to proceed to the next step :
[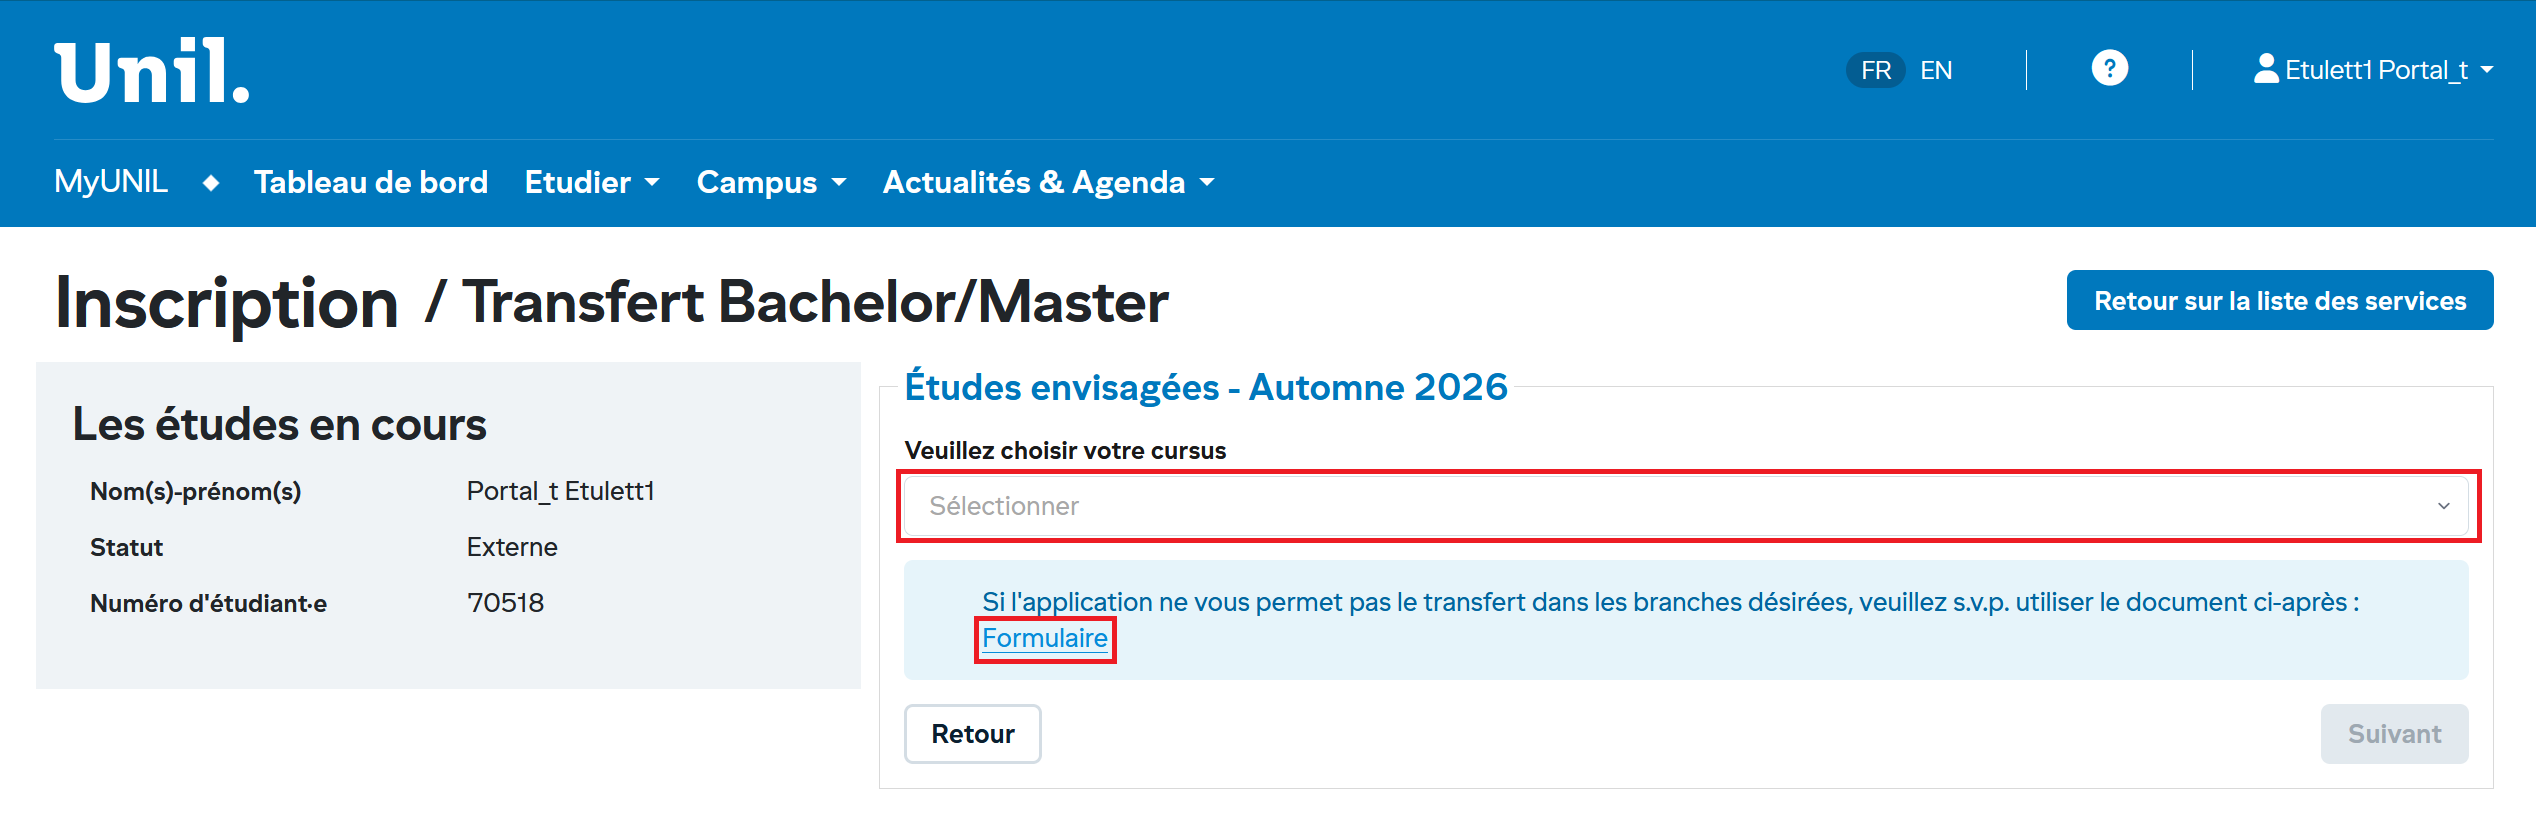](https://wiki.unil.ch/ci/uploads/images/gallery/2026-02/twpimage.png)
If your program is not listed in the selection (combo box), you can submit your request using a form. A link to the form is available under "Form".
[](https://wiki.unil.ch/ci/uploads/images/gallery/2026-02/sOFimage.png)
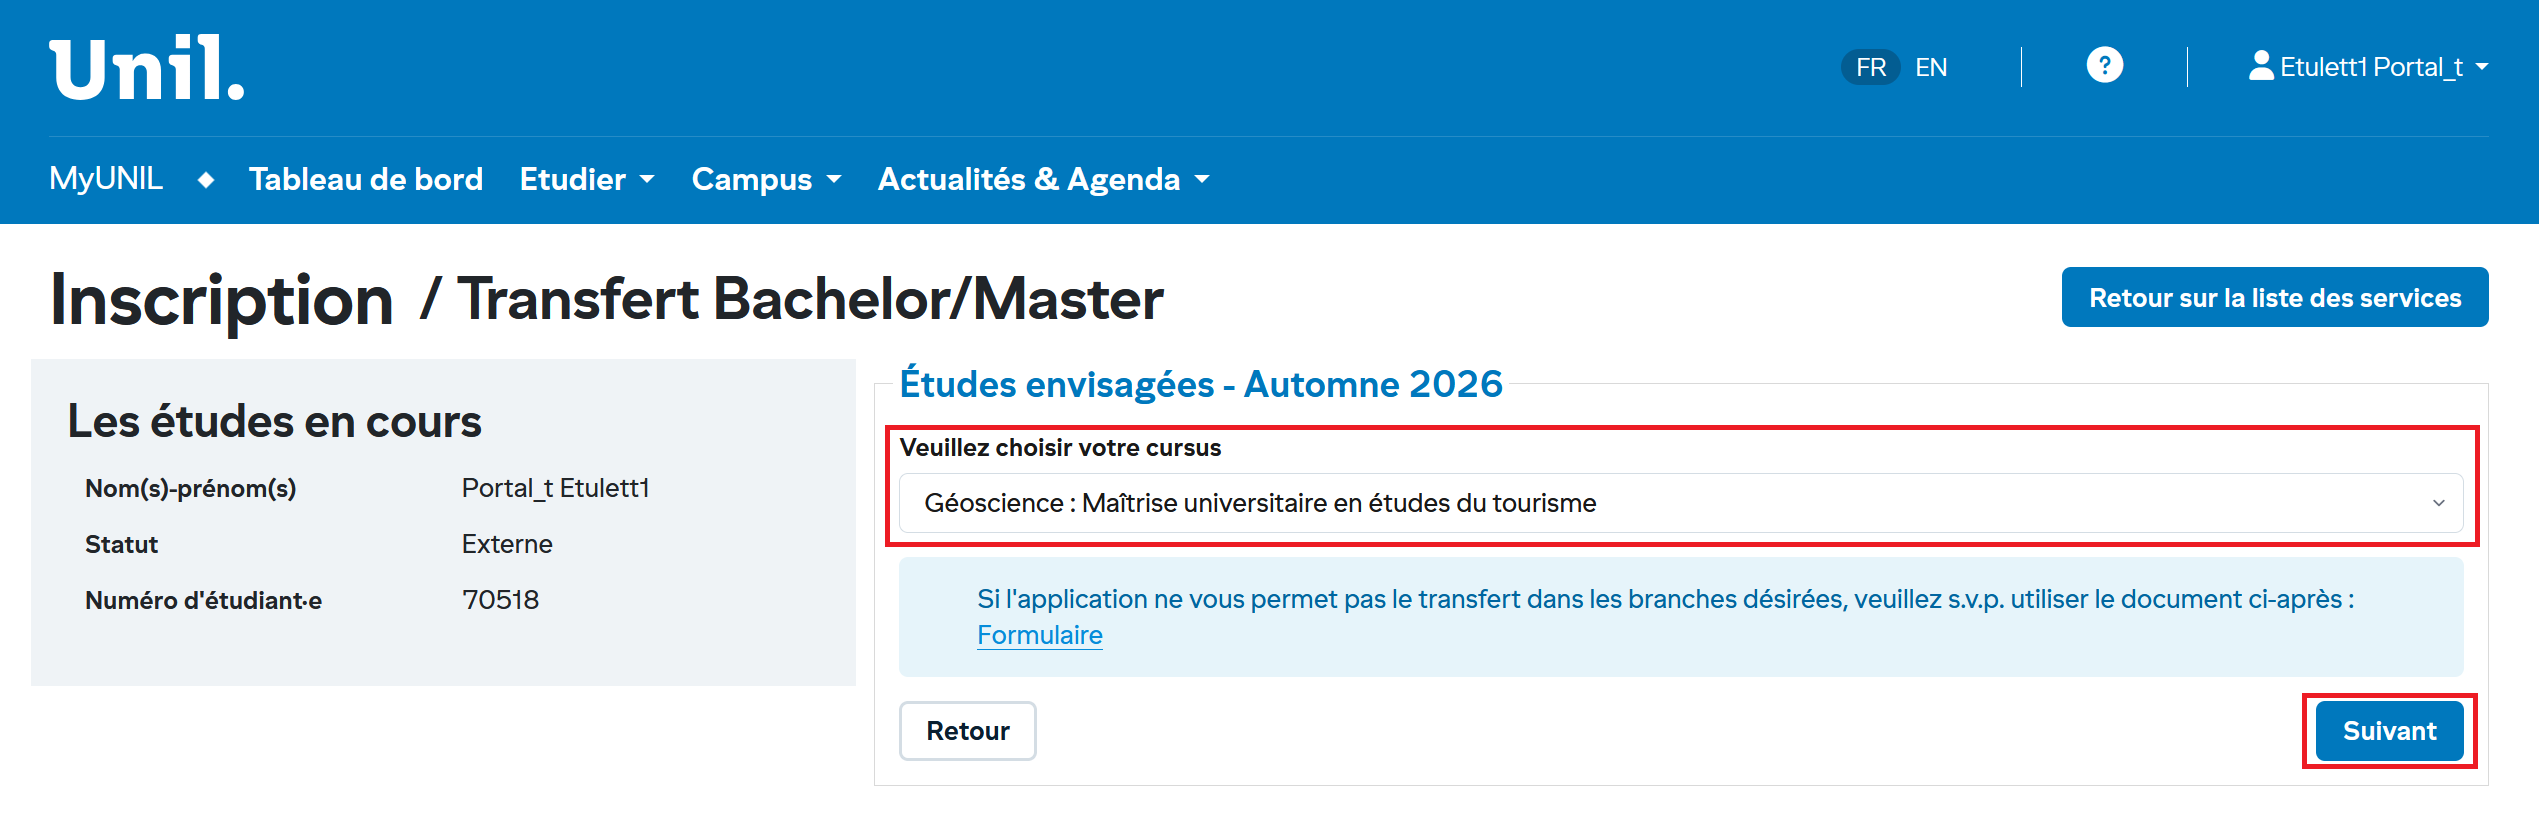
**2.** Select the option and click Next :
[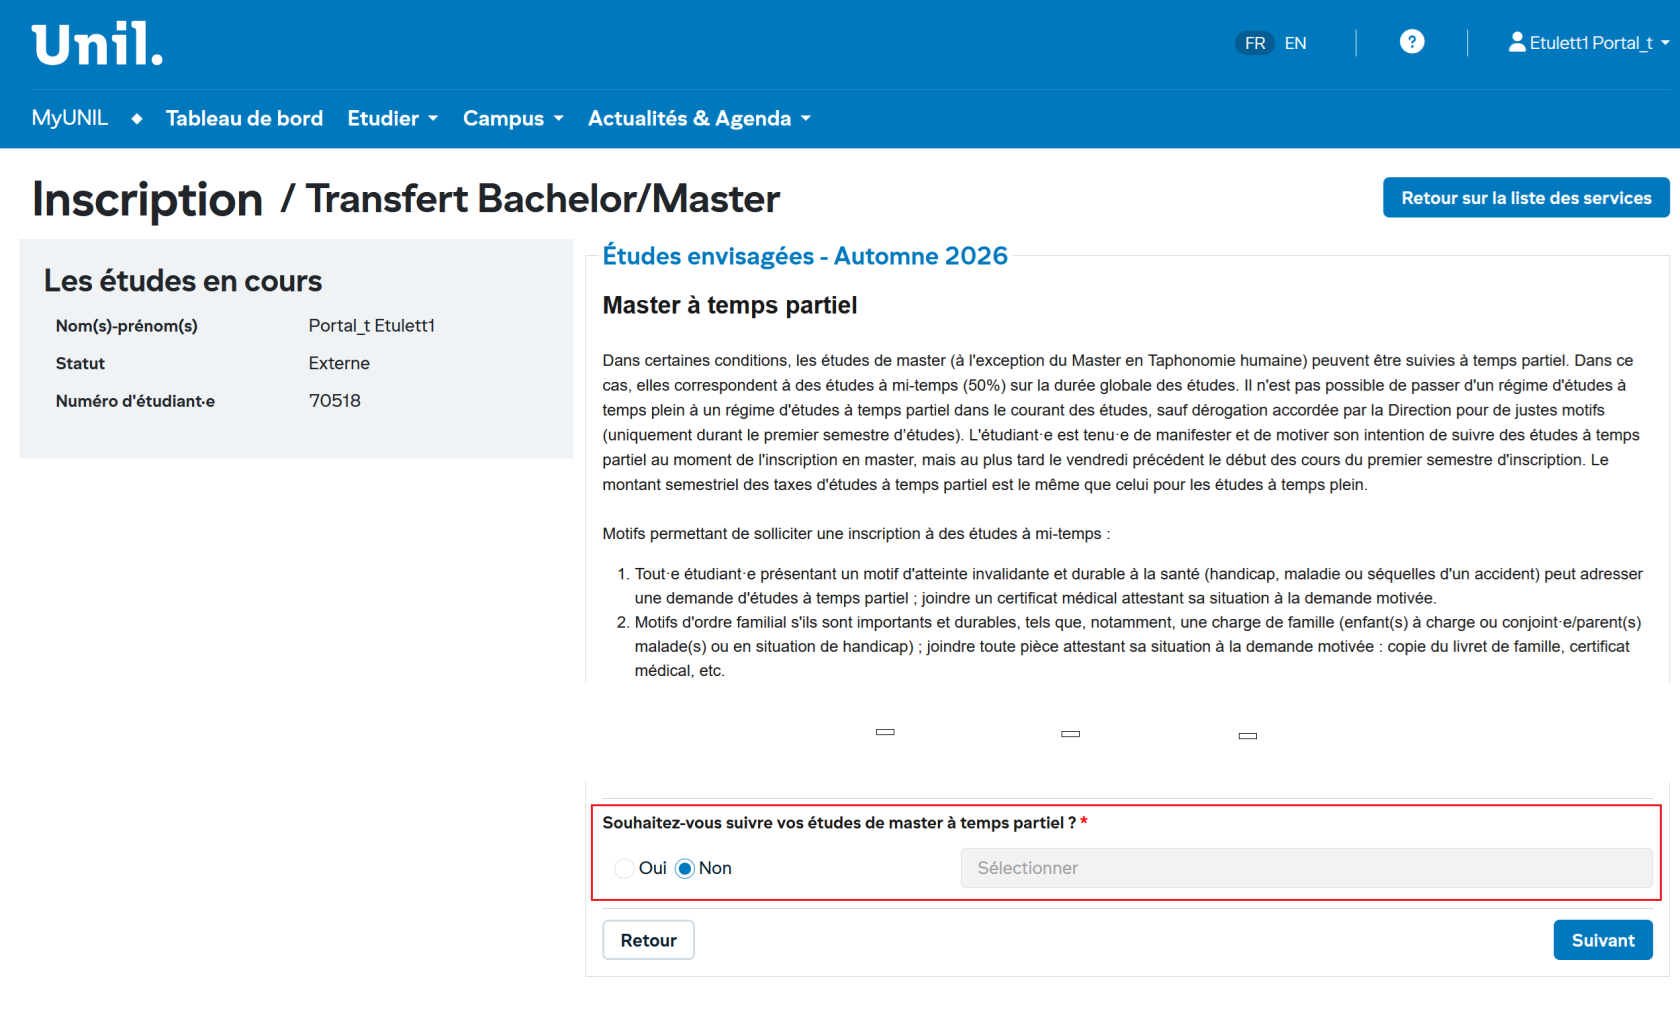](https://wiki.unil.ch/ci/uploads/images/gallery/2026-02/KqSimage.png)
**3.** Select the option and click Confirm :
[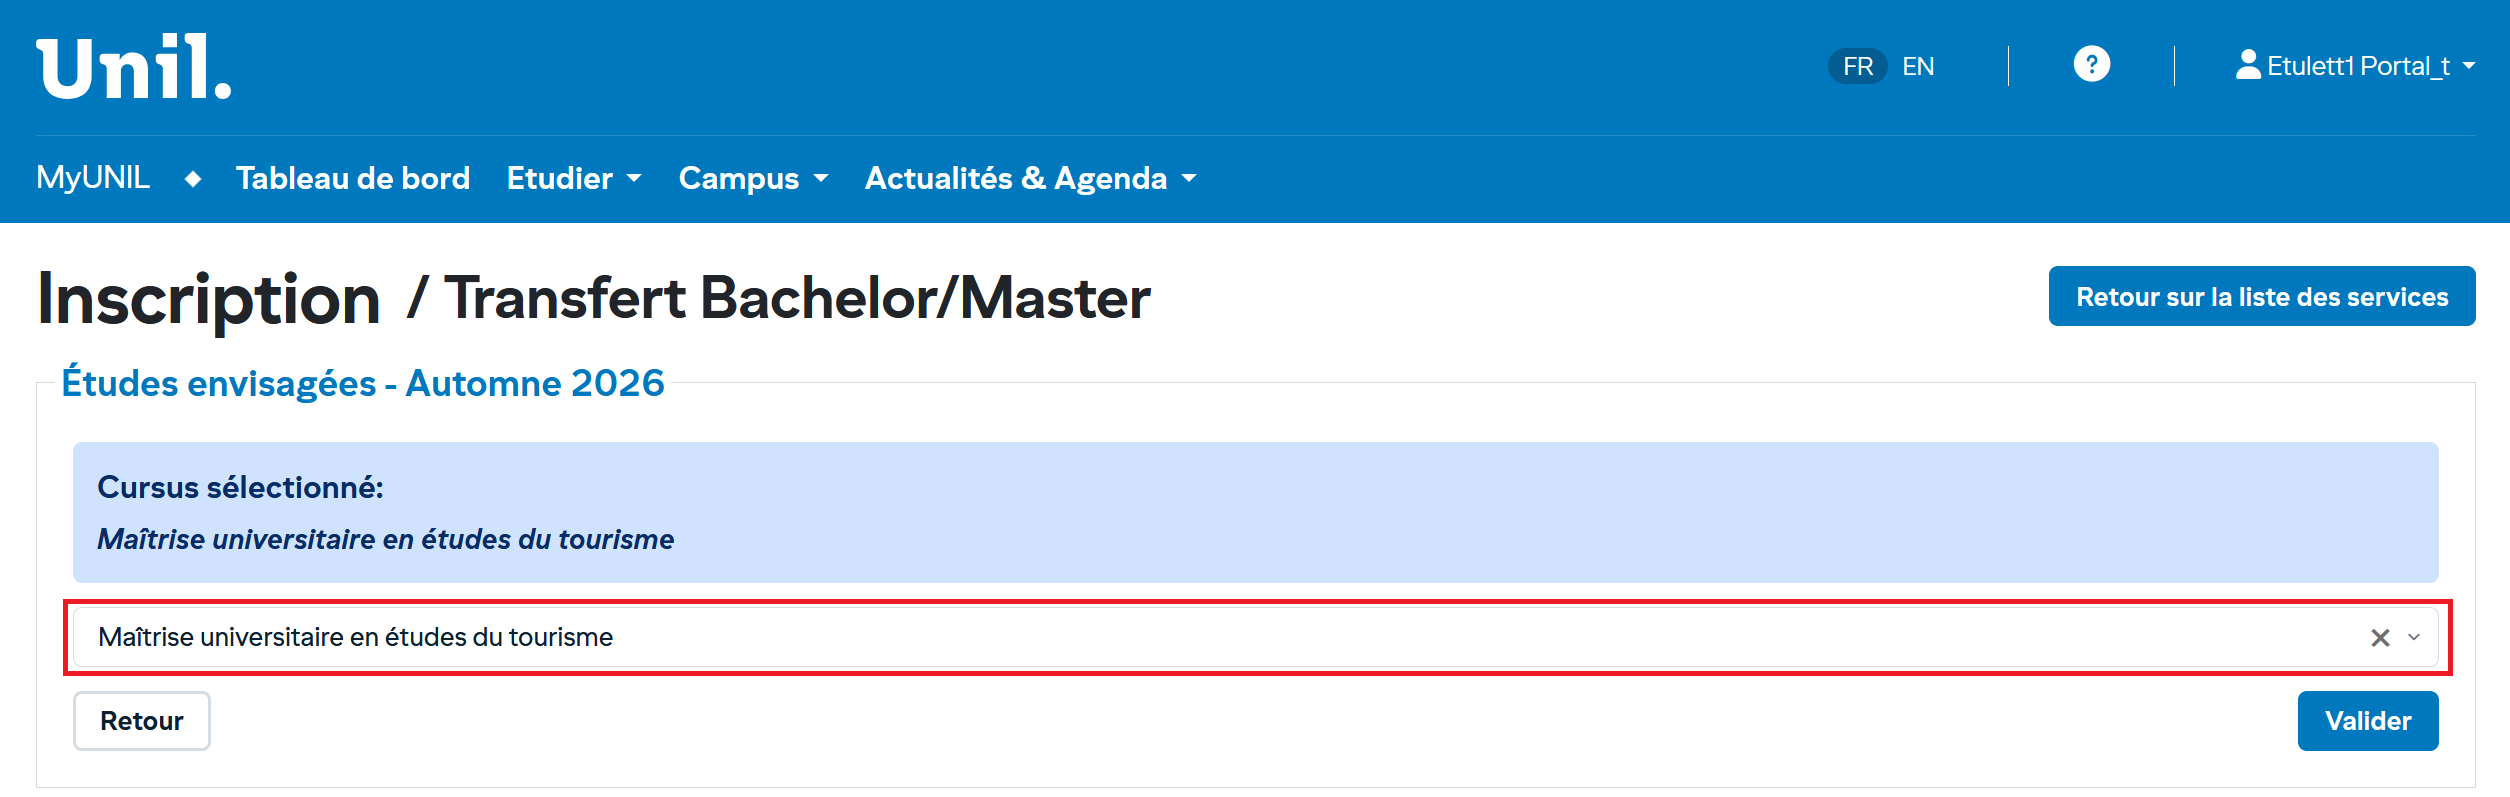](https://wiki.unil.ch/ci/uploads/images/gallery/2026-02/UEUimage.png)
**4.** **Confirm:** this action will create the transfer request and redirect you to the [Summary page.](https://wiki.unil.ch/ci/link/2236#bkmrk-page-r%C3%A9sum%C3%A9)
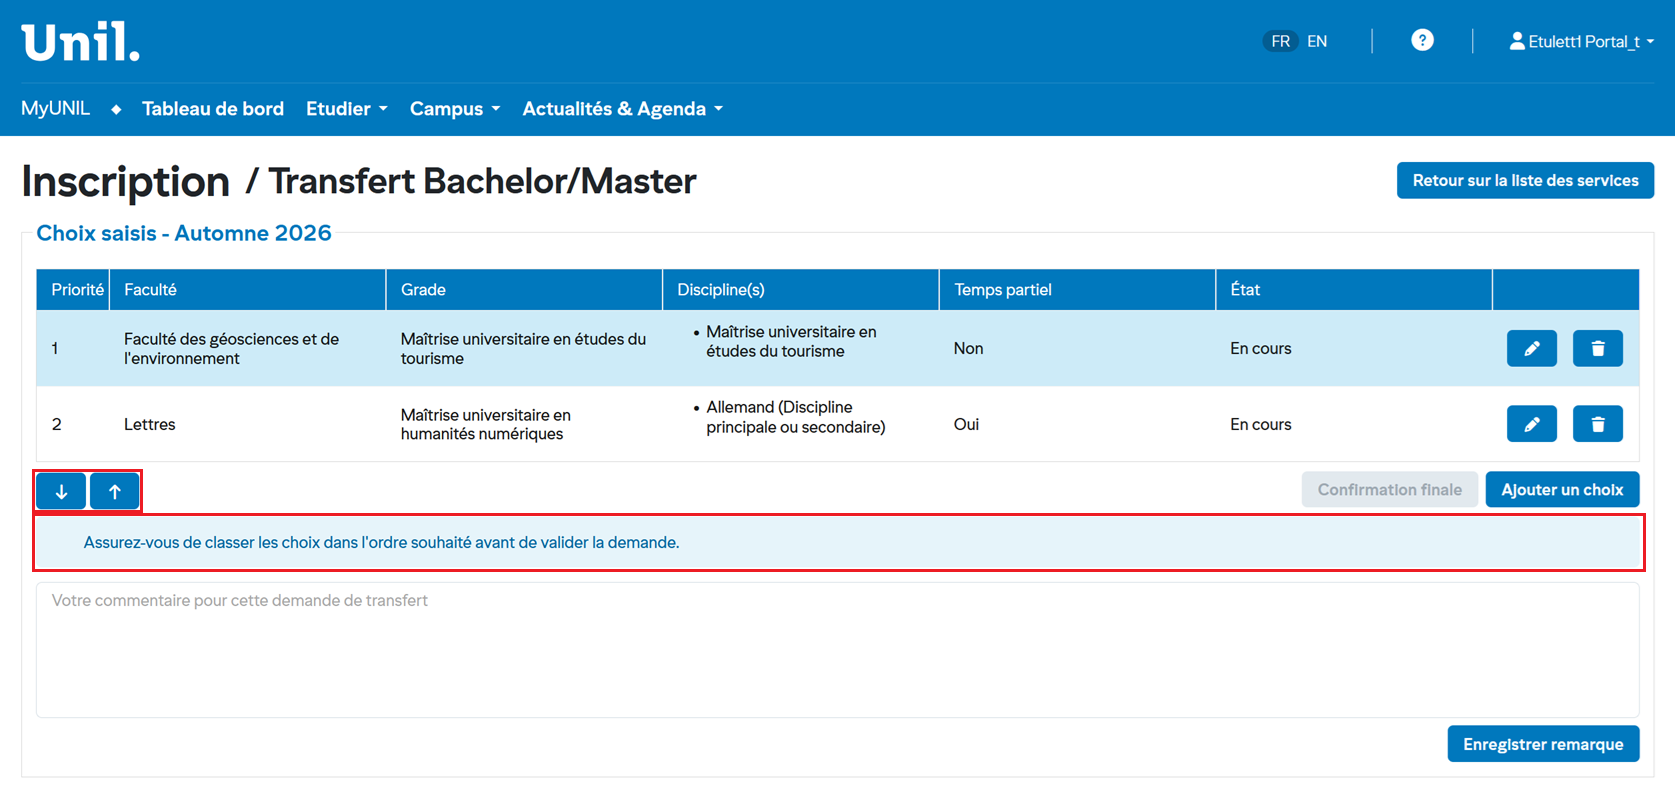
## 3. Modify the priority order of your choices
You can change the order of your choices according to your preferences.
Priority 1 is the highest priority, and the following priorities correspond to lower levels. If more than two options are available, the buttons will be enabled when you select an option, allowing you to reorganize your choices.
[](https://wiki.unil.ch/ci/uploads/images/gallery/2026-02/haIimage.png)
## 4. Confirm the transfer request
You can confirm the request by clicking the "Final Confirmation" button.
[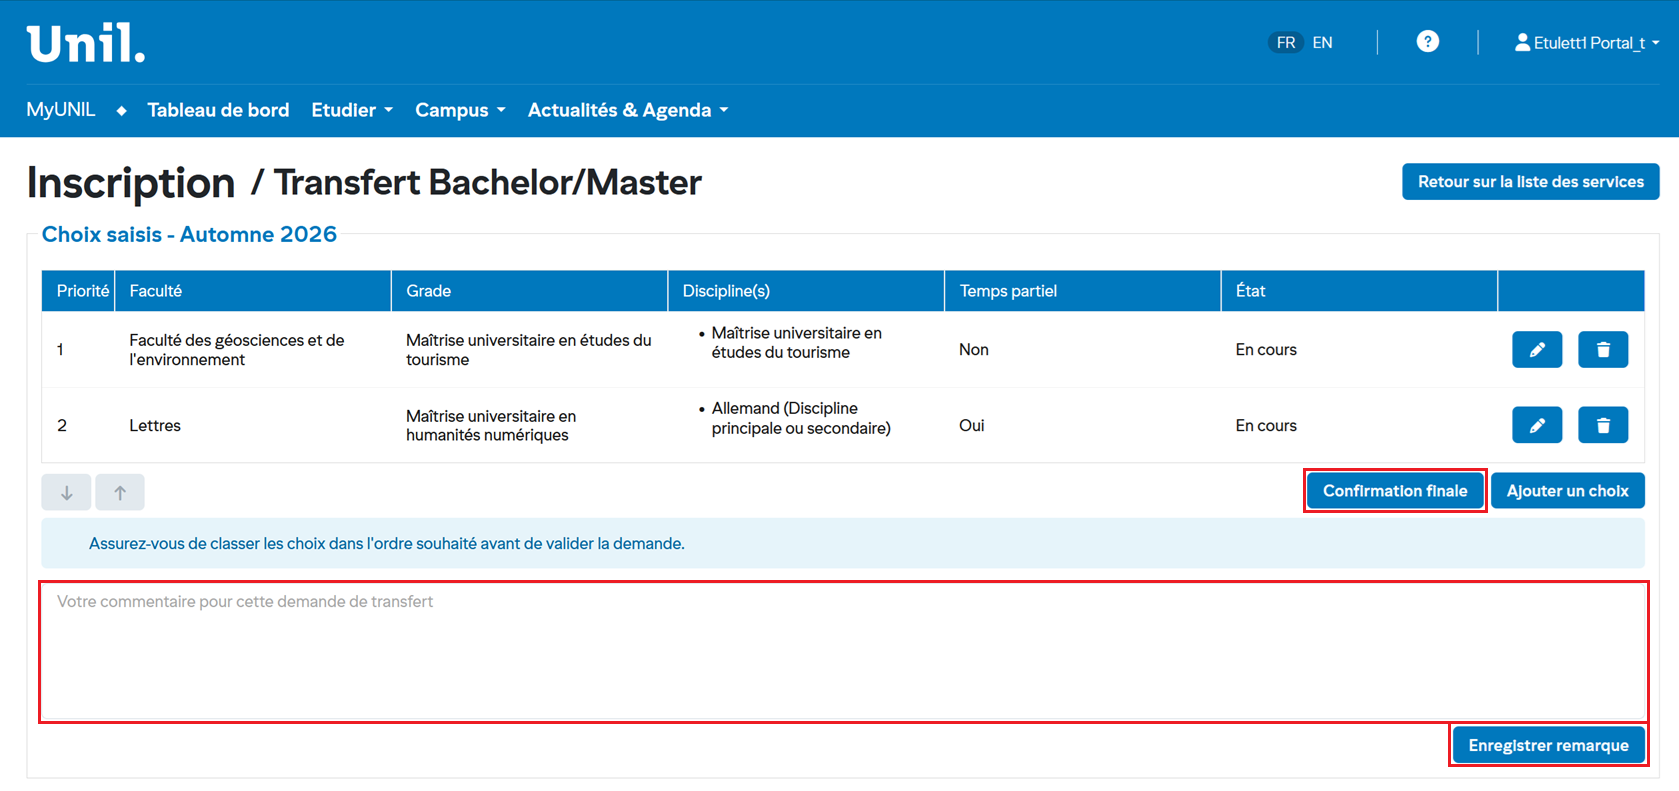](https://wiki.unil.ch/ci/uploads/images/gallery/2026-02/9Hkimage.png)
> **Note:** You can add a comment to provide important information to your faculty and then click "Save remark" to save your remark.
# Course and Assessment Registration
## Table of Contents
1. [Accessing the Registration Service](https://wiki.unil.ch/ci/link/2232#bkmrk-1.-accessing-the-reg)
2. [Registration Contract](https://wiki.unil.ch/ci/link/2232#bkmrk-2.-registration-cont)
3. [Selecting Your Courses](https://wiki.unil.ch/ci/link/2232#bkmrk-3.-selecting-your-co)
4. [Reviewing and Confirming Your Registration](https://wiki.unil.ch/ci/link/2232#bkmrk-4.-reviewing-and-con)
5. [Registration and Withdrawal Periods](https://wiki.unil.ch/ci/link/2232#bkmrk-5.-registration-and-)
6. [Key Points to Remember](https://wiki.unil.ch/ci/link/2232#bkmrk-6.-key-points-to-rem)
---
## 1. Accessing the registration service
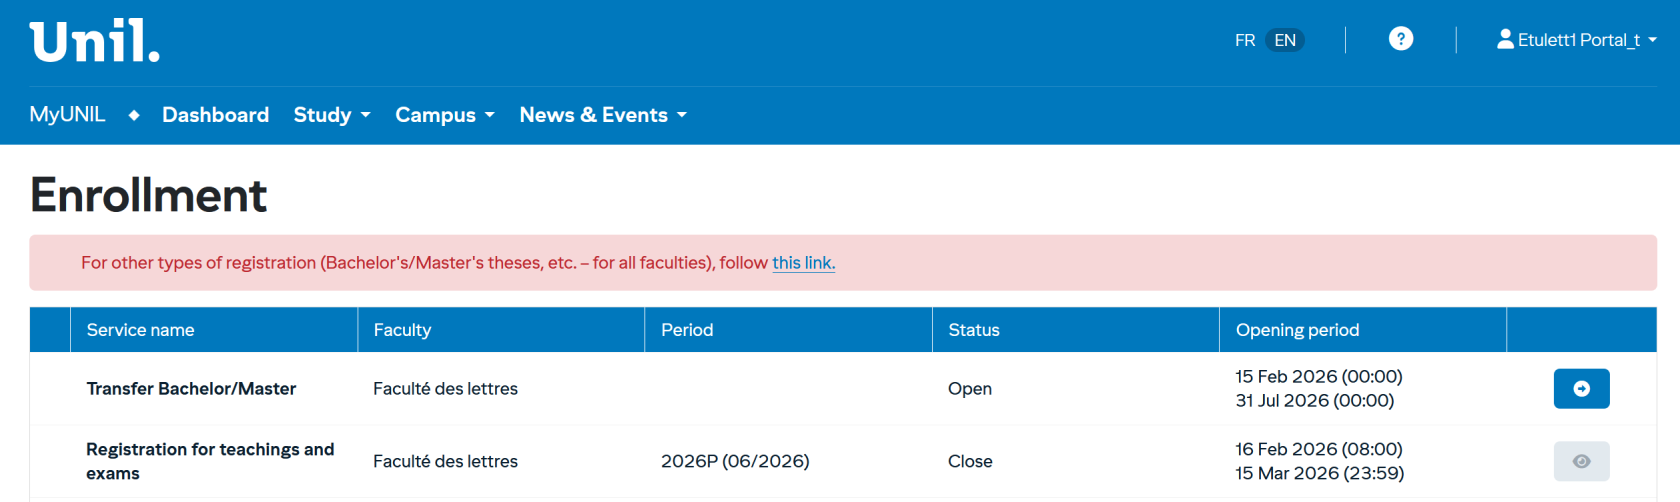
Go to **MyUNIL** and click on **Enrollment** in the navigation menu. The main page displays the list of available services in a table with the following columns:
[](https://wiki.unil.ch/ci/uploads/images/gallery/2026-02/Mwkimage.png)
List of services :
[](https://wiki.unil.ch/ci/uploads/images/gallery/2026-02/7Q2image.png)
The main page displays the list of available services in a table with the following columns:
Column
Description
**Service Name**
Type of operation (registration or withdrawal)
**Faculty**
Your affiliated faculty (e.g., School of Criminal Sciences)
**Period**
The relevant semester (e.g., 2025A for the winter 2026 session)
**Status**
Indicates whether the service is **Open** or **Closed**
**Opening Period**
The exact dates during which the service is accessible
Click the blue icon to the right of the **"Inscription aux enseignements et aux évaluations"** (Course and Assessment Registration) row to begin your registration.
**Button states** :
The button can have multiple states depending on the status.
Each state defines the actions available to the user.
👁️ **Greyed-out eye** — Complement closed
No action is available.
➡️ **Active arrow** — Registration open
Registration is available.
---
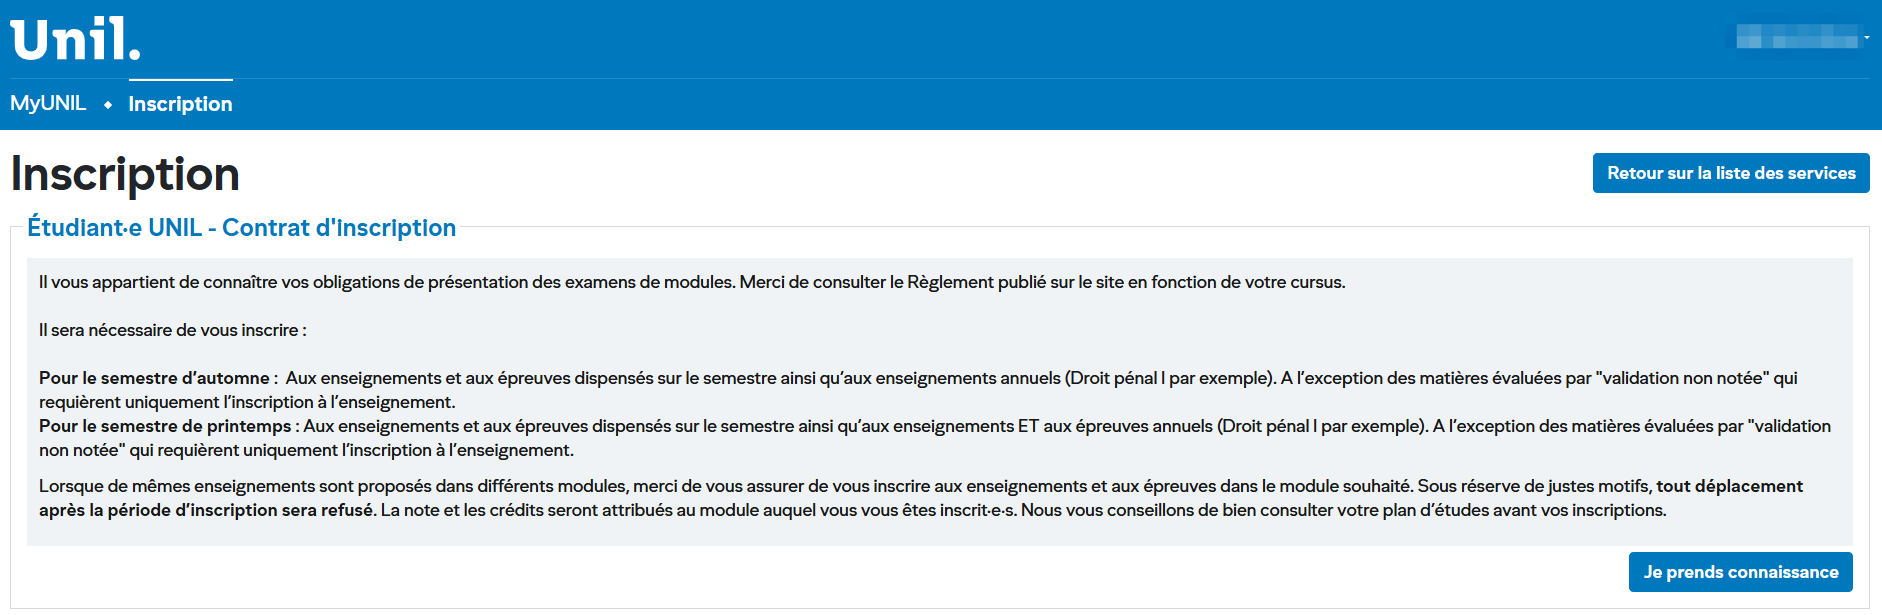
## 2. Registration contract
Before proceeding with registration, a **registration contract** is displayed. Read it carefully as it outlines your obligations. Here are the key points:
[](https://wiki.unil.ch/ci/uploads/images/gallery/2026-02/hzSimage-1.png)
*Information***:** Depending on your faculty or school, there may be no registration contract. In this case, you will be taken directly to the registration process.
Click **"Je prends connaissance"** (I acknowledge) to confirm you have read the contract and access the course selection page.
---
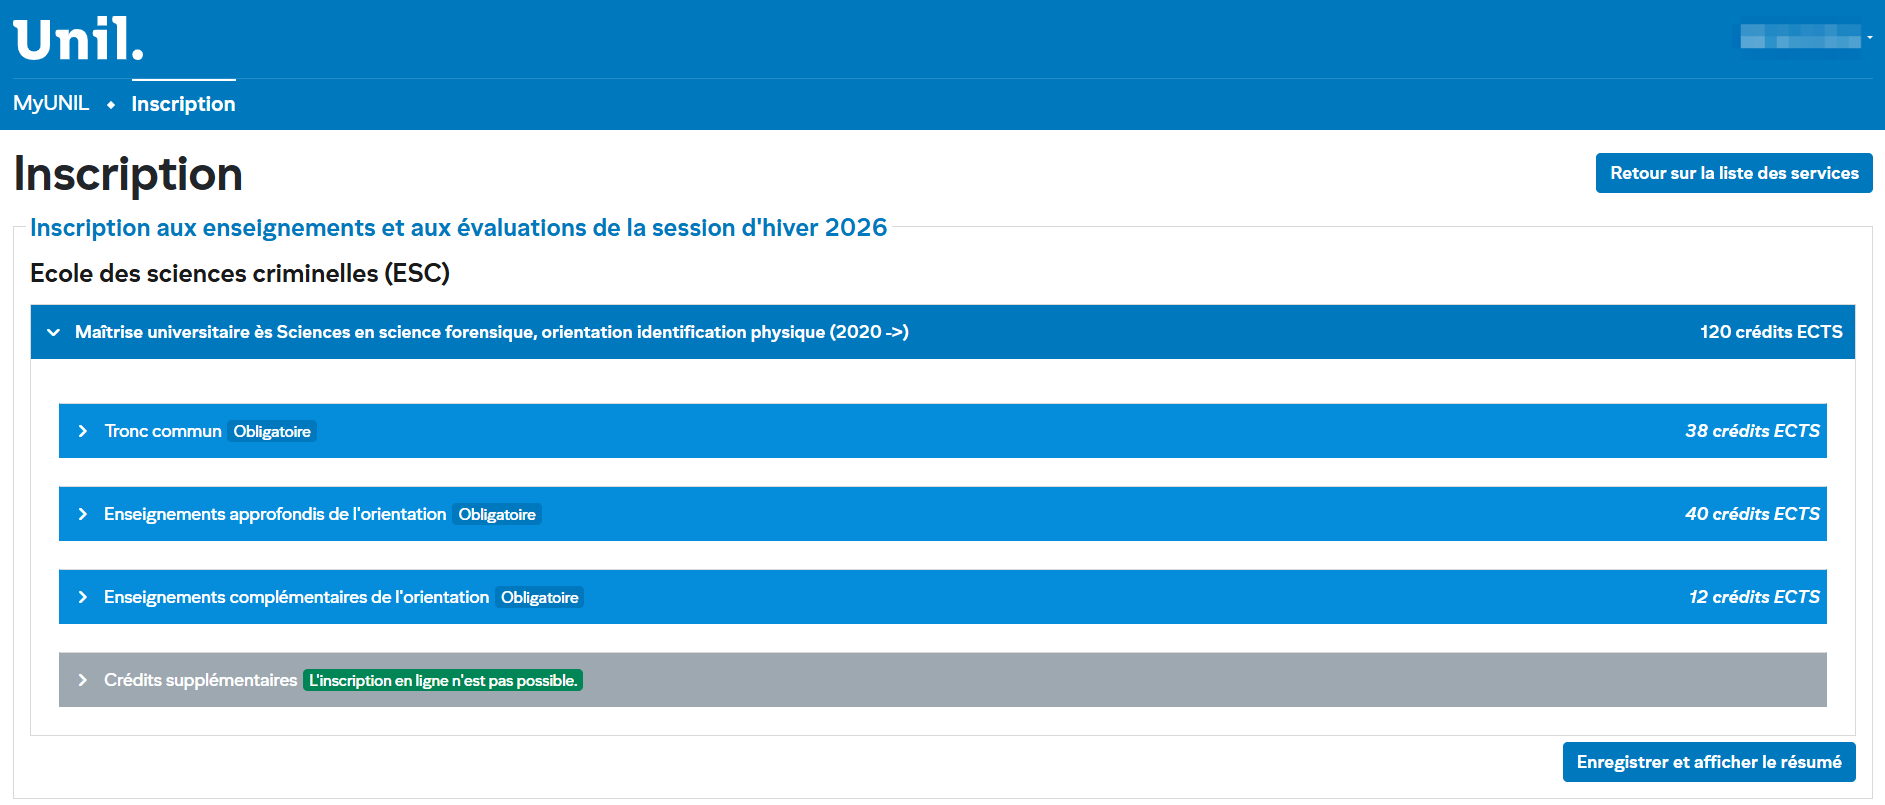
## 3. Selecting your courses
The registration page displays your study programme in **expandable sections** organised hierarchically.
### Page Structure
Your programme is shown at the top (e.g., *Master of Science in Forensic Science, Physical Identification track*) along with the total number of required ECTS credits (e.g., 120 ECTS credits).
Below that, modules are listed with their category and associated credit count:
Module
Type
ECTS Credits
Core Curriculum
Compulsory
38
Advanced Courses in the Track
Compulsory
40
Complementary Courses in the Track
Compulsory
12
Additional Credits
—
—
### How to select a course
1. **Click the chevron** (›) to the left of a module to expand it and display the available courses.
2. **Check the courses** you wish to register for.
3. Repeat for each relevant module.
### Courses offered in multiple modules
If the same course is offered in different modules, make sure you register under the **correct module**. Grades and credits will be attributed to the module in which you are registered.
[](https://wiki.unil.ch/ci/uploads/images/gallery/2026-02/CMNimage-2.png)
> **Tip:** Review your study plan carefully before registering.
> **Registration process details**
> Some faculties use a specific configuration. Therefore, when you select an evaluation or a course, other associated elements may be automatically selected within the same module.
---
## 4. Reviewing and confirming your registration
The **"Récapitulatif de l'inscription"** (Registration Summary) page displays a summary of all your selections. A message prompts you to verify that the information has been entered correctly.
[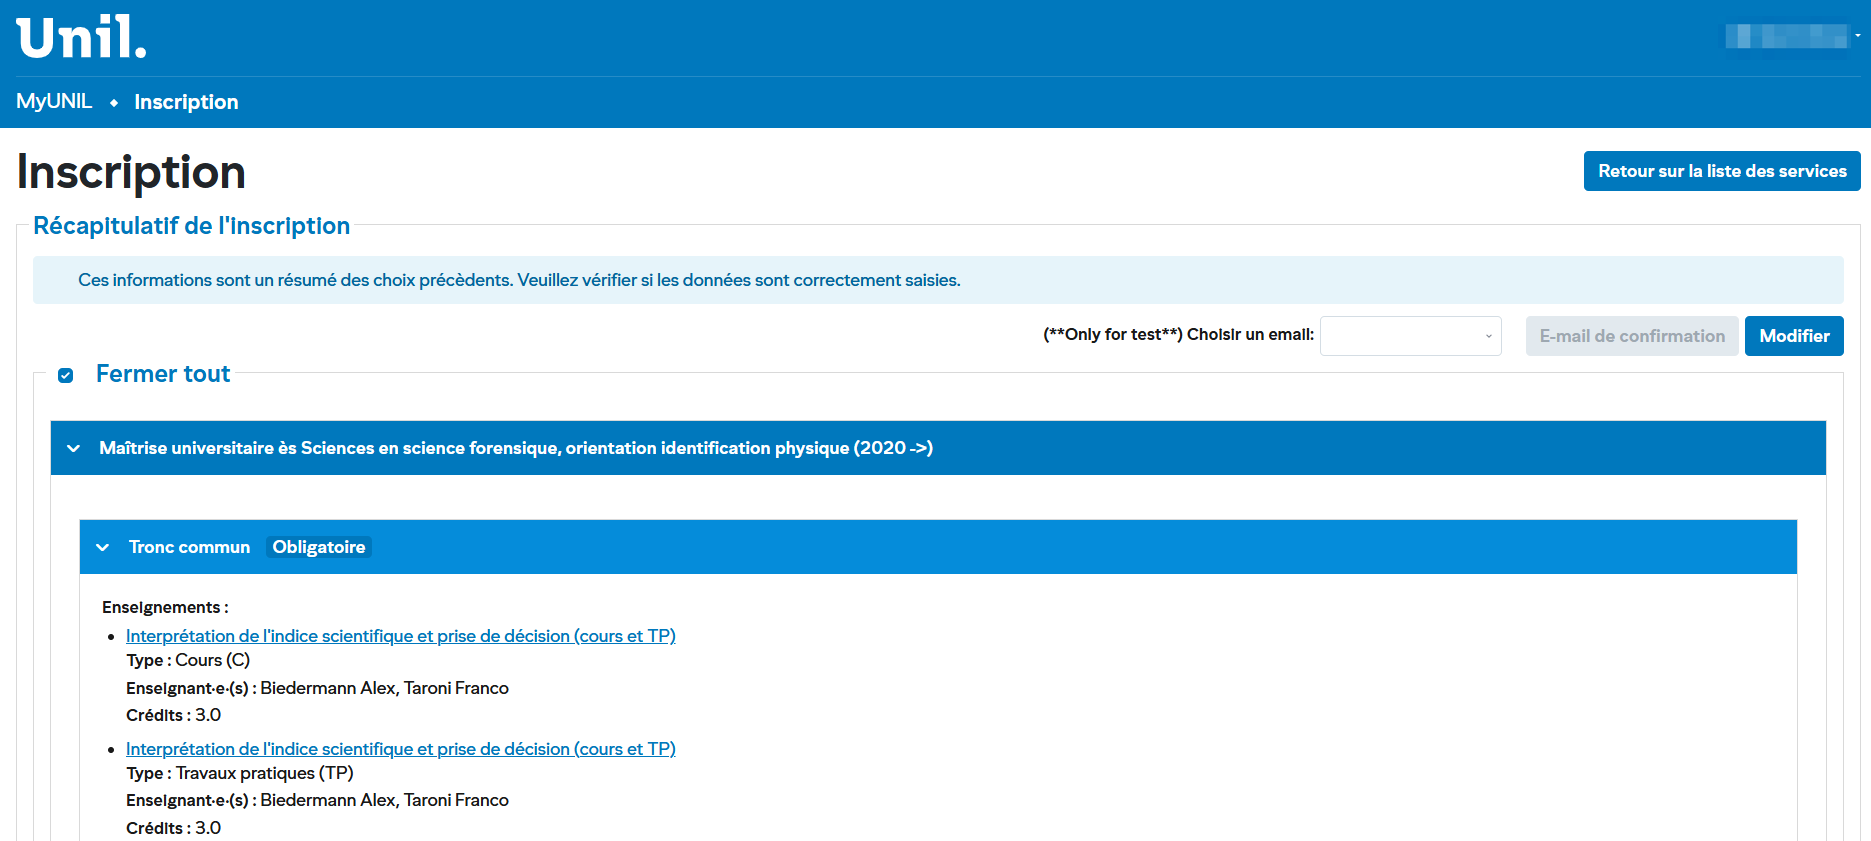](https://wiki.unil.ch/ci/uploads/images/gallery/2026-02/Vc1image-3.png)
### What you see on this page
The summary is organised by module. Each selected course appears with the following details:
- **Course name** (clickable link to the course description)
- **Type**: Lecture (C), Practical Work (TP), Seminar (S), etc.
- **Instructor(s)**: Name(s) of the course instructor(s)
- **Credits**: Number of ECTS credits awarded
### Available actions
- **Edit**: Click the **"Modifier"** (Edit) button at the top right to return to the selection page and make changes.
- **Confirmation email**: You can request a summary email to be sent to your UNIL address.
- **Collapse all / Expand all**: Use the checkbox at the top to expand or collapse all sections at once.
> **Important:** Review your summary carefully. Make sure each course is registered under the correct module.
---
## 5. Registration and withdrawal periods
Registrations and withdrawals are subject to **strict deadlines**. Here is an example calendar for the winter 2026 session (School of Criminal Sciences):
Service
Opening Period
Status
Course and Assessment Registration
15 Sept. 2025 (00:00) – 12 Oct. 2025 (23:59)
Open
Course and Assessment Withdrawal
13 Oct. 2025 (00:00) – 26 Oct. 2025 (23:59)
Closed
> **Note:** Dates and periods vary by faculty. Always check the registration page on MyUNIL for the exact dates that apply to you.
---
## 6. Key points to remember
- **Review your study plan** before registering so you know which courses and modules to choose.
- **Respect the deadlines**: once the registration period is closed, it will no longer be possible to modify your selections (except in justified circumstances).
- **Annual courses and assessments:** The system only allows registration for courses and assessments taking place during the current semester and/or the upcoming examination session. Typically, in the autumn semester, it is not possible to register for assessments of annual courses, as these are only organized starting from the following summer examination session.
- **Additional credits**: if online registration is not available for certain modules, contact your department office.
- For **other types of registration** (Bachelor/Master theses, etc.), a dedicated link is available on the main registration page.