# Research support
# High Performance Computing
The DCSR team is able to help you regarding high performance computing topics including:
- using DCSR clusters when you're not able to perform your research and run computations on your local computer.
- harnessing the DCSR clusters (CPU and GPU)
- scaling your codes to larger clusters like CSCS
Here are the people involved in HPC topics:
- All faculties
- Cristian Ruiz - HPC programming, code optimisation, scientific software stack
- Emmanuel Jeanvoine - HPC programming (CPU and GPU), code optimisation, scientific software stack
- Mainly HEC and GSE faculties
- Flavio Calvo - HPC/scientific programming, code optimisation, numerical schemes/algorithmic
- Margot Sirdey - HPC/scientific programming, code optimisation, numerical schemes/algorithmic
## Technical skills
Here are some topics on which we can help.
### Using the clusters efficiently
The cluster are shared resources. In order to allow all users to get a fair access to the computing resources, the job scheduler has been configured so that excesses are avoided. However this does not prevent you from inefficiently using the resources. Depending on your workload we can help you to minimise the execution time and use of the resources required and therefore to minimise the billing and allowing you to get your results faster. This is usually achieved by tuning the job scripts and the threading parameters of your applications. We can also provide you with some insight regarding the use of the different storage locations on the clusters which can have a large impact on how long your jobs run.
### Scientific computing & choice of optimised libraries
If you have to develop your own codes, several rules and good practices should be adopted. Furthermore, instead of reinventing the wheel and reprogramming everything from scratch, it's very likely than optimised and maintained libraries exist for many problems you will face. We can help you to choose the most commonly used optimised libraries and possibly to benchmark various libraries operating on the same topics according to your needs.
### Profiling & code optimisation
Once you have developed a code, we can help you to profile it in order to identify bottlenecks and to improve some parts of the code where most time is being spent. Optimisation can be achieved in several ways including using a different algorithm, improving memory access, improving storage access, using vectorisation.
### Parallelisation
Depending on your code, it could be possible to slightly modify the core computations so that it could be spread over several CPU cores or nodes. In some cases, it could also be possible and very interesting to port some parts of the code to GPU. Even if some languages like C/C++ or Fortran are more friendly to parallelisation, significant gains can also be obtained with Python, R, or even Julia codes.
### Energy consumption
Energy consumption is a major concern in our current world. We are currently working on providing you with mechanisms that allow them to correlate your computations with the associated energy consumption. That can help you to choose between several computing strategies, to define trade-off between precision and consumption, or even to put the global benefit of your research respecting to your environmental impact.
## Terms of support
We distinguish two kinds of support:
- service mode: you submit a ticket to [helpdesk@unil.ch](mailto:helpdesk@unil.ch?subject=DCSR%20HPC%20support%20request) (don't forget to start the subject with DCSR), we can help for few hours. The service is free.
- project mode: you have a more complex project that requires several days/weeks/months of work. The service is billed (see U1 costs in support column in the [cost model](https://unil.ch/ci/home/menuinst/calcul--soutien-recherche/couts-operationnels.html))
## Contact
Please send an email to [helpdesk@unil.ch](mailto:helpdesk@unil.ch?subject=DCSR%20HPC%20support%20request) and put "DCSR HPC support request" in the subject.
# BioImage Analysis
The DCSR offers image analysis support for the FBM community. Whether you're looking to extract quantitative information, automate a manual task, fix a script, or discuss a new project, you're at the right place! Antony Carrard, bioimage analyst and machine learning expert, will be happy to help you.
## What we can work on together
From a quick question to a full pipeline build from scratch, if it involves extracting information from images, we can talk about it. Here is what I can help you with:
- **Image acquisition & setup** — camera and lighting selection, acquisition protocol, color calibration
- **Pre-processing** — denoising, stitching, channel alignment, flatfield correction
- **Segmentation & detection** — from classical thresholding to deep learning models (SAM, Cellpose, StarDist…)
- **Cell & object identification** — detection, counting, classification by morphology or intensity
- **Colocalization** — spatial co-occurrence analysis, intensity correlation, custom distribution metrics
- **Quantification** — intensity profiles, shape descriptors, color and texture analysis
- **Tracking & behavioral analysis** — object tracking across frames, movement and behavior metrics
- **Large-scale pipelines** — automation, batch processing, HPC when needed
- **Results & visualization** — overlays, plots, summary tables, exportable metrics
## Common tools & software
Depending on your needs and existing workflow, we can also work with established open-source bioimage analysis tools:
- **Fiji / ImageJ** — the standard for general image processing and macro automation
- **CellProfiler** — automated quantification pipelines, no coding required
- **QuPath** — whole-slide and multichannel image analysis
- **Ilastik** — interactive machine learning for segmentation and classification
- **Napari** — Python-based viewer for multidimensional images
## Projects
[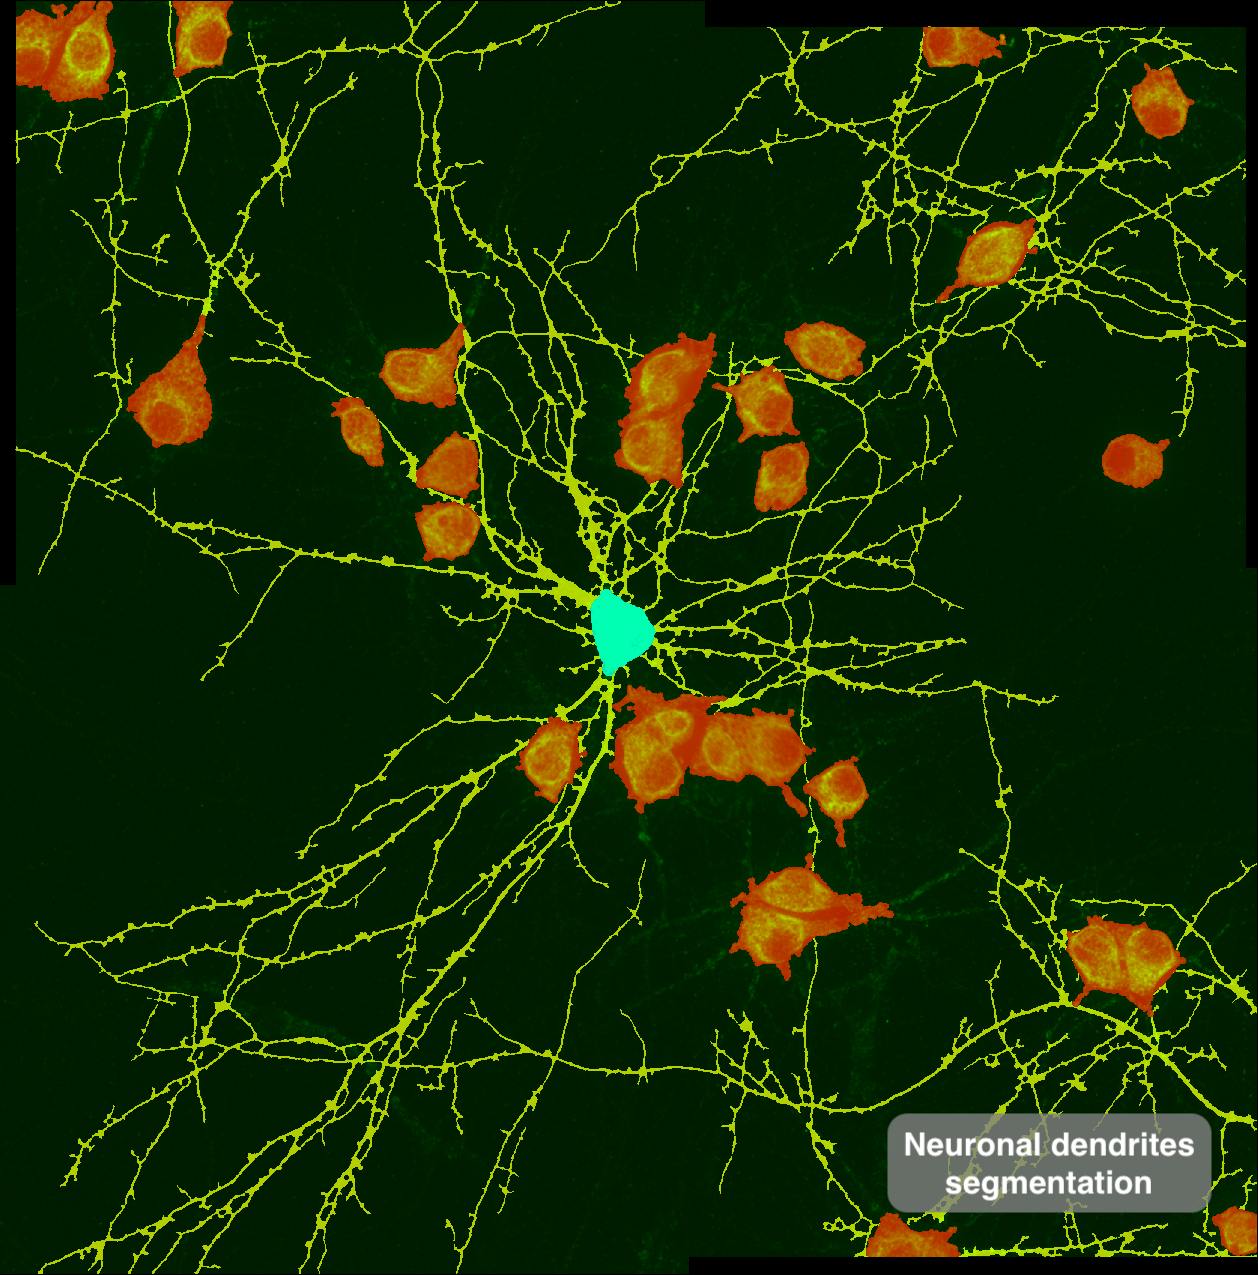](https://wiki.unil.ch/ci/uploads/images/gallery/2026-06/neuronal-dendrites-annotated.png)
*Automatic dendritic segmentation for intensity extraction — Marianna Pompili, Bagni Lab, DNF*
[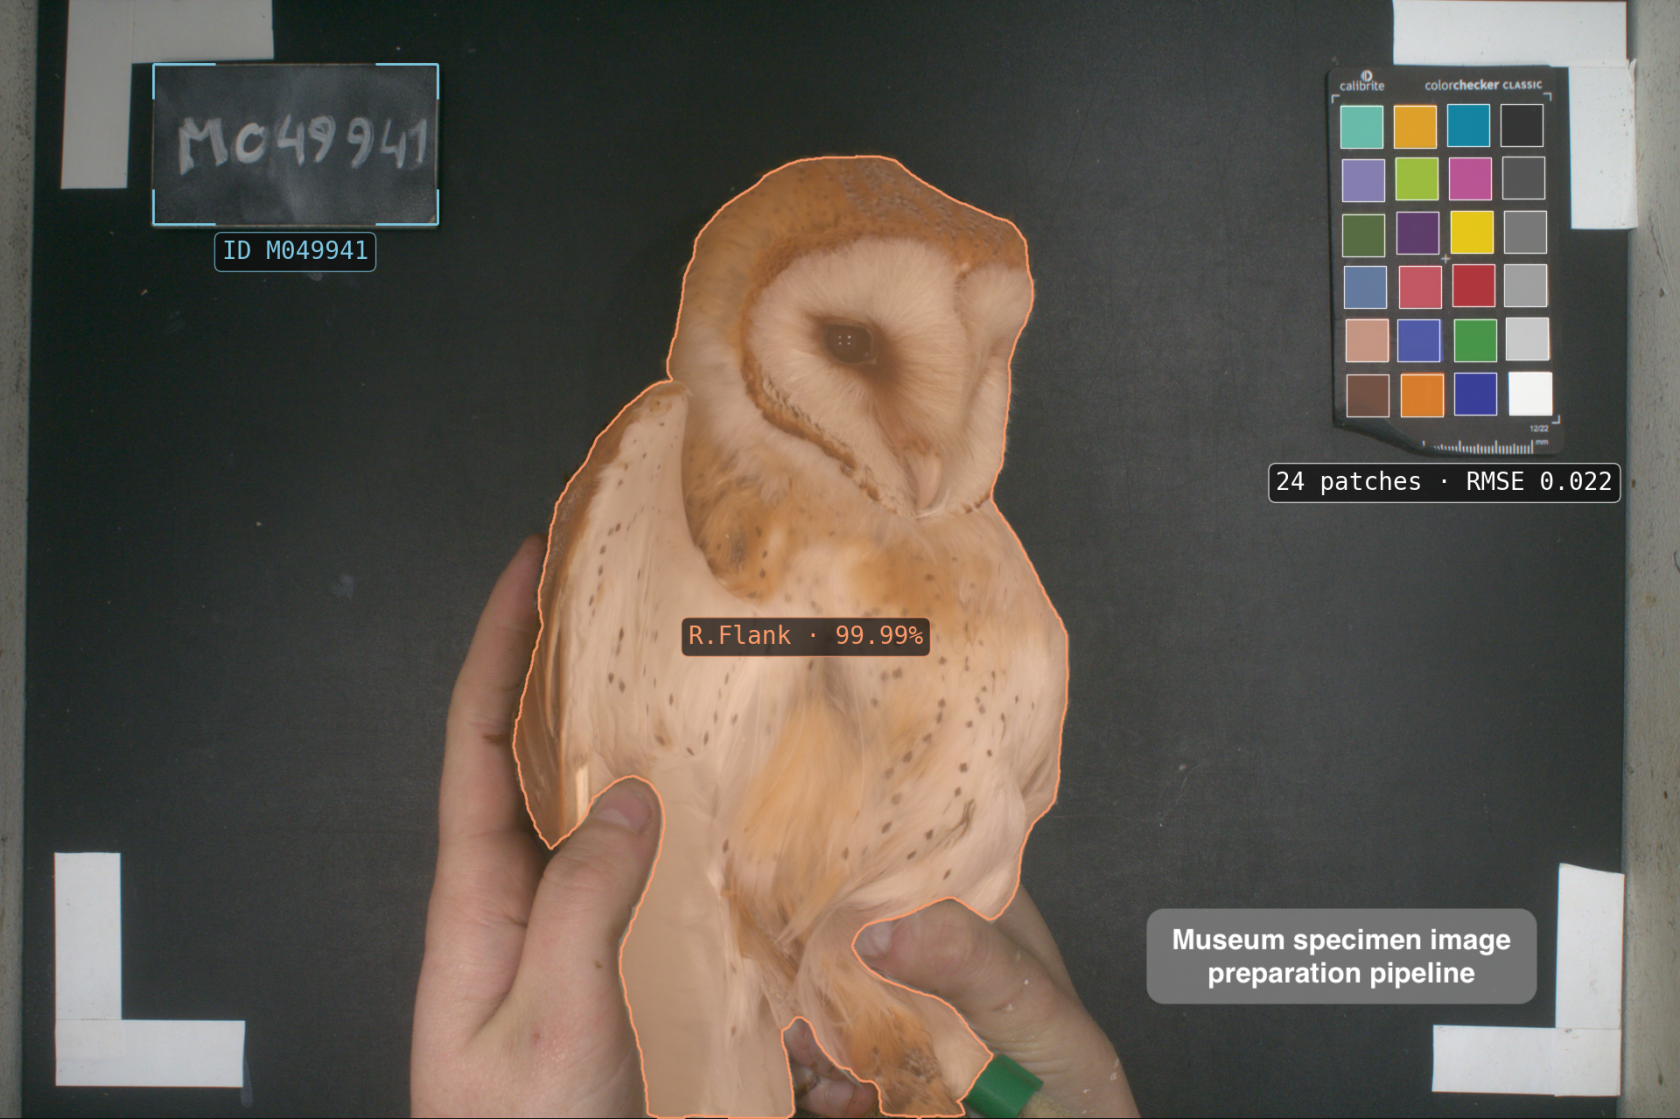](https://wiki.unil.ch/ci/uploads/images/gallery/2026-06/own-preparation-annotated.png)
*Owl specimen ID extraction and image color correction pipeline — Tristan Cumer, Goudet Group, DEE*
[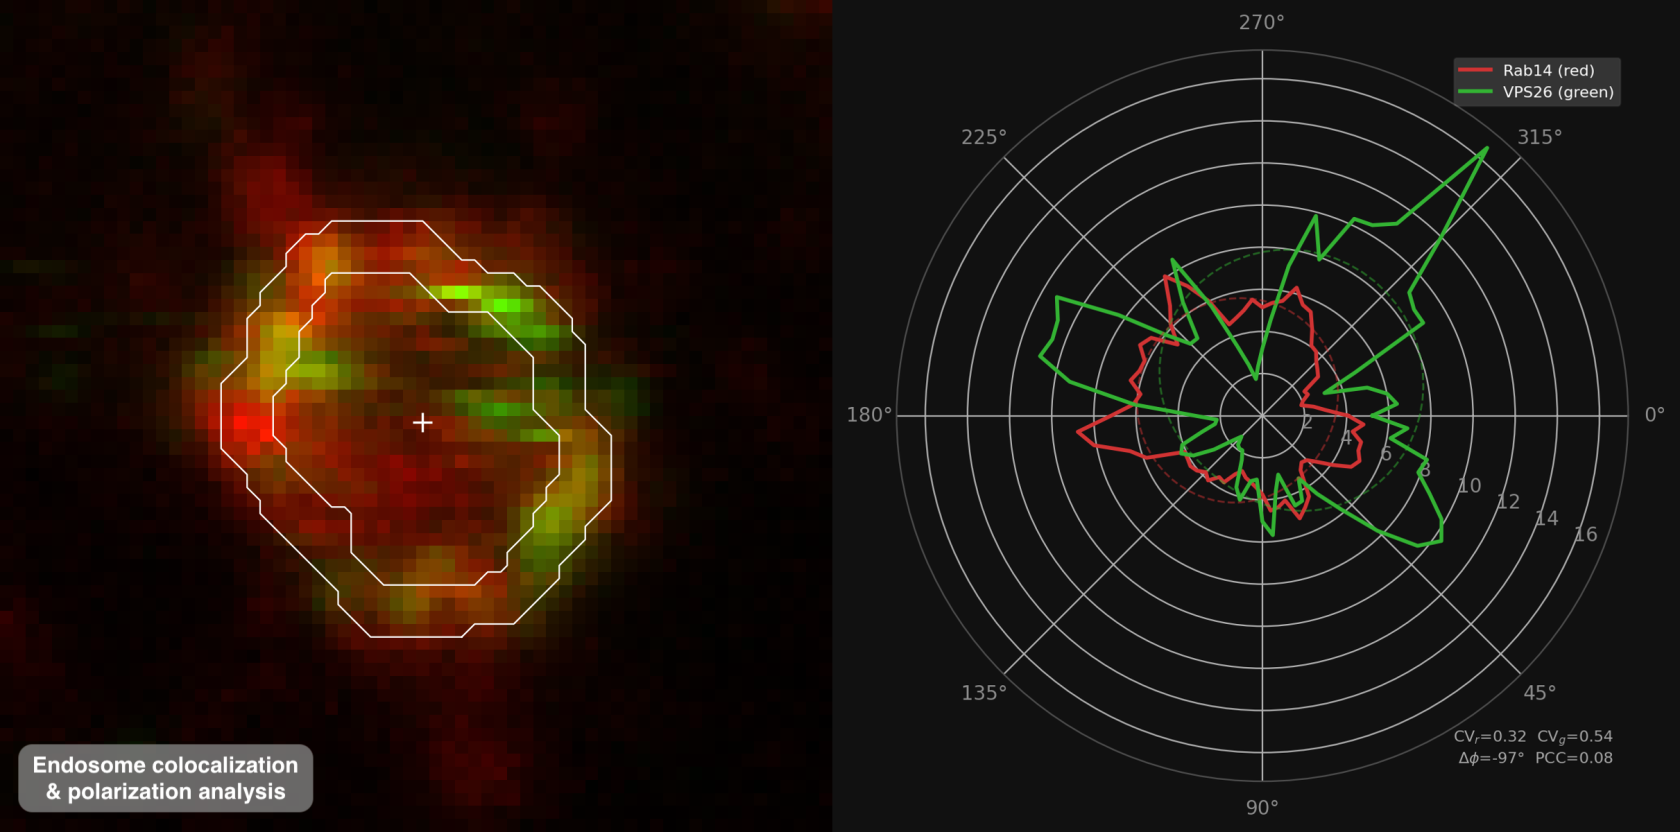](https://wiki.unil.ch/ci/uploads/images/gallery/2026-06/endosome-polar-plot-annotated.png)
*Automatic endosome contour identification for colocalization and polarization analysis — Sarah Hornfeck, Widmann Lab, DSB*
## Contact
Feel free to reach out at — briefly describe your project or question and we'll get back to you shortly.
# Best Practices for Software Development
In progress
# Database support for humanities
The DCSR provides support to researchers in the humanities for projects based on **structured *corpora* (databases, digital libraries or collections, etc.)**.
The DCSR carries out a technological watch to provide researchers and research groups in the humanities with tools likely to cover some of the digital infrastructure needs encountered in the humanities. In the form of shared services, these tools enable researchers to organise, exploit and expose research databases online thanks to configurable presentation interfaces.
The DCSR relies on tools used and supported by a strong community (individuals and institutions). These tools are made available to researchers as **shared services** in order for the DCSR to provide a lasting and sustainable maintenance for the database and their presentation interfaces.
### Database support for humanities
The DCSR offers support for each stage of research within the framework of the tools made available :
- **planning**: help with the design and management of digital projects based on structured data (needs assessment, choice of tools and technologies, workflow, data management plan (DMP), etc.);
- **documentation**: help with the choice of relevant standards (ontologies, vocabularies or authoritative information, technologies) in an open science perspective (technical and semantic interoperability of data) to promote the reuse of data.
- **modelling**: to enable data to be used in accordance with researchers' expectations within a database, the DCSR provides guidance with data structuring (conceptual modelling);
- **collection**: assistance in setting up a workflow in accordance with good practices, with the aim of importing data in batches into a database (file naming policy, organisation of metadata, etc.);
- **storage**: the DCSR is in charge of storage and data backup procedures and handles the maintenance of the infrastructure within the framework of the shared tools provided;
- analysis: -
- **exposure**: depending on the needs of the project, and within the limits of the possibilities of the tools deployed, the DCSR can configure specific presentation interfaces for databases;
- **preservation**: the DCSR can coordinate the transfer of research data into a FAIR data repository in order to insure their long term availability when a database is no longer maintained;
- reuse: -
### Terms of service
TBD
### Contact
Researchers are encouraged to contact the DCSR well in advance (2 months) if the intended support is to help submit a project to a funding agency. Researchers should fill this **[form](https://ls.dcsr.unil.ch/index.php?r=survey/index&sid=671546&lang=fr) **in order to provide the necessary details regarding the project.
Alternatively, for a one-time request, researchers can also contact directly the following people:
- [Marion Rivoal](mailto:marion.rivoal@unil.ch) -- coordination with researchers, needs assessment, data modelling, good pratices in digital project management
- [Loïc Jaouen](mailto:loic.jaouen@unil.ch) -- infrastructure, technical assessment and technical support, good pratices in digital project management
# Arches
Arches est une plateforme open source pour la gestion des données issues du patrimoine culturel. La DCSR met à disposition des chercheurs de l'UNIL des instances locales d'Arches.
# Présentation
[Arches](https://www.archesproject.org/) est une plateforme *open source* développée par le [Getty Conservation Institute](https://www.getty.edu/conservation) et le [World Monuments Fund](http://www.wmf.org/) pour la gestion de données issues du domaine du patrimoine culturel.
[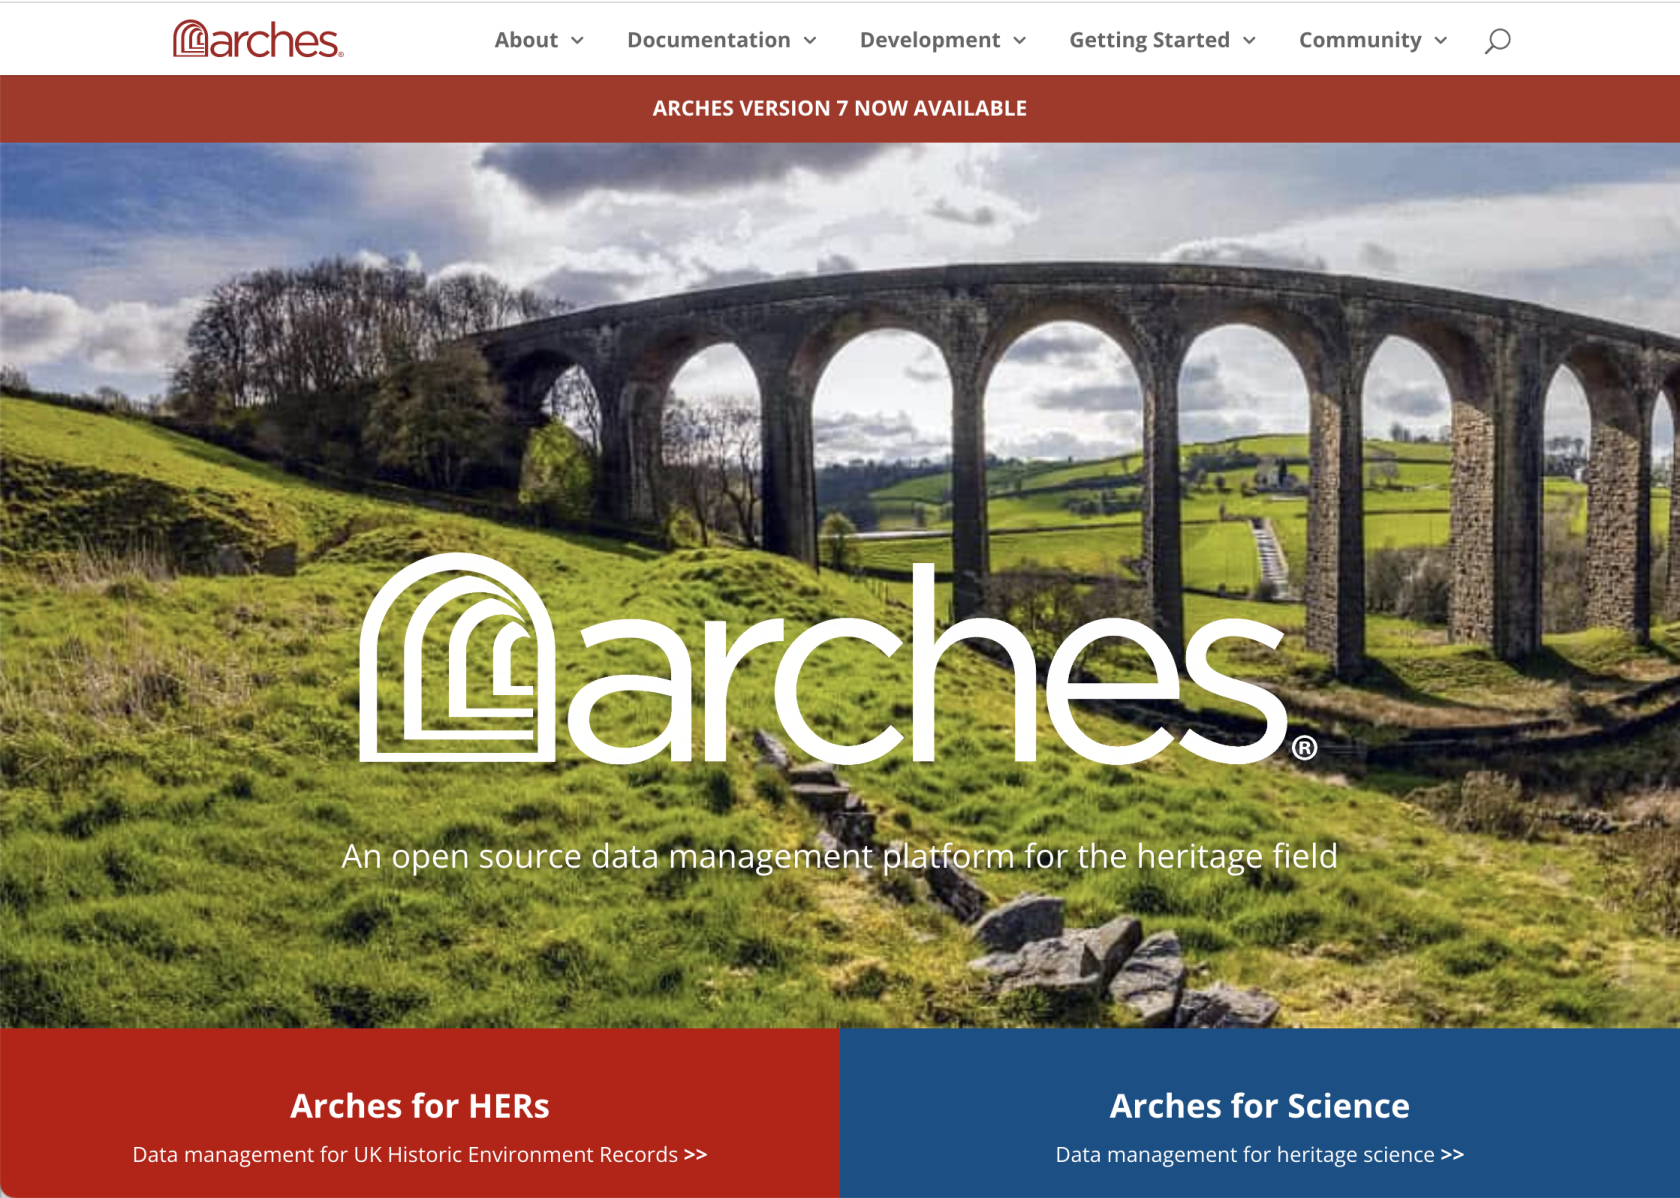](https://wiki.unil.ch/ci/uploads/images/gallery/2023-01/arch.png)
Dans le but de **valoriser les données et les bases de données** des équipes de recherche de l'UNIL, la [DCSR](https://www.unil.ch/ci/fr/home/menuinst/calcul--soutien-recherche.html) met à la disposition des chercheurs des instances locales d'Arches adaptées à leurs besoins. La DCSR accompagne le processus de création par les équipes des bases de données exposées par Arches et forme les utilisateurs au maniement de la plateforme.
En plus de pouvoir être couplée à un serveur d'images [IIIF](https://iiif.io/) (protocole standard d'accès aux images à distance), Arches permet l'utilisation d'ontologies (ex. [CIDOC-CRM](https://www.cidoc-crm.org/)) et de référentiels (en [SKOS](http://www.w3.org/2004/02/skos/core.html)) standard sans l'imposer, laissant à la discrétion des équipes de recherche la manière de structurer leurs données. Cette plateforme intègre également des données géoréférencées et peut, le cas échéant, être associée à un SIG.
# Mode d'emploi général de l'utilisateur
## 1. Connexion
Cliquez sur “Sign in” et identifiez-vous avec l’adresse mail UNIL et le mot de passe fourni par la DCSR.
## 2. Le modèle de données dans Arches
Le modèle de données s’organise entre des types de ressources (= classes) et des propriétés. Un type de ressource (appelé “*Resource Model*”) se voit associé une ou plusieurs propriétés (appelées “*nodes*”) et chaque propriété correspond à un format de données défini, appelé *“datatype”:* texte, date, lien vers un autre type de ressource, nombre, etc.
## 3. Présentation de l'interface graphique
### Saisie des données
#### Création d’une ressource
Une fois authentifié, cliquez sur “*Manage*”, en haut à droite. On accède ensuite à l’écran du gestionnaire de ressources “*Resource Manager*”:
[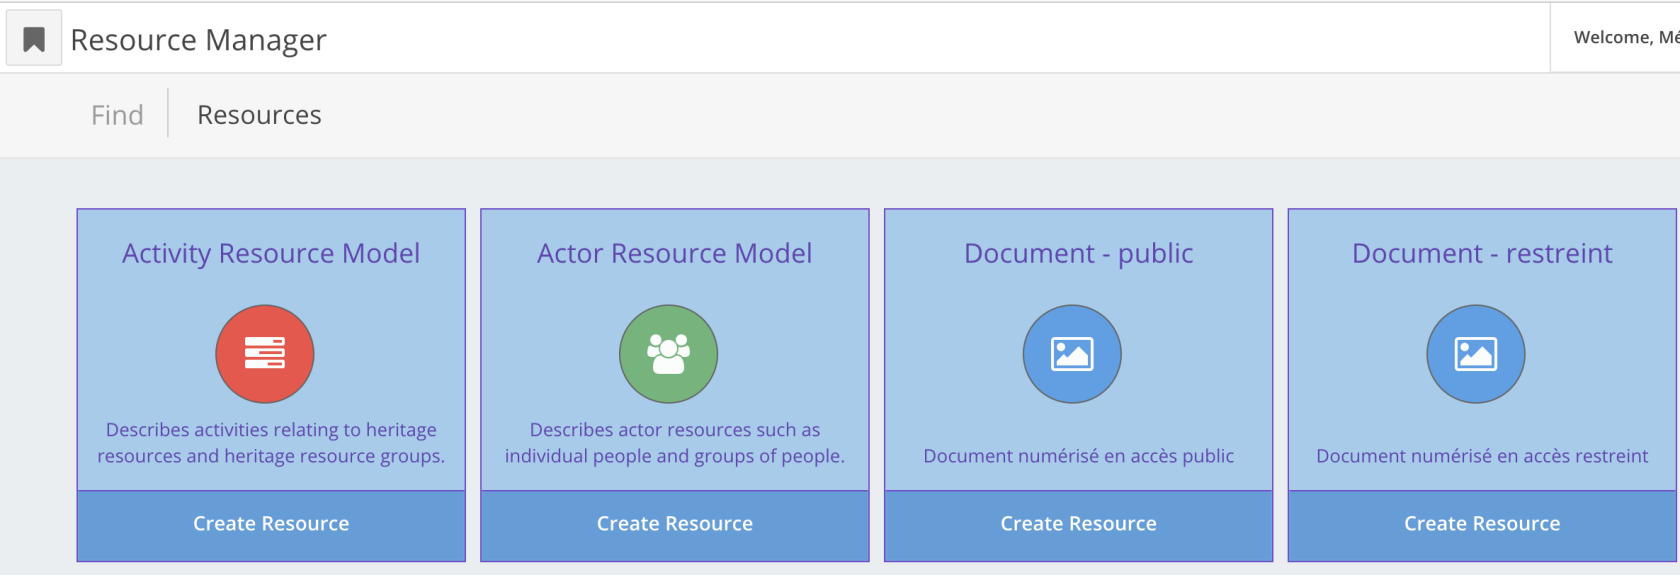](https://wiki.unil.ch/ci/uploads/images/gallery/2023-01/cap1.png)
Sélectionnez le type de ressource (ou classe) que vous souhaitez créer. Cliquez sur “*Create Resource*”.
Pour créer une ressource, il faut créer toutes les propriétés (“*nodes*”) pertinentes pour une ressource donnée. Ces propriétés sont visibles dans le volet latéral gauche.
[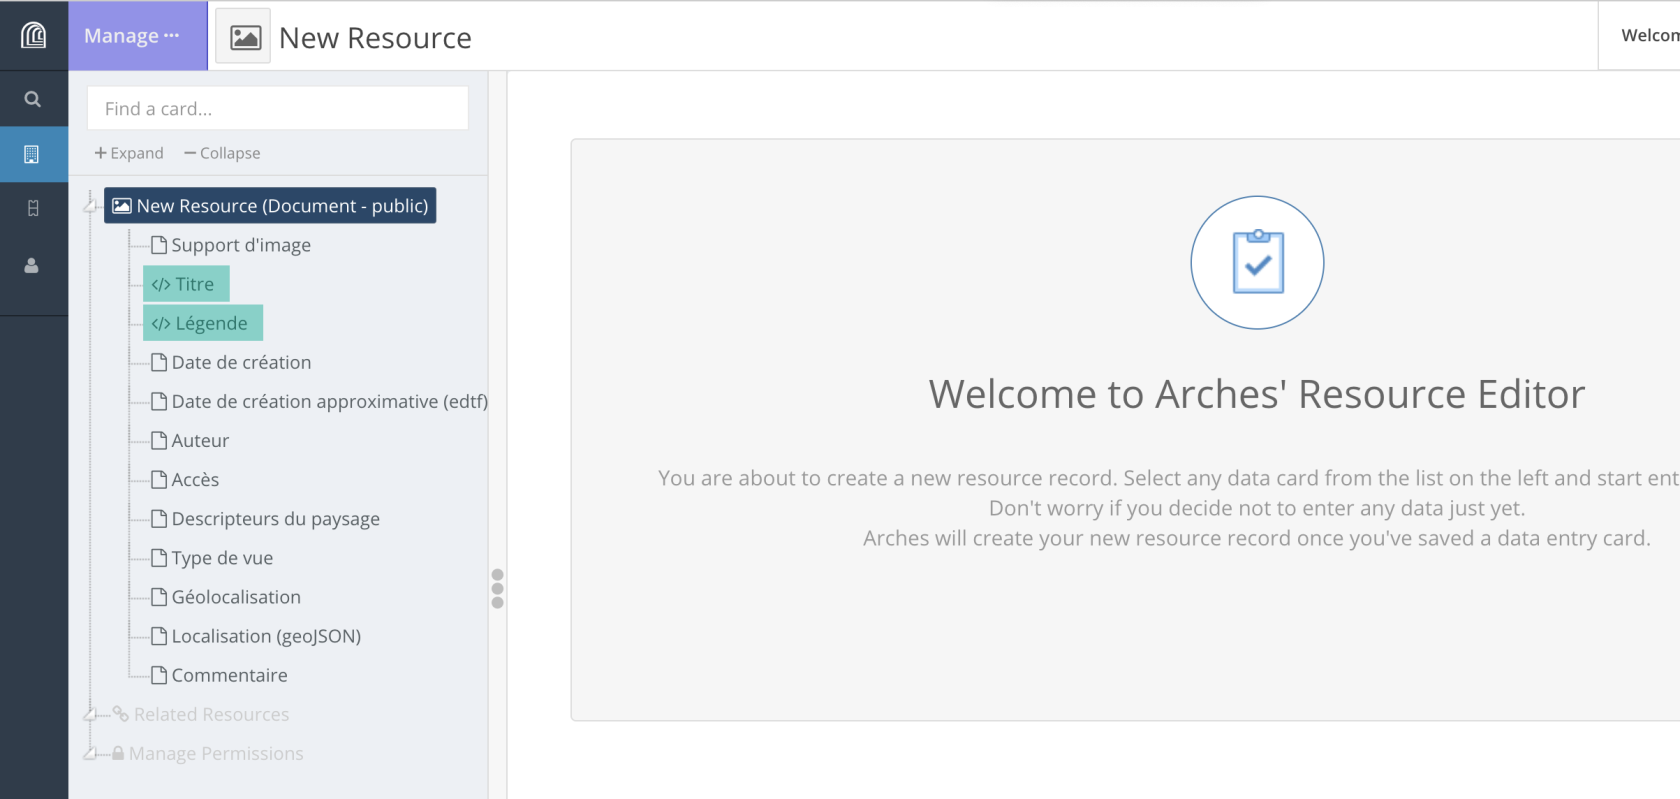](https://wiki.unil.ch/ci/uploads/images/gallery/2023-01/cap2.png)
Lorsqu’on clique sur l’une de ces propriétés, les éléments qui doivent être renseignés s’affichent dans la partie centrale.
[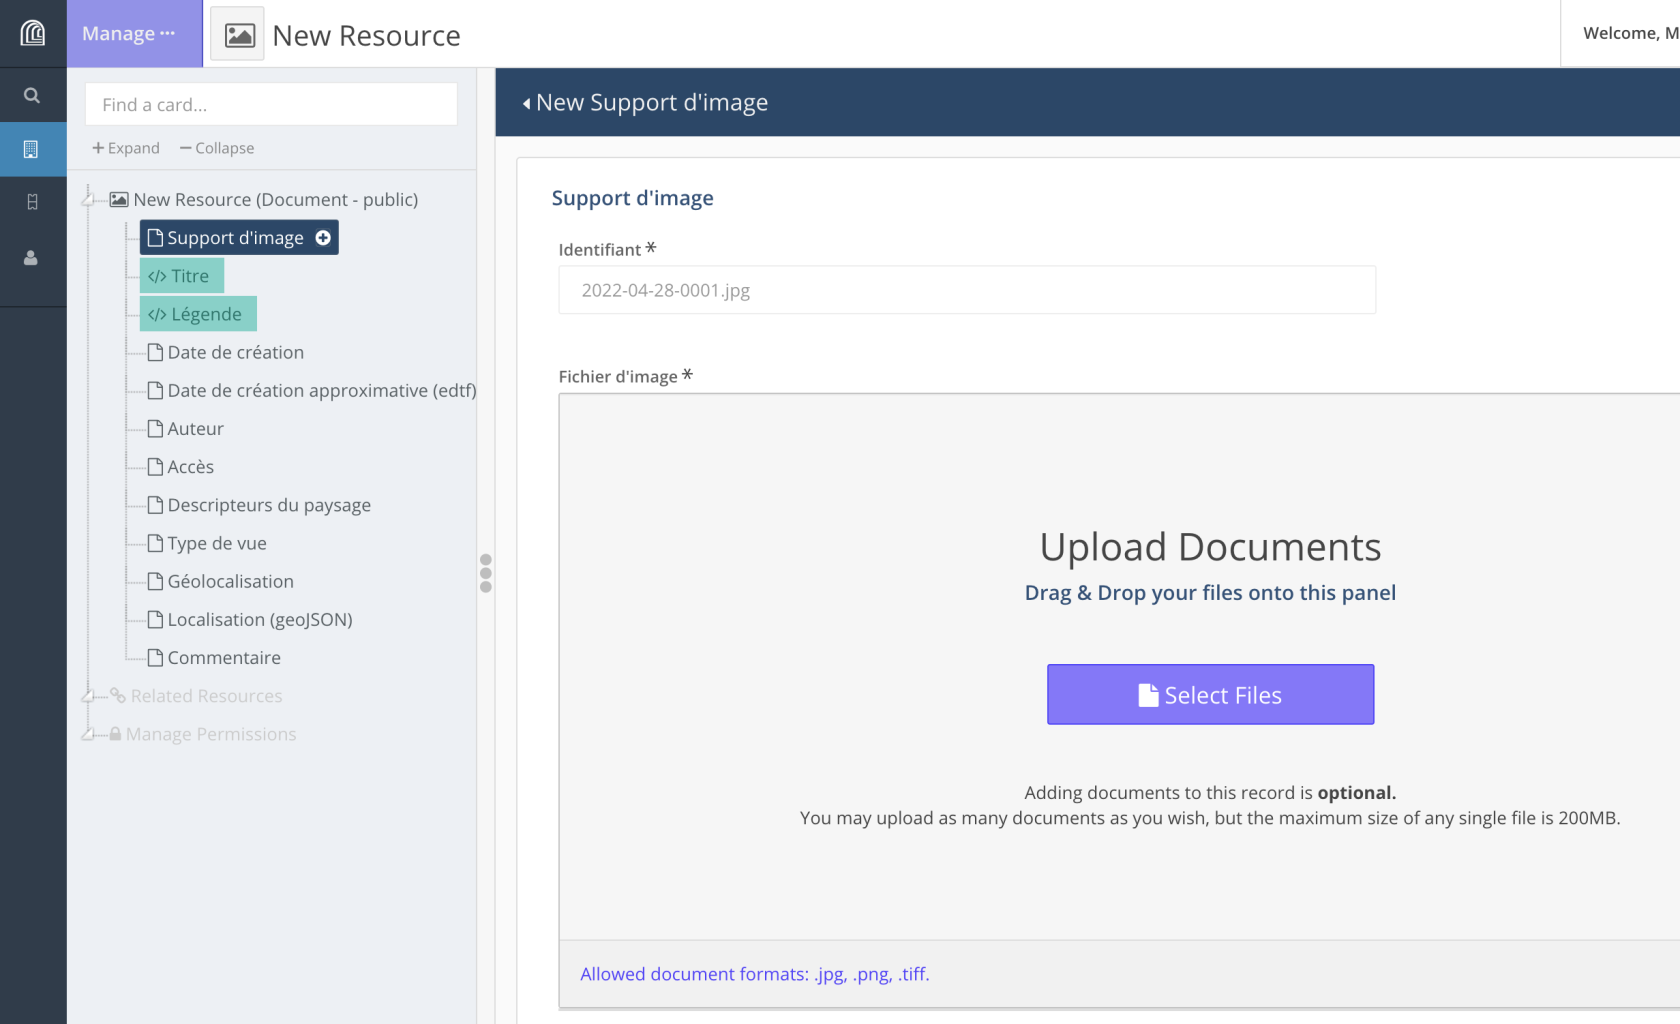](https://wiki.unil.ch/ci/uploads/images/gallery/2023-01/cap3.png)
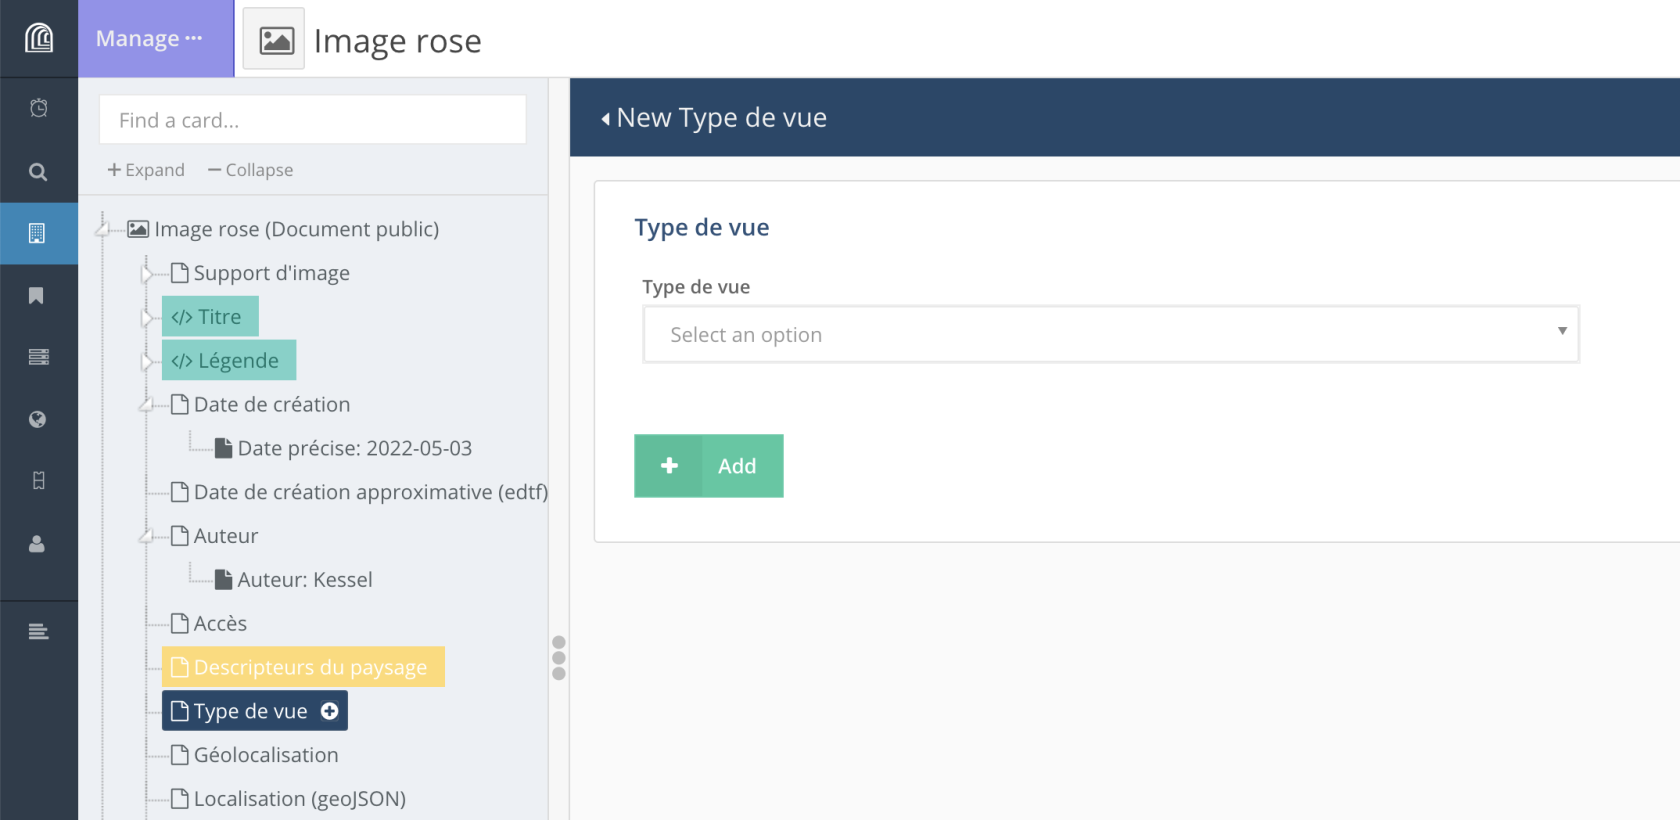
Les éléments obligatoires sont signalés par un **astérisque**. Les éléments surlignés en vert serviront pour identifier une ressource dans les résultats d’une recherche, par exemple; ils servent de titre et de description de la ressource.
Dans la partie centrale sont affichés dans indications concernant le format ou la nature des données attendues pour une propriété donnée.
Après avoir entré une propriété ou les différents éléments qui composent une propriété, on peut valider la saisie (“*+ Add*”) ou l’annuler (“*Cancel edit*”).
[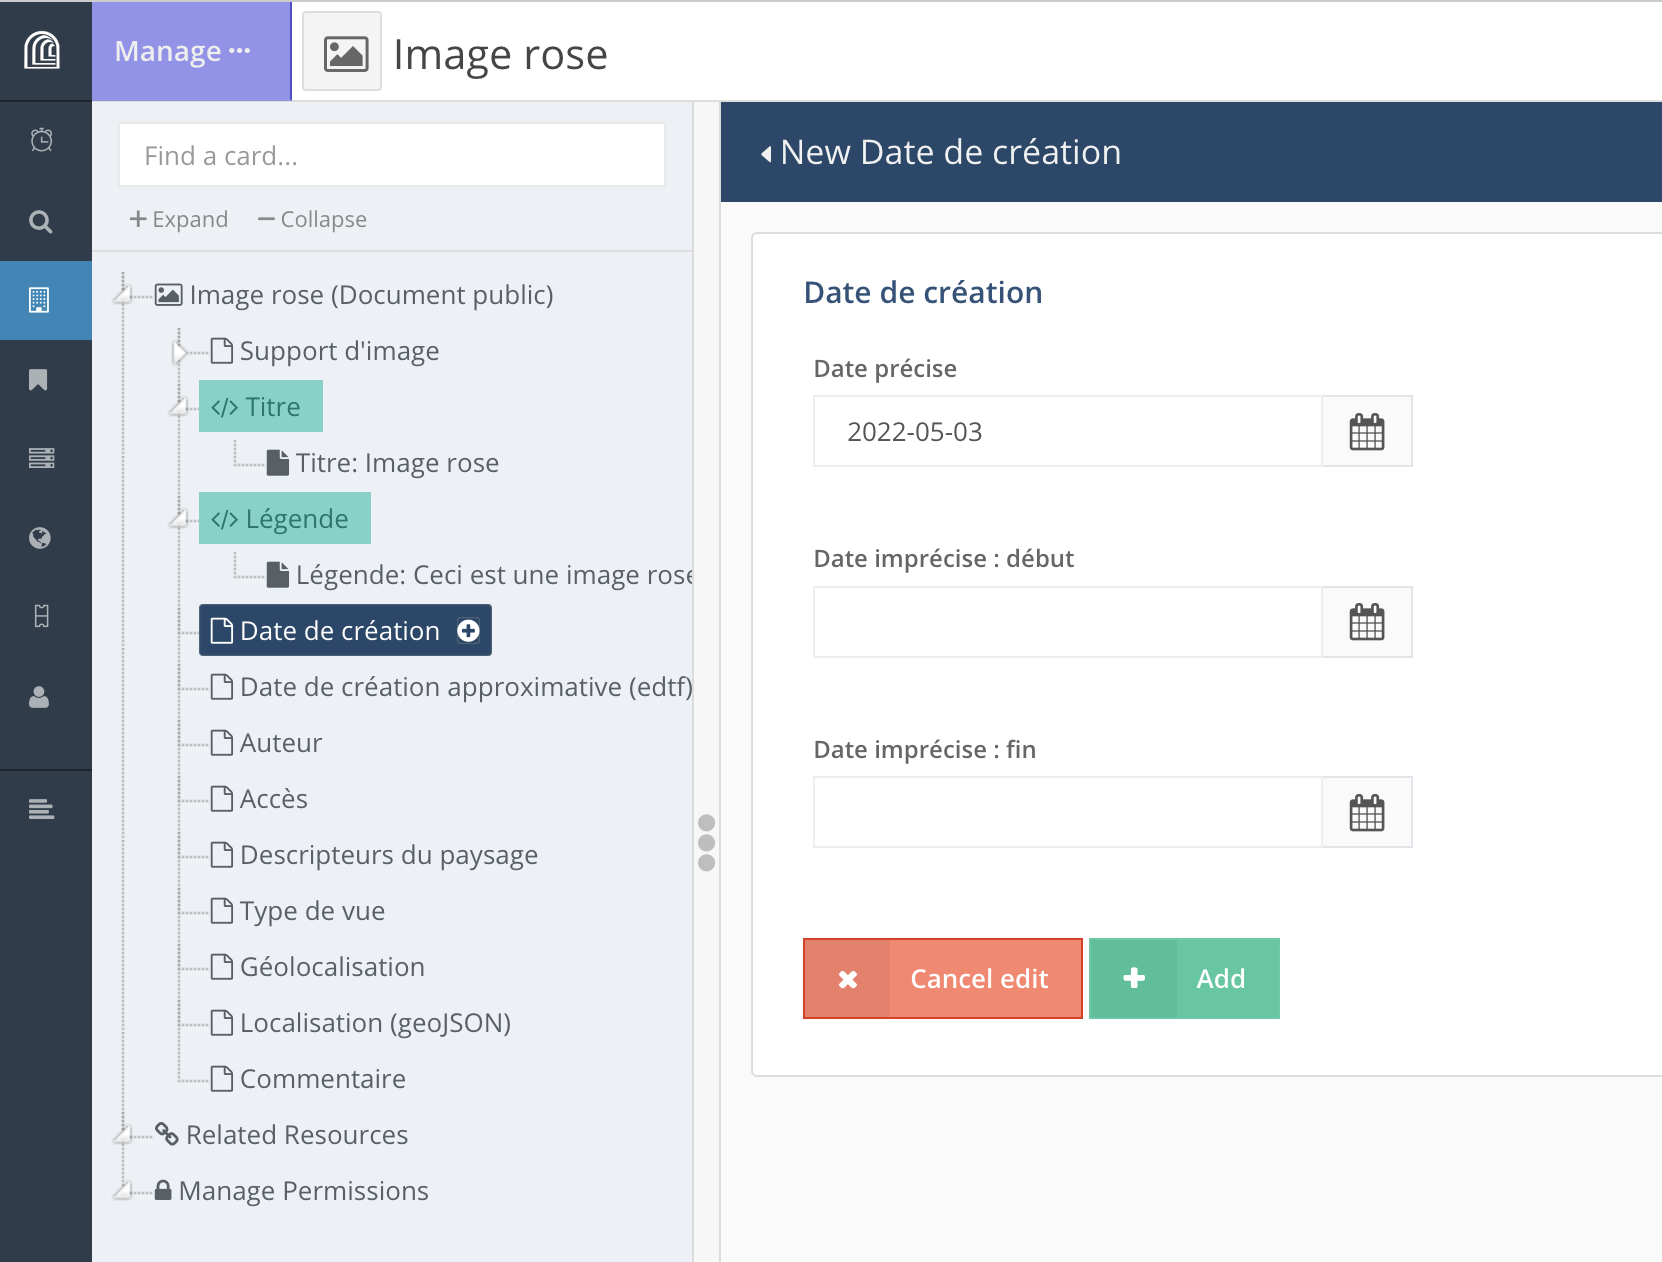](https://wiki.unil.ch/ci/uploads/images/gallery/2023-01/D8Qcap5.png)
Si une valeur a été entrée pour une propriété sans que la saisie ait été validée, la propriété sera surlignée en **jaune**. On peut alors revenir sur la propriété en question et valider la saisie (“*+ Add*”).
[](https://wiki.unil.ch/ci/uploads/images/gallery/2023-01/Aikcap18.png)
Les propriétés affichées en **vert** dans le volet latéral correspondent aux propriétés qui serviront de titre et de description pour la ressource. Ces propriétés qui permettront d’identifier une ressource parmi d’autres résultats de recherche (voir l’exemple ci-dessous).
[](https://wiki.unil.ch/ci/uploads/images/gallery/2023-01/cap4.png)
#### Les formats de données
Les propriétés d’une ressource correspondent à différents formats de données.
##### • **texte brut**
##### • **texte avec mise en forme**
[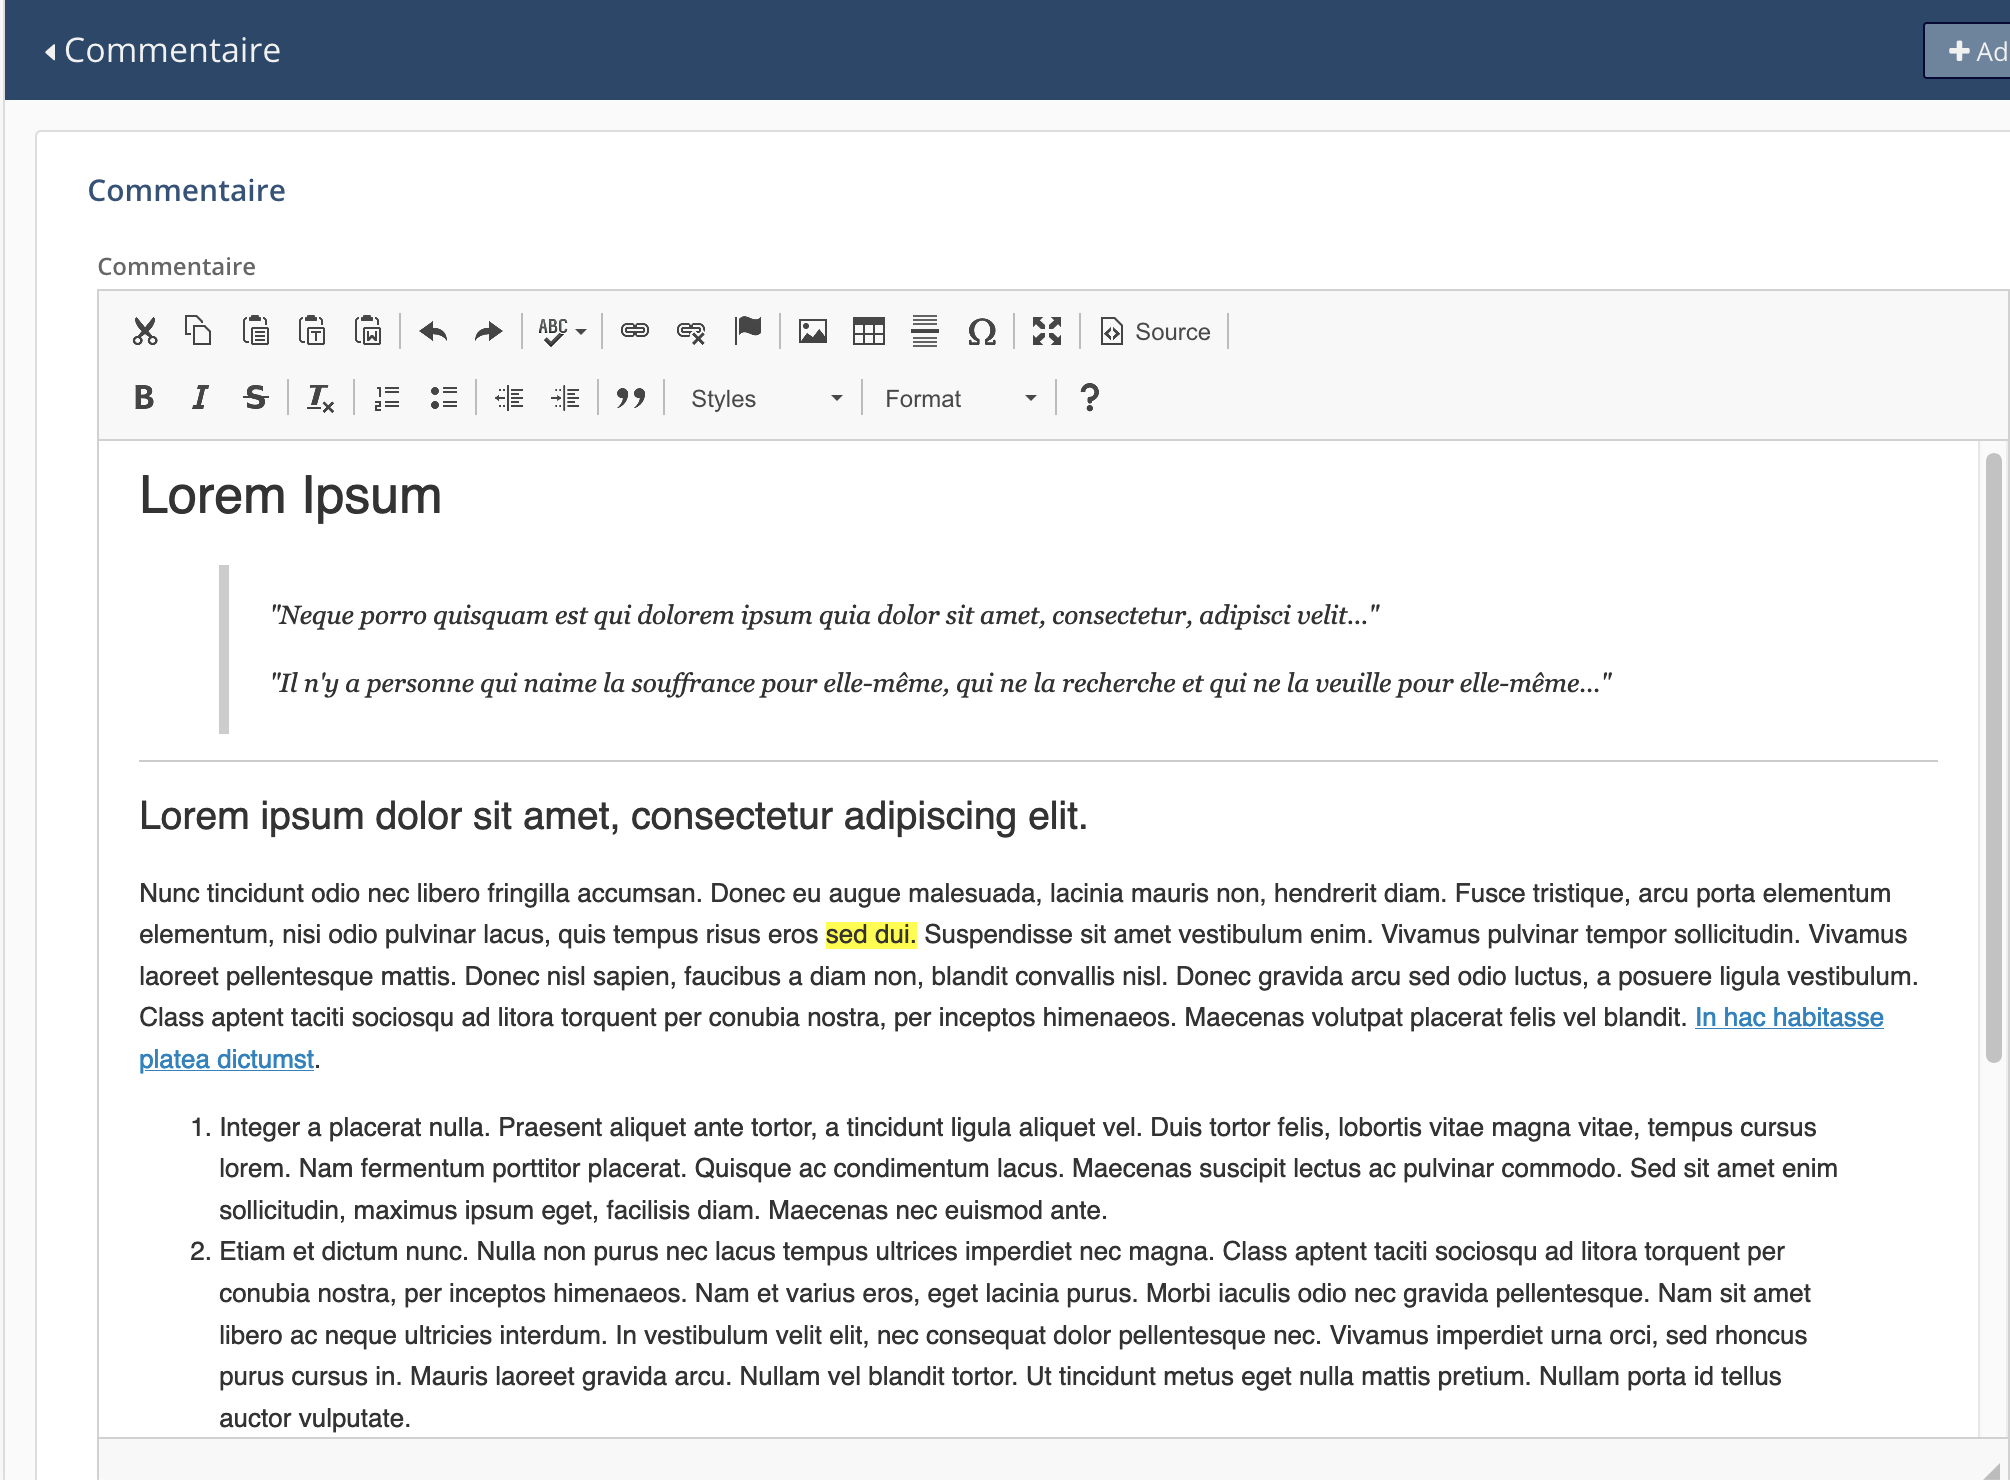](https://wiki.unil.ch/ci/uploads/images/gallery/2023-01/cap6.png)
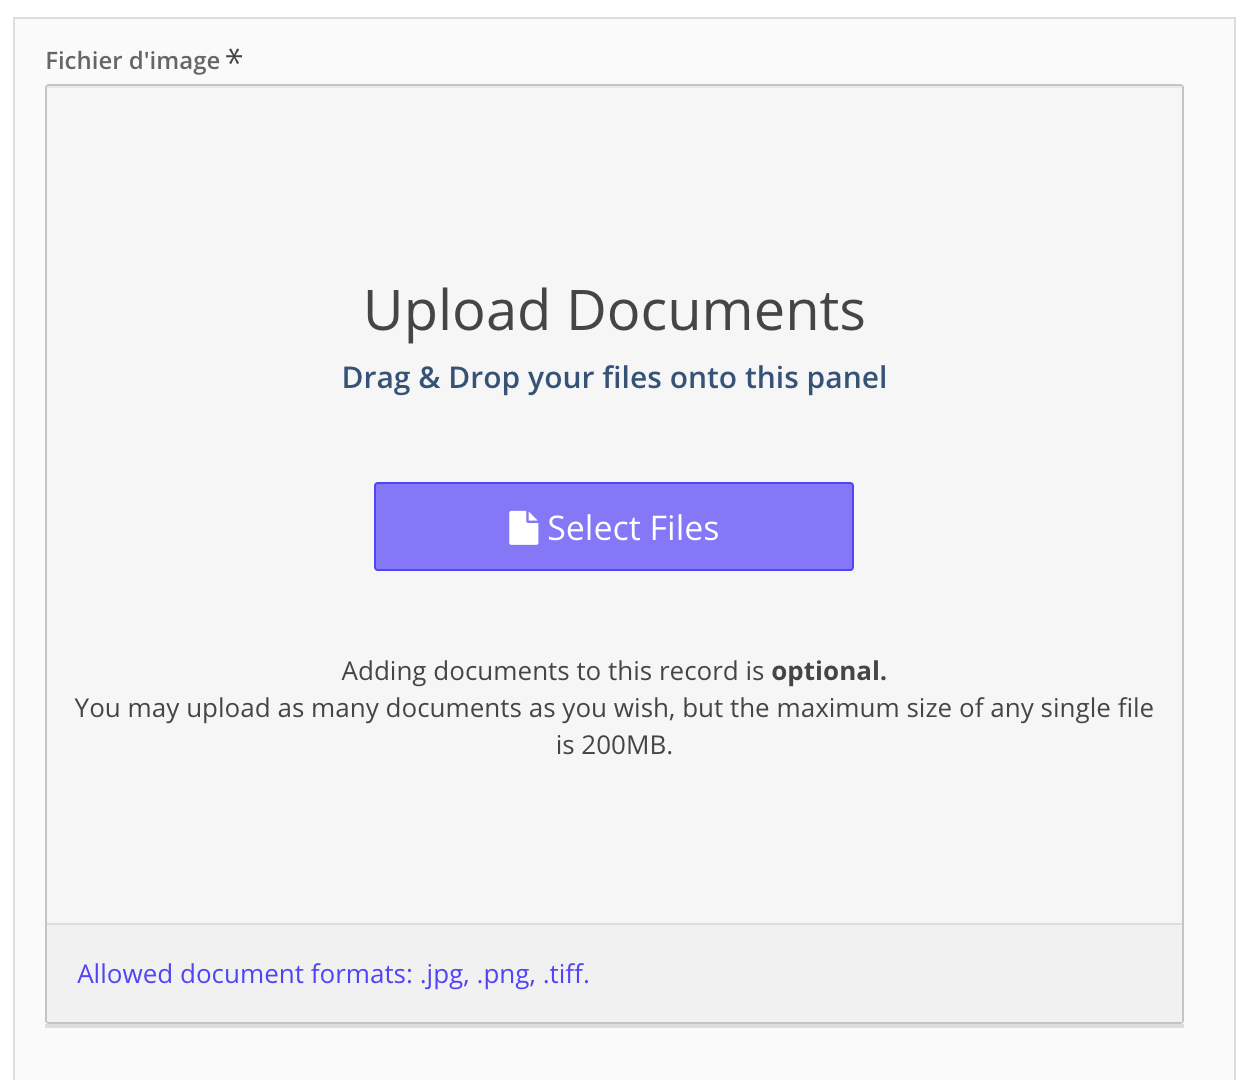
##### • **téléchargement (*upload*) d’un document et/ou d’une image**:
Cliquer-déposer le document ou sélectionner le fichier à télécharger (upload) dans une arborescence de fichiers. Suivre les indications fournies par Arches.
[](https://wiki.unil.ch/ci/uploads/images/gallery/2023-01/cap9.png)
##### • **date**
Les dates sont prises en charge avec différents niveaux de précision:
- date précise
[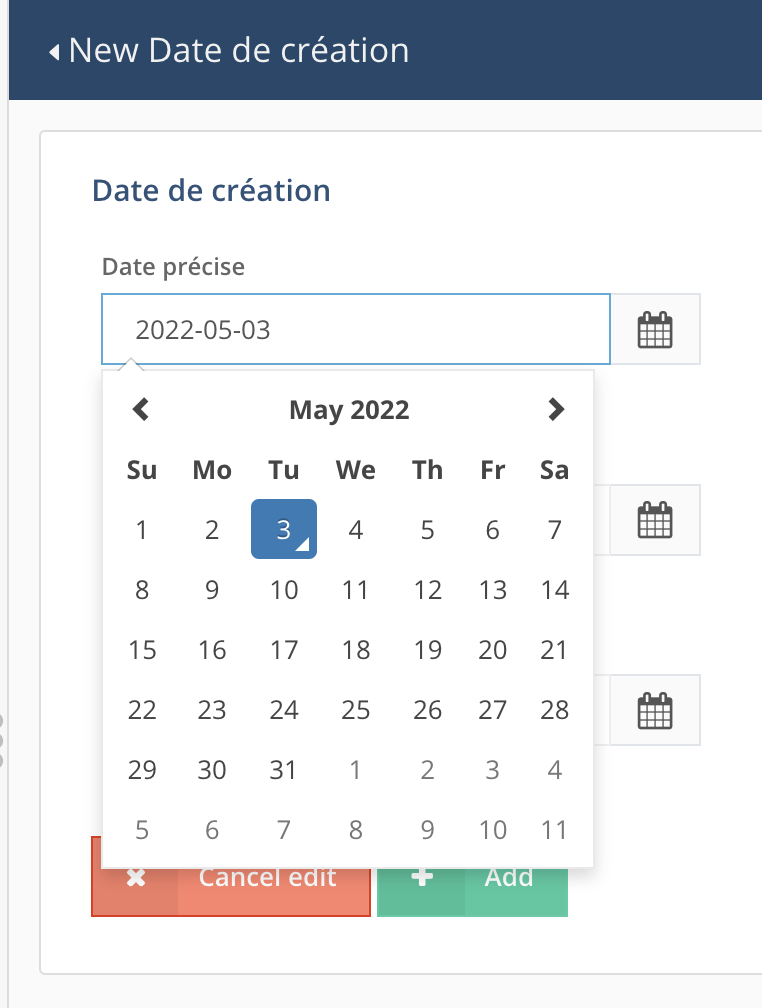](https://wiki.unil.ch/ci/uploads/images/gallery/2023-01/cap7.png)
- date avec une précision affichée de l'ordre du mois ou de l'année
[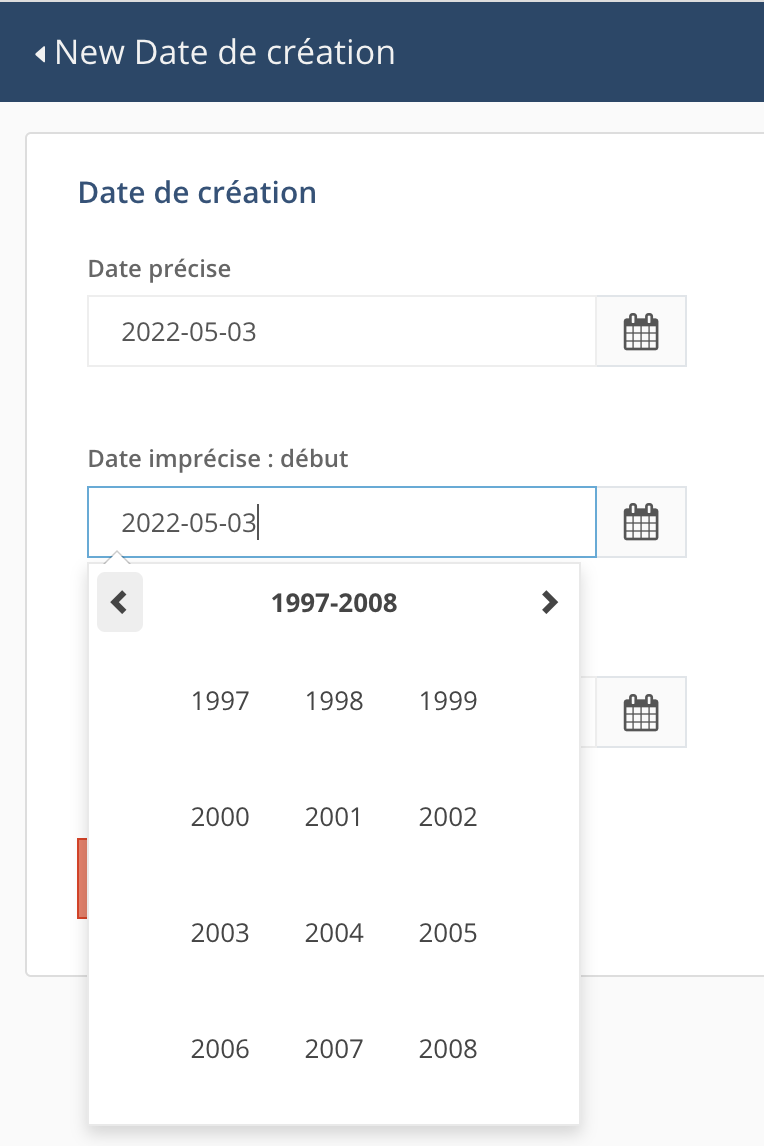](https://wiki.unil.ch/ci/uploads/images/gallery/2023-01/cap8.png)
Dans ces deux cas, on peut utiliser le calendrier pour choisir la date exacte ou entrer la date ou une partie de la date directement dans le champ, ce qui peut faire gagner du temps.
- dates avec une imprécision hétérogène ([Extended Date/Time Format](https://www.loc.gov/standards/datetime/edtf.html)):
- indications de fourchettes chronologiques lorsque la date exacte n’est pas connue: 1960/1971, 1971-06/1971-11, etc.
- les éléments de la date qui ne sont pas connus peuvent être remplacés par un `u` : 20uu-06-17, uuuu-12-11, 1978-uu-15.
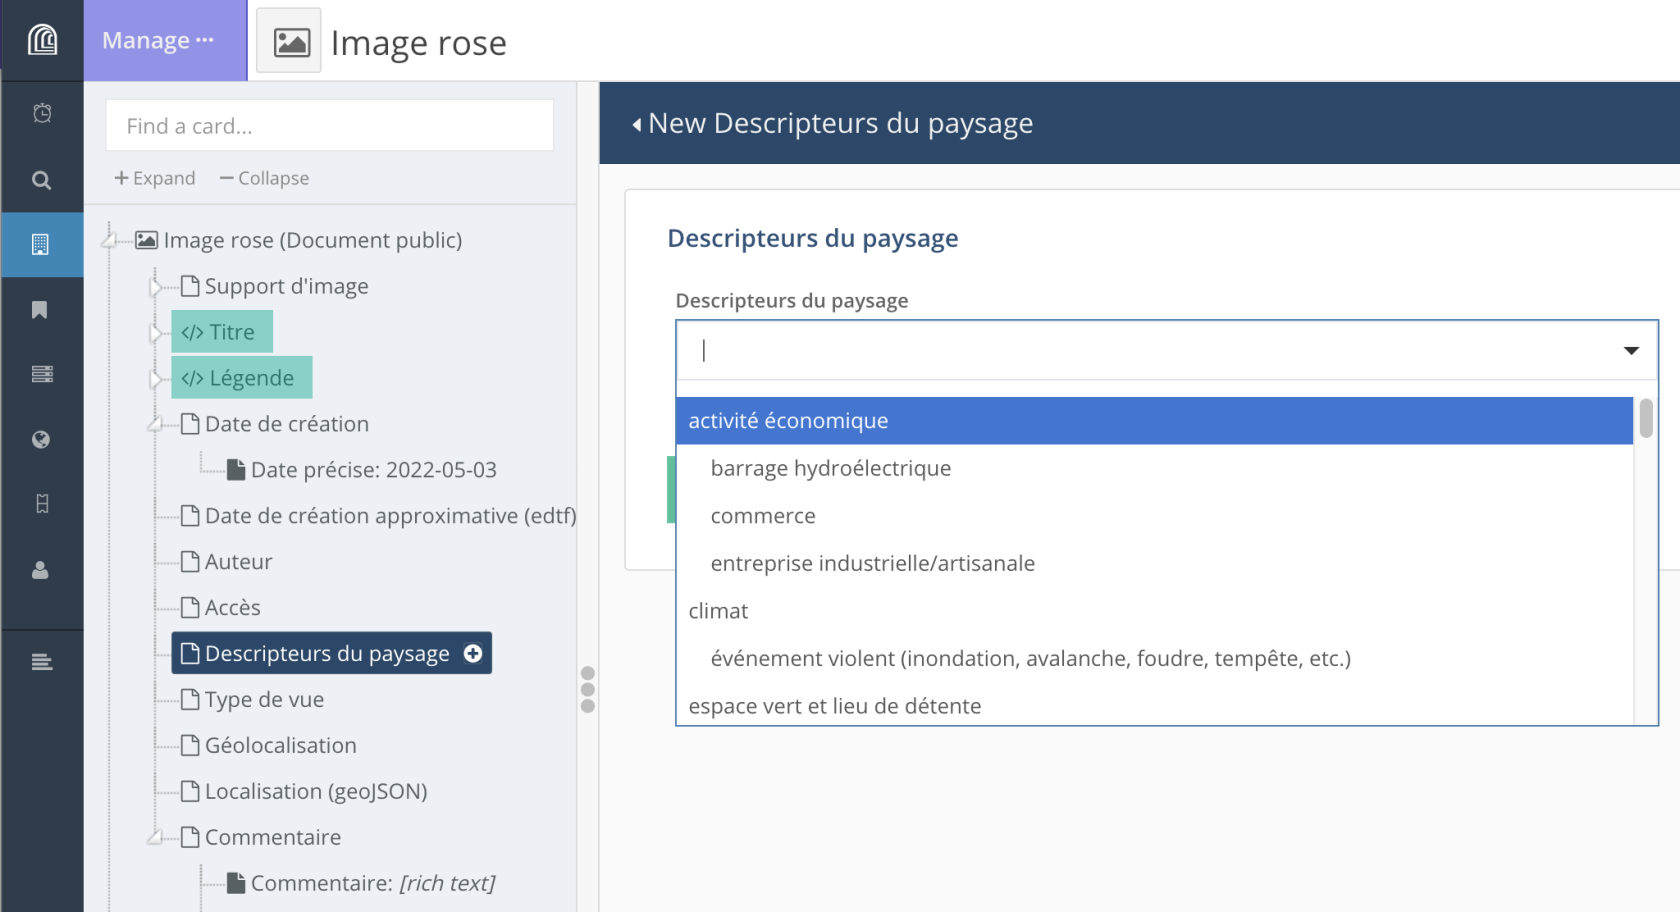
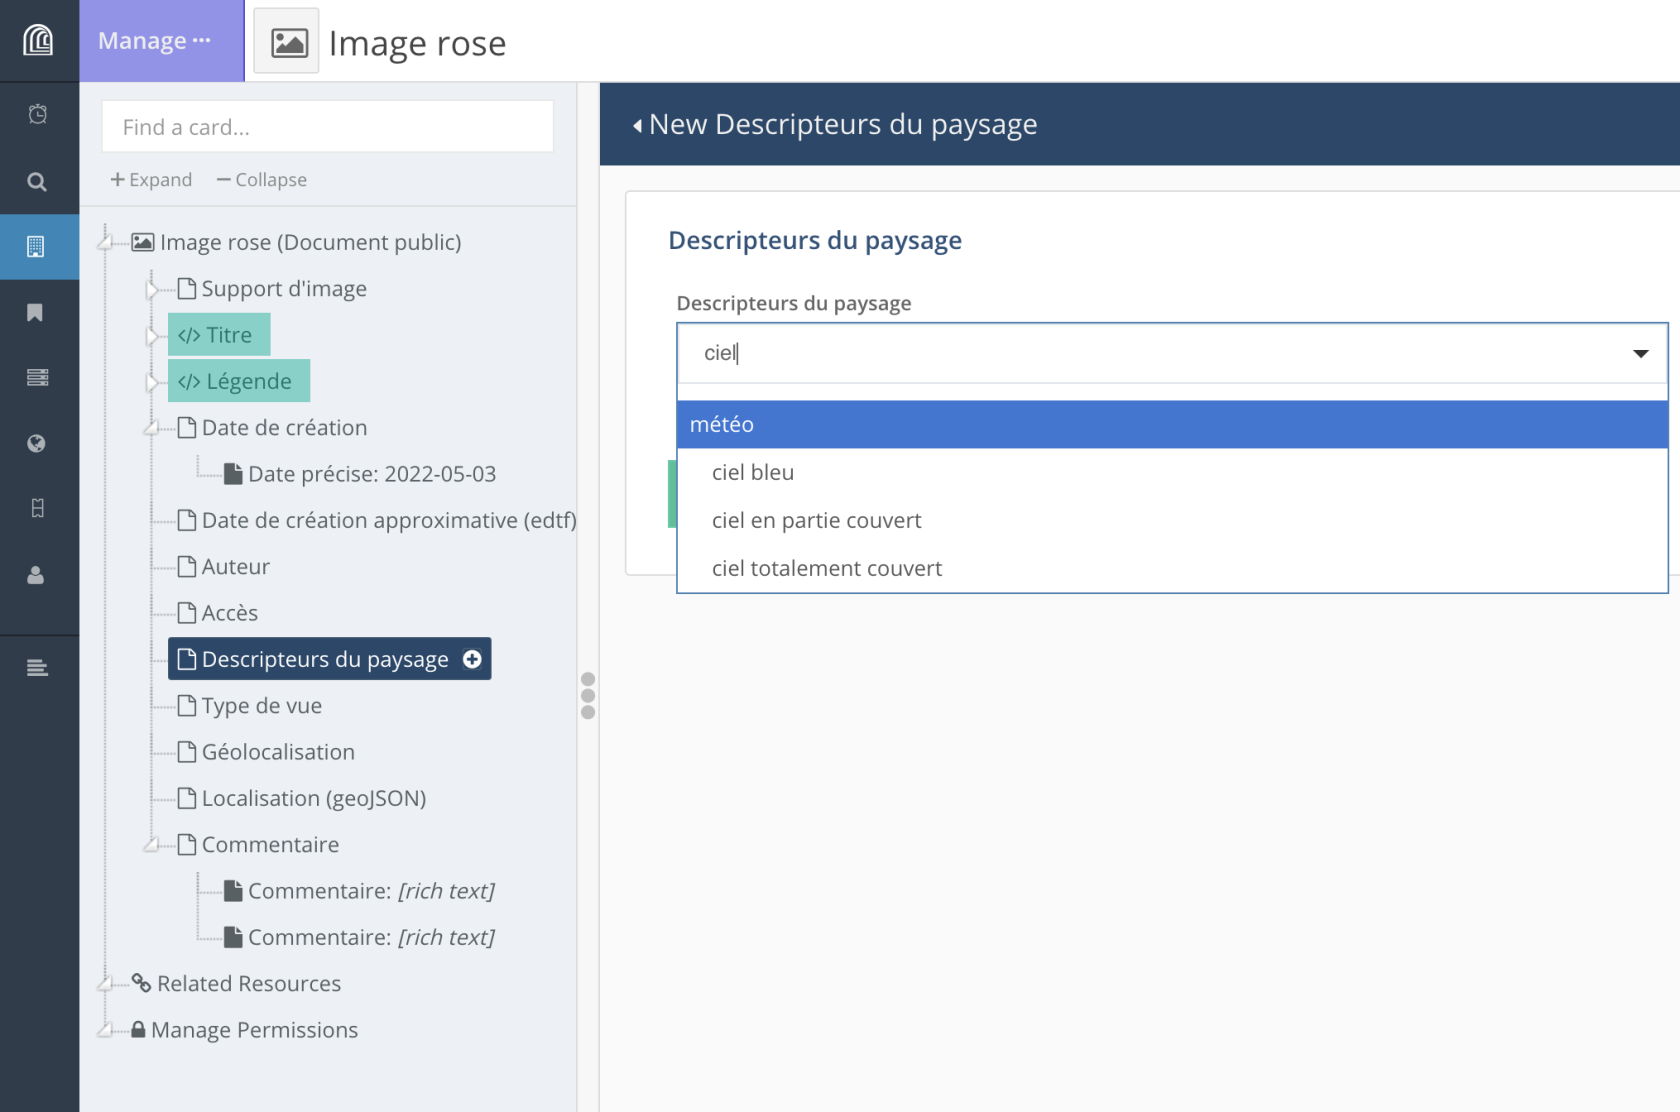
##### • **vocabulaires contrôlés**
Plusieurs types de **vocabulaires contrôlés** (= liste de valeurs, thésaurus) sont pris en charge:
- vocabulaire contrôlé plat
- vocabulaire contrôlé hiérarchique
- thésaurus (SKOS, avec équivalence de terme, multilinguisme, etc.)
Selon les besoins du projet (vocabulaire plat ou hiérarchique, nécessité ou non de faire évoluer le vocabulaire (plat uniquement) en cours de projet), il est possible de choisir l’une ou l’autre manière de gérer ces vocabulaires. Ceux-ci peuvent être affichés sous la forme de cases à cocher ou de listes déroulantes.
Dans le cas de listes déroulantes, l’utilisateur peut faire dérouler l’ensemble de la liste ou entrer les premières lettres du terme recherché.
[](https://wiki.unil.ch/ci/uploads/images/gallery/2023-01/cap10.png)
[](https://wiki.unil.ch/ci/uploads/images/gallery/2023-01/cap11.png)
##### • **URL**
L’utilisateur peut fournir uniquement l’URL ou associer également un texte auquel sera associé le lien hypertexte:
[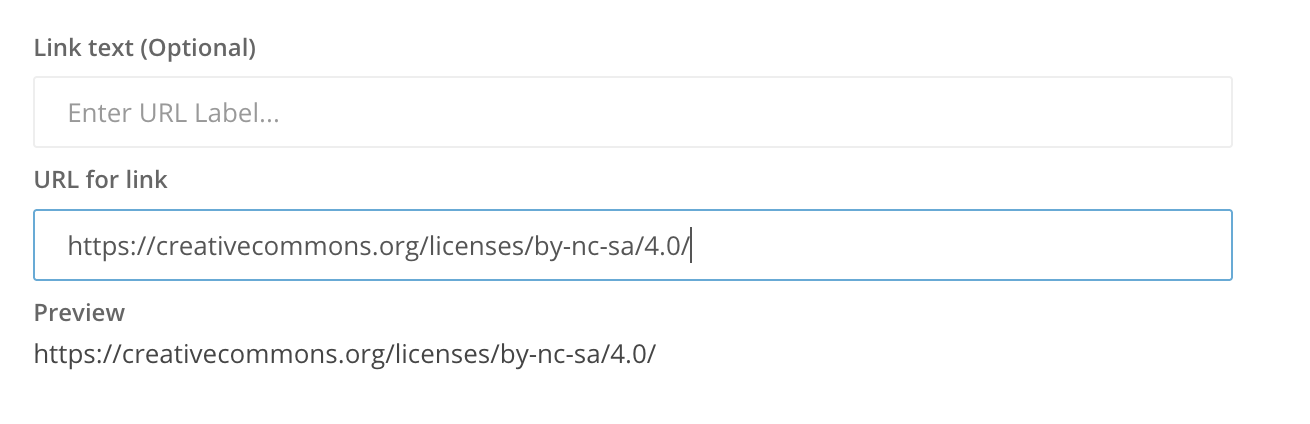](https://wiki.unil.ch/ci/uploads/images/gallery/2023-01/cap12.png)
ou bien :
[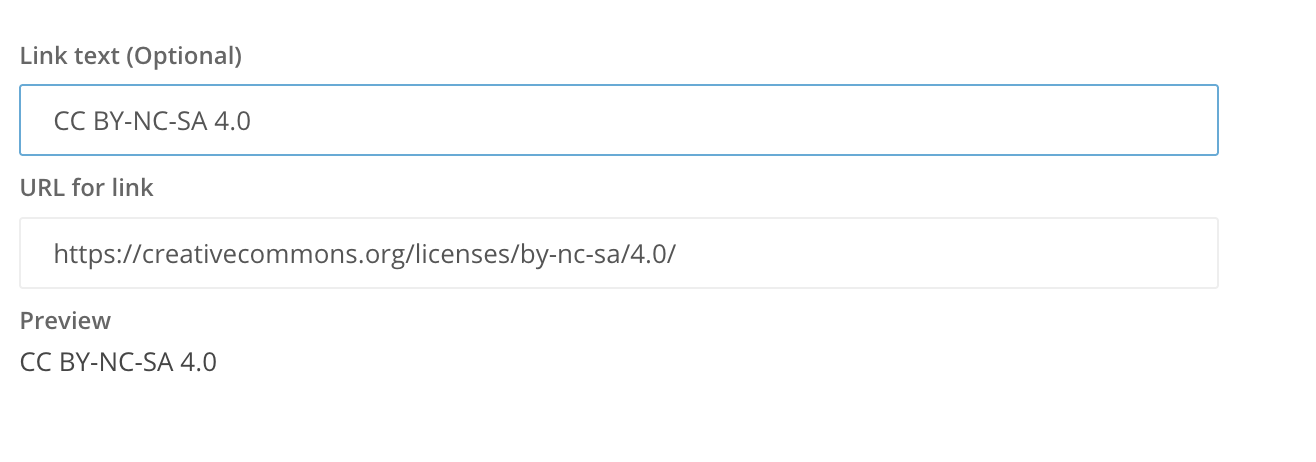](https://wiki.unil.ch/ci/uploads/images/gallery/2023-01/cap13.png)
##### • **lien vers une autre ressource**
Lien vers un autre type (classe) de ressource: en fonction du modèle de données défini pour un projet, il est possible de créer un lien entre deux types de ressource (par exemple un lien entre un “Livre” et un “Auteur”).
[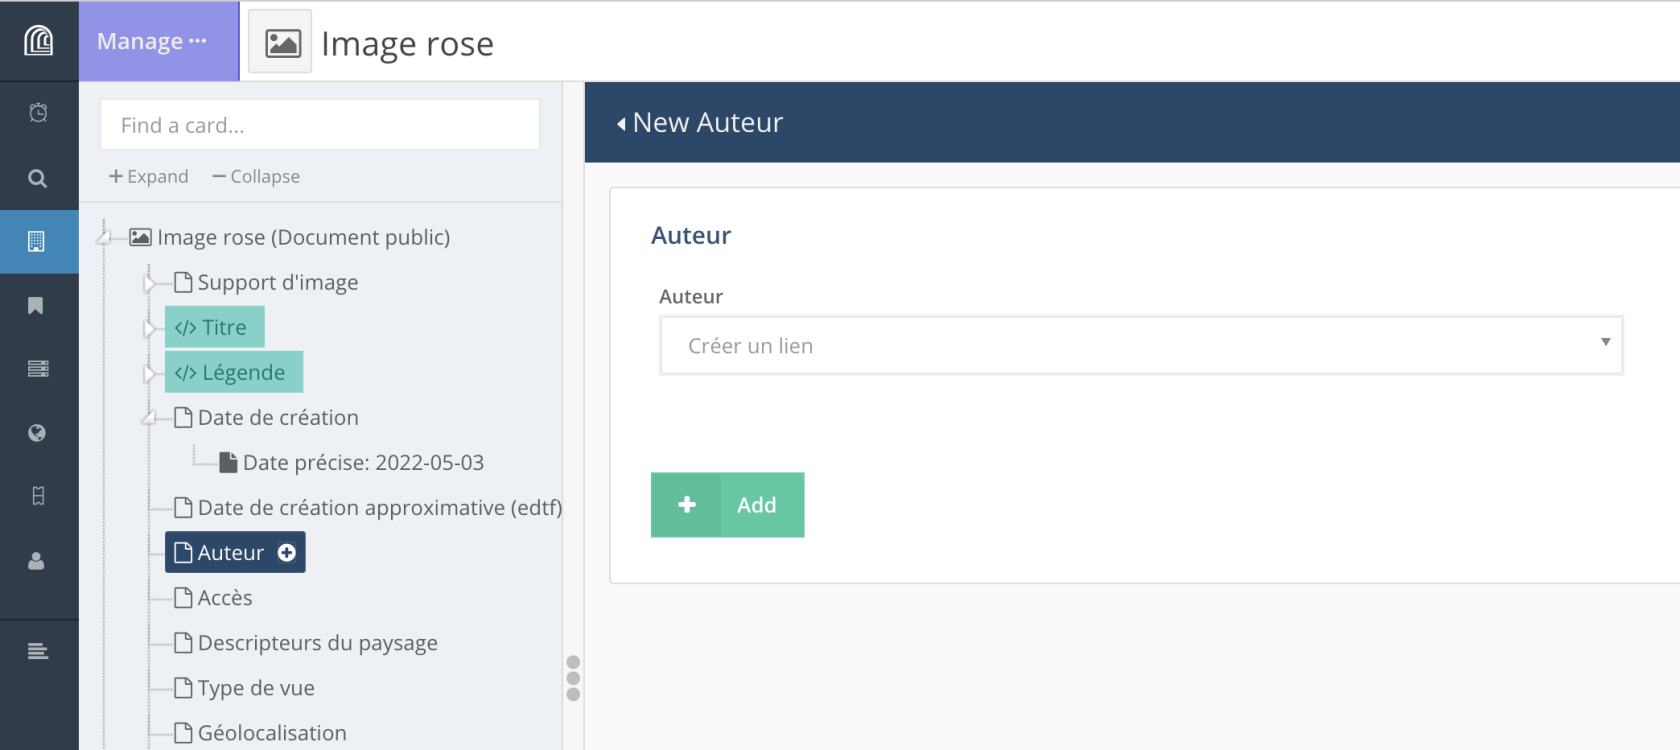](https://wiki.unil.ch/ci/uploads/images/gallery/2023-01/VCocap14.png)
Si la ressource vers laquelle on veut créer un lien existe déjà, on entre quelques lettres correspondant au titre de la ressource ou à l’une de ses propriétés dans le champ correspondant. Arches affiche alors les résultats correspondants.
[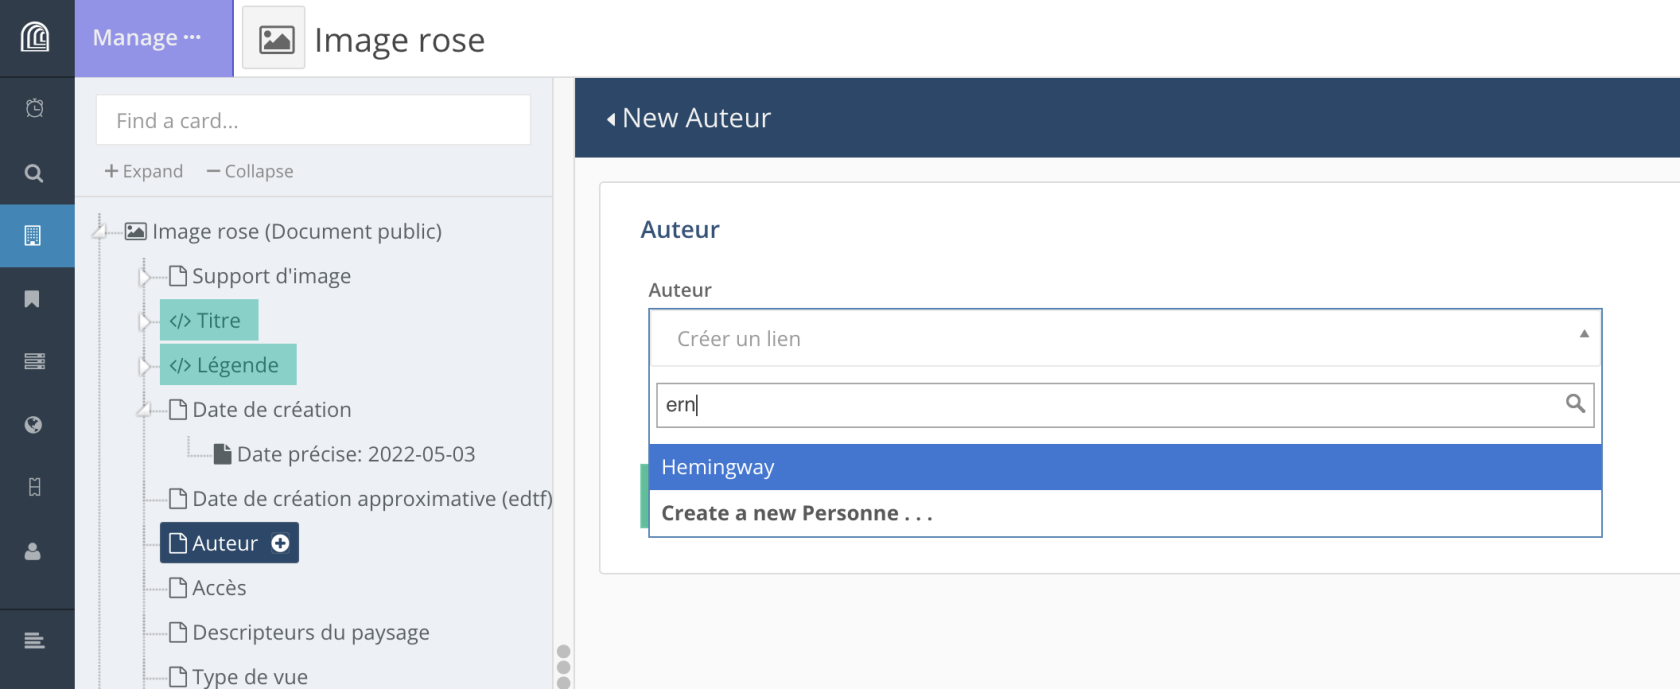](https://wiki.unil.ch/ci/uploads/images/gallery/2023-01/mQ6cap15.png)
Si la ressource n’existe pas, on peut la créer depuis “*Create a new ...*”. Une fois entrée les différents propriétés pour cette ressource, on clique sur “*Return*”.
[](https://wiki.unil.ch/ci/uploads/images/gallery/2023-01/cap16.png)
[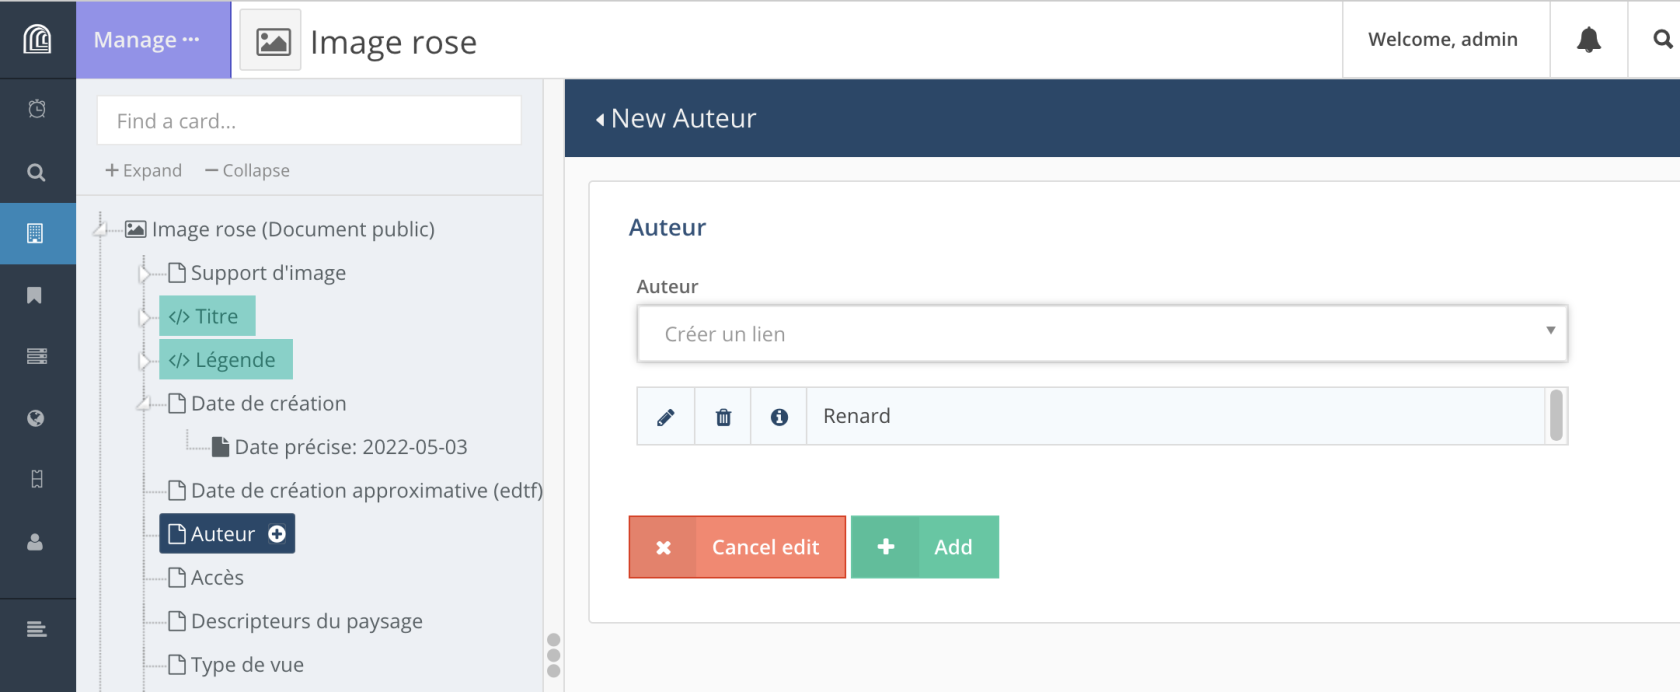](https://wiki.unil.ch/ci/uploads/images/gallery/2023-01/cap17.png)
Le lien est alors créé entre les deux ressources, il ne reste qu’à valider sa création en cliquant sur “*+ | Add*”.
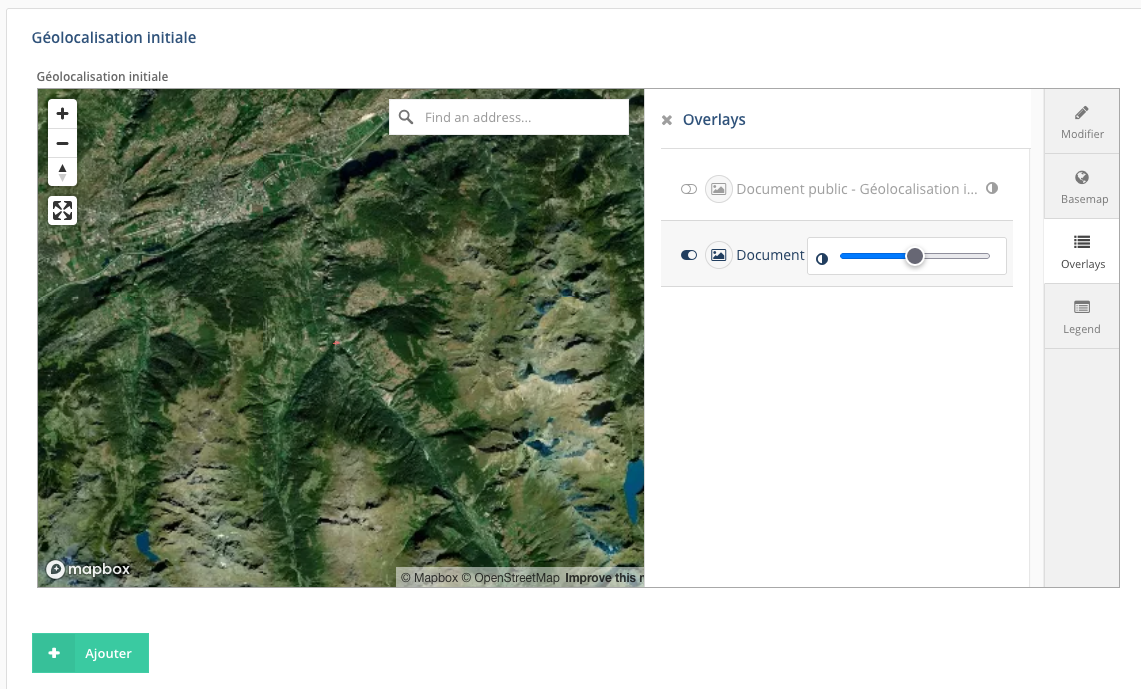
##### • géolocalisation
[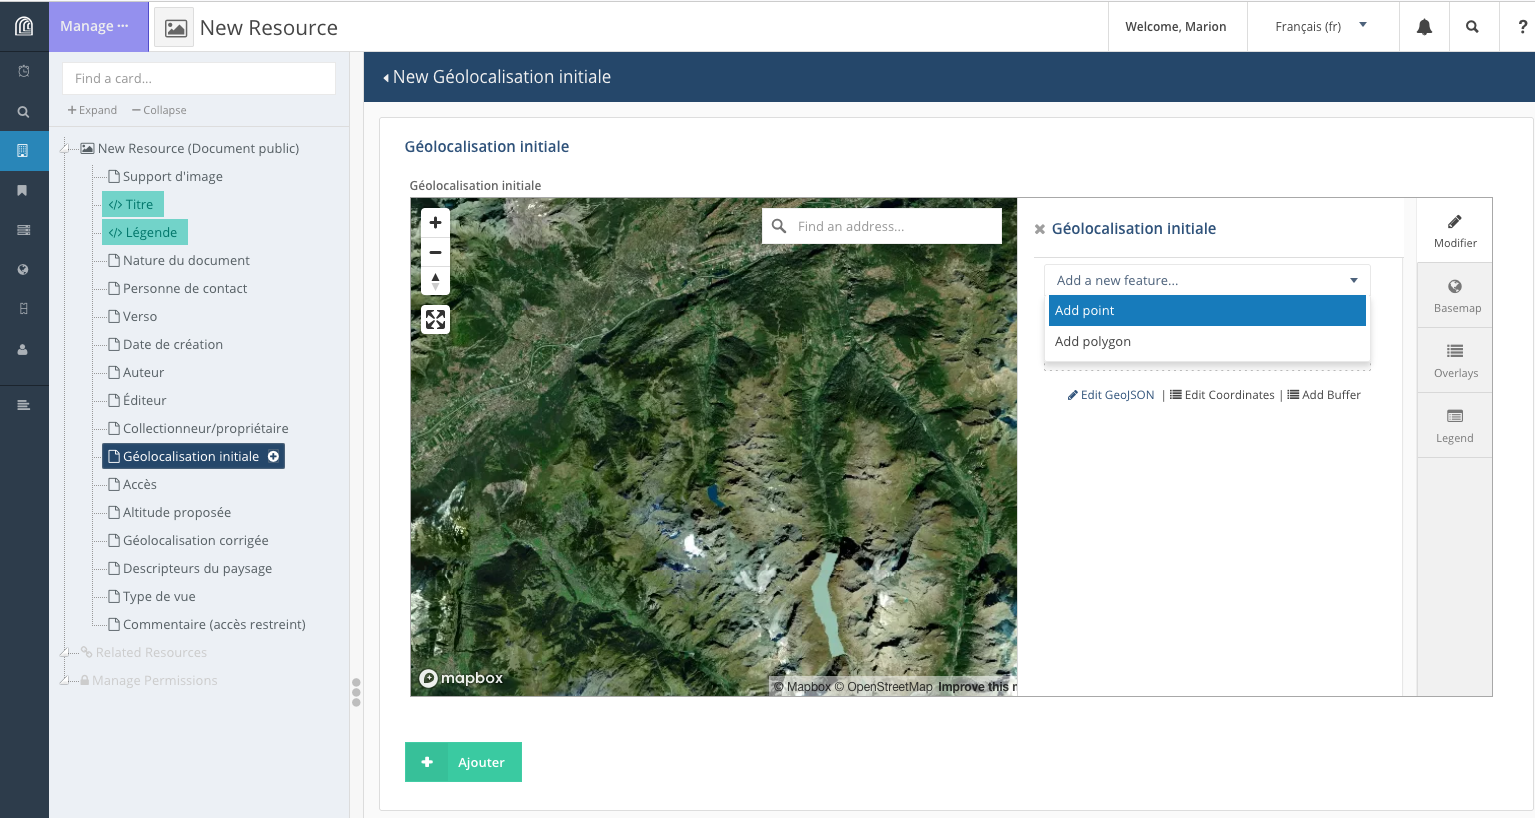](https://wiki.unil.ch/ci/uploads/images/gallery/2023-01/cap22.png)
On peut localiser un élément sur un fond de carte. L’emprise de la carte est normalement définie par défaut pour le projet, tout comme le fond de carte (image satellite ou carte).
Selon la manière dont est paramétrer cette propriété, il est possible de placer sur la carte un point, une ligne ou un polygone via le menu “*Add new feature*”.
L’utilisateur peut modifier le fond de carte à partir du menu latéral, onglet “*Basemap*” et sélectionner celui qui lui convient.
À partir du même menu, l’onglet “*Overlays*” permet à l’utilisateur d’afficher les éléments déjà localisés pour les différentes types de ressources: on peut afficher/cacher ces éléments et régler leur niveau de transparence lorsqu’ils sont affichés (icône placée à droite du nom de la propriété).
[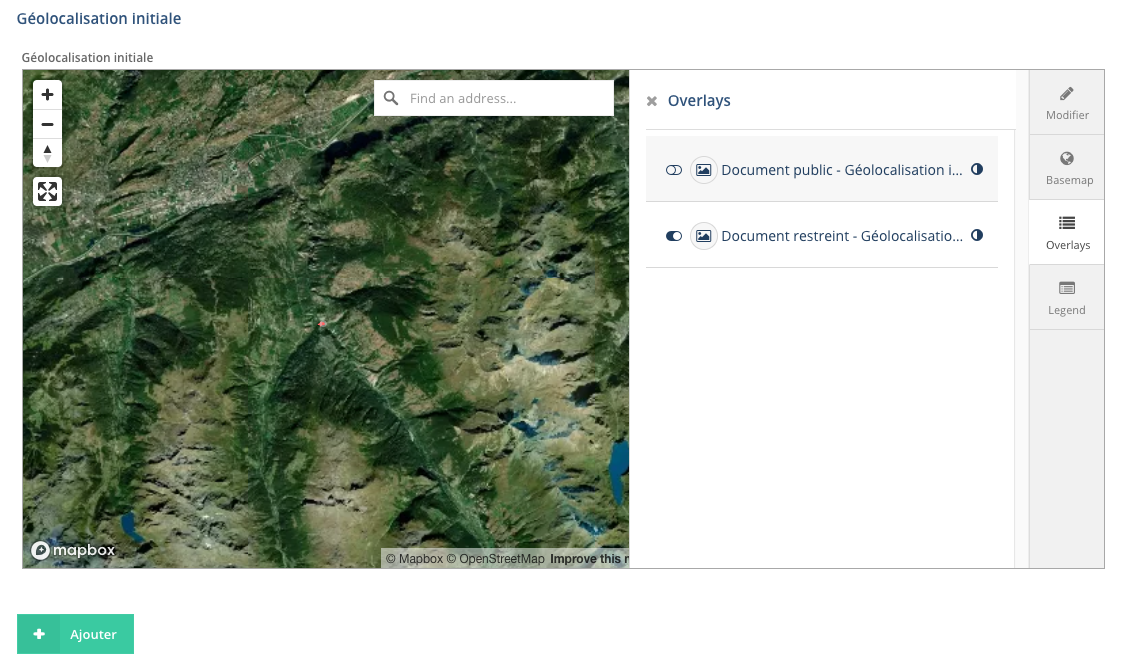](https://wiki.unil.ch/ci/uploads/images/gallery/2023-01/BUTcap23.png)
[](https://wiki.unil.ch/ci/uploads/images/gallery/2023-01/llWcap24.png)
#### Édition d’une ressource
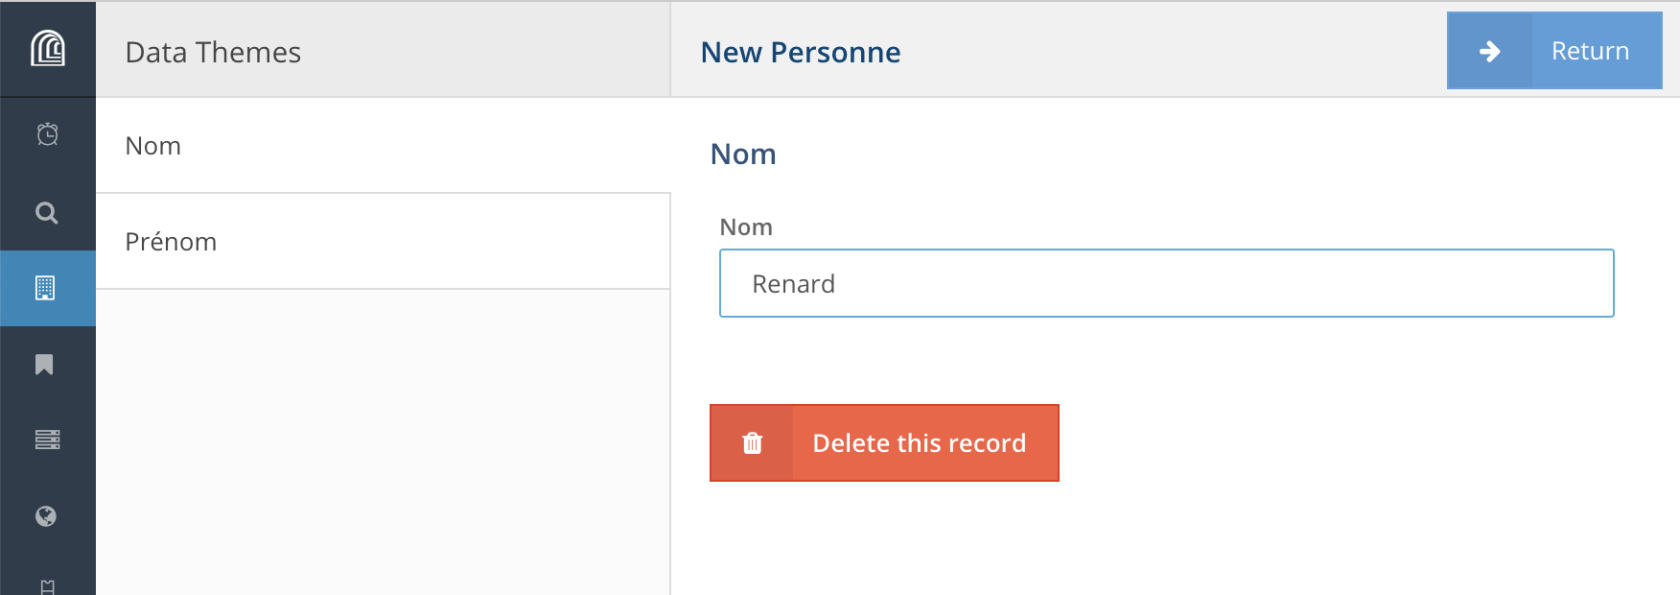
Depuis la page de la ressource, en haut à droite, sélectionner l’icône “crayon” (=“*Edit Resource*”).
[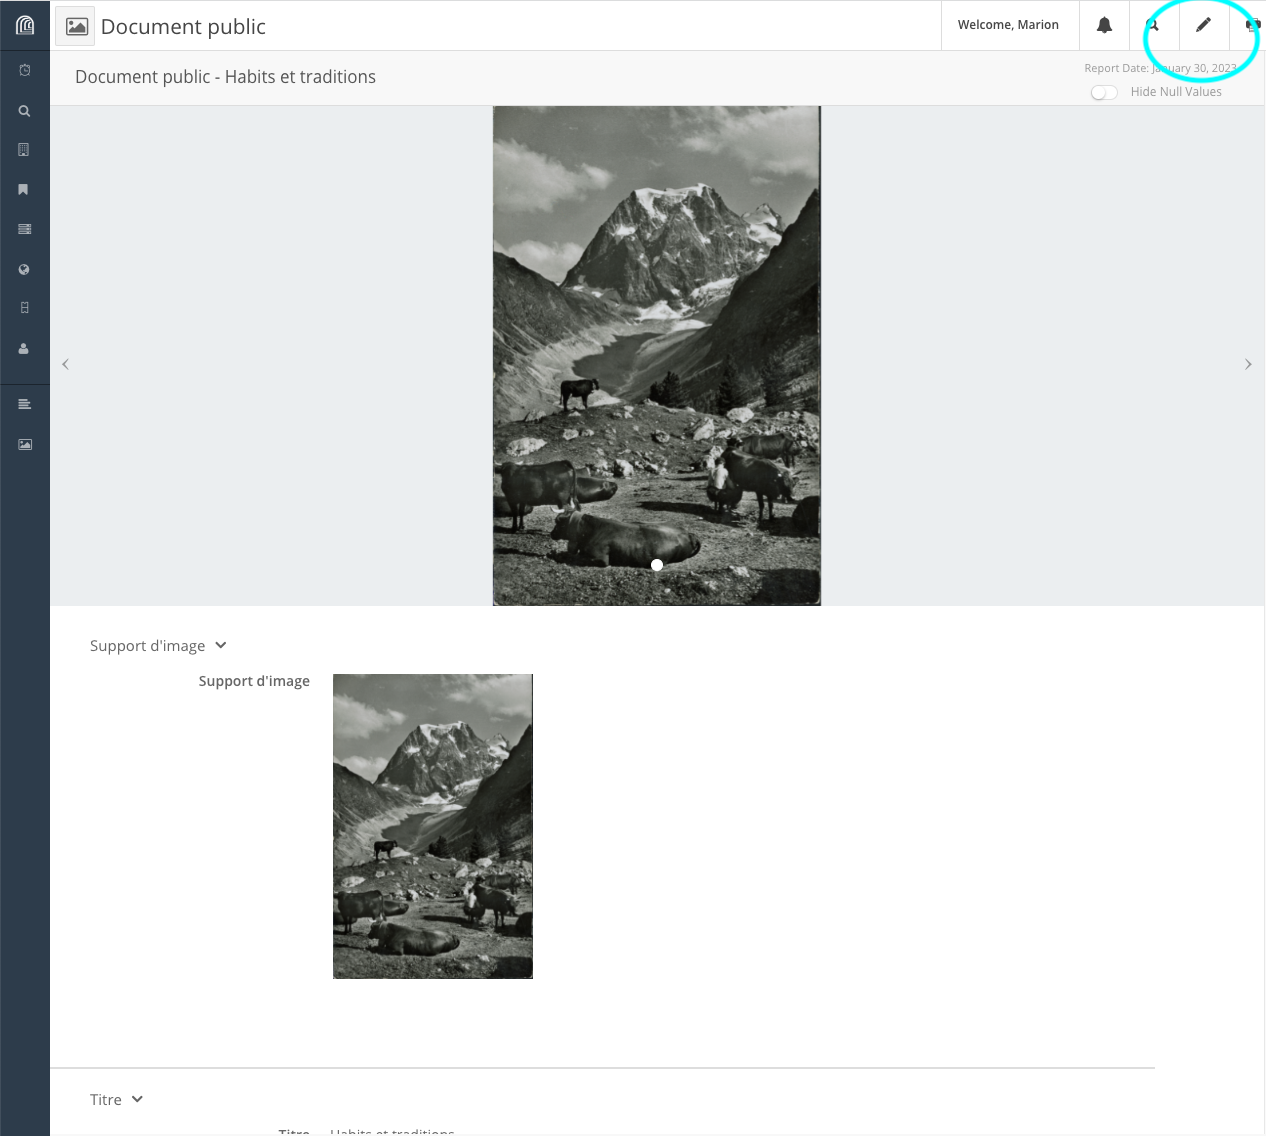](https://wiki.unil.ch/ci/uploads/images/gallery/2023-01/edit1a.png)
Et puis pour éditer chaque propriété, choix entre l’icône “crayon” (=édition) ou “poubelle” (= suppression).
[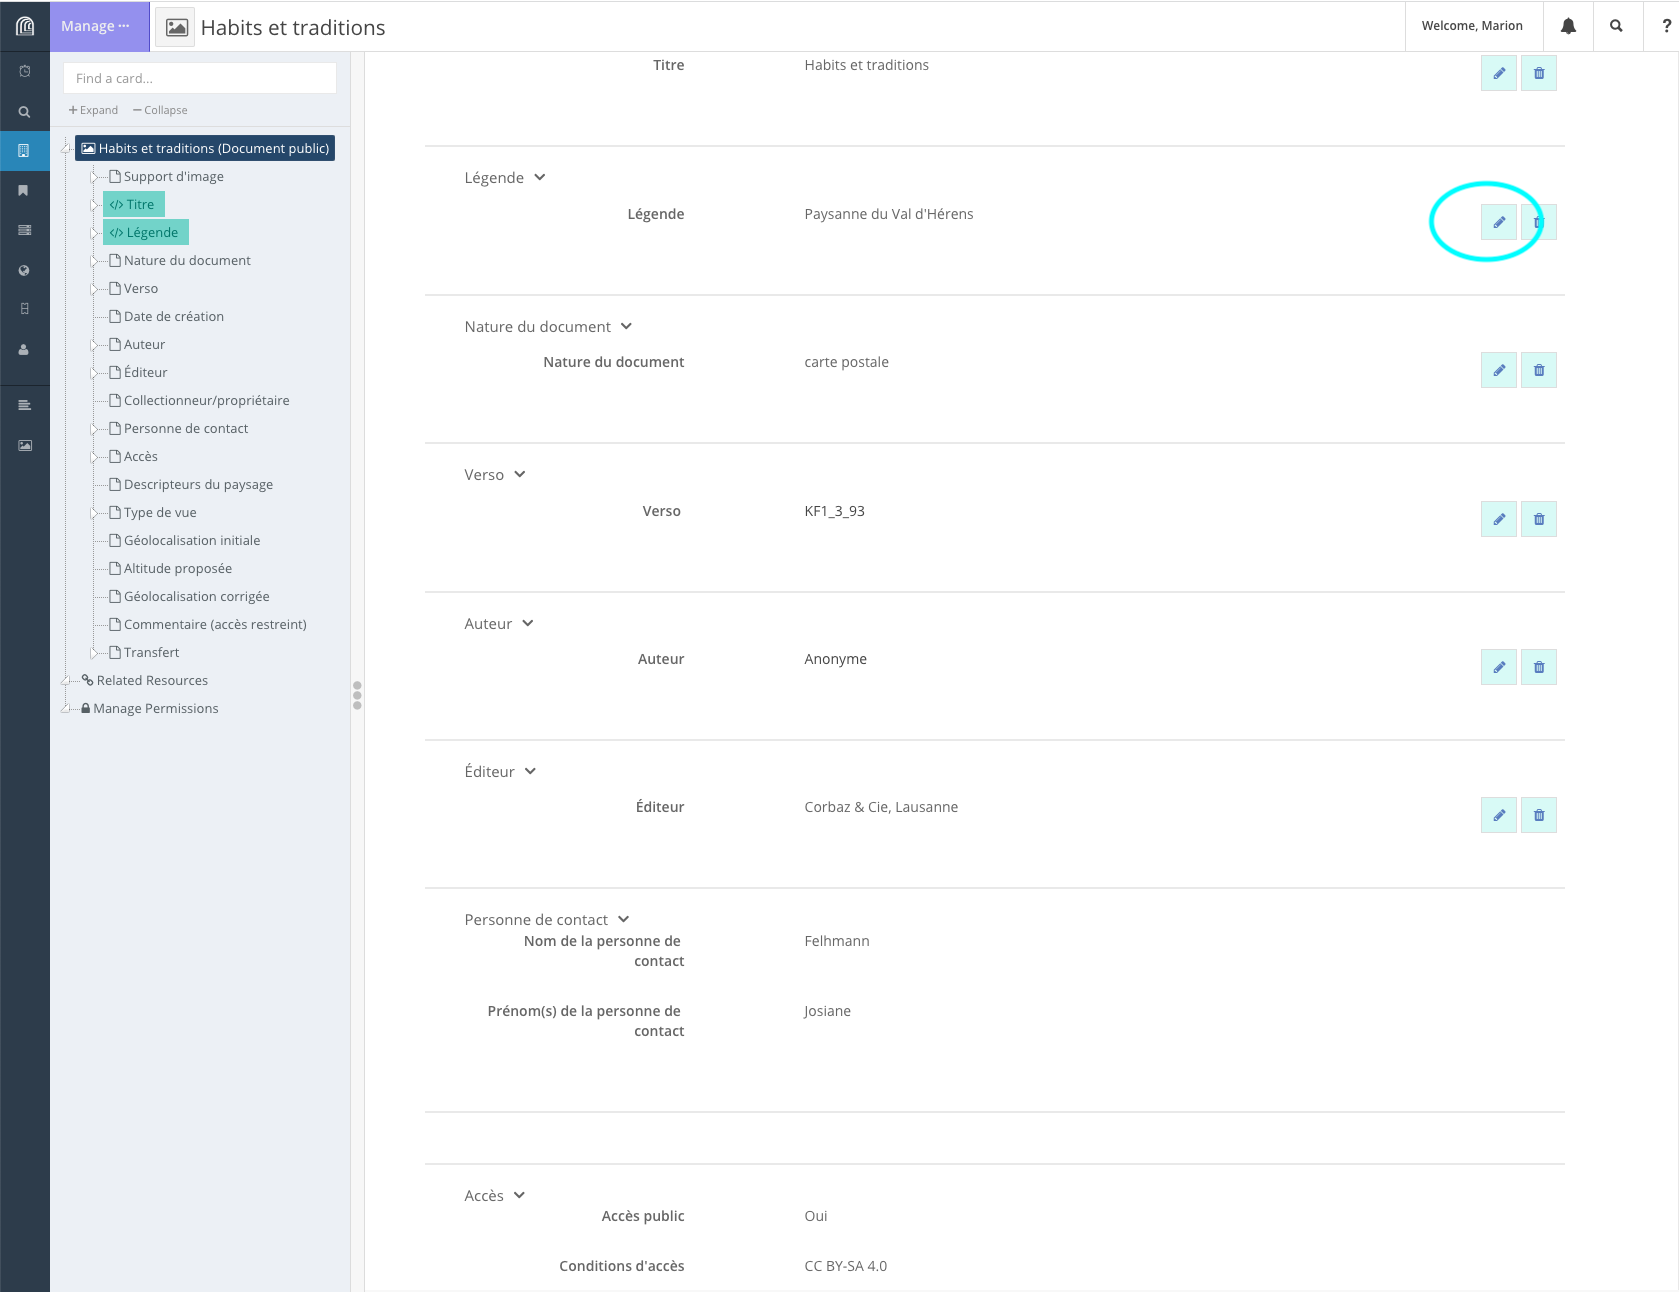](https://wiki.unil.ch/ci/uploads/images/gallery/2023-01/edit1b.png)
Si aucune valeur n'a été entrée pour une propriété et que vous souhaitez en ajouter une, il faut sélectionner directement la propriété dans la partie latérale gauche.
[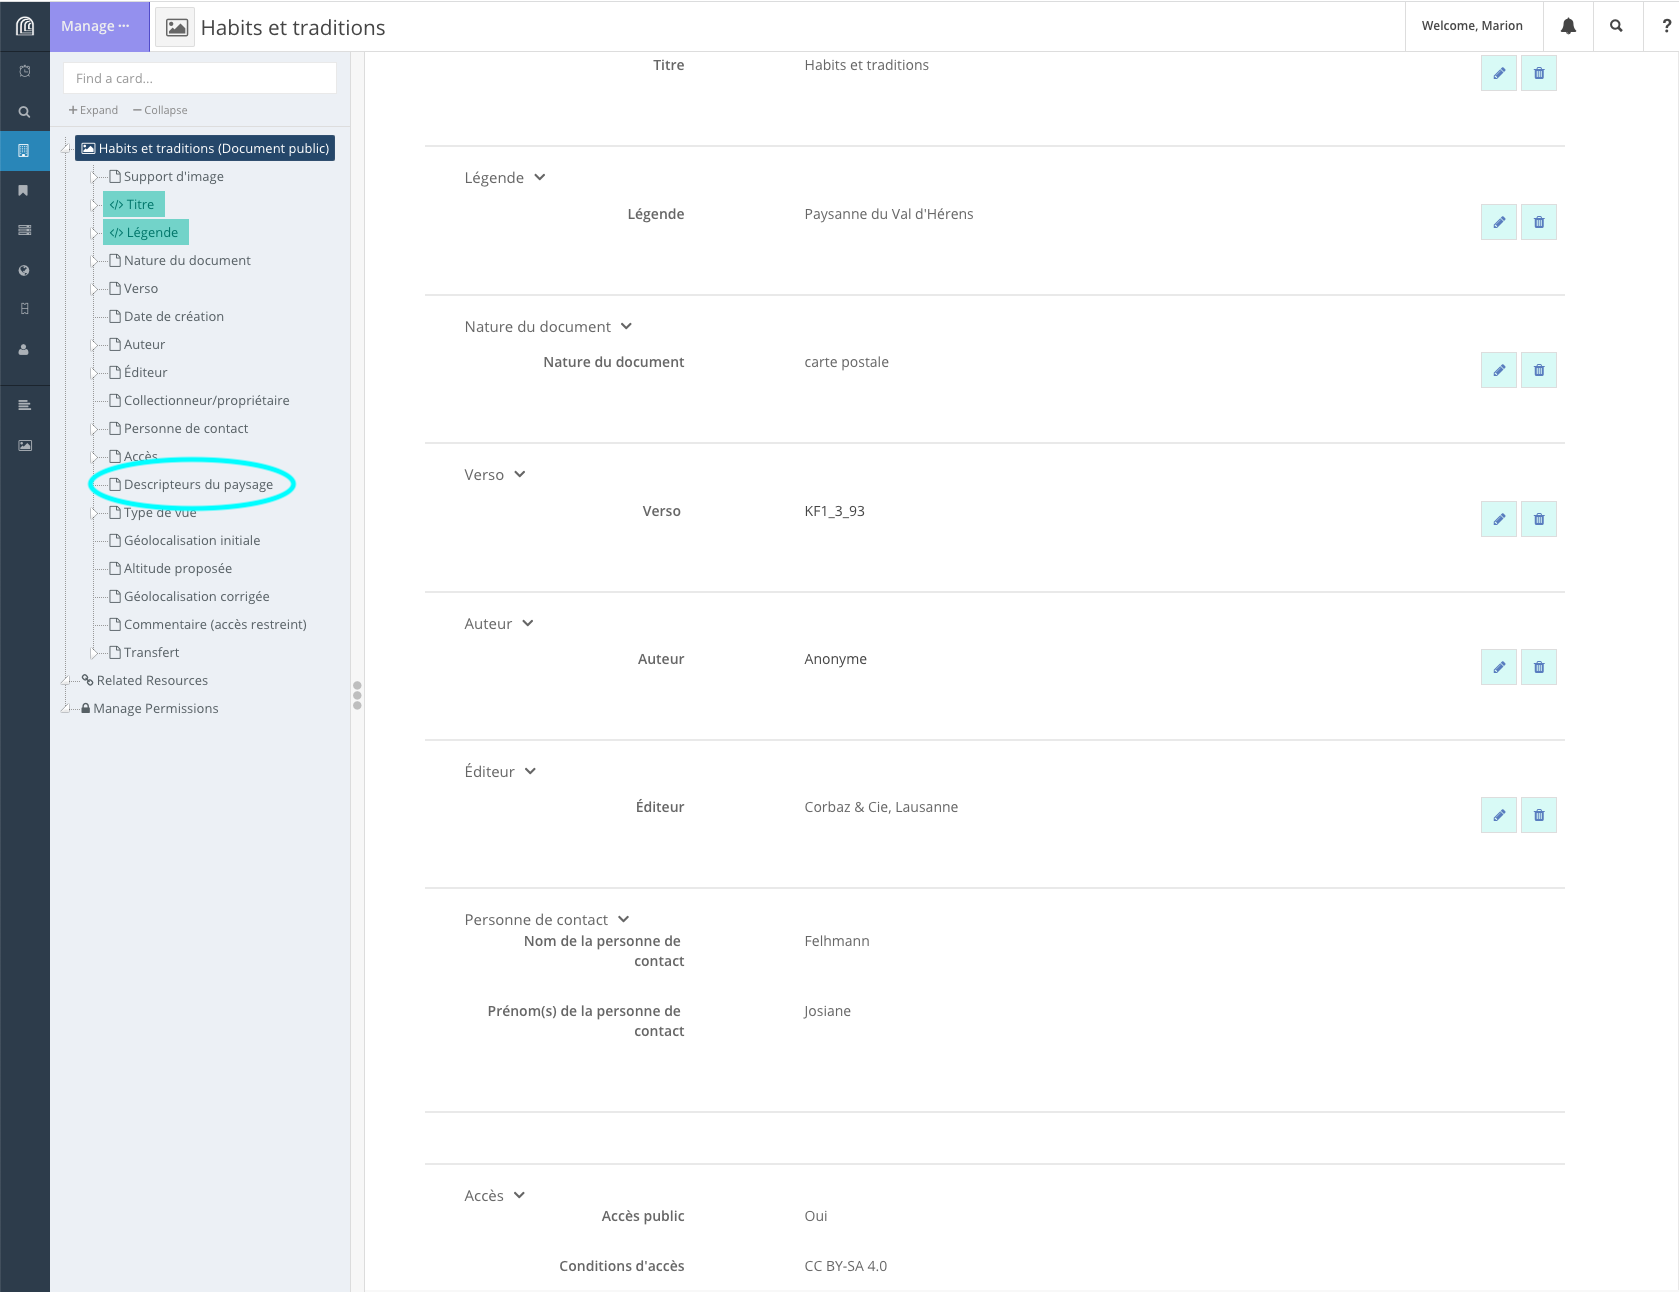](https://wiki.unil.ch/ci/uploads/images/gallery/2023-01/edit1b-copie.png)
Après avoir entré une nouvelle valeur dans le champ de la propriété, l’utilisateur a le choix entre “*Delete this record*”, “*x Cancel edit*” et “*+ Save edit*”.
#### Suppression d’une ressource
Depuis la page de la ressource, en haut à gauche menu “*Manage ···*” > “*Delete Resource*”.
[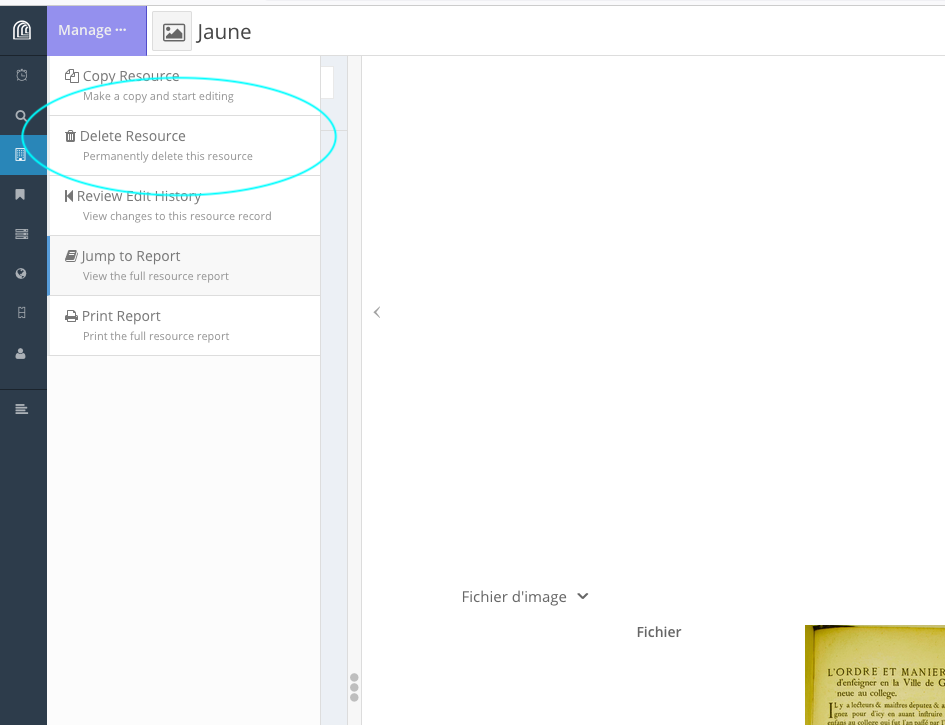](https://wiki.unil.ch/ci/uploads/images/gallery/2023-01/cap19.png)
### Modification des permissions associées à une ressource
Pour **chaque ressource**, il est possible de paramétrer des permissions spécifiques: “*Manage permissions*” en bas de l’onglet latéral, quand on est en cours d’édition de ressource, quand l’utilisateur possède le statut “*Superuser*”.
[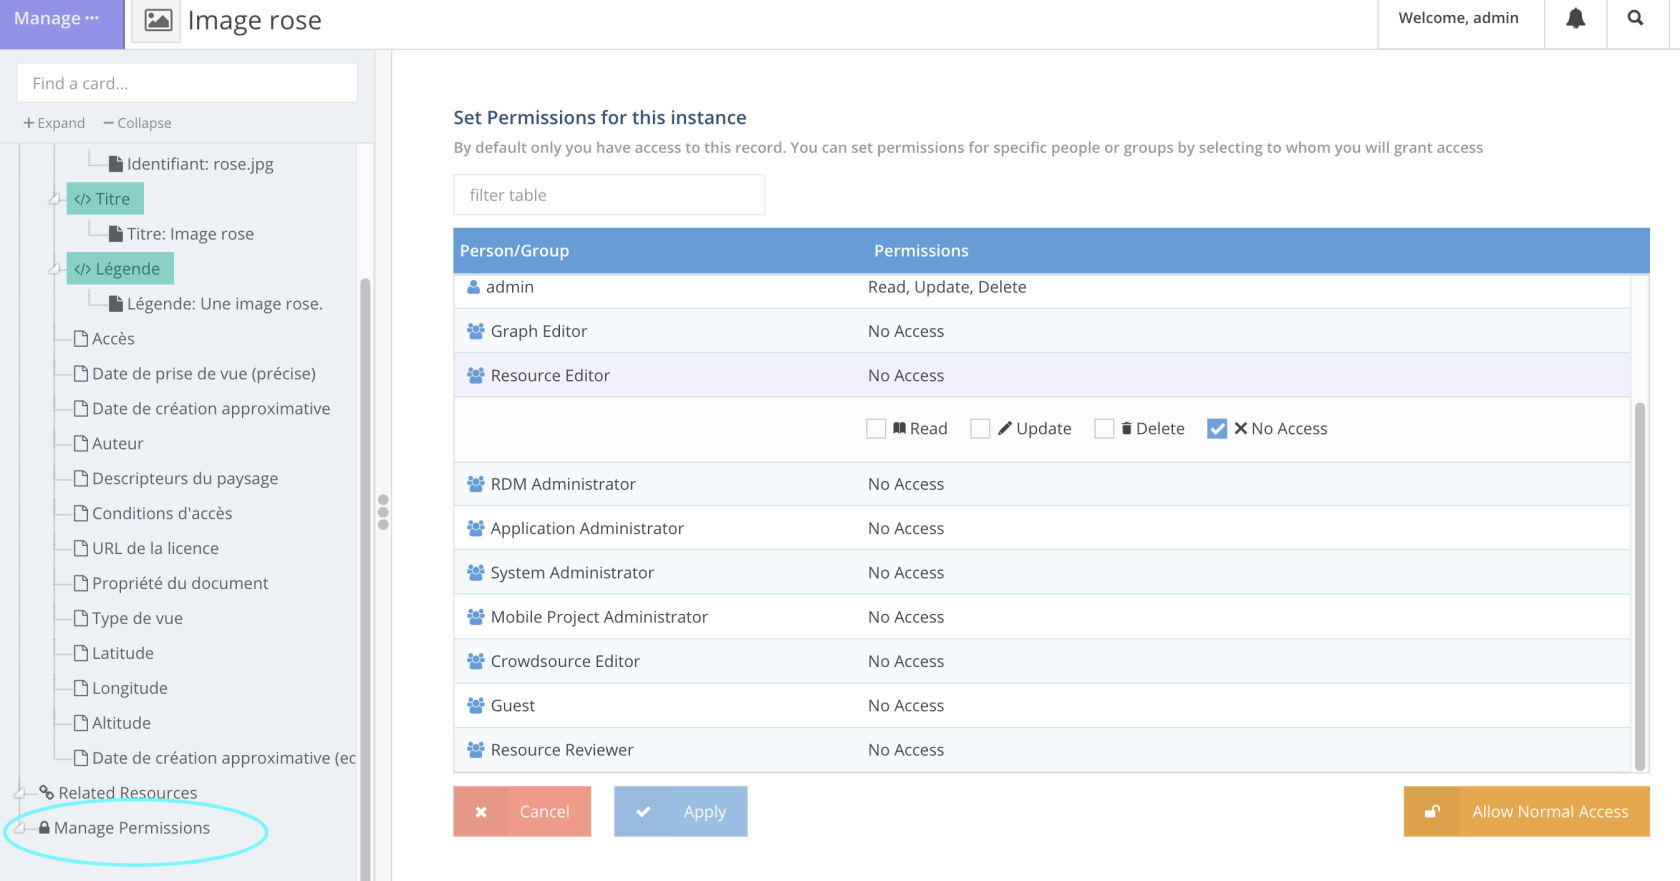](https://wiki.unil.ch/ci/uploads/images/gallery/2023-01/cap39.png)
Si l’utilisateur veut changer les permissions attribuées par défaut à la ressource, dès qu’il clique sur “*Manage permissions*”, il change les permissions courantes et se trouve, par défaut, le seul utilisateur à pouvoir accéder à la ressource en question: il est le seul à disposer des droits *“Read”,* “*Update*”, “*Delete*” sur la ressource, tous les autres utilisateurs individuels et membres de groupes se voient attribuer “*No Access*”.
Pour revenir au schéma de permission tel que défini par défaut pour la ressource, il faut cliquer sur “*Allow Normal Access*”. Et si l’utilisateur veut modifier les permissions associées à cette ressource, il doit sélectionner manuellement un à un tous les groupes **et** tous les utilisateurs individuels auxquels il souhaite donner les droits *“Read”, “Update”* et/ou *“Delete”* et cocher/décocher les droits correspondants.
### Consultation
Depuis la page d’une ressource, en haut à droite “*Hide Null Values*” permet de ne pas afficher les propriétés non renseignées.
### Recherche
Arches offre 4 types de recherche à partir du menu latéral gauche *“Search”,* représenté par l’icône d’une loupe:
- la recherche fondée sur la géolocalisation des ressources (onglet “*Map filter*”)
[](https://wiki.unil.ch/ci/uploads/images/gallery/2023-01/cap29.png)
- la recherche plein texte
[](https://wiki.unil.ch/ci/uploads/images/gallery/2023-01/cap26.png)
- la recherche par type de ressource
[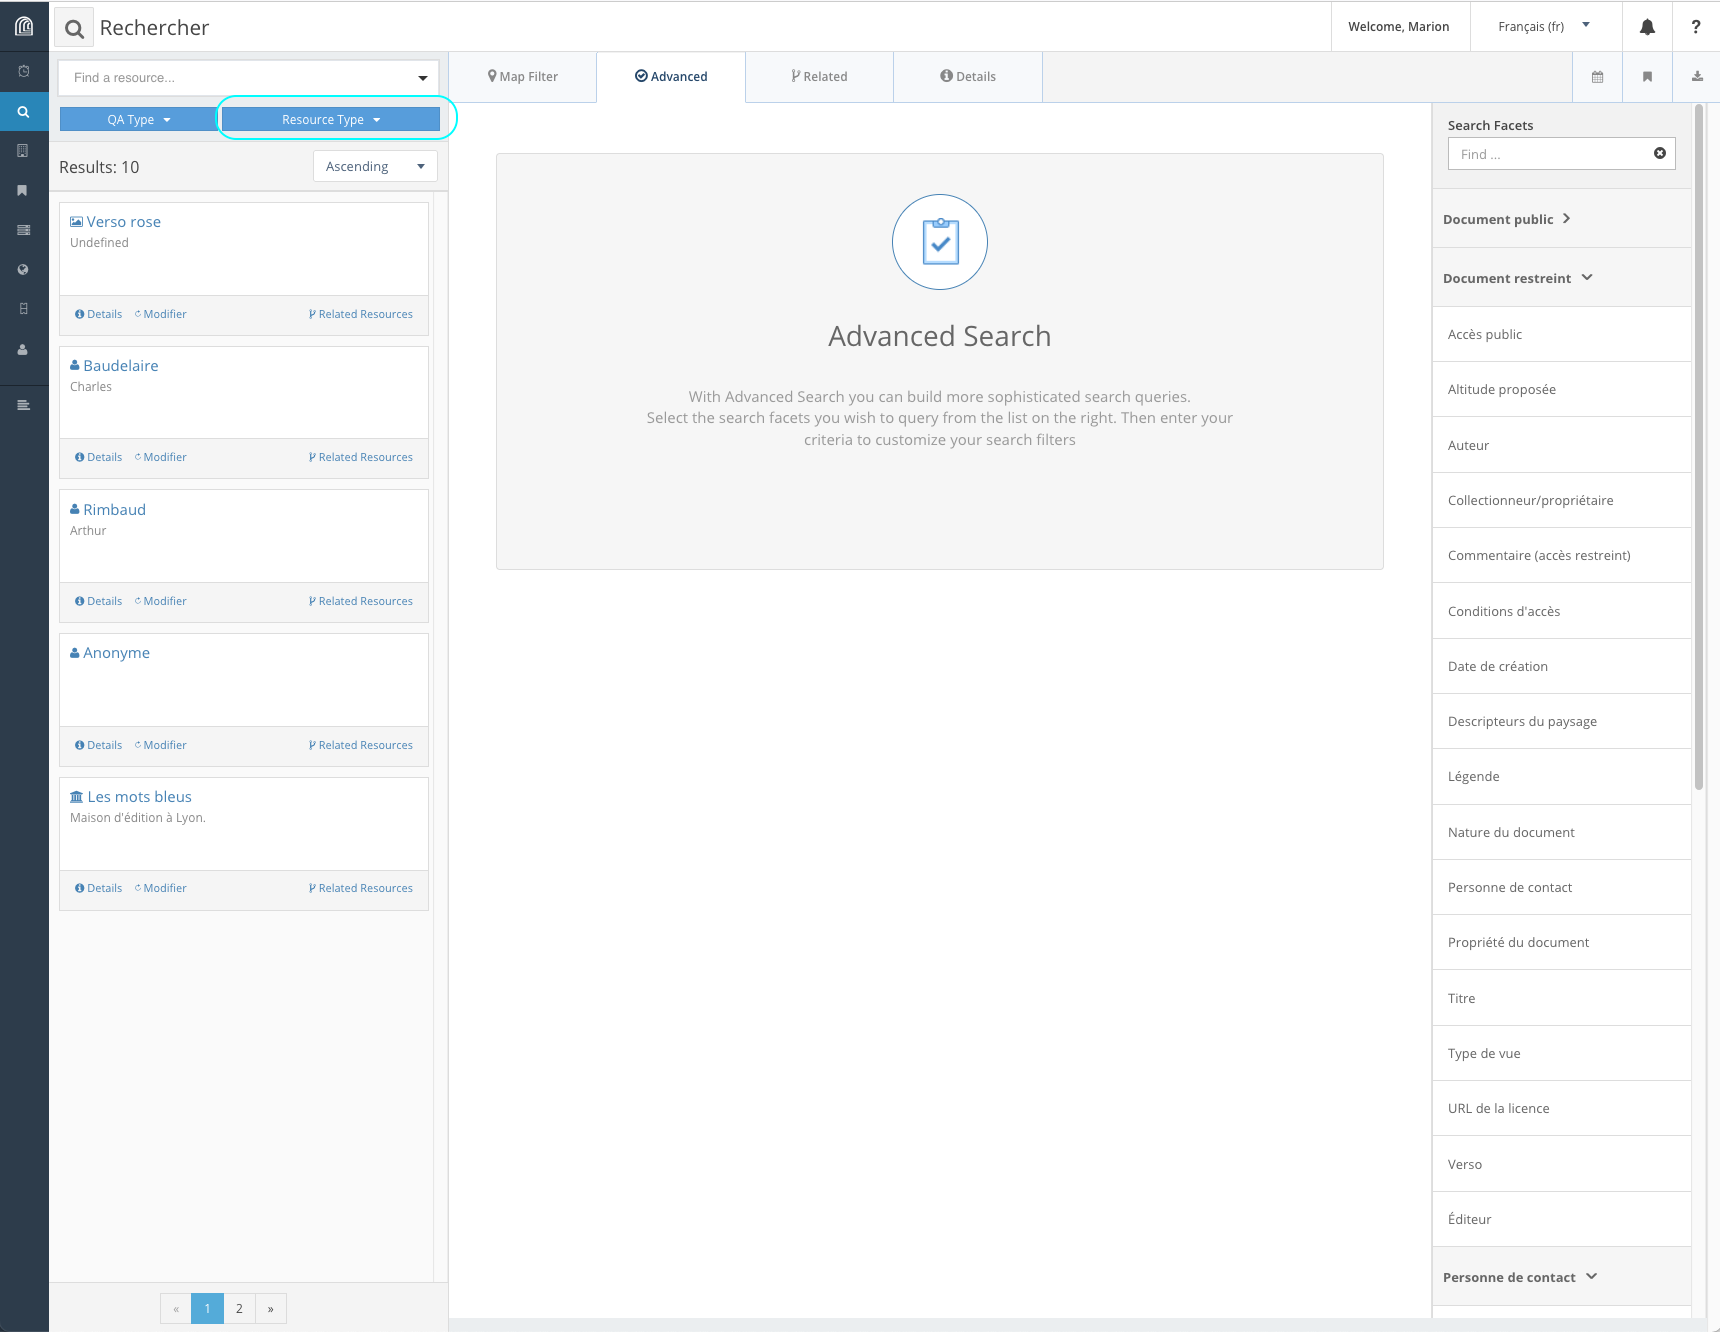](https://wiki.unil.ch/ci/uploads/images/gallery/2023-01/cap27.png)
- la recherche avancée (onglet *“Advanced”)*
[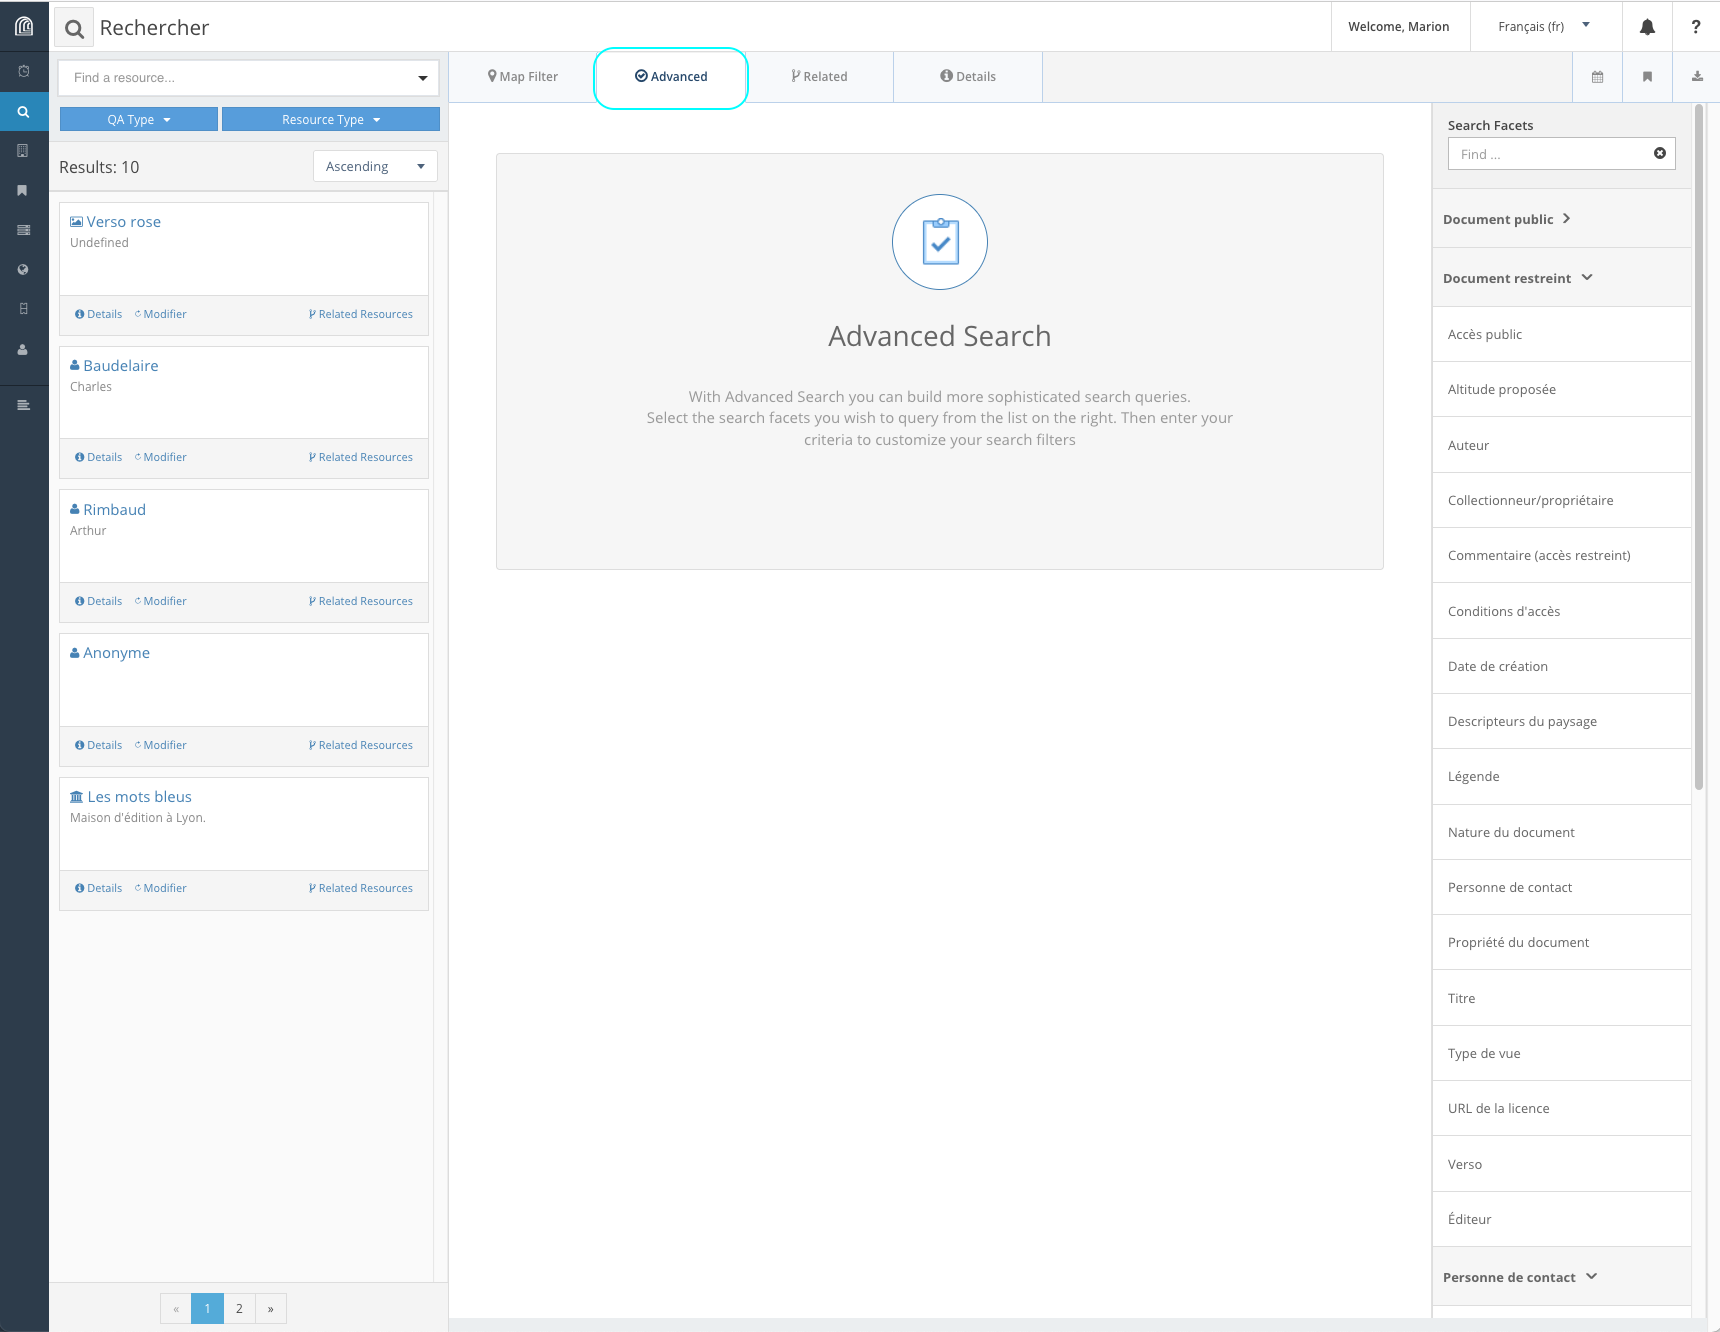](https://wiki.unil.ch/ci/uploads/images/gallery/2023-01/cap28.png)
#### Recherche plein texte
Arches permet de visualiser immédiatement les correspondances avec le terme recherché. il est aussi possible de distinguer entre le terme recherché utilisé dans les champs textuels de la base de données (“*Term Matches*”) et le terme s’il fait partie d‘un vocabulaire contrôlé *(“Concept”).*
[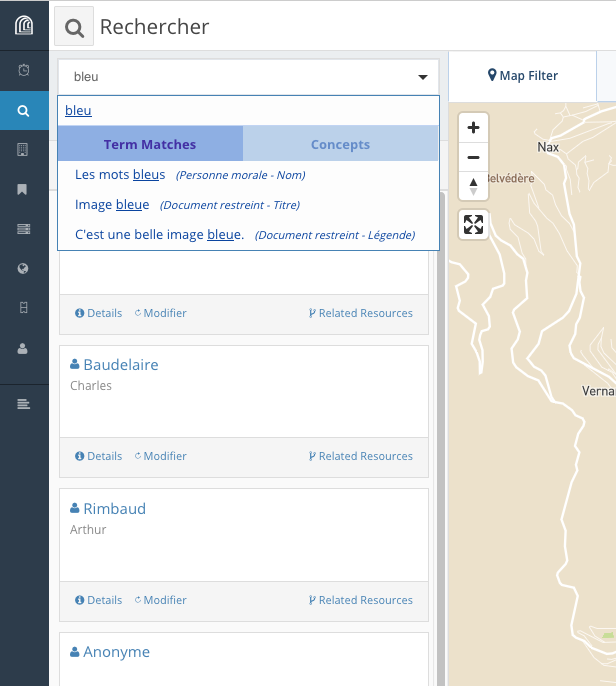](https://wiki.unil.ch/ci/uploads/images/gallery/2023-01/cap35.png)
Le caractère `*` permet de remplacer un ou plusieurs caractères:
[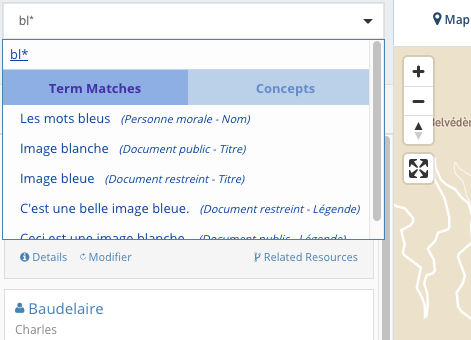](https://wiki.unil.ch/ci/uploads/images/gallery/2023-01/cap36.png)
[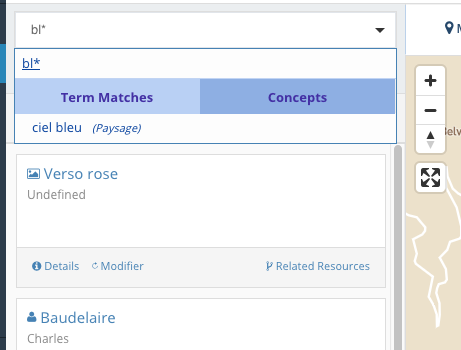](https://wiki.unil.ch/ci/uploads/images/gallery/2023-01/cap37.png)
Mais placé en début de mot, il ne donne pas de résultat (ici, Rimbaud n'apparaît pas parmi les résultats de recherche):
[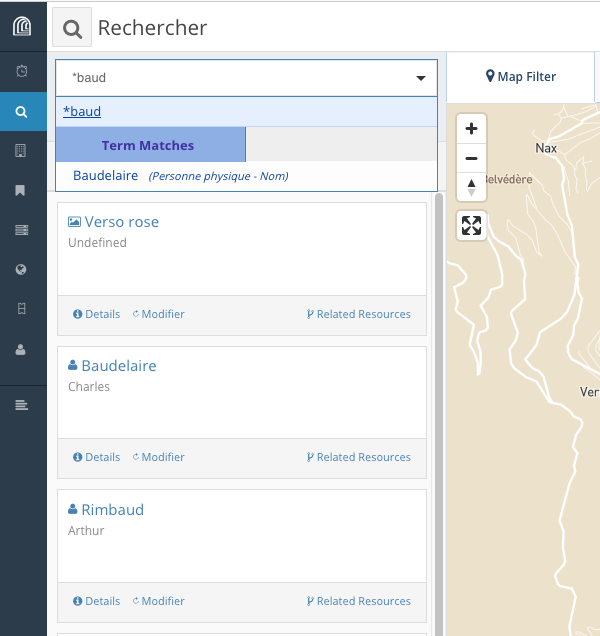](https://wiki.unil.ch/ci/uploads/images/gallery/2023-01/cap38.png)
#### Recherche par type de ressource (en construction)
#### Recherche par date (en construction)
#### Recherche sur la géolocalisation (en construction)
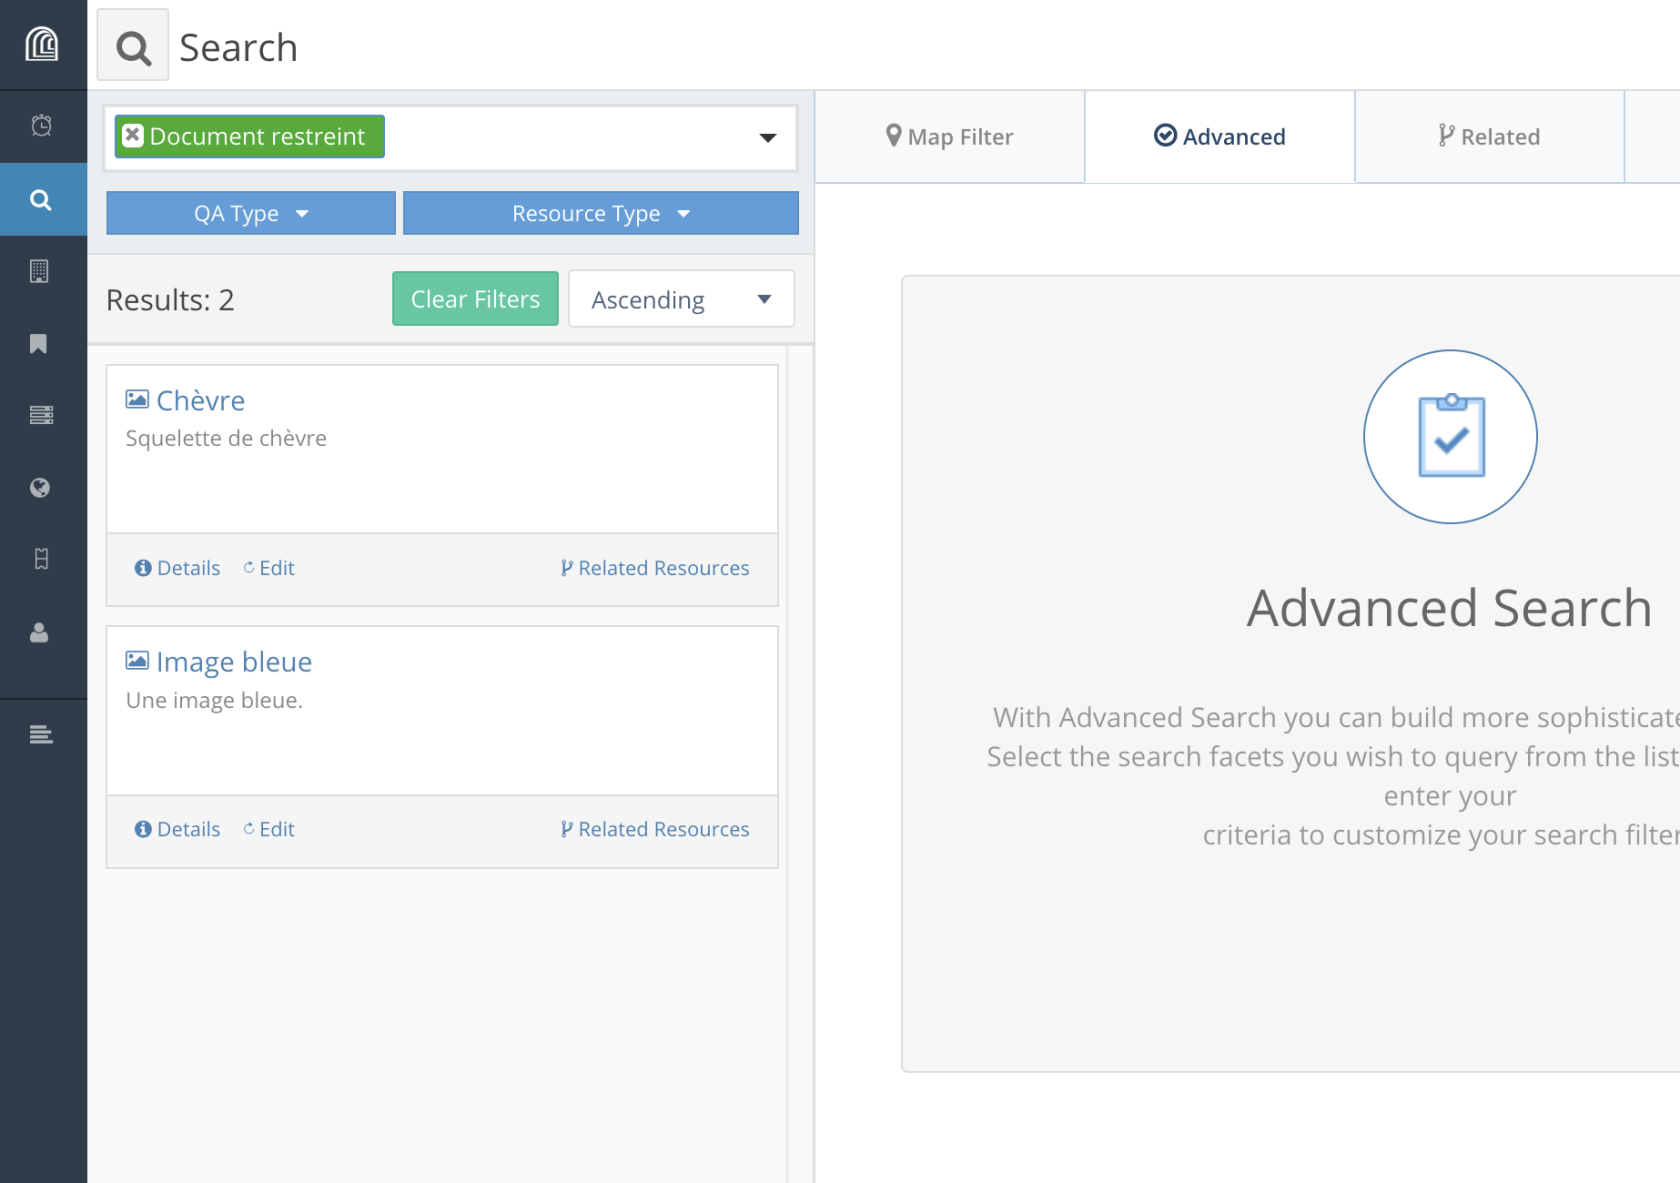
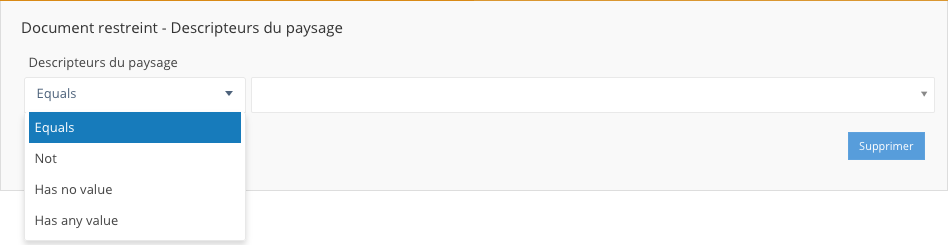
#### Recherche avancée
Cette recherche permet de combiner différents critères (ou facettes) et différents opérateurs (“et” et “ou”).
La partie droite sous “*Search Facets*” liste les types de ressources ainsi que leurs propriétés qui peuvent être utilisés pour la recherche. Dans le champ *“Find...”* sous “*Search Facets*”, l’utilisateur peut trier les types de ressource ou les propriétés à afficher.
Une fois sélectionné un type de ressource, l’utilisateur peut ensuite sélectionner la ou les propriétés pertinentes pour construire sa recherche. Pour combiner les différents critères, une fois la première propriété choisie, il suffit d’en sélectionner une autre, qui s’ajoutera sous la première. L’utilisateur doit ensuite définir l’opérateur pertinent *(“And”* ou *“Or”).*
[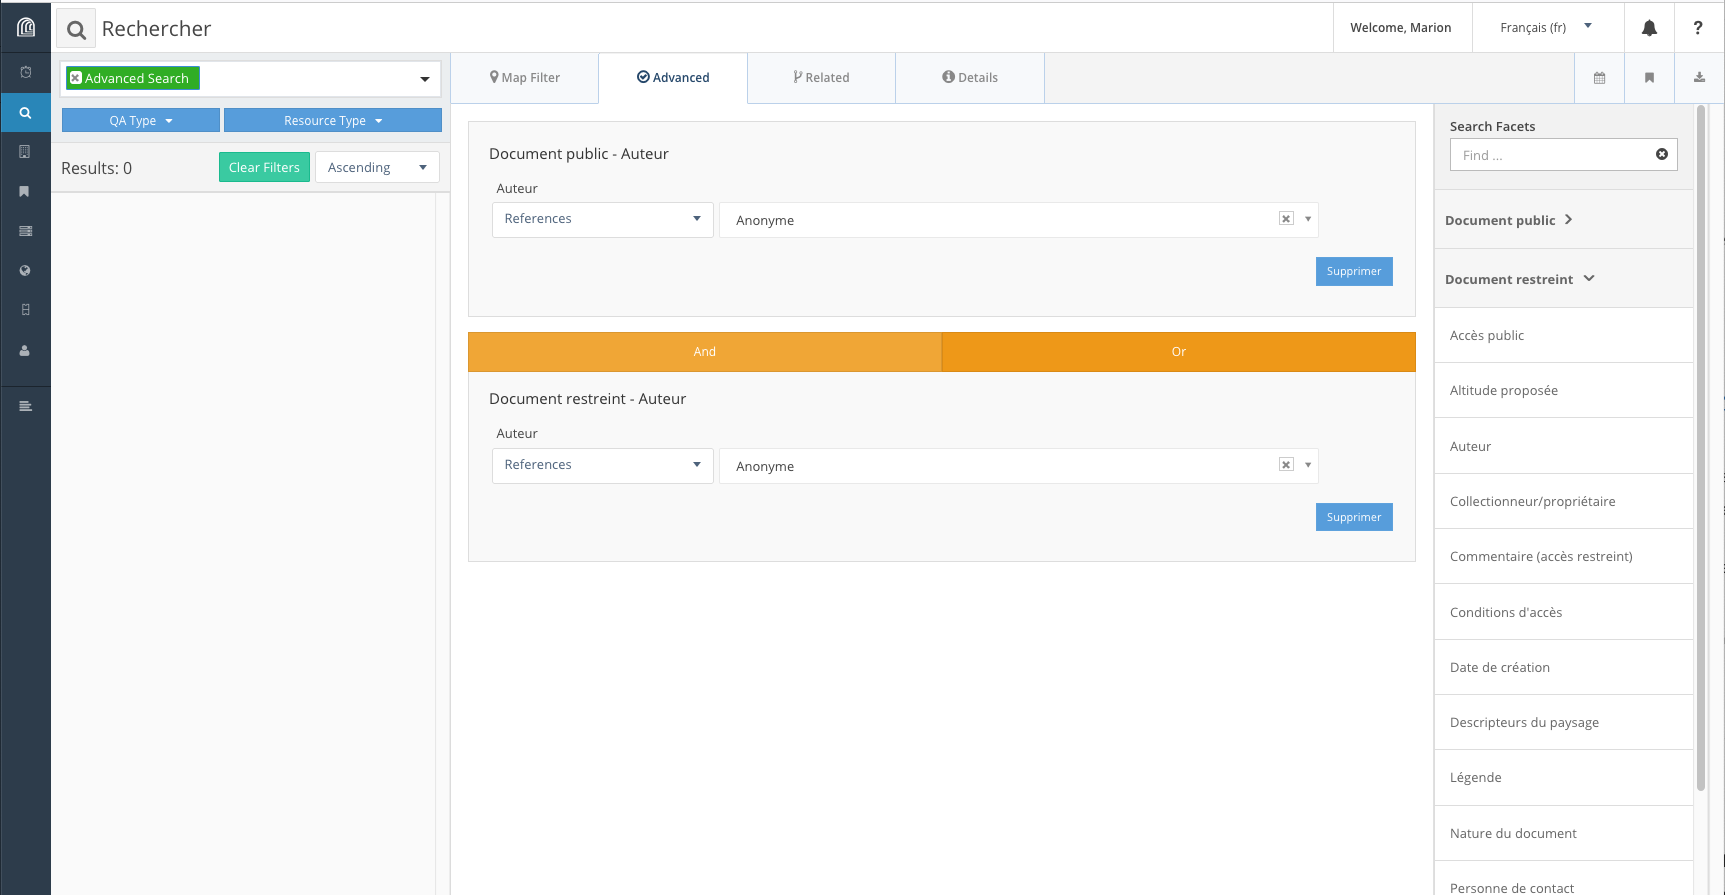](https://wiki.unil.ch/ci/uploads/images/gallery/2023-01/cap25.png)
En fonction du format de données associé à la propriété,
Les paramètres de recherche proposés pour chaque propriété dépendent du format de données associé:
- pour du texte:
[](https://wiki.unil.ch/ci/uploads/images/gallery/2023-01/cap30.png)
- pour un nombre:
[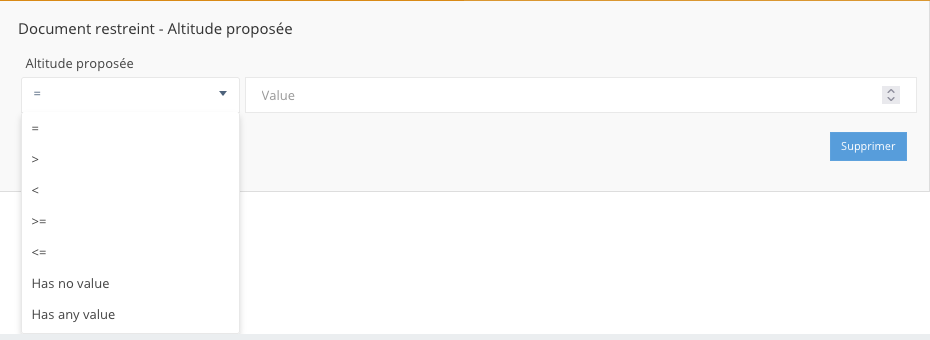](https://wiki.unil.ch/ci/uploads/images/gallery/2023-01/cap31.png)
- pour un booléen (vrai/faux, oui/non):
[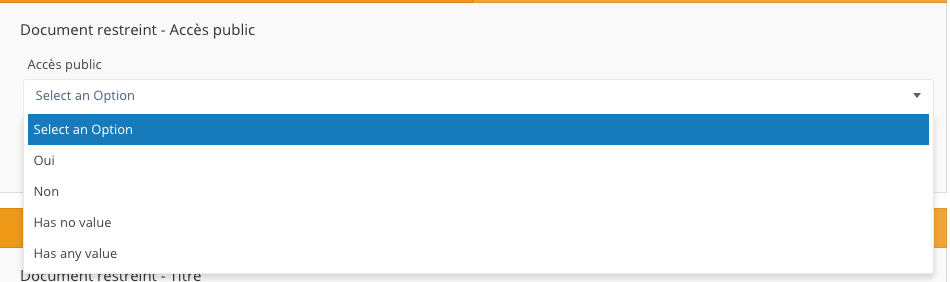](https://wiki.unil.ch/ci/uploads/images/gallery/2023-01/cap32.png)
- pour un lien entre deux types de ressources:
[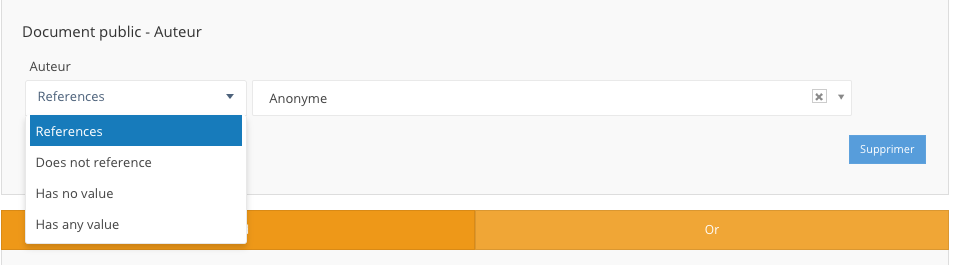](https://wiki.unil.ch/ci/uploads/images/gallery/2023-01/cap33.png)
- pour un vocabulaire contrôlé:
[](https://wiki.unil.ch/ci/uploads/images/gallery/2023-01/cap34.png)
- pour des données géolocalisées:
Le format de données “géolocalisation” n’est pas pris en charge dans la recherche avancée; l’onglet “*Map filter*” permet de filtrer les résultats de recherche en fonction de la localisation des ressources ou de leurs propriétés.
# Import des images (Val d'Hérens/Smapshot)
***Cette section ne concerne que le projet Val d'Hérens 1950/2050.***
### Préambule
La plateforme Arches permet de télécharger une image (*upload*) de [manière autonome](https://wiki.unil.ch/ci/books/research-support/page/mode-demploi-general-de-lutilisateur#bkmrk-%E2%80%A2-t%C3%A9l%C3%A9chargement-%28up).
Cependant, la gestion des images doit suivre ce protocole pour deux raisons :
1. l'espace de stockage (200 Go) alloué sur la machine virtuelle (VM) sur laquelle est déployé Arches impose de rationaliser la gestion des images, compte tenu des paramètres avec lesquels les documents ont été numérisés ;
2. comme [Smapshot](https://smapshot.heig-vd.ch/) accède aux images servies par Cantaloupe via une URL qui contient le nom du fichier d'origine, les utilisateurs doivent veiller ce que toute nouvelle version d'une image téléchargée manuellement dans Arches (par exemple pour corriger une mauvaise orientation) conserve le nom de l'image d'origine.
# 1. Transformation de l'image avant un premier import manuel
Le téléchargement manuel d'une nouvelle image, pour des données qui n'ont pas encore été transférées vers Smapshot, requiert:
- de convertir l'image dans un **format `.png`** (d'une part parce qu'il s'agit d'un format sans perte, contrairement au `jpeg`, et, d'autre part parce que ce format est interprétable par les navigateurs web, contrairement au format `.tif`, ce qui signifie qu'Arches est capable d'afficher l'image) ;
- de limiter la taille du plus grand côté de l'image à **2500 pixels**.
Des outils permettent de transformer des images par lots de manière à ce qu'elles correspondent à ces critères : [ImageMagick](https://imagemagick.org/), des scripts AdobePhotoshop, etc.
Avec ImageMagick, la commande est:
```bash
convert -auto-orient -format png -resize 2500x2500\> original.tif destination.png
```
# 2. Remplacement d'une image par une autre (images déjà intégrées dans Smapshot)
Pour les images déjà intégrées dans Smapshot qui nécessitent un recadrage ou dont l'orientation doit être corrigée, il faut repartir des images stockées dans le `/local/sharedArches` sur l'espace de stockage allouée à la VM d'Arches, puisque:
- toutes ces images ont déjà été converties et redimensionnées
- en partant de ce repertoire on peut conserver le nom des fichiers d'origine.
## 2.1. Avec CyberDuck, sur un Mac
### 2.1.1. Installation de CyberDuck
Installer [CyberDuck](https://cyberduck.io/download/).
### 2.1.2. Paramétrer la connexion
Une fois CyberDuck ouvert, cliquez sur "Ouvrir une connexion" (ou sur "Fichier" > "Ouvrir une connexion").
[](https://wiki.unil.ch/ci/uploads/images/gallery/2023-02/cd1.png)
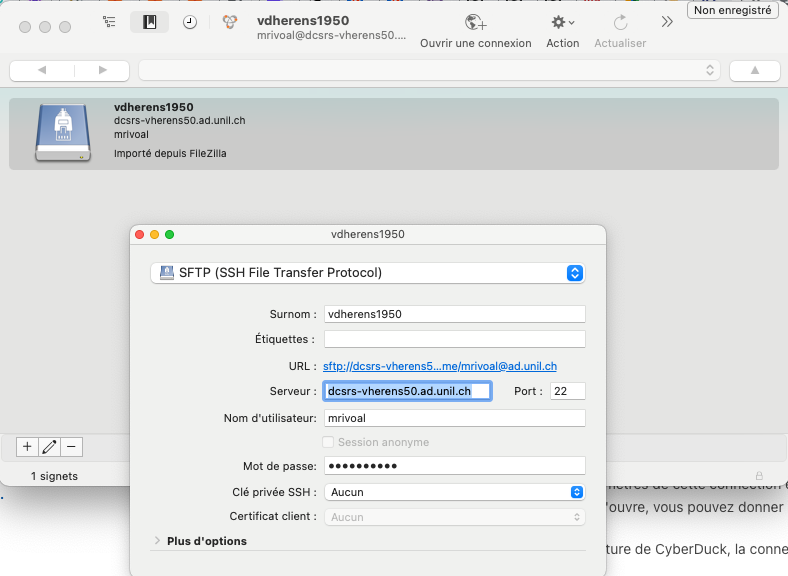
Paramétrer la connexion sur ce modèle (identifiant et mot de passe UNIL):
[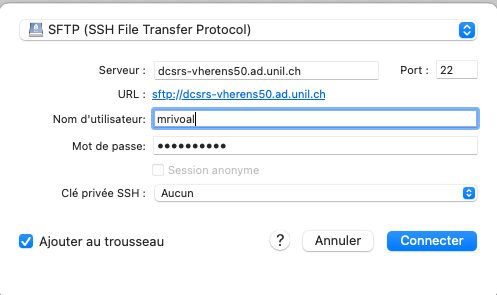](https://wiki.unil.ch/ci/uploads/images/gallery/2023-02/cd3.png)
Et cliquez sur "Connecter" puis sur "Autoriser", sur la boîte de dialogue qui s'ouvre.
[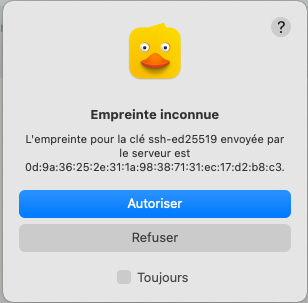](https://wiki.unil.ch/ci/uploads/images/gallery/2023-02/cd9.png)
Pour garder les paramètres de cette connection en mémoire, dans le menu principal, cliquez sur "Signet" > "Nouveau signet". Dans la fenêtre qui s'ouvre, vous pouvez donner au signet le surnom "vdherens1950".
[](https://wiki.unil.ch/ci/uploads/images/gallery/2023-02/cd8.png)
À la prochaine ouverture de CyberDuck, la connexion au serveur **vdherens1950** vous sera proposée dès la fenêtre d'accueil.
[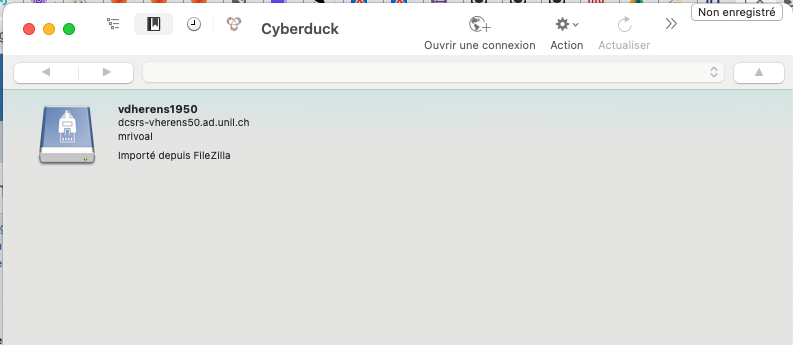](https://wiki.unil.ch/ci/uploads/images/gallery/2023-02/cd7.png).
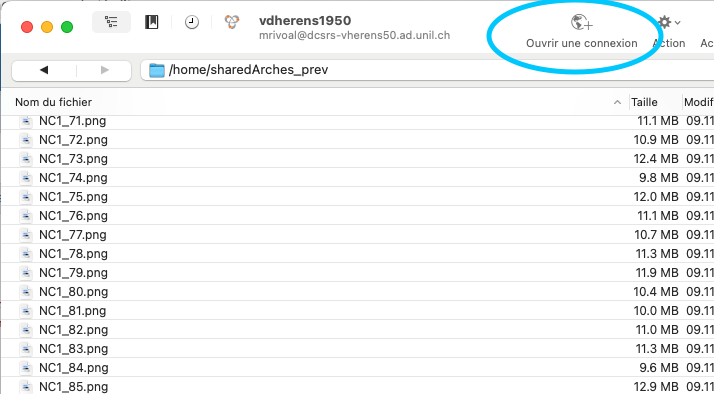
### 2.1.3. Atteindre le repertoire d'images partagé `/local/sharedArches`
Vous arrivez sur un répertoire à votre nom dans l'espace de stockage :
[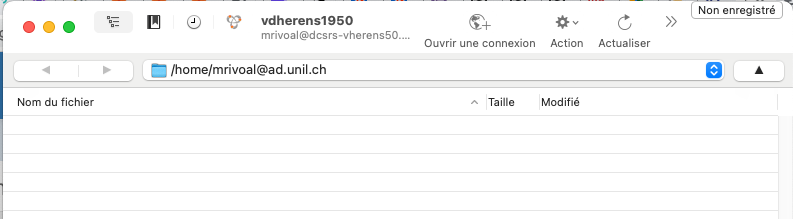](https://wiki.unil.ch/ci/uploads/images/gallery/2023-02/cd4.png)
Il s'agit maintenant de rejoindre le répertoire `/local/sharedArches` dans lequel se trouvent les images. Dans le menu déroulant, sélectionner `/` :
[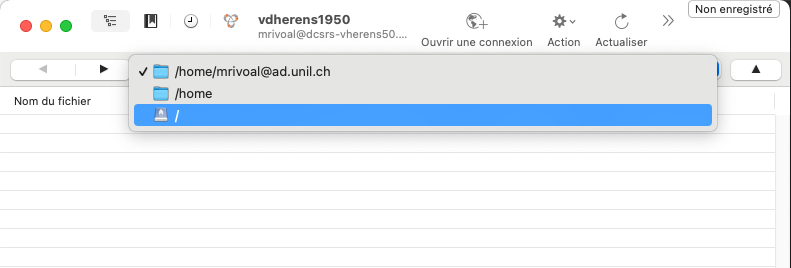](https://wiki.unil.ch/ci/uploads/images/gallery/2023-02/cd13.png)
Puis parmi les répertoires qui s'affichent, choisissez "local" > "sharedArches" :
[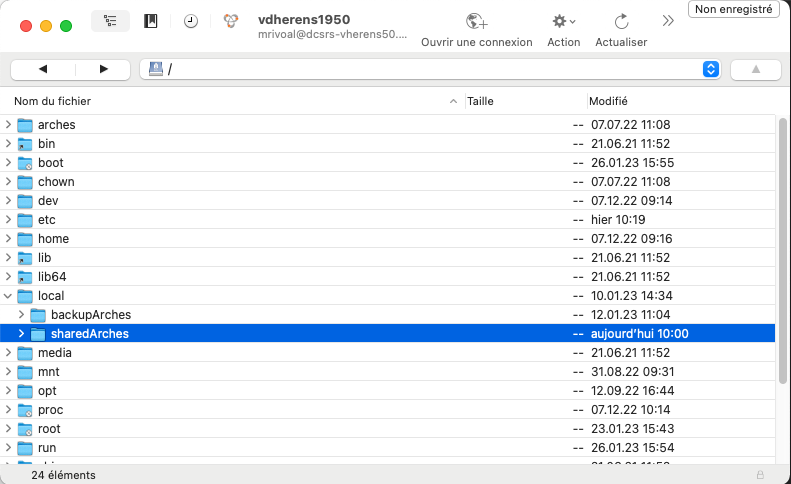](https://wiki.unil.ch/ci/uploads/images/gallery/2023-02/cd14.png)
Vous voici dans le repertoire d'images partagé.
[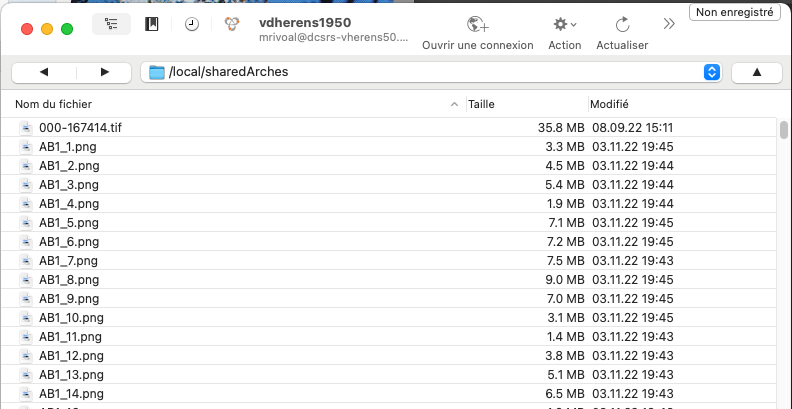](https://wiki.unil.ch/ci/uploads/images/gallery/2023-02/cd15.png)
### 2.1.4. Parcourir les images avec le visualisateur interne de CyberDuck
Il est possible de consulter les images directement dans le répertoire `/local/sharedArches` avec le **visualisateur interne de CyberDuck**.
Avec un clic droit sur le nom de fichier, choisissez "Coup d'œil" dans le menu contextuel. Il faut à CyberDuck quelques secondes pour charger ces aperçus et les afficher.
Il est aussi possible de sélectionner plusieurs images (maintenir la touche majuscule/shift enfondée puis clic droit) et de visualiser l'ensemble des images sélectionnées.
[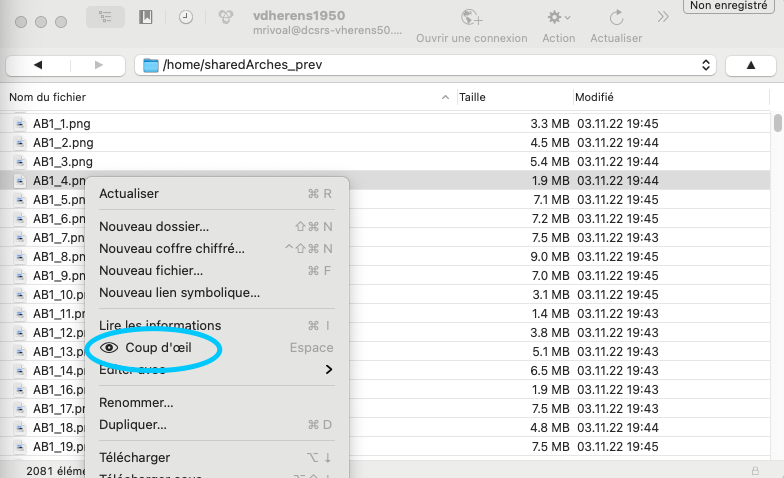](https://wiki.unil.ch/ci/uploads/images/gallery/2023-02/cd10.png)
### 2.1.5. Éditer les images
L'édition peut se faire avec différentes applications, en fonction des options disponibles sous "Editer avec" dans le menu contextuel.
[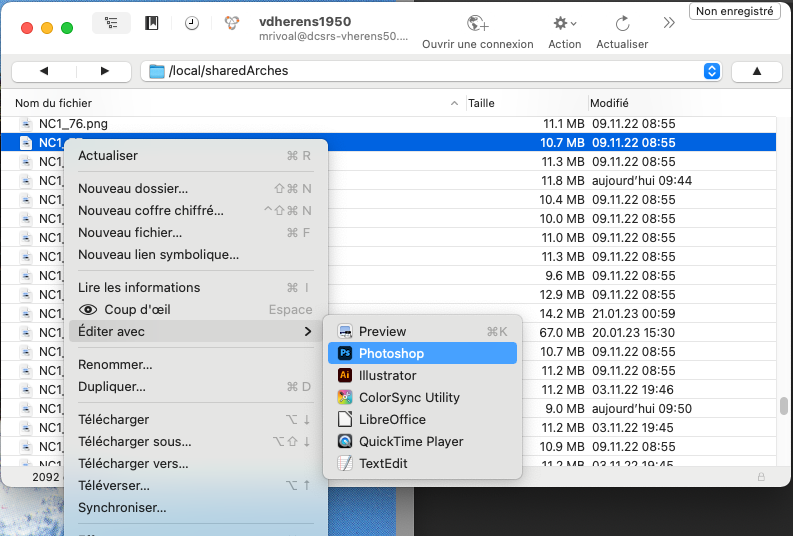](https://wiki.unil.ch/ci/uploads/images/gallery/2023-02/cd16.png)
Nous avons testé l'édition d'images avec 2 applications :
- avec **Aperçu**, il n'est pas possible d'enregistrer les modifications apportées directement sur le serveur. C'est une copie de l'image qu'Aperçu propose d'enregistrer, en local.
- **Adobe Photoshop** permet d'enregistrer directement ces modifications, avec un simple `commande + S`.
## 2.2. Sous Linux
### 2.2.1. Paramétrer la connexion
Pour une distribution [Ubuntu](https://ubuntu.com/), à partir du navigateur de fichier, on peut sélectionner "Autres emplacements":
[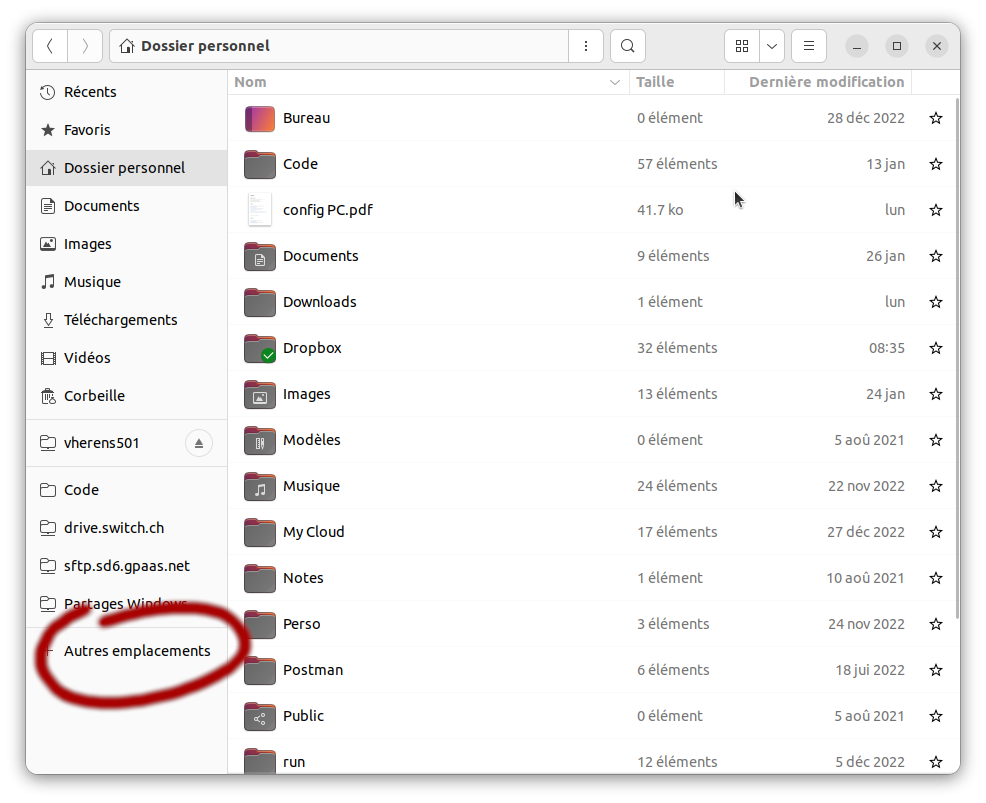](https://wiki.unil.ch/ci/uploads/images/gallery/2023-02/image-1675431951375.png)
pour entrer l'adresse du serveur: `sftp://dcsrs-vherens50.dcsr.unil.ch/` puis cliquer sur "se connecter":
[](https://wiki.unil.ch/ci/uploads/images/gallery/2023-02/image-1675432177025.png)
Pour les connections suivantes, l'adesse du serveur devrait rester dans la liste des connections recentes.
Il faut se connecter avec l'identifiant Unil sans l'addresse mail, soit pour moi, `ljaouen`.
### 2.2.2. Atteindre le repertoire d'images partagé /local/sharedArches
Par défaut, le répertoire de l'utilistateur est ouvert, clicquer sur le nom du serveur permet de remonter à la source pour naviguer dans le répertoire `/local/sharedArches`:
[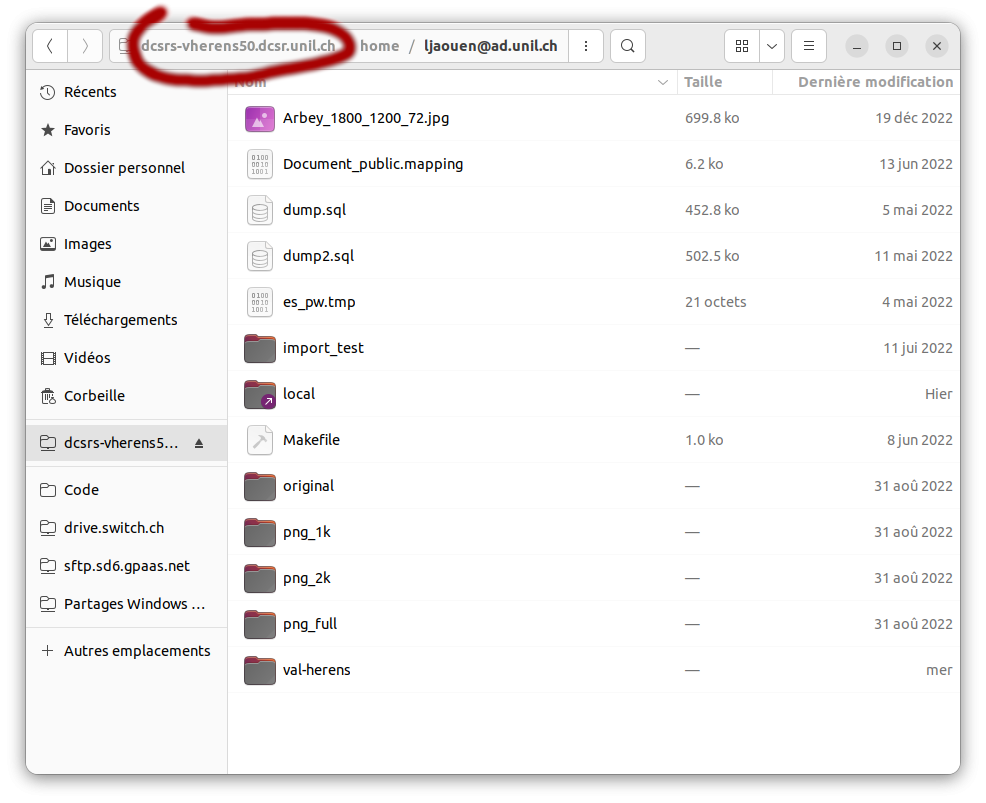](https://wiki.unil.ch/ci/uploads/images/gallery/2023-02/image-1675436308234.png)
### 2.2.3. Parcourir les images avec le visualisateur par défaut
Arrivé dans le répertoire `/local/sharedArches`, la liste des images est visible, cliquer (double) sur une des images l'affiche:
[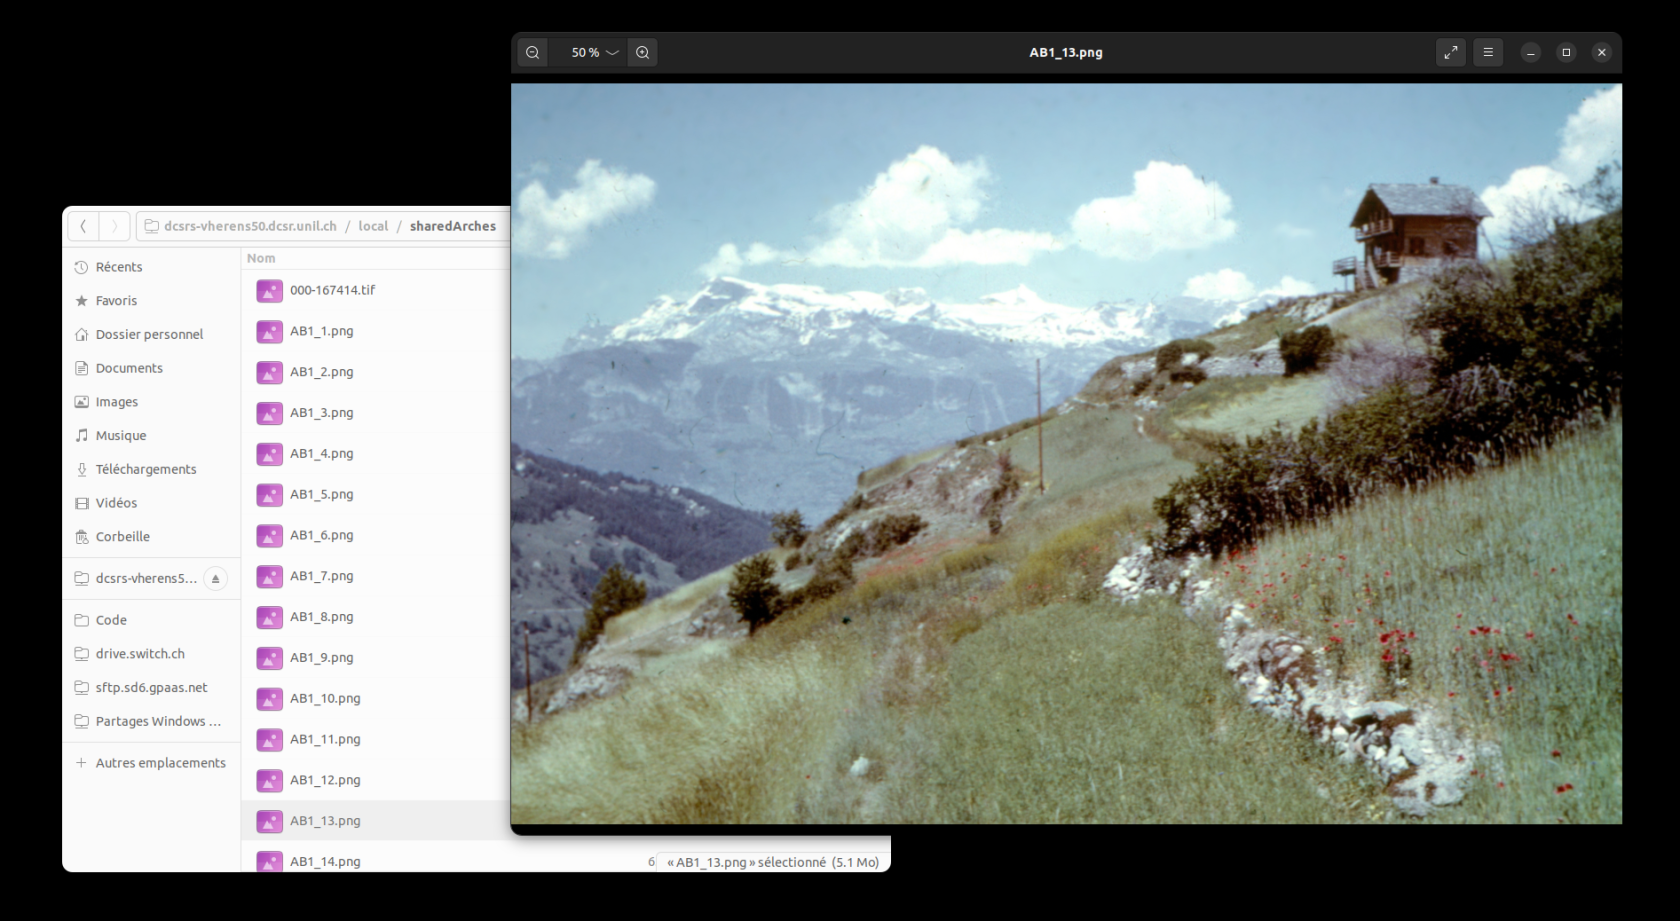](https://wiki.unil.ch/ci/uploads/images/gallery/2023-02/image-1675436324830.png)
La navigation d'une image à l'autre se fait avec les touches du clavier [<-] et [->].
### 2.2.4. Éditer les images
#### 2.2.4.1 Rotation simple
Pour faire pivoter l'image, il faut passer la souris sur l'image ce qui fait apparaître les deux indicateurs de rotation en bas au milieu:
[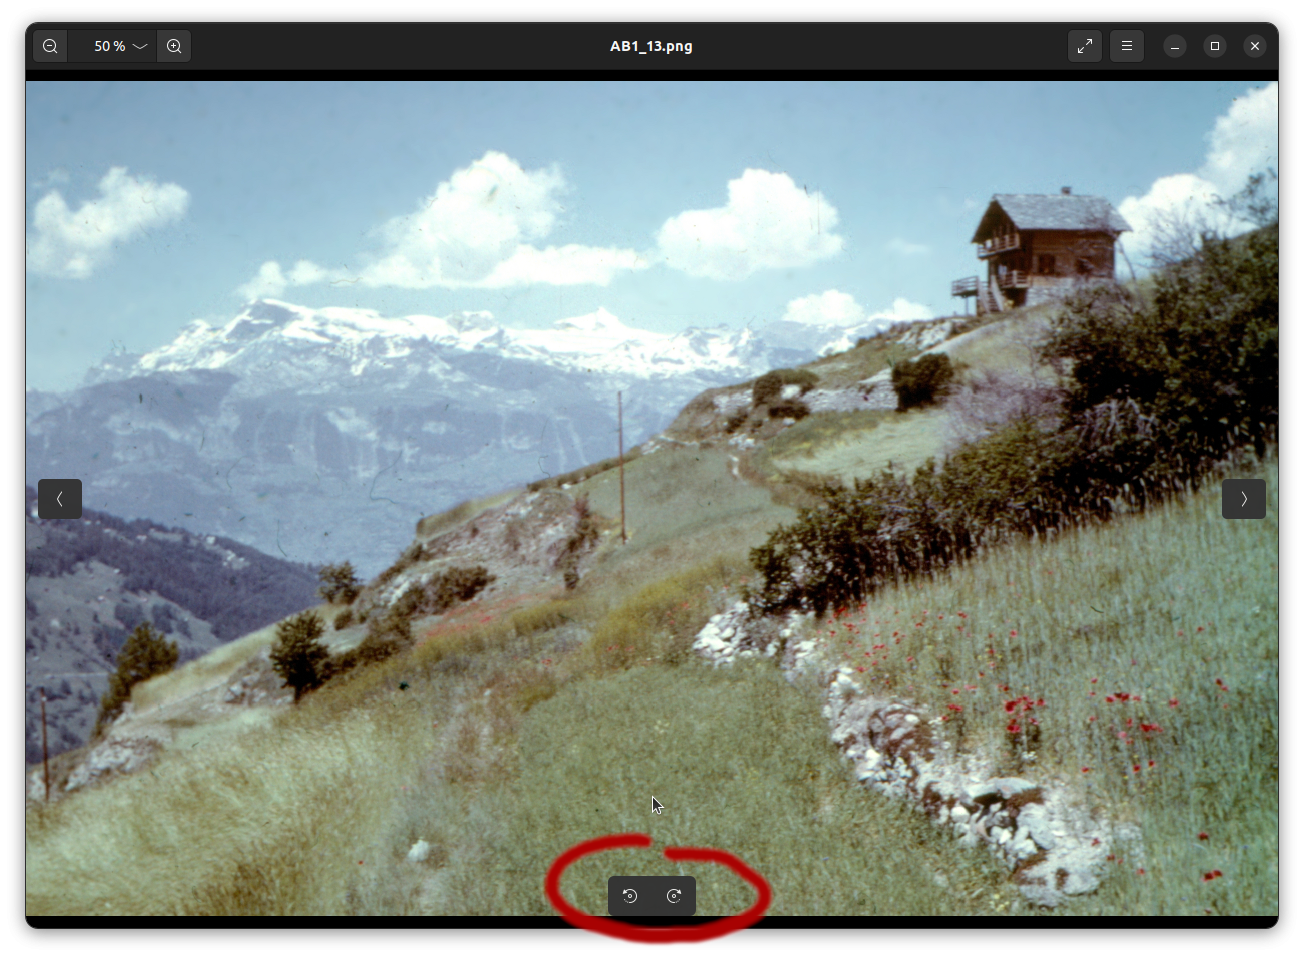](https://wiki.unil.ch/ci/uploads/images/gallery/2023-02/image-1675671271449.png)
En suite, il suffit d'enregistrer ([control]+[s]) ou de passer par le menu:
[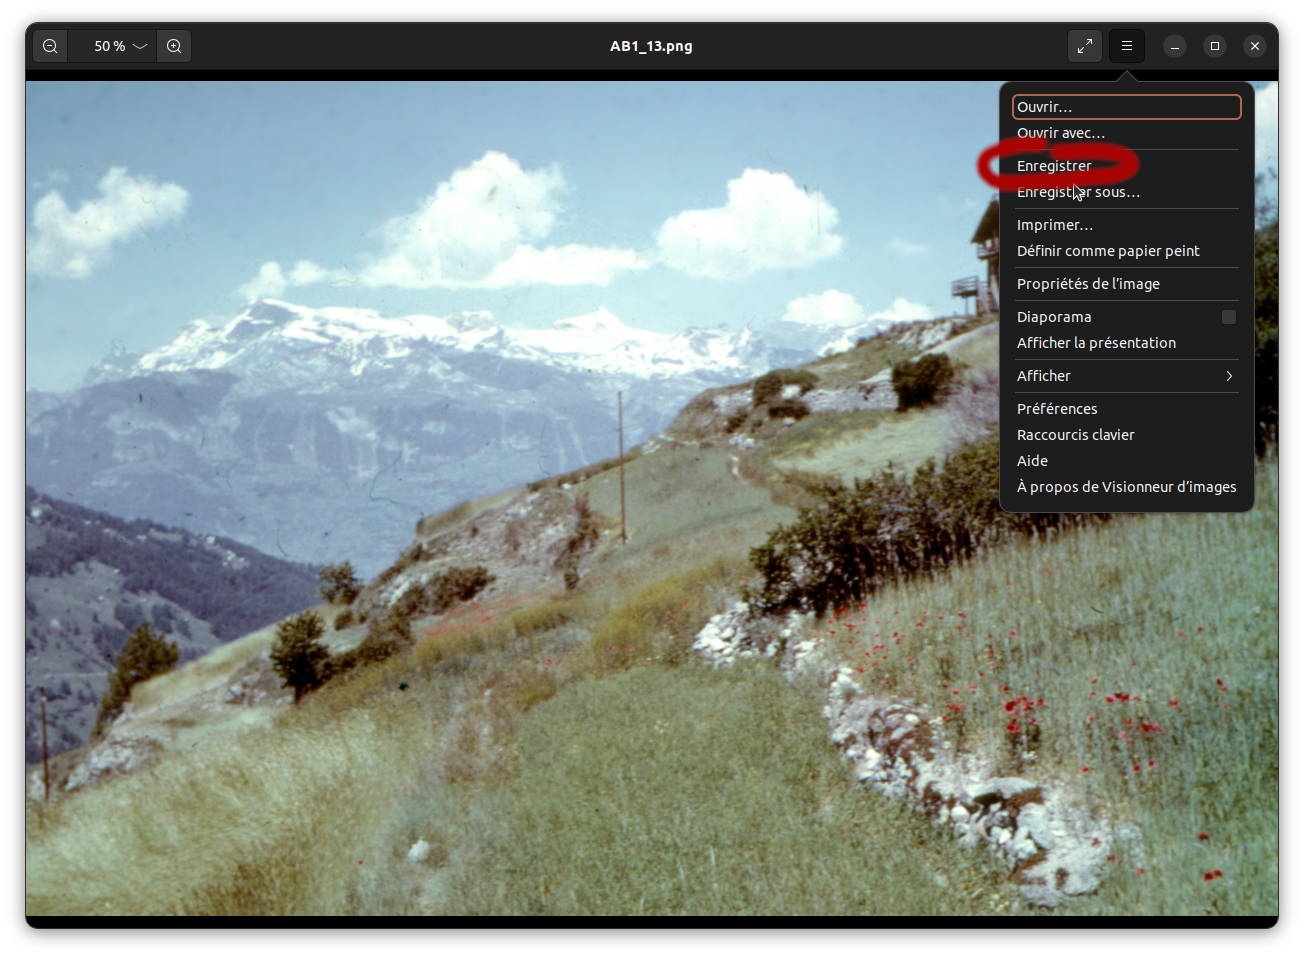](https://wiki.unil.ch/ci/uploads/images/gallery/2023-02/image-1675675582545.png)
#### 2.2.4.2. Edition fine
Pour une édition plus fine (rognage, rotation, découpage) il est possible d'ouvrir l'image avec un autre éditeur (comme [gimp](https://www.gimp.org/), à installer), l'ouverture se fait par un click droit, la sauvegarde de l'image par l'option _Fichier => Ecraser _
[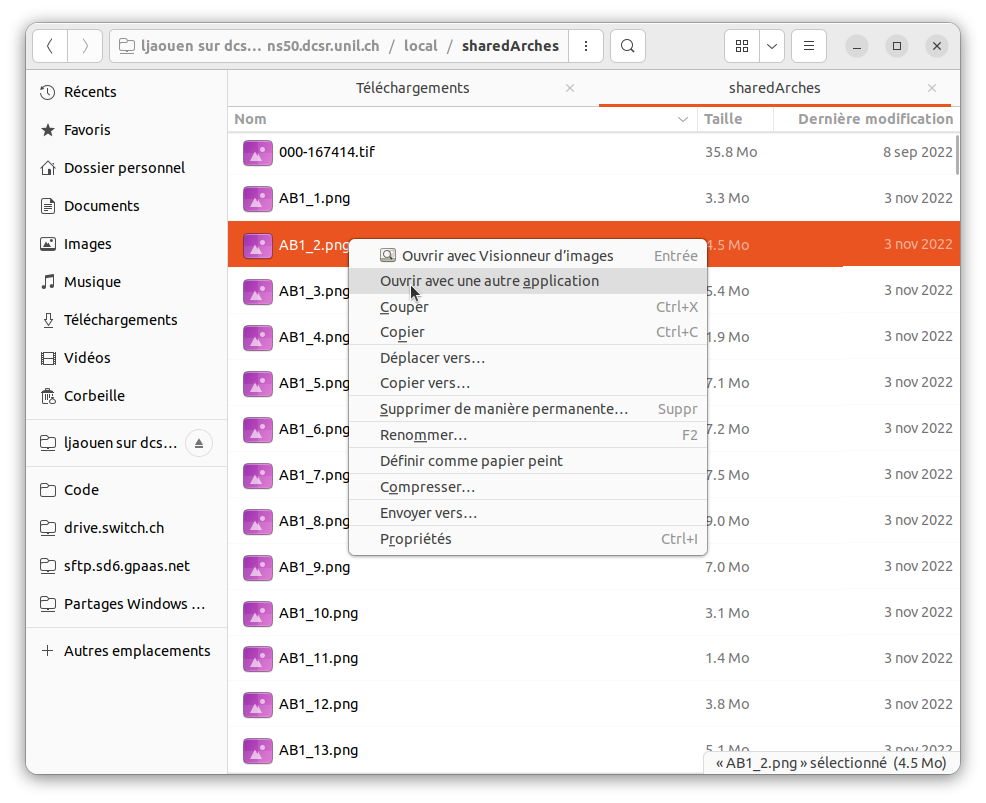](https://wiki.unil.ch/ci/uploads/images/gallery/2023-02/image-1675676945394.png)
# Machine Learning
# Scientific Support
#### Need help with Machine Learning in your research?
Contact us at with subject: DCSR ML support
Scientific support for Machine Learning projects, as outlined below, is provided free of charge to all UNIL members.
#### Introduction
Machine Learning provides a powerful framework for predictive modeling in scientific research:
- Infer outcomes from complex datasets using classification and regression models
- Evaluate and improve models based on predictive performance
- Use exploratory techniques to better understand and prepare your data
At DCSR, we support researchers in several key areas of Machine Learning:
#### Training
We help you understand how specific Machine Learning methods work and how to apply them in your research. We also offers short introductory courses on Machine Learning; see [ML courses](https://wiki.unil.ch/ci/books/research-support/page/courses).
#### Methodology
We assist you in selecting and applying appropriate Machine Learning methods for your research.
This may include:
- A pilot phase, where we collaboratively develop and test code on your laptop or UNIL clusters
- A production phase, where we help scale and refine your workflow
More specifically, we can:
- Identify existing tools suited to your analysis
- Help install and run them on your laptop or UNIL clusters
- Explain key parameters and settings
- Help develop custom algorithms and code if no suitable tools exist
#### Infrastructure
We help you efficiently run your Machine Learning workflows on UNIL clusters.
This includes:
- Installing and configuring your code
- Profiling performance to optimize resource usage (RAM, CPUs/GPUs, number of nodes)
#### Collaboration at UNIL
We can connect you with relevant experts at UNIL to discuss specific Machine Learning challenges.
#### Example Use Cases:
1. Experimental scientist
Wants to analyze data using Machine Learning on a laptop or UNIL clusters.
→ We help identify suitable tools, explain how they work, and support their use.
2. Data scientist (setup phase)
Wants to implement a Machine Learning pipeline but is unsure how to proceed.
→ We help select and apply appropriate methods.
3. Data scientist (review phase)
Has implemented a pipeline and wants feedback.
→ We review the methodology and suggest improvements or alternatives.
4. Scaling from laptop to cluster
Wants to move a pipeline from a local computer to UNIL clusters.
→ We assist with deployment, software setup, and performance optimization.
#### Contact
You can reach us at with subject: DCSR ML support
# Courses
Here are the Machine Learning courses provided by the DCSR:
- [A Gentle Introduction to Decision Trees and Random Forests with Python and R](https://wiki.unil.ch/ci/books/cours-pour-le-personnel-et-les-doctorantes-unil/page/research-a-gentle-introduction-to-decision-trees-and-random-forests-with-python-and-r)
- [A Gentle Introduction to Deep Learning with Python and R](https://wiki.unil.ch/ci/books/cours-pour-le-personnel-et-les-doctorantes-unil/page/research-a-gentle-introduction-to-deep-learning-with-python-and-r)
- [An Introduction to Image Analysis with CNNs in Python](https://wiki.unil.ch/ci/books/cours-pour-le-personnel-et-les-doctorantes-unil/page/research-an-introduction-to-image-analysis-with-cnns-in-python)
- [An Introduction to Text Analysis with Transformers and LLMs in Python](https://wiki.unil.ch/ci/books/cours-pour-le-personnel-et-les-doctorantes-unil/page/research-an-introduction-to-text-analysis-with-transformers-and-llms-in-python)
These courses are free of charge for all UNIL members.
You can find the schedule and registration details here: [https://courses.unil.ch/ci](https://courses.unil.ch/ci)
For more information about these courses, please contact us at with subject: DCSR ML courses
# DCSR-LLM - Toolkit for Research at UNIL
Large language models are attracting growing interest across research fields, but many academic uses require more than a simple chatbot interface. Researchers often need to compare models, test them on specific tasks, extract structured information from documents, or adapt them to a domain-specific workflow. For these needs, reproducibility, local control, and transparent experimentation matter as much as convenience.
[dcsr-llm](https://git.dcsr.unil.ch/Scientific-Computing/dcsr-llm) was developed with that reality in mind. It is a command-line toolkit designed to support research workflows with large language models in a more controlled and reproducible way. Rather than focusing only on conversational use, it brings together several core functions in a single framework: inspecting models before use, downloading and running them locally, generating predictions, benchmarking results, extracting structured data from text corpora, fine-tuning models, and exporting them for other environments.
[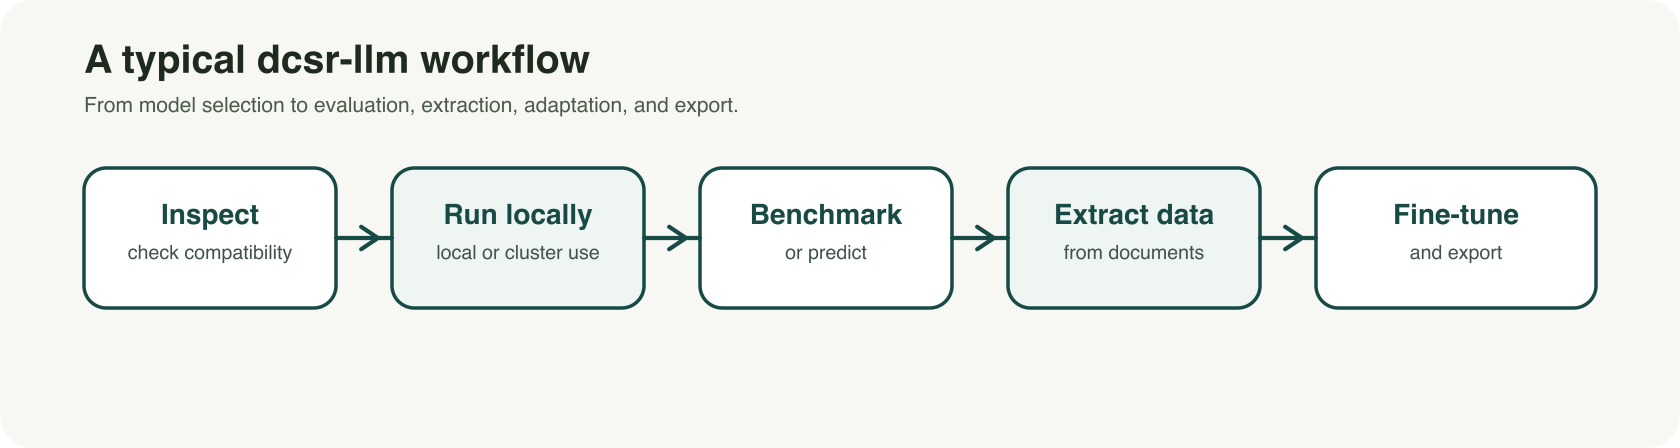](https://wiki.unil.ch/ci/uploads/images/gallery/2026-03/output.png)
For UNIL researchers, the value is practical. The tool is designed to work on local machines as well as on UNIL-supported GPU environments such as the Curnagl and Urblauna clusters. This makes it possible to move beyond isolated prompting and toward more systematic workflows. A team can, for example, inspect whether a model is compatible with its infrastructure, benchmark several models on the same question set, extract targeted variables from a document collection, or fine-tune an instruction model for a specialized task or terminology.
Several use cases are especially relevant in a research context. One is model selection: before downloading large files, researchers can inspect a model and estimate whether it is suitable for their hardware and intended workflow. Another is evaluation: instead of relying on impressions, researchers can benchmark baseline, quantized, or fine-tuned models on the same dataset and compare results consistently. A third is structured extraction: dcsr-llm can transform unstructured text into validated JSON outputs, with evidence tracking and review mechanisms that are useful for corpus-based work. For more advanced projects, the toolkit also supports fine-tuning existing instruct models to better match a domain, style, or task protocol.
A key strength of dcsr-llm is that it treats LLM use as a research workflow rather than a one-off interaction. Configurations, saved artifacts, and explicit processing steps help support reproducibility and make experiments easier to document, rerun, and compare. This is particularly important in academic settings, where results need to be traceable and methods need to remain understandable.
dcsr-llm is best understood as a technical research tool rather than a one-click application. It does not replace critical judgment, and model outputs still need to be checked and validated. But for researchers who want a more rigorous and flexible way to work with LLMs, it offers a strong foundation.
UNIL members who would like to learn more, try the tool, or provide feedback can visit the [dcsr-llm repository](https://git.dcsr.unil.ch/Scientific-Computing/dcsr-llm) or contact us at with subject: DCSR-LLM.
Repository: [https://git.dcsr.unil.ch/Scientific-Computing/dcsr-llm](https://git.dcsr.unil.ch/Scientific-Computing/dcsr-llm)
# Deep Learning with GPUs
The training phase of your deep learning model may be very time consuming. To accelerate this process you may want to use GPUs and you will need to install the deep learning packages, such as Keras or PyTorch, properly. Here is a short documentation on how to install some well known deep learning packages in Python. If you encounter any problem during the installation or if you need to install other deep learning packages (in Python, R or other programming languages), please send an email to with subject DCSR: Deep Learning package installation, and we will try to help you.
### TensorFlow and Keras
We will install the TensorFlow 2's implementation of the Keras API (tf.keras); see [https://keras.io/about/](https://keras.io/about/)
To install the packages in your work directory:
```
cd /work/PATH_TO_YOUR_PROJECT
```
Log into a GPU node:
```
Sinteractive -m 4G -G 1
```
Check that the GPU is visible:
```
nvidia-smi
```
If it works properly you should see a message including an NVIDIA table. If you instead receive an error message such as "nvidia-smi: command not found" it means there is a problem.
To use TensorFlow on NVIDIA GPUs we recommend the use of NVIDIA containers including TensorFlow and its dependences such as CUDA and CuDNN that are necessary for GPU acceleration. The NVIDIA containers will also include various Python libraries and Python itself in such a way that everything is compatible with the version of TensorFlow you choose. Nevertheless, if you prefer to use the virtual environment method, please look at the instructions in the comments below.
```
module load singularityce/4.1.0
export SINGULARITY_BINDPATH="/scratch,/dcsrsoft,/users,/work,/reference"
```
We have already downloaded several versions of TensorFlow:
```
/dcsrsoft/singularity/containers/tensorflow/tensorflow-ngc-24.05-2.15.sif
/dcsrsoft/singularity/containers/tensorflow/tensorflow-ngc-24.01-2.14.sif
/dcsrsoft/singularity/containers/tensorflow/tensorflow-ngc-23.10-2.13.sif
/dcsrsoft/singularity/containers/tensorflow/tensorflow-ngc-23.07-2.12.sif
/dcsrsoft/singularity/containers/tensorflow/tensorflow-ngc-23.03-2.11.sif
/dcsrsoft/singularity/containers/tensorflow/tensorflow-ngc-22.12-2.10.sif
```
Here the last two numbers indicate the TensorFlow version, for example "tensorflow-ngc-24.05-2.15.sif" corresponds to TensorFlow version "2.15". In case you want to use another version, see the instructions in the comments below.
To run it:
```
singularity run --nv /dcsrsoft/singularity/containers/tensorflow/tensorflow-ngc-24.05-2.15.sif
```
You may receive a few error messages such as “not a valid test operator”, but this is ok and should not cause any problem. You should see a message by NVIDIA including the TensorFlow version. The prompt should now start with "Singularity>" emphasising that you are working within a singularity container.
To check that TensorFlow was properly installed:
```
Singularity> python -c 'import tensorflow; print(tensorflow.__version__)'
```
There might be a few warning messages such as "Unable to register", but this is ok, and the output should be something like "2.15.0".
To confirm that TensorFlow is using the GPU:
```
Singularity> python -c 'import tensorflow as tf; gpus = tf.config.list_physical_devices("GPU"); print("Num GPUs Available: ", len(gpus)); print("GPUs: ", gpus)'
```
You can check the list of python libraries available:
```
Singularity> pip list
```
Notice that on top of TensorFlow several well known libraries, such as "notebook", "numpy", "pandas", "scikit-learn" and "scipy", were installed in the container. The great news here is that NVIDIA made sure that all these libraries were compatible with TensorFlow so there should not be any version incompatibilities.
If necessary you may install extra packages that your deep learning code will use. For that you should create a virtual environment. Here we will call it "venv\_tensorflow\_gpu", but you may choose another name:
```
Singularity> python -m venv --system-site-packages venv_tensorflow_gpu
```
Activate the virtual environment:
```
Singularity> source venv_tensorflow_gpu/bin/activate
```
To install for example "tf\_keras\_vis":
```
(venv_tensorflow_gpu) Singularity> pip install tf_keras_vis
```
Deactivate your virtual environment and logout from singularity and the GPU node:
```
(venv_tensorflow_gpu) Singularity> deactivate
Singularity> exit
exit
```
#### Comments
##### Reproducibility
The container version specifies all Python libraries versions, ensuring consistency across different environments. If you also use a virtual environment and want to make your installation more reproducible, you may proceed as follows:
1\. Create a file called "requirements.txt" and write the package names inside. You may also specify the package versions. For example:
```
tf_keras_vis==0.8.7
```
2\. Proceed as above, but instead of installing the packages individually, type
```
pip install -r requirements.txt
```
##### Build your own container
Go to the webpage: [https://docs.nvidia.com/deeplearning/frameworks/tensorflow-release-notes/index.html](https://docs.nvidia.com/deeplearning/frameworks/tensorflow-release-notes/index.html)
Click on the latest release, which is "TensorFlow Release 24.05" at the time we're writing this documentation, and scroll down to see the table "NVIDIA TensorFlow Container Versions". It will show you the container versions and associated TensorFlow versions. For exemple, if you want to use TensorFlow 2.14 you could select the container 24.01.
Go to the webpage: [https://catalog.ngc.nvidia.com/orgs/nvidia/containers/tensorflow/tags](https://catalog.ngc.nvidia.com/orgs/nvidia/containers/tensorflow/tags)
Select the appropriate container, for 24.01 it is "nvcr.io/nvidia/tensorflow:24.01-tf2-py3". Do not choose any "-igpu" containers because they do not work on the UNIL clusters.
Choose a name for the container, for example "tensorflow-ngc-24.01-tf2.14.sif", and create the following file by using your favorite editor:
```
cd /scratch/username/
vi tensorflow-ngc.def
```
```
Bootstrap: docker
From: nvcr.io/nvidia/tensorflow:24.01-tf2-py3
%post
apt-get update && apt -y upgrade
PYTHONVERSION=$(python3 --version|cut -f2 -d\ | cut -f-2 -d.)
apt-get install -y bash wget gzip locales virutalenv git
sed -i '/^#.* en_.*.UTF-8 /s/^#//' /etc/locale.gen
sed -i '/^#.* fr_.*.UTF-8 /s/^#//' /etc/locale.gen
locale-gen
```
Note that if you choose a difference container version, you will need to replace "24.01" by the appropriate container version in the script.
You can now download the container:
```
module load singularityce/4.1.0
export SINGULARITY_DISABLE_CACHE=1
singularity build --fakeroot tensorflow-ngc-24.01-tf2.14.sif tensorflow-ngc.def
mv tensorflow-ngc-24.01-tf2.14.sif /work/PATH_TO_YOUR_PROJECT
```
That's it. You can then use it as it was explained above.
Warning: Do not log into a GPU node for building a singularity container, it will not work. But of course you will need to log into a GPU node to use it as shown below.
##### Use a virtual environment
Using containers is convenient because it is often difficult to install TensorFlow directly within a virtual environment. The reason is that TensorFlow has several dependencies and we must load or install the correct versions of them. Here are some instructions:
```
cd /work/PATH_TO_YOUR_PROJECT
Sinteractive -m 4G -G 1
module load python/3.10.13 tk/8.6.11 tcl/8.6.12
python -m venv venv_tensorflow_gpu
source venv_tensorflow_gpu/bin/activate
pip install tensorflow[and-cuda]==2.14.0 "numpy<2"
```
#### Run your deep learning code
To test your deep learning code (maximum 1h), say "my\_deep\_learning\_code.py", you may use the interactive mode:
```
cd /PATH_TO_YOUR_CODE/
Sinteractive -m 4G -G 1
module load singularityce/4.1.0
export SINGULARITY_BINDPATH="/scratch,/dcsrsoft,/users,/work,/reference"
singularity run --nv /dcsrsoft/singularity/containers/tensorflow/tensorflow-ngc-24.05-2.15.sif
source /work/PATH_TO_YOUR_PROJECT/venv_tensorflow_gpu/bin/activate
```
Run your code:
```
python my_deep_learning_code.py
```
or copy/paste your code inside a python environment:
```
python
copy/paste your code. For example:
import tensorflow as tf
from tensorflow.keras.models import Sequential
from tensorflow.keras.layers import Dense
from tensorflow.keras.utils import to_categorical
etc
```
Once you have finished testing your code, you must close your interactive session (by typing exit), and then run it on the cluster by using an sbatch script, say "my\_sbatch\_script.sh":
```
#!/bin/bash -l
#SBATCH --account your_account_id
#SBATCH --mail-type ALL
#SBATCH --mail-user firstname.surname@unil.ch
#SBATCH --chdir /scratch/username/
#SBATCH --job-name my_deep_learning_job
#SBATCH --output my_deep_learning_job.out
#SBATCH --partition gpu
#SBATCH --gres gpu:1
#SBATCH --gres-flags enforce-binding
#SBATCH --nodes 1
#SBATCH --ntasks 1
#SBATCH --cpus-per-task 1
#SBATCH --mem 10G
#SBATCH --time 01:00:00
module load singularityce/4.1.0
export SINGULARITY_BINDPATH="/scratch,/dcsrsoft,/users,/work,/reference"
# To use only singularity
export singularity_python="singularity run --nv /dcsrsoft/singularity/containers/tensorflow/tensorflow-ngc-24.05-2.15.sif python"
# To use singularity and virtual environment
export singularity_python="singularity run --nv /dcsrsoft/singularity/containers/tensorflow/tensorflow-ngc-24.05-2.15.sif /work/PATH_TO_YOUR_PROJECT/venv_tensorflow_gpu/bin/python"
$singularity_python /PATH_TO_YOUR_CODE/my_deep_learning_code.py
```
To launch your job:
```
cd PATH_TO_YOUR_SBATCH_SCRIPT/
sbatch my_sbatch_script.sh
```
Remember that you should write the output files in your /scratch directory.
#### Multi-GPU parallelism
If you want to use a single GPU, you do not need to tell Keras to use the GPU. Indeed, if a GPU is available, Keras will use it automatically.