Public documentation
Public documentation of the service
- Data Protection
- Installation
- Sharing Files and Folders
- OneDrive Online - Web App
- Synchronize Teams/SharePoint Files
- File or Folder Management and Recovery in OneDrive
- Version Management in OneDrive
- Getting Started with OneDrive
- Downloading Data from the Website
- File On Demand Functionality
- Collaborate with UNIL members as an external user
Data Protection
Data Security
| SWITCHdrive |
OneDrive |
|
| Storage Location |
Switzerland |
Switzerland |
| Encryption |
❌ | ✅ |
| Dedicated Instance data storage |
❌ | ✅ |
| Data replication across multiple sites |
❌ | ✅ |
| Long-Term Storage (research, archives, etc.) |
❌ | ❌ |
Conditions of Use
The conditions of use for OneDrive are the same as those for SWITCHdrive. To know where to store which data : https://www.unil.ch/ci/data
| SWITCHdrive |
OneDrive | |
| Public Data |
✅ |
✅ |
| Internal Data |
✅ | ✅ |
| Inter-Service Data |
✅ | ✅ |
| Confidential Data |
✅ | ✅ |
| Sensitive Data |
❌ | ❌ |
Public (public data, article, webpage, etc.)
Internal (reserved for internal university use, not available on public websites)
Inter-Service (same as above, reserved for a specific department or faculty)
Confidential (document from management, HR, Finance, etc.)
Research Data
Research data stored on OneDrive/Teams for collaborative work must be subsequently moved to institutional resources. It must then be deleted from OneDrive/Teams.
UNIL recommends the use of institutional resources provided by the Division of Computing and Research Support (DCSR) for long-term storage of research data (see Article 8 of Directive 4.5 (in french)).
Server Storage
DCSR provides storage for each Principal Investigator (PI) in research projects. The service is free for storage up to 1 TB per PI.
Research Resource Request
Data transfer
DCSR also offers a service if you need to send data to external collaborators.
File Transfer
Help and Information
If you need assistance or additional information, you can contact the support personnel within your faculty:
- FBM: Cécile Lebrand, Research Data Specialist (data steward)
- FDCA: Auriane Marmier, Research Data Specialist (data steward); Hugo Hueber, Research Engineer
- FGSE: Zhargalma Dandarova, Research Data Specialist (data steward)
- FTSR: Christelle Cocco, Research Data Specialist (data steward); Samy Ibriz Pelaez, Research Engineer
- HEC: Zhargalma Dandarova, Research Data Specialist (data steward)
- Letters: Please address your requests to recherche-lettres@unil.ch
- SSP: Ellina Mourtazina, Research Data Specialist (data steward); Glen Lomax, Research Engineer;
For more information on research data storage, you can visit this page.
Installation
Windows 10 and 11
Installation:
On Windows 10 and Windows 11, OneDrive is usually installed by default. If you can't find it, you can download the application here: https://www.microsoft.com/en-us/microsoft-365/onedrive/download.
Configuration:
-
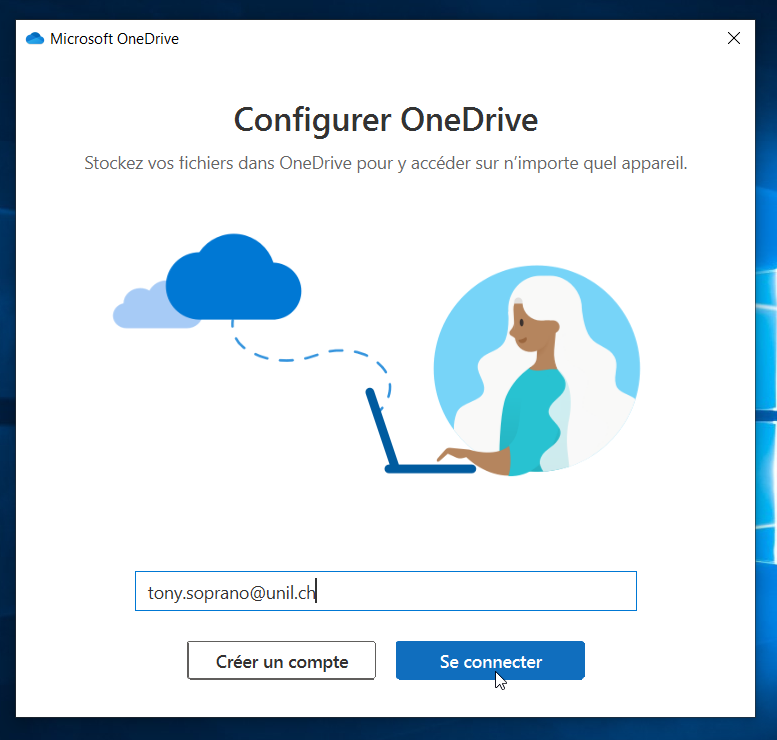
Launch the application by clicking on the icon in your taskbar


-
Click on the Sign In button

-
Enter your @unil.ch email address.

-
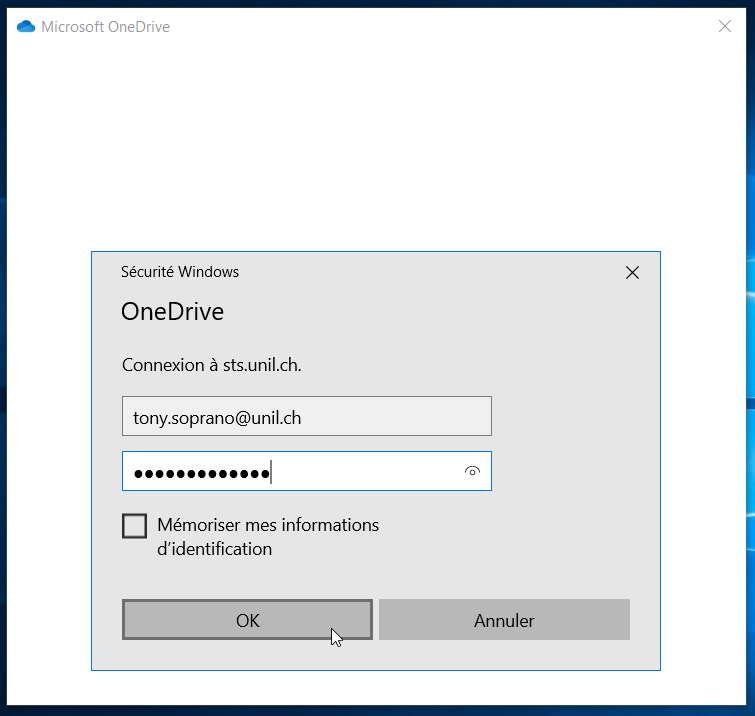
On the page that opens, enter your UNIL credentials (email address @unil.ch and UNIL password).

-
If asked to choose the account type, select Work or school.

-
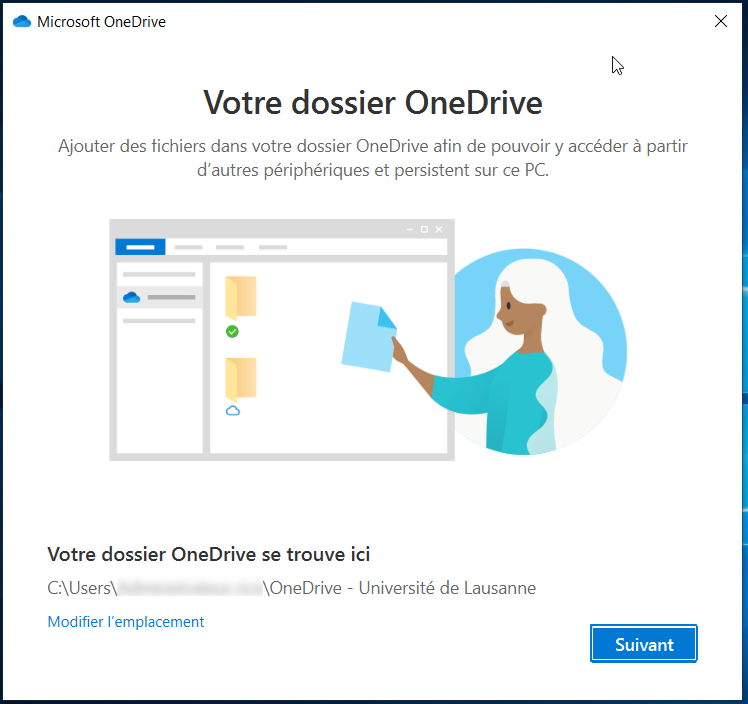
By default, OneDrive syncs a OneDrive-Université de Lausanne folder in your user folder. You can modify it if you wish. Never sync an entire user folder or a folder from another synchronization application (SWITCHdrive, Dropbox, etc.).

-
By default, the folders Desktop, Documents, and Pictures are synced to OneDrive. You can deselect a folder if you do not want it to be added to OneDrive. Then click Continue.

-
Several explanation screens will appear. Skip them by clicking Next.
-
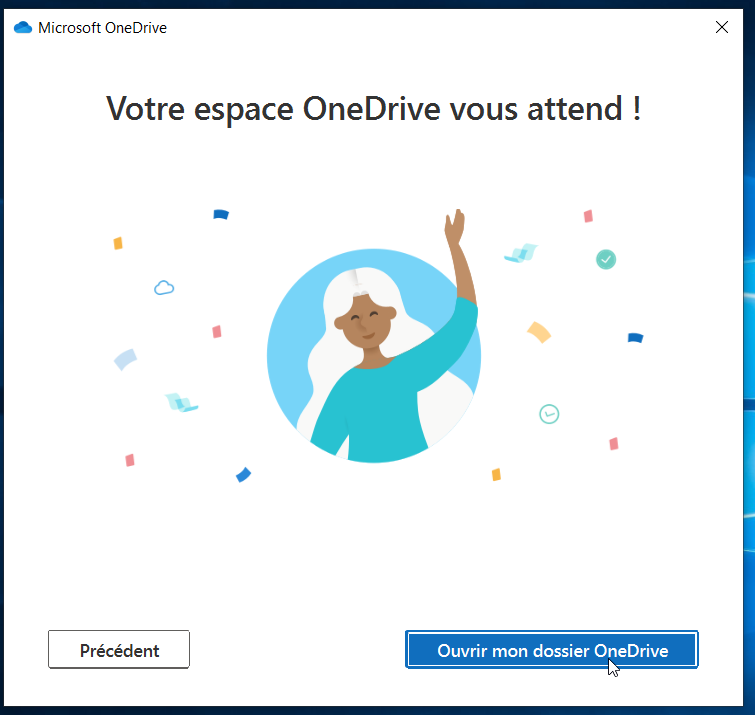
The final screen allows you to open your synchronization folder and start depositing files. If you chose to sync the Desktop, Documents, and/or Pictures folders, the data loading will start immediately.

-
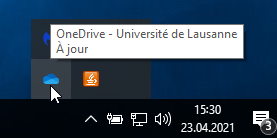
You can check that your account is configured correctly if the OneDrive icon in the taskbar turns blue.


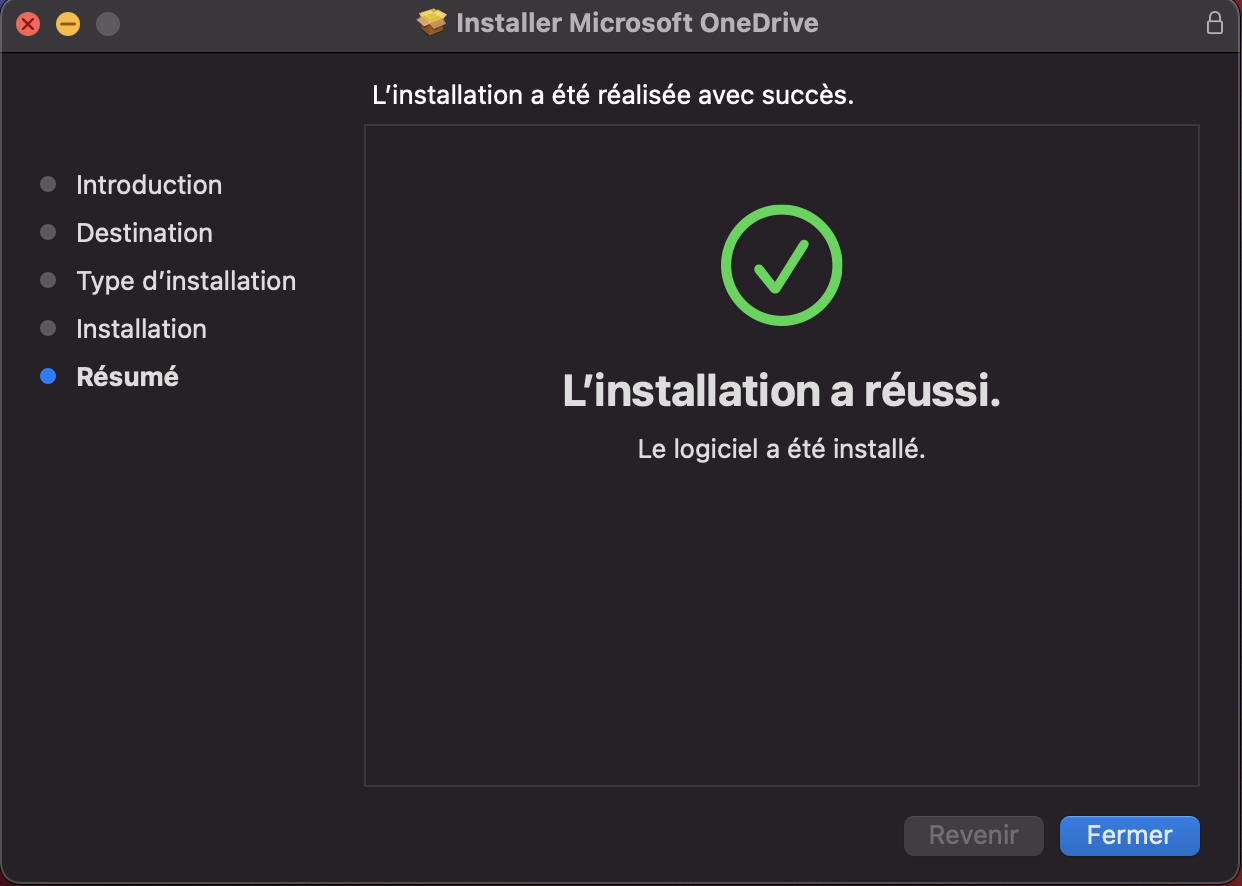
macOS
Method 1: App Store
OneDrive can be installed from the Apple App Store: https://apps.apple.com/ch/app/onedrive/id823766827?l=fr&mt=12

Method 2: Download
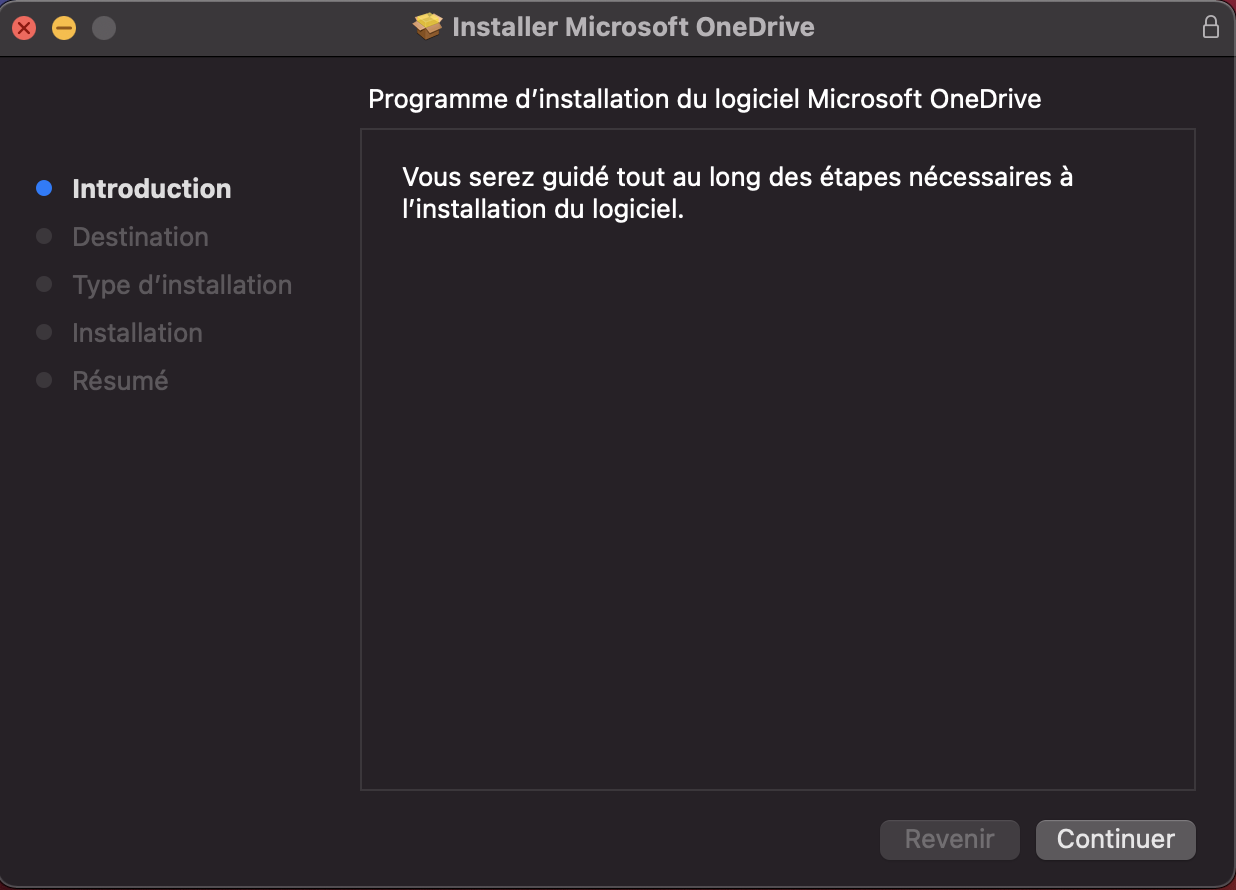
- Download the installation file here: OneDrive macOS
- Double-click on the installation file.
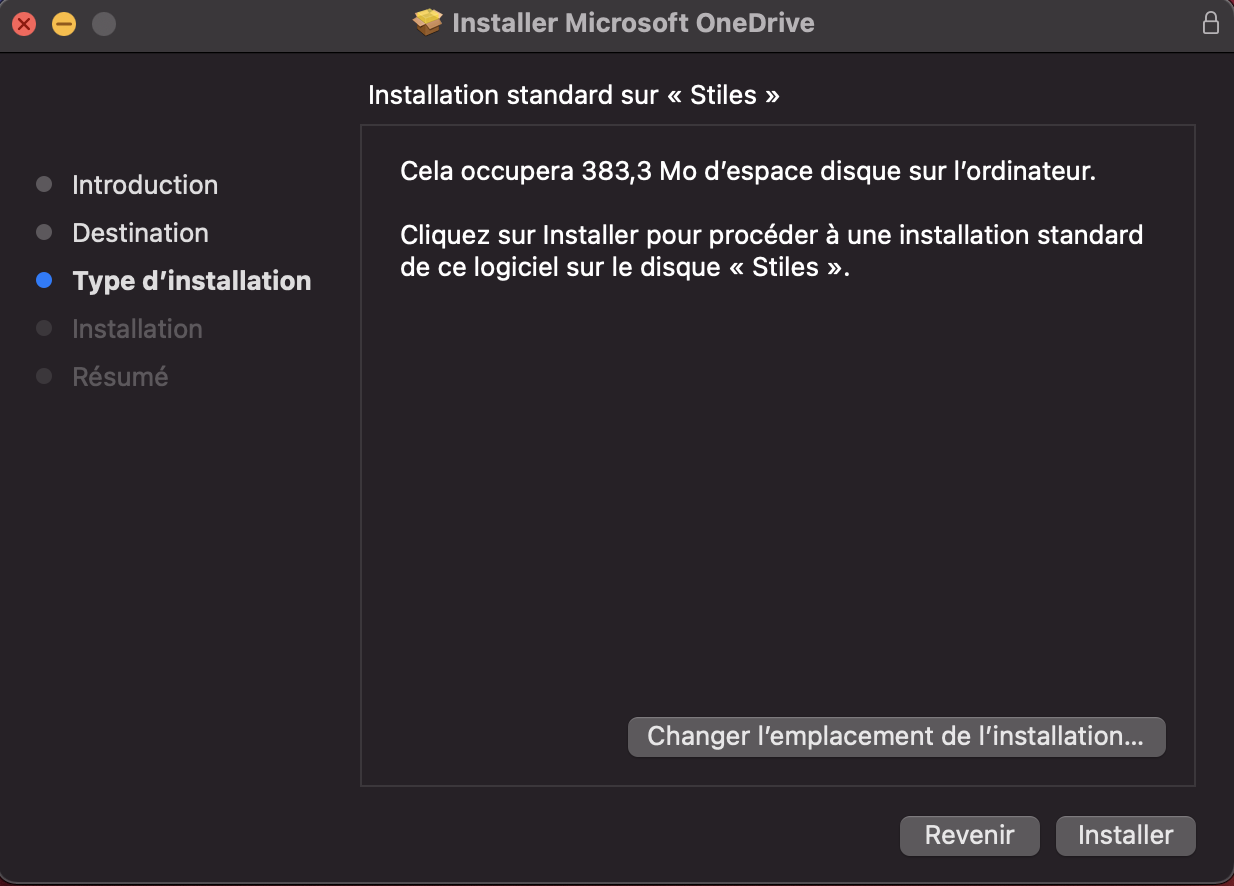
- Click Next

- Click Install

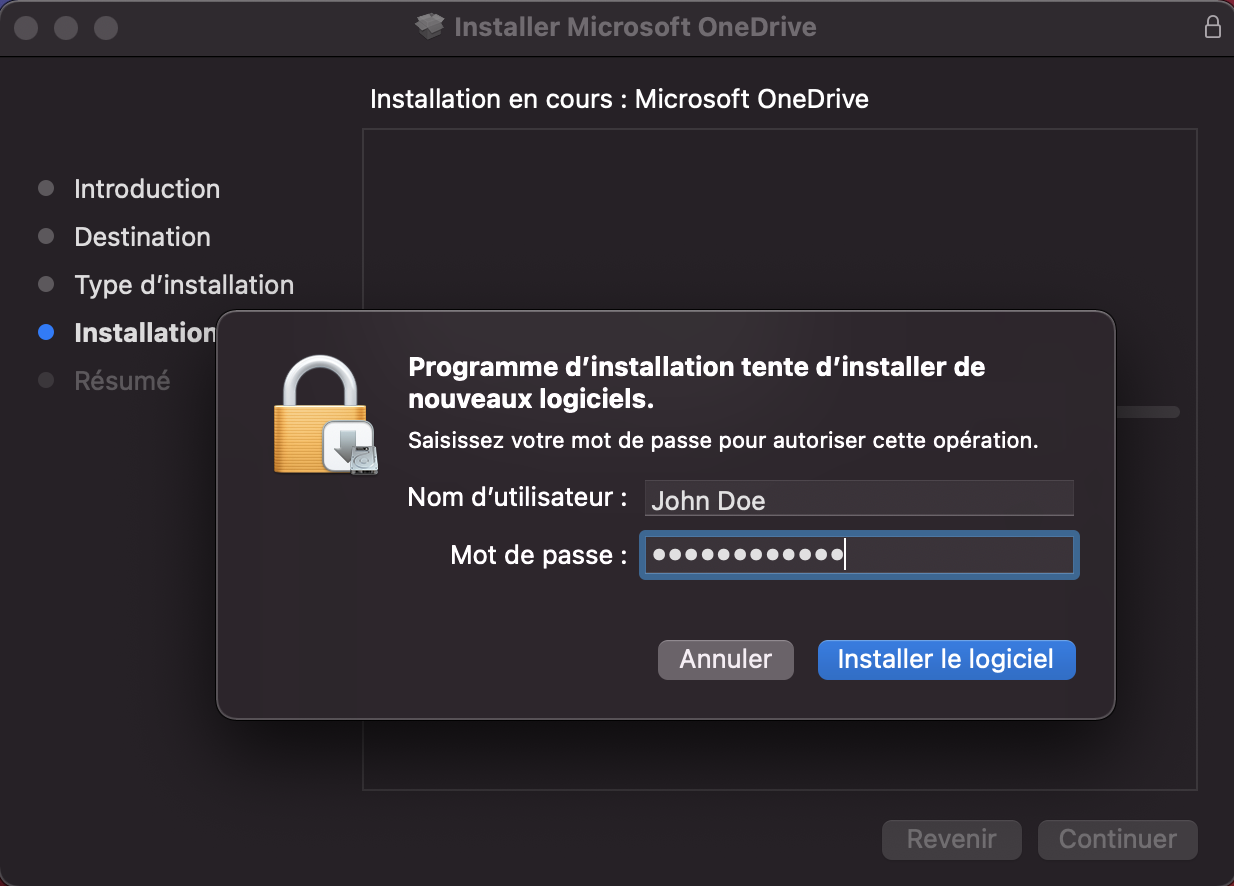
- Enter your computer password and click Install Software

- Once the installation is complete, click Close

- Launch the application from the Applications folder.
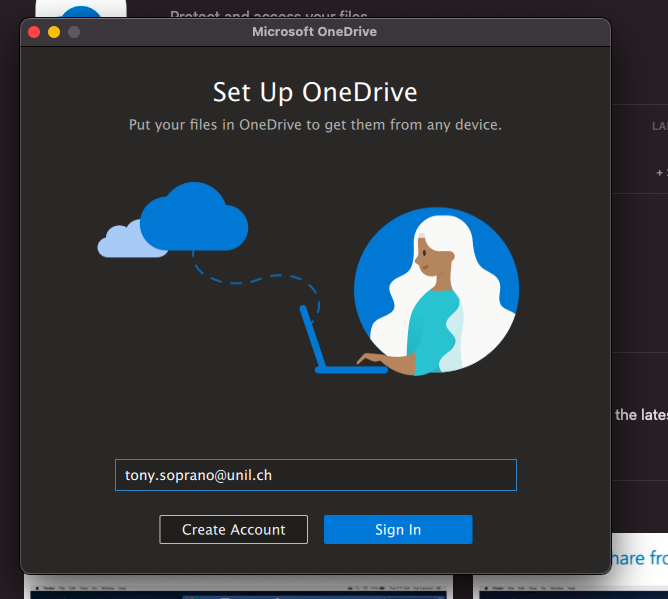
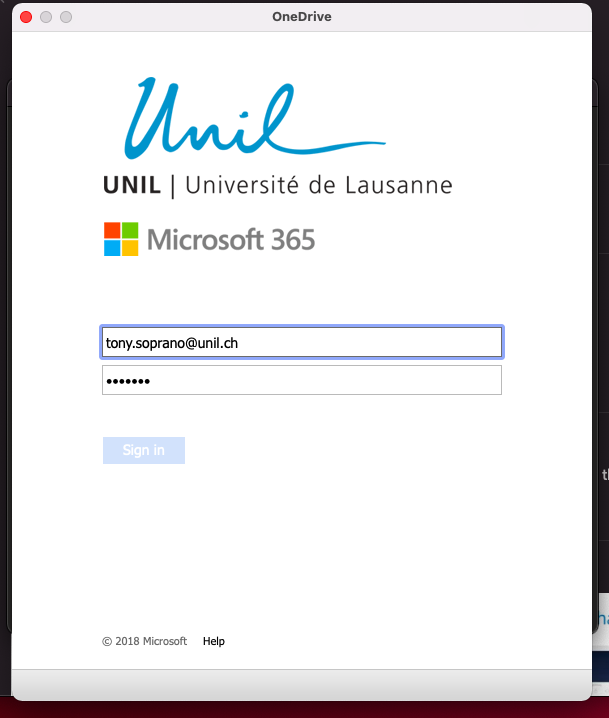
Configuration
- Enter your UNIL email address

- If asked, choose Work or school

- You will then be redirected to the UNIL login page. Enter your UNIL password and click Sign In.

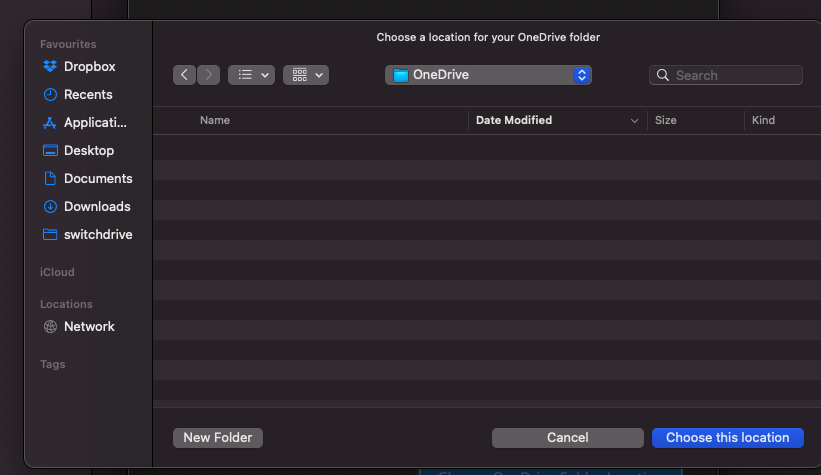
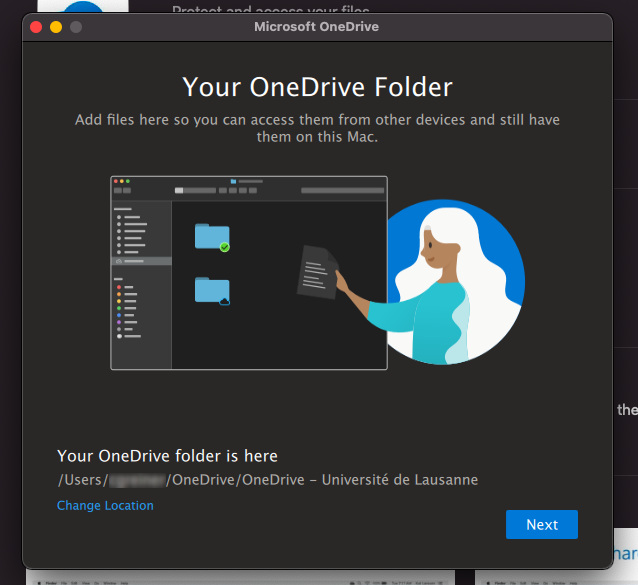
- By default, OneDrive syncs a OneDrive folder in your user folder. You can modify it if you wish. Never sync an entire user folder or a folder from another synchronization application (SWITCHdrive, Dropbox, etc.).


- Several explanation screens will appear. Skip them by clicking Next
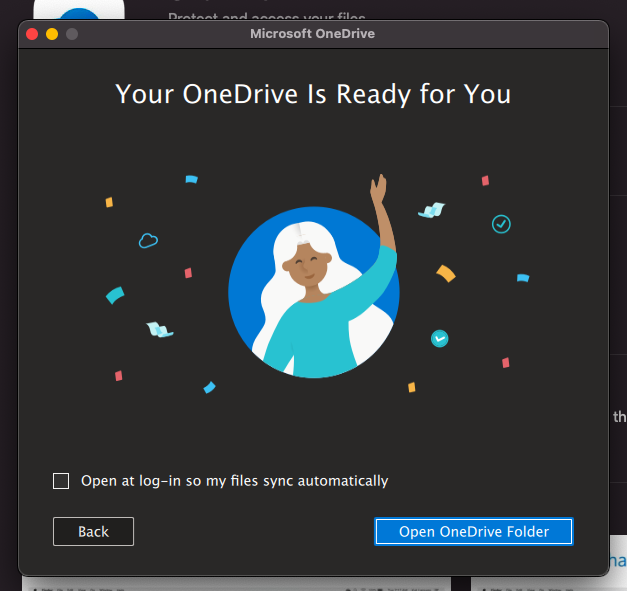
- The final screen allows you to open your synchronization folder and start depositing files. If you chose to sync the Desktop, Documents, and/or Pictures folders, the data loading will start immediately.

Linux
There is no official OneDrive client for Linux. It is recommended to use the OneDrive web interface.
You can use an unofficial command-line client for synchronization. For more information, read this https://askubuntu.com/questions/804301/how-to-sync-onedrive-business-office-365-on-linux, and the link to the project can be found here https://github.com/abraunegg/onedrive/blob/master/docs/INSTALL.md
Some Linux distributions seem to offer OneDrive through their package manager, but this version is often not up-to-date. It is advisable to follow the instructions in the GitHub repository below!
Ubuntu 20.04
The simplest solution seems to be Insync, but it is a paid service!
Add the OneDrive repository to your APT sources:
sudo vim /etc/apt/sources.list
Add the following line at the end of the file:
deb https://download.opensuse.org/repositories/home:/npreining:/debian-ubuntu-onedrive/xUbuntu_20.04/ ./
Close Vim (if you don't know how to close Vim, switch to macOS or Windows :))
Download the key for the repo and add it:
wget https://download.opensuse.org/repositories/home:/npreining:/debian-ubuntu-onedrive/xUbuntu_20.04/Release.key
sudo apt-key add ./Release.keysudo apt update
sudo apt install onedriveLaunch the client to configure it:
onedriveThis will give you:
Configuring Global Azure AD Endpoints
Authorize this app visiting:
https://login.microsoftonline.com/common/oauth2/v2.0/authorize?client_id=xxxxxxxx-xxxx-xxxx-xxxx-xxxxxxxxxxxx&scope=Files.ReadWrite%20Files.ReadWrite.all%20Sites.Read.All%20Sites.ReadWrite.All%20offline_access&response_type=code&redirect_uri=https://login.microsoftonline.com/common/oauth2/nativeclient
Enter the response uri
Click on the URL starting with http://login.microsoftonline.com. This will open your browser (or copy/paste it if clicking doesn't work) and log you into your Microsoft M365 account, leading you to a blank page. Copy/paste the URL of this blank page into the terminal and press Enter:
Enter the response uri: https://login.microsoftonline.com/common/oauth2/nativeclient?code=[.........]
The application has been successfully authorized; however, no additional command switches were provided.
Please use --help for further assistance regarding running this application.Start syncing with the following command (the --verbose switch can be omitted), and your OneDrive files will be synchronized to the ~/OneDrive directory:
onedrive --synchronize --verboseThere is a graphical interface based on this OneDrive version called OneDriveGUI: https://github.com/bpozdena/OneDriveGUI
Mobile Phone and Tablet
iOS and iPadOS
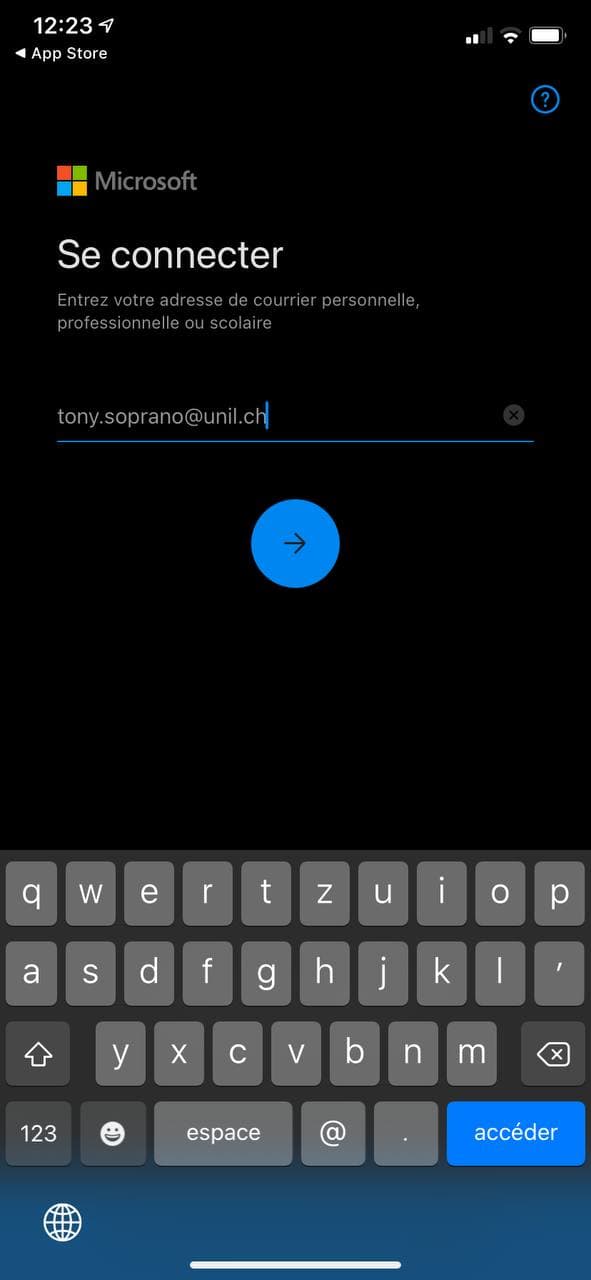
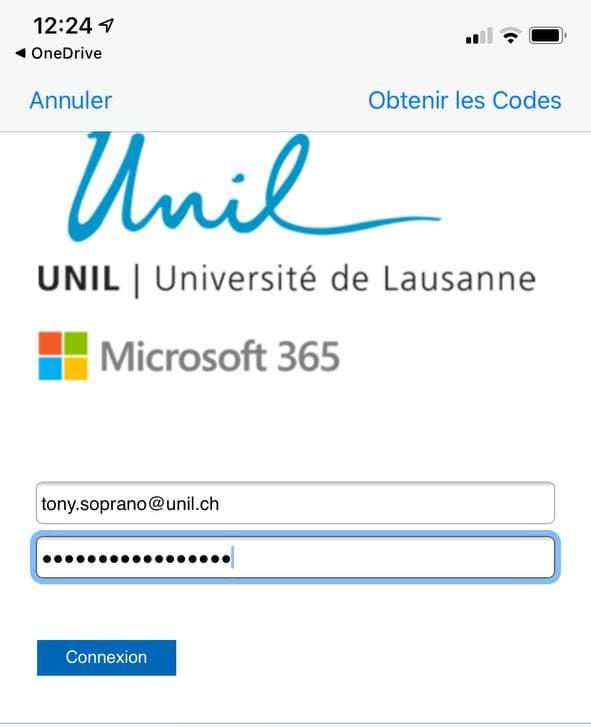
- Go to the App Store and install the OneDrive application.
- Enter your UNIL email address.

- You will be redirected to the UNIL login screen. Enter your UNIL credentials (email and password) and click Sign In

- You will then have access to your OneDrive

Android
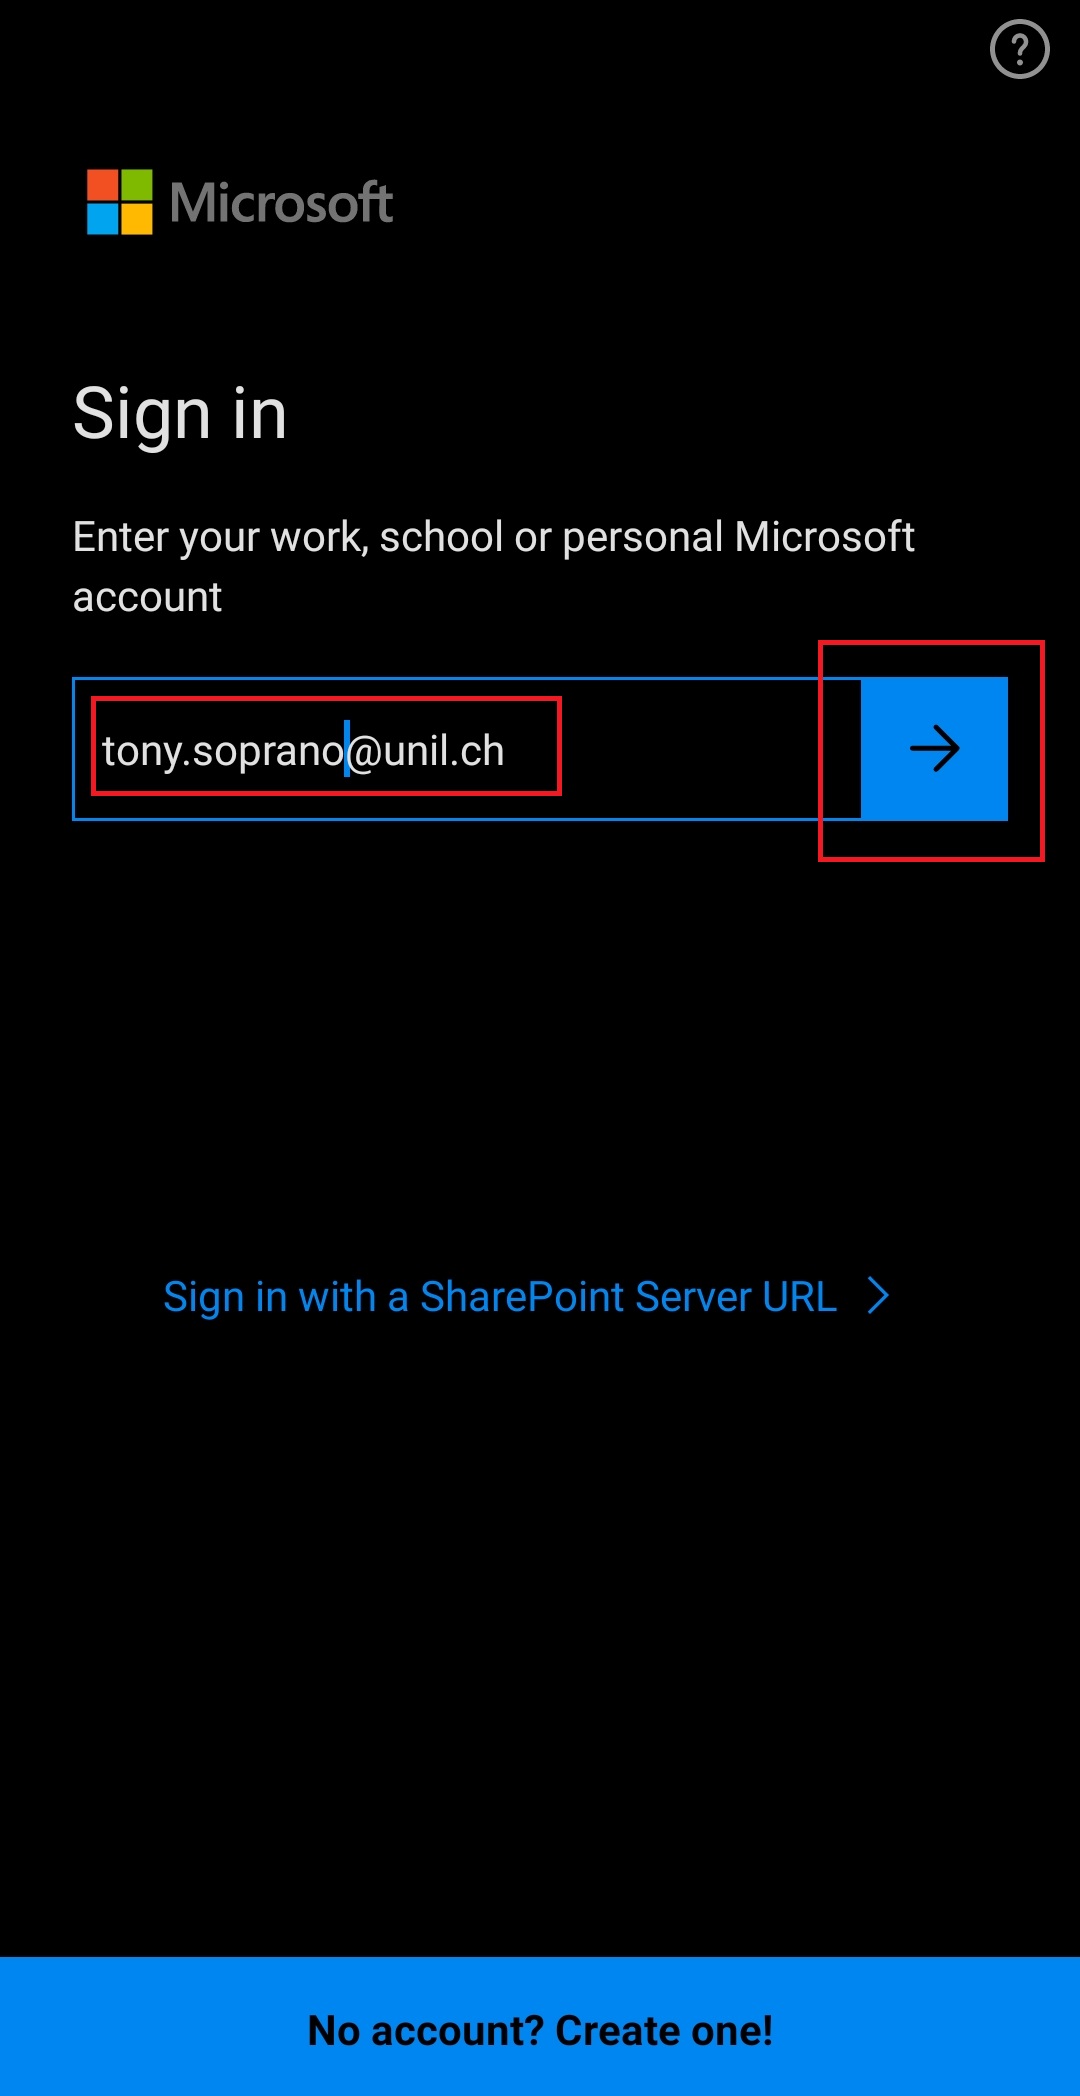
- Go to the Google Play Store and install the Microsoft OneDrive application.
- Launch the application and select Sign in

- Enter your @unil.ch email address and continue

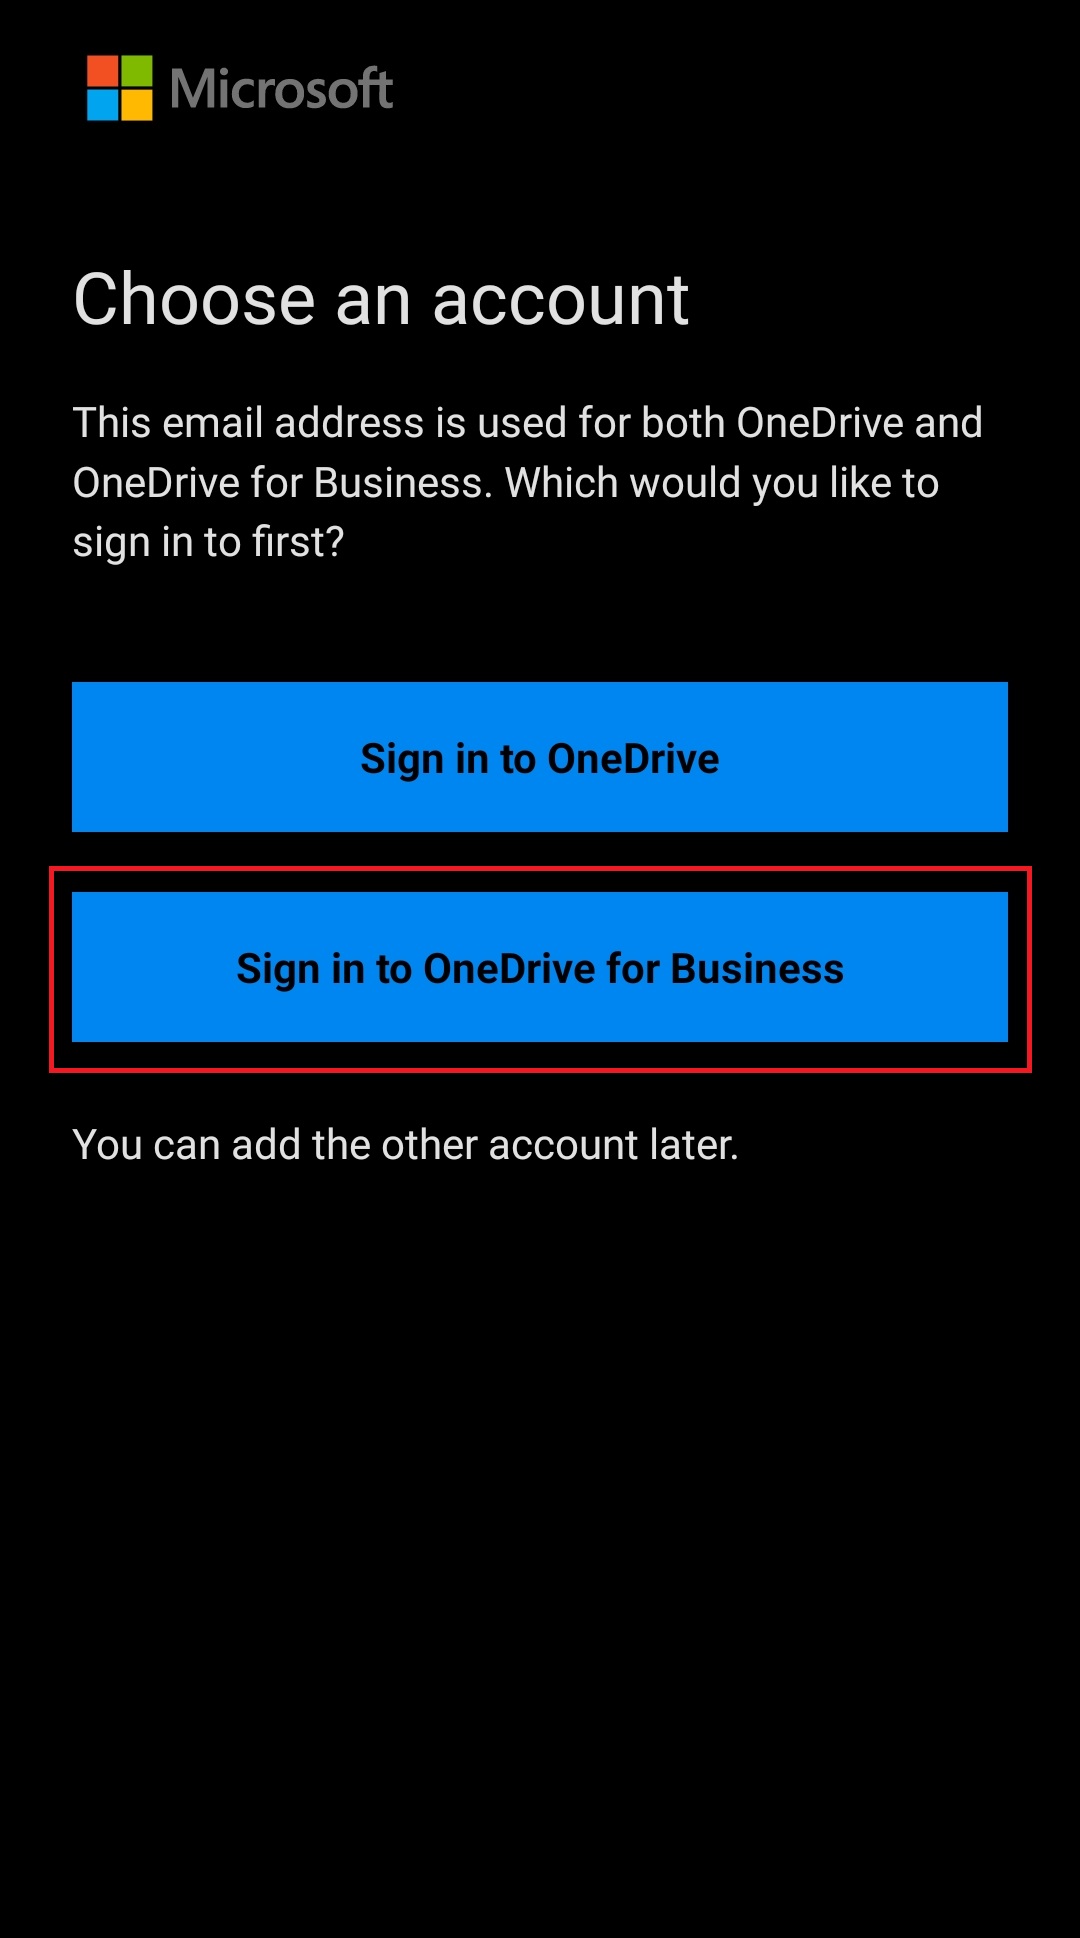
- Select Sign in to OneDrive For Business if prompted

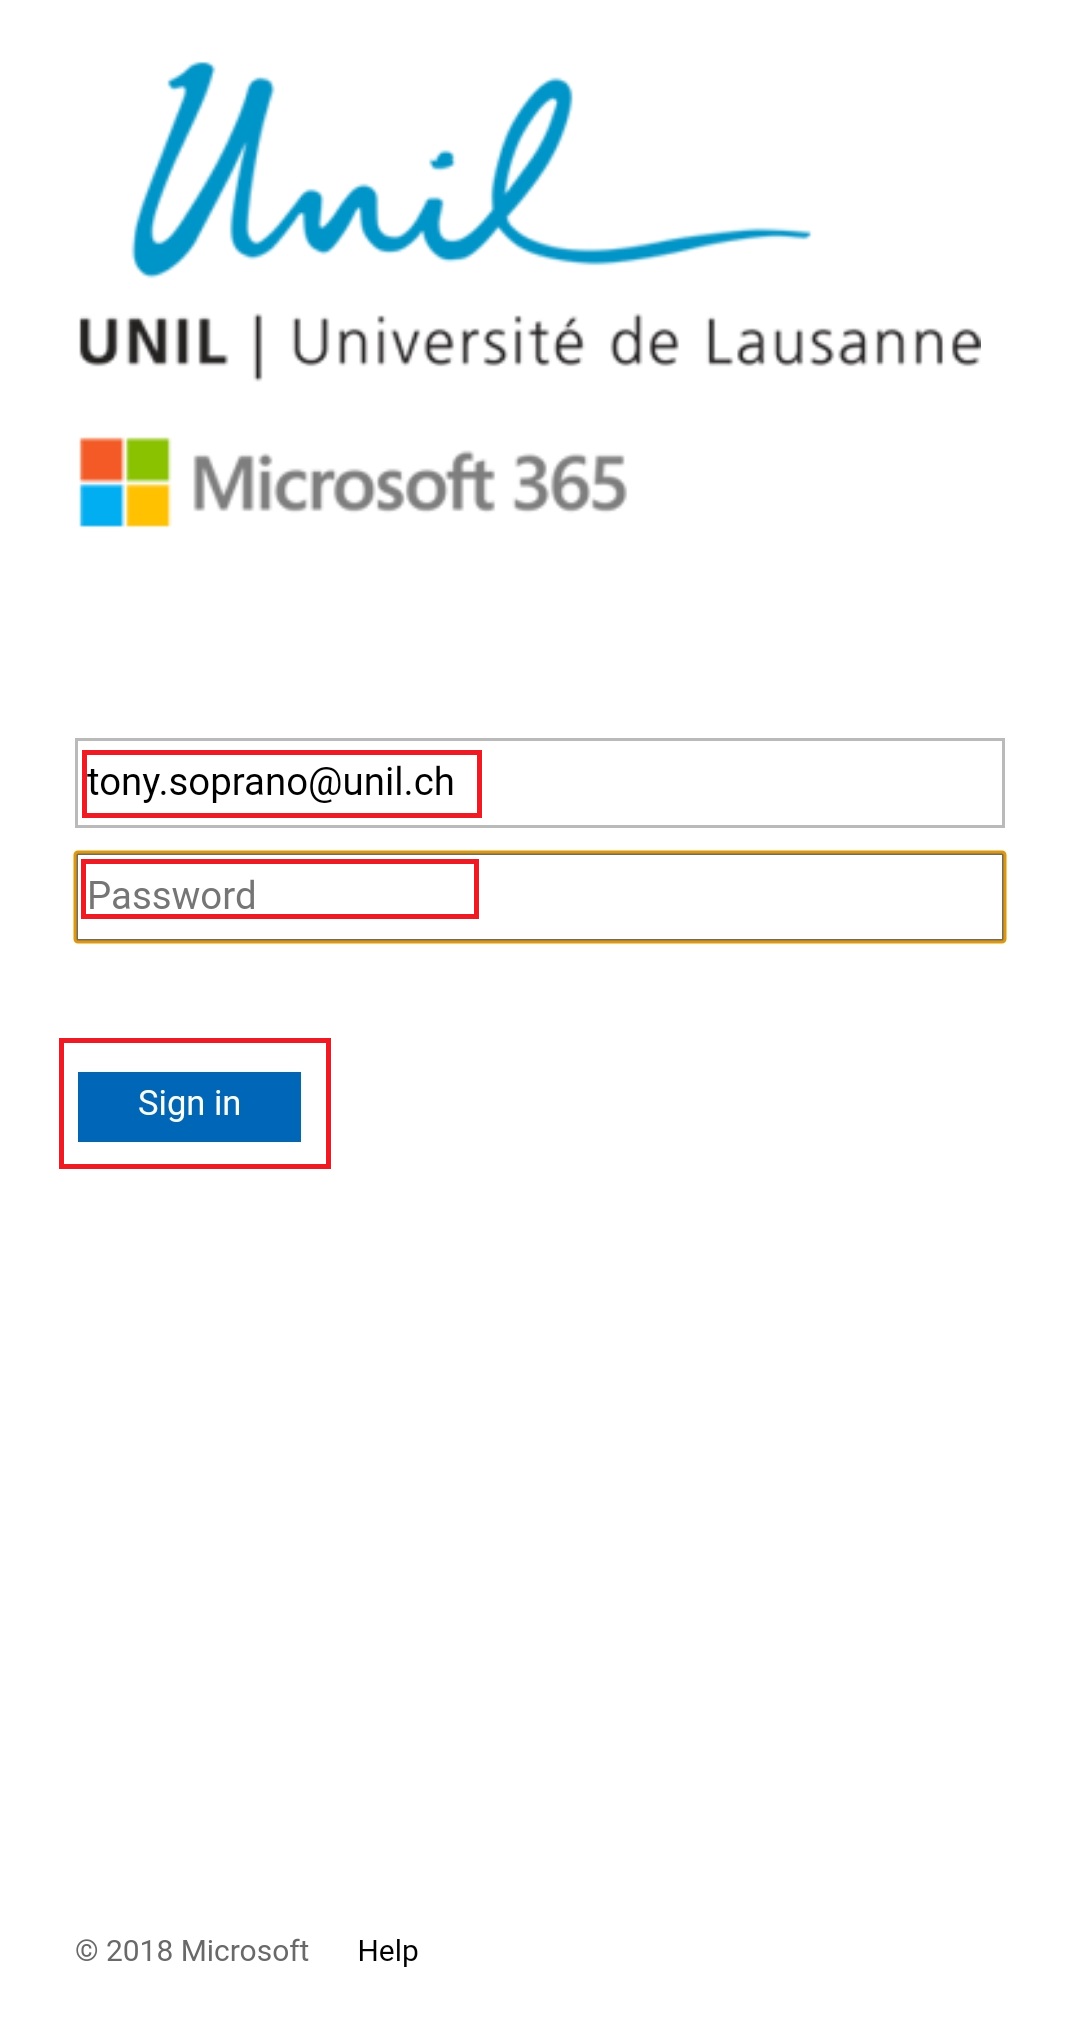
- Enter your @unil.ch email address and your UNIL password, then click Sign In

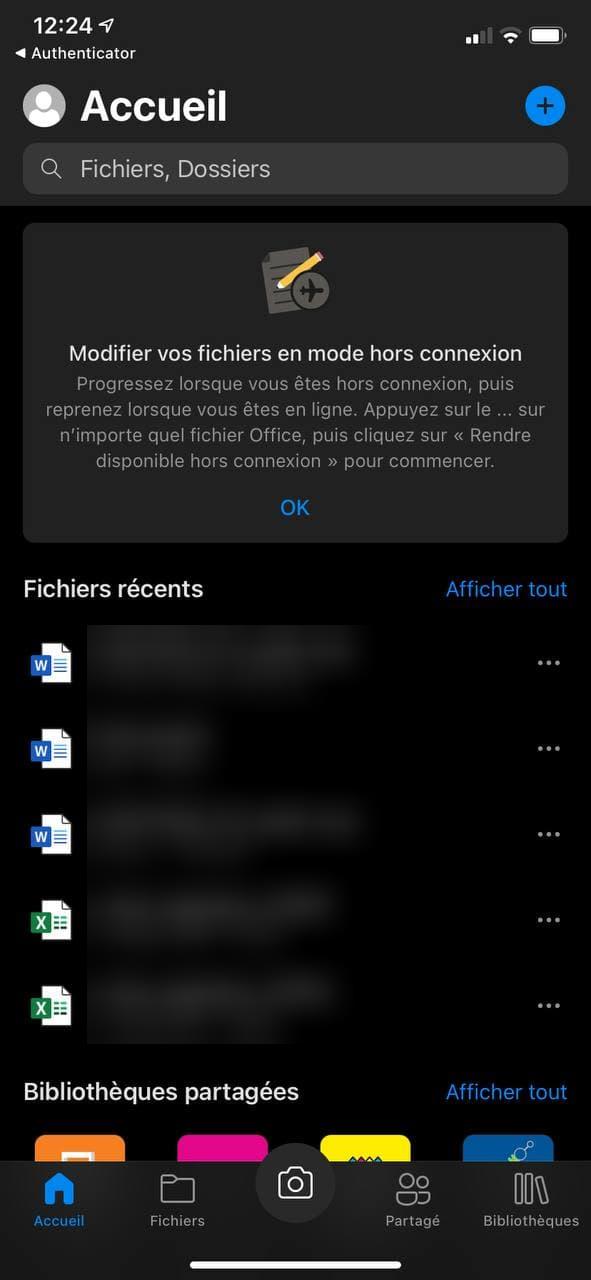
- The final screen after installation

- Click on "Home" to see an overview of your account


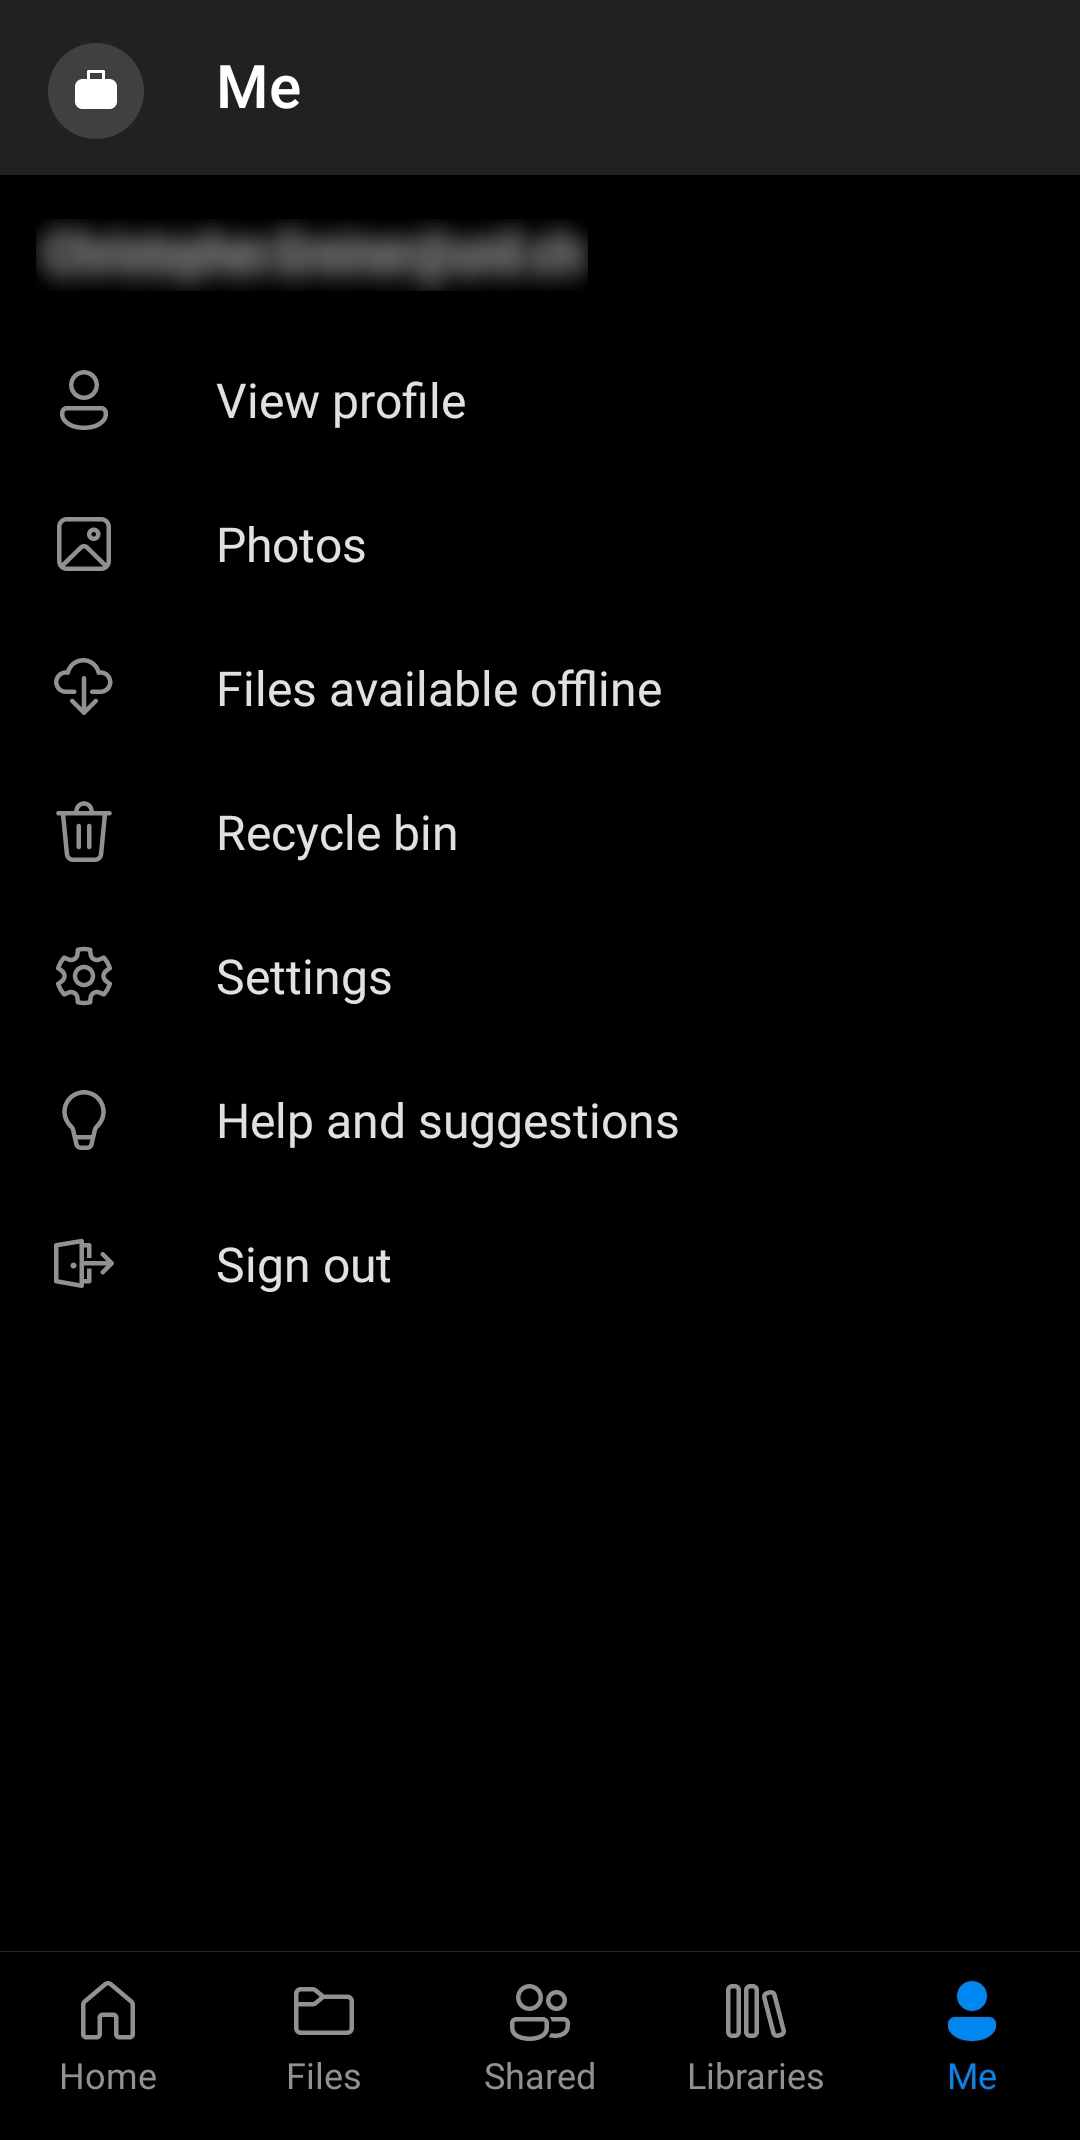

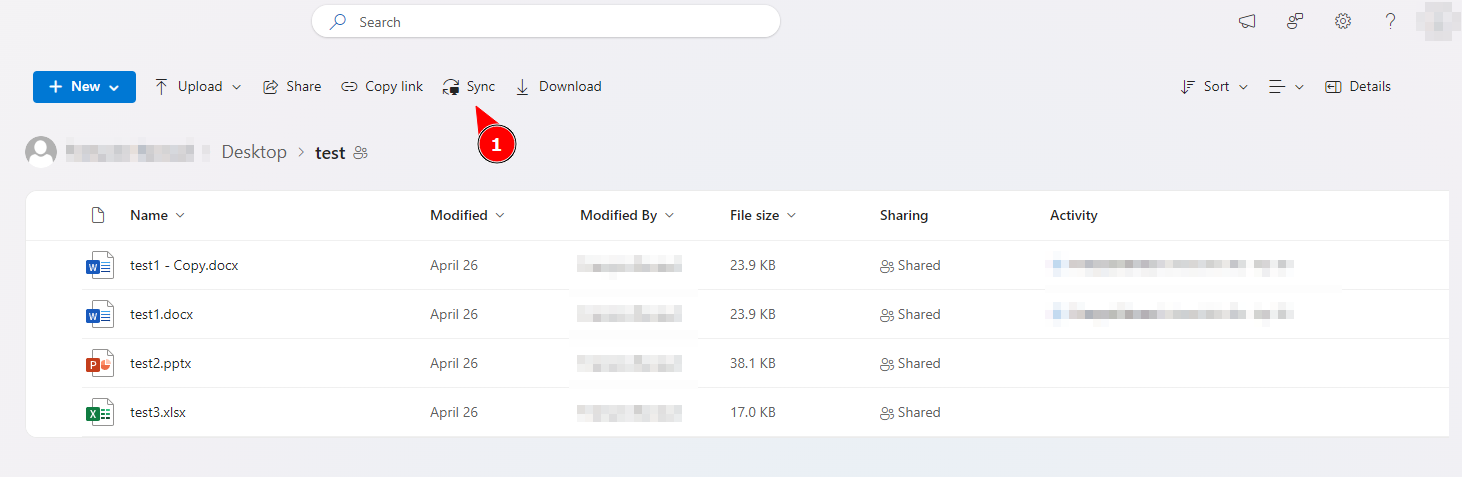
Sharing Files and Folders
With OneDrive, you can share files or folders with other people, groups, or via a link. Sharing folders with specific individuals is useful for collaboration with internal or external individuals or groups at the University of Lausanne. The option to share via a link is preferable for sharing with a large number of people whom you may not personally know.
Sharing Folders or Files with Specific Individuals or Groups
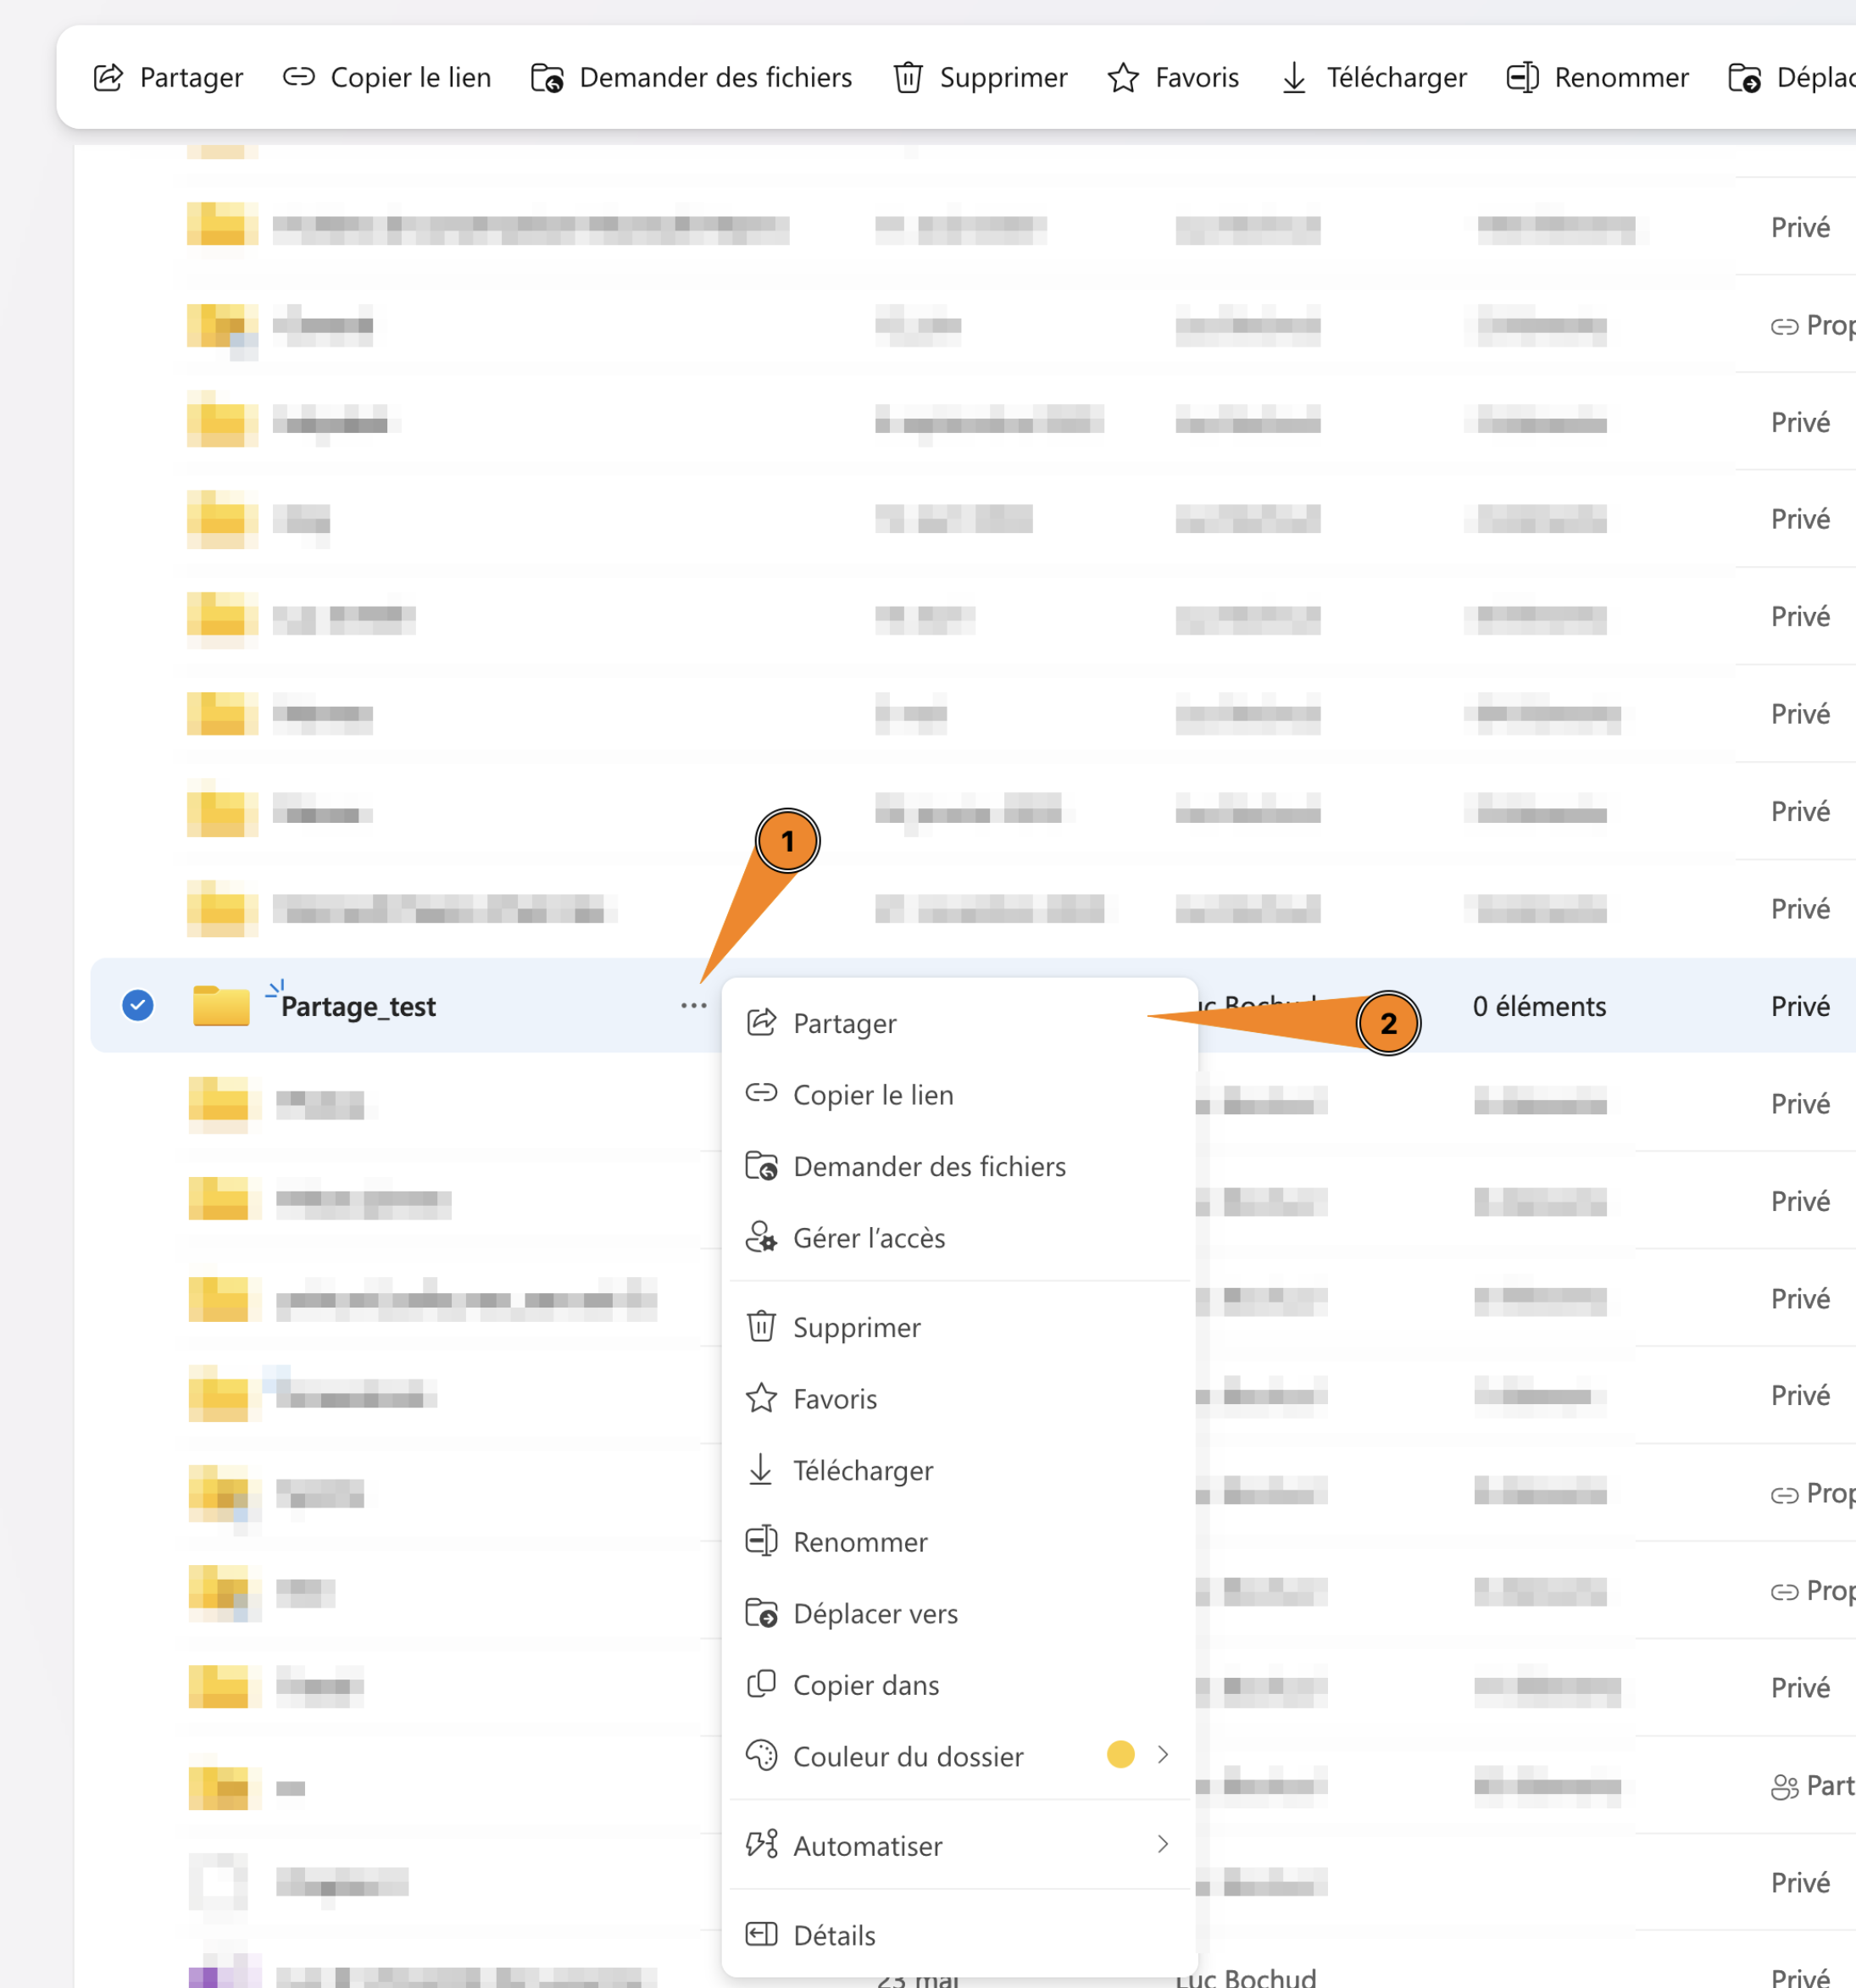
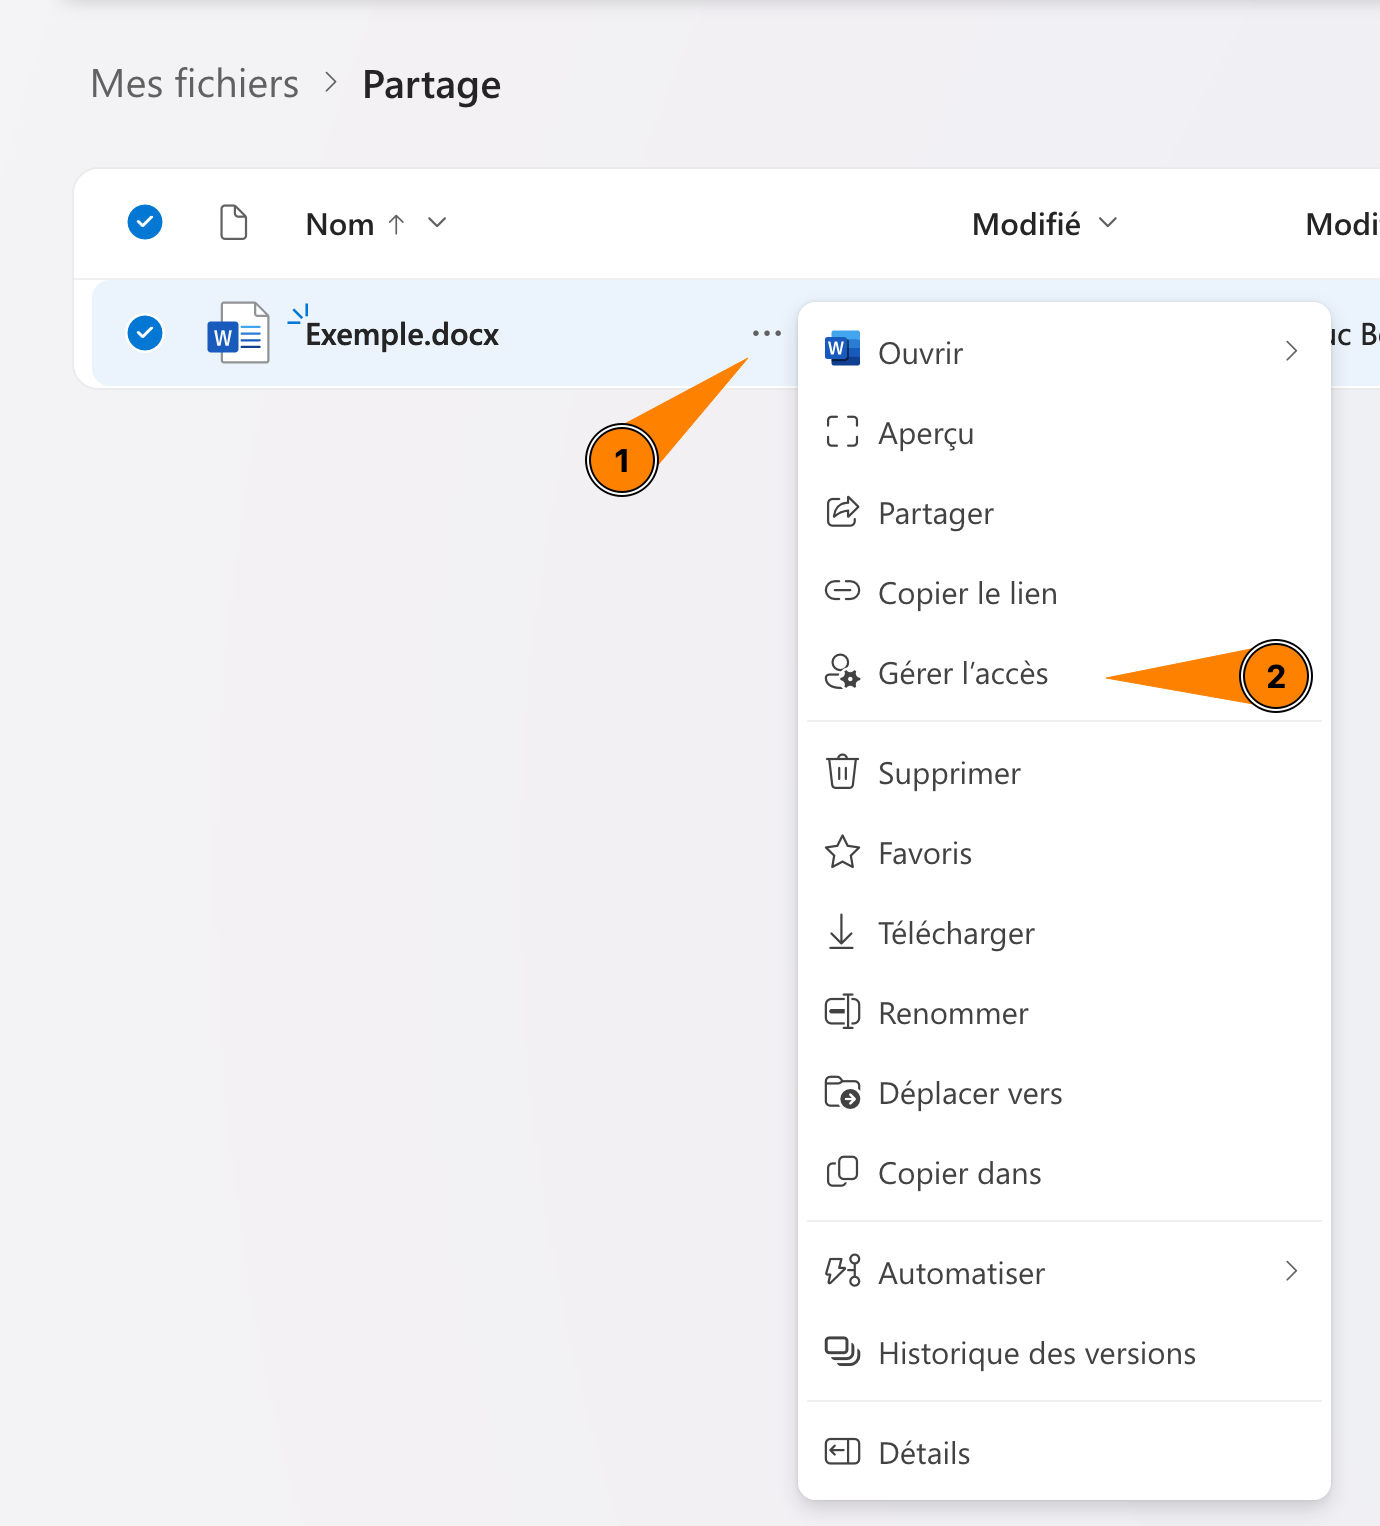
To grant access to your OneDrive data to another person or group, you can use the web interface by logging in to onedrive.com. Then click on the three dots (1) and "Share" (2).
You can also do this directly from your computer:
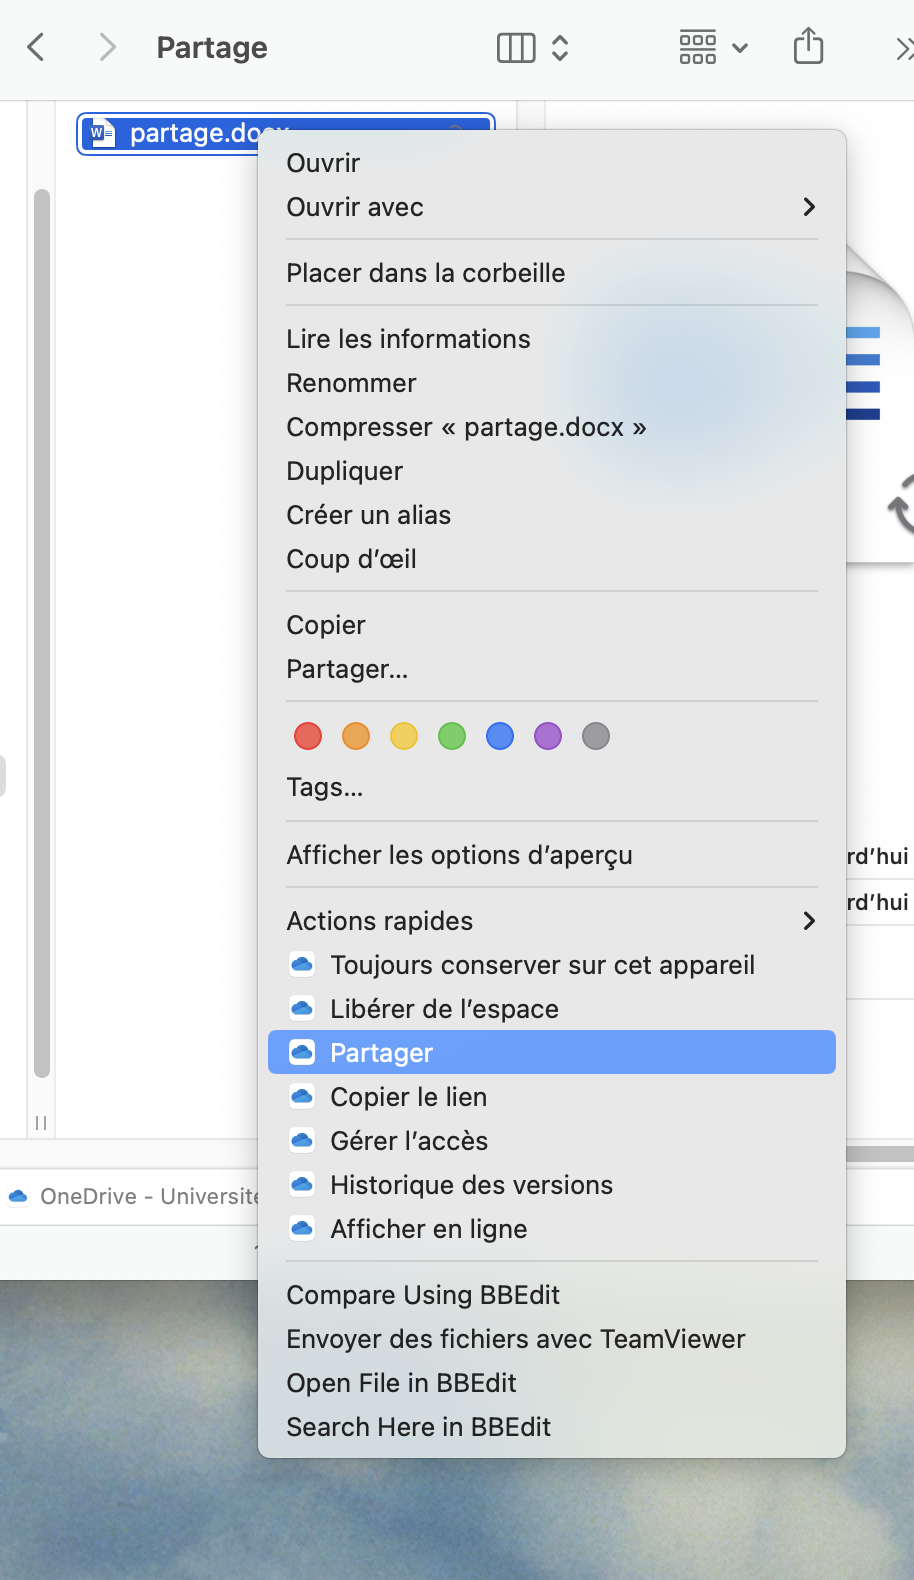
On macOS, right-click and choose "Share":
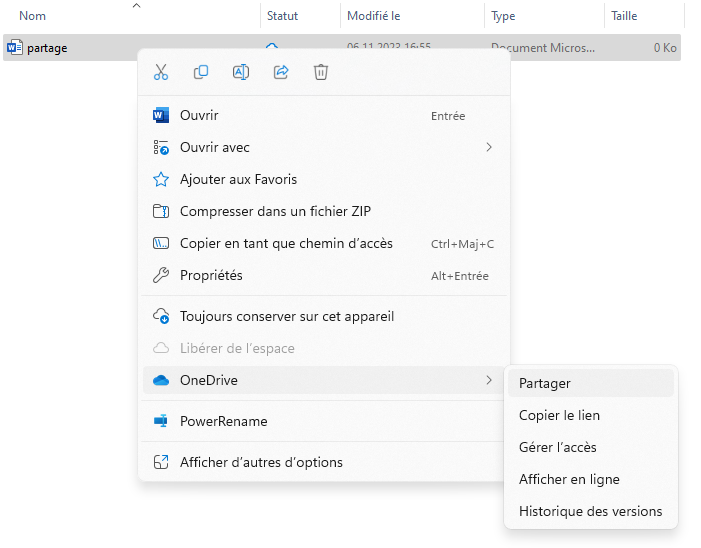
On Windows, right-click on the folder or file, then select "OneDrive" and "Share":
Sharing Procedure
Regardless of the method you use for sharing, you should encounter a window similar to the one below:
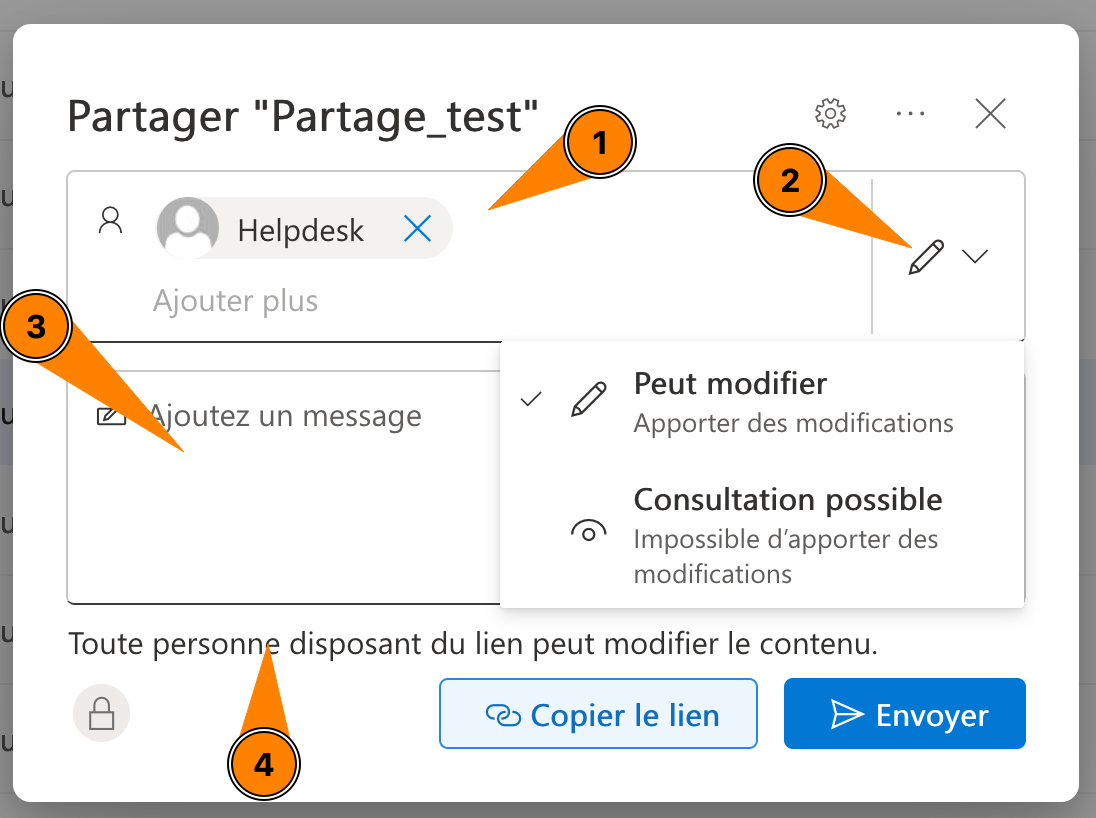
- You can add specific people or groups with whom to share the document.
- Modify the access type of individuals by clicking on the small pencil.
- Add a message that will be sent to the specified people or groups.
- Finally, you can click on "Anyone with the link can edit the content" to fine-tune the sharing. You will see the following window:
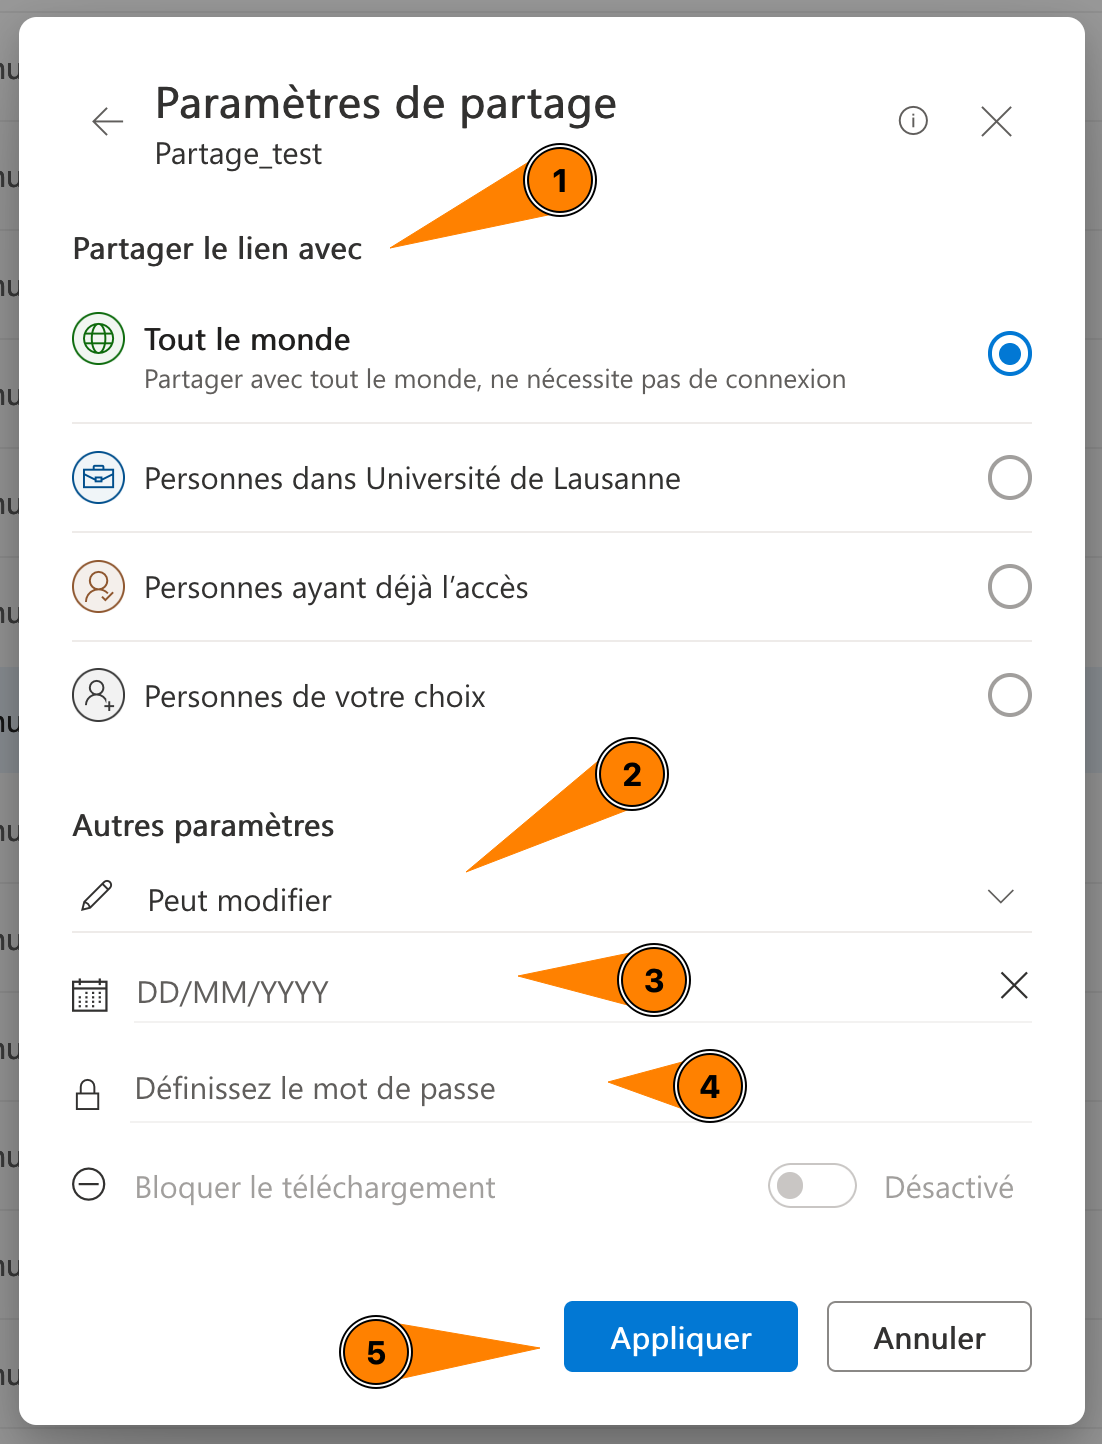
By default, the sharing scope is set to "People at the University of Lausanne" only; don't forget to change this setting if you want to share a document with external people.
- Choose who can access the document or folder.
- Specify again whether people can edit or only view what you are sharing.
- Set an end date for sharing.
- Set a password to access it.
- Finally, remember to save the changes by clicking the "Apply" button.
You will then return to the previous page and can click "Send" to send a message with the sharing link to the specified people or groups.
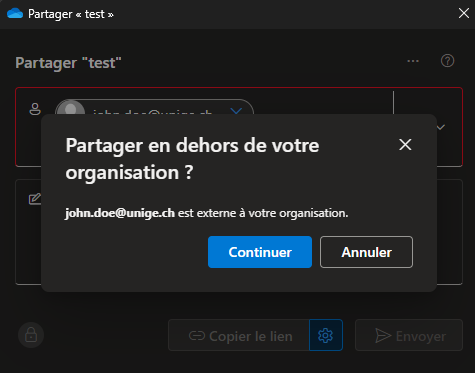
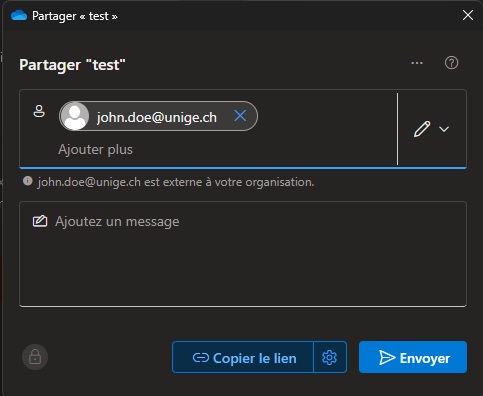
Sharing folders or files with people outside UNIL
The procedure to follow is the same as indicated above. You won't be able to search for the person in the directory because they are not part of UNIL. A warning message will indicate that you are sharing data outside UNIL.
Limitations
When you share data with external individuals, certain features are restricted because the data belongs to UNIL from OneDrive's perspective.
Key limitations:
- Externals will only be able to edit Office files from a browser. It will be impossible to open the file in the desktop application.
- Externals will not be able to add folders and/or files to their personal OneDrive using the "Sync" or "Add a shortcut to My Files" option.
- Shared folders and files will not appear in the "Shared with me" tab in an external's OneDrive account.
If the person you are working with want to use these features, you must use a team in Microsoft Teams:
If someone from another institution shares data with you from their OneDrive, the limitations will be the same.
Sharing via Link
However, they cannot add or delete files in a shared folder by default.
Adding/Removing Ownership of a Shared Folder
- Click on the three dots (1) of the file or folder you want to share and select "Manage access" in the menu (2).
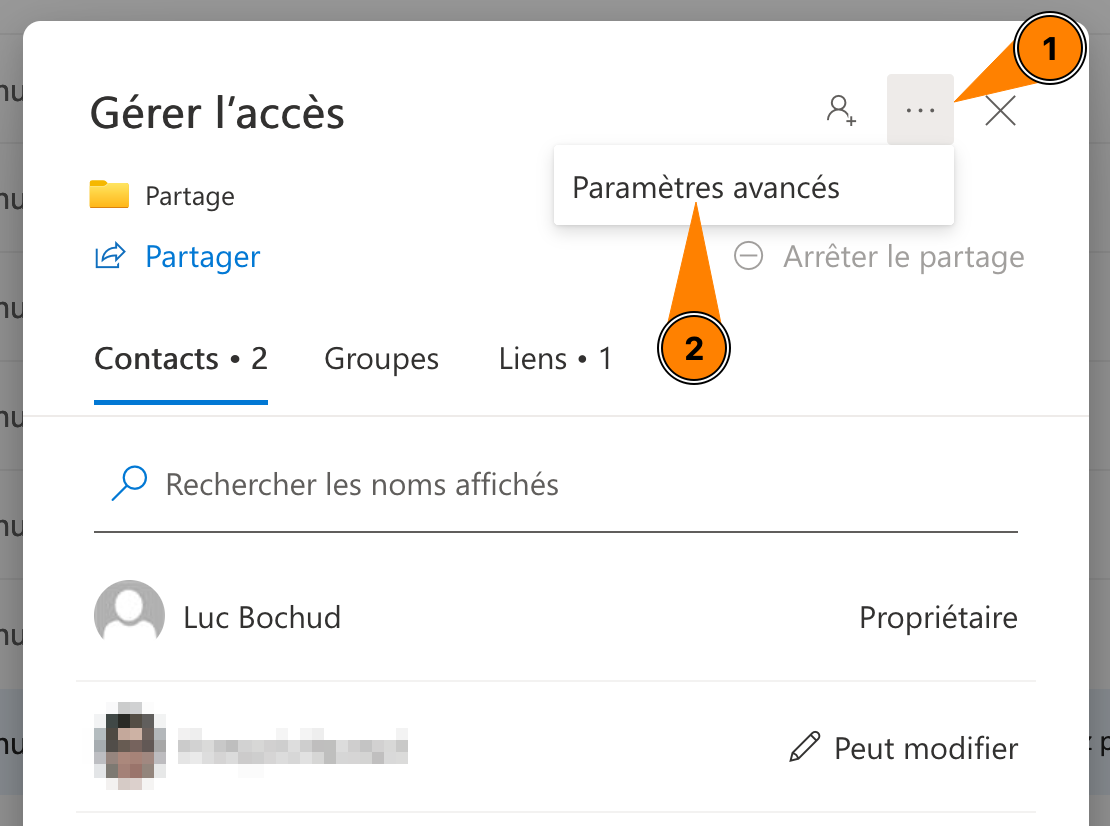
- Click on "..." (1) and then "Advanced settings" (2).
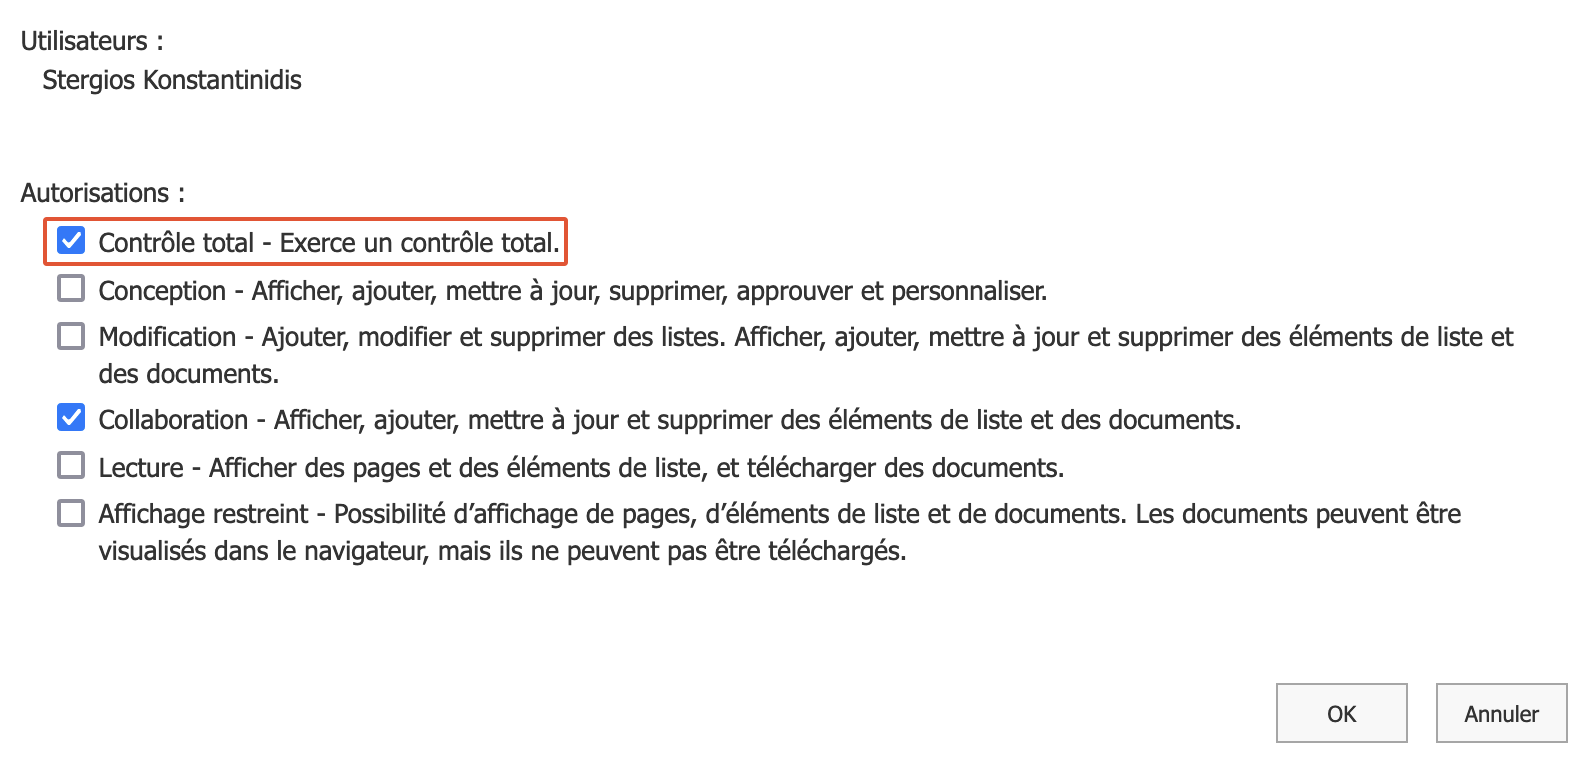
- Select the new/old owner (1) and click on "Edit permissions" (2).

- Check/uncheck "Full control" at the top of the permissions list.


How to Find Shared Items
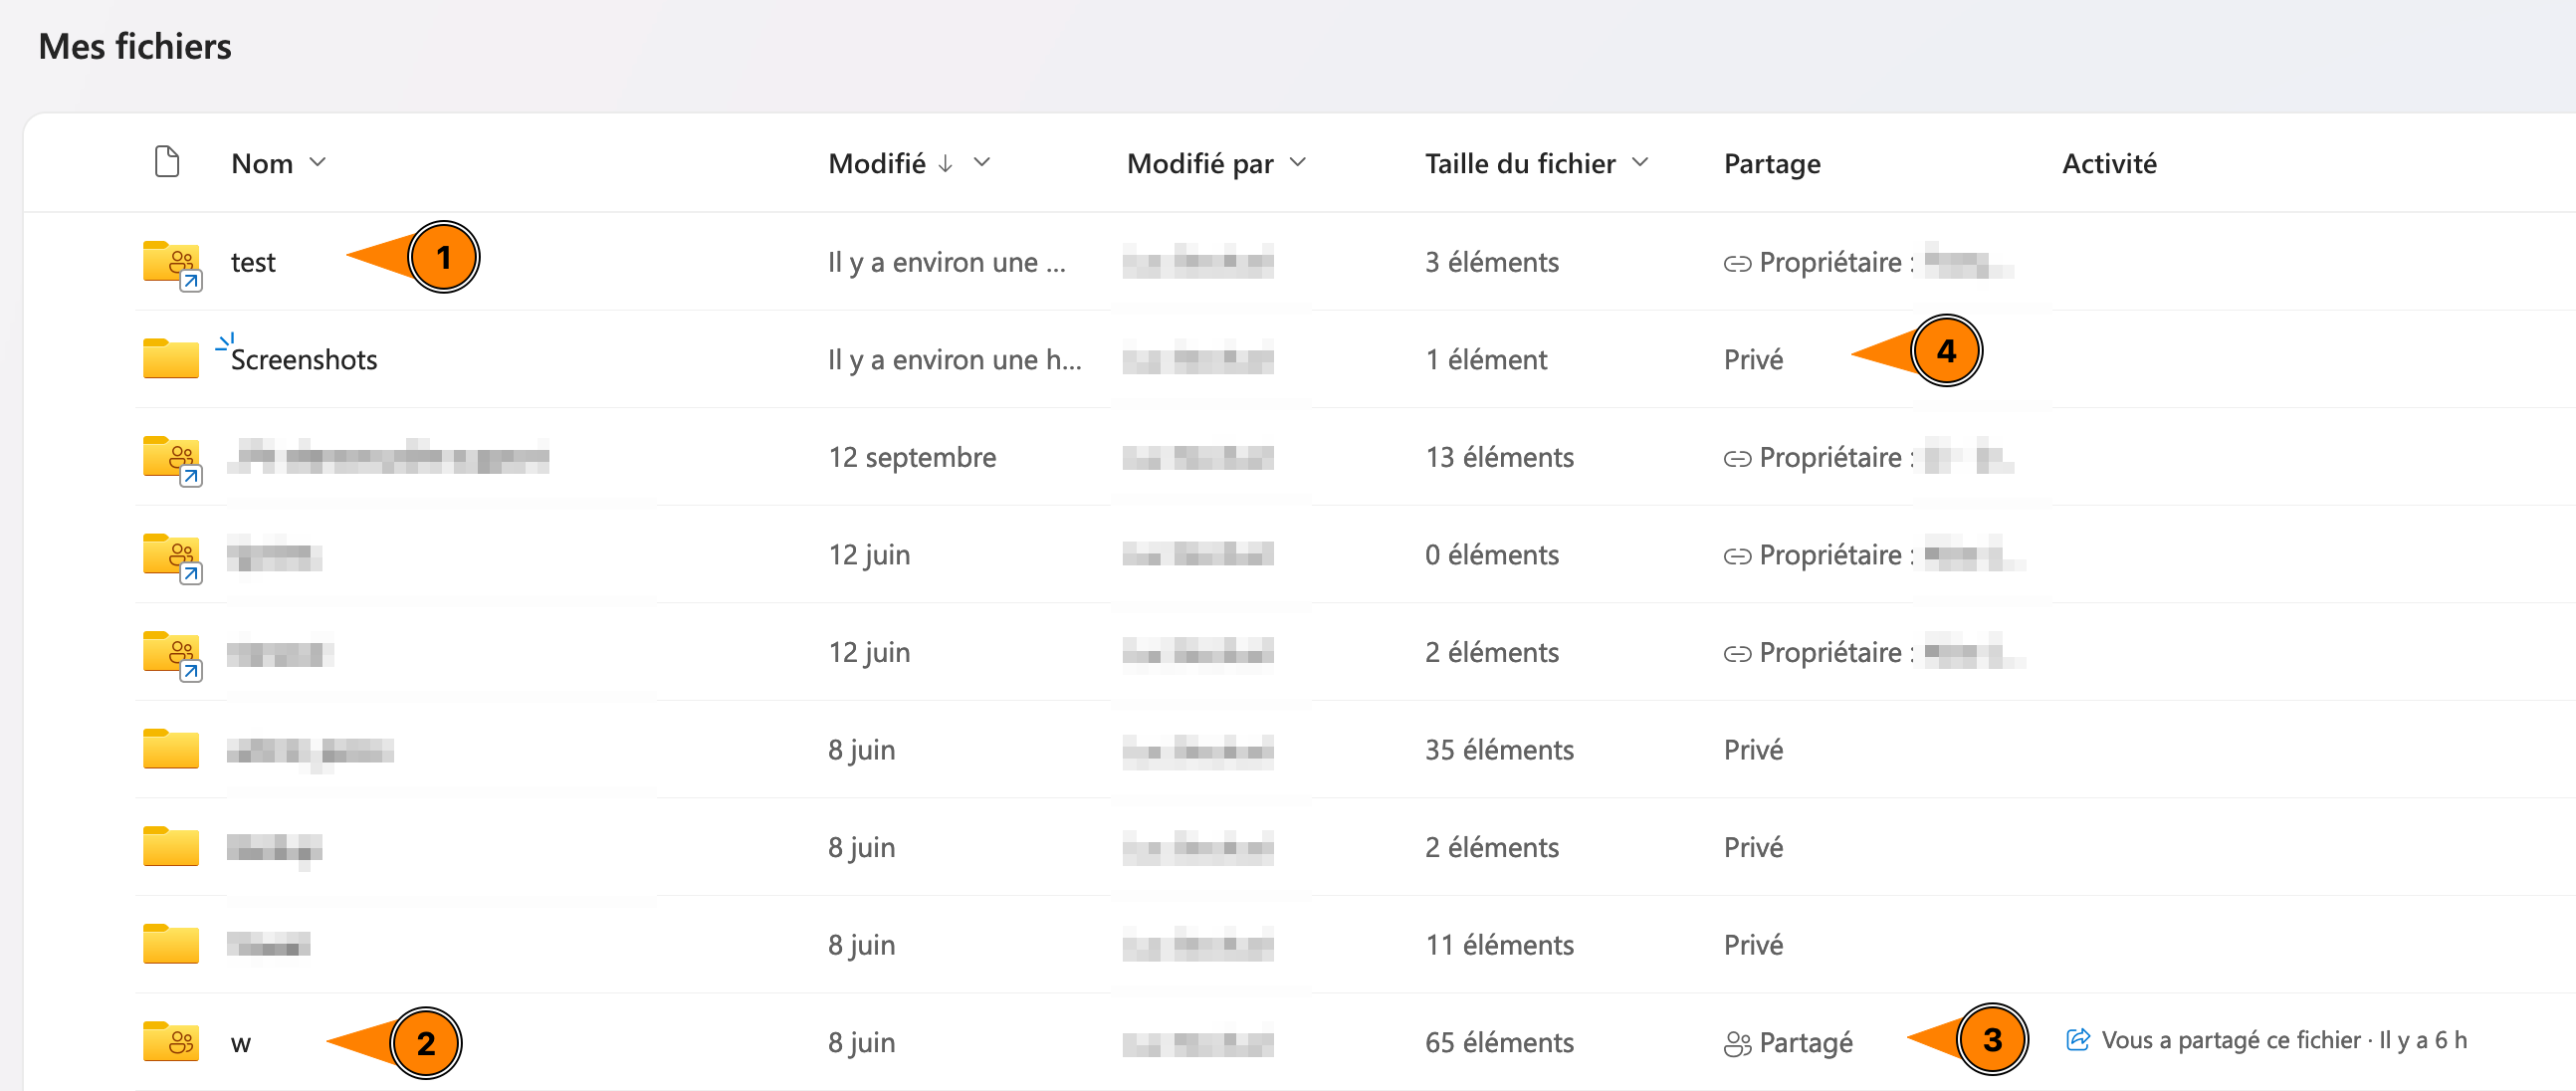
You can find files shared with you (2) and files shared by you (3) in the Shared tab of the web version of OneDrive.

Files and folders shared with you do not automatically appear in your OneDrive folder. To add them:
- Go to the Shared with you page.
- Once the file or folder you want to add to your OneDrive folder is selected, click on Add shortcut to My files in the top bar (1) or by clicking on the three dots (2).

- You can see the folder in your OneDrive folder (1). You can distinguish it from a folder shared by you (2 and 3) or a folder to which only you have access (4). Folders and files added to "My files" are also synchronized in your OneDrive folder if you have installed the client on your computer.


OneDrive Online - Web App
Web app
- Open a browser and go to https://unils-my.sharepoint.com
- Log in using your UNIL credentials
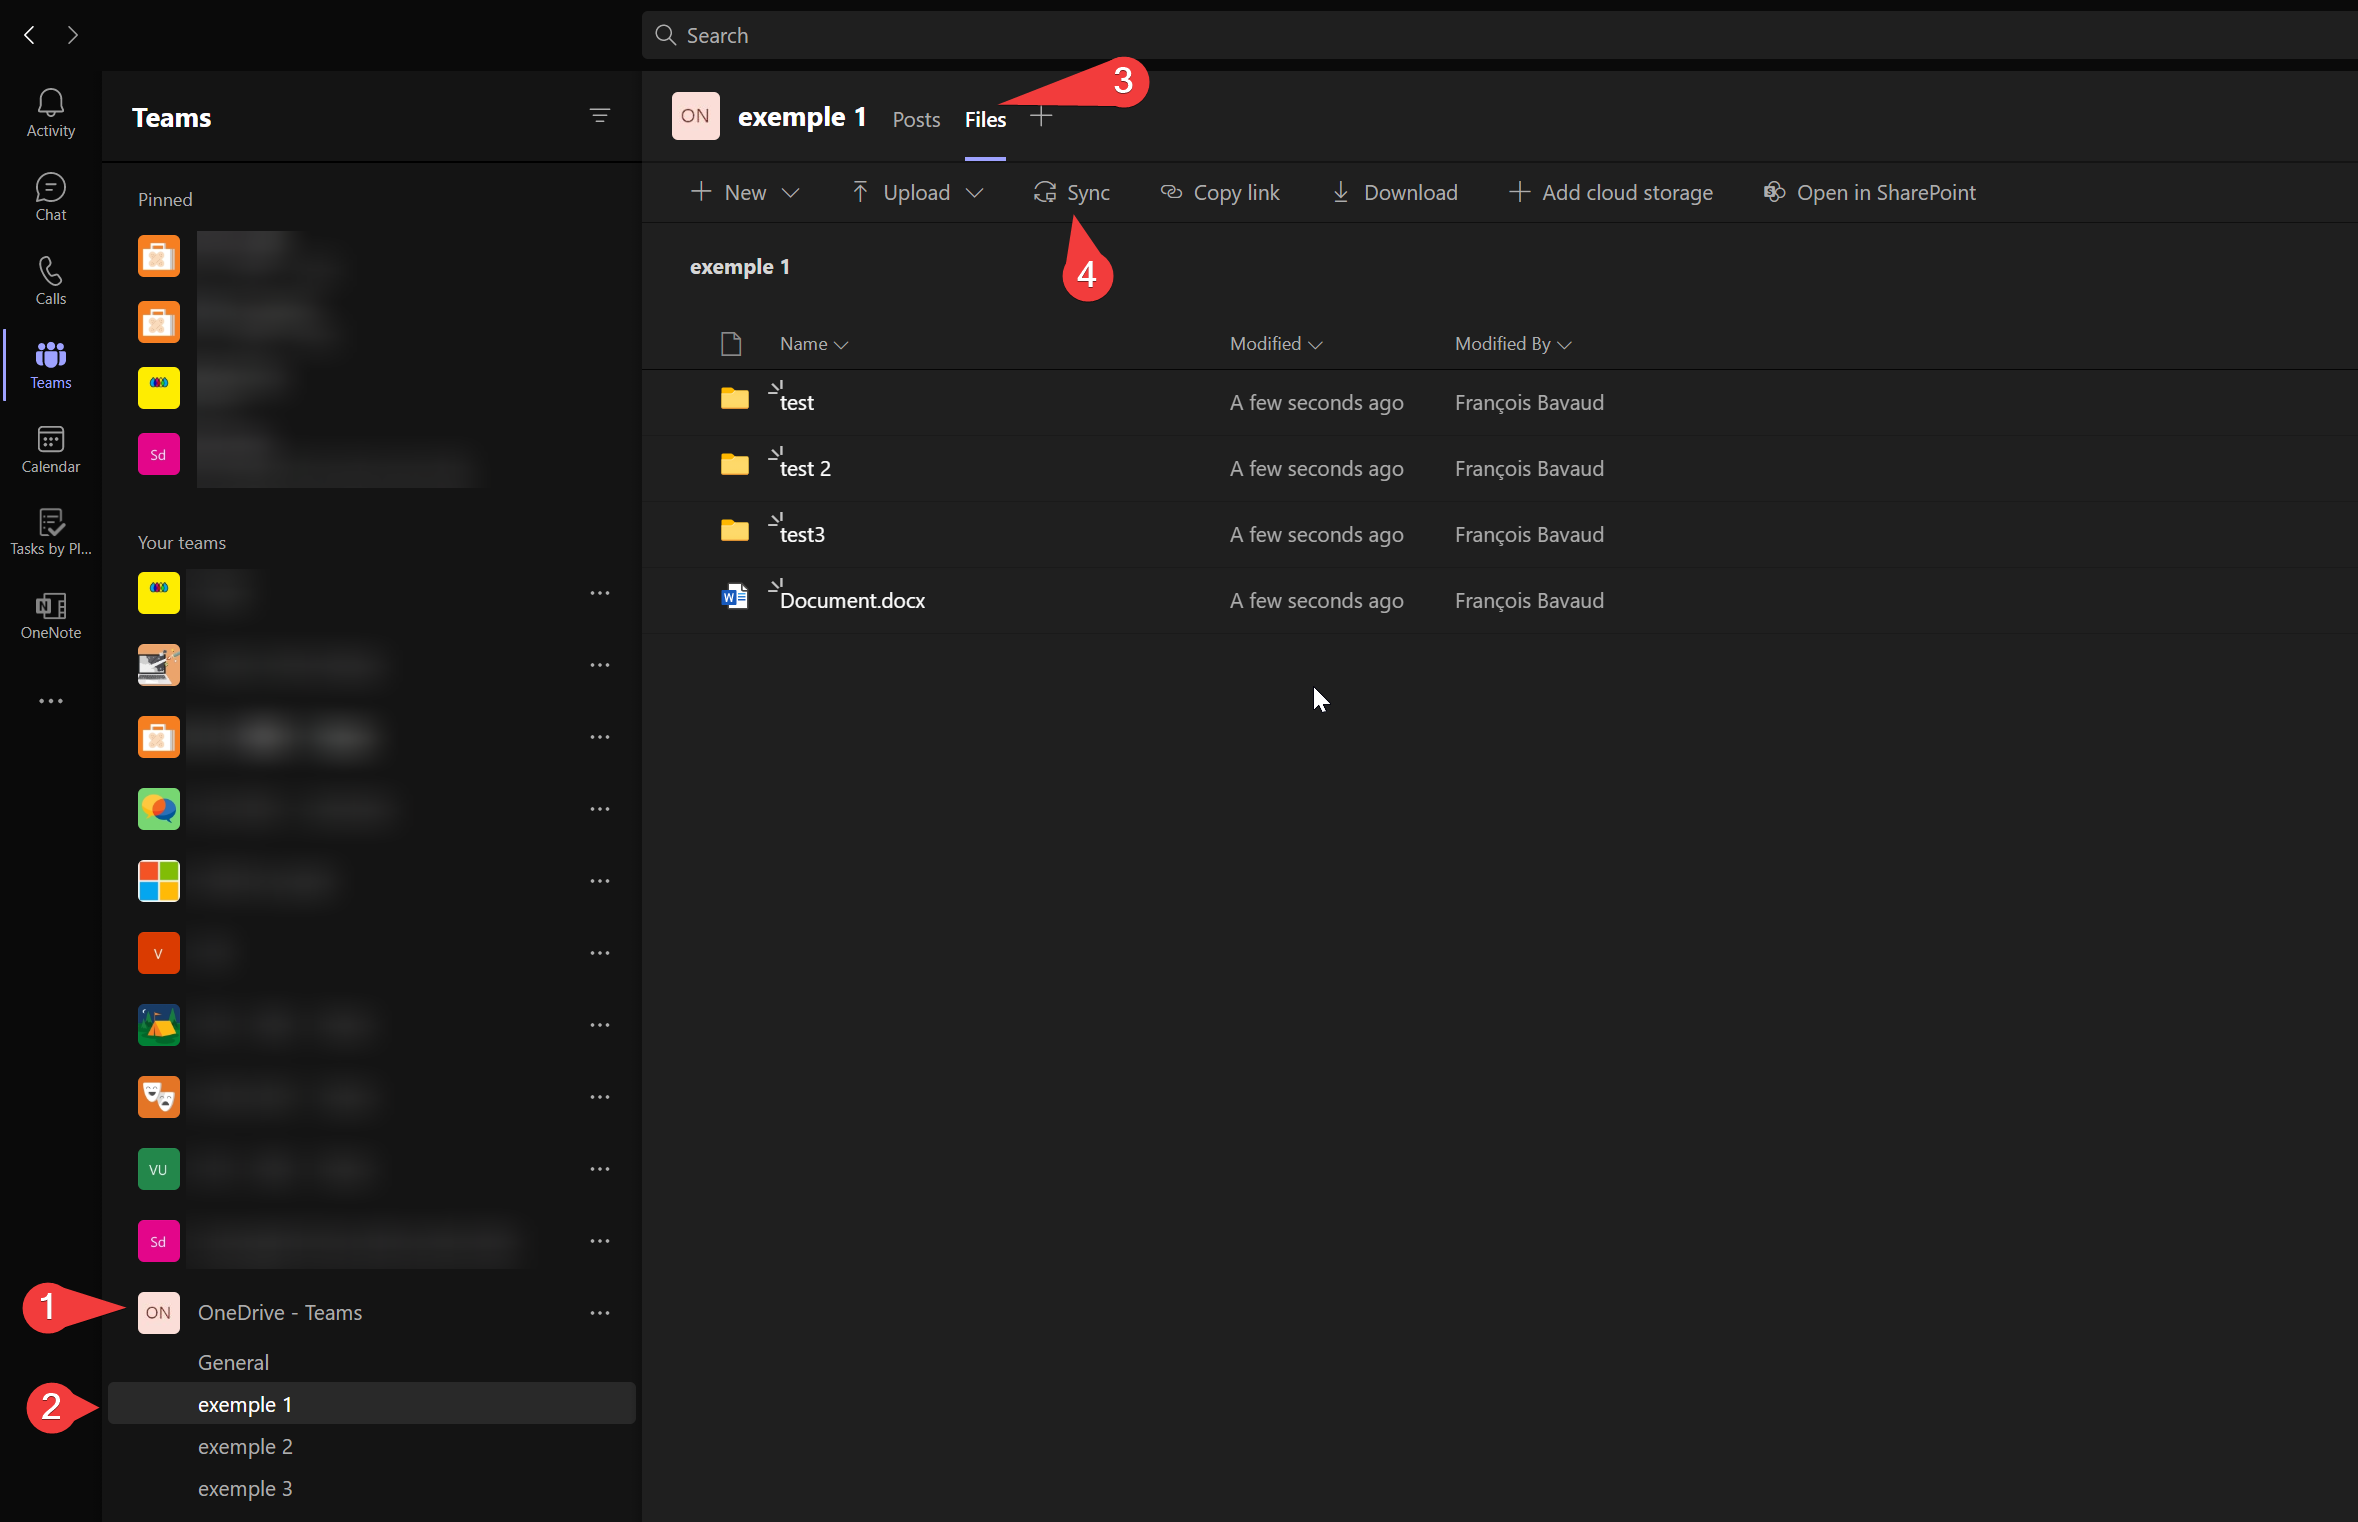
Synchronize Teams/SharePoint Files
As the UNIL has a Microsoft 365 Business subscription, you can sync your Microsoft SharePoint and Teams files with a folder on your computer. This allows you to work directly in File Explorer and access files, even in offline mode. When you reconnect, changes made to these files are automatically synchronized.
To sync your Teams files
-
Prerequisites: Set up OneDrive on your computer.
-
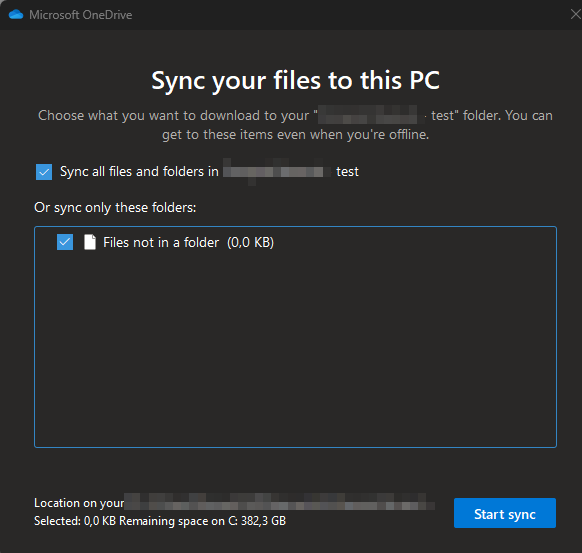
Select the channel in the Teams (1-2). Open the "Files" tab and click "Sync."

-
In the window that opens, select the folders you want to sync. Click Start sync

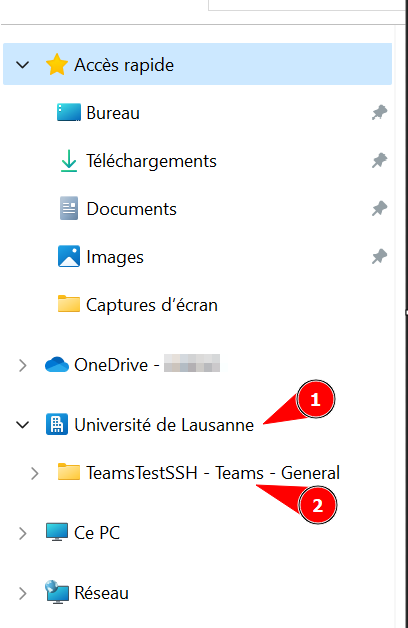
-
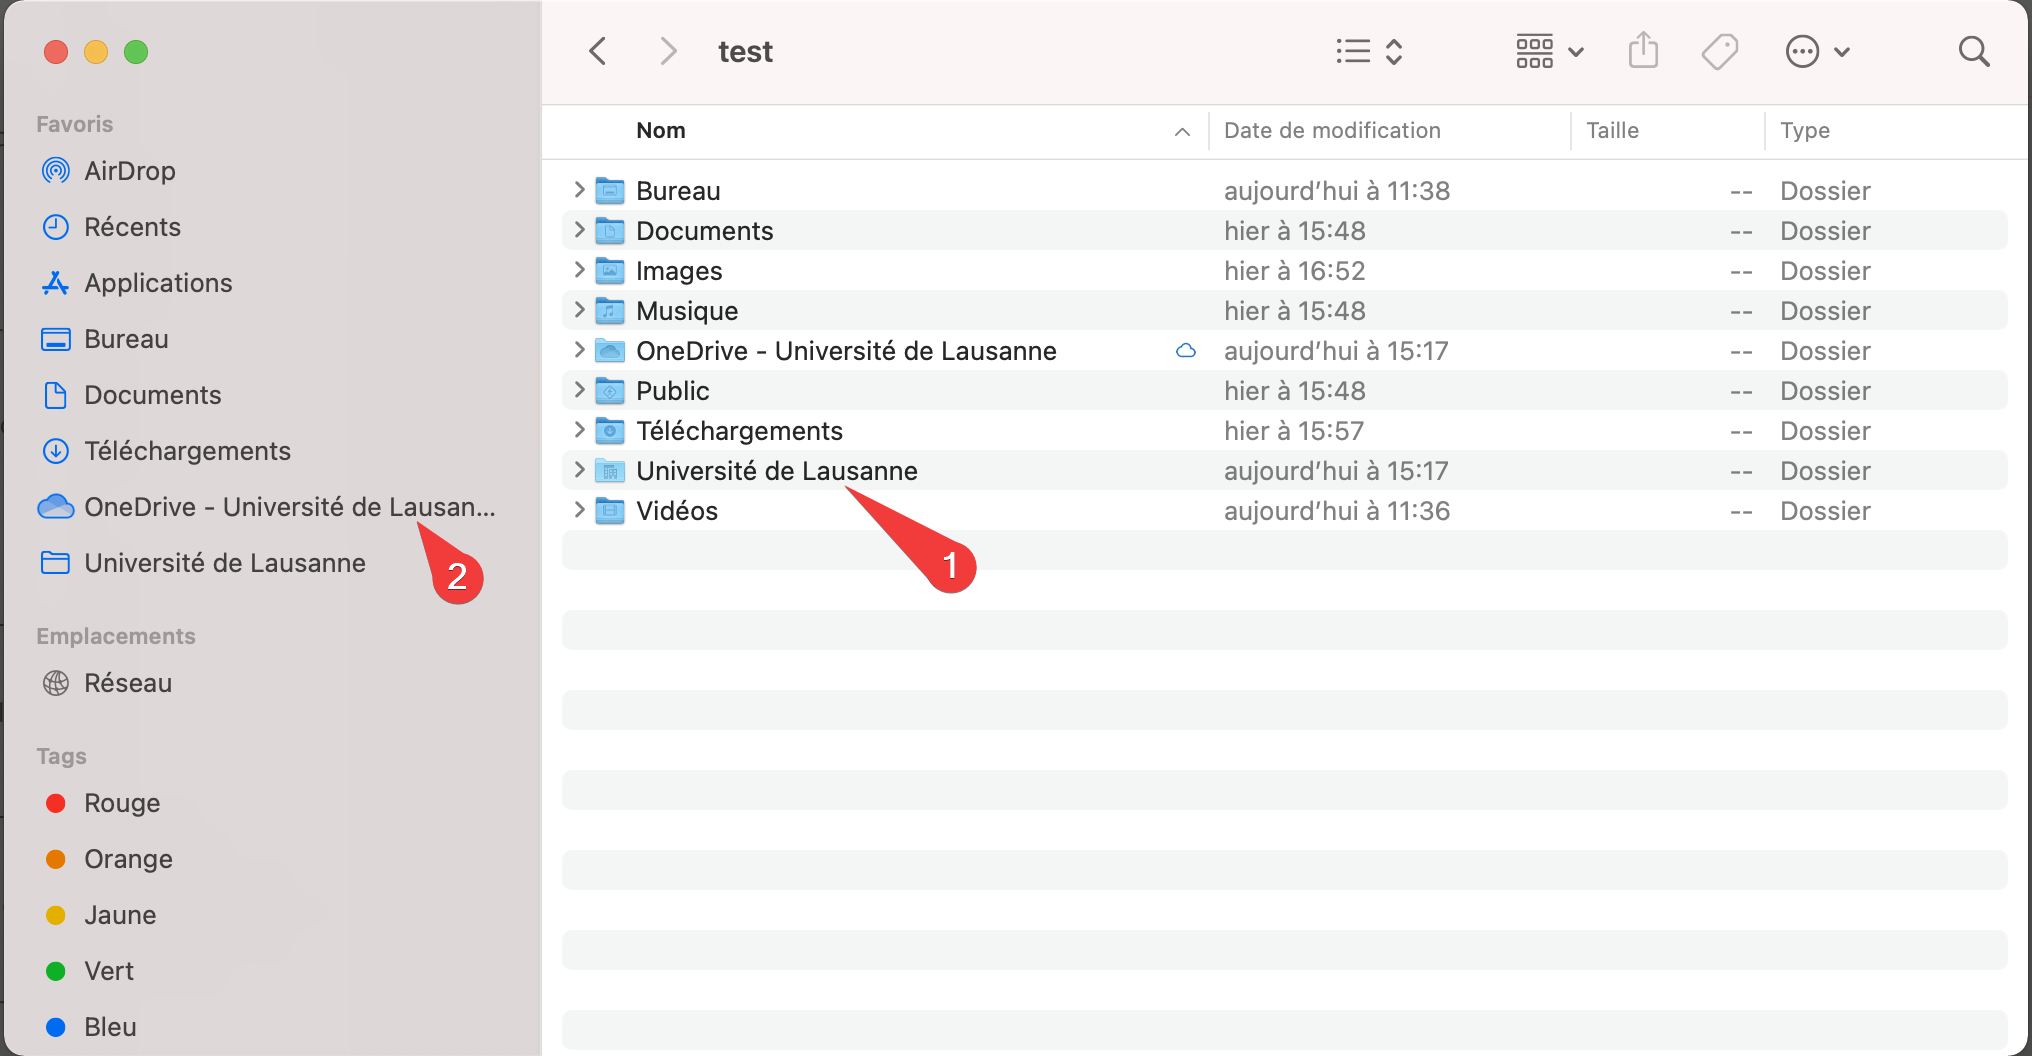
You will then find the synchronized folder in a folder named "Université de Lausanne" in your user folder. A new tab will also be added on the left side of your Windows File Explorer or macOS Finder window.


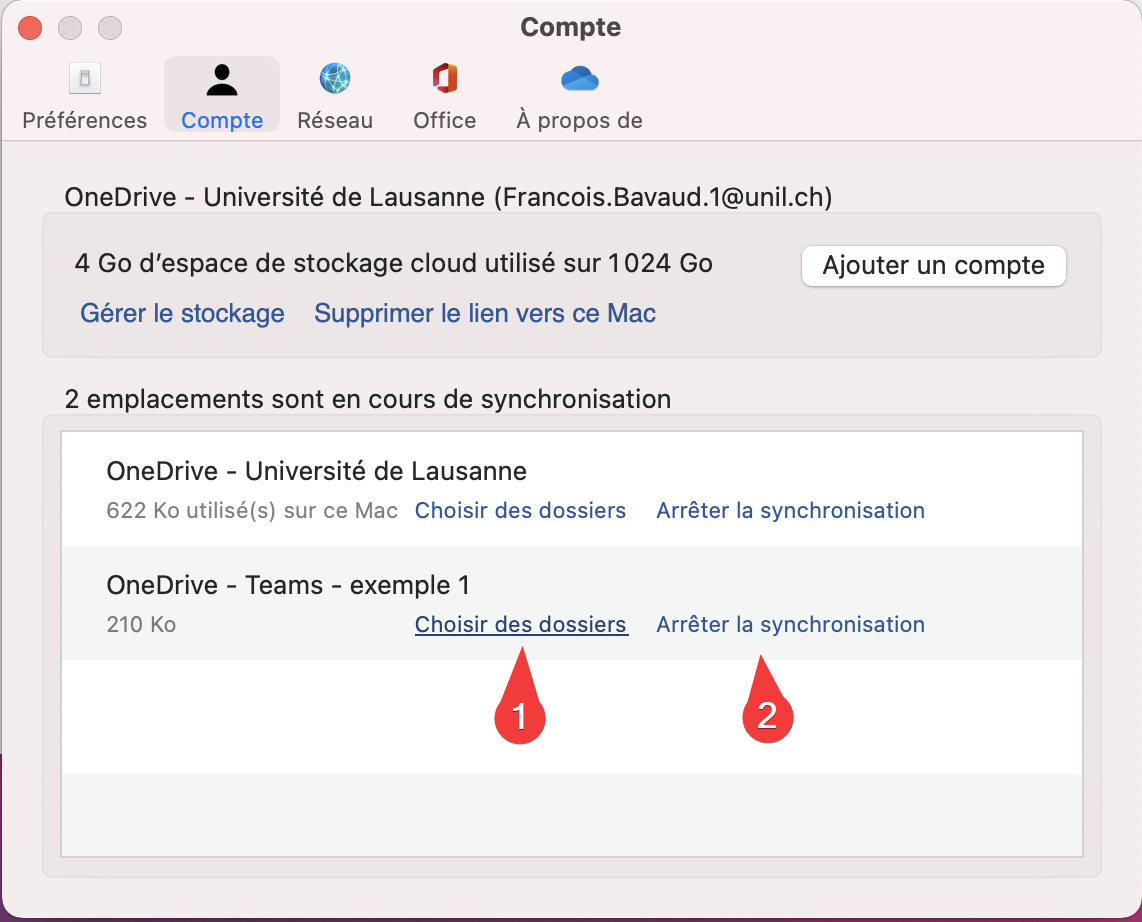
Modify or Remove Sync
You can modify the list of folders you want to sync with your OneDrive account. To do this, open the software preferences and click on the Account tab.
Windows

macOS
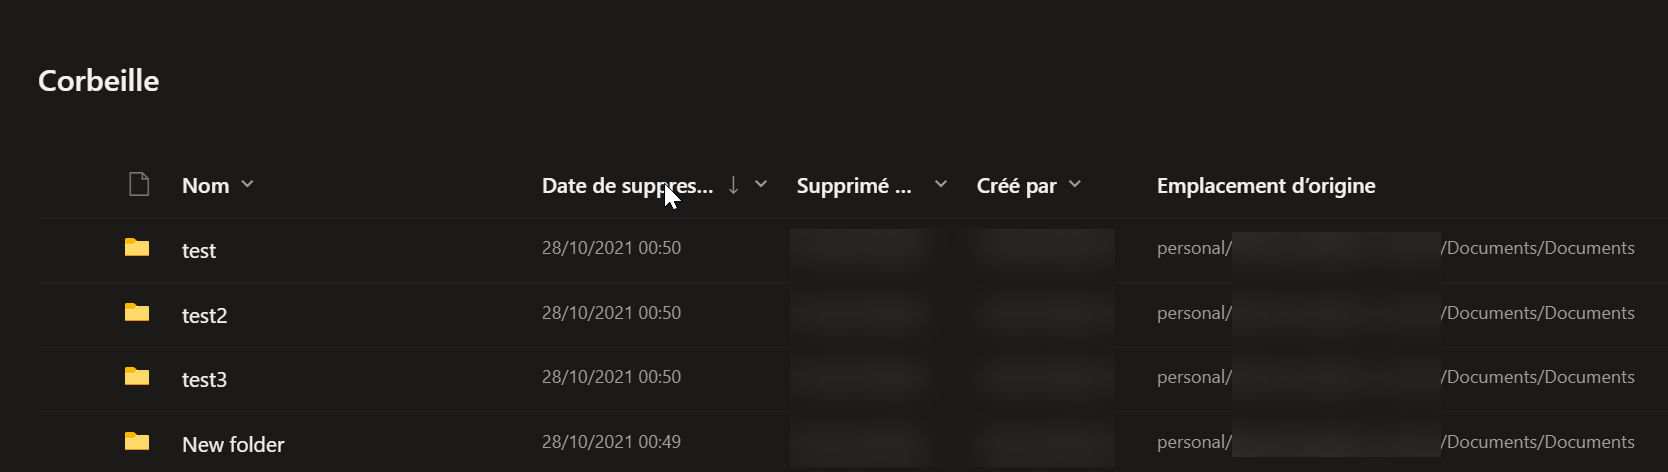
File or Folder Management and Recovery in OneDrive
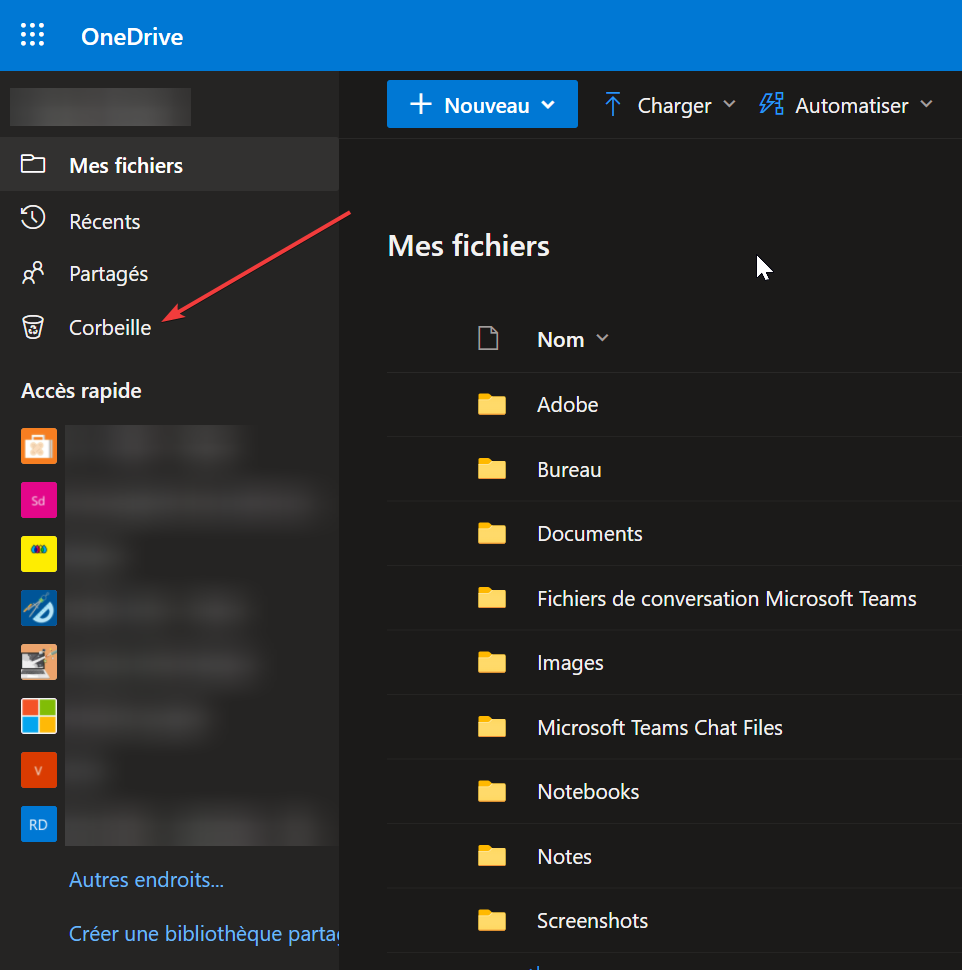
If you delete a folder or file in your OneDrive folder, you can likely recover it from the OneDrive recycle bin. The recycle bin is only available on the web version of OneDrive.
Access the Recycle Bin:
-
Log in to https://unils-my.sharepoint.com/.
-
On the left menu, select Recycle Bin

-
You will have access to the list of folders and files that have been deleted from your OneDrive folder.

-
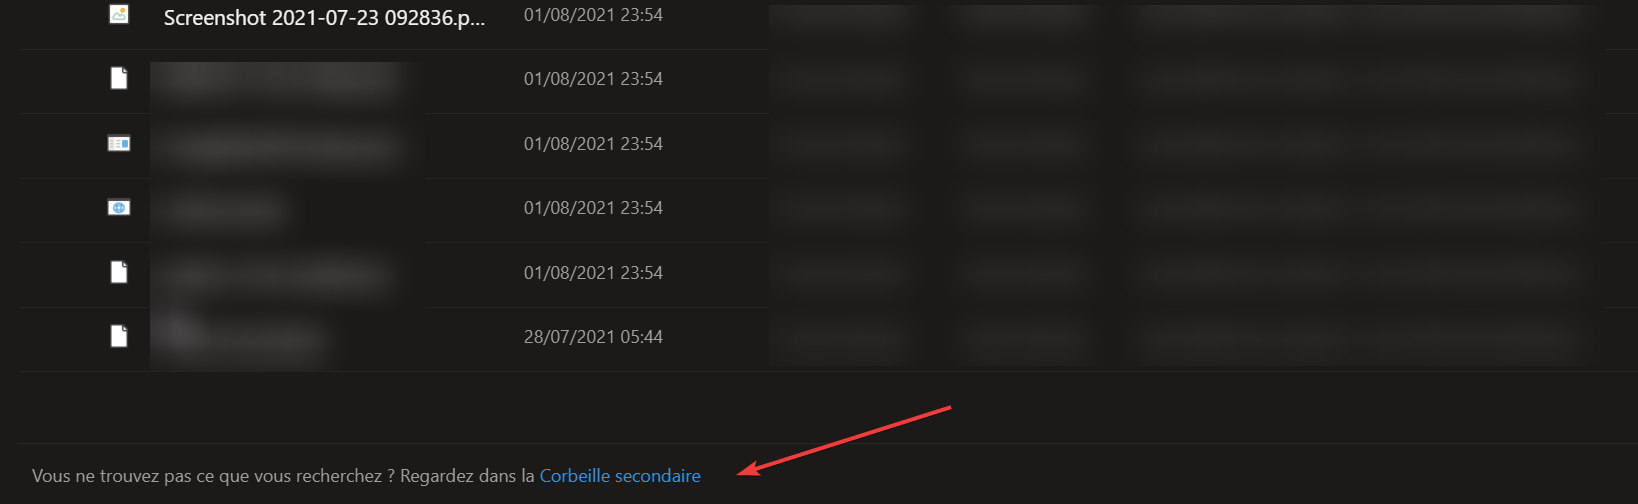
If you don't find the files you're looking for, they may be in the secondary recycle bin. To access it, click on the link at the end of the list of files in the recycle bin.

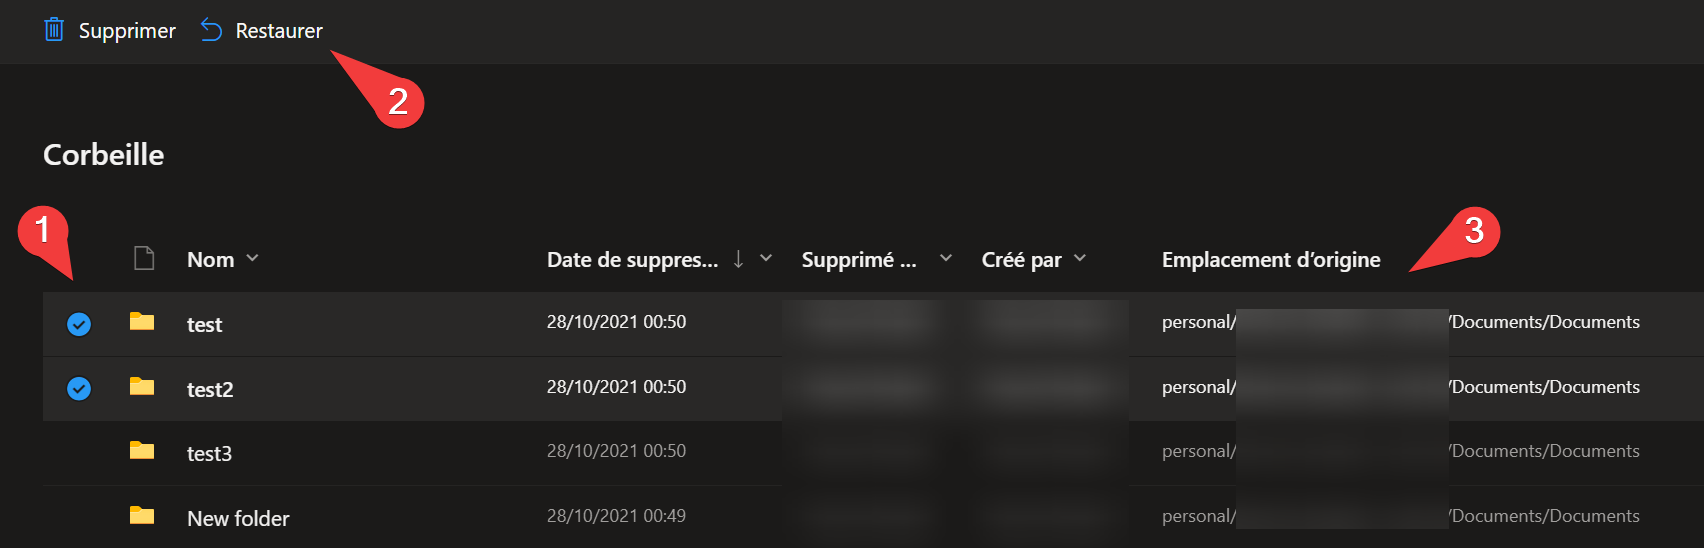
Restore Data:
In the recycle bin, select the files and/or folders to restore. A blue checkmark will appear to the left of the selected data (1). Click Restore (2). The data will be placed back to its original location (3).
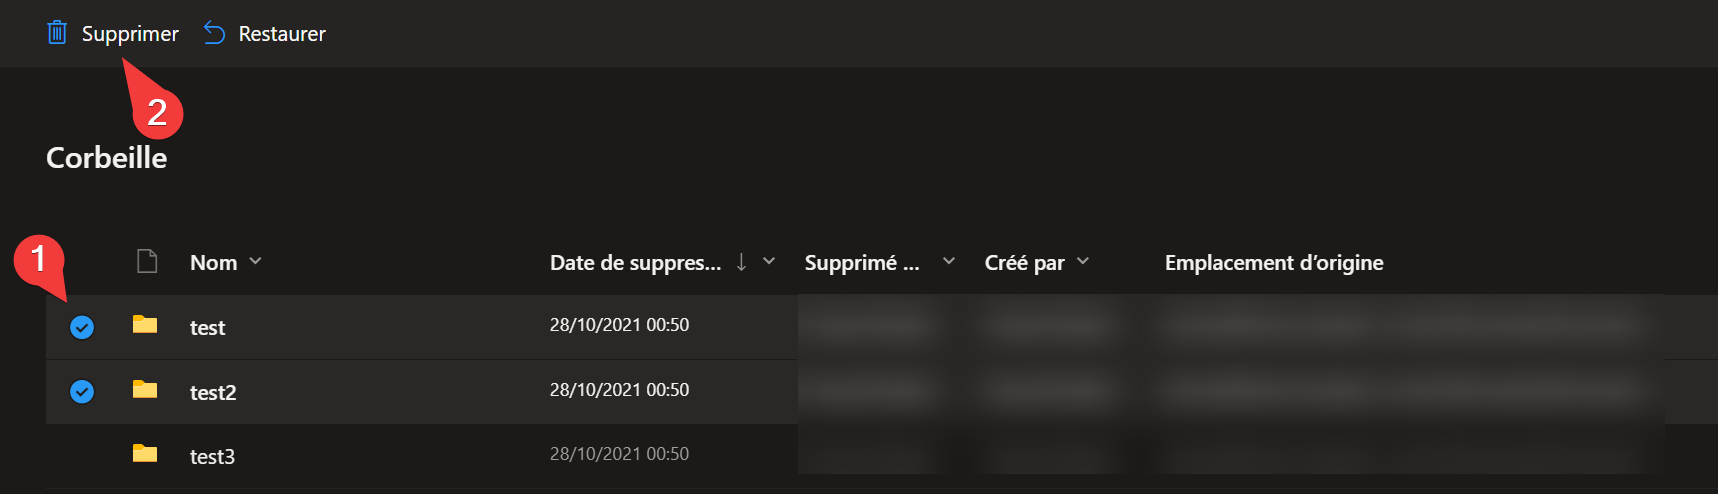
Permanently Delete Data:
In the recycle bin, select the files and/or folders to delete permanently. A blue checkmark will appear to the left of the selected data (1). Click Delete (2).
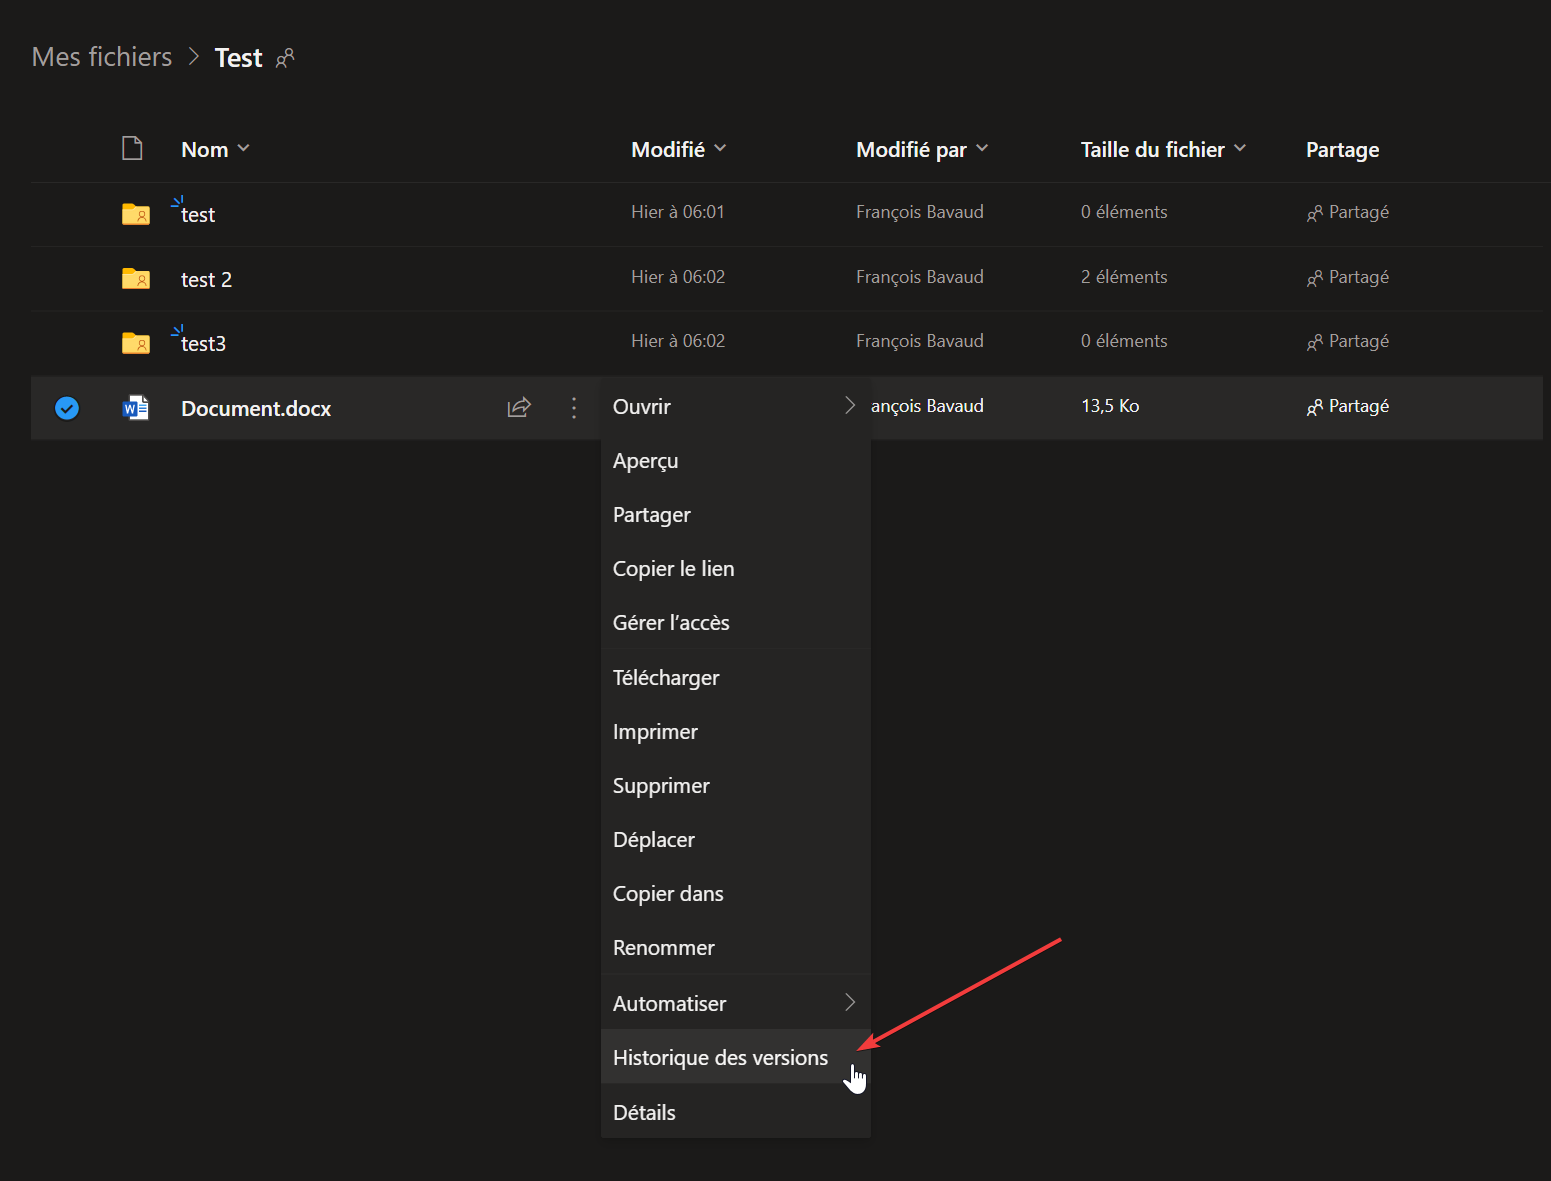
Version Management in OneDrive
OneDrive incorporates a version management system. With version history, you can view and restore previous versions of your files stored in OneDrive.
It is not possible to restore entire folders.
Version History from an Office 365 Application:
-
Open the file with a desktop application (Word, Excel, PowerPoint, etc.). In the following steps, we use Word as an example.
-
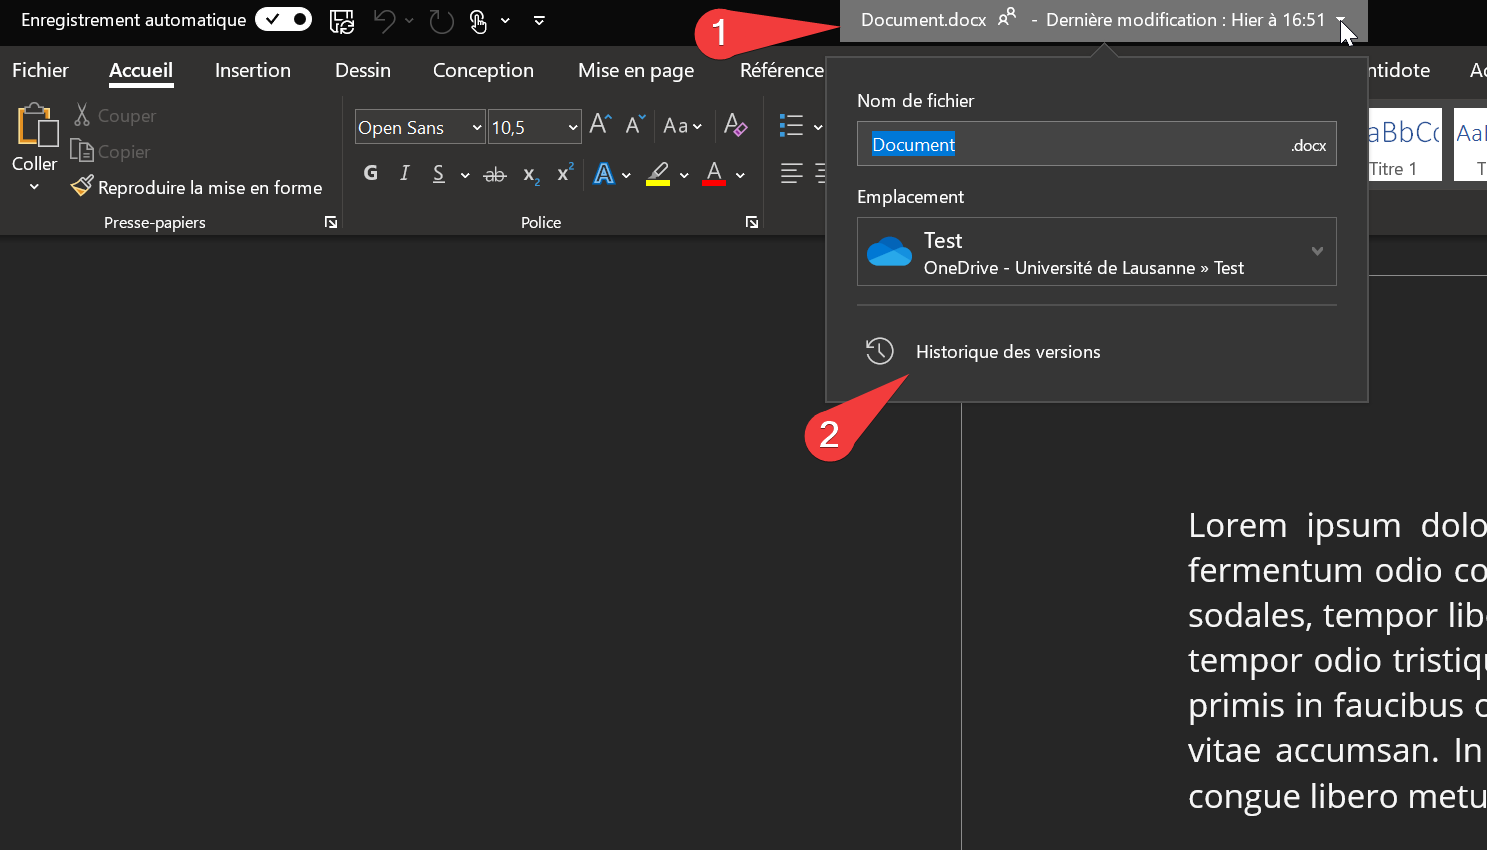
At the top of the page, click on the document name (1). The latest modification is indicated there. Then, click on Version History (2).

-
In the tab on the right, click on the version you want to view. It will open in a new window of the application.

-
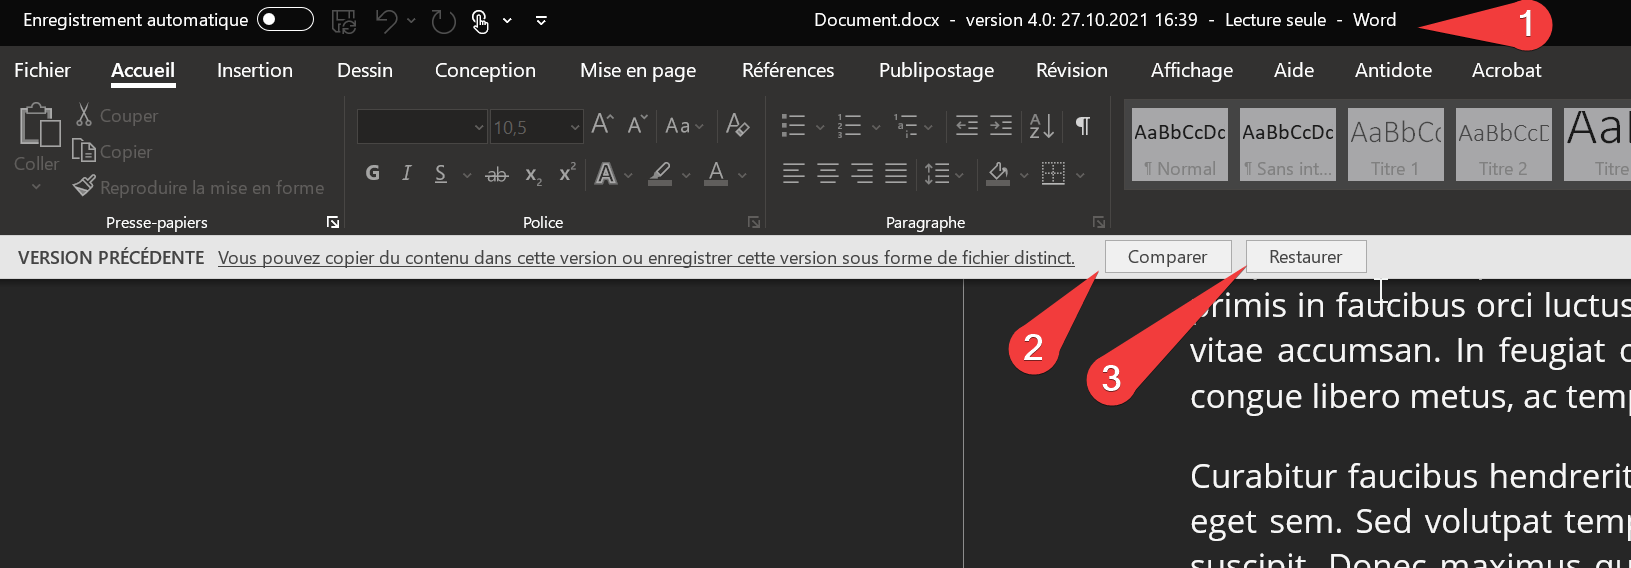
In this new window, you can see the version (1). If necessary, you can compare the two versions (2). If the version is suitable, you can restore it (3) instead of the current version.


Restore a Version from the OneDrive Application:
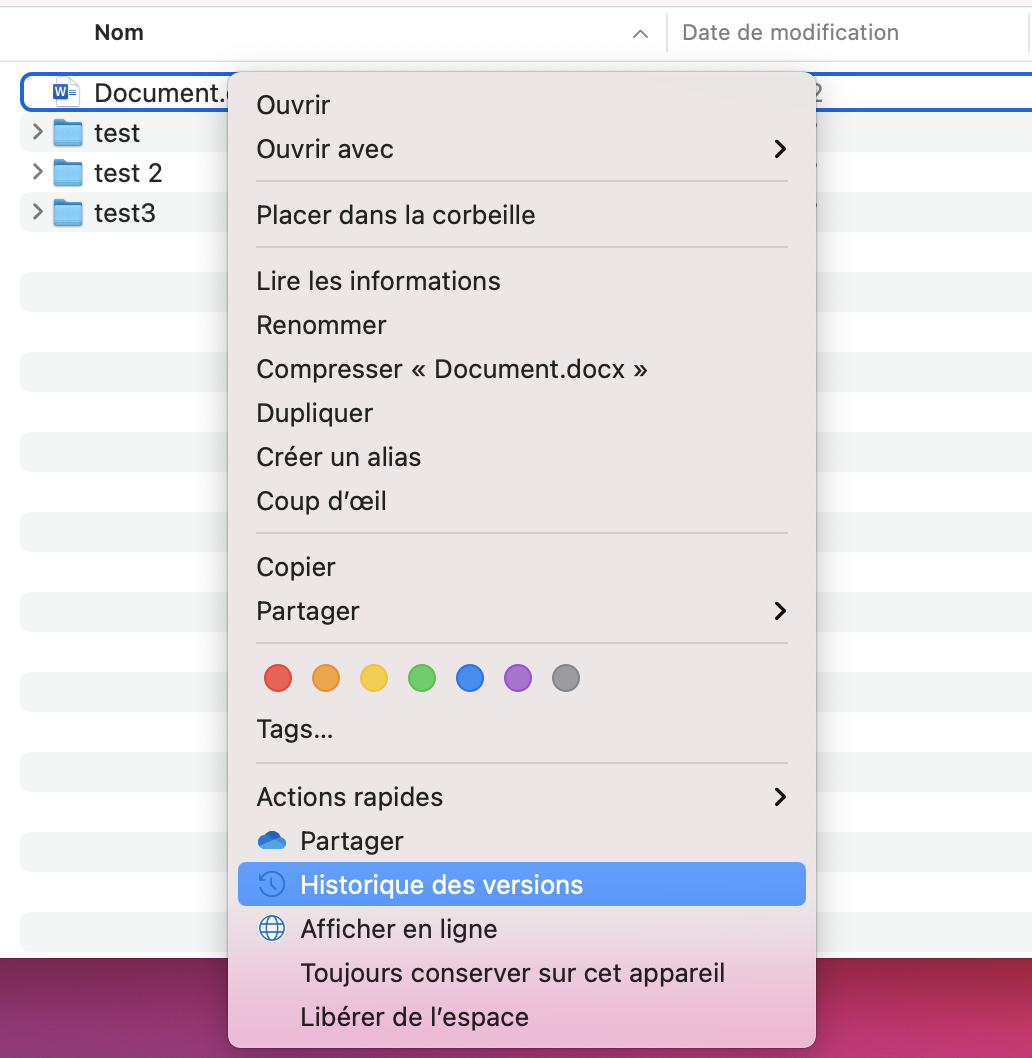
The procedure is the same on both Windows and macOS
-
Right-click on the file and click on Version History

-
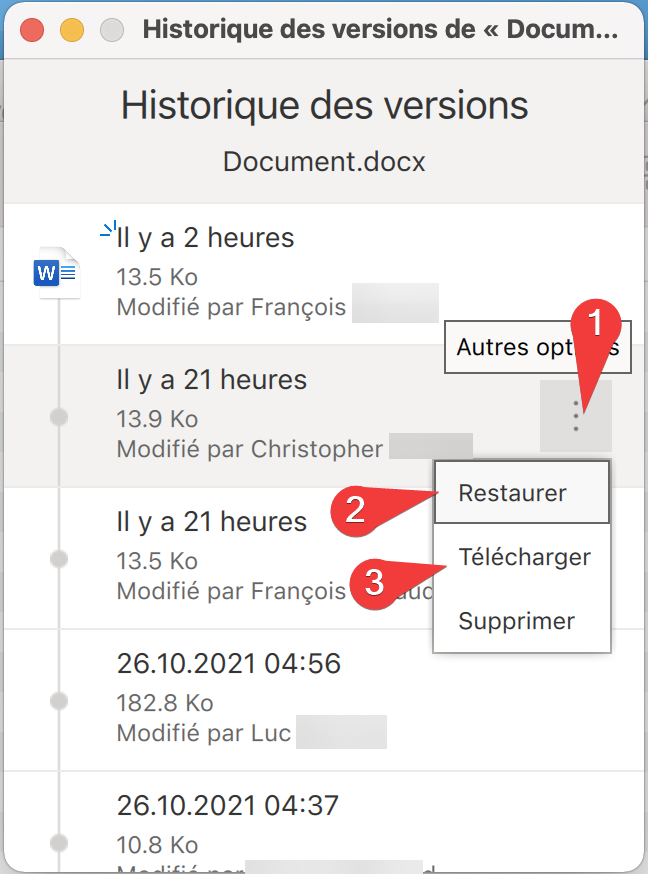
In the opened window, choose the version and click on the three dots (1). You can either directly restore the version (2) or download it (3).

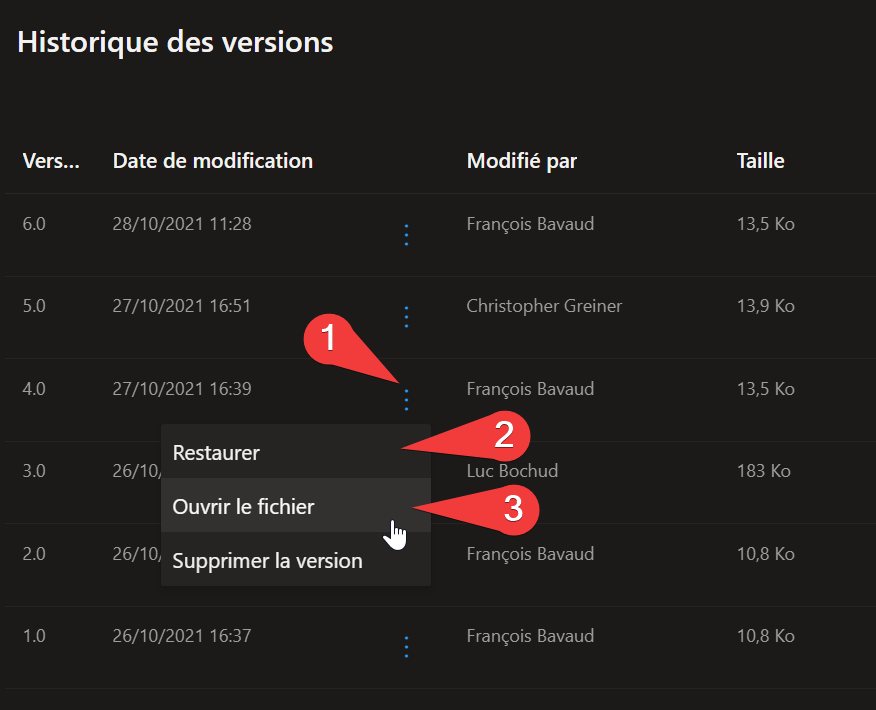
Restore a Version from OneDrive Online:
-
Click on the three dots on the line of the relevant file. From the menu, select Version History

-
In the menu that opens on the right, click on the three dots (1) of the version you want to view. In the context menu, you have the choice to either directly restore (2) the version or open the file (3).

-
If it is a file from an Office software, you can see the version (1). If necessary, you can compare the two versions (2) and, if the version is suitable, restore it (3) instead of the current version.
Getting Started with OneDrive
Terms of Use
OneDrive is a service that is part of Microsoft's Office 365, the cloud solution. Therefore, you can refer to Microsoft's Cloud Solutions Terms of Use (in french).
In summary, work data can be stored on OneDrive, but it is prohibited to store sensitive data.
Service Description
OneDrive is a Microsoft cloud solution that allows you to store, synchronize, and share files. In particular:
OneDrive is not a data backup solution. For this purpose, use our workstation backup service.
OneDrive is not an archiving solution. This service does not replace Document Management Systems (GED), NAS, etc. Refer to the rules of your service, institute, or faculty.
OneDrive is not a solution to synchronize your entire work environment. We strongly advise against syncing your entire user folder across multiple devices because, in addition to your data, this folder contains system-specific files. Syncing them will undoubtedly cause system failures, rendering your computer unusable.
OneDrive is not a lifelong solution. To access OneDrive, you must have a UNIL computer account. The closure of the UNIL account also results in the withdrawal of access to Microsoft's cloud solutions and, therefore, to OneDrive.
Management Tools (Access, Synchronization)
OneDrive allows you to access your files at any time from any device. For this, you have various solutions:
Synchronization works on the following principle: if you modify or add a file from one computer, the addition or modification will first be reflected on OneDrive and then, in a second step, on all your devices.
Available Space
Each user has 1TB of space.
Conflict Management
When OneDrive is used for teamwork, there is a real risk that a file may be simultaneously modified by multiple people. This kind of problem is called a "conflict".
If a file is opened only through Microsoft tools (Office software, Teams, or Office Online), there will be no conflict. People who have opened the file can edit it simultaneously. The presence of another person is indicated at the top of the page and in the text.
However, if the file is opened in another software (e.g., LibreOffice), OneDrive will not be able to manage collaboration. A mechanism is provided to handle such cases: if two people simultaneously edit a file, OneDrive will detect this and automatically create a copy of the file. Thus, the first person will work on the original file, while the second will work on the copy (named FileName-UserNameMachine). Both files will be saved in the system.
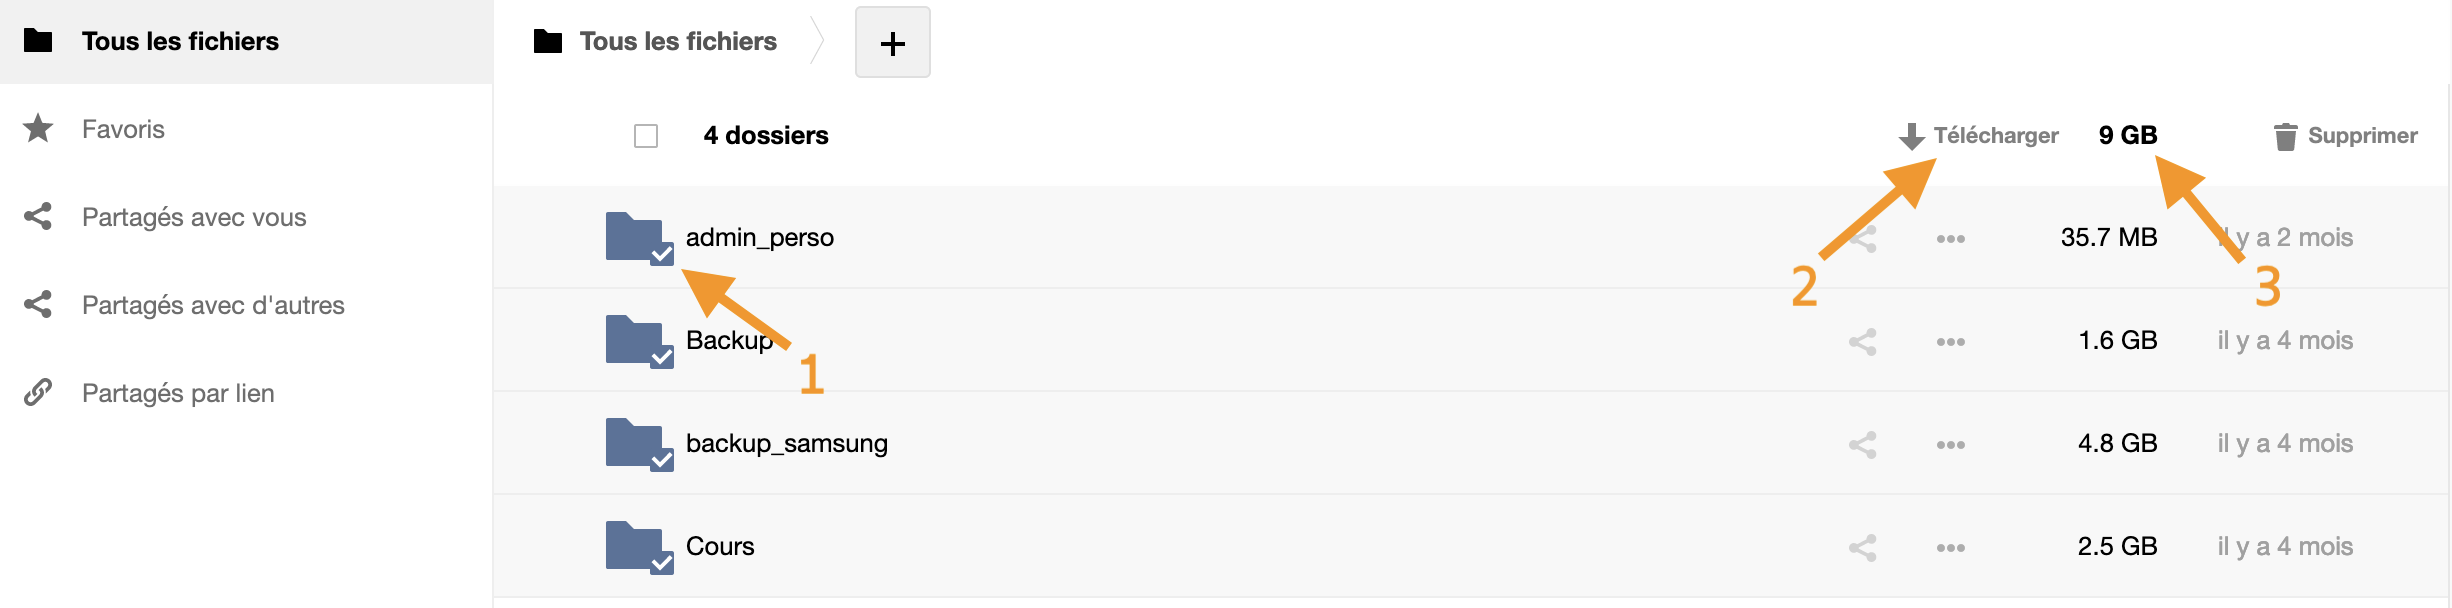
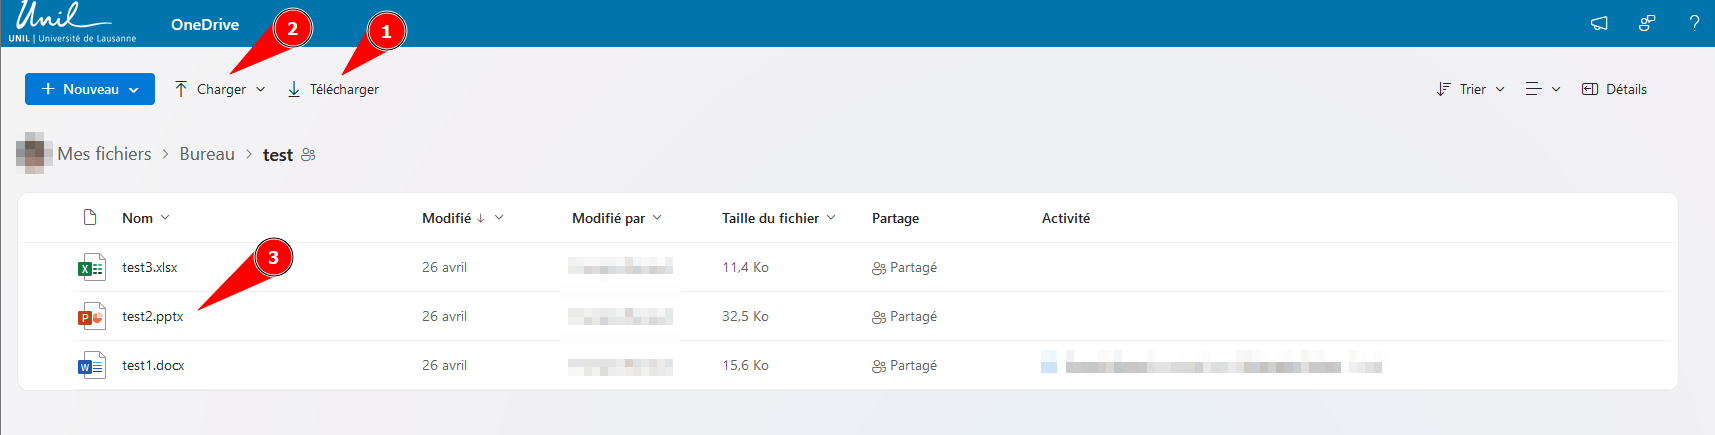
Downloading Data from the Website
- To download your data if you don't have the SWITCHdrive desktop application, you can visit the service's website.
- Select the folders you want to retrieve by clicking on the small checkbox next to the icon (1).
- Click on the Download button at the top of the page (2).
Make sure to observe the total size of the data you are about to download (3). The download time can be quite long, and interrupting the process may cause issues. Try to break down the download by selecting only a portion of the folders.
File On Demand Functionality
By default, the "File on Demand" function is enabled. This means that data is downloaded only when you try to access it. This can be problematic if you are disconnected from the network and want to access your files offline.
macOS
To download everything, you can either do this:
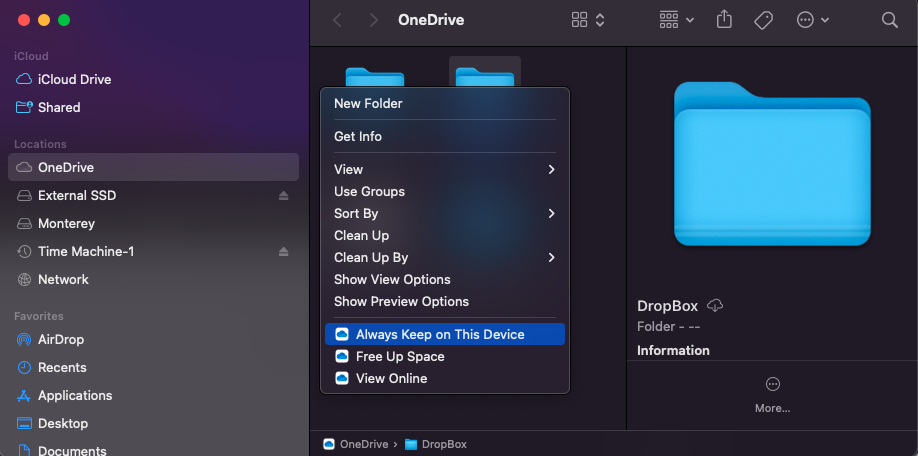
Or in the app configuration:
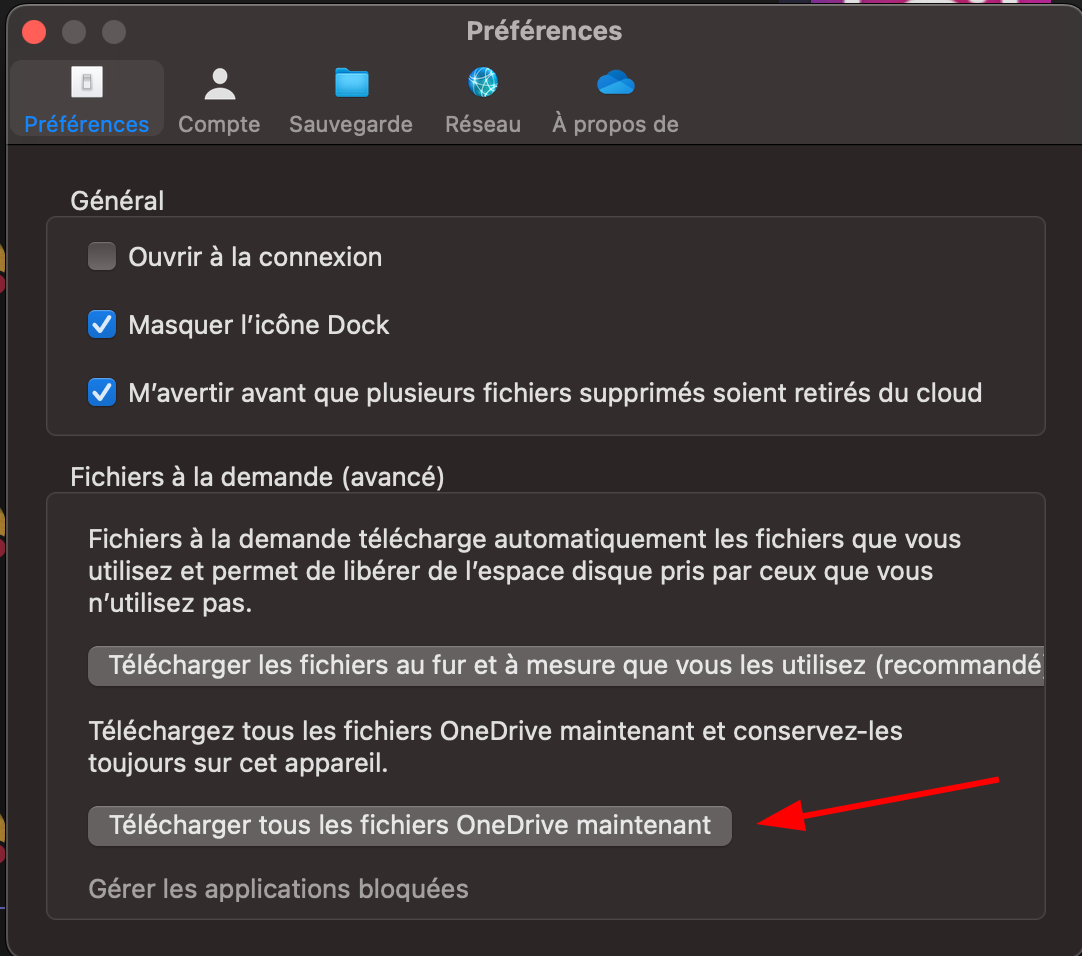
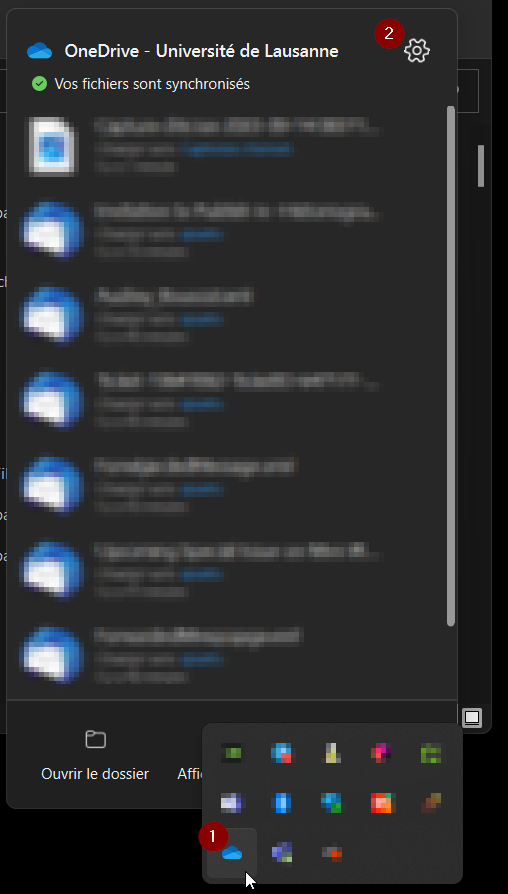
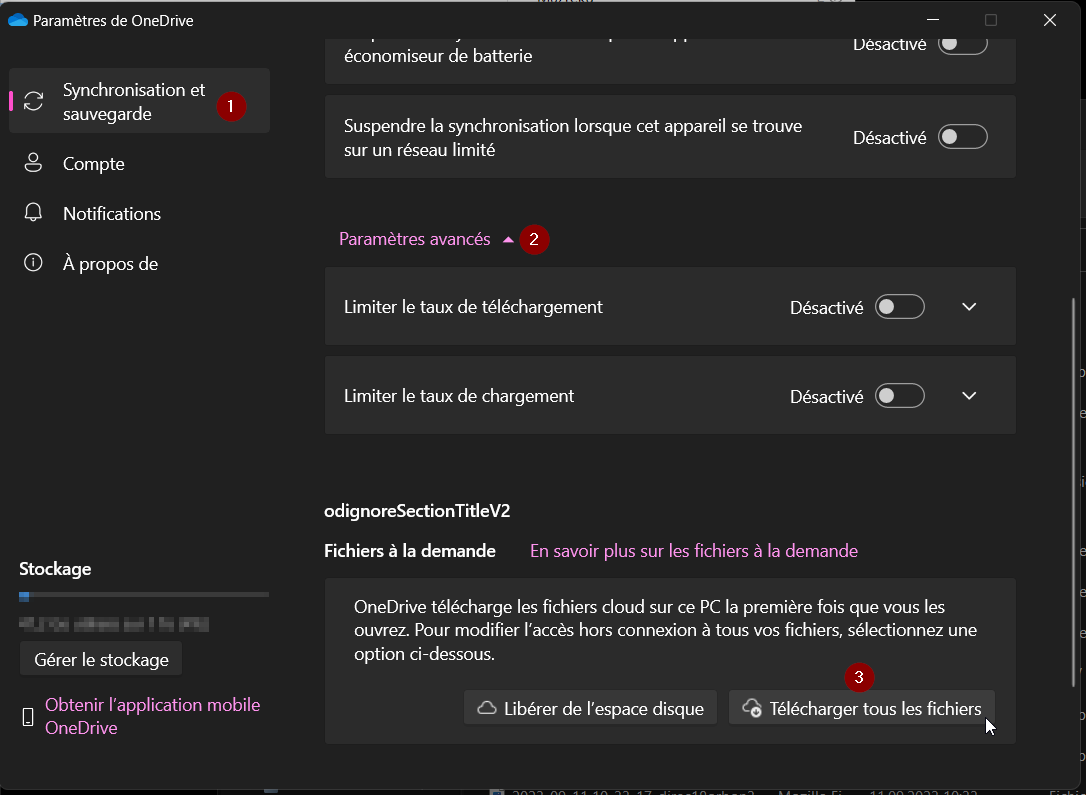
Windows
To download all files on Windows:
-
Click on the OneDrive icon in the bottom right and choose Help & Settings.

-
In Sync and Backup, click on Advanced settings, and click on Download all files.

Collaborate with UNIL members as an external user
Without a Guest Account
If you do not have a guest account, you will only be able to access shared data via the web.
Sharing a Single File
-
Office Files: The file will automatically open in Office Online (Word Online, Excel Online, etc.). You can edit the file and collaborate with the person who shared it with you. If you download the file, you can edit it using the Office application on your computer, but you will not be able to collaborate in real time with the person who shared it.
-
Non-Editable Formats: If the file format does not support online editing, your only option will be to download the file.
Sharing a Folder
By default, you will be able to:
-
Download data to your device.
-
Upload data to the folder.
-
Open Microsoft Office files in Office Online.
With a Guest Account
When invited to a Teams group at the University of Lausanne, you must create a guest account. This will allow you to open shared files in Office applications on your computer.
If your organization also uses Office 365 and you used your professional email address to create the guest account, you will also have access to enterprise sharing features (B2B Sharing):
Synchronize shared data from OneDrive
Prerequisites : You must install and configure OneDrive on your computer using your organization’s account. Refer to your IT department’s documentation for instructions.
This option may not always be available. Certain settings in your organization could block this functionality. If synchronization cannot be set up, the "Synchronize" button will not appear.
The "Add shortcut to My Files" option does not work if the sharing is from another organization. This is a bug on Microsoft’s side.
- Open the sharing link and click on the "Sync" button.

- In the following window, select the data you want to synchronize and confirm.

- A folder named "Université de Lausanne" will appear in your file explorer or Finder. The data you choose to synchronize from UNIL contacts will be added to this folder.


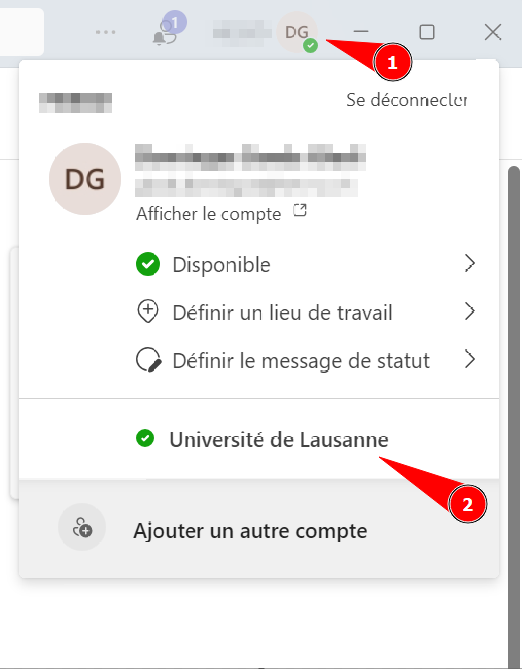
Synchronizing Shared Data from Teams
-
In Teams, click on the profile icon in the top-right corner of the application (1). If you’ve been invited to a Teams group at UNIL, you should see "Université de Lausanne" in the menu (2). This button allows you to switch to UNIL’s Teams.

-
To synchronize the team’s data to your OneDrive, follow the instructions provided on this page.
-
Once synchronization is set up, a folder named "Université de Lausanne" will appear in your file explorer or Finder.