Virtual machines for research
Public documentation
Introduction to the virtual machine service
The DCSR has deployed a new facility to provide researchers with a virtual machine (VM) service. Two kind of virtual machines are available:
- virtual workstations: the idea is to offer a workstation reachable from anywhere (even outside UNIL) from a simple Web browser or a dedicated client. Depending on the requested configuration, a virtual workstation can be used to cover basic office needs, or it could be a powerful computer able to deal with intensive computation and possibly with data visualization that leverages advanced graphics accelerators. Thanks to this workstation, one could start a task from UNIL and recover the same task from somewhere else without losing the workspace and the associated windows. These virtual workstations are offered within the frame of a Virtual Desktop Infrastructure (VDI).
- virtual servers: this kind of virtual machine (VM) is ideal for research groups that need to run long-term services. For instance, it could host a reference database or a web application shared among a group or a department. But also, it is possible to host any kind of analysis tools that would require computation capabilities.
Should I use a virtual workstation or a virtual server?
If you need to run applications and interact through a graphical interface (excepted a web interface), you have to choose virtual workstations. Instead, if you need to run applications that don't need graphical interface or that can be used through a web interface you have to choose virtual servers. If you hesitate, contact us!
How to ask for a virtual machine?
You have to use the research resource requests application available there. Any demand must be performed by the PI of a group. After having filled the information related to the project, you have to select the appropriate bundles (either virtualization workstation or virtualization server):
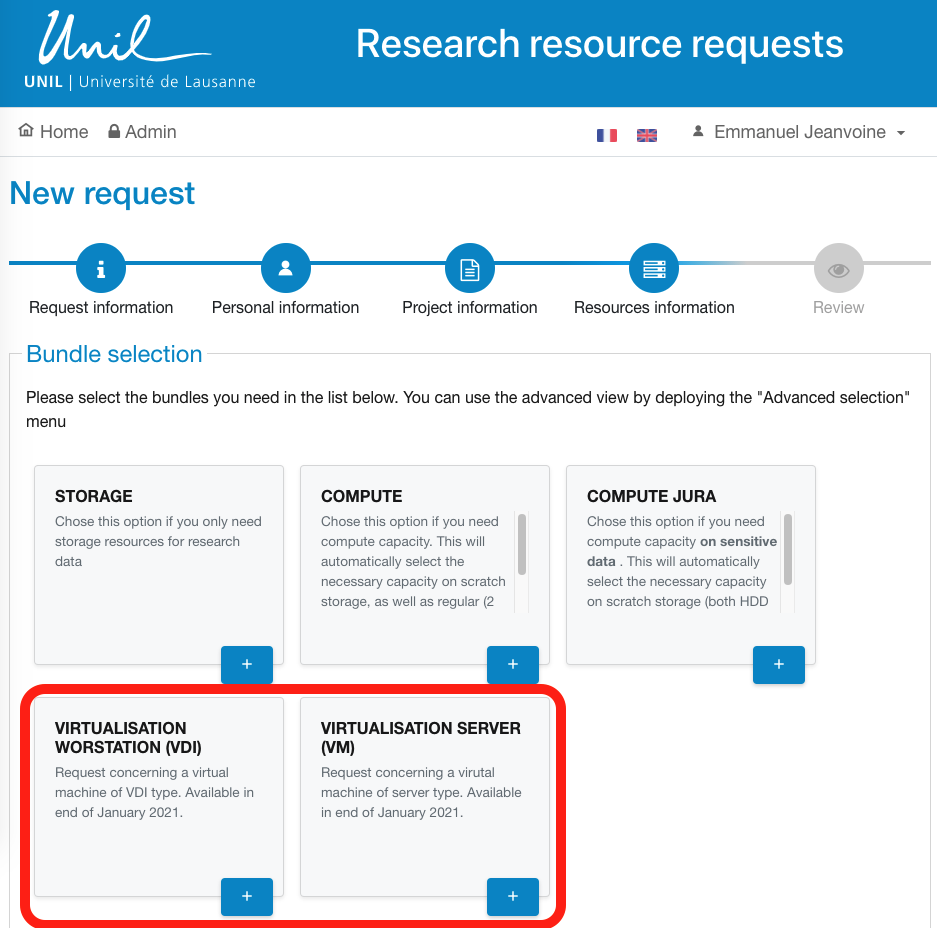
Then, if you choose one of the both products, you have to fill the characteristics:
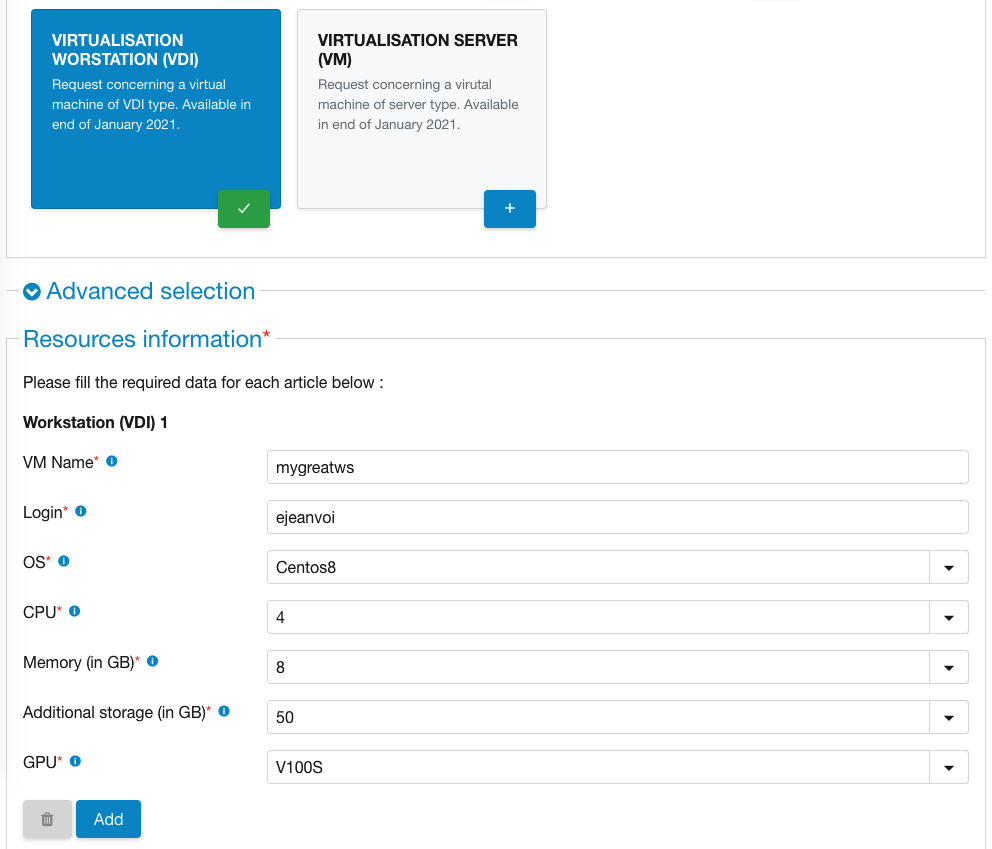
Some important points to note:
- Login corresponds to the UNIL login of the user that will use the virtual machine. It is not necessarily the PI of the group.
- OS: you can choose the operating system that will be installed on the virtual machine, at the moment we offer Centos8 and Windows10.
- CPU and memory: you have to define the amount of cores and memory required for your virtual machine. This should be defined according to the requirements of the applications you plan to run. If you don't know, just ask us. In any case, we will be able to increase both values later, so don't over-estimate your needs.
- Additional storage: by default: only a few GB will be available in the virtual machine. If you need more space for your application, you can specify it here. Note that you will be able to mount the NAS into the virtual machine, so this space is not supposed to be used as an archive or long term storage area.
- GPU: this option is only available for virtual workstations. Depending on your applications, you can use a Nvidia T4 GPU (suitable for machine learning or artificial intelligence workload) or a Nvidia V100S GPU (suitable for general purpose graphical computation).
Once the fields are filled, you can choose to add another virtual machine of the same kind. If you don't need another one, just click the "Next" button at the end of the page and complete the resource request.
How to connect to virtual machines?
Connection to virtual workstation
Connection to virtual workstations is performed thanks to VMware Horizon available either through a web browser or a desktop client. Just go to this page and choose if you prefer the HTML access or the desktop client. If you work from home, you will first need to be in VPN using Pulse Secure (see VPN instructions). In most of the cases, HTML access will be easier but if you want to define some advanced key shortcuts or choose some parameters like video compression, you will have to choose the desktop client method to access those parameters. The desktop client will ask you for a view server address, use vdi.dcsr.unil.ch as the address.
Let's suppose that you have chosen HTML access, you have to enter your UNIL credentials and then login.
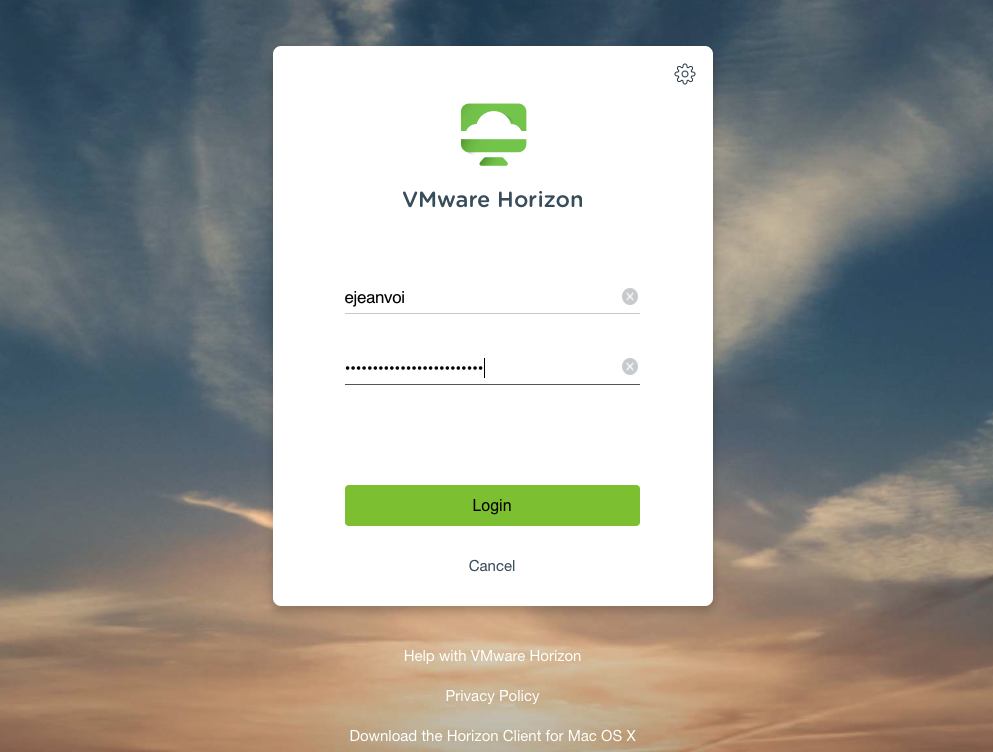
Once logged in Horizon, your virtual machine(s) will appear:
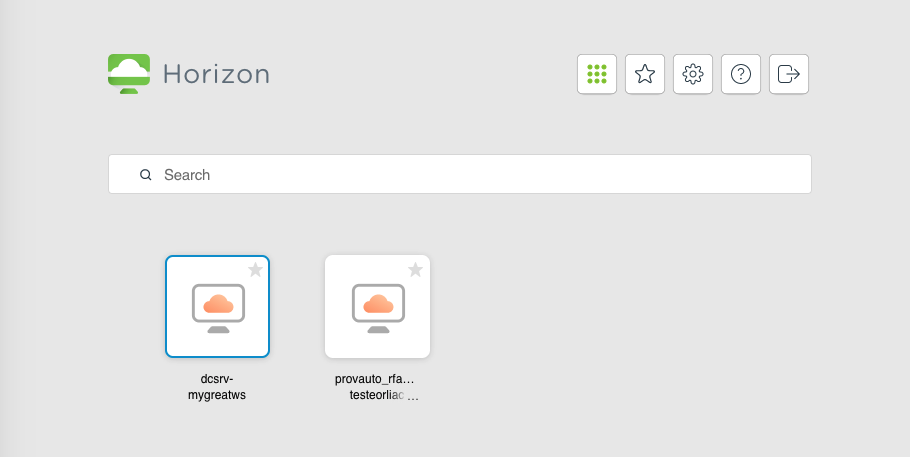
Finally, you just have to click on the virtual machine and the graphical desktop will appear. Here is an example with a Linux desktop:
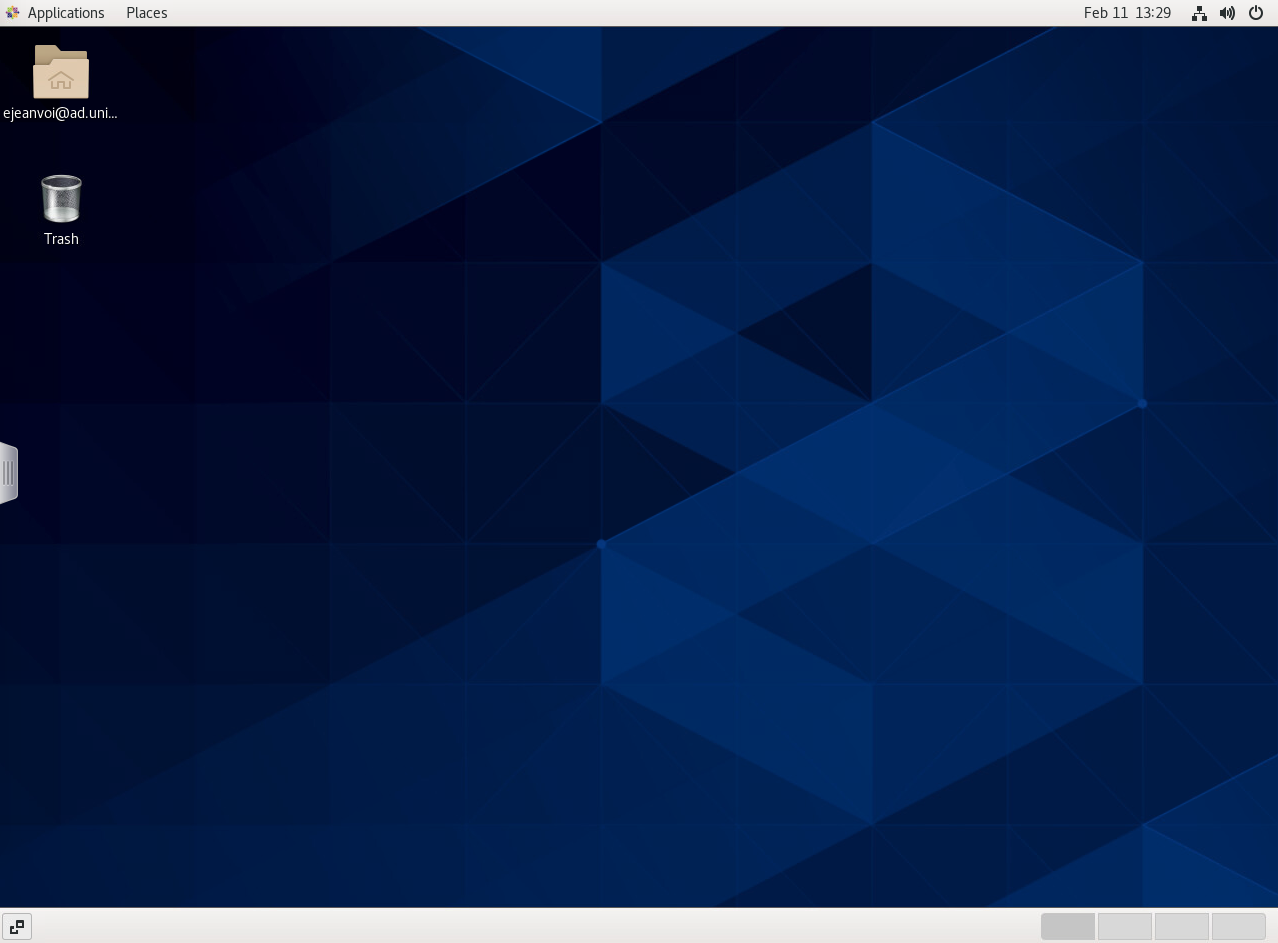
To exit, you have 2 options depending on if you have finished your work, or not.
If you have finished your work, you can just logout (below are the 3 steps):

If you haven't finished your work, you can disconnect using the Horizon menu (button on the middle-left of the screen):
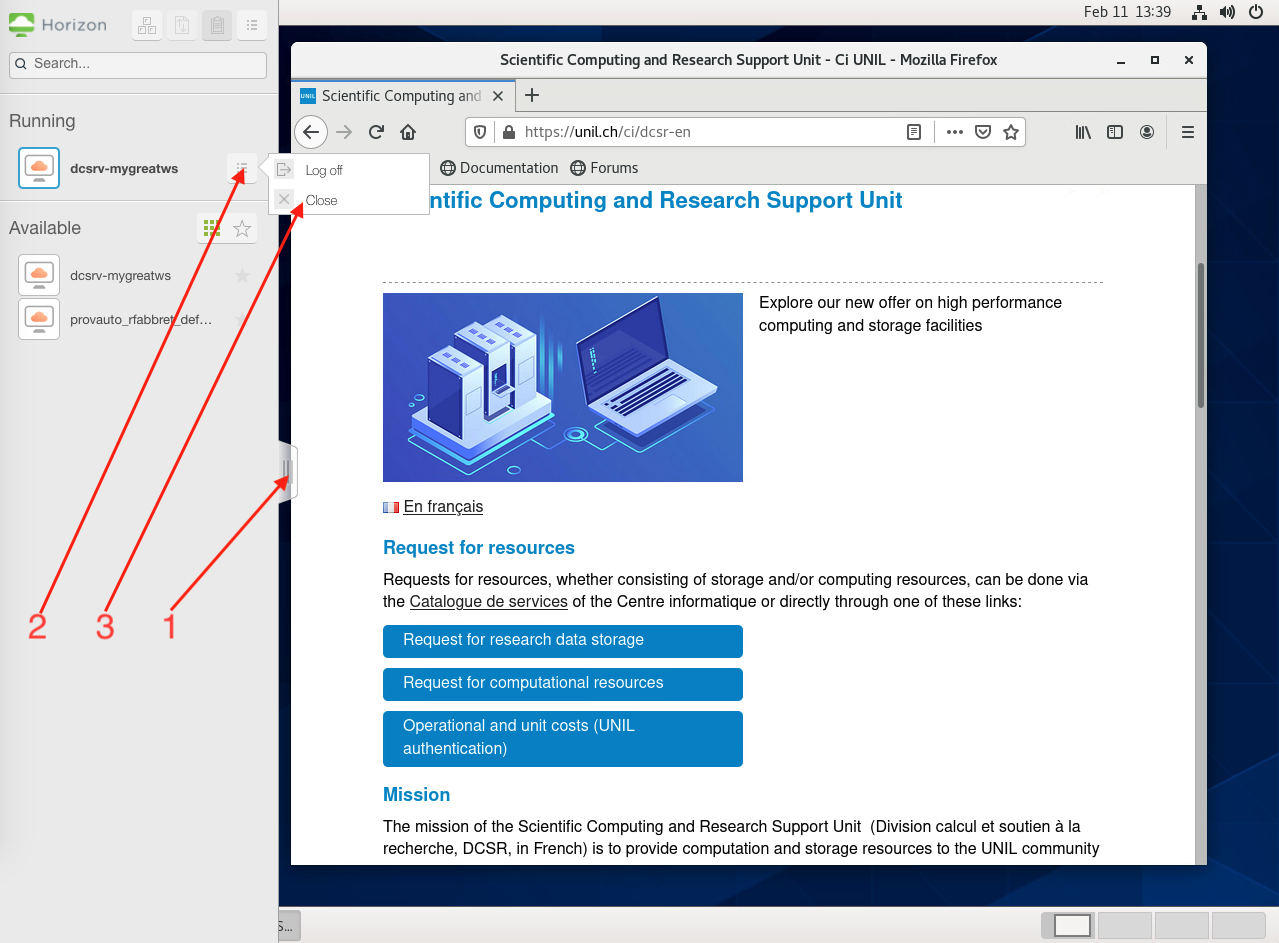
Using the second method, you will recover every thing when you'll come back.
For Linux based virtual workstations, it is also possible to connect using SSH. In that case, the hostname of the virtual machine is dcsrv-$VMNAME.ad.unil.ch ($VMNAME is the name provided in the resource requests application). For instance, in the case presented here (vmname=mygreatws and login=ejeanvoi), SSH connection would be performed as follows:
$> ssh ejeanvoi@dcsrv-mygreatws.ad.unil.ch
Connection to virtual server
Linux virtual servers
Use ssh from your computer to connect to your virtual server, as described below. Remark: If you work from home, you will first need to be in VPN using Pulse Secure (see VPN instructions).
To connect to a Linux based virtual server, you have to use SSH. In that case, the hostname of the virtual machine is dcsrs-$VMNAME.ad.unil.ch ($VMNAME is the name provided in the resource requests application). For instance, if in the application we have defined vmname=mygreatsrv and login=ejeanvoi, SSH connection would be performed as follows:
$> ssh ejeanvoi@dcsrs-mygreatsrv.ad.unil.ch
Windows virtual server
A RDP (Remote Desktop Protocol) client must be used to connect to Windows virtual servers. Download "Windows App" from the App Store and follow the instructions below.
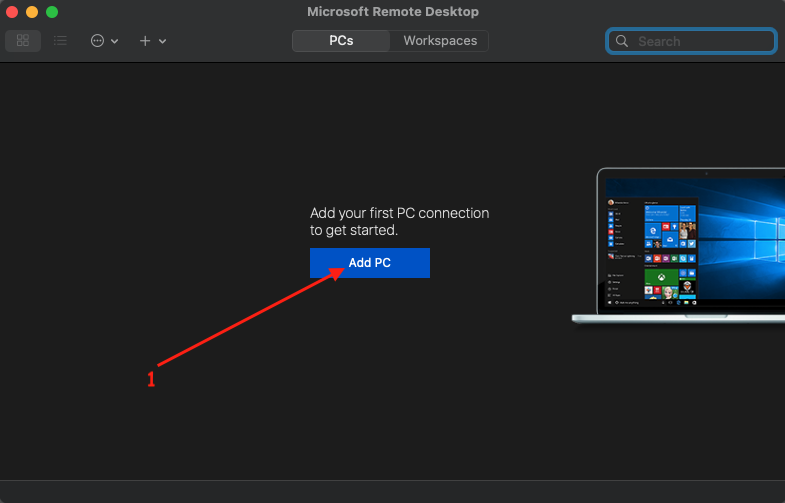

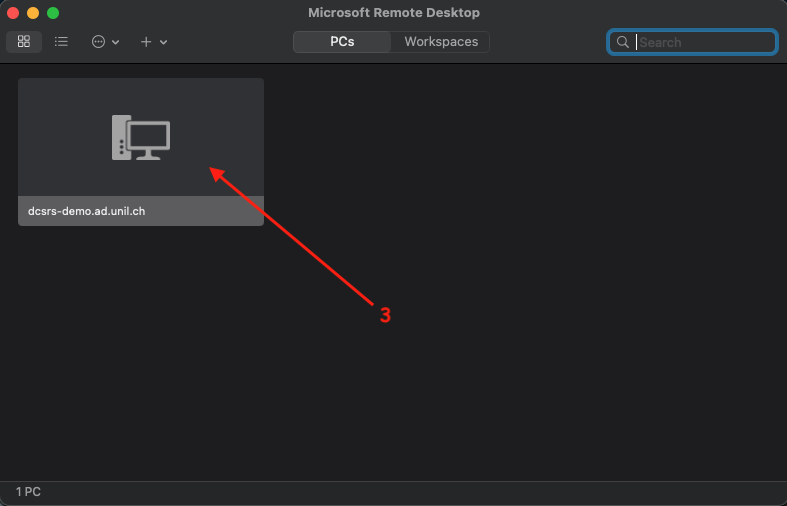
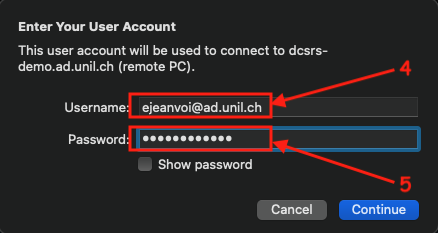
Important: the username is the UNIL login + "@ad.unil.ch" and the password is the UNIL password
Software installation and system configuration
Users should be autonomous regarding use and configuration of their virtual machines. They can install all the applications required for their research.
Linux
On Linux based virtual machine, a user can become an administrator by adding sudo before its commands. For instance, to install gromacs using the Yum package manager:
[ejeanvoi@dcsrv-mygreatws ~]$ sudo yum install gromacsUpdating Subscription Management repositories.Centos8-Appstream 65 kB/s | 2.5 kB 00:00Centos8-HA 54 kB/s | 2.1 kB 00:00Centos8-Powertools 61 kB/s | 2.5 kB 00:00Centos8-Base 54 kB/s | 2.1 kB 00:00Epel8 70 kB/s | 2.8 kB 00:00Centos8-Devel 55 kB/s | 2.1 kB 00:00Centos8-Extra 53 kB/s | 2.1 kB 00:00Dependencies resolved.================================================================================Package Arch Version Repository Size================================================================================Installing:gromacs x86_64 2019.4-1.el8 Default_Organization_Epel8_Epel8 132 kInstalling dependencies:fftw-libs-double x86_64 3.3.5-11.el8 appstream 992 kfftw-libs-single x86_64 3.3.5-11.el8 appstream 1.0 Mgromacs-common noarch 2019.4-1.el8 Default_Organization_Epel8_Epel8 801 kgromacs-libs x86_64 2019.4-1.el8 Default_Organization_Epel8_Epel8 13 Mhwloc-libs x86_64 1.11.9-3.el8 baseos 1.6 Mlibgfortran x86_64 8.3.1-5.1.el8 baseos 639 klibquadmath x86_64 8.3.1-5.1.el8 baseos 169 klmfit x86_64 8.2.2-1.el8 Default_Organization_Epel8_Epel8 29 kocl-icd x86_64 2.2.12-1.el8 appstream 51 kopenblas x86_64 0.3.3-5.el8 appstream 4.3 Mtng x86_64 1.8.2-4.el8 Default_Organization_Epel8_Epel8 133 kInstalling weak dependencies:gromacs-opencl x86_64 2019.4-1.el8 Default_Organization_Epel8_Epel8 58 k
Transaction Summary================================================================================Install 13 Packages
Total download size: 22 MInstalled size: 81 MIs this ok [y/N]:
Windows
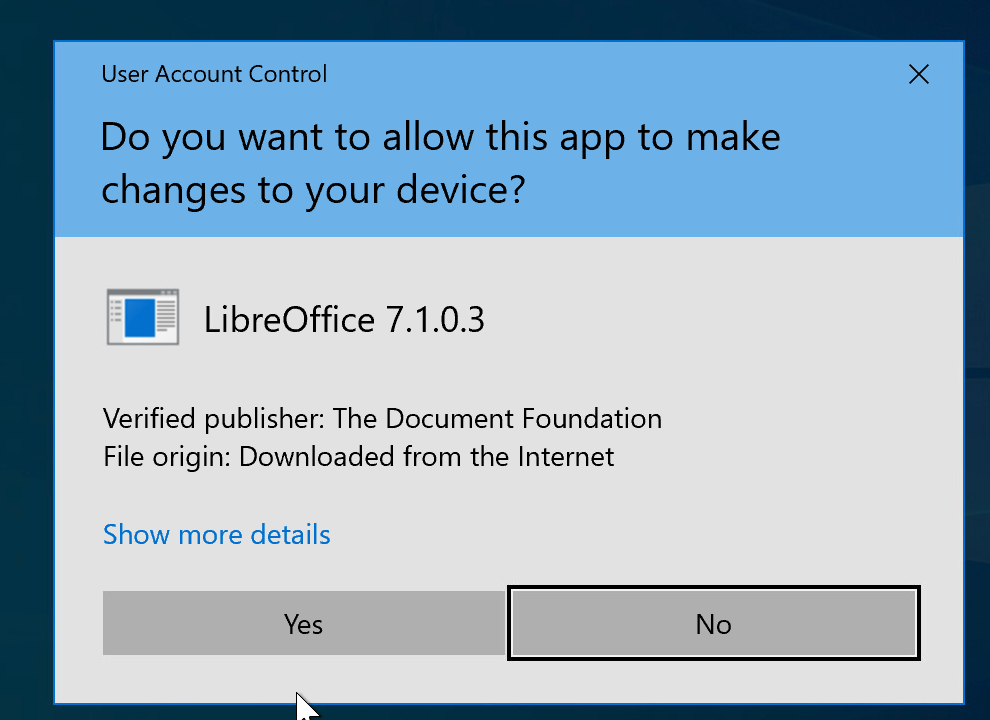
On Windows based virtual machines, you can install any application. If administrator rights are required, a prompt asking you to allow the application to make changes to your device is displayed, just answer Yes in that case. Here is an example:
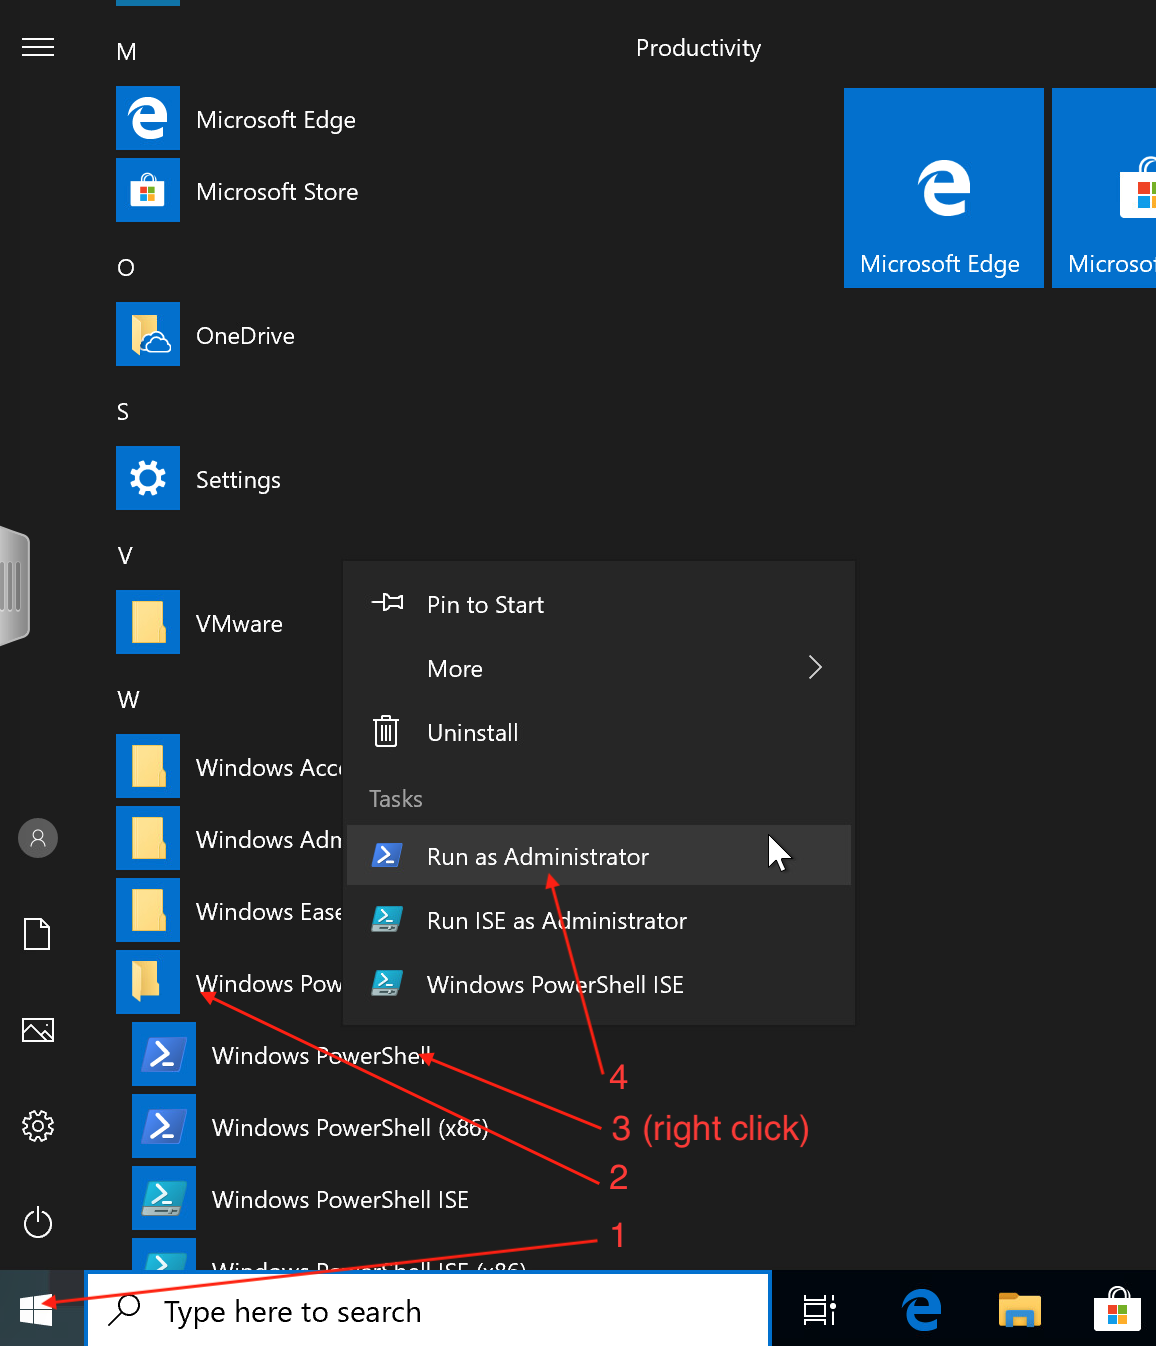
You can also open some applications directly in Adminstrator mode, for instance with a Powershell terminal:
FAQ
-
How to contact DCSR regarding virtual machine topics?
Just send a mail to helpdesk@unil.ch, and in the topic put at least "DCSR VM"
-
I need to allow other users to connect in the virtual machine, is it possible?
Yes it is. Just contact us with the list of UNIL logins to allow in the virtual machine.
-
Is it possible to modify the characteristics of a virtual machine?
Yes it is. Just contact us with a small explanation and the new characteristics.
-
I've some trouble to install the software required for my research, could you help me?
Given our limited manpower, we ask users to first read carefully the documentation of their software and then to try by themselves . If it's not working, of course we will do our best to make it working :)
-
Can I access the NAS DCSR from the virtual machines?
Yes it is possible and recommended to store your important data. Just follow the same steps than the ones required to your laptop. The documentation can be found there.
-
In case of an issue, do you have a backup of my virtual machines and can it be restored?
Yes, all virtual machines are backed up once a day. Linux or windows virtual machines have a retention policy of three month (It means we are able to restore it at "3 months ago time"). Some "test servers" have a backup policy of 1 month only (It means we are able to restore it at "1 months ago time").
Enable GUI access to a Rocky Linux VM
This guide explains how to install a lightweight graphical environment (XFCE) and configure XRDP to enable remote desktop access to your Rocky Linux virtual machine.
Note: You must have sudo privileges to perform the installation steps.
🔧 Step 1: Update the System
sudo dnf update -y🧪 Step 2: Install EPEL repository
The installation of the XFCE desktop environment requires to install the EPEL repository which is a repository that provides high-quality software packages for RHEL-distributions.
sudo dnf install epel-release -y🎛️ Step 3: Install XFCE Desktop Environment
sudo dnf groupinstall "Xfce" -y📦 Step 4: Install XRDP
sudo dnf install xrdp -y🔄 Step 5: Enable and Start XRDP
sudo systemctl enable xrdp --nowCheck the service status:
sudo systemctl status xrdpYou should see "active (running)".
🔐 Step 6: Open RDP Port in Firewall
sudo firewall-cmd --permanent --add-port=3389/tcp
sudo firewall-cmd --reload
🛠️ Step 7: Set XFCE as the Default Desktop for XRDP Sessions
Create or modify your user’s .Xclients file:
echo "startxfce4" > ~/.Xclients chmod +x ~/.XclientsTo apply this for all new users, you can add it to /etc/skel/:
echo "startxfce4" | sudo tee /etc/skel/.Xclients
sudo chmod +x /etc/skel/.Xclients
🔄 Step 8: Reboot the system
To ensure all services and graphical environment changes take effect, reboot the virtual machine:
sudo systemctl rebootWait a few moments for the system to come back online.
💻 Step 9: Connect via Remote Desktop
From your local machine, open your Remote Desktop Client (RDP) and connect to:
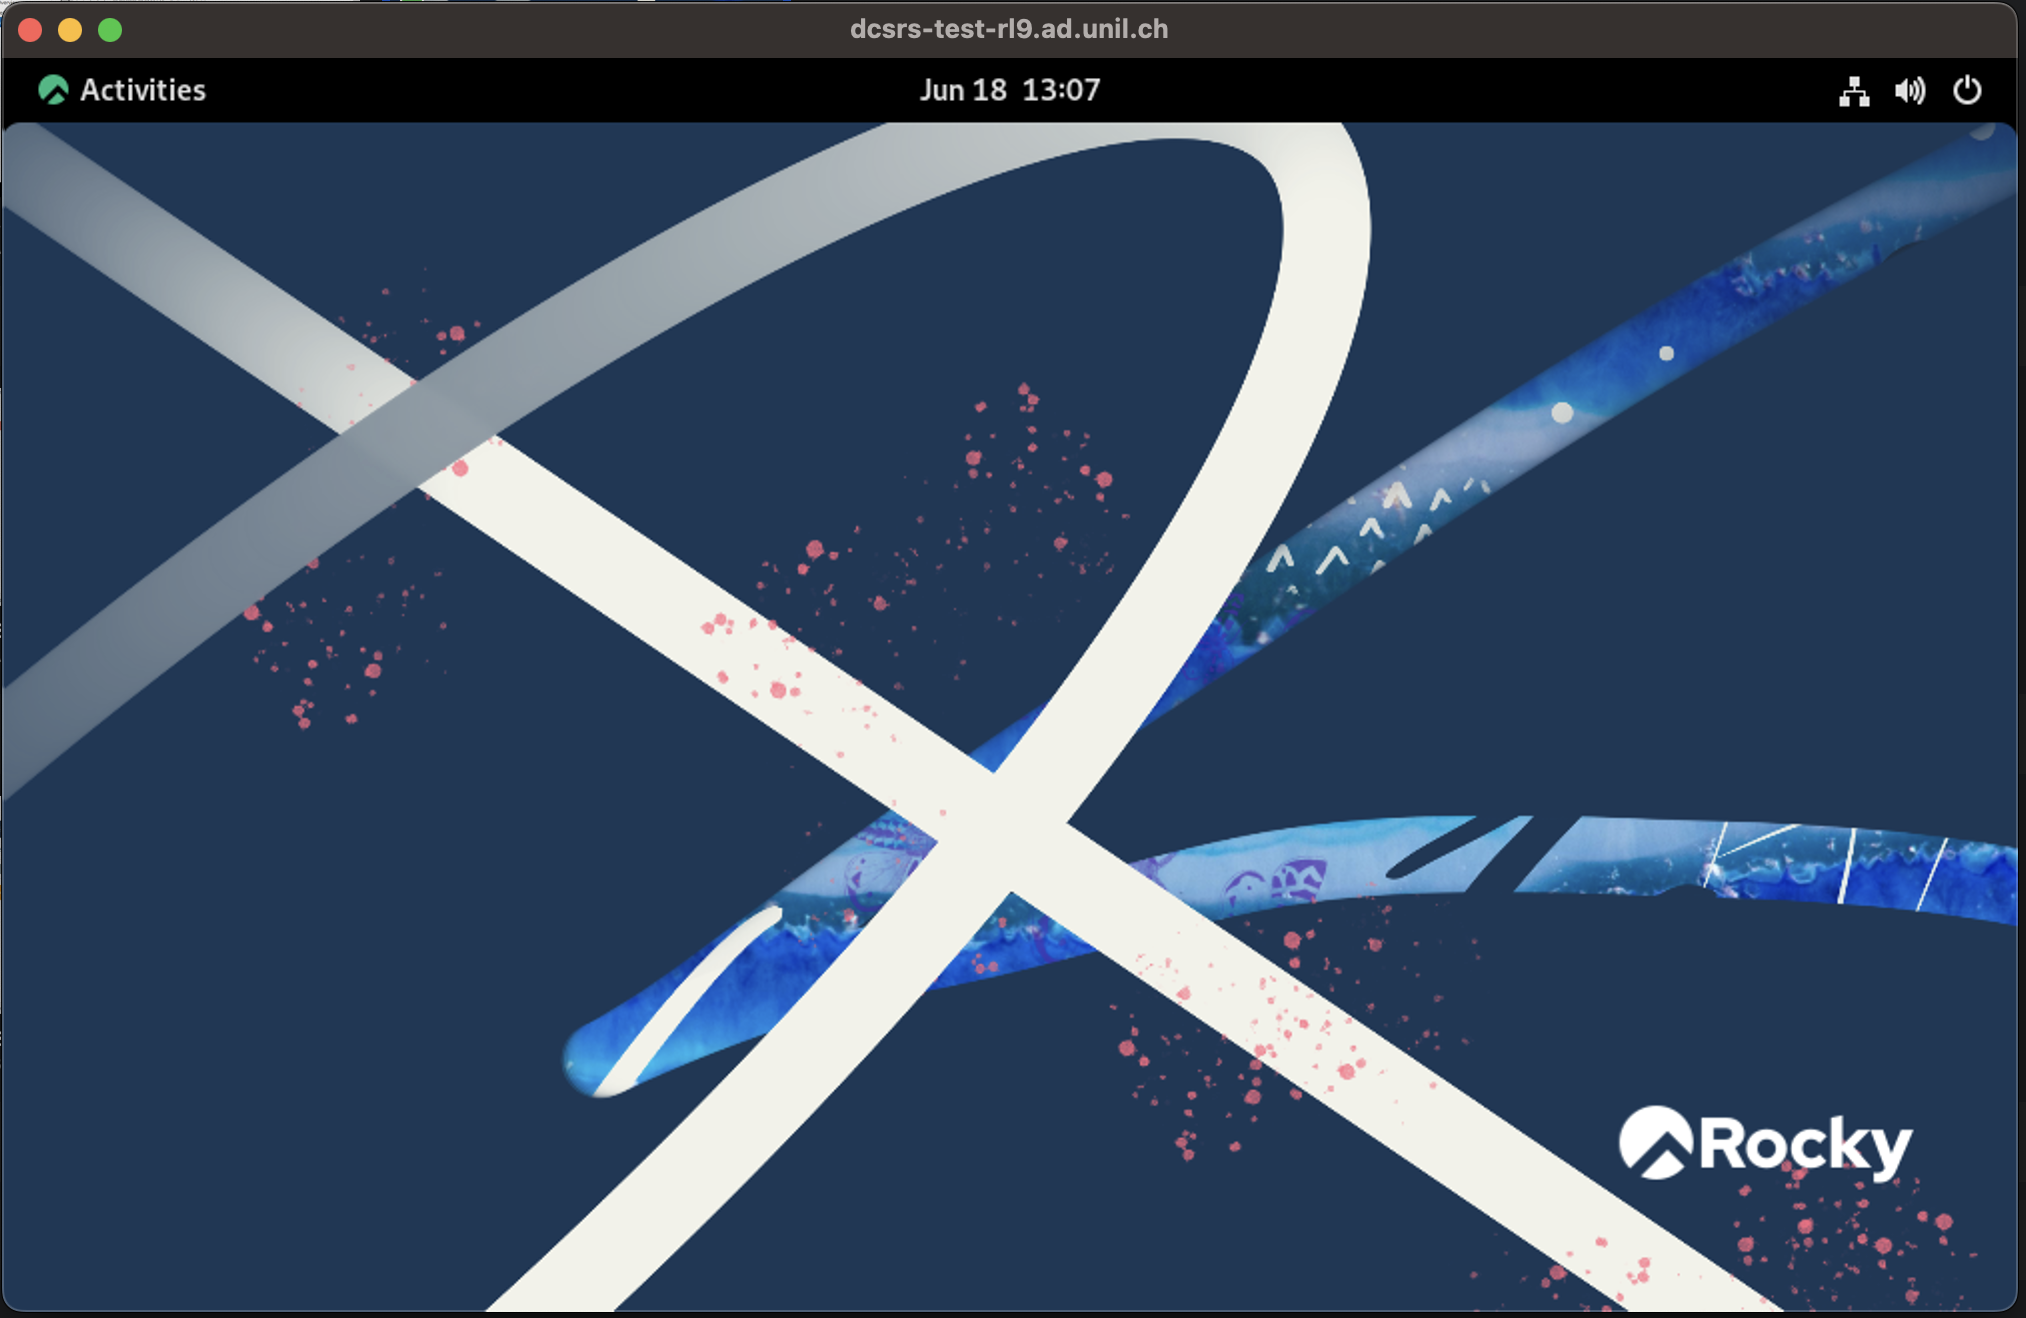
If you need further help, please contact your system administrator or open a support ticket with the helpdesk (helpdesk@unil.ch).
Exposing a web service to the Internet
Who this page is for — the PI and the technical administrator of a VM hosted by DCSR who want to make a web service reachable from the Internet. To start the request: email
helpdesk@unil.ch— see section 2.
1. In short
| Question | Answer |
|---|---|
| Which ports can be exposed? | TCP/80 and TCP/443 only. No other port (SSH, 8080, databases, ...) is allowed. |
| Which path does the traffic take? | Internet → UNIL firewall (FWaaS) → F5 load balancer → your VM. |
| Who provides the public certificate? | A Let's Encrypt certificate held by the F5, not by your VM. |
| What changes on my VM? | DCSR migrates it to a dedicated VLAN and gives it a fixed internal IP. |
| What do I have to do? | Harden the web service, fix the vulnerabilities found by the scan, and keep that level over time. |
2. How to start the request
Send an email to
helpdesk@unil.chwith the subject line:[DCSR] exposing web service to the internet - <your_VM_name>In the body, give:
- a short description of the web service you want to expose (a few words are enough);
- the public DNS name you want users to type, of the form
https://<your_service>.unil.ch.This creates an Otobo ticket. The DCSR engineer starts the workflow once that request has been received — nothing happens before it.
3. How a visitor reaches your VM
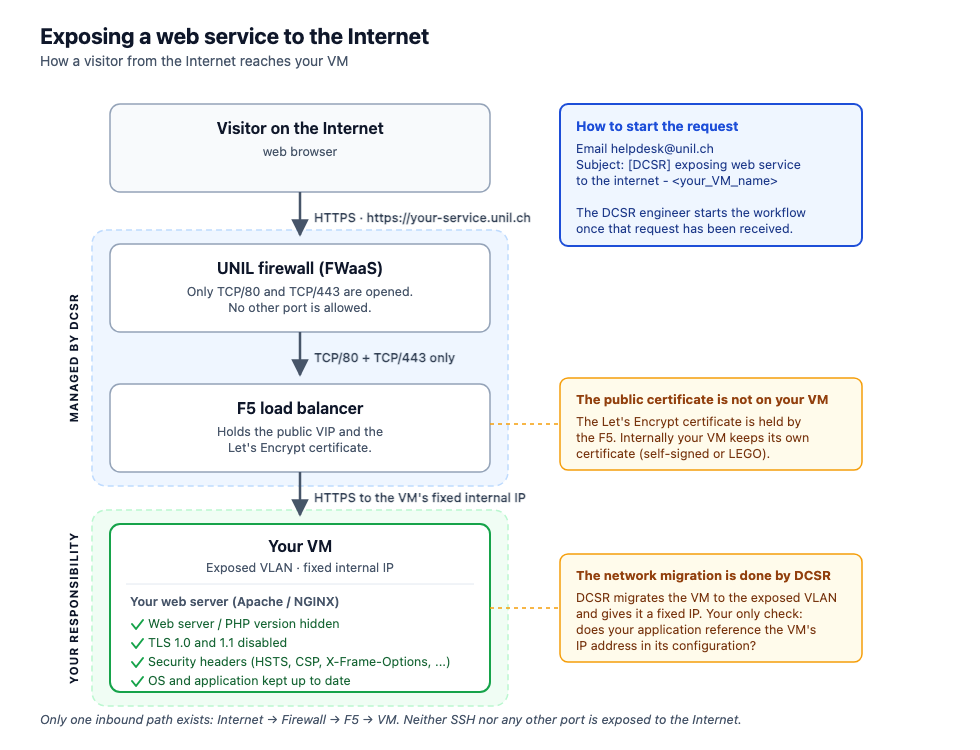
The key point: two components are not yours (the firewall and the F5, managed by DCSR), and one is your responsibility — your VM and the web service running on it. The security level of the whole chain is the security level of your VM.
4. Prerequisites before requesting
- The web service works and has been tested inside the UNIL network (including HTTPS) via
https://dcsrs-<vmname>.ad.unil.ch. - The VM is up to date (OS + application).
- A technical administrator is identified and available throughout the procedure — the PI can take on that role.
- The PI is identified and will fill in the FWaaS form at the end of the process.
- The desired public URL has been chosen:
xx.unil.ch.
5. What going public means for your VM
The network migration is handled by DCSR. Your VM is migrated to the exposed VLAN and given a fixed internal IP. You have nothing to do for that migration itself.
One thing to check on your side: if your web application, its virtual hosts or any of its configuration files reference the VM's IP address, that reference must be updated to the new IP. If your application only uses host names, there is nothing to change.
Agents are installed. Monitoring (Prometheus) and vulnerability scanning (Nessus/Tenable agent).
Your VM becomes a target. It is scanned from the outside, and will keep being scanned. A critical vulnerability found after going public must be fixed — if necessary by temporarily removing public access.
6. Who does what
| Actor | Role |
|---|---|
| DCSR system engineer | Handles the request, coordinates the workflow, internal IP and DNS reservation, VLAN migration, fixed IP, agents, Nessus/Tenable scan, header check, final access validation with you. |
| Researcher / VM administrator | Web service hardening, vulnerability remediation, functional testing. |
| PI | Fills in the FWaaS form (port opening request). |
| DCSR network engineer | Public DNS, F5 VIP, F5 and firewall configuration, Let's Encrypt certificate. |
7. Security requirements on your side
These four points cause most of the back-and-forth. Handling them before the scan saves several days.
a) Hide the web server and PHP version
- Apache: hide the version
- NGINX: hide the version
- Check:
curl -Ik https://your-service.ad.unil.ch(-kis needed as long as the certificate is self-signed)
b) Disable TLS 1.0 and TLS 1.1 — only TLS 1.2 and 1.3 are accepted.
c) Set the security headers
| Header | Purpose |
|---|---|
Strict-Transport-Security |
Forces HTTPS on subsequent visits. |
X-Frame-Options |
Prevents your site being embedded in a third-party iframe. |
X-Content-Type-Options |
Prevents MIME type sniffing. |
Referrer-Policy |
Limits the information sent to third-party sites. |
Permissions-Policy |
Restricts access to browser APIs (camera, microphone, ...). |
Content-Security-Policy |
Limits allowed content sources (as far as feasible). |
Check: securityheaders.com (tick the hide option so the result is not published).
d) Fix the vulnerabilities found by the scan — DCSR runs a Nessus/Tenable scan. You receive the report and fix what is identified, with the support of your DCSR engineer. A disputed vulnerability that is hard to fix can be escalated to the security team for a decision.
8. SSL certificates
| Context | Certificate |
|---|---|
| Before going public (UNIL internal) | Self-signed certificate on the VM. |
| After going public | Let's Encrypt certificate held by the F5. Your VM manages nothing on the public side. |
Procedures: Self-signed (NGINX) · Self-signed (Apache)
9. How the request unfolds
Your DCSR engineer keeps you informed at each step. Three phases need something from you.
| Phase | What happens | What is expected from you |
|---|---|---|
| 1. Preparation | Internal IP and DNS reservation, documentation. | Confirm the desired public URL. |
| 2. Network compliance | VLAN migration, switch to fixed IP, agent installation, AD/AWX attachment. | Check whether your application references the VM's IP, and re-validate the service. |
| 3. Hardening | — | Hide versions, disable TLS 1.0/1.1, set the headers. |
| 4. Security scan | Nessus/Tenable scan and analysis. | Fix the identified vulnerabilities. |
| 5. Public opening | Public DNS, F5 VIP and configuration, firewall opening. | The PI fills in the FWaaS form — see section 10. |
| 6. Validation | Header verification, access test. | Confirm the service works from the Internet. |
10. The FWaaS form
Fill in the form only when your DCSR engineer explicitly tells you to — that is, once they confirm every prerequisite has been completed. A form submitted too early leads to a rejected or reopened ticket, and delays the whole request.
Filled in by the PI: Firewall as a Service.
- Requested ports: TCP/80 and TCP/443 only.
- Field DNS name of the destination server: the chosen public URL — it must be valid at the time of the request.
- Field Comment: give the VM name and its internal IP.
The form automatically creates an Otobo ticket handled by the network/security teams.
11. After going public
You will receive automatic email notifications about your VM. They are not informational noise — each one calls for an action on your side:
| Notification | What you have to do |
|---|---|
| Vulnerabilities identified on your VM | Analyse the report and fix them, with the support of your DCSR engineer. |
| OS updates available | Apply them within a reasonable delay. |
| Reboot required after OS security updates | Schedule and perform the reboot; the updates are not effective until then. |
Ignoring these notifications leaves a publicly exposed VM vulnerable, and public access may be suspended until the situation is fixed.
Also:
- New vulnerability found? Contact your DCSR engineer; depending on severity, public access may be suspended until it is fixed.
- Changing the public URL: requires a new FWaaS request and new F5 configuration.
- End of service life: request decommissioning so that public exposure and DNS entries are removed cleanly.
12. FAQ
Can I expose another port (SSH, 8080, a database)? No. Only TCP/80 and TCP/443 can be exposed. For administrative access or a non-web protocol, use the UNIL VPN or an internal jump host.
How long does the procedure take? The DCSR part is usually quick (1-2 days); the real delays come from hardening/remediation on your side and from the firewall ticket being processed.
My service handles sensitive data. Say so in your initial request: those VMs are tracked separately and public exposure is not always the right answer.
Is my VM backed up?
Yes, with a 3-month retention. To restore it to a given date, email helpdesk@unil.ch with the subject [DCSR] request VM restore - <your_vm_name> and state the date of the archive you want.
My service does not need to be public, only reachable from off campus. The UNIL VPN covers that without any Internet exposure — often the better option.
Who do I contact? Your DCSR engineer, or helpdesk@unil.ch for a new request.
13. Useful links
- FWaaS form
- securityheaders.com
- Self-signed certificate with NGINX
- Self-signed certificate with Apache