Managing media on Rec·Unil
- Connecting to Rec·Unil
- Managing and setting up your channel(s)
- Manage access to your videos
- Manage the publication of your videos
- Editing your videos
- Send a request for the editing (trimming) of your videos to the helpdesk
Connecting to Rec·Unil
We recommend that you use Firefox or Google Chrome to access the Rec·Unil service.
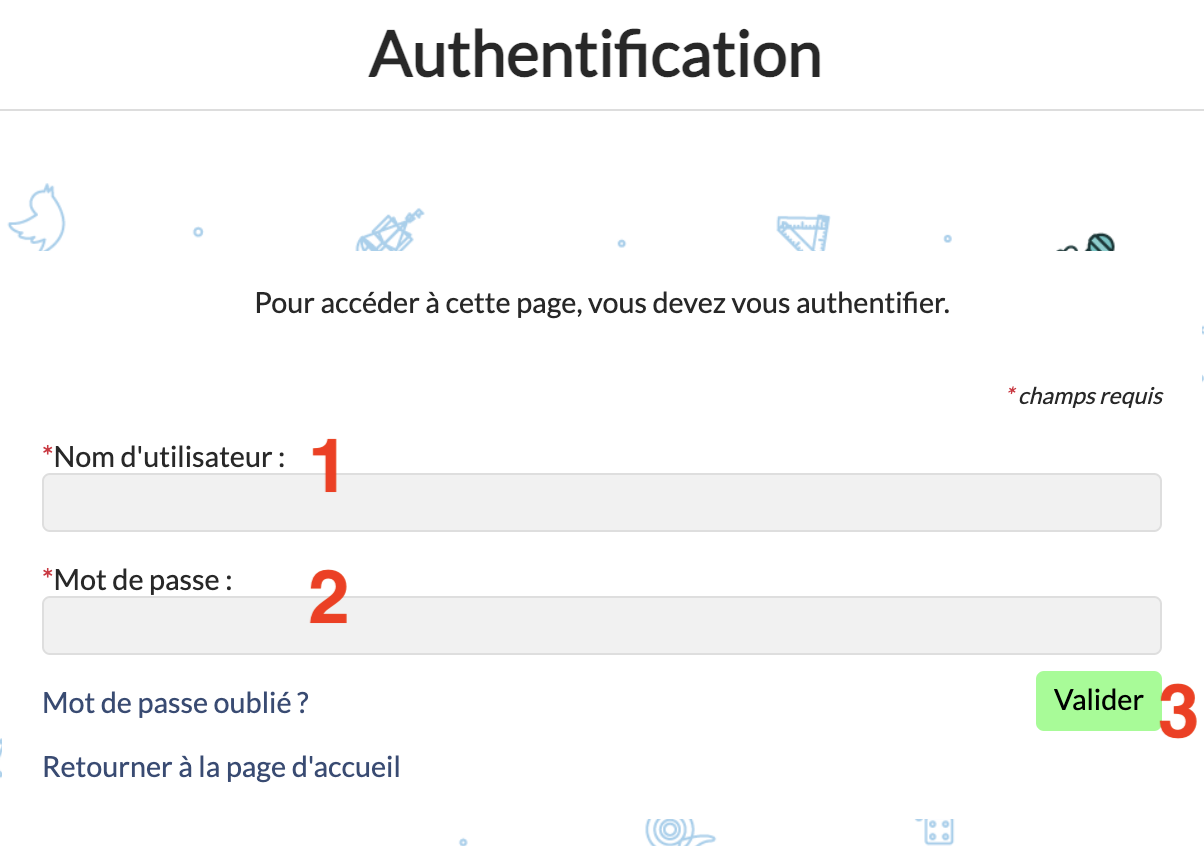
To connect to the Rec·Unil Media Server, go to https://rec.unil.ch/ and click on the "Sign in" button at the top right of the page.

Enter your Unil login and validate. You are now connected to your personal account on Media Server Rec·Unil.
Video resource
The video below outlines the procedure in images (in French):
Managing and setting up your channel(s)
Accessing your channel settings
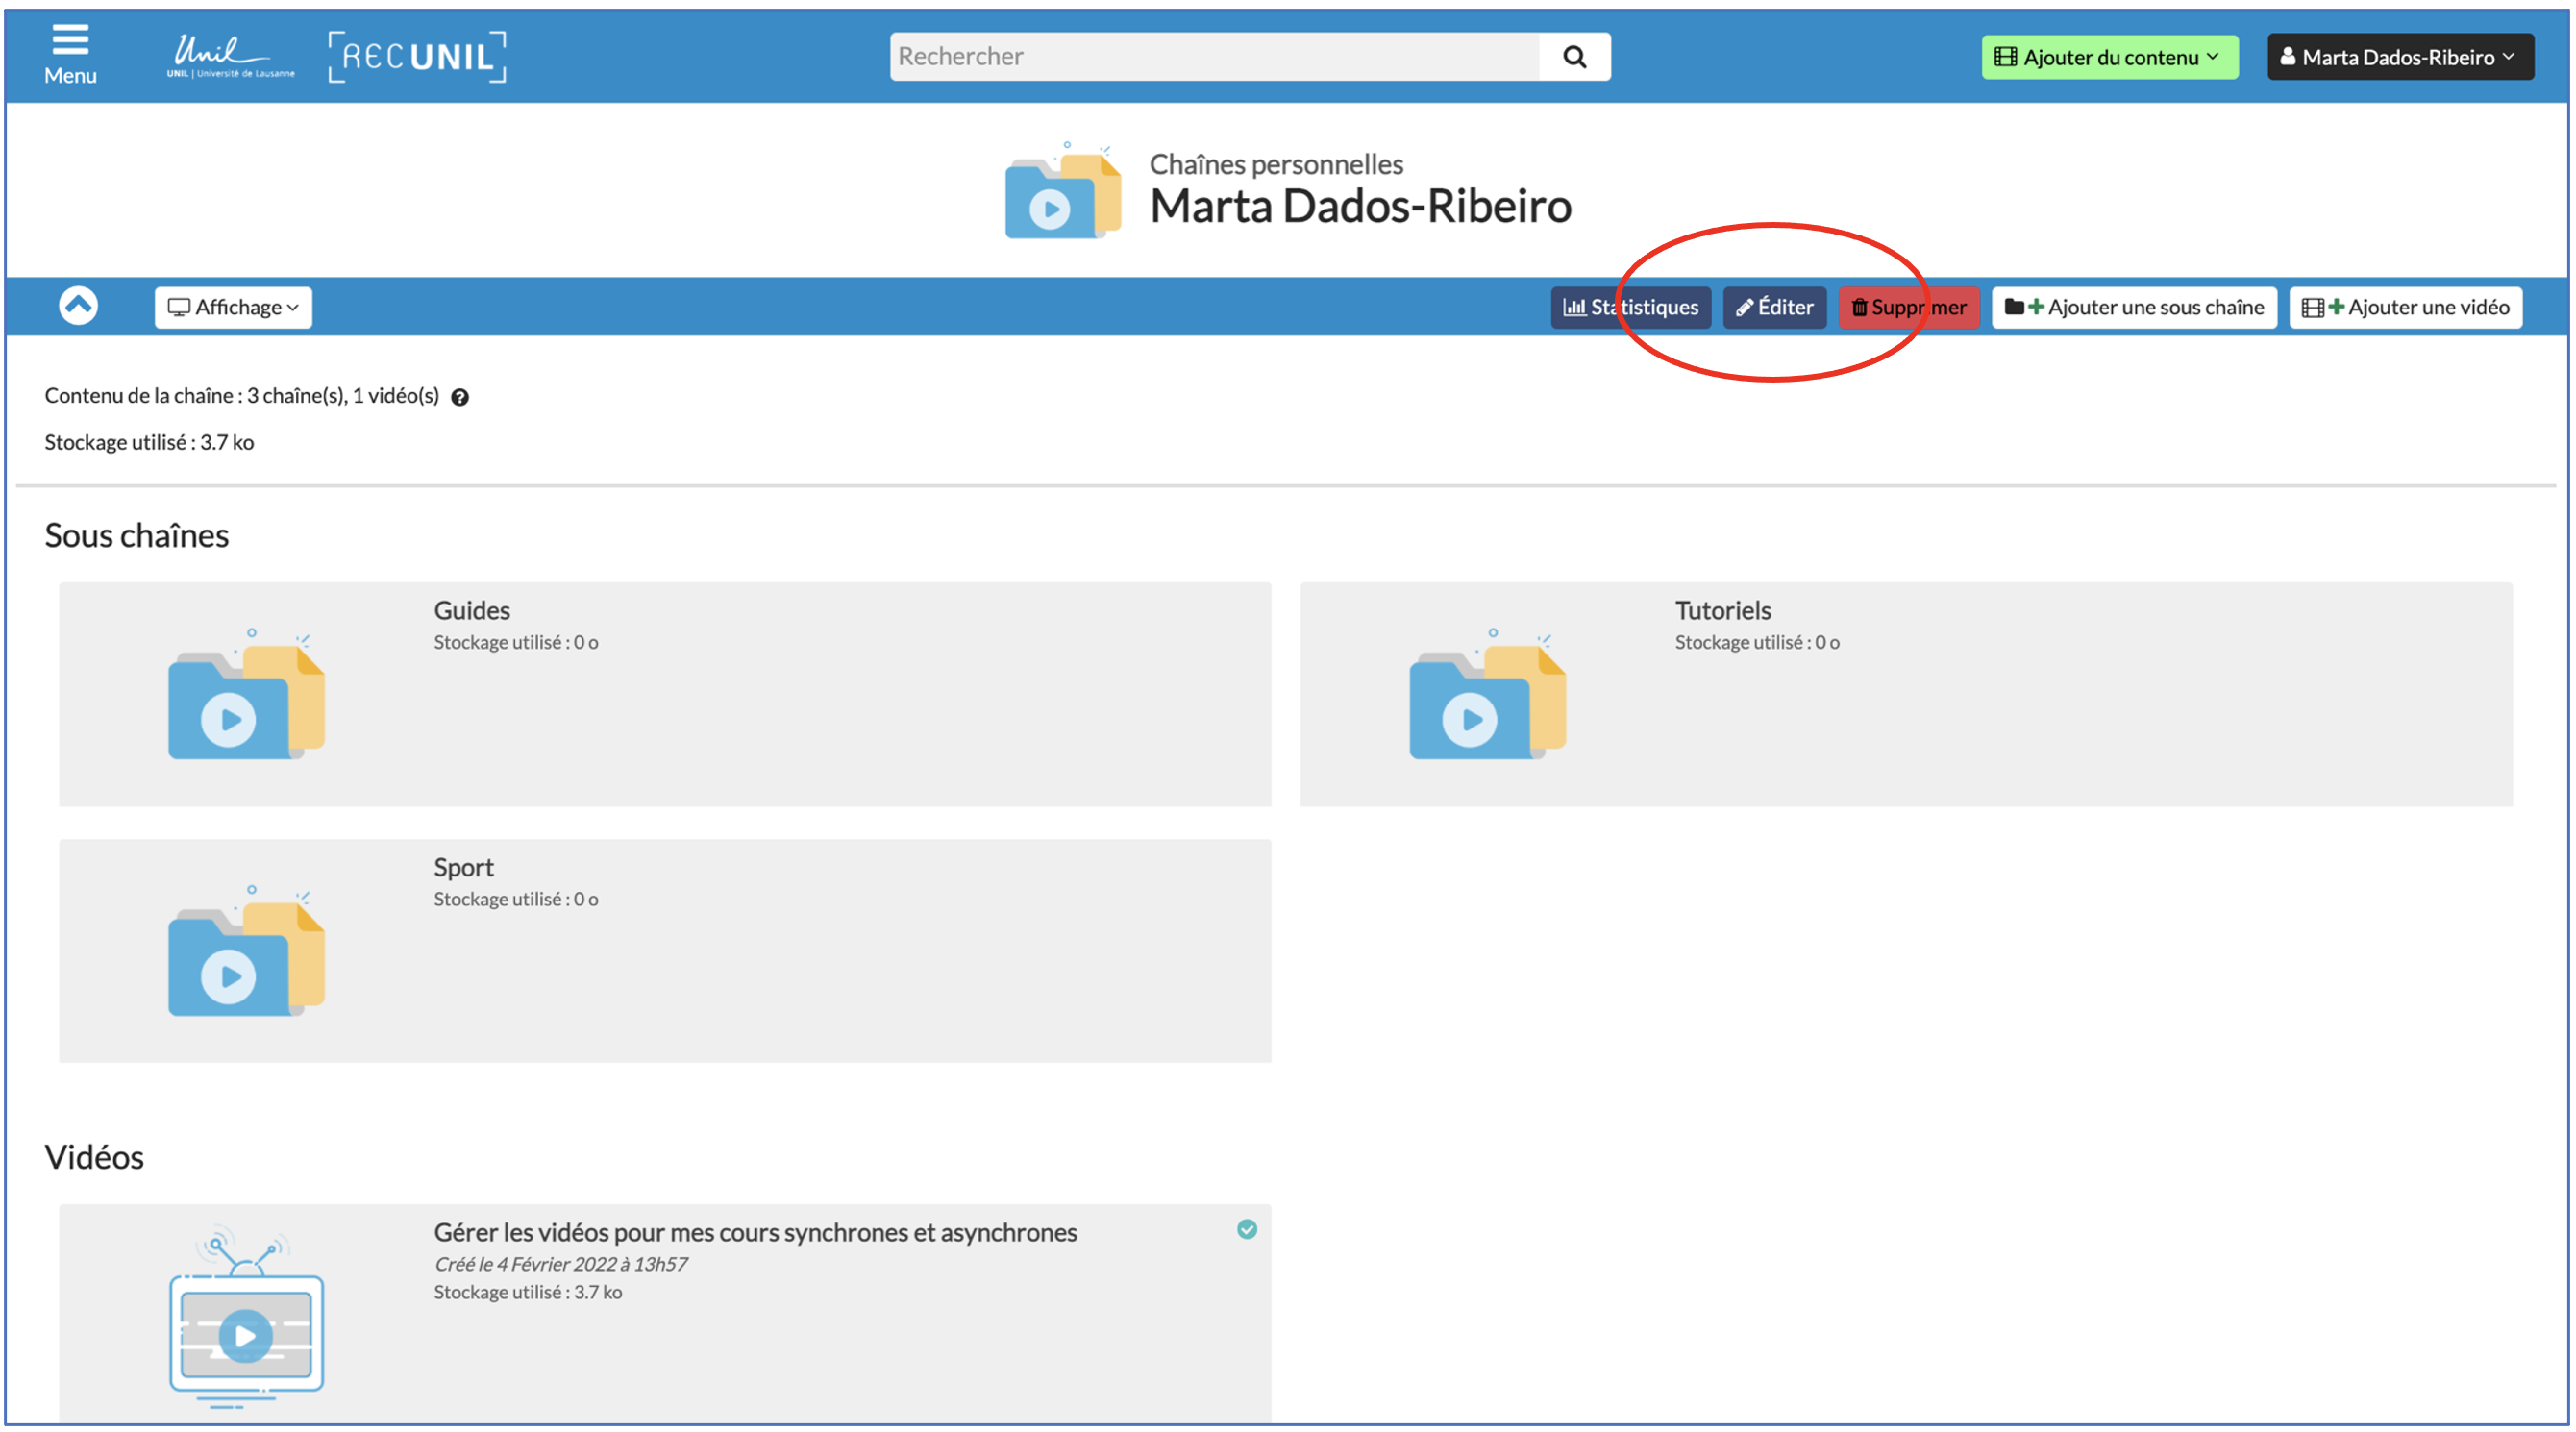
To manage and set up your channels, after logging in, click on your name at the top right of the Rec·Unil page, then click on "My channel".

The "Edit" button allows you to access the settings page of your personal channel. The modifiable parameters are detailed below.

Accessing subchannel settings
To access the parameters of a sub-channel, access your main channel as described above, then hover over your sub-channel with your cursor. The "Edit" button will appear. Click on it.
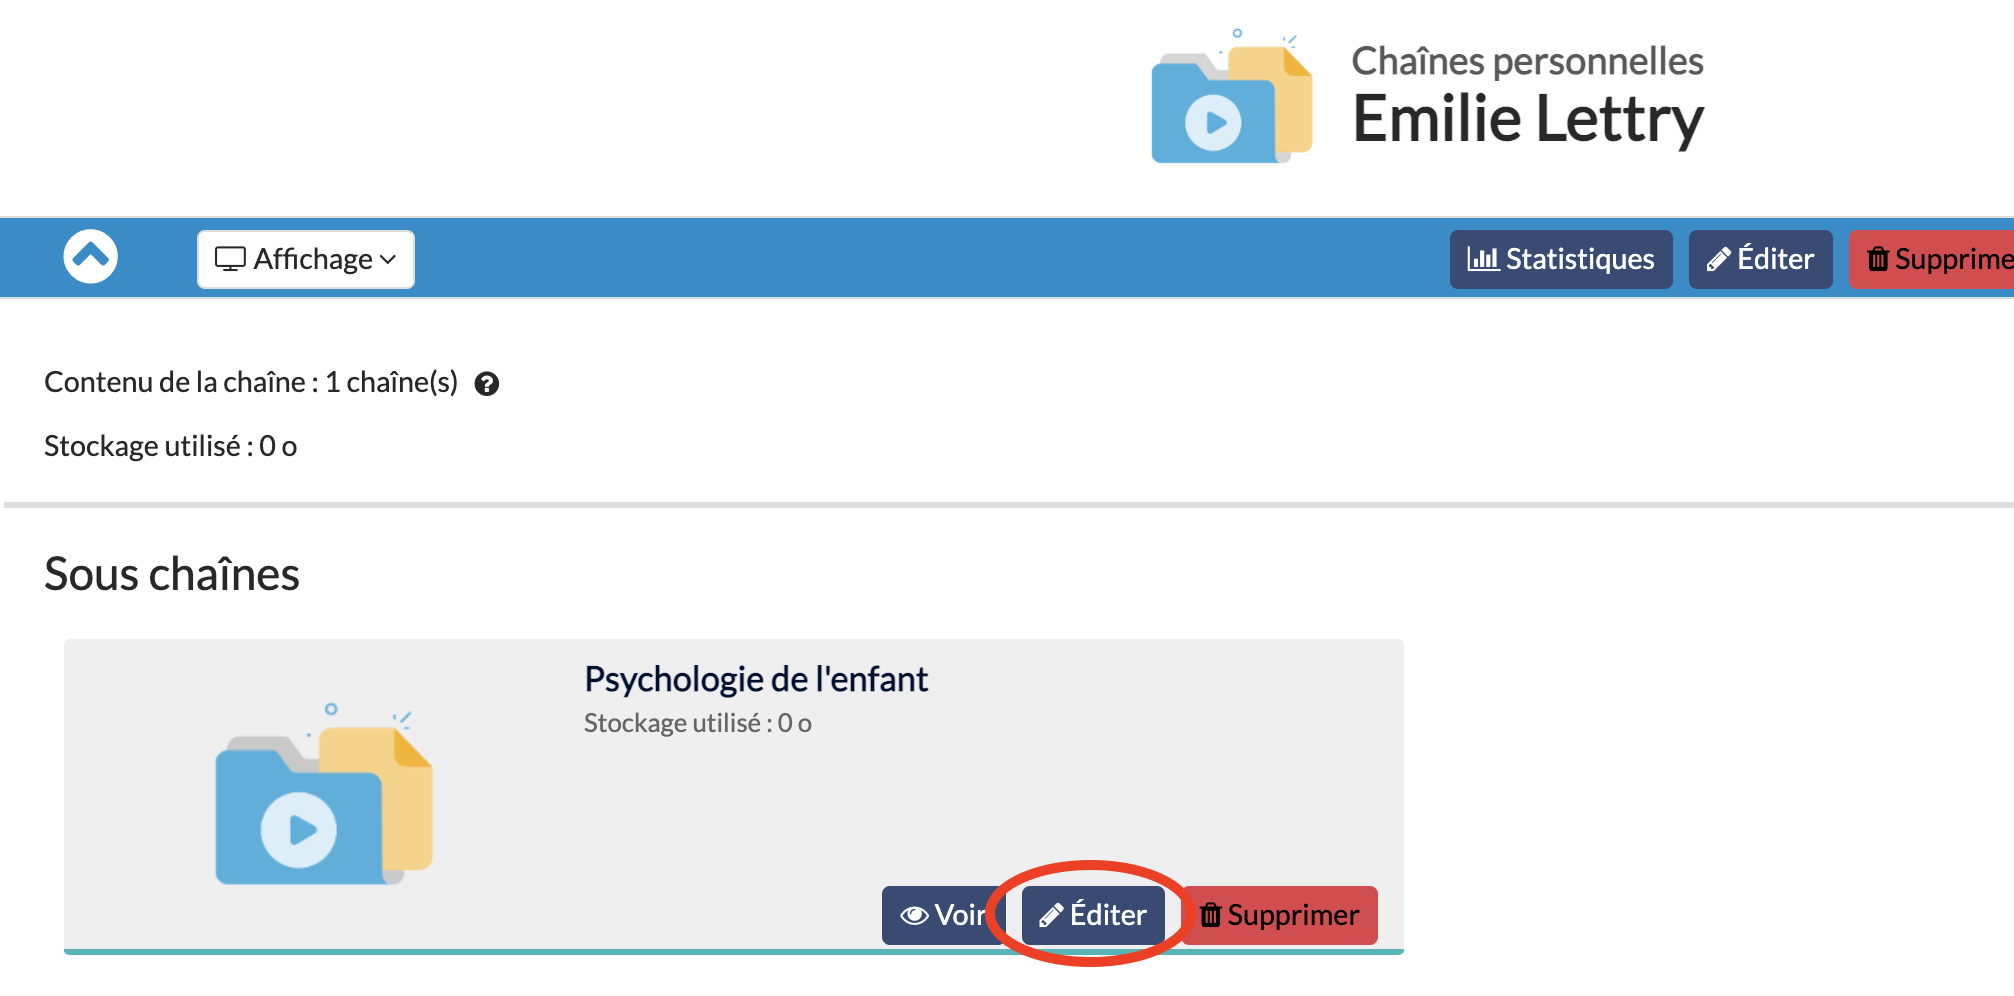
The parameters page of a subchannel is automatically displayed when the subchannel is first created.
Available settings
In the edit page of your channel/subchannel, you can navigate between 6 different settings tabs.

The Settings tab allows you to:
- Find the different links to access your channel.
- Modify the Metadata of your channel (Title, Description, Language, Sorting)
- Modify the Advanced Settings (Show View Counter, Show RSS Links, Storage Quota, External Reference, External Data)
- Check the LTI Links
The Preview image tab allows you to:
- Check the current image preview
- Create a thumbnail (= preview image) from the thumbnail of a video
- Change the preview image of your channel by importing an image of your choice
It is recommended to use an image in JPEG format of 240 px width and 135 px height.
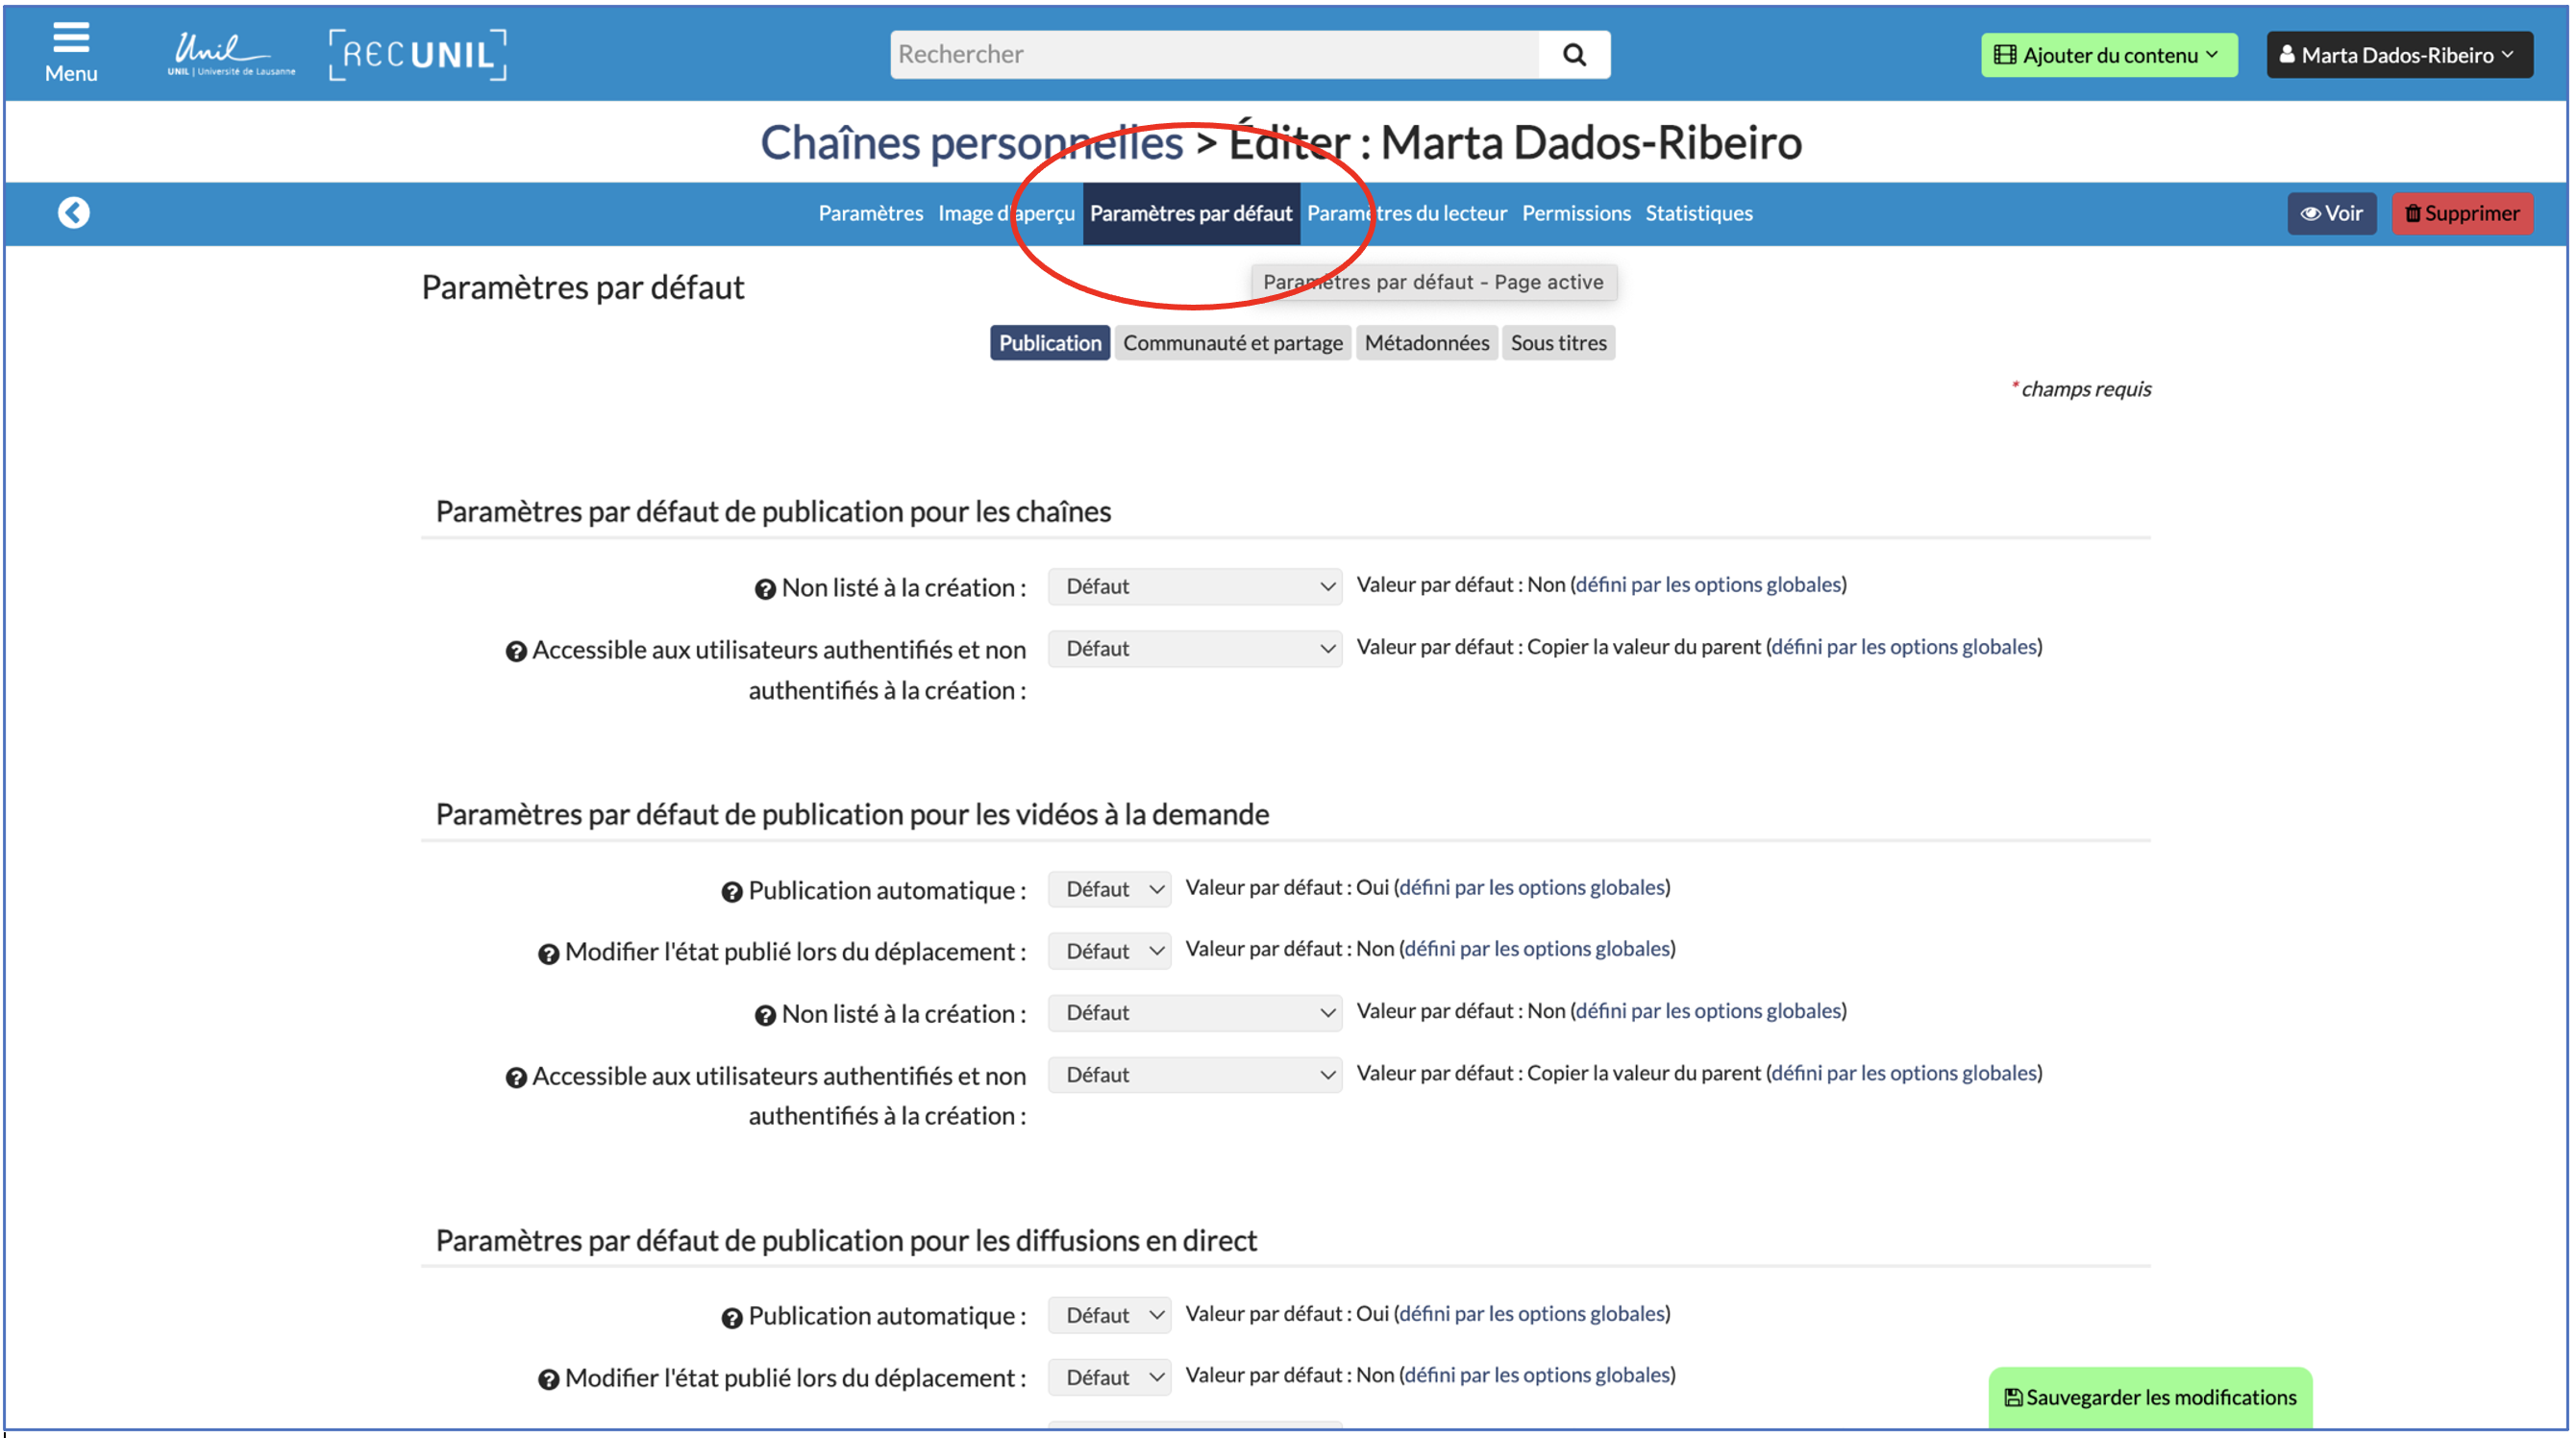
The Default Settings tab allows you to:
- Change the default publishing settings for channels (Listing at the time of creation, Authenticated and non-authenticated user access at the time of creation)
- Change the default publishing settings for on-demand videos (Automatic publishing, Status upon relocation, Listing at the time of creation, Authenticated and non-authenticated user access at the time of creation)
- Change the default publishing settings for live broadcasts (Auto-publish, Status upon relocation, Listing at the time of creation, Authenticated and non-authenticated user access at the time of creation)
- Change publishing defaults for sets of photos (Auto-publish, Status upon relocation, Listing at the time of creation, Authenticated and non-authenticated user access at the time of creation)
- Allow integration via LTI
- Change notification settings (Email addresses to notify when new media is added, Email addresses to notify when new memos are added)
- Change storage settings (Storage alert threshold, Email addresses of the channel managers)
The Player Settings tab allows you to:
- Edit the Dynamic Rich Media Options:
- Define and set the player logo
- Change the player background
- Enable and set transition animations
- Define the duration of slide display on autopilot
- Enable user control
- Modify Rich Media Classic Options (Video Ratio, Slide Ratio, First Source Ratio)
- Change the Start and End credits
- Set the Side Panel (Side Panel Width, Default Open Tab, Hidden Tabs, Disabled Annotation Types, Hide Side Panel Completely, Show Side Panel)
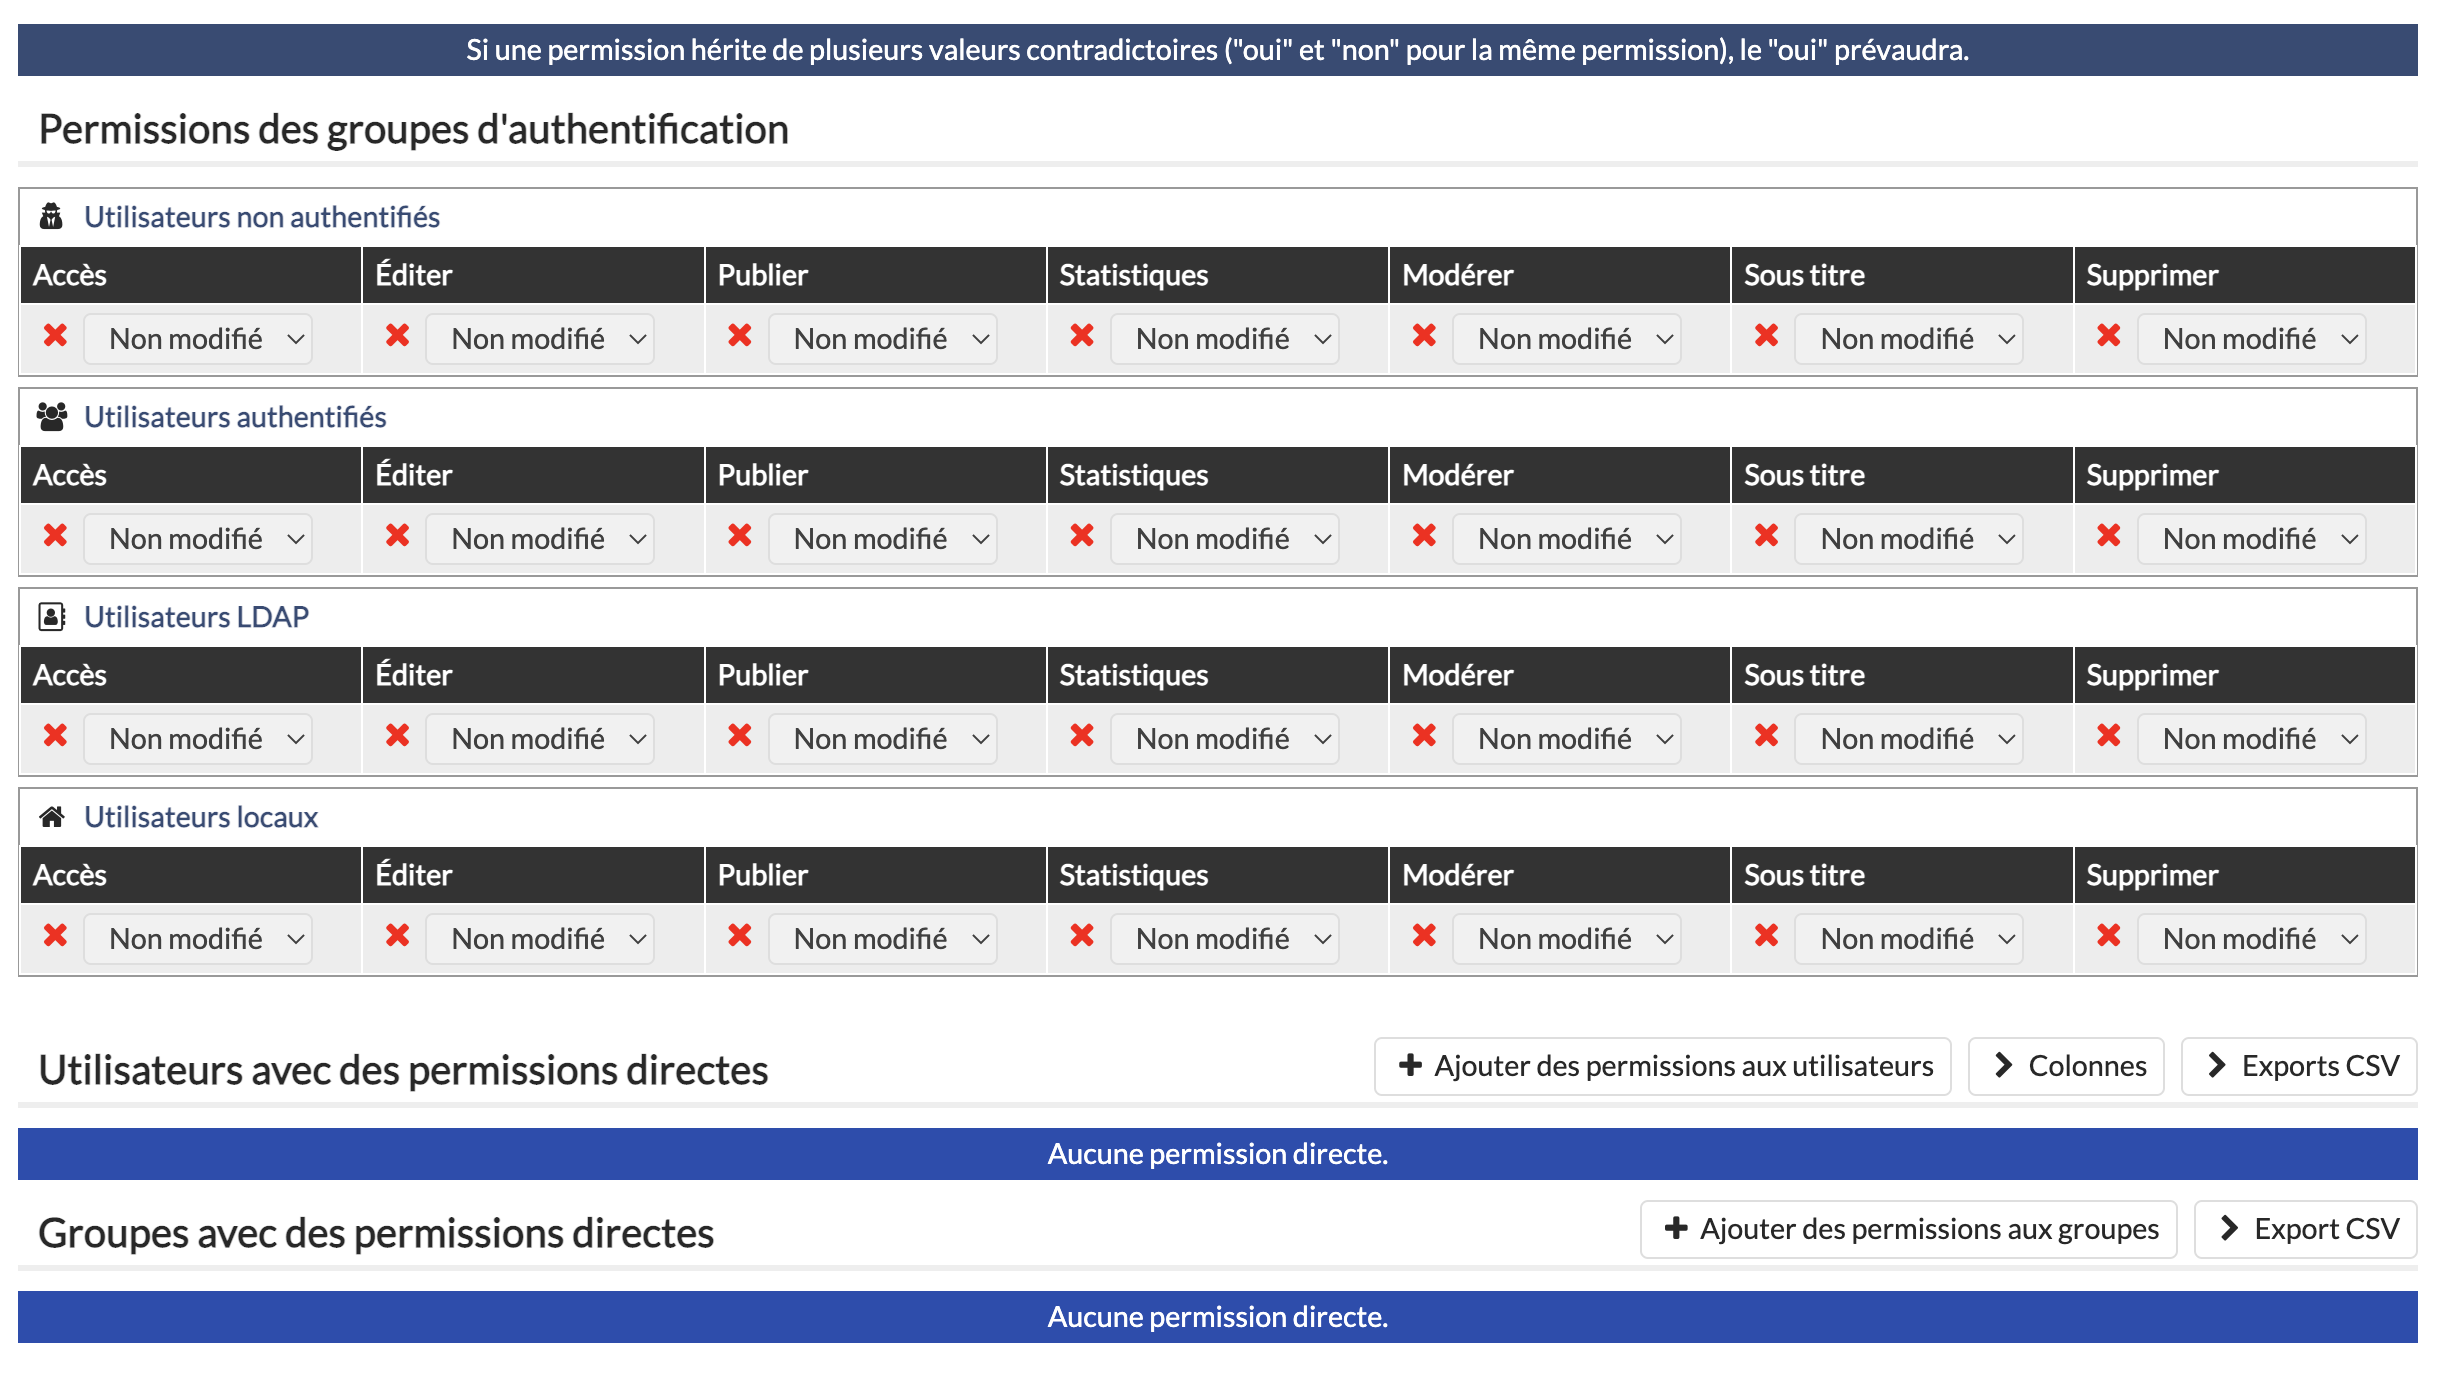
The Permissions tab allows you to:
Change the permissions of the user categories below on the channel or on the channel's media.
|
User categories: |
Available authorizations |
|
|
You can also grant direct permissions to specific users (for example, your course assistant).
The Statistics tab allows you to:
- View the statistics of your channel and statistics of the media in your channel.
Don't forget to save your changes with the green "Save Changes" button at the bottom right of the page.
Video Resource
The video below shows how to access the settings and manage your channel(s) (in French).
Manage access to your videos
Their are two ways of managing access to your videos:
- Modify the access permissions to the sub-channel. To do this, go to the channel/subchannel editing page, then manage permissions in the Permission tab. See the page Manage and set up you channel(s) for more details.
- Edit the access permissions for each video. See below:
Go to the video editing page
Start by accessing the channel where your video is located (see this page if necessary), then hover over the video with your cursor. The "Edit" button will appear, click on it.

The video settings editing page is automatically displayed when importing or creating a video.
Editing permissions
Once on the video parameters edition page, you will need to go to the "Permissions" tab. However, since this page contains many tabs, the Permissions tab is not always visible. To access it, click on the arrow to the right of the tabs list.

Then click on the Permissions tab.

You are now on the video permissions editing page.
Once on this page, you can set permissions regarding videos (Access, Edit, Publish, Statistics, Moderate, Subtitles, Delete) for each user group and for individual users.
Don't forget to save the changes by clicking on the "Save Changes" button at the bottom right of the page.
Manage the publication of your videos
Manage the publication status of a video
You have the option to unpublish a specific video on your channel, so that it is not visible to other users, for example if you wish to edit it. You can also choose to make the video available during a specified time period.
1. Once you are logged into your REC·Unil channel, scroll down to the video you are interested in and hover your mouse over it. Then click on Edit.

2. In the Publishing settings section, you can uncheck the Published option to unpublish the video (or check it if you want to publish your video again).
If, however, you want your video to be available during a specified time period, you can set the dates under Automatically publish on [insert date] and Automatically unpublish on [insert date].
Once you have set the parameters, make sure to click on Save Changes at the bottom of the screen.

Change the default video publication parameters for a given channel
By default, the videos you add to your RecUNIL channel are automatically published (and accessible via Moodle, if the channel is linked to a Moodle page). If you want to change these default settings, follow the steps below.
- Once you are logged into your REC·Unil channel, click on Edit in the menu at the top of the screen.

2. At the top of the page, select Default settings.
3. In the Default publishing settings for on-demand videos section, open the drop-down menu next to Automatic publishing. Select No if you do not want your videos to be automatically published by default. Make sure you click Save changes at the bottom of the screen.

Editing your videos
Cutting sequences in a video to create a new video
It is possible to edit/cut a video in RecUNIL. To do so, go to the video editing page (to know how to access the video editing page, see this page).
Click on the "Trim" tab.

To trim the video, you need to select the pieces of the video which you wish to keep.
To do this, place the cursor on the video scroll bar at the beginning of a sequence you want to keep (1), then click on "Start a new segment here" (2). A new video segment is selected (3).
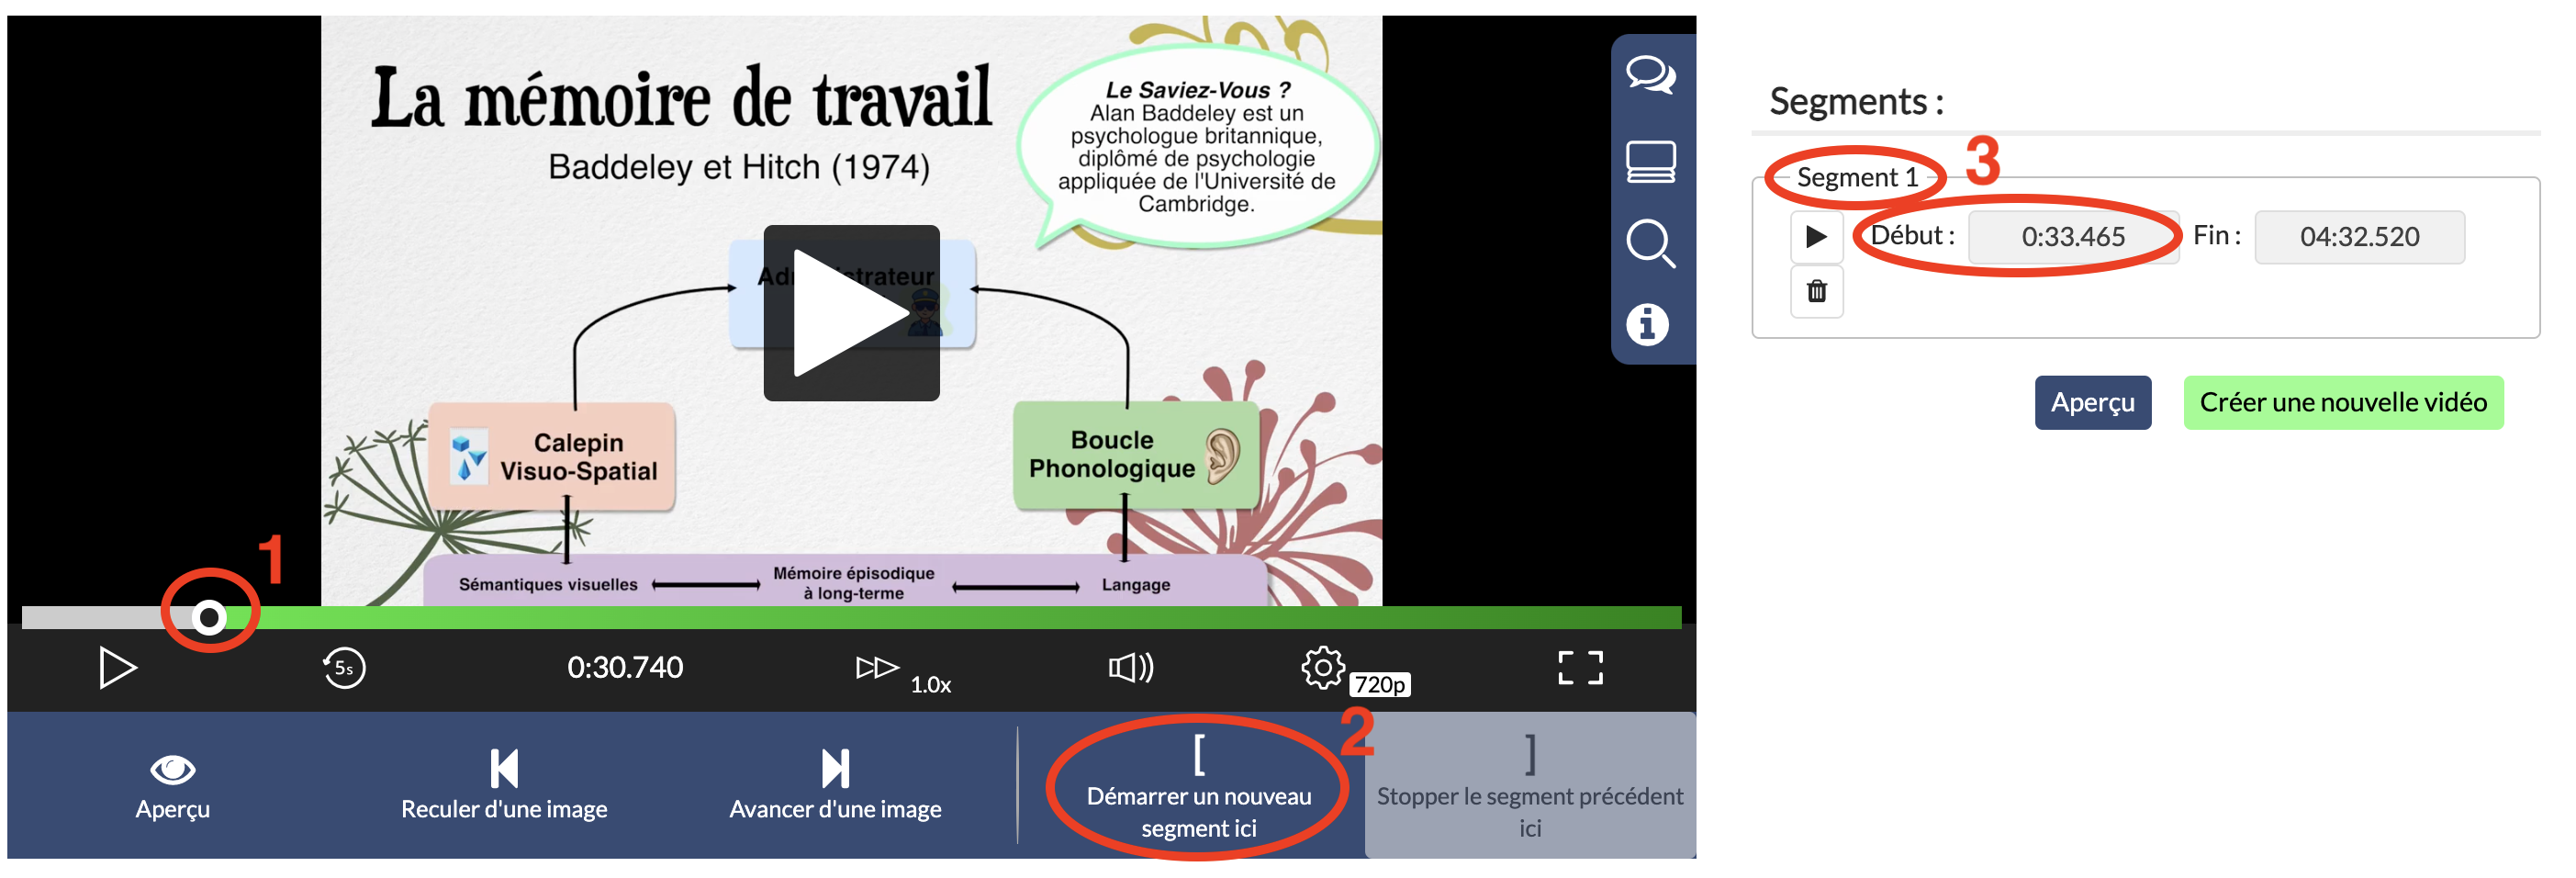
Move the cursor to the end of the sequence (4) you want to keep and click "Stop segment here" (5). A segment of the video is thus cut out and kept (6).

You can repeat the operation of selecting a segment as often as necessary.
To see the final result of the cut, click on "Preview". The preview starts in the player.
To validate the cut and create a new video with the cut sequences, click on "Create a new video".

Give the new video a name and click on "Create a new video".

After processing the video, the new version of the video is displayed. You can change its parameters and publish it by clicking the "Edit" button at the top right of the page.
![]()
Video resource (in French)
Send a request for the editing (trimming) of your videos to the helpdesk
You can ask for your videos to be edited by our helpdesk.
To do so, please send an email to captation@unil.ch with the following information:
- The title of your course
- The date of the recording
- The link to the video on your channel
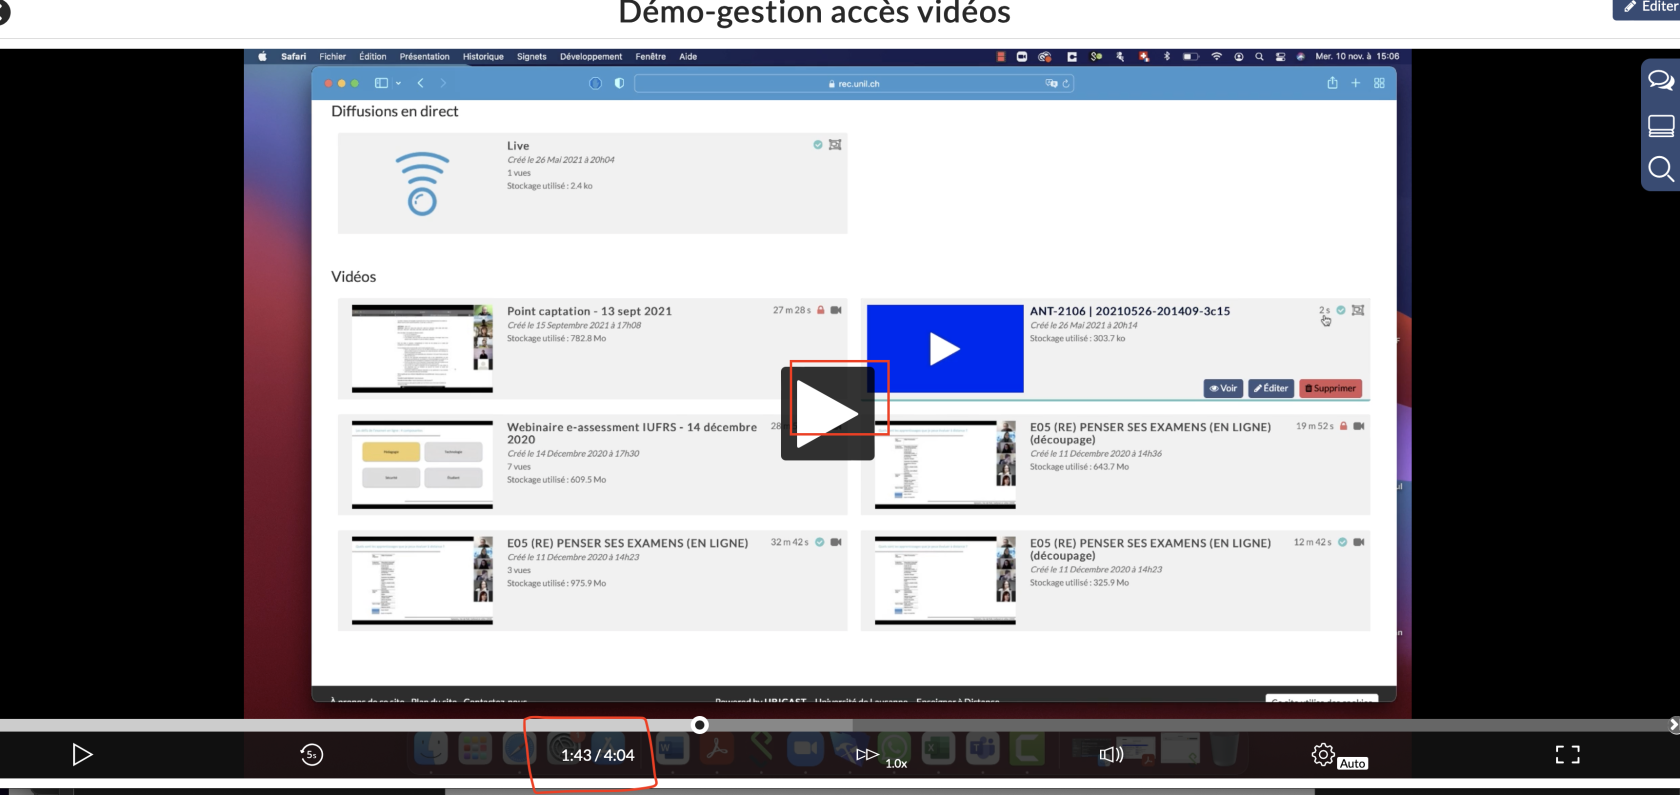
- The pieces of video that you would like us to remove, specifying for each one:
- The start time
- The end time
- This information is visible at the bottom of the player.
We can also train one of your team members to perform this task.
Please note that it may take up to 3 business days for the edited version of the video to be available on your channel. Editing only takes a few minutes before a new encoding of your edited video is launched, but the delay depends on the number of requests we receive and the encoding load of the servers.