Entering & Editing
- How to edit and/or publish an entry in SERVAL
- Create new record via an identifier (DOI/PMID)
- Create a new record manually
- Editing a record (advanced entry)
- Publishing of a draft record
- Adding and/or correcting metadata
- Adding of a full text and/or secondary documents
- Adding and/or correcting links (to persons, units and/or groups)
- Changing the type of a record
- Deleting a publication
- Depositing a thesis in Serval
How to edit and/or publish an entry in SERVAL
The advanced entry (edit) of a record allows in particular:
It can be accessed by editing an existing record (draft or public state):
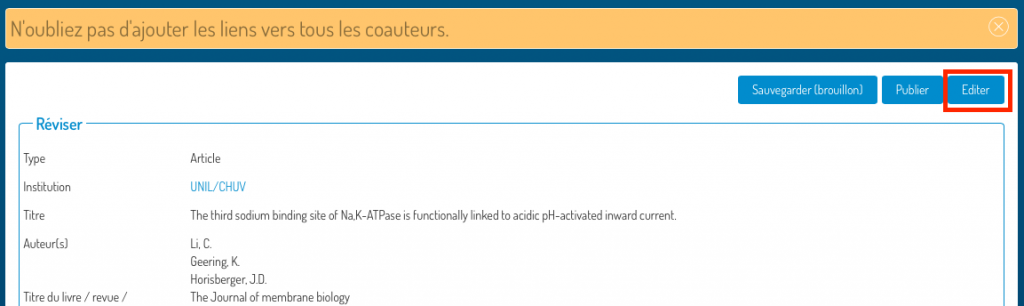
or by pressing “Edit” in the revision step when creating a new record (entered with or without an ID):
Create new record via an identifier (DOI/PMID)
Form
The creation of a new record is done in three steps on the same screen:
- Retrieving data from the identifier
- Linking people and units
- Adding of the full text of the publication (PDF)
1. Enter the institution and the identifier
Please enter the institution where the research was conducted (UNIL/CHUV or external) (1), the identifier (DOI/PMID) (2), and click on “Retrieve data” (3).
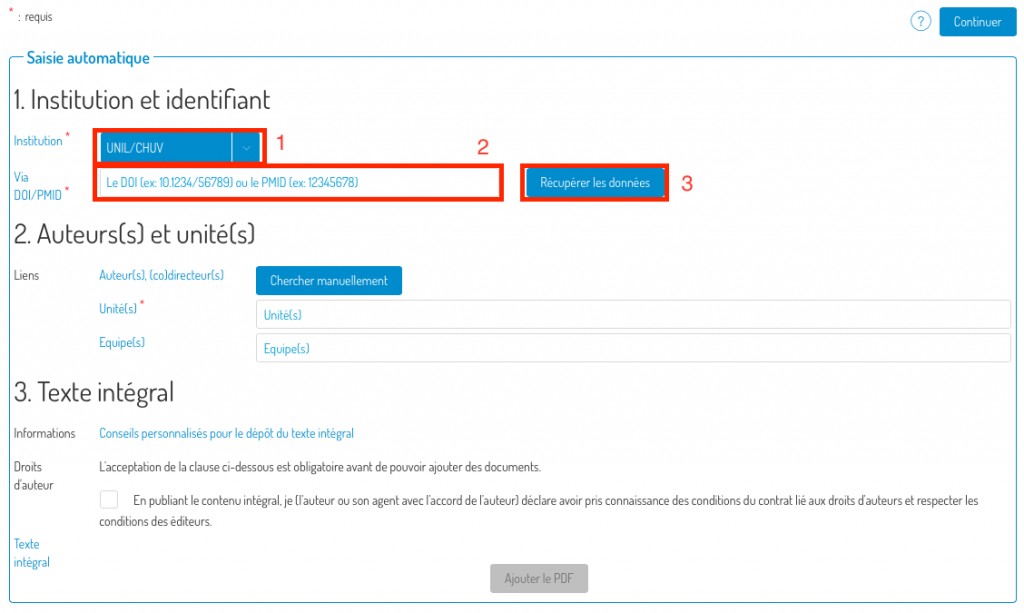
2. Link to persons and units
Then enter links to the authors and units where the research leading to the publication was conducted.
Proposals (if found) will be displayed after data recovery from the identifier (1). When you check the authors’ boxes, their units will automatically be added to the “Unit(s)” field (2).
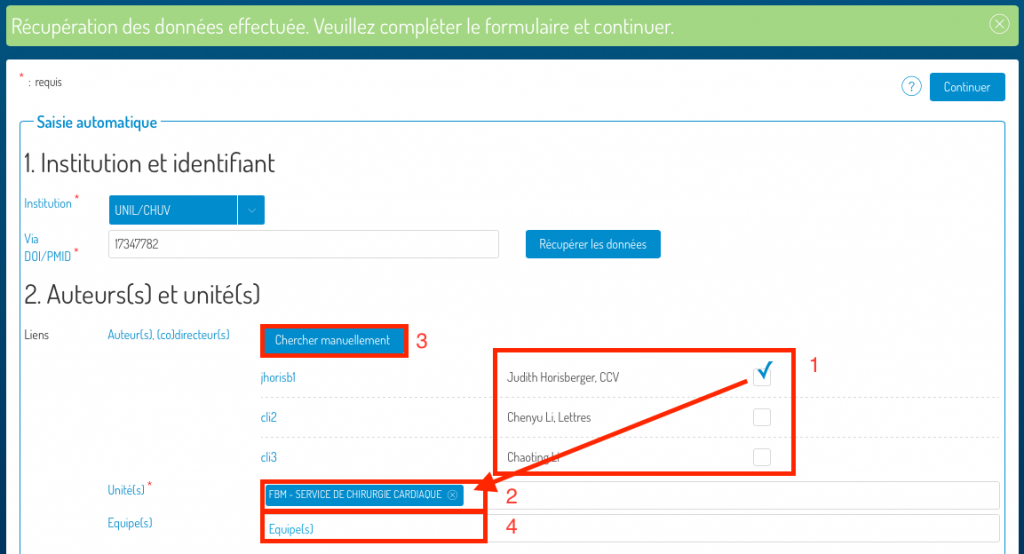
Add a unit by typing its name directly into the “Unit(s)” field (2). You can also add a research groupe by typing its name directly into the “Team(s)” field (4).
Manually linking persons to the record
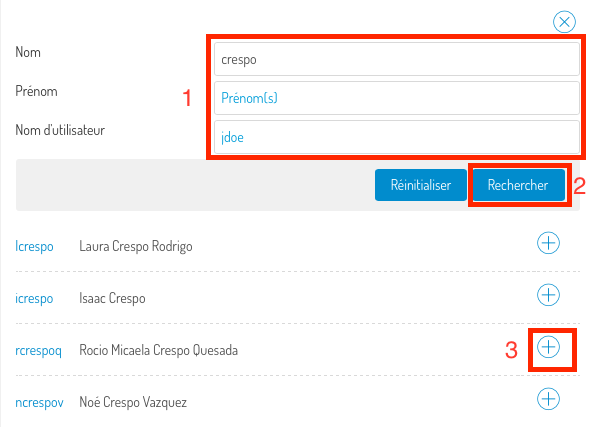
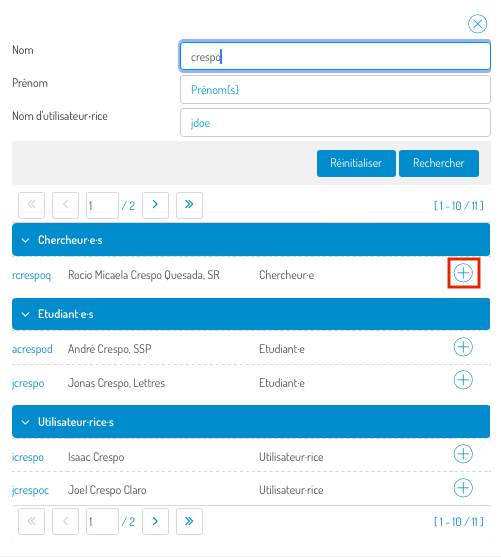
In the pop-up screen, type the name and/or the surname and/or the identifier of the person you are looking for (1) (less is more!) and click on “search”.
Once you find the person you were looking for, click on the “+” symbol next to their name, and the link will be added to the record.
3. Add the full text (PDF of the publication)
Then add the full text of your publication in order to archive and share it (if possible).
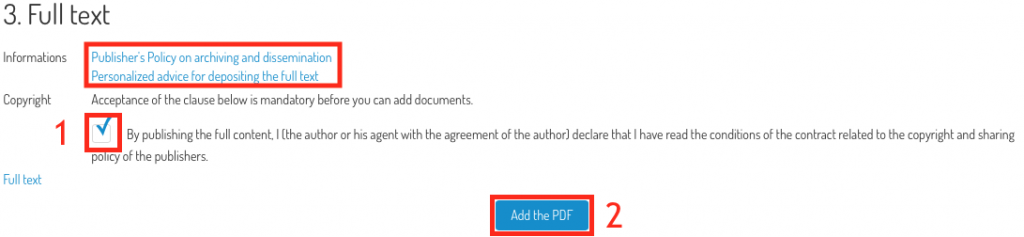
To know your rights and obligations regarding the self-archiving of a copy of your publication, follow the links provided in the “Information” field.
Then check the “Copyright” box (1) and press “Add PDF” (2).
You can then browse your computer and choose the PDF to add.

Choose the version of the manuscript you are submitting (in case of doubt, consult this link) and the visibility of the document (restricted UNIL, public or under embargo). If you choose “under embargo”, a calendar is displayed in the “End of embargo” column to be able to specify the end date of the embargo. You also have the possibility to define the document’s license, if you know it.
Continue and verify
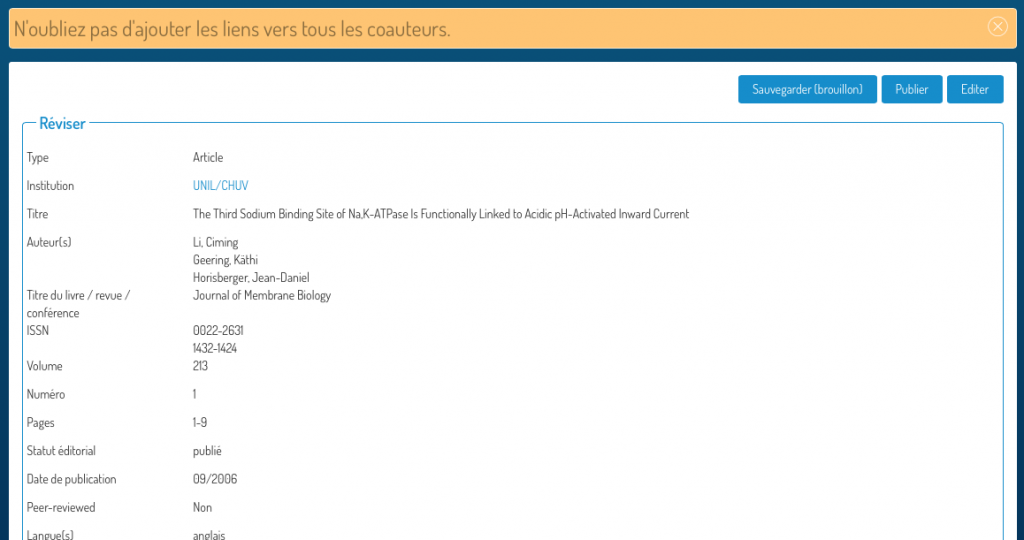
Press “Continue”. You will be redirected to a verification screen to control the data retrieved from the identifier and the links you added.
You have the choice of saving the record (draft), publishing it, or editing it to complete or correct it.
Warning: if you publish a record and it contains a full text, it (the PDF itself) can no longer, in principle, be modified or deleted, while the metadata will still be editable. So think carefully before publishing a notice that contains a full text.
Create a new record manually

These badges indicate the fields that should be completed for your publication to be properly indexed by Google Scholar and Google.
The creation of a new record is done in three steps on the same screen:
- Entering bibliographic information about the publication
- Linking people and units
- Adding of the full text of the publication (PDF)
1. Entering bibliographic information
Please enter:
1. the type of publication;
2. the institution where the research was conducted (UNIL/CHUV or external);
3. the title of the publication;
4. the persons associated with the publication. Use the drop-down menu (7) to specify the role of the person (author, co-first author, scientific editor, etc.). Use the “add a person” button (8) to add other persons to the record;
5. The title of the journal (for articles);
6. The language(s) of the publication.

These are the minimum metadata necessary to create the record. You will have the opportunity to add more in the next step (Continue and verify).
2. Link persons and units
What are links for?
- They allow you to link your publications to your profile (which will be displayed in your Unisciences page).
- They also allow you to assign your publications to the unit where you conducted the research on which your publications are based. The Unisciences page of your unit will thus also be complete.
- You can also link your co-authors, who can then also take control of the record and possibly complete it.
Link the persons and the units where the research leading to the publication was conducted.
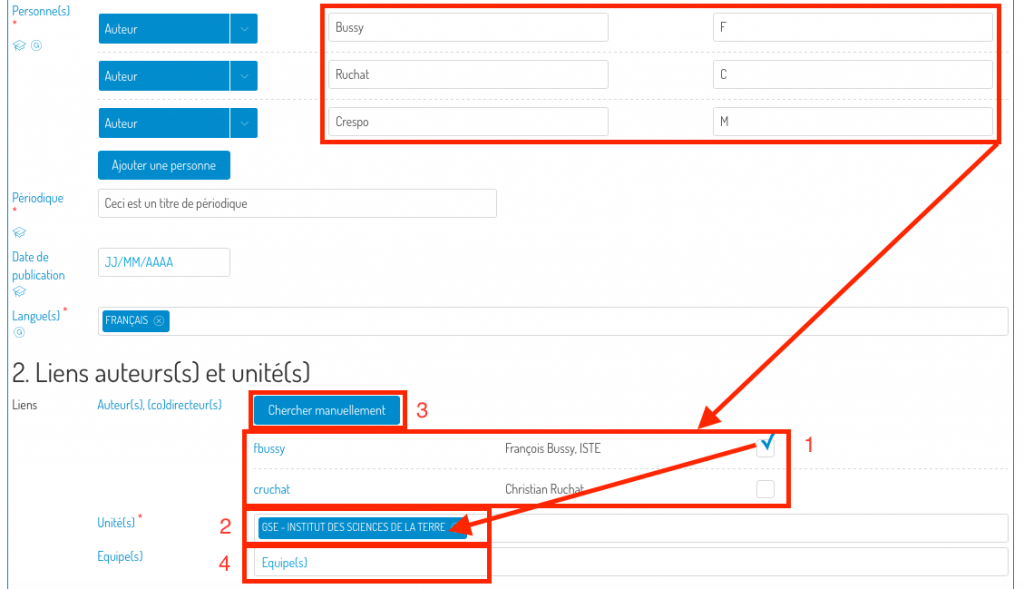
Proposals for links to persons (if found) will be displayed following the completion of the “Person(s)” field (1). When you tick the authors’ boxes, their units will automatically be added to the “Unit(s)” (2) field.
If a person has not been found automatically, you can add them by using the “search manually” button (3).
Add a unit by typing its name directly into the “Unit(s)” field (2). It is also possible to link the record to a search group by typing its name directly into the “Team(s)” field (4).
Manually linking persons to the record
In the pop-up screen, type the name and/or the surname and/or the identifier of the person you are looking for (1) (less is more!) and click on “search”.
Once you find the person you were looking for, click on the “+” symbol next to their name, and the link will be added to the record.
3. Add the full text (PDF of the publication)
Then add the full text of your publication in order to archive and share it (if possible).
To know your rights and obligations regarding the self-archiving of a copy of your publication, follow the links provided in the “Information” field.
Then check the “Copyright” box (1) and press “Add PDF” (2).
You can then browse your computer and choose the PDF to add.
Choose the version of the manuscript you are submitting (in case of doubt, consult this link) and the visibility of the document (restricted UNIL, public or under embargo). If you choose “under embargo”, a calendar is displayed in the “End of embargo” column to be able to specify the end date of the embargo. You also have the possibility to define the document’s license, if you know it.
Warning: if you publish a record and it contains a full text, it (the PDF itself) can no longer, in principle, be modified or deleted, while the metadata will still be editable. So think carefully before publishing a notice that contains a full text.
Continue and verify
Press “Continue”. You will be redirected to a verification screen to control the data retrieved from the identifier and the links you added.
You have the choice of saving the record (draft), publishing it, or editing it to complete or correct it.
Editing a record (advanced entry)
Publishing of a draft record
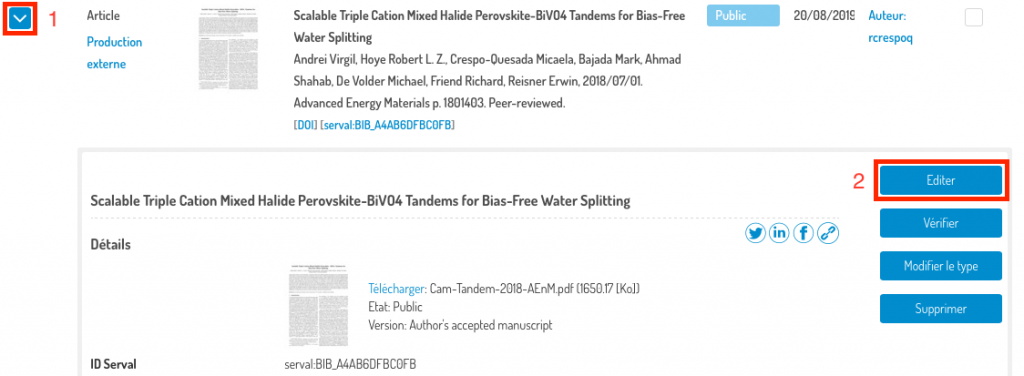
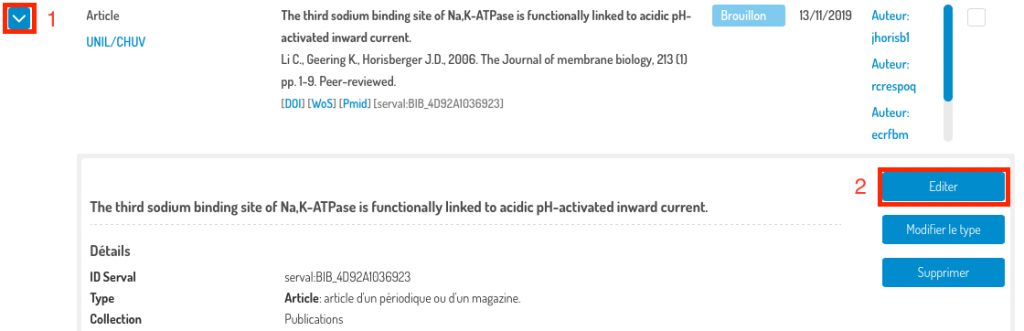
Access the editing (advanced entry) interface of the record in question by pressing the blue chevron (1) in the “Details/Edit” column, then press “Edit” (2).
Once in the advanced entry screen, press “Publish”.

Your record is now in public:

Adding and/or correcting metadata
Go to the editing (advanced entry) interface of the record in question by pressing the blue chevron (1) in the “Details/Edit” column, then press “Edit” (2).
You are directed to the advanced entry (editing) interface with all its sections deployed:
- Filling in the form with an identifier;
- Mandatory or recommended metadata;
- Documents (full text and secondary documents);
- Optional metadata.
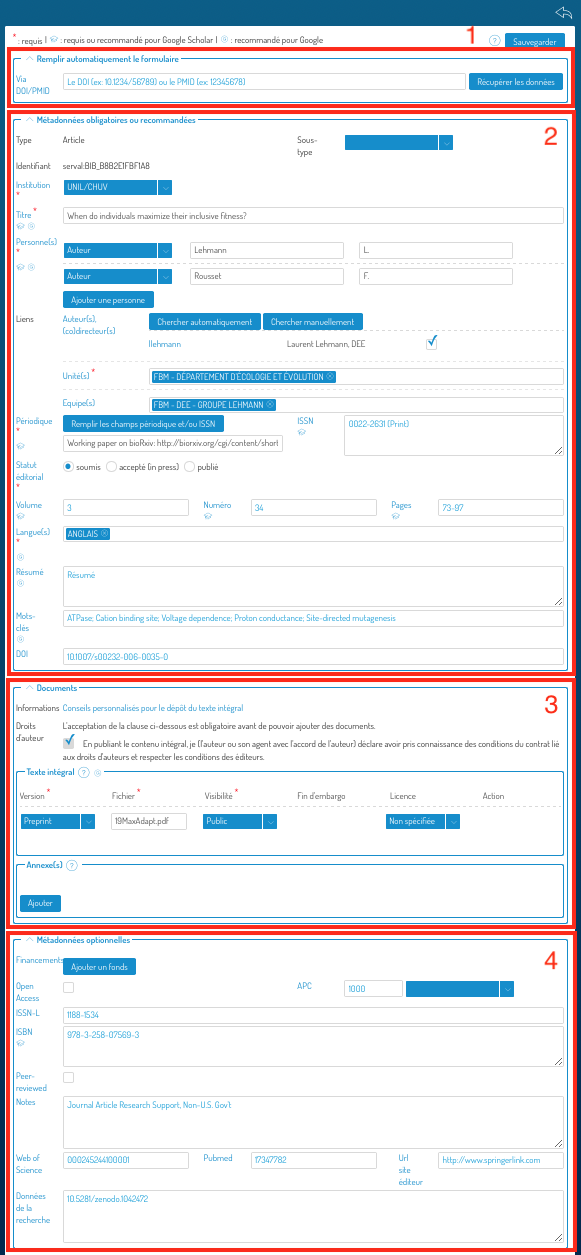
Each section can be deployed or condensed using the chevron to the left of the section name:

You can complete or correct the data in sections (2) and (4). If an identifier had not been used to create the record (but exists), then you can complete the metadata using section (1). Warning: existing metadata will be overwritten.
Don’t forget to save your changes by pressing the “Save” button at the top right or bottom of the screen.
![]()
You can cancel the changes at any time by pressing the “Go back” icon.

Adding of a full text and/or secondary documents
Go to the editing (advanced entry) interface of the record in question by pressing the blue chevron (1) in the “Details/Edit” column, then press “Edit” (2).
You are directed to the advanced entry (editing) interface with all its sections deployed:
- Filling in the form with an identifier;
- Mandatory or recommended metadata;
- Documents (full text and secondary documents);
- Optional metadata.
Each section can be deployed or condensed using the chevron to the left of the section name:
Go to section (3), Documents.
In this section, you can either add a full text (or secondary documents) if there were none yet, or correct the metadata associated with the documents.
Adding a full text (PDF) or secondary documents
To find out your rights and obligations regarding the self-archiving of a copy of your publication, follow the links provided in the “Information” field (1).
Then check the “Copyright” box (2) and press “Add PDF” (3).
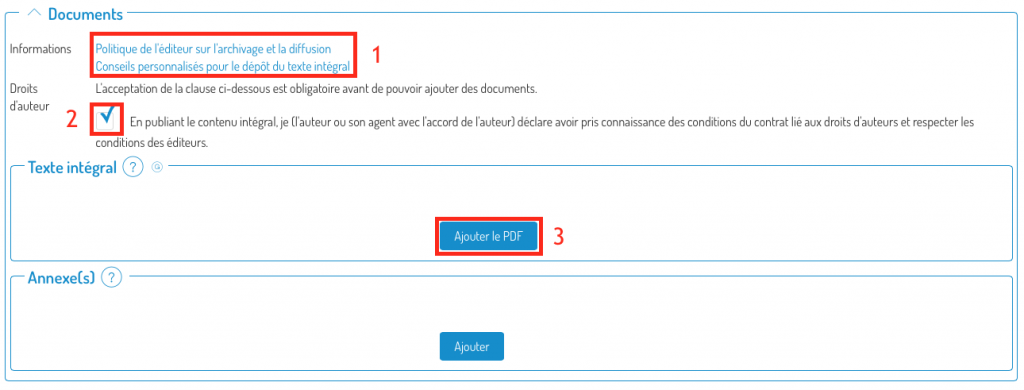
You can then browse your computer to choose the PDF to add.
Then choose the version of the manuscript you are submitting (in case of doubt, consult this link) and the visibility of the document (restricted UNIL – by default -, public or under embargo). If you choose “under embargo”, a calendar is displayed in the “end of embargo” column to be able to specify the end date of the embargo. You also have the possibility to define the document’s license, if you know it.
Correction of metadata associated with a document
You can also modify the metadata associated with a document:
Correct the metadata: the version of the manuscript you are submitting (in case of doubt, consult this link) or the visibility of the document (restricted UNIL – by default -, public or under embargo). If you choose “under embargo”, a calendar is displayed in the “end of embargo” column to be able to specify the end date of the embargo. You also have the possibility to define the document’s license, if you know it.
Don’t forget to save your changes by pressing the “Save” button at the top right or bottom of the screen.
![]()
You can cancel the changes at any time by pressing the “Go back” icon.
Adding and/or correcting links (to persons, units and/or groups)
Go to the editing (advanced entry) interface of the record in question by pressing the blue chevron (1) in the “Details/Edit” column, then press “Edit” (2).
You are directed to the advanced entry (editing) interface with all its sections deployed:
- Filling in the form with an identifier;
- Mandatory or recommended metadata;
- Documents (full text and secondary documents);
- Optional metadata.
Each section can be deployed or condensed using the chevron to the left of the section name:
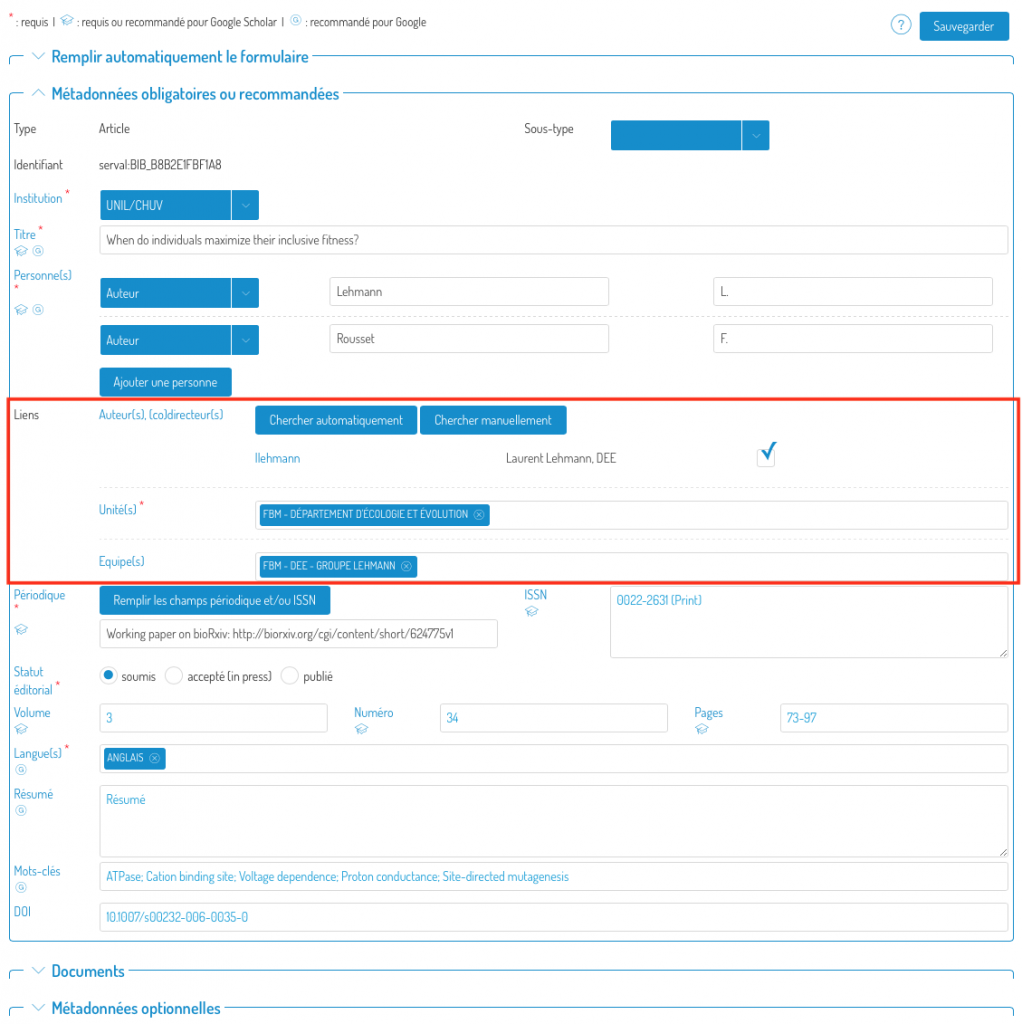
Go to section (2) where the links are located:
What are links for?
- They allow you to link your publications to your profile (which will be displayed in Unisciences).
- They also allow you to assign your publications to the unit where you conducted the research on which your publications are based. The Unisciences page of your unit will therefore also be complete.
- You can also link your co-authors, who can then also take control of the leaflet and possibly complete it.
Link people to the notice with automatic proposals
Proposals for links to people (if found from the names in the “Person(s)” field (1)) will be displayed by pressing the “Search automatically” button (2). When you tick the authors’ boxes, their units will automatically be added to the “Unit(s)” (4) field.
Adding a unit is done by typing its name directly into the “Unit(s)” field (4). It is also possible to link the record to a search group by typing its name directly into the “Team(s)” field (5).
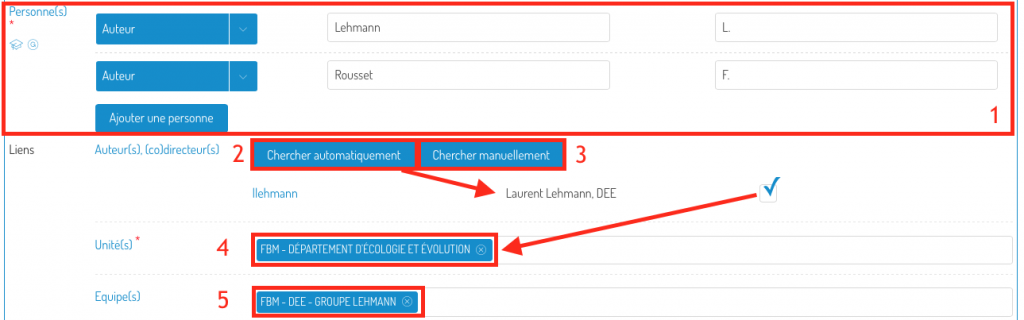
Manually link people to the record
In the pop-up window, type the name and/or first name and/or ID of the person you are looking for (1) and click on “Search”.
Once you have found the person, click on the “+” symbol next to his name, and the link will be added to the record.
Don’t forget to save your changes by pressing the “Save” button at the top right or bottom of the screen.
![]()
You can cancel the changes at any time by pressing the “Go back” icon.
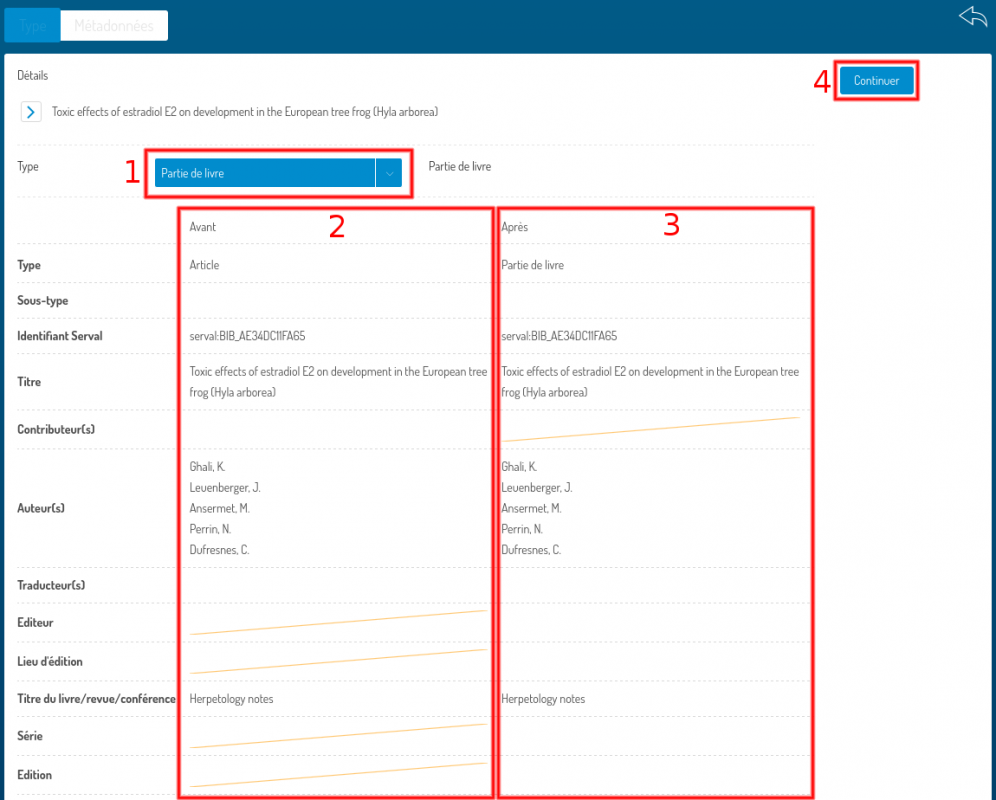
Changing the type of a record
Go to the editing (advanced entry) of the record in question by pressing the blue chevron (1) in the “Details/Edit” column, then press “Change Type” (2).

Choose the type of publication (1) in which you want to convert this publication. The “Before” (2) and “After” (3) fields allow you to see the changes that will be made during the conversion. Once you are sure of your choice, click on “Continue” (4).
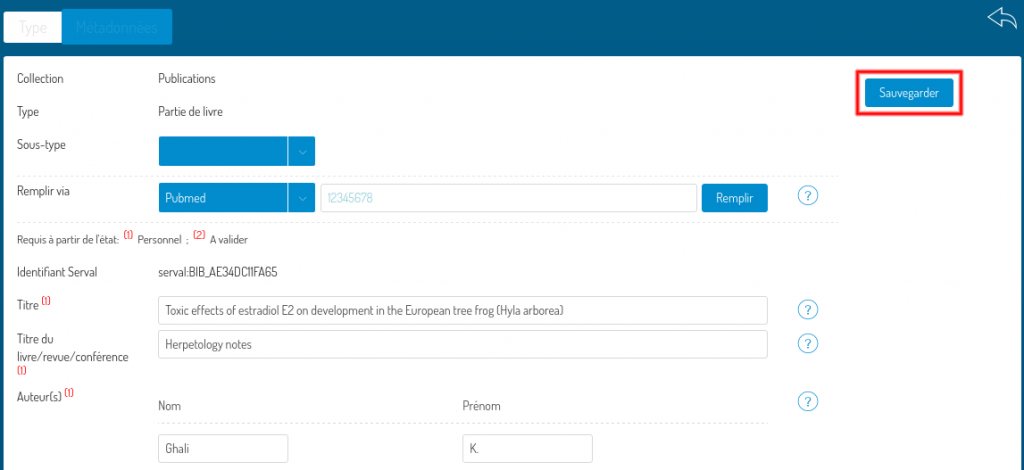
Adapt the metadata to match the new type selected. Then click on “Save” to save the type change and metadata changes.
Deleting a publication
Go to the editing (advanced entry) of the record in question by pressing the blue chevron (1) in the “Details/Edit” column, then press “Change Type” (2). Only publications in the “Draft” state can be deleted.

Depositing a thesis in Serval
1. Introduction
Entering the thesis into Serval is a compulsory step in obtaining the doctorate degree. This process helps to preserve and enhance the value of doctoral students' research work. You will find all the information you need to obtain a doctorate in Directive 3.10 issued by the UNIL Direction.
You can also review the thesis distribution conditions (link).
This guide will take you through the various stages of submission, from creating an account to the final submission of your thesis for validation.
2. Access to Serval
To view the repository: Interface publique for people from outside UNIL.
To enter publications: If you are a member of UNIL, you can access it through the public interface by clicking on the “connect” icon in the top right-hand corner of the page.
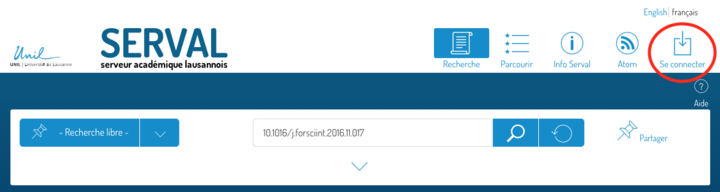
You can also do this through MyUnil by clicking on the icon at the top right of your personal page.

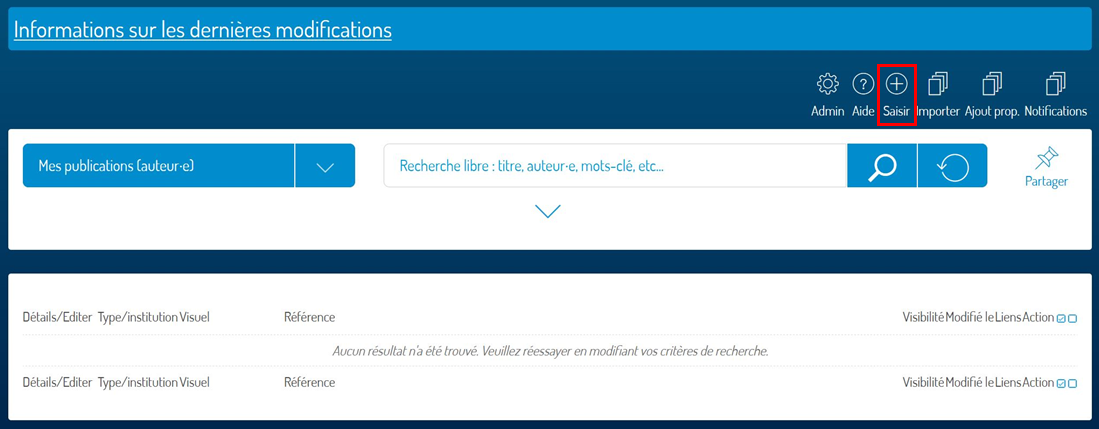
If you do not have access or cannot see the “Enter” button (+) at the top right of the page, please contact serval_help@unil.ch
3. Enter your thesis
Start data entry
To begin, click on the “Enter” button to access the deposit form.
A pop-up window appears, asking you to select “No identifier”.

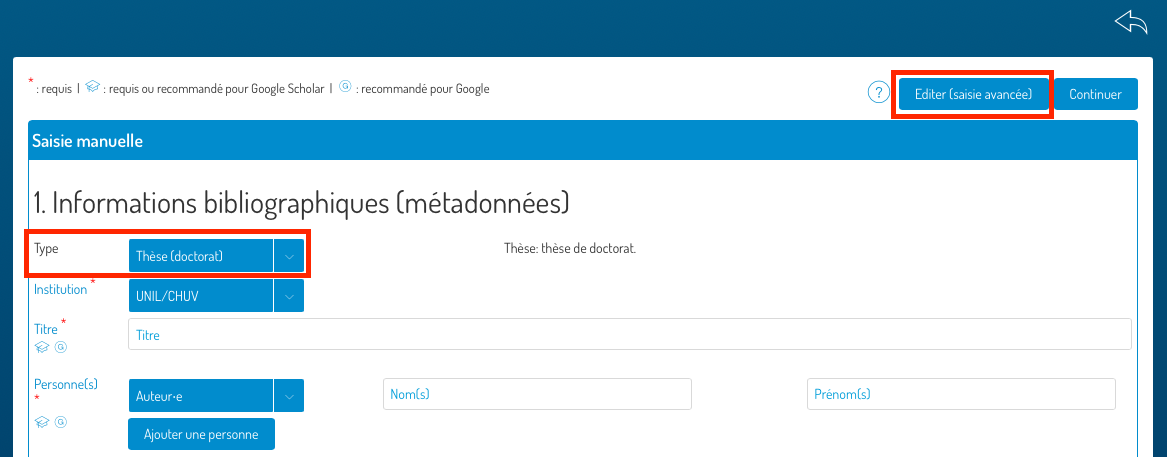
Then, in the simplified entry interface, first choose the “Thesis (PhD)” type, then press “Advanced entry” to enter all the necessary details.
Enter metadata (bibliographic information)
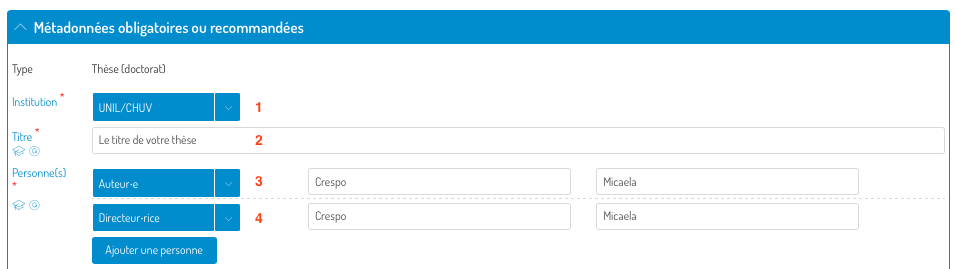
Please enter the mandatory or recommended metadata:
- Home institution: choose UNIL/CHUV ;
- The complete title of the thesis;
- Persons associated with the thesis (author, thesis director, etc.), using the “Add a person” button if necessary.
- Don't forget to include your director (and possibly your co-director) too.
Duplicate Check
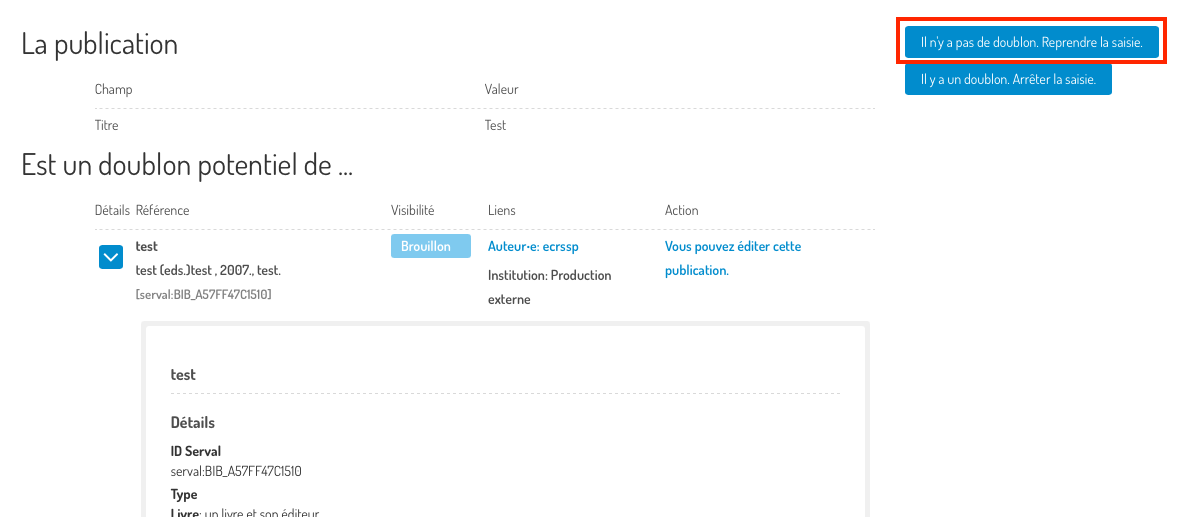
When you enter the title of your thesis, Serval automatically checks for potential duplicates in the repository. If a publication derived from your thesis (such as an article or a book) has a similar title, Serval will pause the entry process to alert you to a possible duplicate.
Before proceeding, verify whether the existing record refers to a different publication rather than your thesis. If it does, click « There is no duplicate. Resume editing" to continue.
Adding links
It is important to link the author and supervisor to the thesis (which will appear on their Unisciences pages) as well as to the research unit where you carried out your work. This contributes to the visibility of your work within the institution and research teams.
Use the “Links” field to search for and link authors, thesis directors and research units. If a person is not found automatically when you add him/her in the “Person” field, you can add him/her manually using the appropriate button.

To manually search for a person, simply enter their name, then press the “+” button once the person has been found.
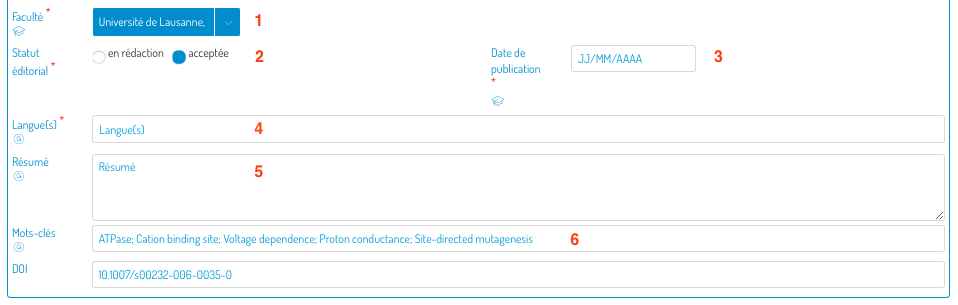
Fill in the rest of the metadata:
- Faculty with which you are affiliated;
- Editorial status (Accepted);
- Enter the date of the public dissertation defense in the "Publication Date" field ;
- Language;
- The abstract of your thesis (recommended to improve the indexing of your thesis) ;
- Keywords;
Upload PDF of your thesis
To finalize the deposit, you must add the full text of the thesis in PDF format. UNIL's Directive 3.10 requires that the cover page and imprimatur be added to the PDF. Please ensure that these documents are added to the PDF of your thesis before submission.
Modifying the document after submission is difficult. Please ensure with your supervisor that the file you are about to submit is acceptable (image resolution, corrections, etc.).
To finalize the deposit, you need to add the full text of the thesis in PDF format. Click on “Add PDF” to download the file from your computer. Remember to accept the proposed clause (1), which is mandatory for adding a document. Once this has been done, the following fields will appear:
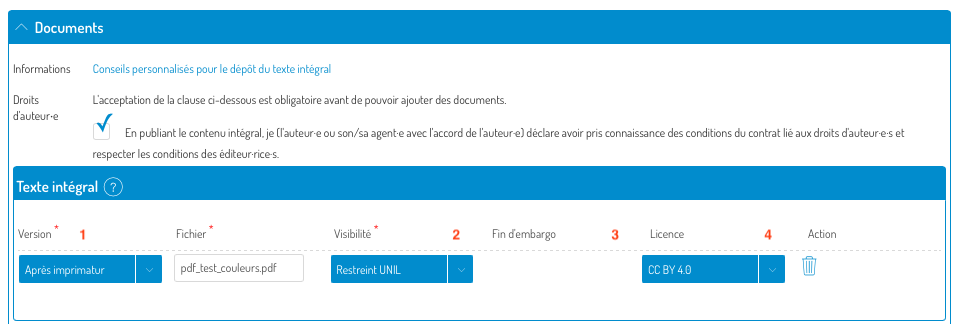
- The version of the full-text document must always be the version after imprimatur.
- Remember to select the document visibility:
- Restricted UNIL (default - accessible only to authenticated UNIL personnel) ;
- Public ;
- Under embargo (accessible only to authenticated UNIL personnel until the end of the embargo);
- If you have chosen an embargo, select the end date;
- And don't forget to select the appropriate license for distribution of the document, depending on potential third-party rights.
Licenses
In general, the thesis is uploaded to Serval under a Creative Commons Attribution 4.0 International license (CC BY 4.0 - https://creativecommons.org/licenses/by/4.0/) or another Creative Commons license of the author's choice, so that any interested user can access it.
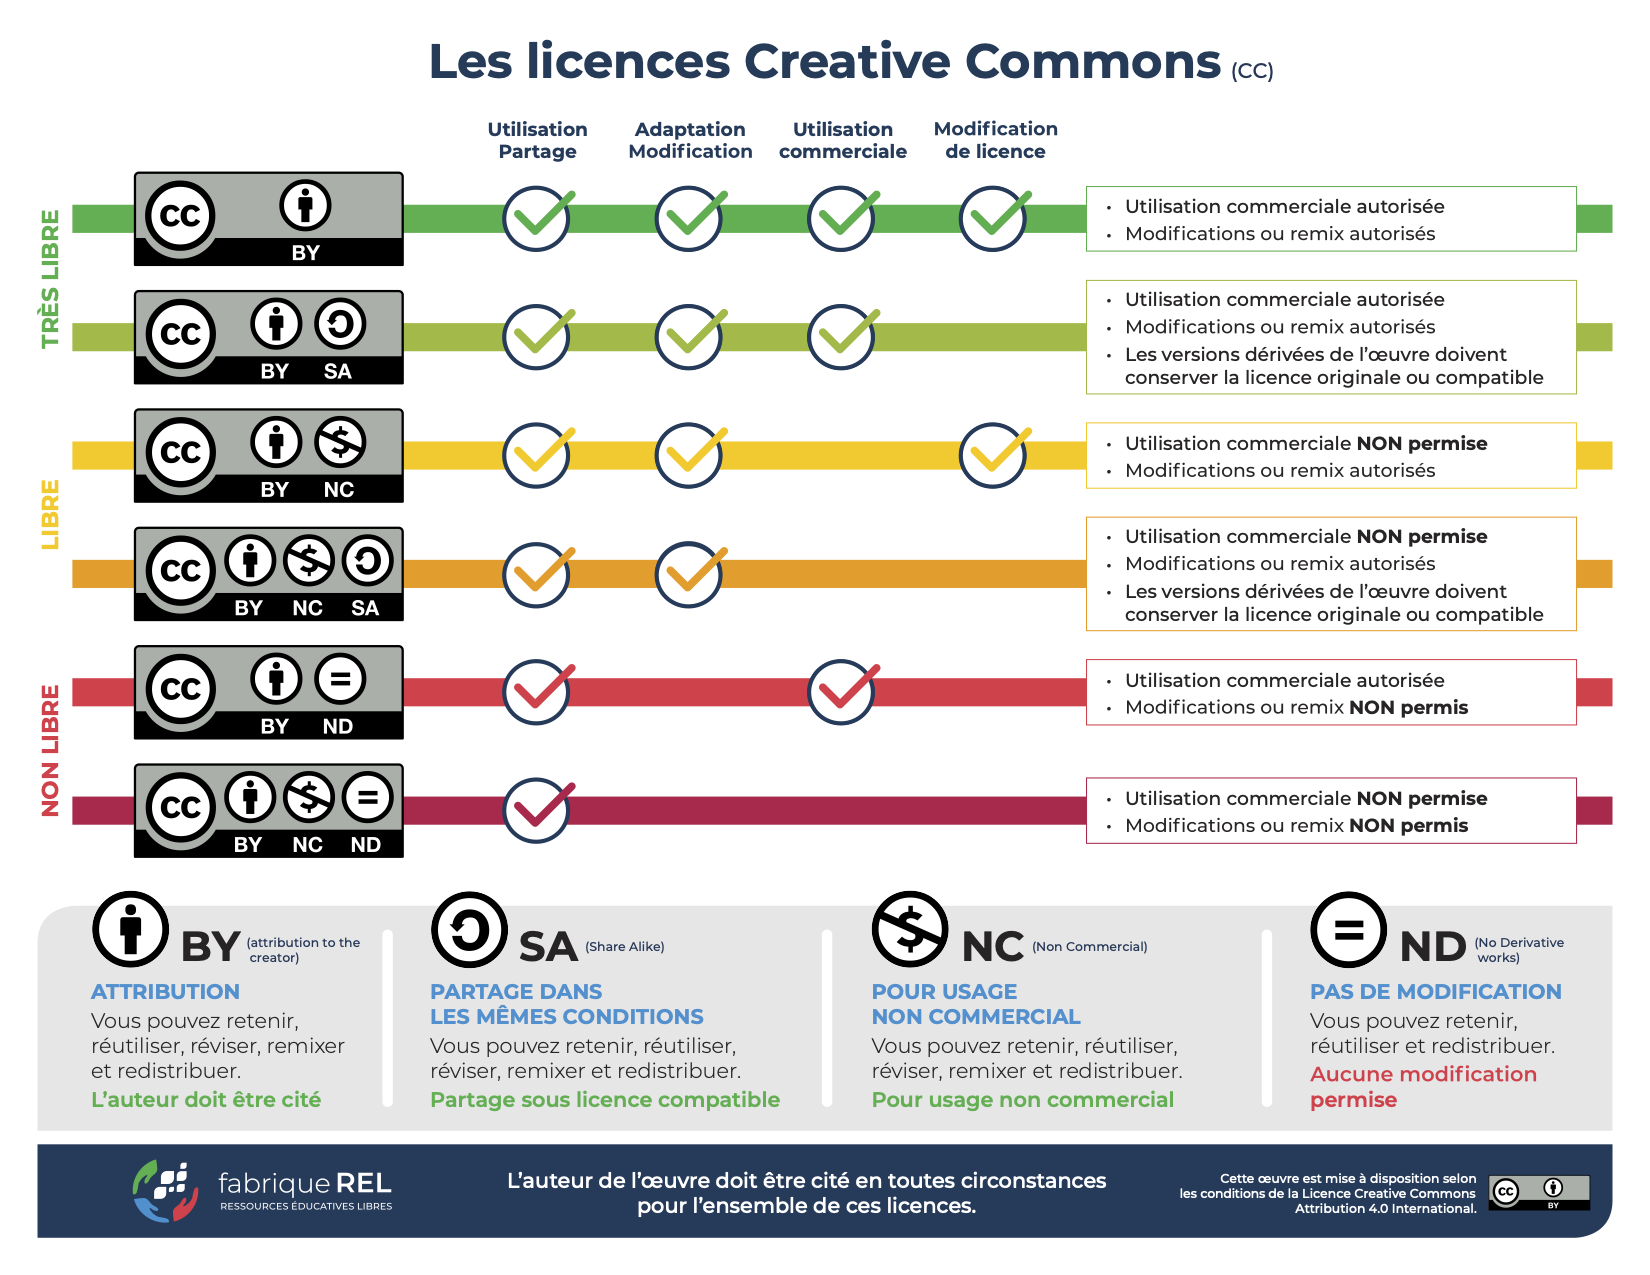
If third-party rights, such as those of publishers or co-authors, prevent distribution under a Creative Commons license, the author may grant UNIL a simple (non-exclusive) and free license to put the thesis online in the institutional repository after the end of any embargo (choose “all rights reserved”).
4. Save or submit your thesis
To finalize the process, please press the “Submit” button at the bottom or top of the page. The thesis will then be submitted and processed by BCUL.
It is also possible to save the record for later finalization.

5. Finalize the degree order
You can now return to your degree order and finalize it.