# Importing et exporting

This section explains how to import data into IRIS from external files, and how to export content in different formats. It also includes accepted formats, constraints to be respected and advice on how to avoid common errors.

# Exporting items from IRIS

### <iframe allowfullscreen="allowfullscreen" class=" align-center" height="314" src="https://www.youtube.com/embed/-XUeo0_pKBI" width="560"></iframe>


<p class="callout warning">*The voice in this video was generated by artificial intelligence.*</p>

### Introduction

This tutorial provides a step-by-step guide to exporting items from the IRIS platform.  
Several types of items can be exported: your personal profile, your own publications, as well as **<span style="color: rgb(241, 196, 15);">collections</span>** such as other researcher profiles, publications, units, or periodicals (academic journals that group several publications).

Depending on your needs, you can:

- Export an individual item by accessing its dedicated page
- Use search filters to export a set of items matching specific criteria (e.g. all publications in English or from several specific periodicals)

In the following sections, you'll find detailed procedures for each export type.

#### Using Filters to Export a Set of Entities

As with exporting specific entities, you should first select the desired entity type from the homepage. Then, you can apply the filters relevant to your needs.

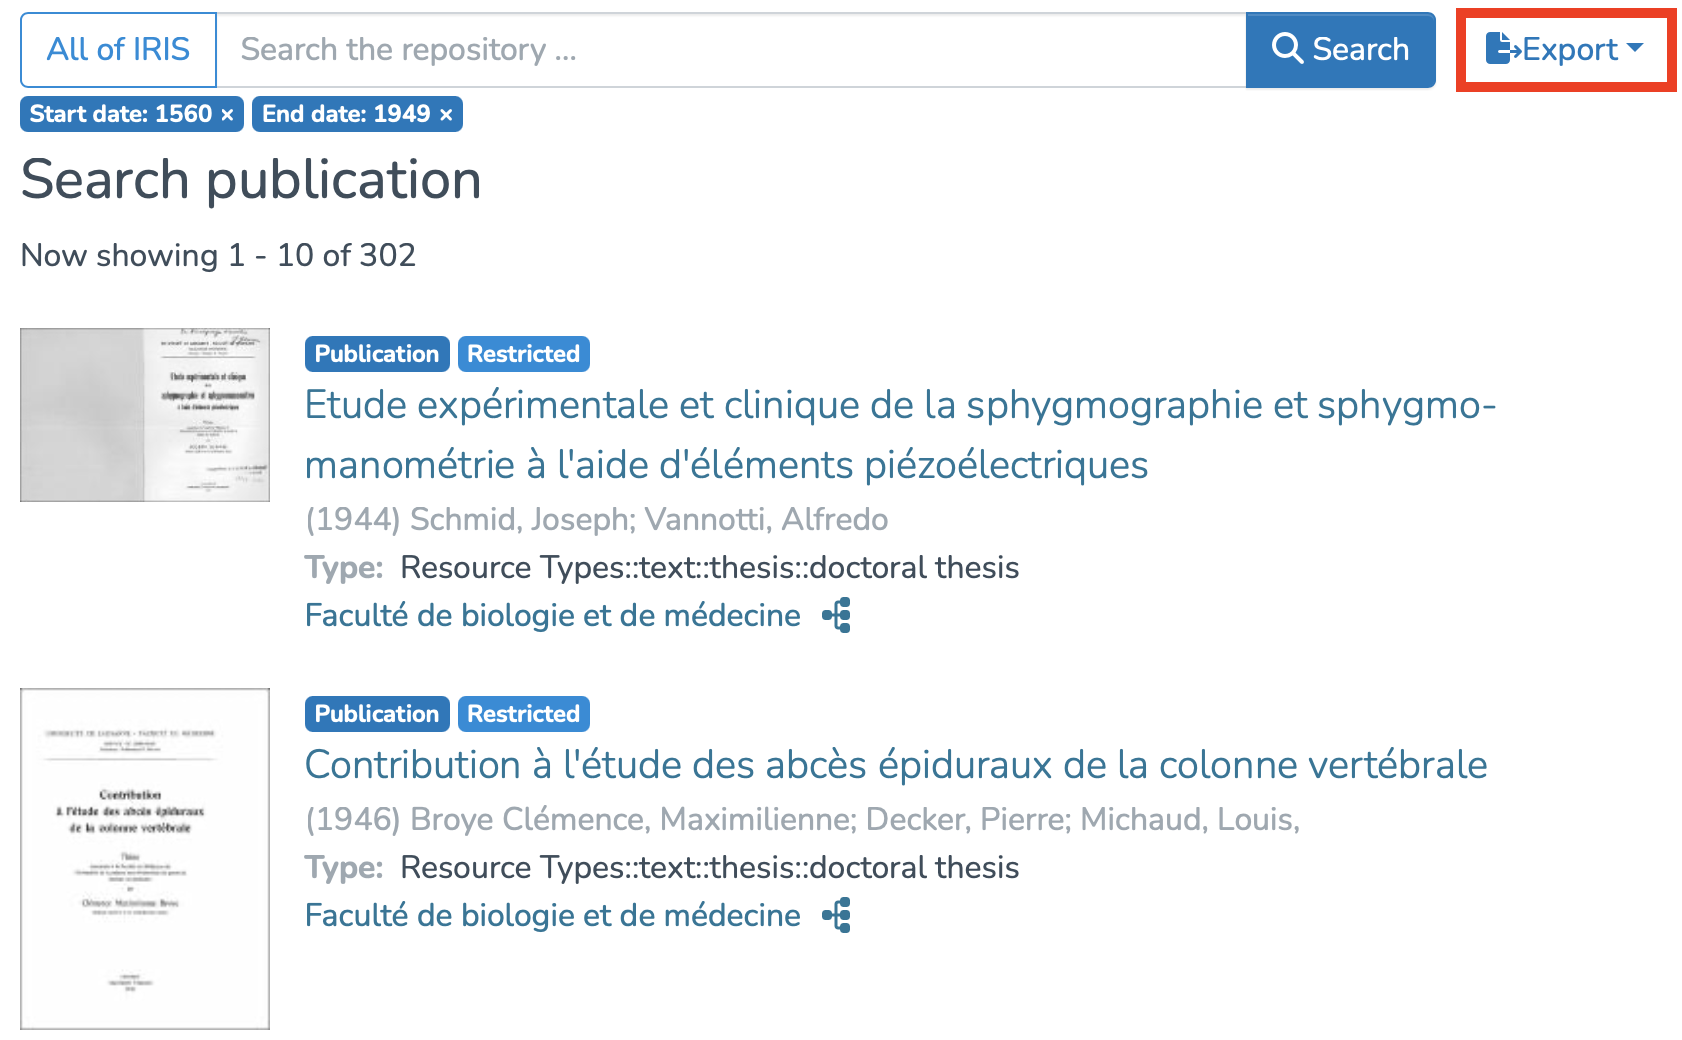
In the following example, we are exporting all publications from 1560 to 1949.

[![Capture d’écran 2025-07-31 à 12.50.09.png](https://wiki.unil.ch/recherche/uploads/images/gallery/2025-07/scaled-1680-/capture-decran-2025-07-31-a-12-50-09.png)](https://wiki.unil.ch/recherche/uploads/images/gallery/2025-07/capture-decran-2025-07-31-a-12-50-09.png)
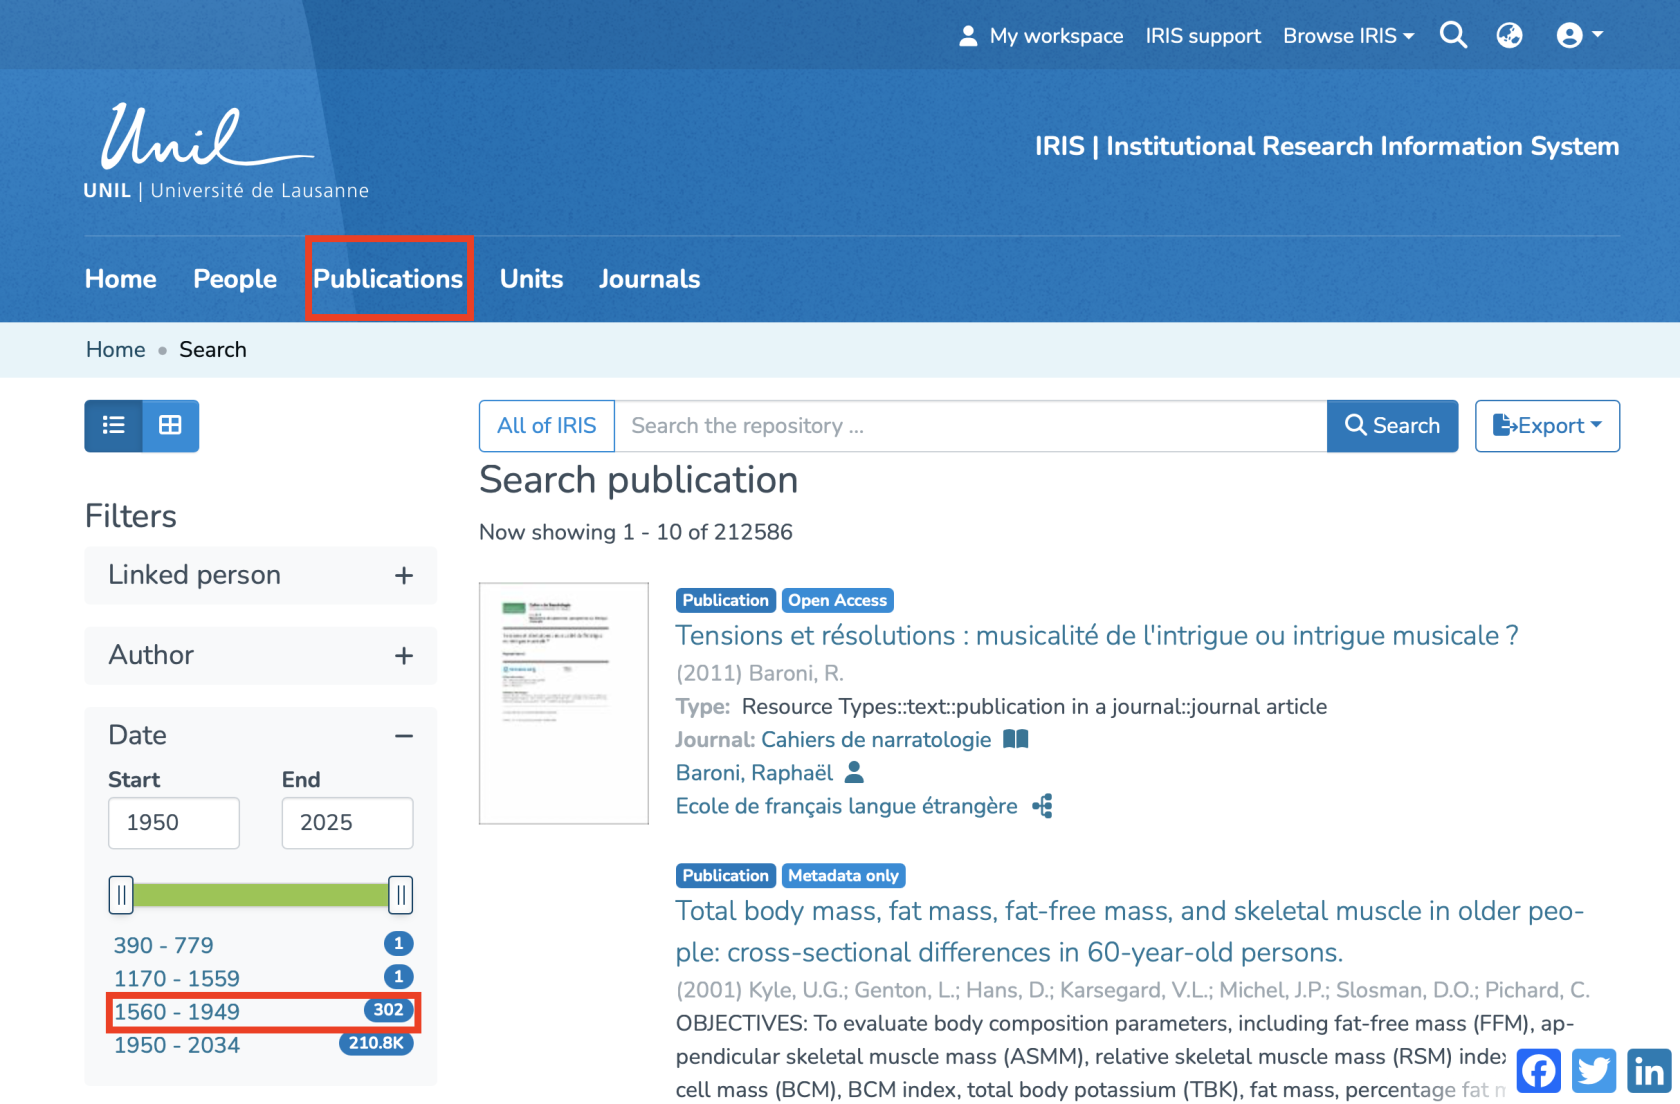
Once your search is filtered, simply click the **"Export"** button. Multiple entity types may be proposed. In this case, since we’re already in the "Publications" category, you just need to select it. However, if your search is more general and returns multiple <span style="color: rgb(241, 196, 15);">collections</span> (profiles, units, periodicals, etc.), you will first need to select the specific type you want to export.

[![Capture d’écran 2025-07-31 à 12.51.29.png](https://wiki.unil.ch/recherche/uploads/images/gallery/2025-07/scaled-1680-/capture-decran-2025-07-31-a-12-51-29.png)](https://wiki.unil.ch/recherche/uploads/images/gallery/2025-07/capture-decran-2025-07-31-a-12-51-29.png)
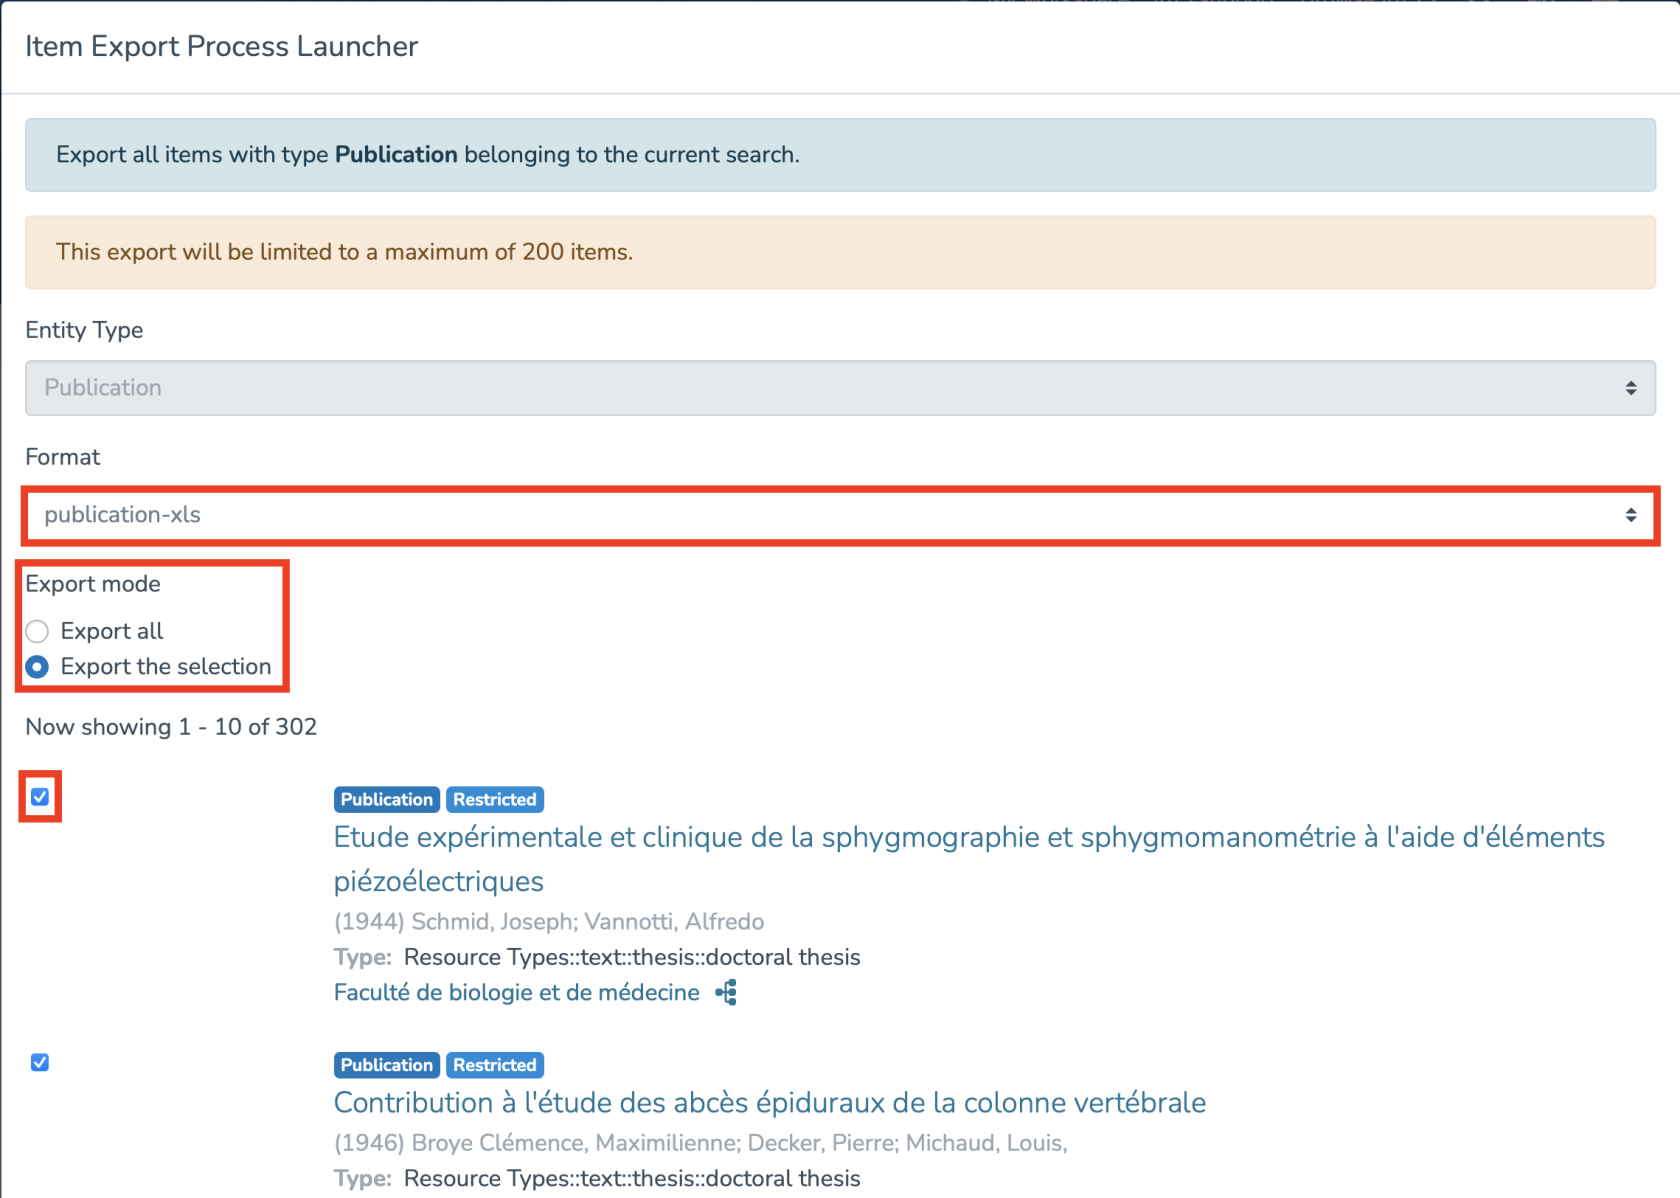
You will then access the **"Item Export Process Launcher"**. You must:

1. Choose the output file format
2. Select the export mode – either export all results or only a selection
    
    
    - If you wish to export only selected items, you will need to check them manually one by one

Once these steps are completed, click the **"Export"** button in the bottom-right corner and a downloadable file will be generated.

[![Capture d’écran 2025-07-31 à 12.52.25.png](https://wiki.unil.ch/recherche/uploads/images/gallery/2025-07/scaled-1680-/capture-decran-2025-07-31-a-12-52-25.png)](https://wiki.unil.ch/recherche/uploads/images/gallery/2025-07/capture-decran-2025-07-31-a-12-52-25.png)

<span style="color: rgb(224, 62, 45);">**N.B** : From your workspace, you can only export the records you have created yourself, not those you are merely linked to.</span>

#### Exporting Your Own List of Publications

You can also export your own list of publications by following these steps:

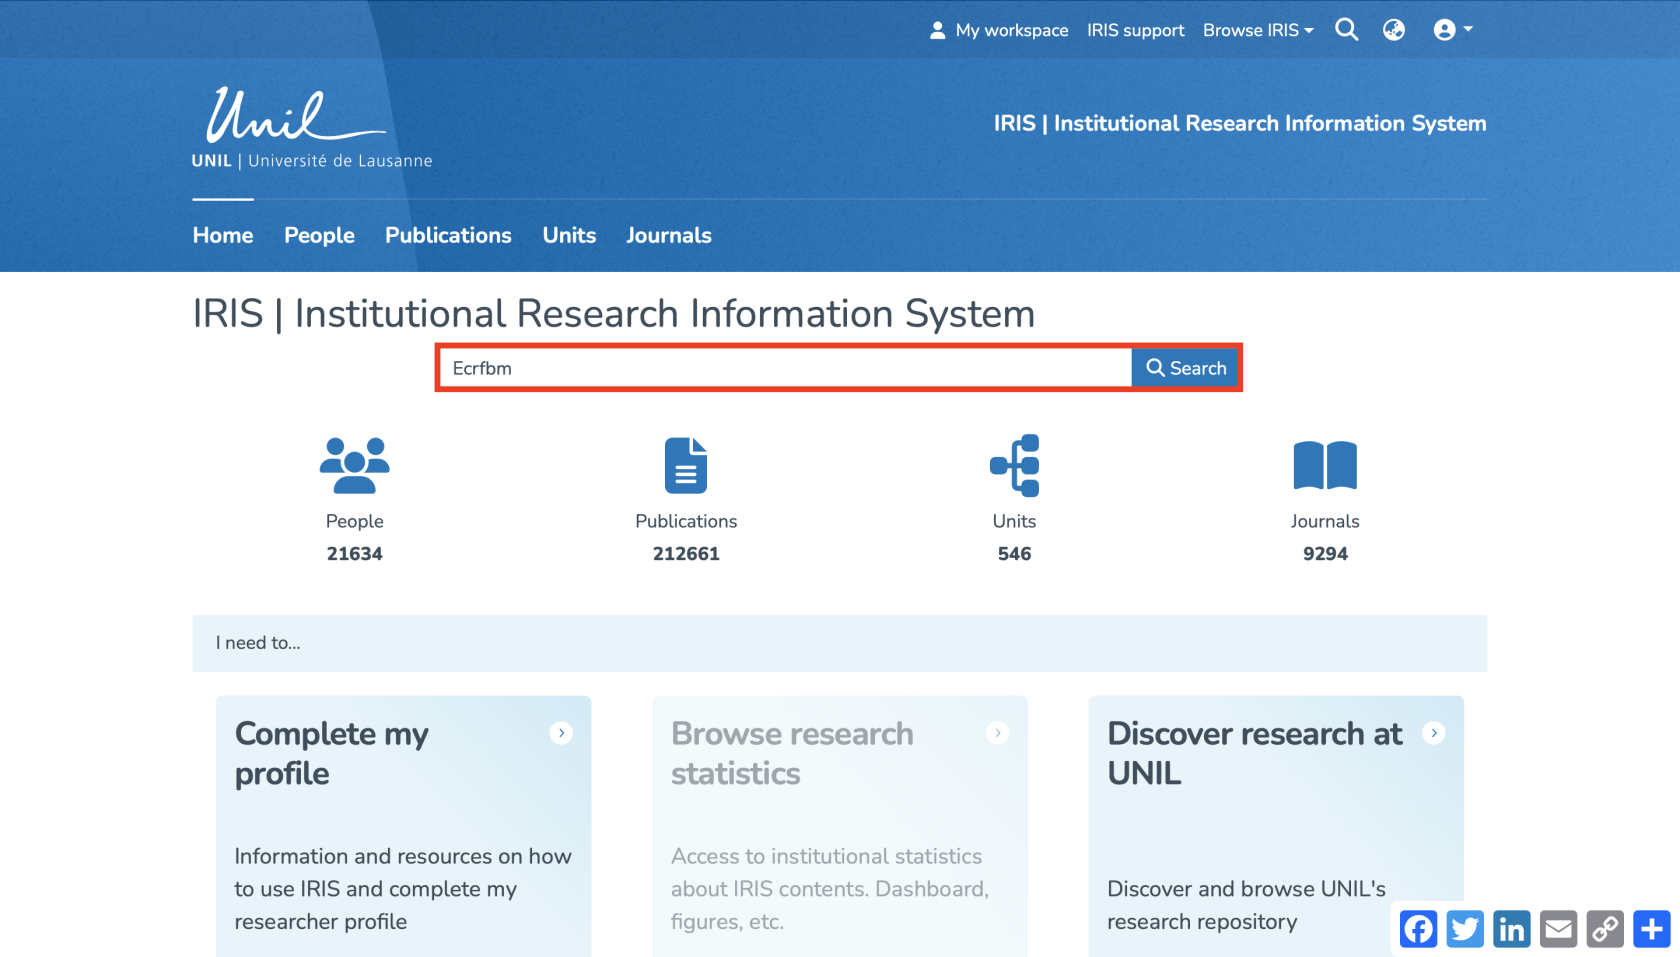
1\. Search for your own profile using the general search bar.

[![Capture d’écran 2025-08-15 à 09.11.34.png](https://wiki.unil.ch/recherche/uploads/images/gallery/2025-08/scaled-1680-/capture-decran-2025-08-15-a-09-11-34.png)](https://wiki.unil.ch/recherche/uploads/images/gallery/2025-08/capture-decran-2025-08-15-a-09-11-34.png)
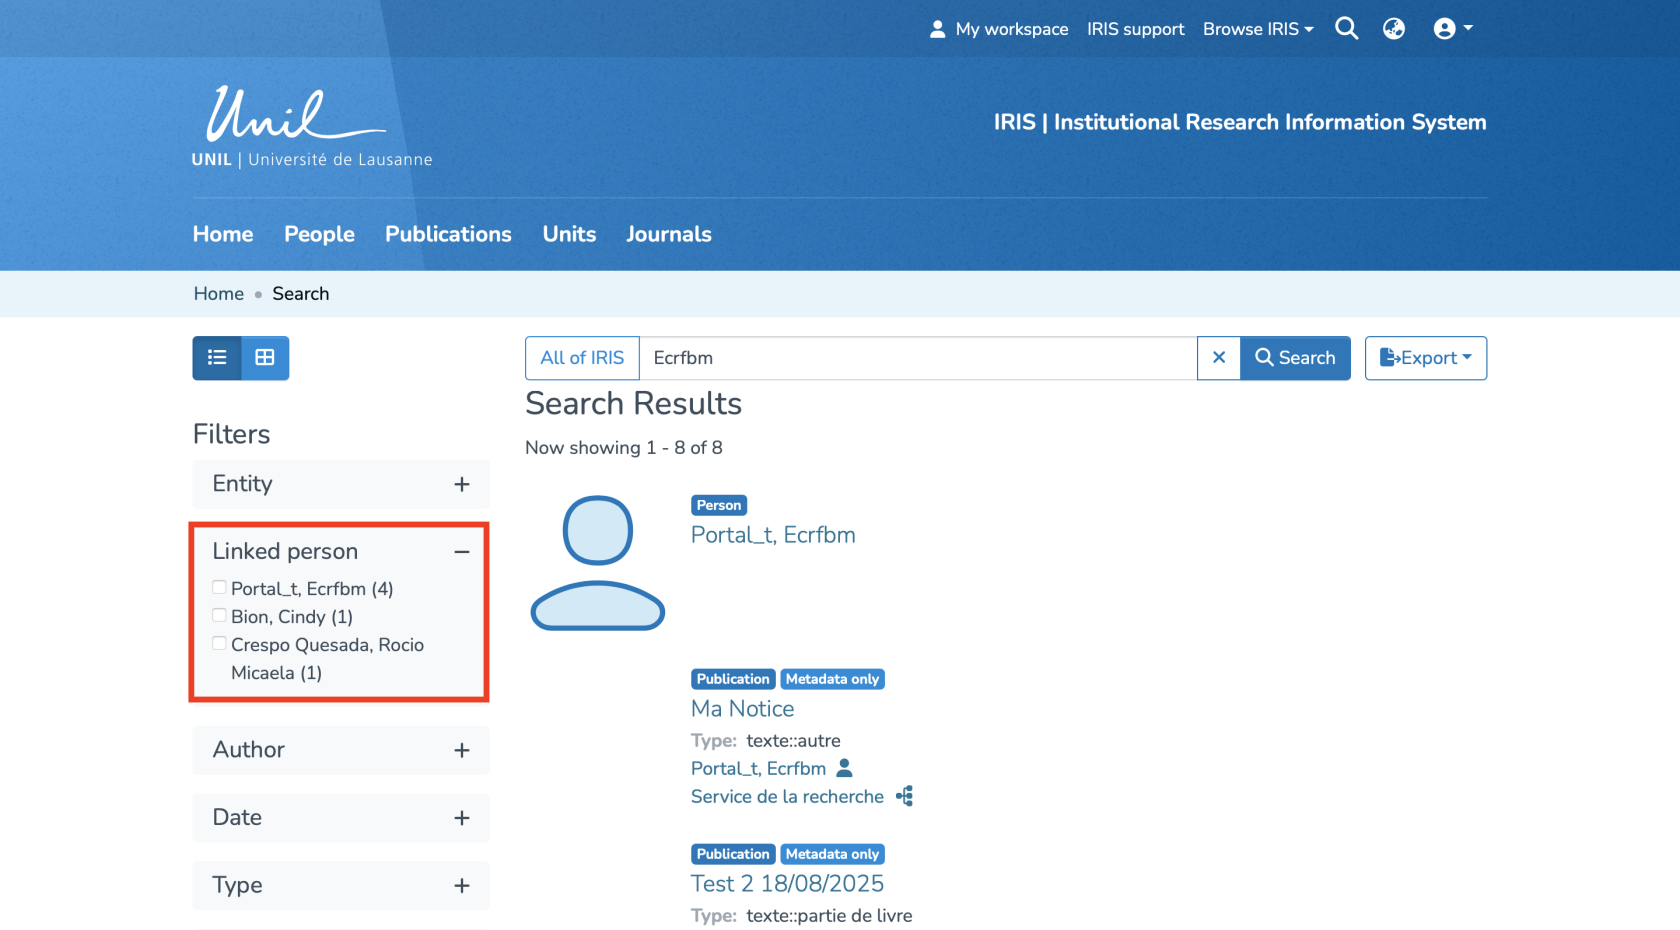
2\. In order to access the publications you are linked to, you will need to select the corresponding linked person using the following filter.

[![Capture d’écran 2025-08-21 à 21.10.20.png](https://wiki.unil.ch/recherche/uploads/images/gallery/2025-08/scaled-1680-/capture-decran-2025-08-21-a-21-10-20.png)](https://wiki.unil.ch/recherche/uploads/images/gallery/2025-08/capture-decran-2025-08-21-a-21-10-20.png)
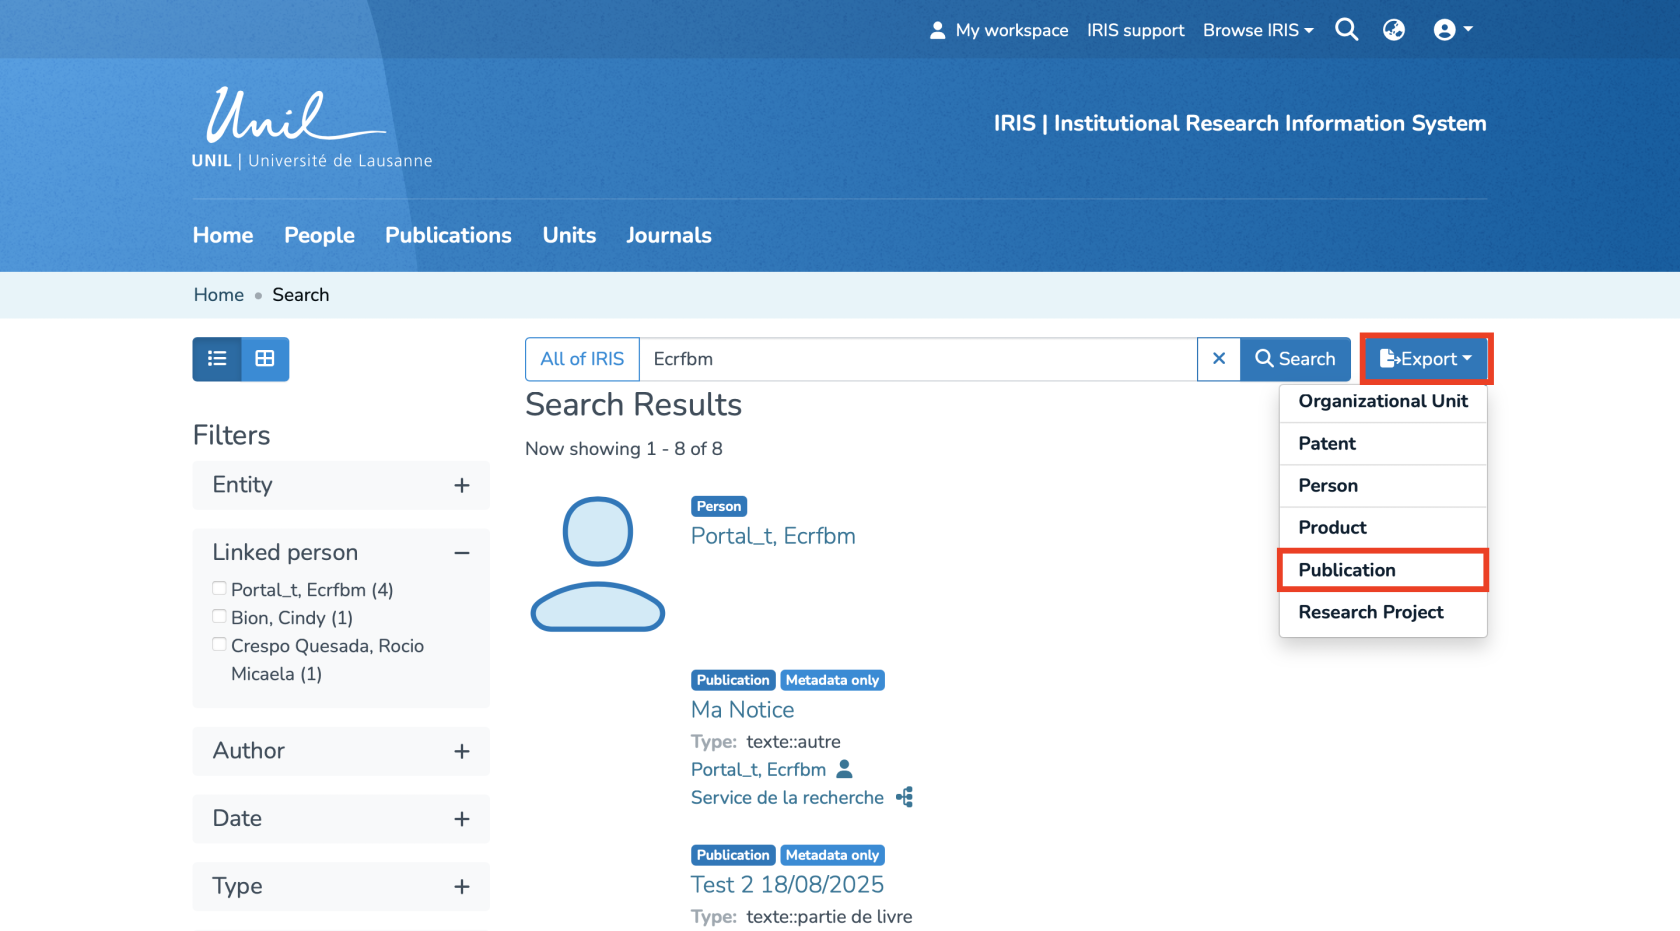
3\. You will then have access to the publications linked to your profile. Click on the **“Export”** button, then select **“Publications.”**

[![Capture d’écran 2025-08-21 à 21.11.02.png](https://wiki.unil.ch/recherche/uploads/images/gallery/2025-08/scaled-1680-/capture-decran-2025-08-21-a-21-11-02.png)](https://wiki.unil.ch/recherche/uploads/images/gallery/2025-08/capture-decran-2025-08-21-a-21-11-02.png)
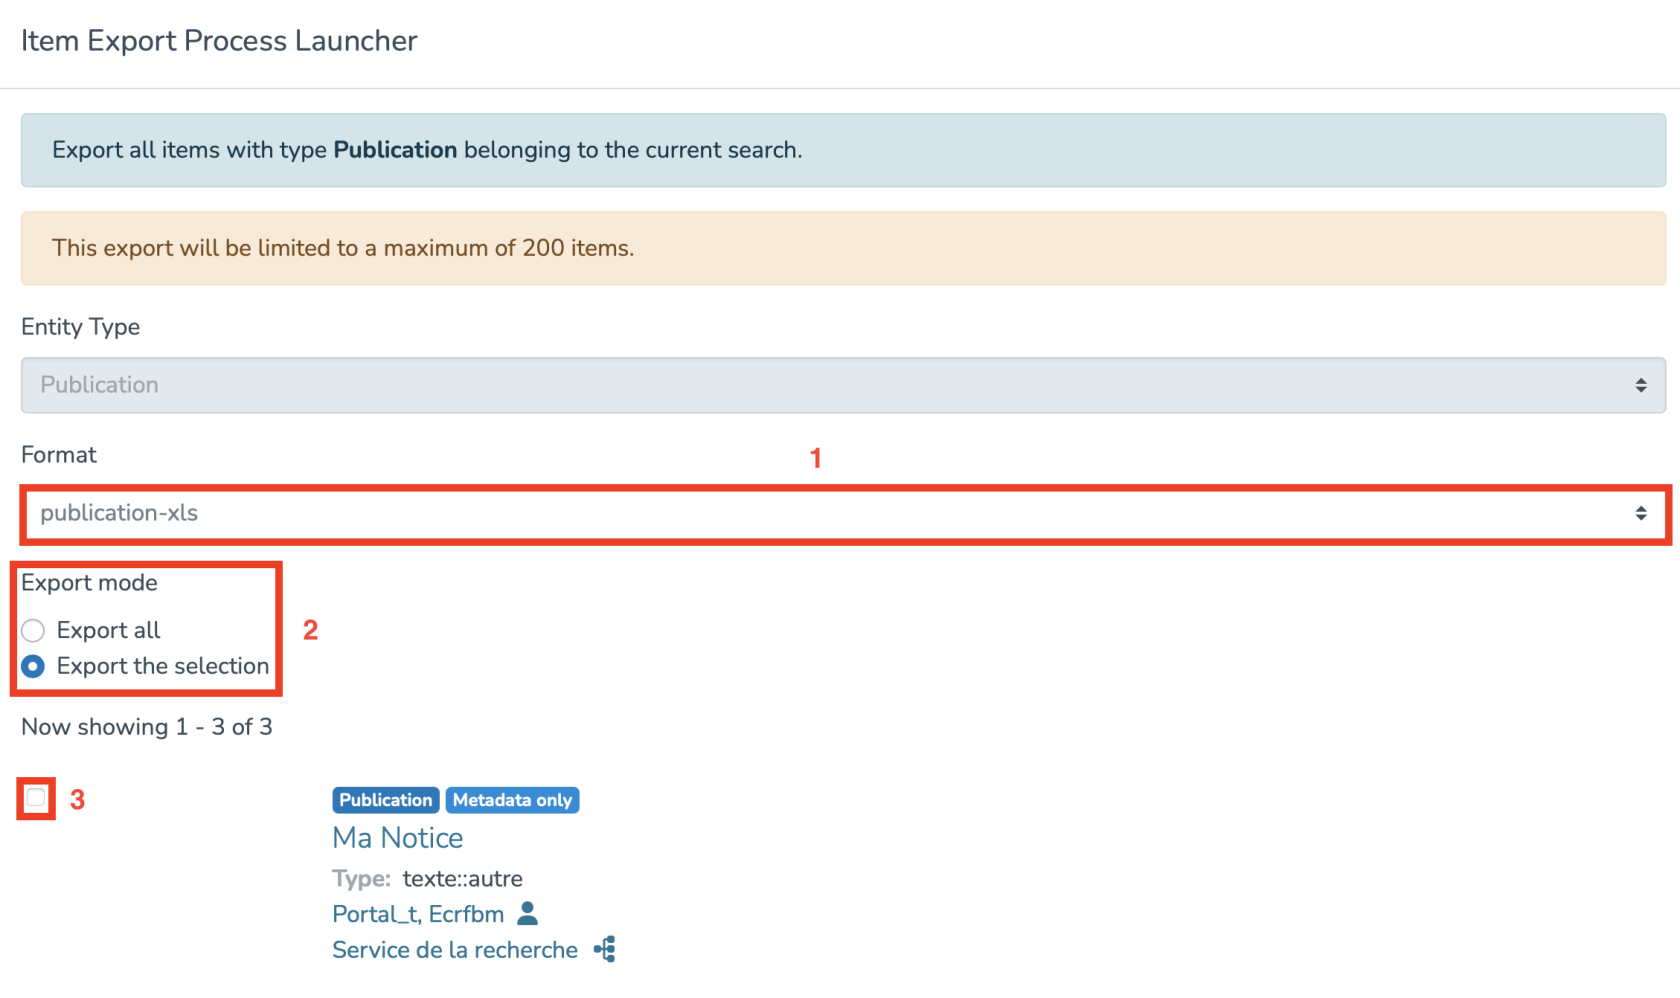
This will open the **Item Export Process Launcher**.

You will need to:

1\. Select the output file format.

2\. Choose the export mode: whether you want to export **all** results or only a **selection** from your list.

3\. If you only want to export a selection, you must manually check each item you want to include.

[![Capture d’écran 2025-08-15 à 09.15.44.png](https://wiki.unil.ch/recherche/uploads/images/gallery/2025-08/scaled-1680-/capture-decran-2025-08-15-a-09-15-44.png)](https://wiki.unil.ch/recherche/uploads/images/gallery/2025-08/capture-decran-2025-08-15-a-09-15-44.png)
Once these steps are completed, click on the **“Export”** button at the bottom right, you will then be able to download your file.

#### Exporting a specific item

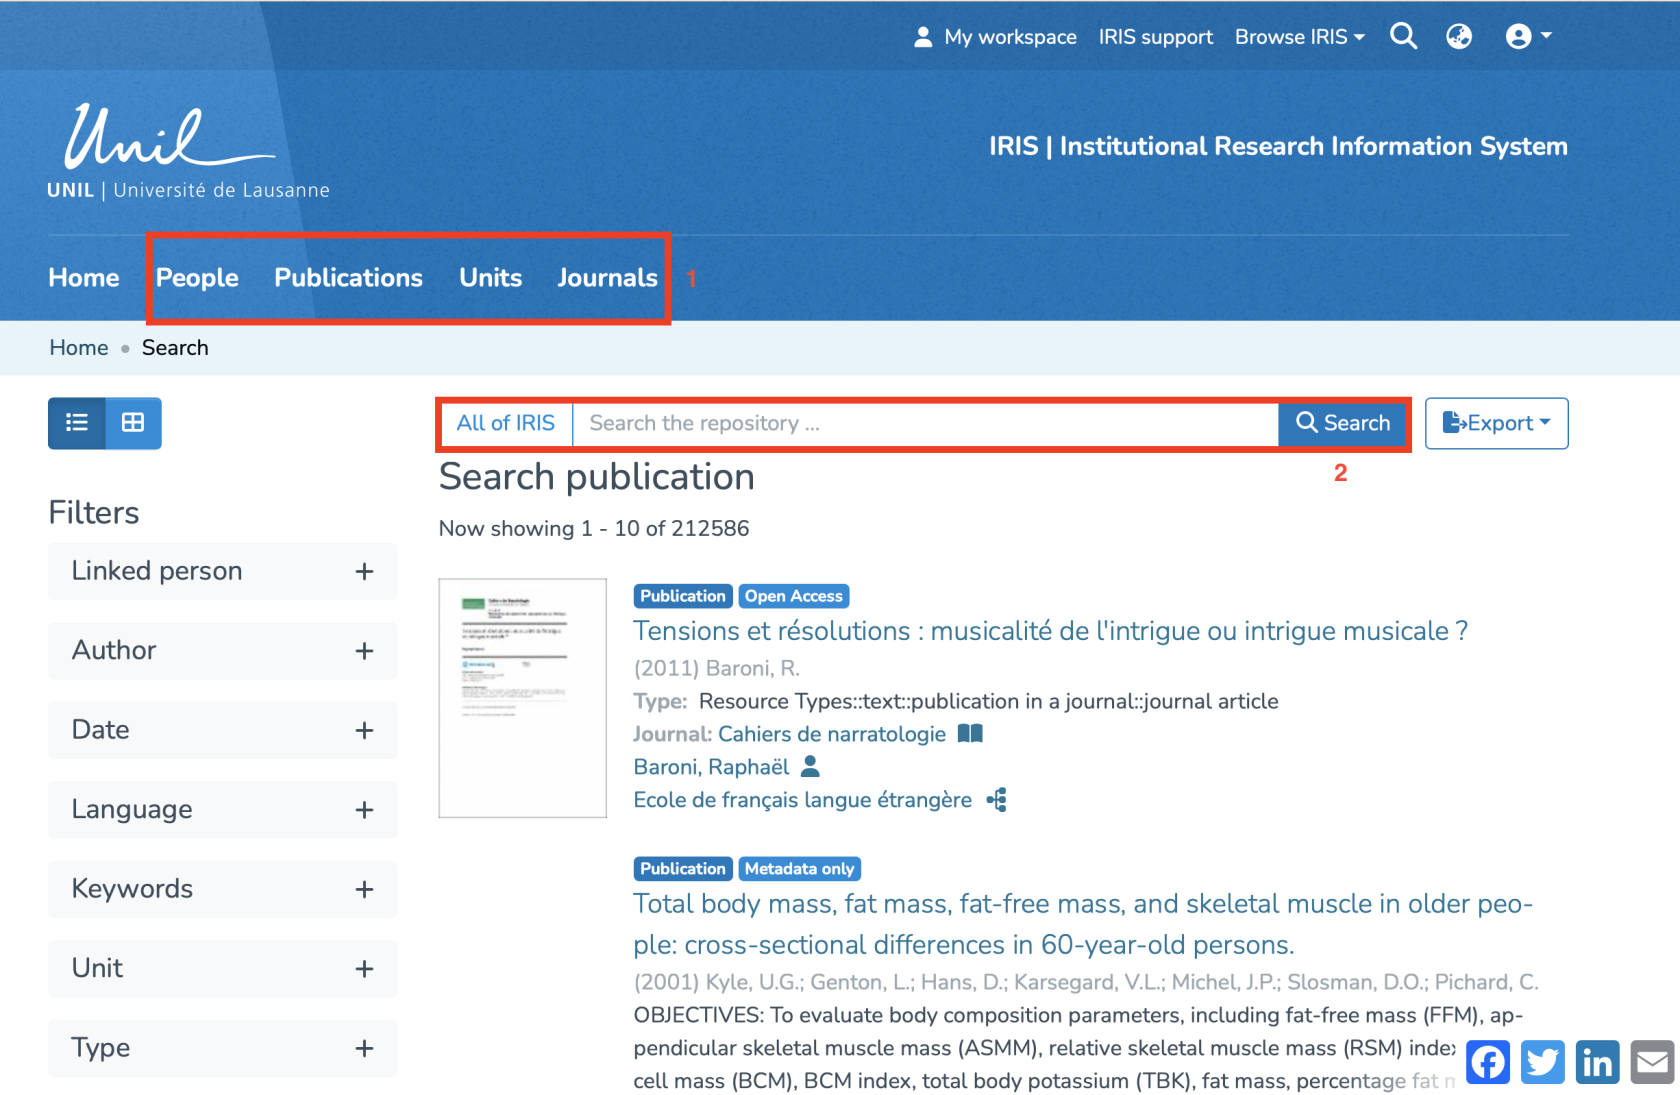
From the homepage, you can search for an item either by selecting its type (1) and launching the search (2), or simply by entering keywords directly in the main search bar.

[![Capture d’écran 2025-07-31 à 12.44.55.png](https://wiki.unil.ch/recherche/uploads/images/gallery/2025-07/scaled-1680-/capture-decran-2025-07-31-a-12-44-55.png)](https://wiki.unil.ch/recherche/uploads/images/gallery/2025-07/capture-decran-2025-07-31-a-12-44-55.png)
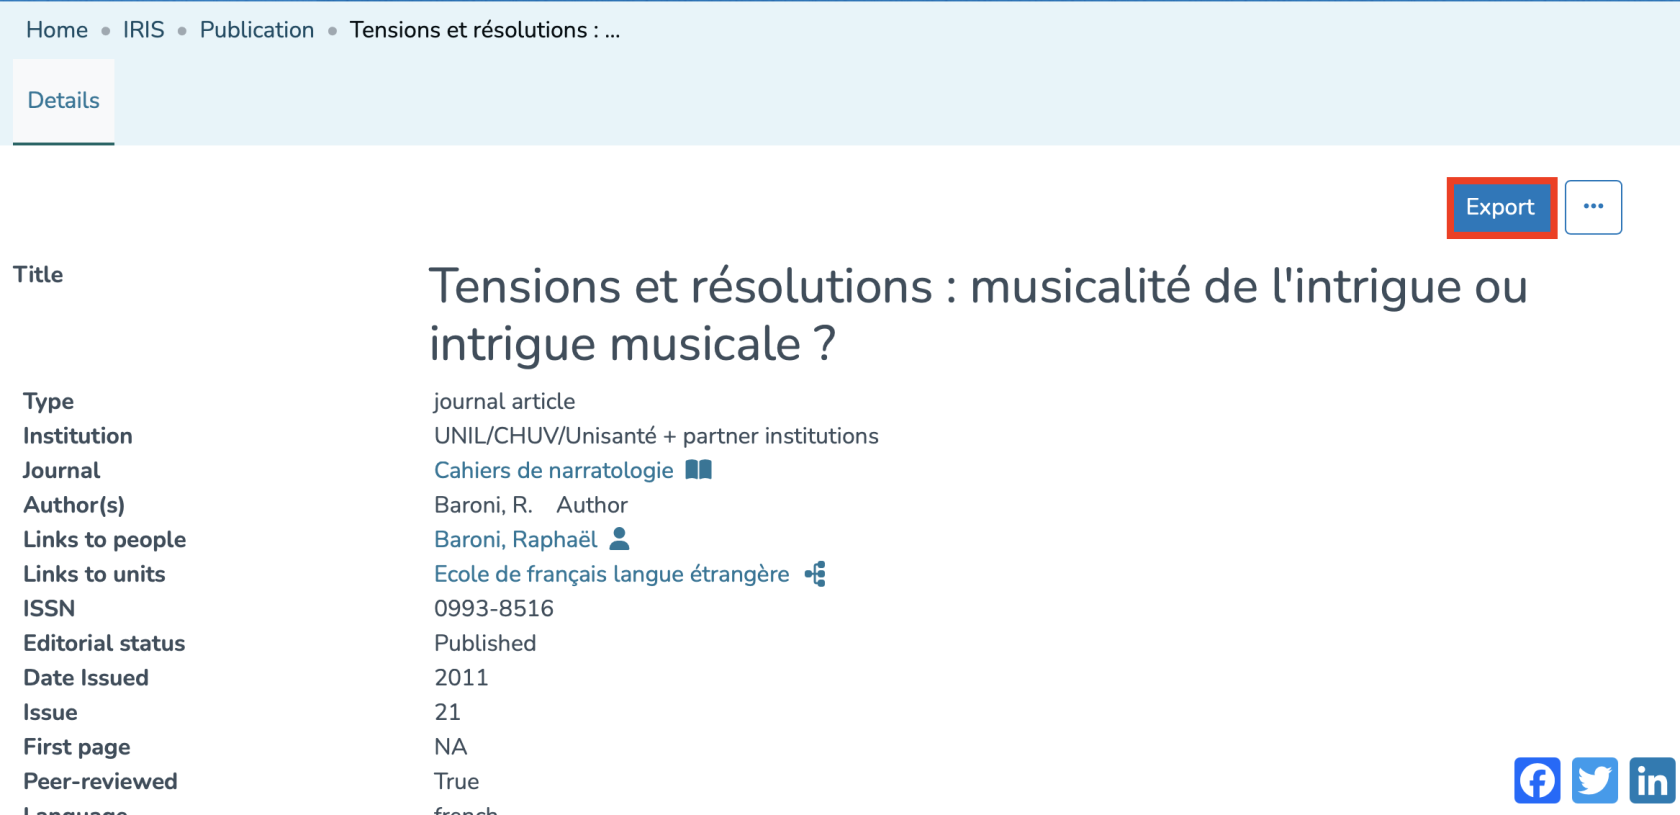
Once you have selected the desired entity, click on it to open its page, then click the **"Export"** button in the top-right corner.

[![Capture d’écran 2025-07-31 à 12.46.33.png](https://wiki.unil.ch/recherche/uploads/images/gallery/2025-07/scaled-1680-/capture-decran-2025-07-31-a-12-46-33.png)](https://wiki.unil.ch/recherche/uploads/images/gallery/2025-07/capture-decran-2025-07-31-a-12-46-33.png)
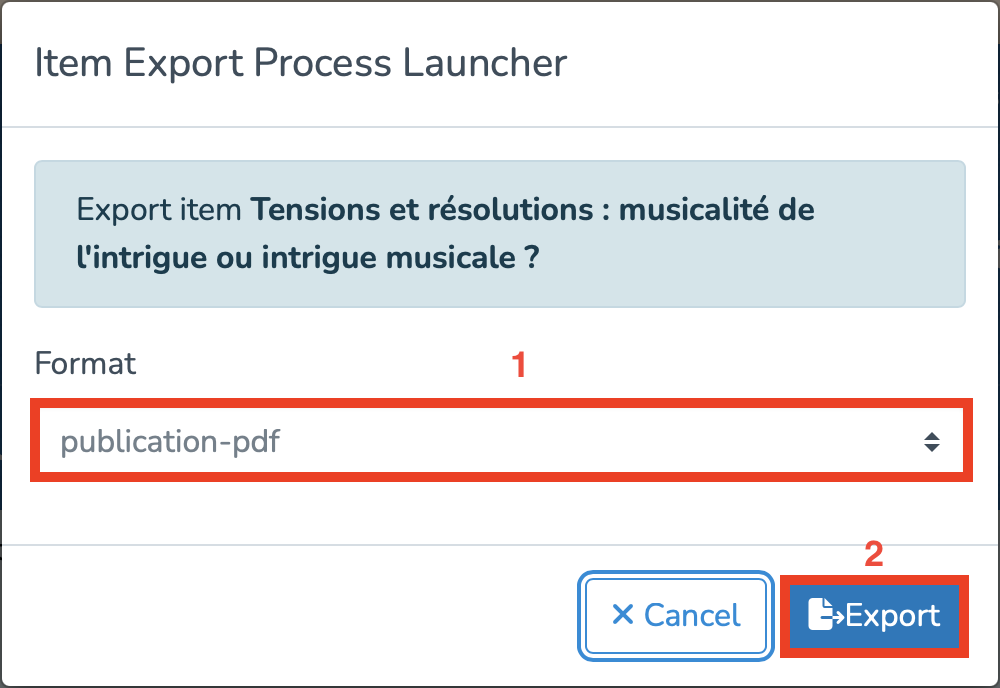
You will then be prompted to choose the output file format (1), and click the **"Export"** button.

[![Capture d’écran 2025-07-31 à 12.47.13.png](https://wiki.unil.ch/recherche/uploads/images/gallery/2025-07/scaled-1680-/capture-decran-2025-07-31-a-12-47-13.png)](https://wiki.unil.ch/recherche/uploads/images/gallery/2025-07/capture-decran-2025-07-31-a-12-47-13.png)
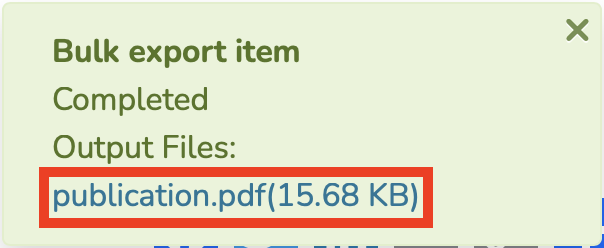
A download message will appear in the bottom-left corner of your screen. Once the download is complete, click on **<span style="color: rgb(35, 111, 161);">the file name</span>** to open it, as shown below.

[![Capture d’écran 2025-07-31 à 12.48.18.png](https://wiki.unil.ch/recherche/uploads/images/gallery/2025-07/scaled-1680-/capture-decran-2025-07-31-a-12-48-18.png)](https://wiki.unil.ch/recherche/uploads/images/gallery/2025-07/capture-decran-2025-07-31-a-12-48-18.png)

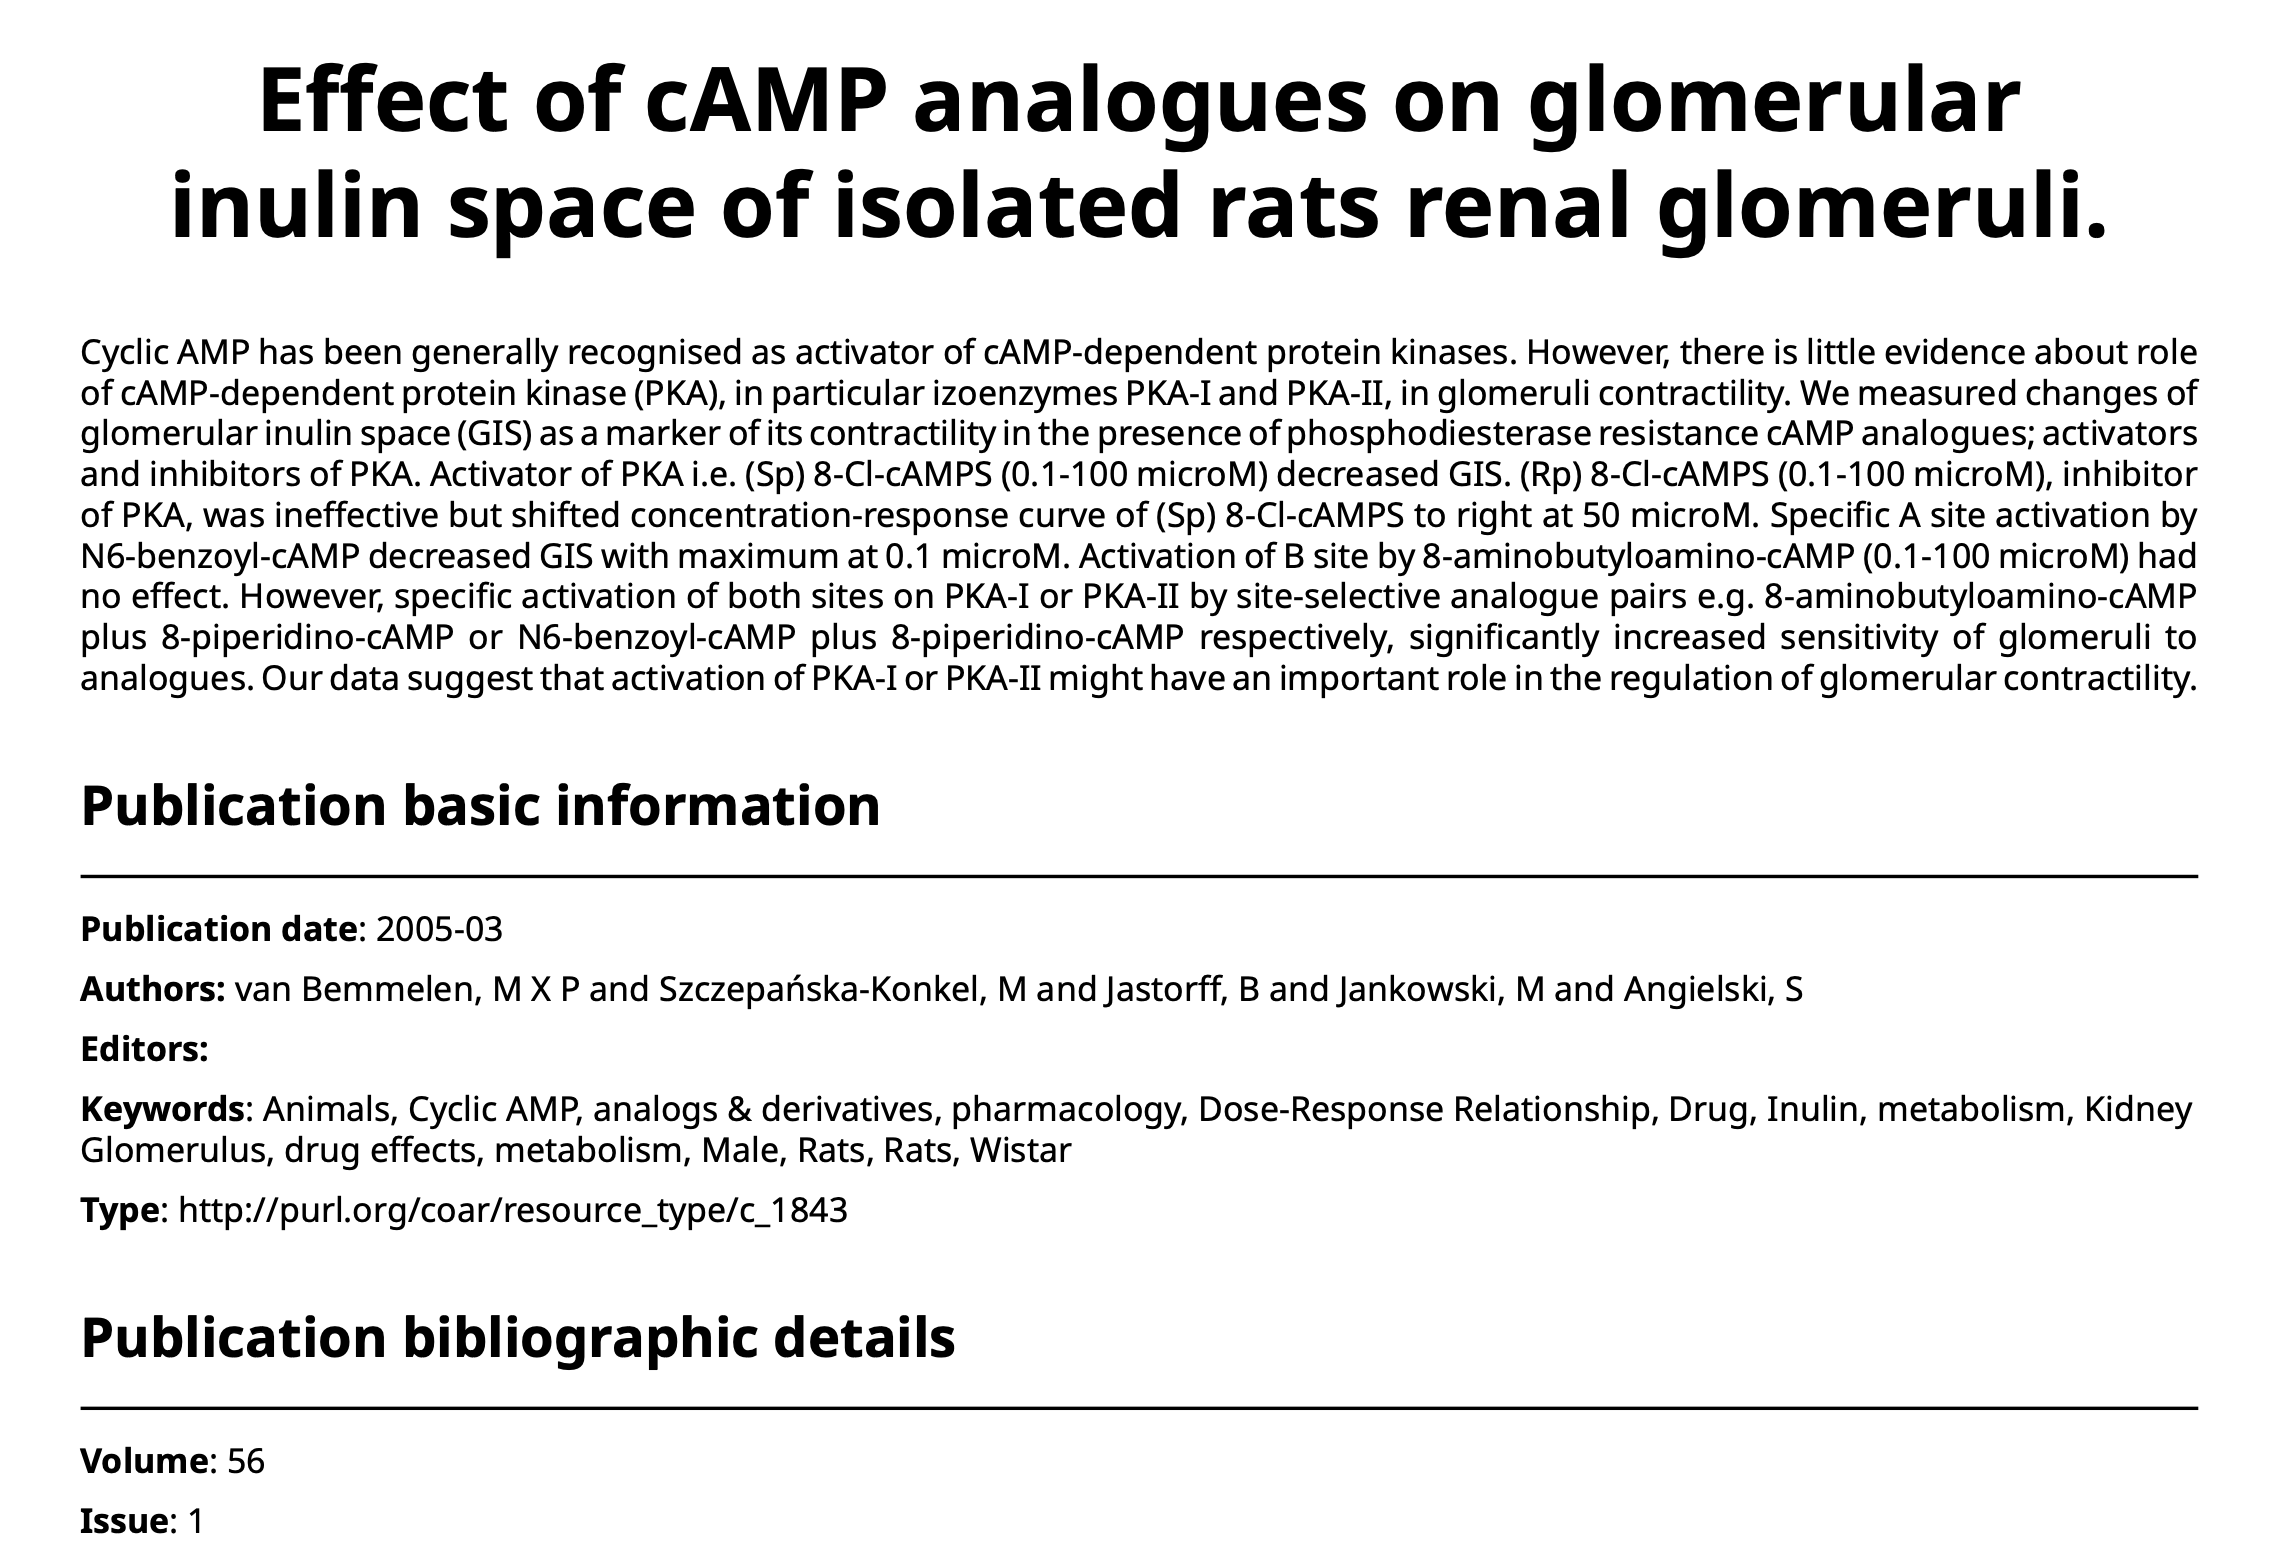
You will then access a file generated in the selected format, as illustrated here:

[![Capture d’écran 2025-07-11 à 08.25.30.png](https://wiki.unil.ch/recherche/uploads/images/gallery/2025-07/scaled-1680-/capture-decran-2025-07-11-a-08-25-30.png)](https://wiki.unil.ch/recherche/uploads/images/gallery/2025-07/capture-decran-2025-07-11-a-08-25-30.png)
# Linking your ORCID account with IRIS

#### <iframe allowfullscreen="allowfullscreen" class=" align-center" height="314" src="https://www.youtube.com/embed/cyXNQ_cPkXA" width="560"></iframe>


<p class="callout warning">*The voice in this video was generated by artificial intelligence.*</p>

#### Why link your ORCID account with IRIS?

ORCID is a system that provides a reliable way to link your research outputs to your profile, through a unique identifier associated with your researcher profile.

Linking your ORCID account to IRIS allows you to easily connect and synchronize your research activities between the two systems.

This integration facilitates the import and export of your publications, projects, and funding information, while ensuring the consistency and reliability of your data.

It therefore helps to increase the visibility of your work, simplify the management of your research outputs, and ensure compliance with funding agencies’ requirements, thereby strengthening your impact within the scientific community.

#### Create an ORCID Account (if you haven't already)

1. Go to the official website: [https://orcid.org](https://orcid.org)
2. This will allow you to obtain a unique identifier through which your research contributions can be reliably tracked.

#### Access your researcher profile

***Accessing Your Profile via the Login Menu***

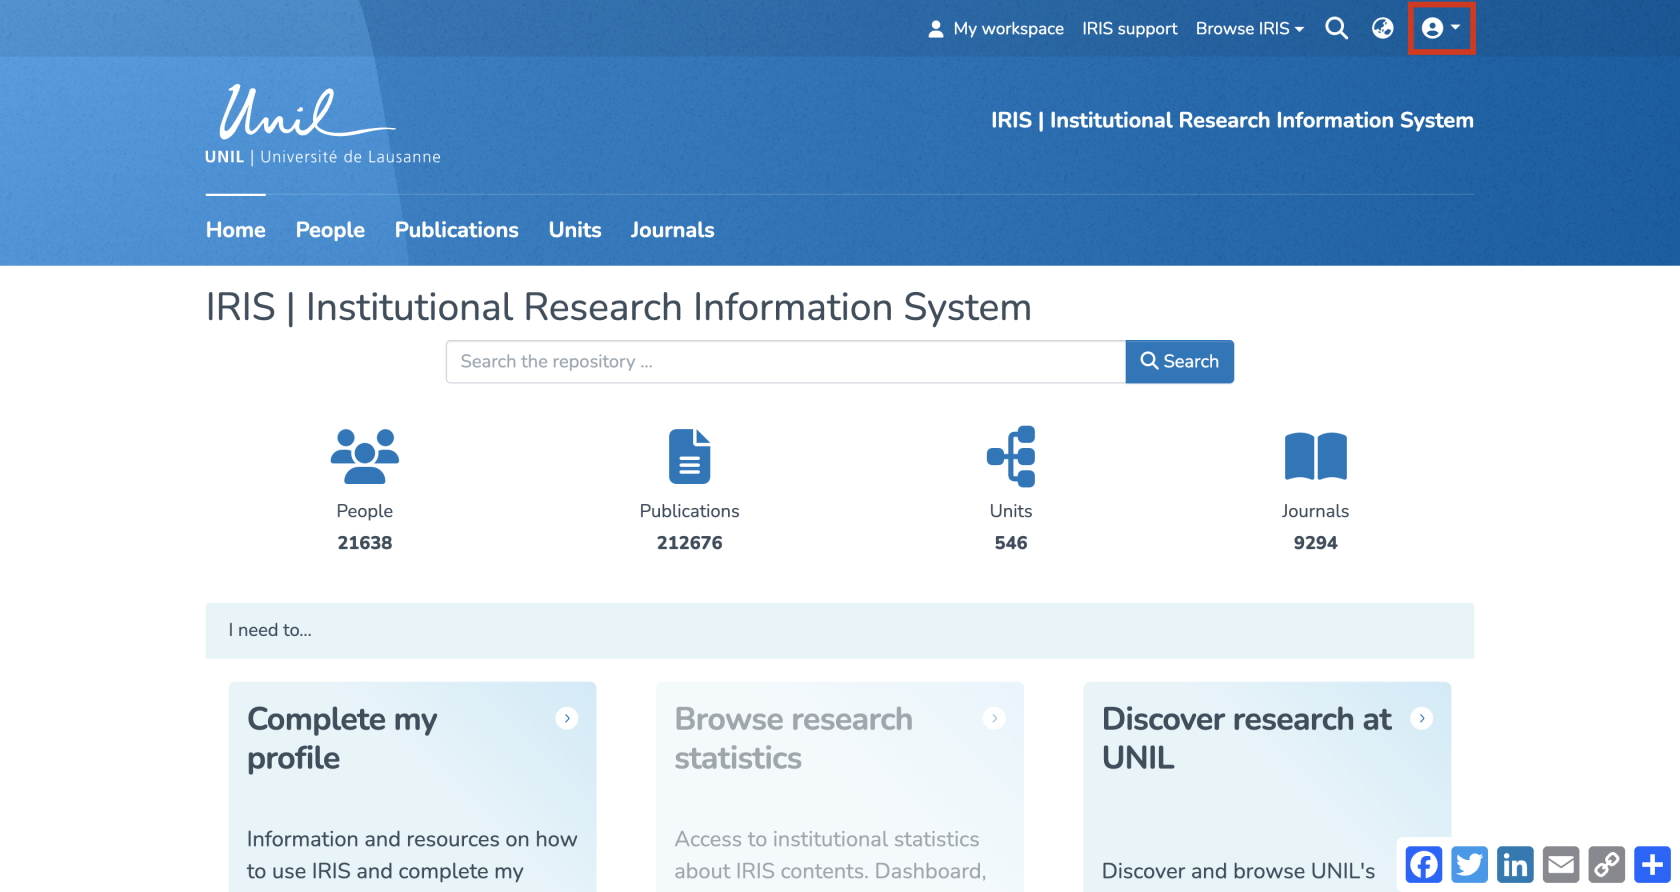
1. From the IRIS homepage, click on the login menu.[![image.png](https://wiki.unil.ch/recherche/uploads/images/gallery/2025-09/scaled-1680-/E94image.png)](https://wiki.unil.ch/recherche/uploads/images/gallery/2025-09/E94image.png)
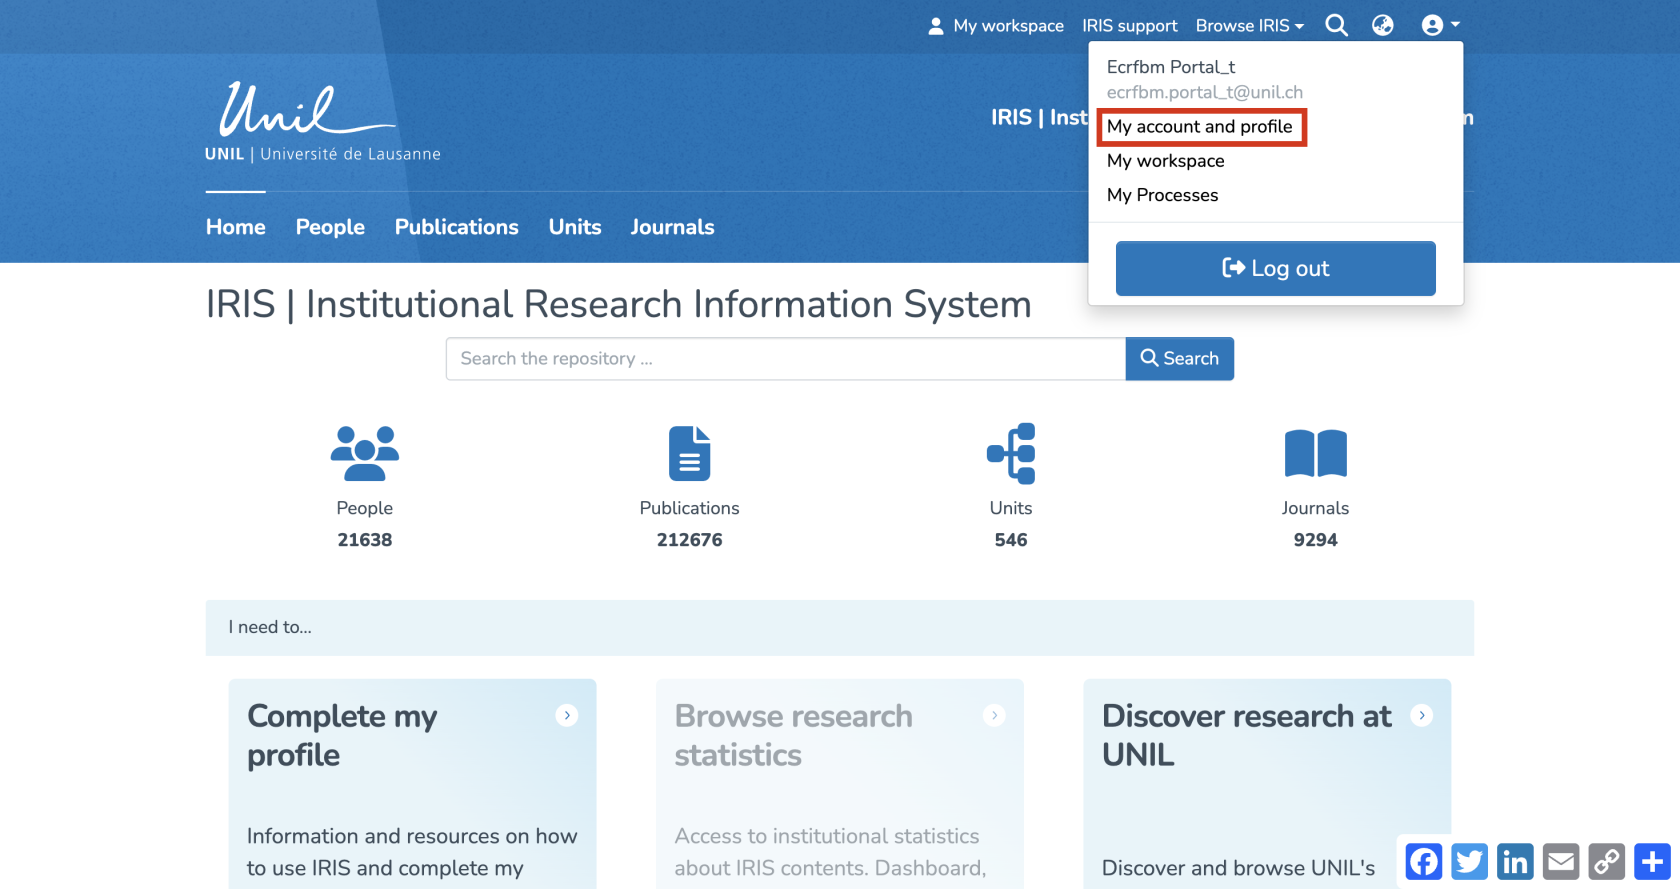
2. In the dropdown menu, select “My account and profile.”[![image.png](https://wiki.unil.ch/recherche/uploads/images/gallery/2025-09/scaled-1680-/2sJimage.png)](https://wiki.unil.ch/recherche/uploads/images/gallery/2025-09/2sJimage.png)
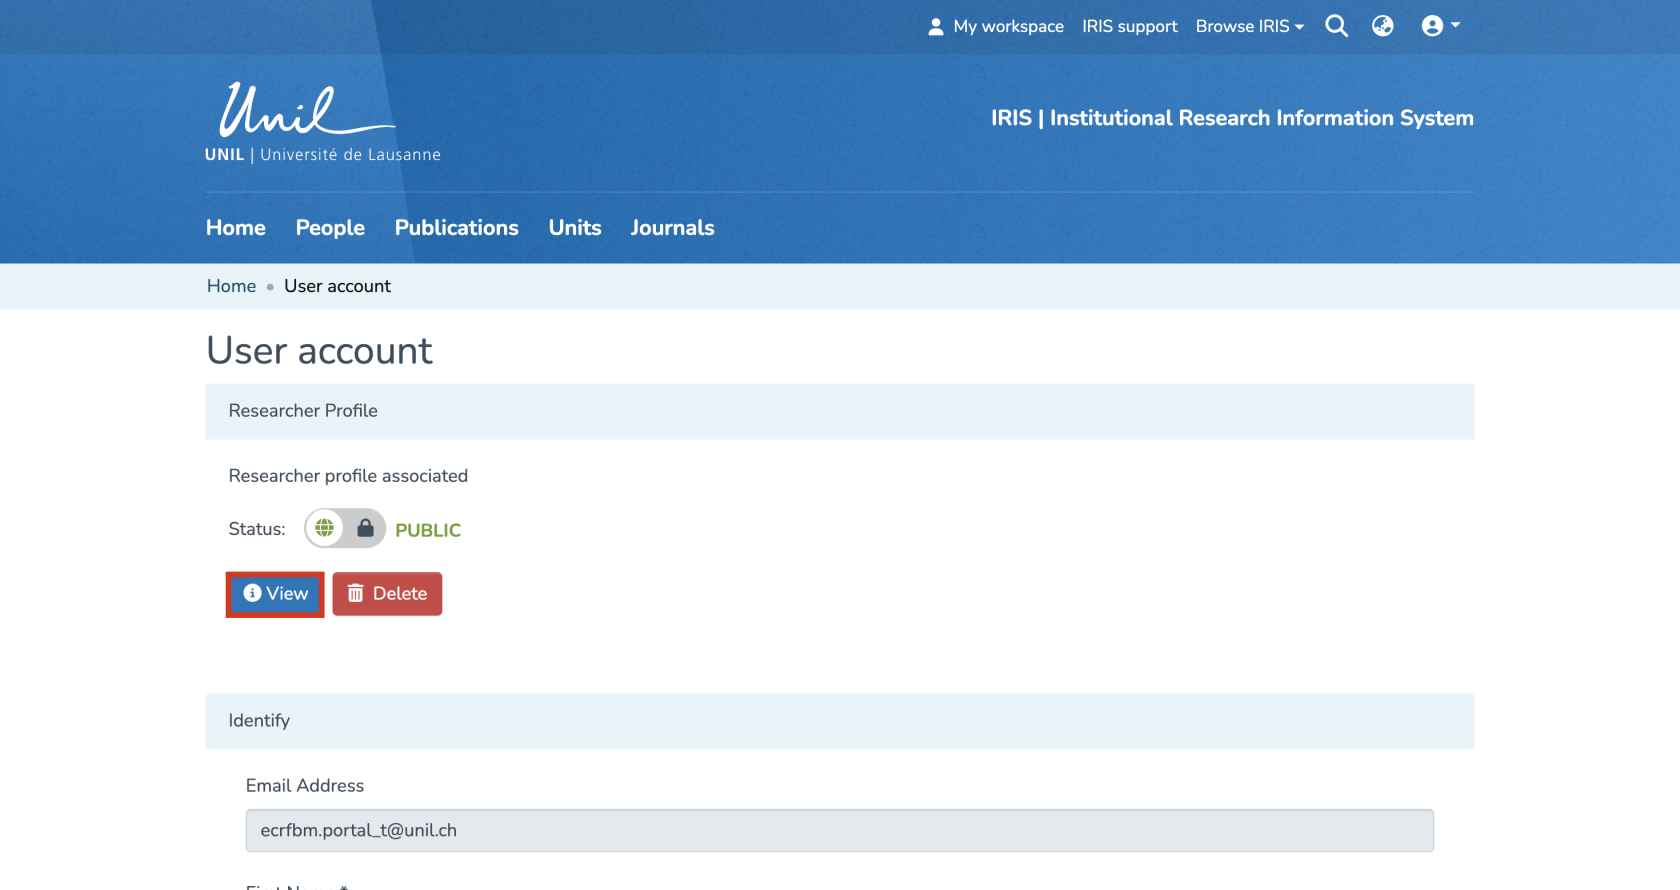
3. You’ll be redirected to a page titled “Update Profile”. Click on “View” to open the full version of your profile.[![image.png](https://wiki.unil.ch/recherche/uploads/images/gallery/2025-09/scaled-1680-/XNPimage.png)](https://wiki.unil.ch/recherche/uploads/images/gallery/2025-09/XNPimage.png)
***Accessing Your Profile via Search***

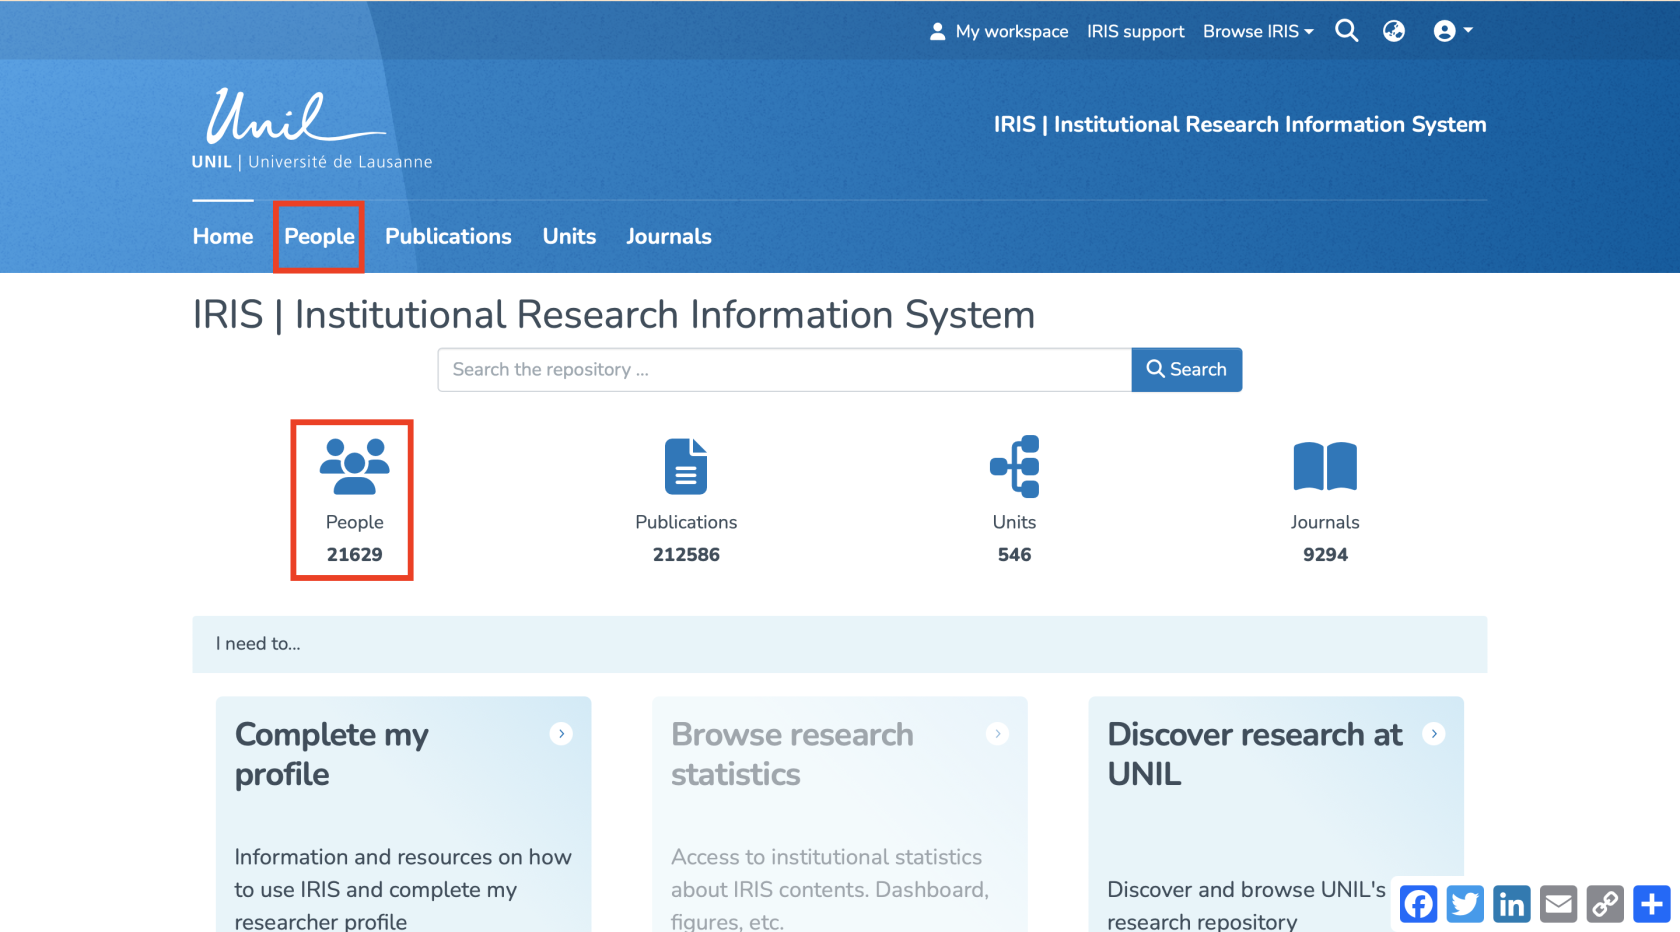
1. From the IRIS homepage, click on “People.”[![Capture d’écran 2025-07-31 à 12.14.11.png](https://wiki.unil.ch/recherche/uploads/images/gallery/2025-07/scaled-1680-/capture-decran-2025-07-31-a-12-14-11.png)](https://wiki.unil.ch/recherche/uploads/images/gallery/2025-07/capture-decran-2025-07-31-a-12-14-11.png)
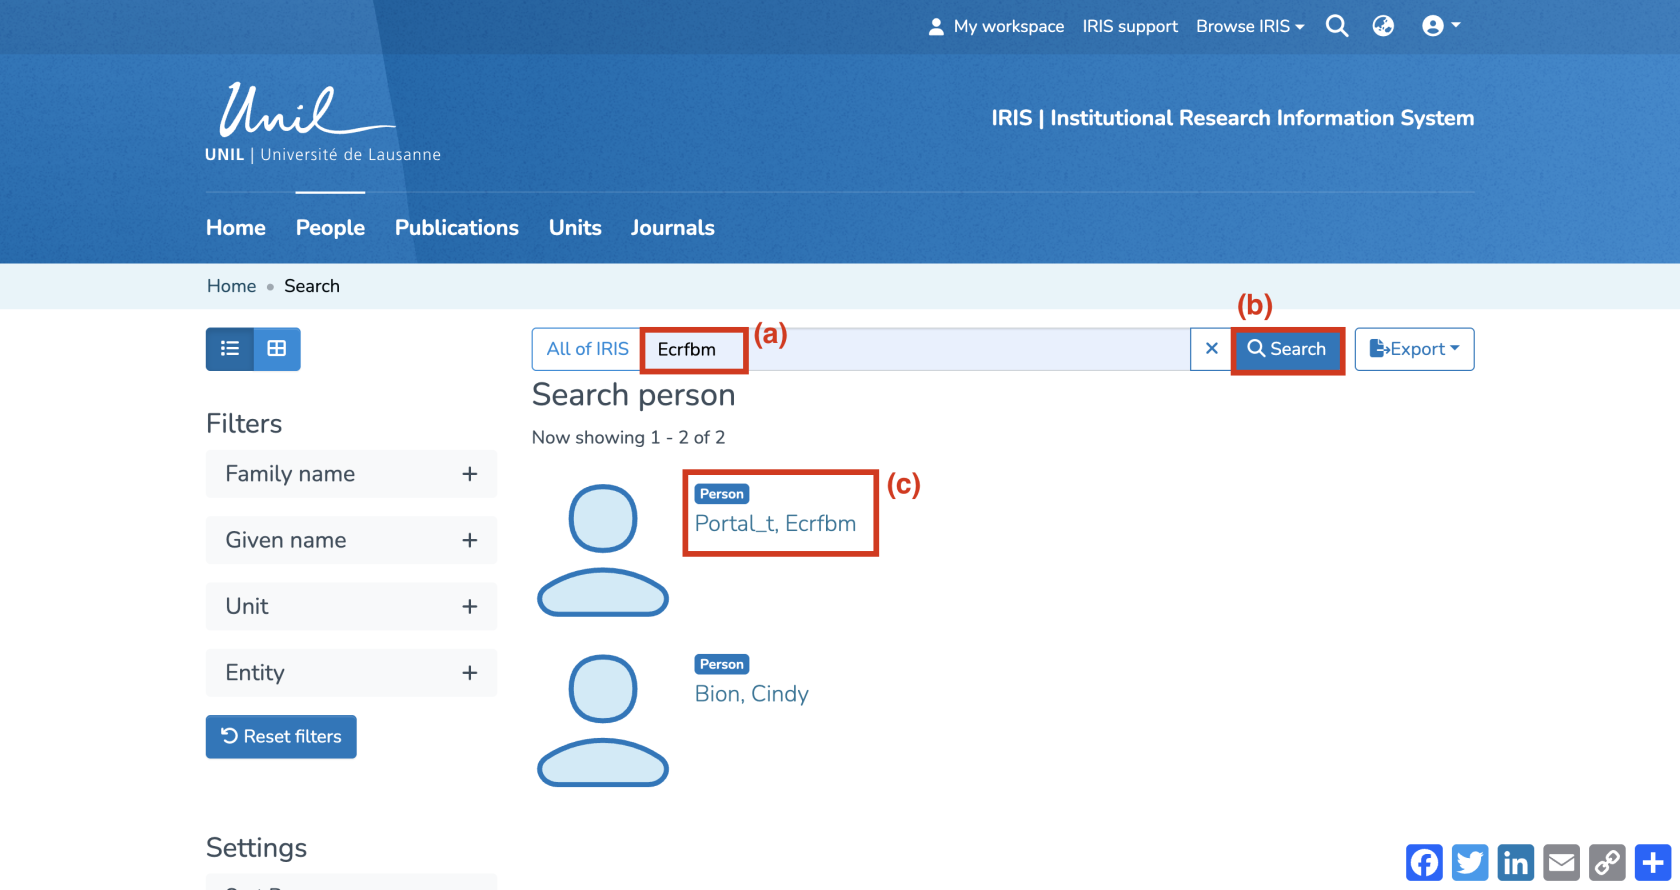
2. In the search bar that appears, enter your name (a), then click “Search” (b).
3. Once the search is complete, your profile will appear in the results. Click on your name (c).[![image.png](https://wiki.unil.ch/recherche/uploads/images/gallery/2025-09/scaled-1680-/0ukimage.png)](https://wiki.unil.ch/recherche/uploads/images/gallery/2025-09/0ukimage.png)
#### Open ORCID Settings

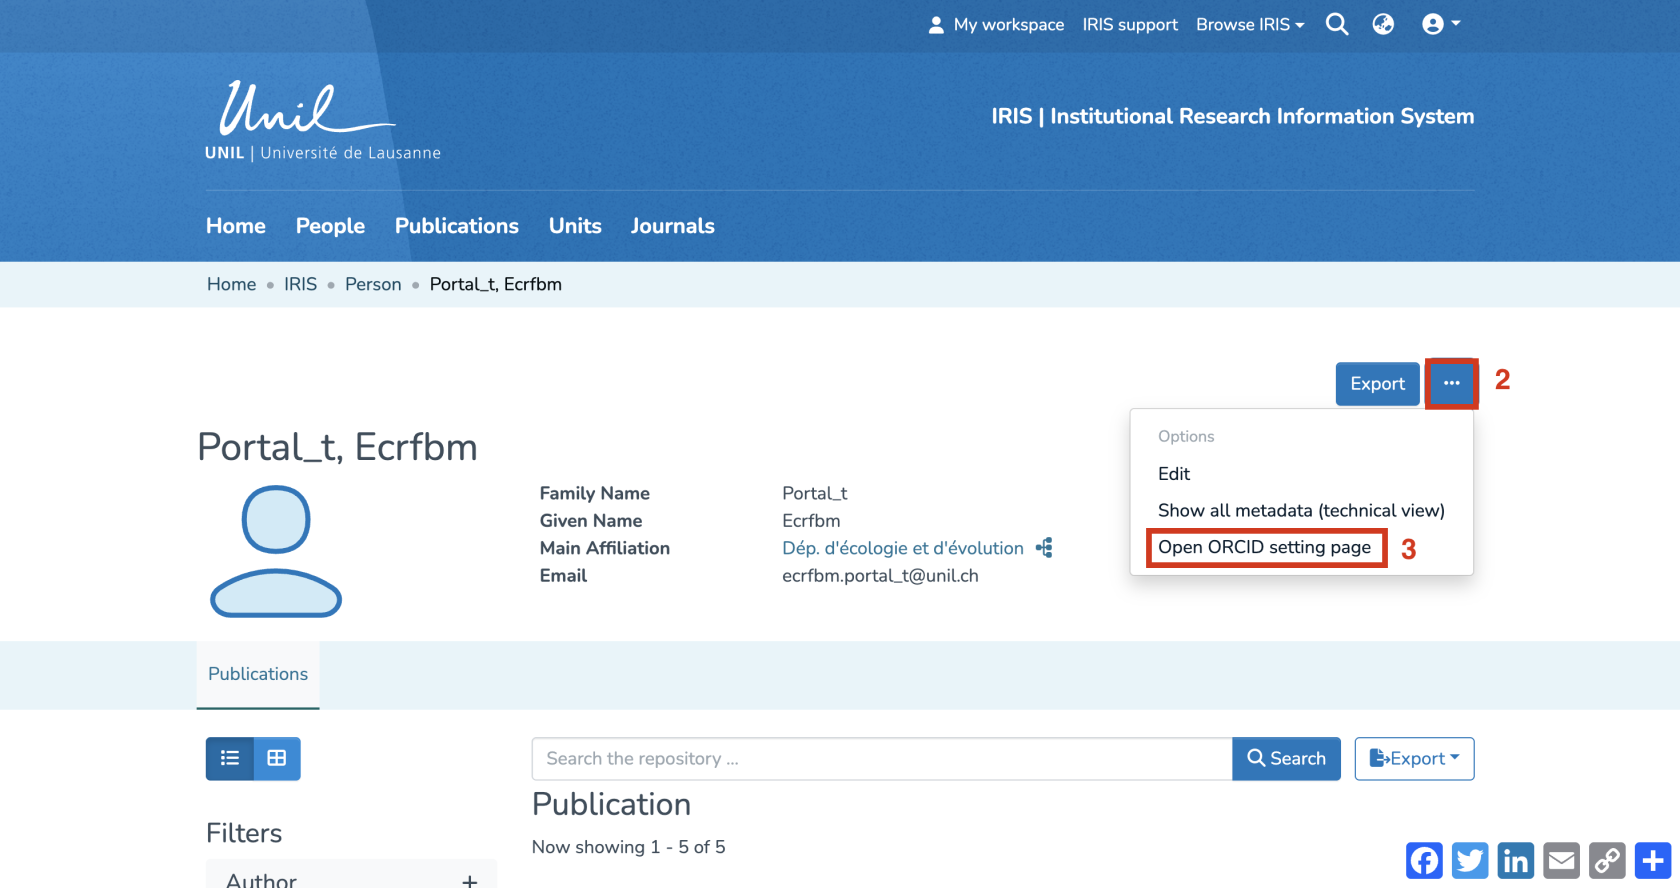
1. You are now on your researcher profile page.
2. Click on the three-dot icon to open the options menu.
3. Select “Open ORCID setting page.” [![image.png](https://wiki.unil.ch/recherche/uploads/images/gallery/2025-09/scaled-1680-/N8Fimage.png)](https://wiki.unil.ch/recherche/uploads/images/gallery/2025-09/N8Fimage.png)
#### Connect Your ORCID ID

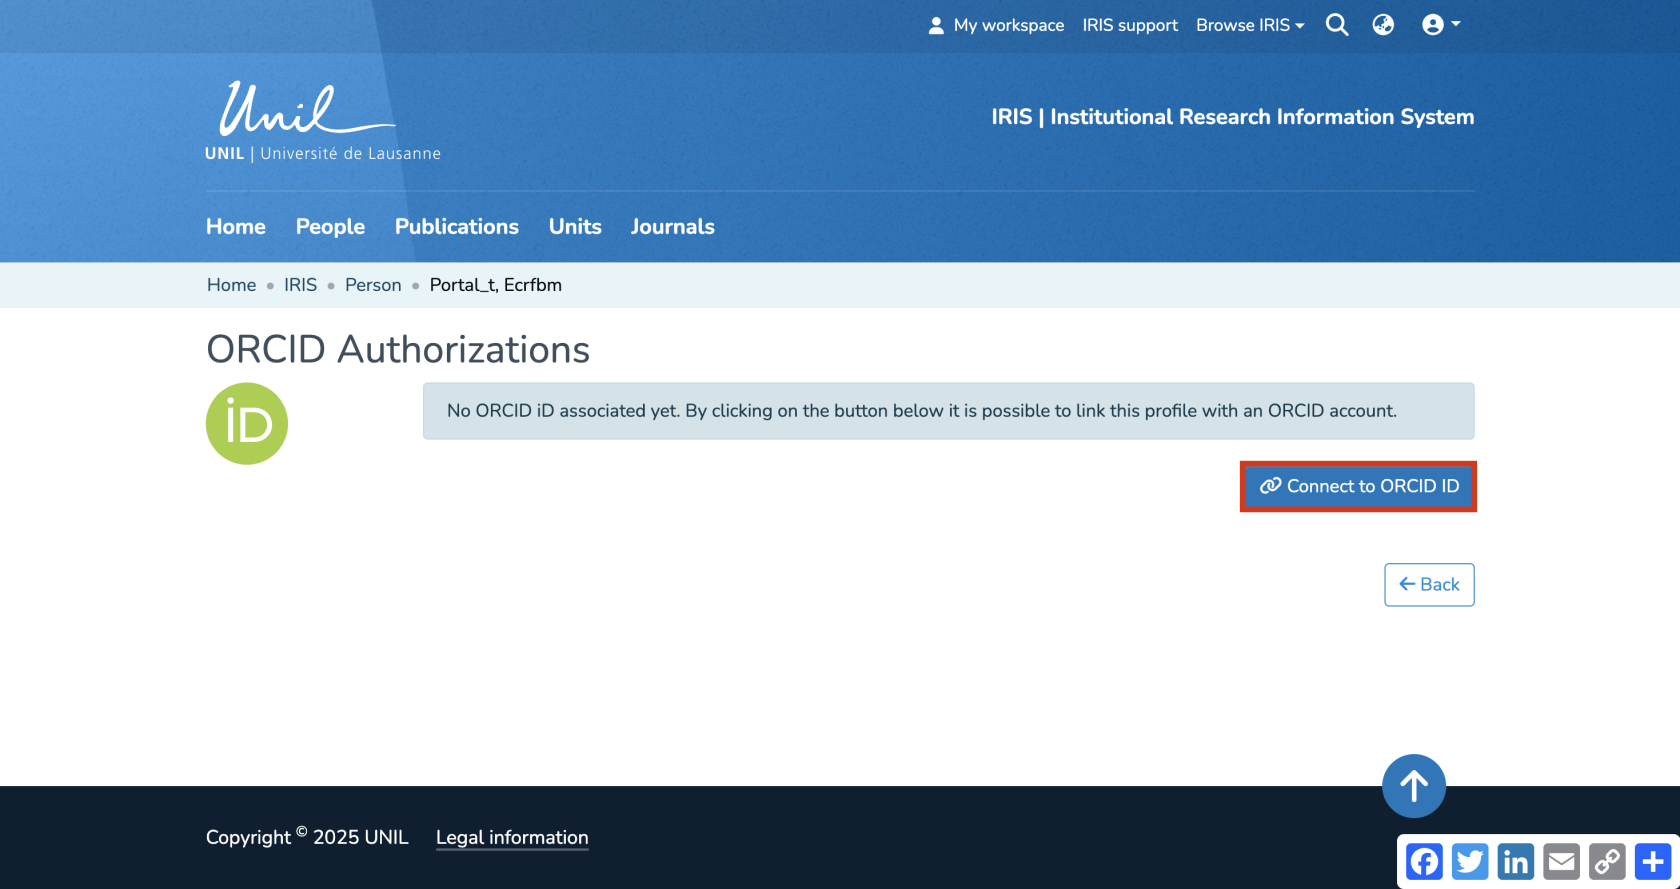
1. On the “ORCID Authorizations” page, click on “Connect to ORCID ID.” [![image.png](https://wiki.unil.ch/recherche/uploads/images/gallery/2025-09/scaled-1680-/1koimage.png)](https://wiki.unil.ch/recherche/uploads/images/gallery/2025-09/1koimage.png)
2. A new ORCID page will open, asking you to enter your ORCID login information to authorize the link with IRIS. [![image.png](https://wiki.unil.ch/recherche/uploads/images/gallery/2025-07/scaled-1680-/Flwimage.png)](https://wiki.unil.ch/recherche/uploads/images/gallery/2025-07/Flwimage.png)
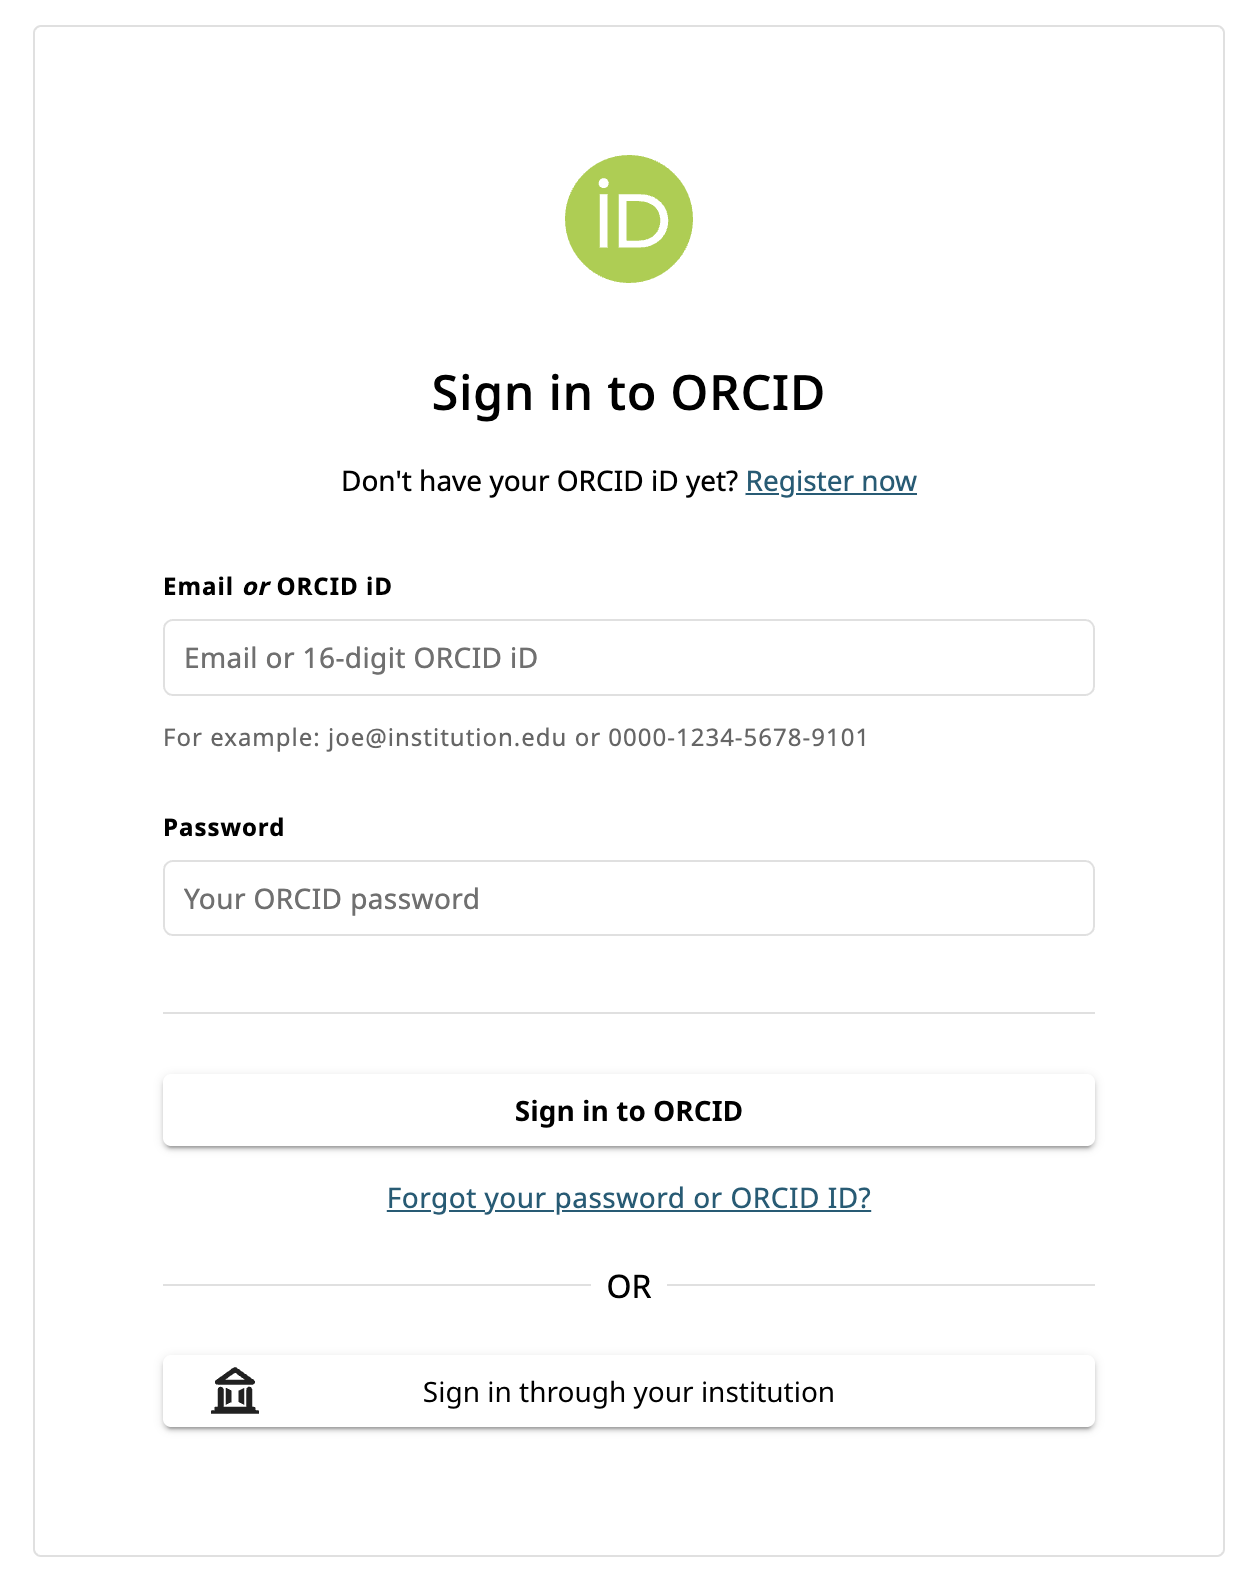
3. Once access is granted, your ORCID and IRIS profiles will be synchronized.
4. Linking your ORCID account to IRIS enables communication between the two systems. However, publications will not be transferred automatically.  
    When a new publication is added to your ORCID profile, IRIS will notify you upon your next login and guide you through a [simplified process](https://wiki.unil.ch/recherche/books/user-guide/page/manual-import-of-orcid-publications-into-iris) to add it to your IRIS profile.

# Importing individual items into IRIS (DOI/PMID/ORCID)

#### <span style="color: rgb(0, 0, 0);"><iframe allowfullscreen="allowfullscreen" class=" align-center" height="314" src="https://www.youtube.com/embed/FuLFRUzZg84" width="560"></iframe>

</span>

<p class="callout warning"><span style="color: rgb(0, 0, 0);">*The voice in this video was generated by artificial intelligence.*</span></p>

#### <span style="color: rgb(0, 0, 0);">Access Your Workspace</span>

  
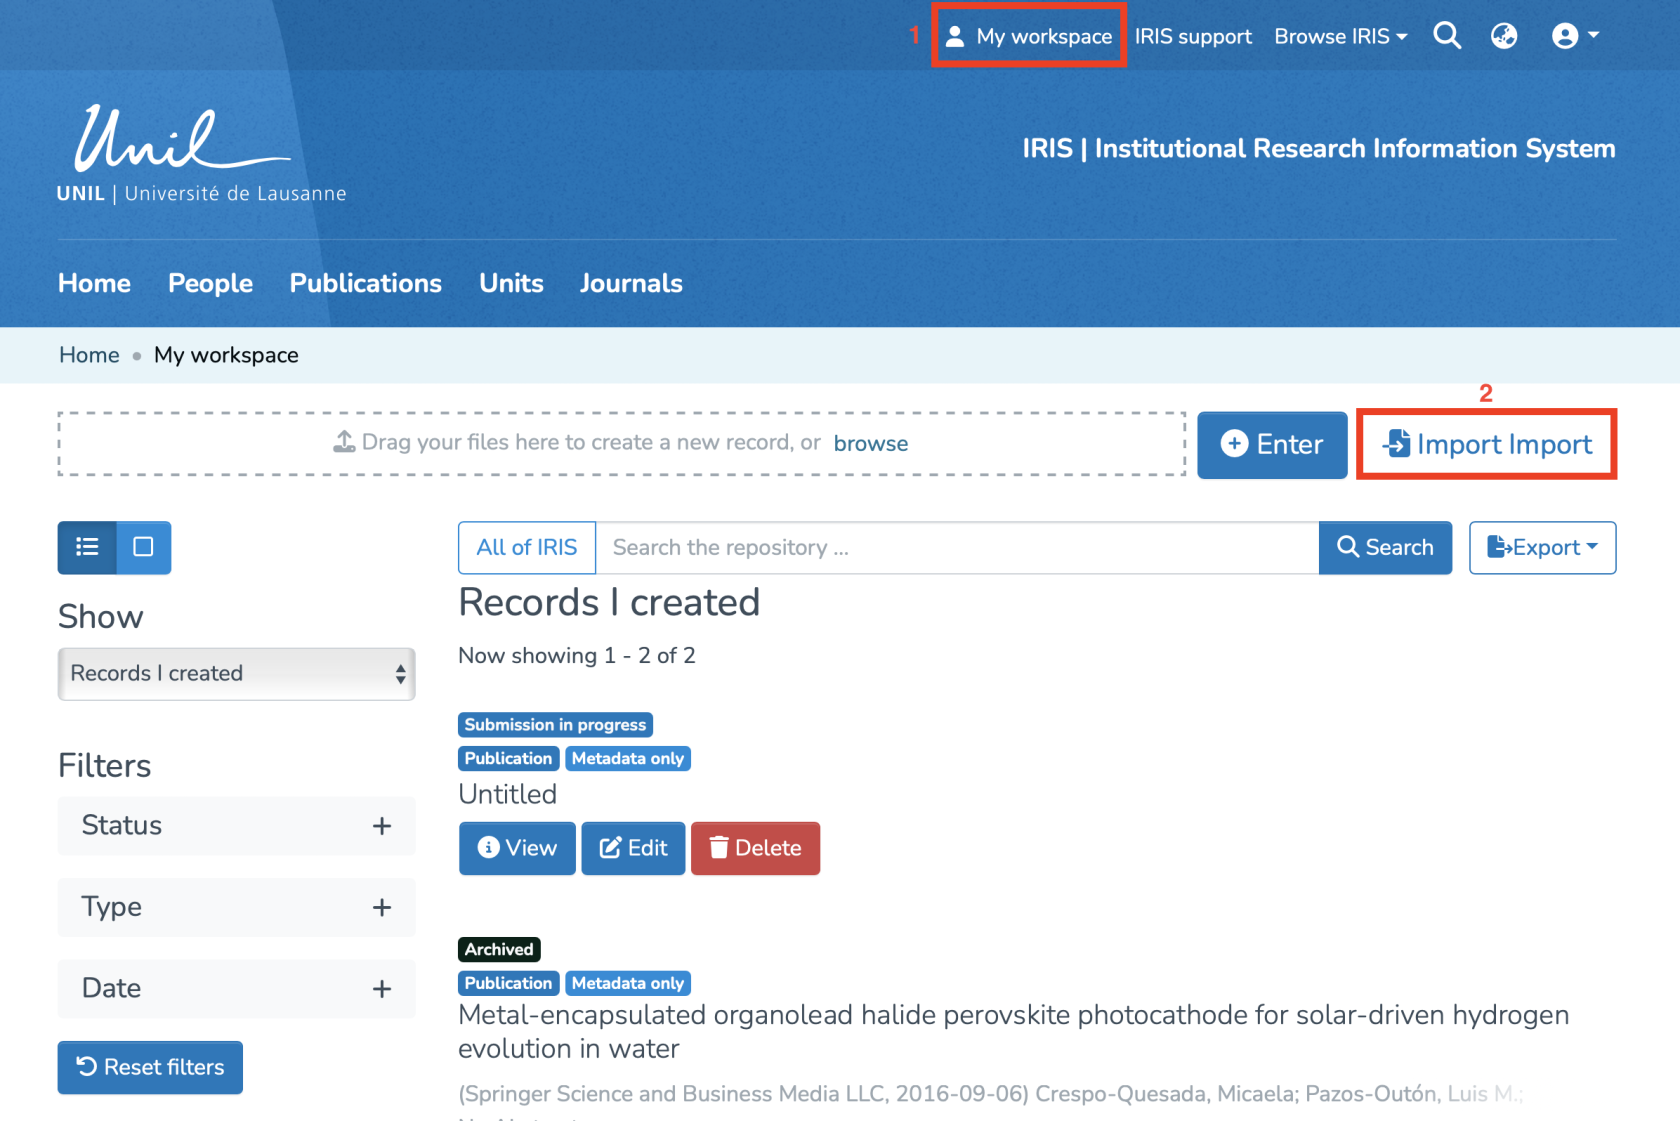
<span style="color: rgb(0, 0, 0);">The import of individual items into IRIS is done from your workspace:</span>

1. <span style="color: rgb(0, 0, 0);">Click on **“My Workspace.”**</span>
2. <span style="color: rgb(0, 0, 0);">Click on **“Import”** to be redirected to the import page.</span>

[![Capture d’écran 2025-07-31 à 12.26.15.png](https://wiki.unil.ch/recherche/uploads/images/gallery/2025-07/scaled-1680-/capture-decran-2025-07-31-a-12-26-15.png)](https://wiki.unil.ch/recherche/uploads/images/gallery/2025-07/capture-decran-2025-07-31-a-12-26-15.png)

#### <span style="color: rgb(0, 0, 0);">Importing Items</span>

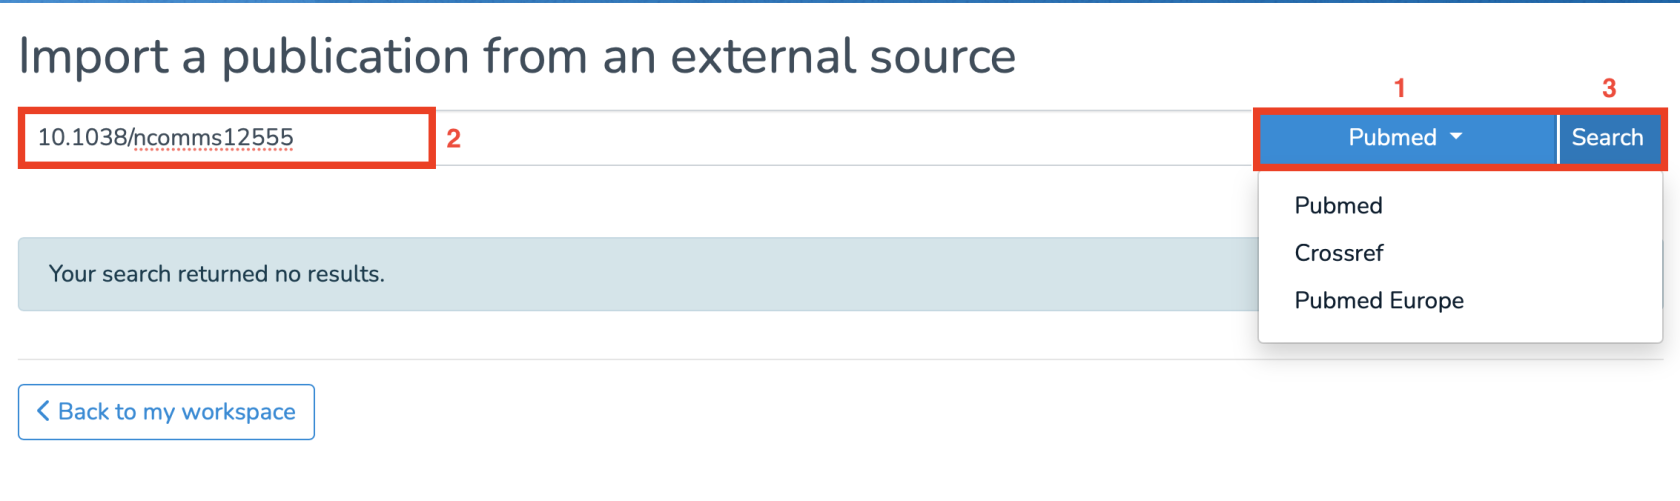
<span style="color: rgb(0, 0, 0);">On the import page:</span>

1. <span style="color: rgb(0, 0, 0);">Click on (1) to select the type of entry (PubMed/DOI).</span>
2. <span style="color: rgb(0, 0, 0);">Enter the corresponding source for your choice.</span>
3. <span style="color: rgb(0, 0, 0);">Click on **“Search.”**</span>

[![Capture d’écran 2025-07-31 à 12.33.52.png](https://wiki.unil.ch/recherche/uploads/images/gallery/2025-07/scaled-1680-/capture-decran-2025-07-31-a-12-33-52.png)](https://wiki.unil.ch/recherche/uploads/images/gallery/2025-07/capture-decran-2025-07-31-a-12-33-52.png)

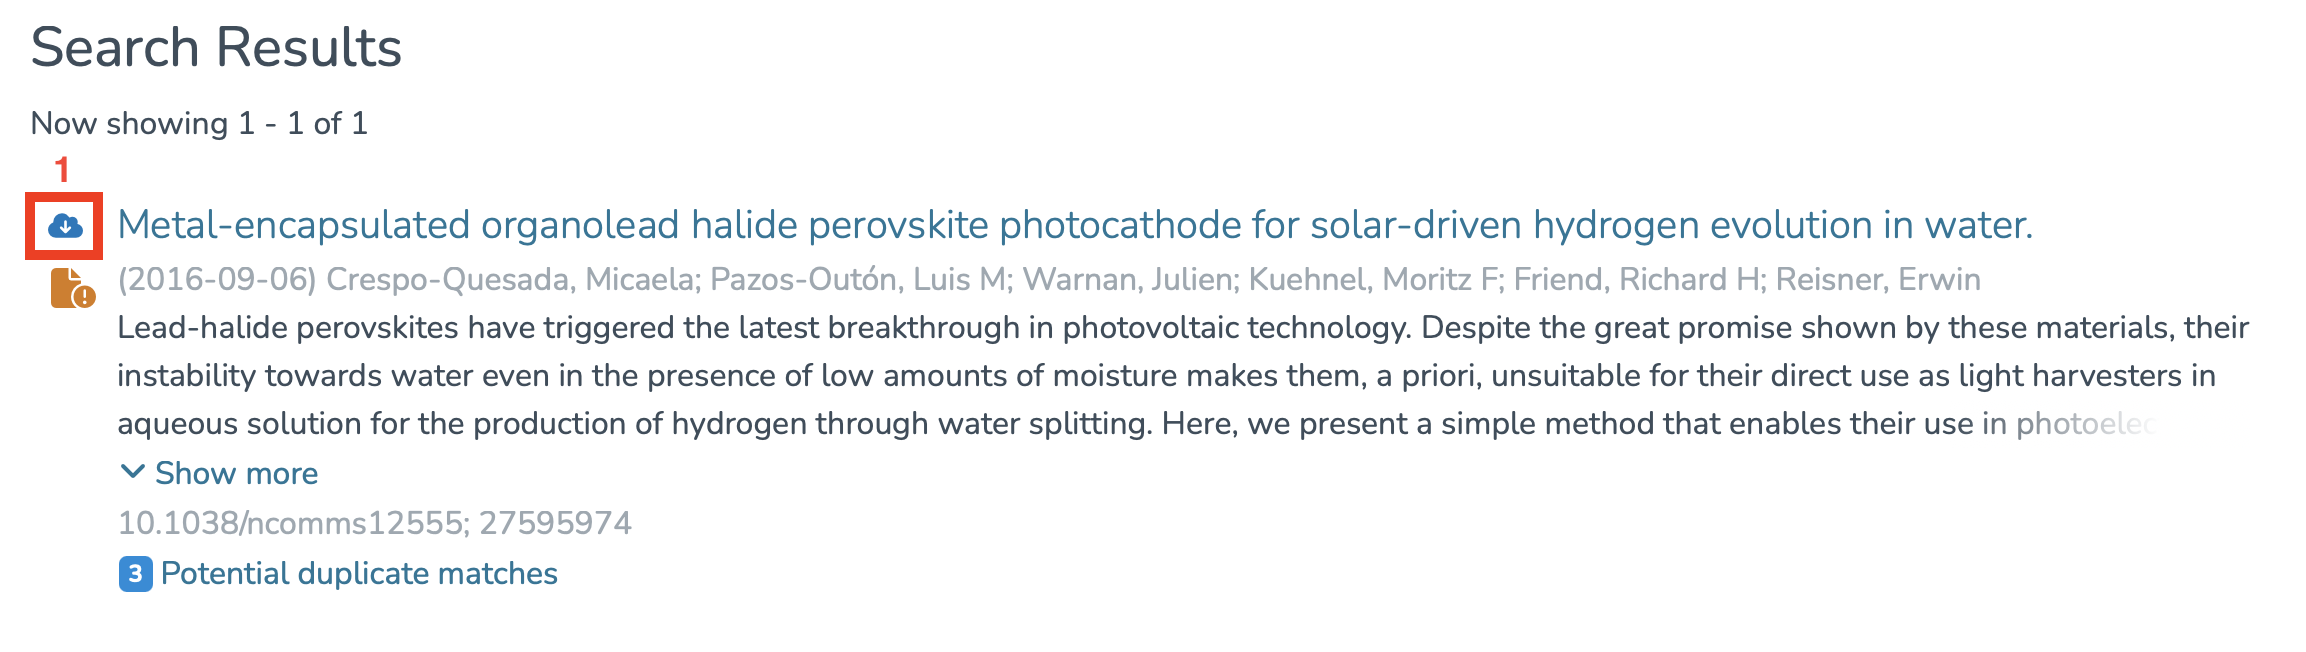
<span style="color: rgb(0, 0, 0);">You will see the results related to your search and will need to click on (1) to import.</span>

[![Capture d’écran 2025-07-31 à 12.35.19.png](https://wiki.unil.ch/recherche/uploads/images/gallery/2025-07/scaled-1680-/capture-decran-2025-07-31-a-12-35-19.png)](https://wiki.unil.ch/recherche/uploads/images/gallery/2025-07/capture-decran-2025-07-31-a-12-35-19.png)

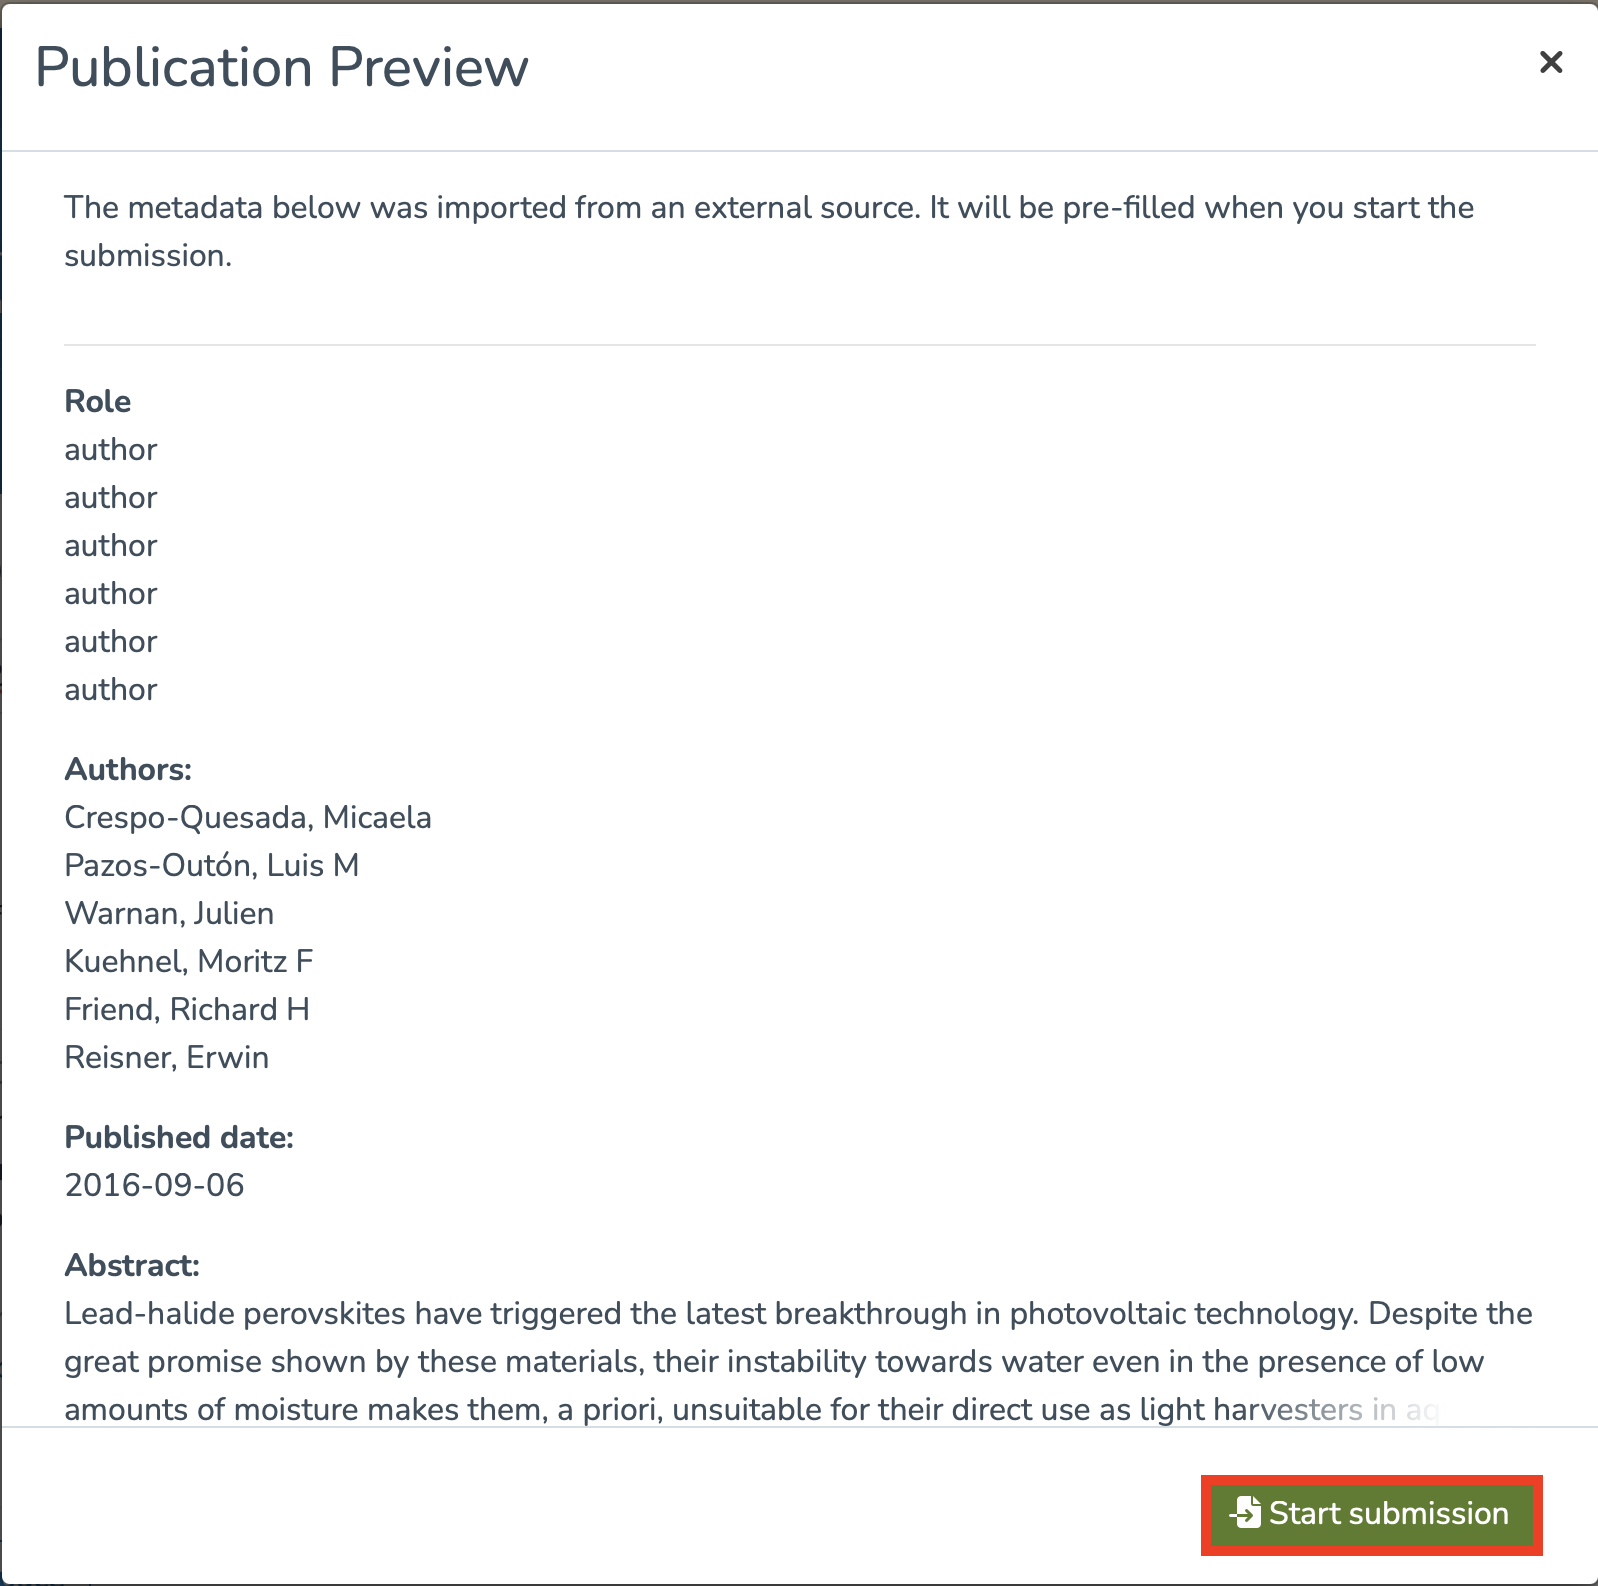
<span style="color: rgb(0, 0, 0);">You will then be redirected to a page containing the metadata of the search result and will need to click on **“Start Submission”** to begin the import process.</span>

[![Capture d’écran 2025-07-31 à 12.36.13.png](https://wiki.unil.ch/recherche/uploads/images/gallery/2025-07/scaled-1680-/capture-decran-2025-07-31-a-12-36-13.png)](https://wiki.unil.ch/recherche/uploads/images/gallery/2025-07/capture-decran-2025-07-31-a-12-36-13.png)

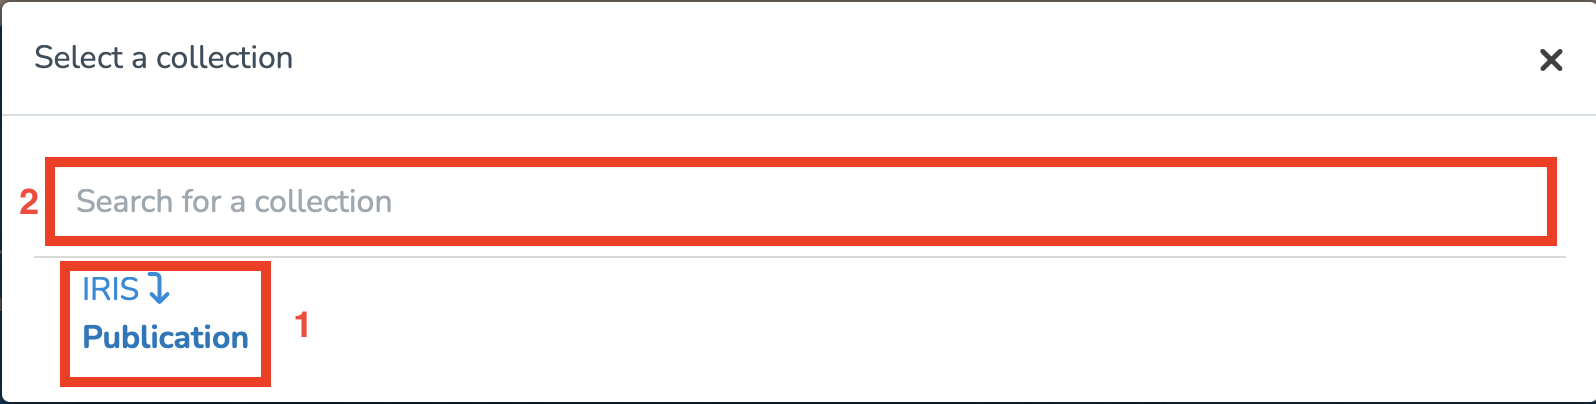
<span style="color: rgb(0, 0, 0);">Once this is done, you will need to select a collection in which to import the item:</span>

- <span style="color: rgb(0, 0, 0);">You can choose the proposed collection,</span>
- <span style="color: rgb(0, 0, 0);">Or manually enter a collection.</span>

[![Capture d’écran 2025-07-31 à 12.37.02.png](https://wiki.unil.ch/recherche/uploads/images/gallery/2025-07/scaled-1680-/capture-decran-2025-07-31-a-12-37-02.png)](https://wiki.unil.ch/recherche/uploads/images/gallery/2025-07/capture-decran-2025-07-31-a-12-37-02.png)

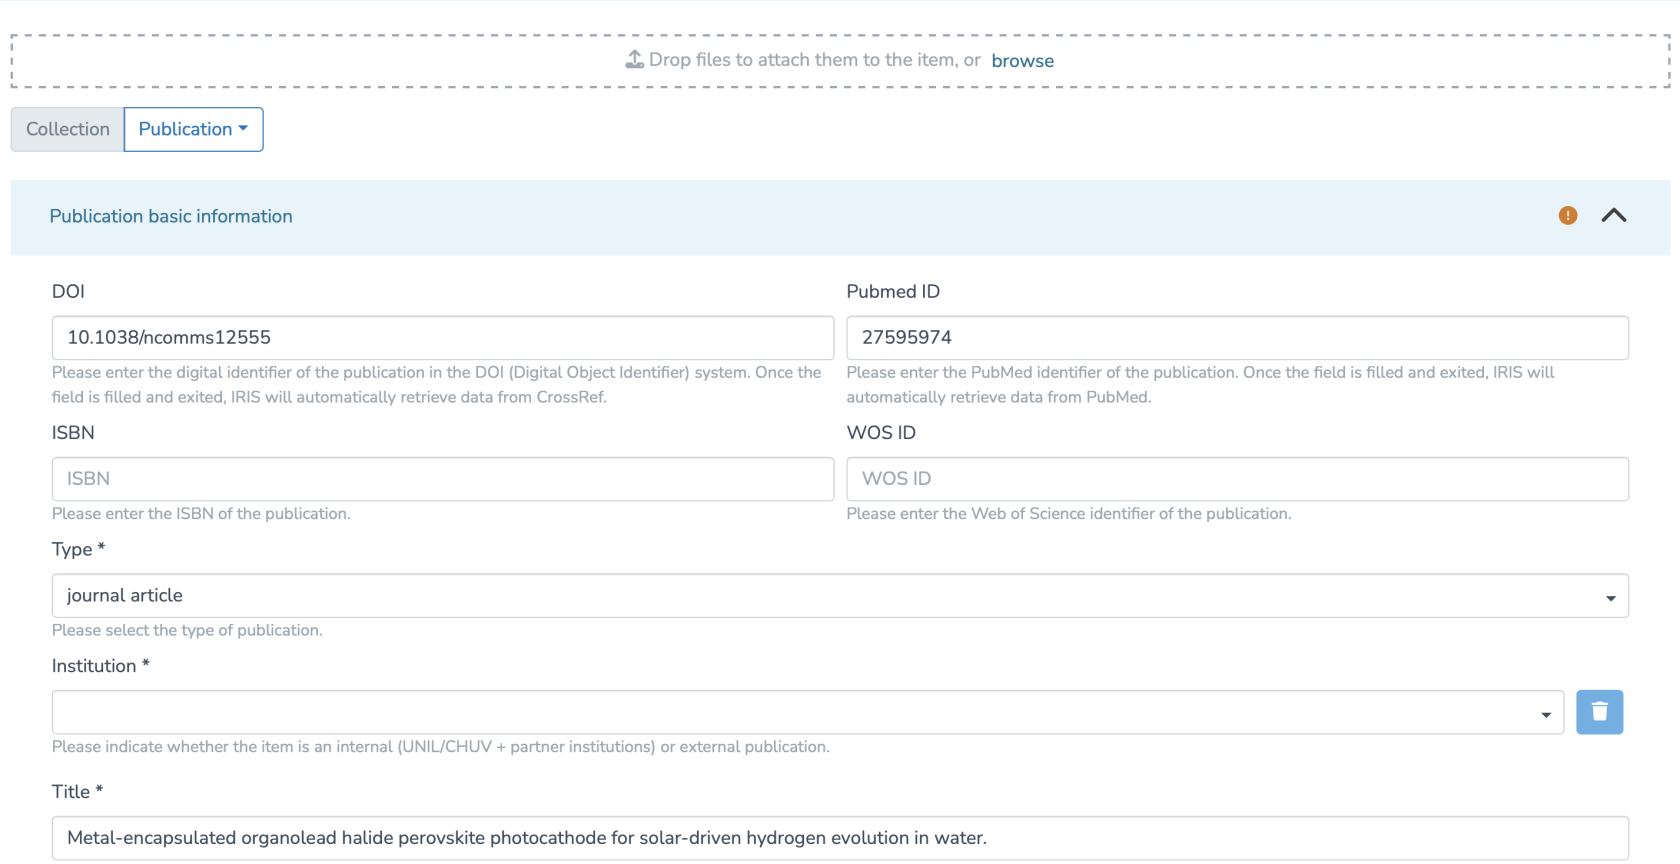
<span style="color: rgb(0, 0, 0);">You will then access the entry form.</span>

<span style="color: rgb(0, 0, 0);">**Note:** Fields marked with a “\*” are mandatory and must be completed if they are not already filled in.</span>

[![Capture d’écran 2025-07-31 à 12.38.49.png](https://wiki.unil.ch/recherche/uploads/images/gallery/2025-07/scaled-1680-/capture-decran-2025-07-31-a-12-38-49.png)](https://wiki.unil.ch/recherche/uploads/images/gallery/2025-07/capture-decran-2025-07-31-a-12-38-49.png)

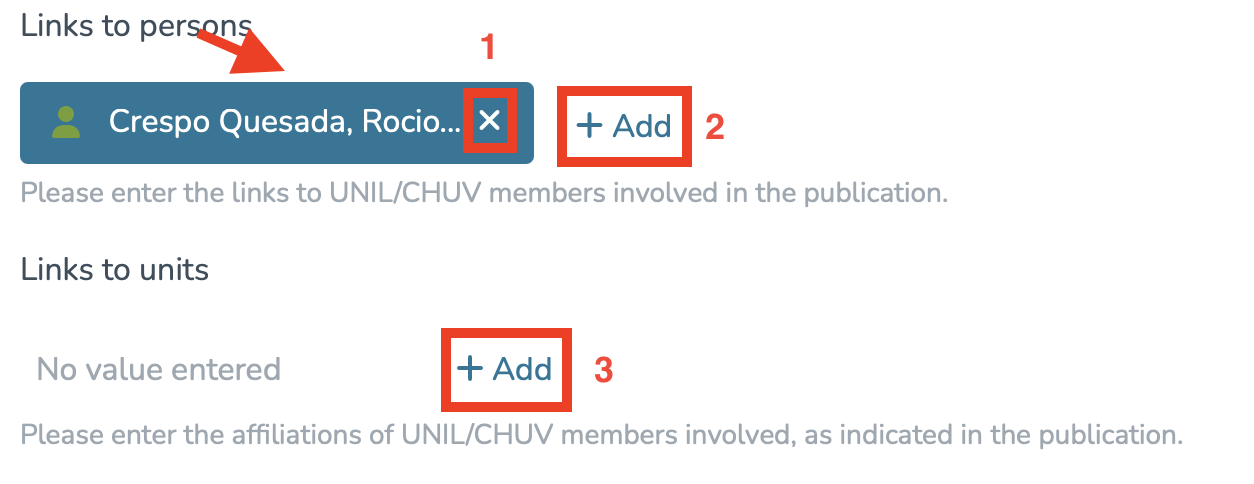
<span style="color: rgb(0, 0, 0);">Make sure to fill in the two following fields by clicking on **“Add”**:</span>

- <span style="color: rgb(0, 0, 0);">Links to people (Internal &amp; external publication to UNIL/CHUV/Unisanté).</span>
- <span style="color: rgb(0, 0, 0);">Links to units (Only internal publication to UNIL/CHUV/Unisanté).</span>

[![Capture d’écran 2025-07-31 à 12.20.44.png](https://wiki.unil.ch/recherche/uploads/images/gallery/2025-07/scaled-1680-/zaocapture-decran-2025-07-31-a-12-20-44.png)](https://wiki.unil.ch/recherche/uploads/images/gallery/2025-07/zaocapture-decran-2025-07-31-a-12-20-44.png)

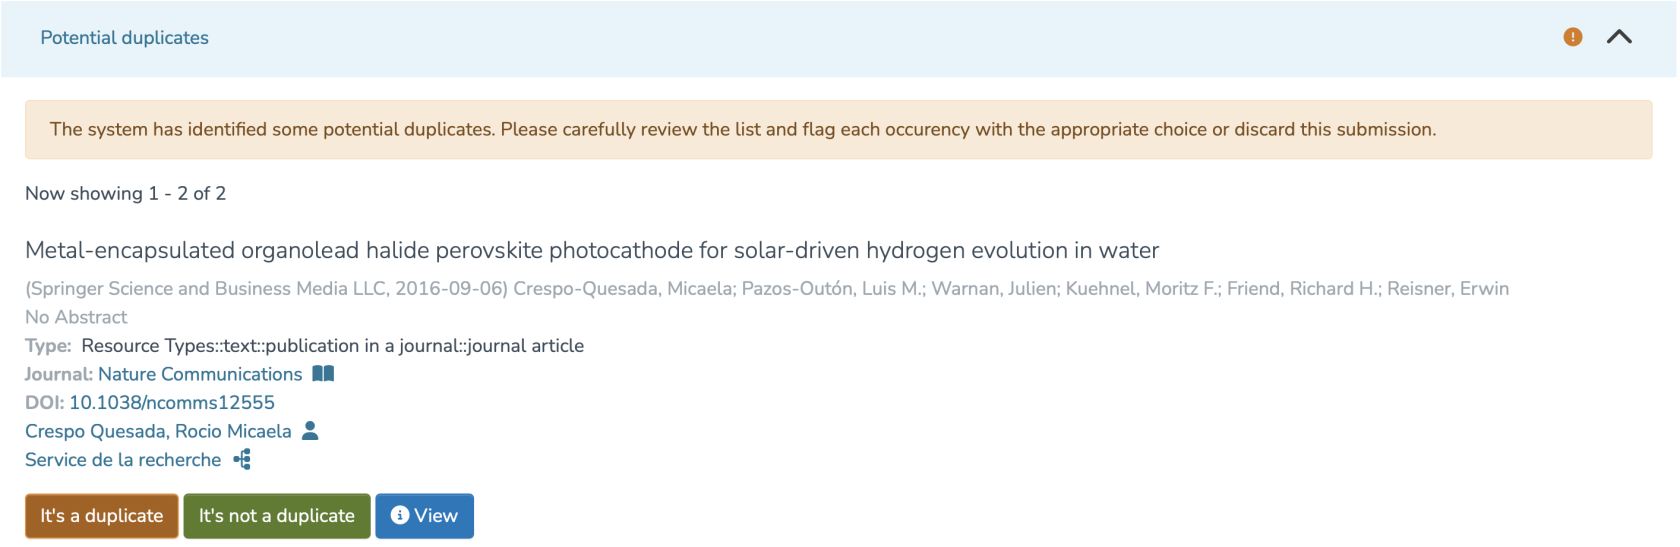
<span style="color: rgb(0, 0, 0);">The system will then suggest a list of potential duplicates. You must go through each suggested publication and specify whether it is a duplicate by clicking **“It is a duplicate”** or **“It is not a duplicate,”** as appropriate.</span>

<span style="color: rgb(0, 0, 0);">**Note:** Make sure to review every publication, as multiple pages may be available.</span>

[![Capture d’écran 2025-07-31 à 12.40.50.png](https://wiki.unil.ch/recherche/uploads/images/gallery/2025-07/scaled-1680-/capture-decran-2025-07-31-a-12-40-50.png)](https://wiki.unil.ch/recherche/uploads/images/gallery/2025-07/capture-decran-2025-07-31-a-12-40-50.png)

<span style="color: rgb(0, 0, 0);">Once these steps are completed, you will need to:</span>

- <span style="color: rgb(0, 0, 0);">Approve the license by checking the indicated box.</span>
- <span style="color: rgb(0, 0, 0);">Choose whether to **save** or **publish** your import immediately.</span>

[![Capture d’écran 2025-07-31 à 12.03.09.png](https://wiki.unil.ch/recherche/uploads/images/gallery/2025-07/scaled-1680-/Krdcapture-decran-2025-07-31-a-12-03-09.png)](https://wiki.unil.ch/recherche/uploads/images/gallery/2025-07/Krdcapture-decran-2025-07-31-a-12-03-09.png)

<span style="color: rgb(0, 0, 0);">After publishing your import, you can access its metadata as follows:</span>

- <span style="color: rgb(0, 0, 0);">Access your workspace.</span>
- <span style="color: rgb(0, 0, 0);">Click on **“View.”**</span>

[![Capture d’écran 2025-07-31 à 12.04.40.png](https://wiki.unil.ch/recherche/uploads/images/gallery/2025-07/scaled-1680-/zOBcapture-decran-2025-07-31-a-12-04-40.png)](https://wiki.unil.ch/recherche/uploads/images/gallery/2025-07/zOBcapture-decran-2025-07-31-a-12-04-40.png)

# Exporting Publications from IRIS to ORCID

To export your publications from IRIS into ORCID, you must first ensure that your ORCID settings page is correctly configured. To do this, you need to access your researcher profile.

#### Access your researcher profile

***Accessing Your Profile via the Login Menu***

1. From the IRIS homepage, click on the login menu.[![image.png](https://wiki.unil.ch/recherche/uploads/images/gallery/2025-09/scaled-1680-/E94image.png)](https://wiki.unil.ch/recherche/uploads/images/gallery/2025-09/E94image.png)

2. In the dropdown menu, select “My account and profile.”[![image.png](https://wiki.unil.ch/recherche/uploads/images/gallery/2025-09/scaled-1680-/2sJimage.png)](https://wiki.unil.ch/recherche/uploads/images/gallery/2025-09/2sJimage.png)

3. You’ll be redirected to a page titled “Update Profile”. Click on “View” to open the full version of your profile.[![image.png](https://wiki.unil.ch/recherche/uploads/images/gallery/2025-09/scaled-1680-/XNPimage.png)](https://wiki.unil.ch/recherche/uploads/images/gallery/2025-09/XNPimage.png)

***Accessing Your Profile via Search***

1. From the IRIS homepage, click on “People.”[![Capture d’écran 2025-07-31 à 12.14.11.png](https://wiki.unil.ch/recherche/uploads/images/gallery/2025-07/scaled-1680-/capture-decran-2025-07-31-a-12-14-11.png)](https://wiki.unil.ch/recherche/uploads/images/gallery/2025-07/capture-decran-2025-07-31-a-12-14-11.png)

2. In the search bar that appears, enter your name (a), then click “Search” (b).
3. Once the search is complete, your profile will appear in the results. Click on your name (c).[![image.png](https://wiki.unil.ch/recherche/uploads/images/gallery/2025-09/scaled-1680-/0ukimage.png)](https://wiki.unil.ch/recherche/uploads/images/gallery/2025-09/0ukimage.png)

#### Open ORCID Settings

1. You are now on your researcher profile page.
2. Click on the three-dot icon to open the options menu.
3. Select “Open ORCID setting page.” [![image.png](https://wiki.unil.ch/recherche/uploads/images/gallery/2025-09/scaled-1680-/N8Fimage.png)](https://wiki.unil.ch/recherche/uploads/images/gallery/2025-09/N8Fimage.png)

#### Verifying Synchronization Settings

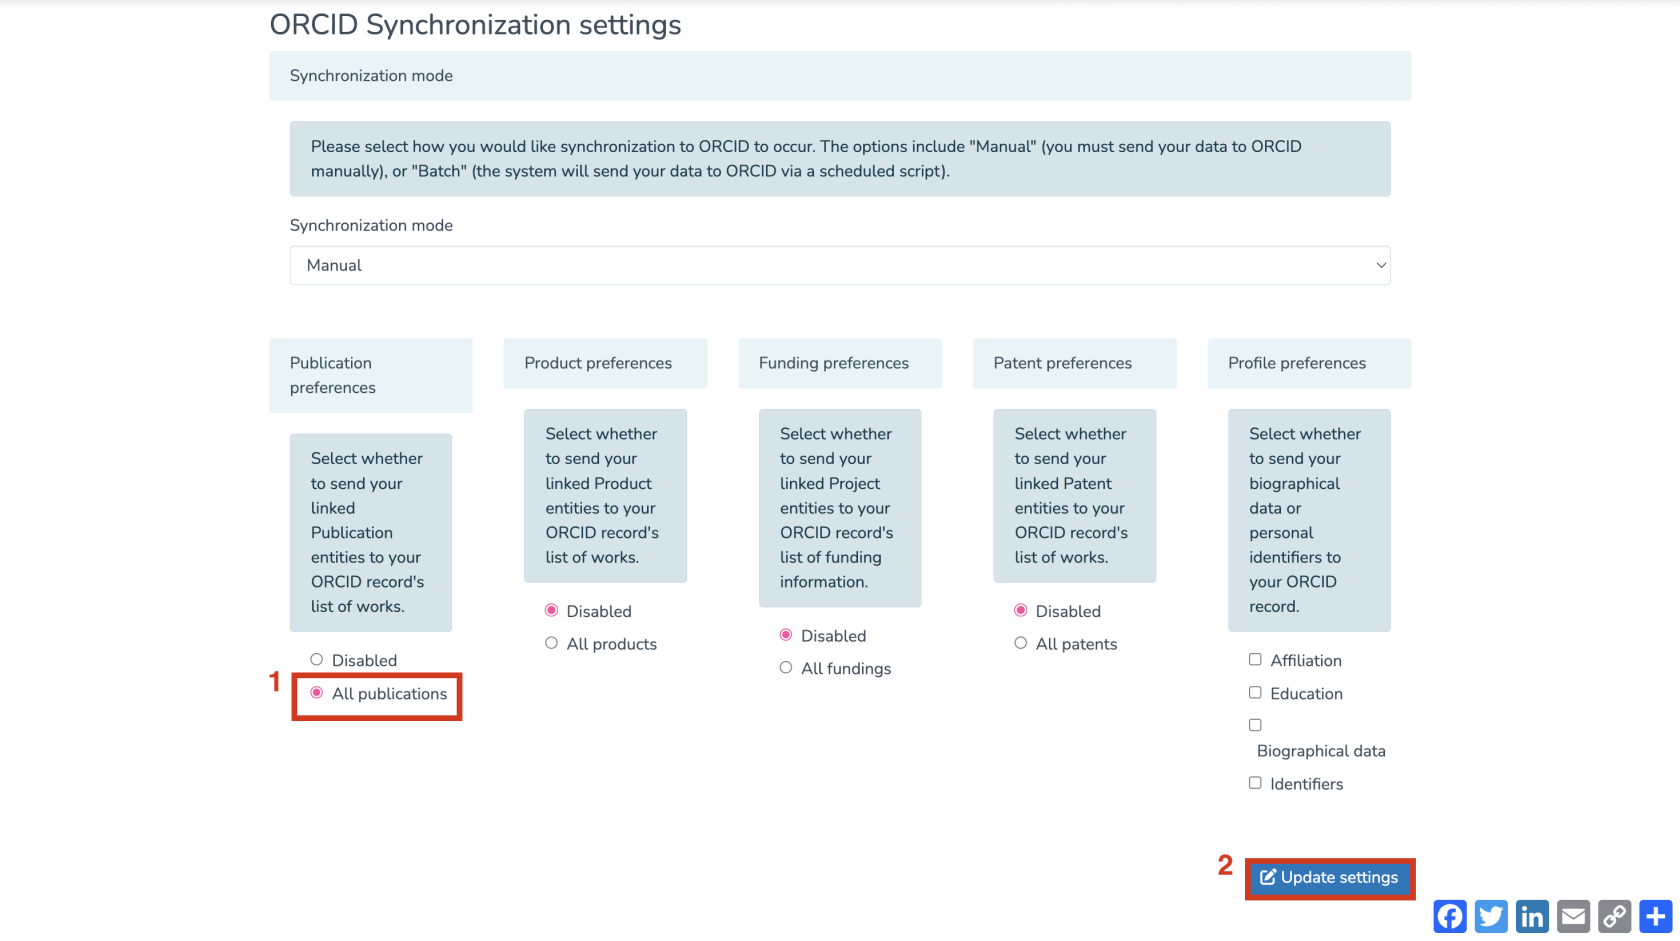
1. In the “ORCID Synchronization settings” section, make sure “All publications” is selected under “Publication preferences.” This will enable synchronization of your works with ORCID. If needed, you can also select the same option for products, funding, and patents.
2. Once your preferences are set, click “Update settings.” [![image.png](https://wiki.unil.ch/recherche/uploads/images/gallery/2025-10/scaled-1680-/oCsimage.png)](https://wiki.unil.ch/recherche/uploads/images/gallery/2025-10/oCsimage.png)
#### Exporting Publications

1. The page will refresh automatically. Under the section “ORCID Registry Queue”, you should see the list of publications ready to be exported. For each publication, click the “+” button to add a new entry to your ORCID record.
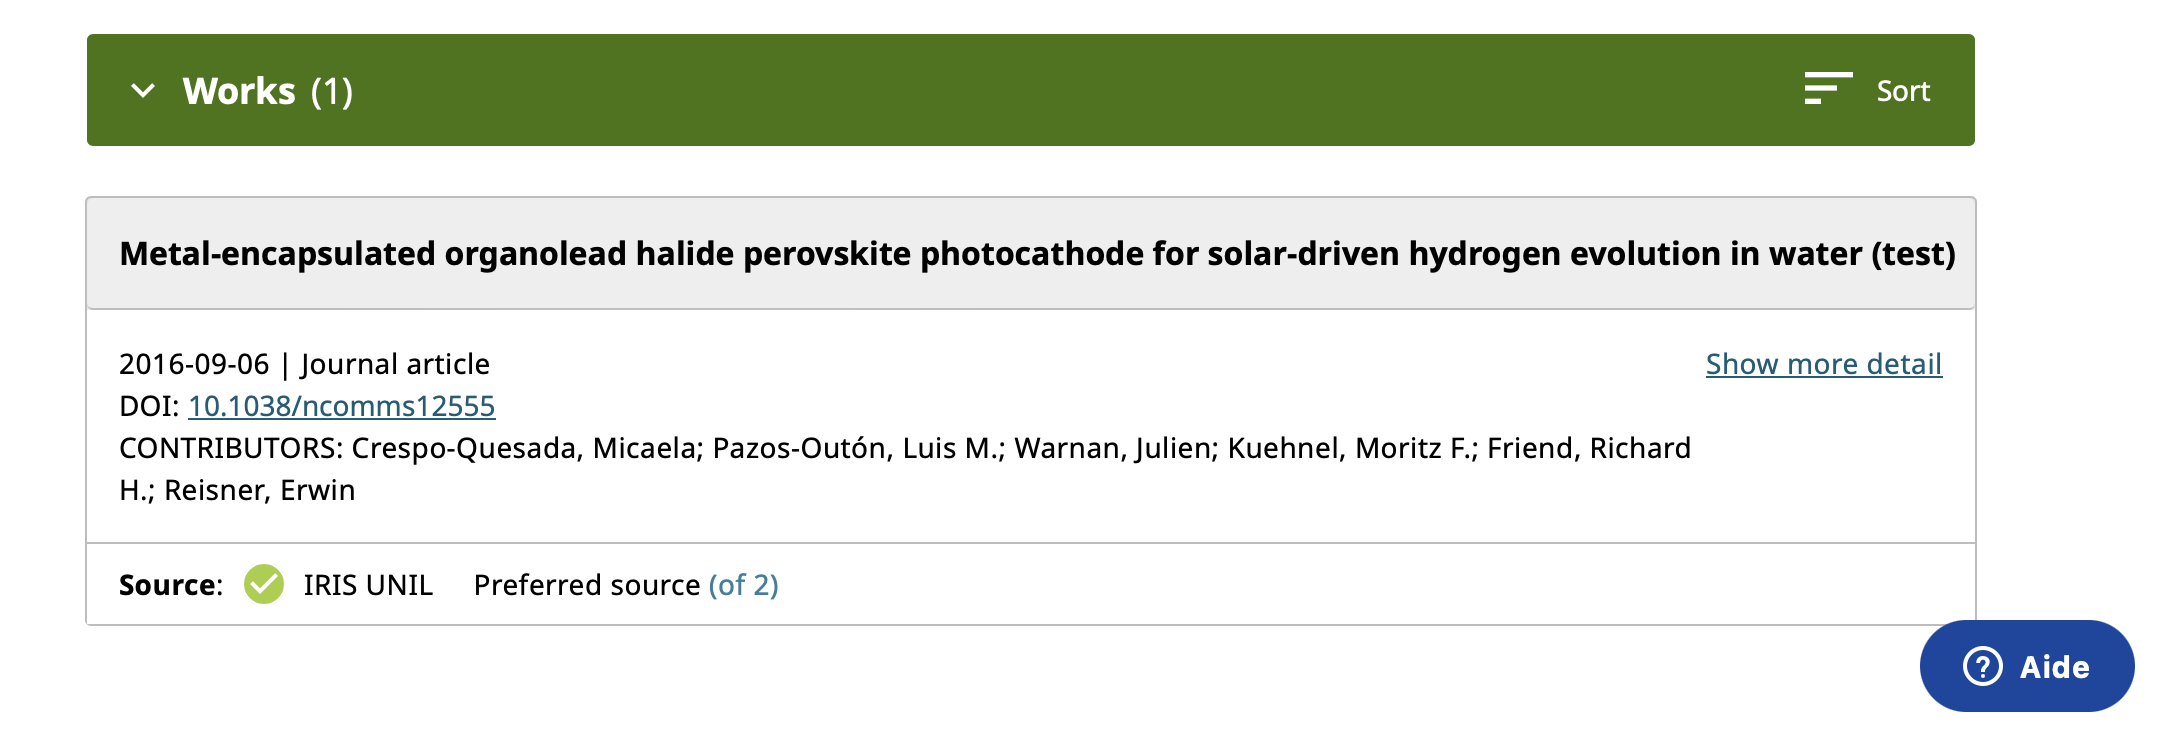
2. Once the export is complete, you can check your ORCID profile to ensure the publication has been successfully added. It should appear under the “Works” section of your ORCID profile. [![image.png](https://wiki.unil.ch/recherche/uploads/images/gallery/2025-10/scaled-1680-/9ZMimage.png)](https://wiki.unil.ch/recherche/uploads/images/gallery/2025-10/9ZMimage.png)
# Manual import of ORCID publications into IRIS

<p class="callout warning">FBM members are requested not to import their references and to contact <open.access@chuv.ch>.</p>

If a publication is detected on your ORCID profile, you should receive a notification in IRIS suggesting that publications are available for import. Click on "review the suggestions" to begin the import process.[![image.png](https://wiki.unil.ch/recherche/uploads/images/gallery/2025-10/scaled-1680-/NbYimage.png)](https://wiki.unil.ch/recherche/uploads/images/gallery/2025-10/NbYimage.png)

[![image.png](https://wiki.unil.ch/recherche/uploads/images/gallery/2025-10/scaled-1680-/xGbimage.png)](https://wiki.unil.ch/recherche/uploads/images/gallery/2025-10/xGbimage.png)

You will also be notified via your Workspace and User Account.

[![image.png](https://wiki.unil.ch/recherche/uploads/images/gallery/2025-10/scaled-1680-/7fuimage.png)](https://wiki.unil.ch/recherche/uploads/images/gallery/2025-10/7fuimage.png)

[![image.png](https://wiki.unil.ch/recherche/uploads/images/gallery/2025-10/scaled-1680-/Nt1image.png)](https://wiki.unil.ch/recherche/uploads/images/gallery/2025-10/Nt1image.png)

#### Selecting Publications to Import

1. IRIS will then display a list of publications retrieved from ORCID. If any of the publications do not concern you, simply click “This record does not concern me.” [![image.png](https://wiki.unil.ch/recherche/uploads/images/gallery/2025-10/scaled-1680-/o1bimage.png)](https://wiki.unil.ch/recherche/uploads/images/gallery/2025-10/o1bimage.png)
2. If, on the contrary, you wish to import one or several of them, check the corresponding box(es), then click “Accept and create draft.” [![image.png](https://wiki.unil.ch/recherche/uploads/images/gallery/2025-10/scaled-1680-/0olimage.png)](https://wiki.unil.ch/recherche/uploads/images/gallery/2025-10/0olimage.png)
3. In the drop-down menu that appears, select “Publication.” [![image.png](https://wiki.unil.ch/recherche/uploads/images/gallery/2025-10/scaled-1680-/Bqrimage.png)](https://wiki.unil.ch/recherche/uploads/images/gallery/2025-10/Bqrimage.png)

#### Creation in IRIS

Once this is done, you will be redirected to your workspace, where the imported publications will appear under “Submission in progress”, in the “Records I Created” section. At this stage, you can still edit the publication before publishing it.

[![image.png](https://wiki.unil.ch/recherche/uploads/images/gallery/2025-10/scaled-1680-/leFimage.png)](https://wiki.unil.ch/recherche/uploads/images/gallery/2025-10/leFimage.png)

# Importing ORCID publications into IRIS from an external source

<p class="callout warning">FBM members are requested not to import their references and to contact <open.access@chuv.ch>.</p>

It is possible to import ORCID publications into IRIS from an external source, either from your own ORCID profile or from another researcher’s profile. The advantage of this method is that it allows duplicate records to be detected before the import. Here’s how to proceed:

#### Accessing the Import Function

1. Go to your Workspace in IRIS.
2. Click on “Import” to start the import process.[![Capture d’écran 2025-07-31 à 12.26.15.png](https://wiki.unil.ch/recherche/uploads/images/gallery/2025-07/scaled-1680-/capture-decran-2025-07-31-a-12-26-15.png)](https://wiki.unil.ch/recherche/uploads/images/gallery/2025-07/capture-decran-2025-07-31-a-12-26-15.png)
3. Since the publications you want to import come from an ORCID profile, click on the drop-down menu, scroll through the list, and select ORCID as the import source. [![image.png](https://wiki.unil.ch/recherche/uploads/images/gallery/2025-10/scaled-1680-/pdvimage.png)](https://wiki.unil.ch/recherche/uploads/images/gallery/2025-10/pdvimage.png)
4. In the search field, enter the ORCID ID of the profile from which you wish to import publications (your own or another person's).
5. Then click on “Search.” [![image.png](https://wiki.unil.ch/recherche/uploads/images/gallery/2025-10/scaled-1680-/Lj9image.png)](https://wiki.unil.ch/recherche/uploads/images/gallery/2025-10/Lj9image.png)

#### Viewing Available Publications &amp; Checking for Duplicates

1. Once the search is complete, all publications associated with the selected ORCID profile will be displayed. [![image.png](https://wiki.unil.ch/recherche/uploads/images/gallery/2025-10/scaled-1680-/Wbpimage.png)](https://wiki.unil.ch/recherche/uploads/images/gallery/2025-10/Wbpimage.png)
2. One key advantage of this method is that IRIS automatically detects duplicates before the import.
3. Under each publication, you’ll find a section titled “Potential duplicate matches.” [![image.png](https://wiki.unil.ch/recherche/uploads/images/gallery/2025-10/scaled-1680-/HZQimage.png)](https://wiki.unil.ch/recherche/uploads/images/gallery/2025-10/HZQimage.png)
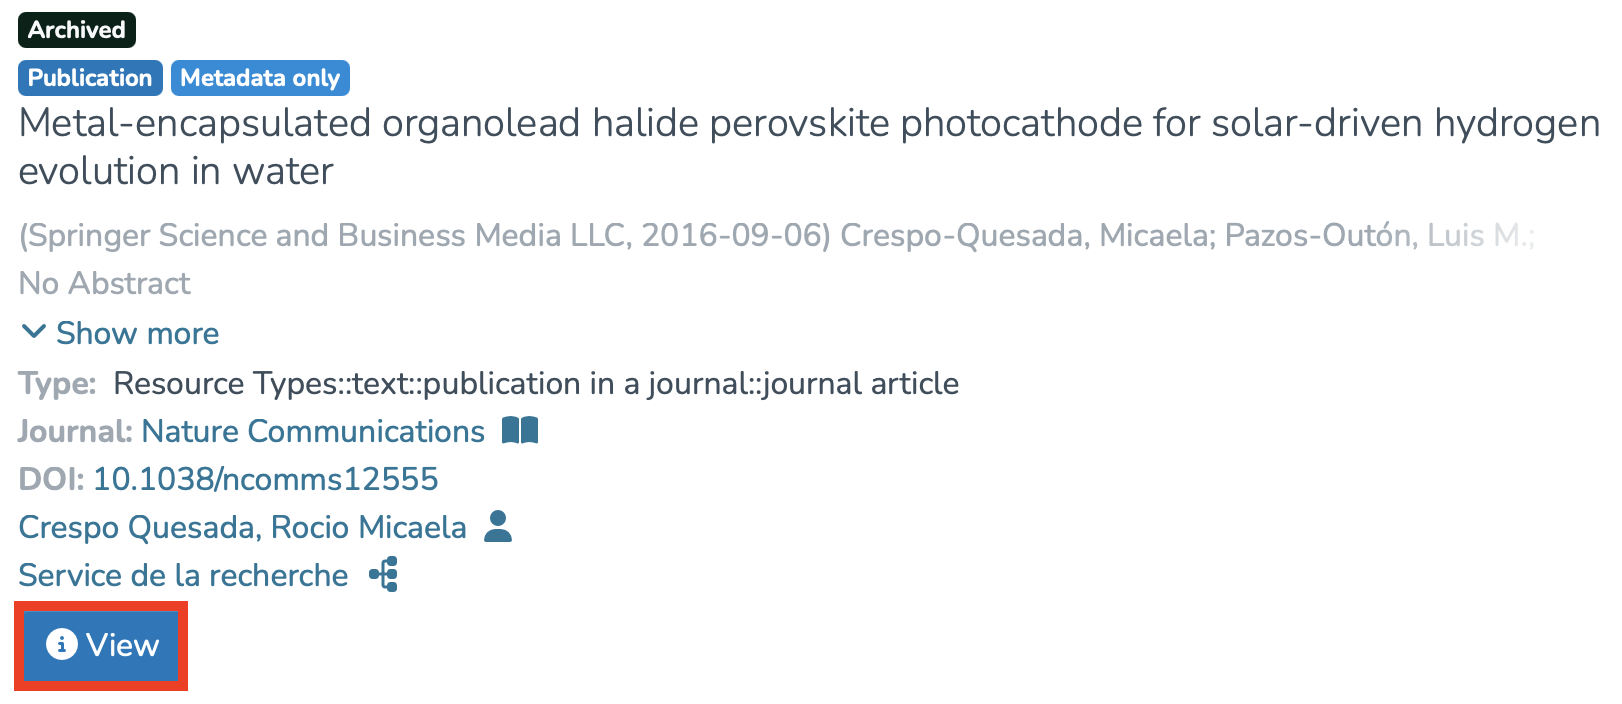
4. By clicking on it, you can view a list of publications already in IRIS that the system recognizes as possible duplicates. [![image.png](https://wiki.unil.ch/recherche/uploads/images/gallery/2025-10/scaled-1680-/XK3image.png)](https://wiki.unil.ch/recherche/uploads/images/gallery/2025-10/XK3image.png)
    
    [![image.png](https://wiki.unil.ch/recherche/uploads/images/gallery/2025-10/scaled-1680-/76Uimage.png)](https://wiki.unil.ch/recherche/uploads/images/gallery/2025-10/76Uimage.png)
    
    [![image.png](https://wiki.unil.ch/recherche/uploads/images/gallery/2025-10/scaled-1680-/tBBimage.png)](https://wiki.unil.ch/recherche/uploads/images/gallery/2025-10/tBBimage.png)

#### Importing a Publication

1. If the publication is correct and relevant, click on the cloud icon to the left of the title. [![image.png](https://wiki.unil.ch/recherche/uploads/images/gallery/2025-10/scaled-1680-/07kimage.png)](https://wiki.unil.ch/recherche/uploads/images/gallery/2025-10/07kimage.png)
2. A window will open showing the metadata of the publication. Click on “Start submission” to continue. [![image.png](https://wiki.unil.ch/recherche/uploads/images/gallery/2025-10/scaled-1680-/d40image.png)](https://wiki.unil.ch/recherche/uploads/images/gallery/2025-10/d40image.png)
    
    [![image.png](https://wiki.unil.ch/recherche/uploads/images/gallery/2025-10/scaled-1680-/AUCimage.png)](https://wiki.unil.ch/recherche/uploads/images/gallery/2025-10/AUCimage.png)
3. After this step, you will be redirected to your workspace, where the imported publications will appear under “Submission in progress”, in the “Records I Created” section. At this stage, you can still edit the publication before publishing it. [![image.png](https://wiki.unil.ch/recherche/uploads/images/gallery/2025-10/scaled-1680-/20cimage.png)](https://wiki.unil.ch/recherche/uploads/images/gallery/2025-10/20cimage.png)

# ORCID – SNSF Portal Integration

ORCID provides a reliable way to link your research outputs to your profile through a unique identifier associated with you as a researcher.

**[Linking your ORCID account with IRIS](https://wiki.unil.ch/recherche/books/user-guide/page/linking-your-orcid-account-with-iris)** allows you to easily connect and synchronize your research activities between the two systems.

This integration facilitates the **[import](https://wiki.unil.ch/recherche/books/user-guide/page/manual-import-of-orcid-publications-into-iris)** and [**export**](https://wiki.unil.ch/recherche/books/user-guide/page/exporting-publications-from-iris-to-orcid) of your publications, projects, and funding information, while ensuring the consistency and reliability of your data.

It also increases the visibility of your work, simplifies the management of your research outputs, and helps ensure compliance with funding body requirements, thereby strengthening your impact within the scientific community.

It is also possible to link your ORCID account to the SNSF portal. This connection is particularly important, as it allows you to import your references from ORCID into your SNSF profile and is required for the submission of a proposal.

#### Linking ORCID to the SNSF Portal (portal.snf.ch)

If the connection was not established when creating your SNSF account, you can configure it at any time from your profile.

To do so:

1. Click on “Complete your profile” under “Profile &amp; CV”.[![image.png](https://wiki.unil.ch/recherche/uploads/images/gallery/2026-02/scaled-1680-/iYWimage.png)](https://wiki.unil.ch/recherche/uploads/images/gallery/2026-02/iYWimage.png)
2. Go to the “Linked identities” section.
3. [![image.png](https://wiki.unil.ch/recherche/uploads/images/gallery/2026-02/scaled-1680-/osSimage.png)](https://wiki.unil.ch/recherche/uploads/images/gallery/2026-02/osSimage.png)
4. A dedicated line for the ORCID iD is available.
5. Click “Add” to link your account. [![image.png](https://wiki.unil.ch/recherche/uploads/images/gallery/2026-02/scaled-1680-/uACimage.png)](https://wiki.unil.ch/recherche/uploads/images/gallery/2026-02/uACimage.png)

You will then be redirected to the ORCID login page.  
After entering your credentials, the connection will be established and your two accounts will be linked.

You will automatically return to the “Linked identities” section. A confirmation message will indicate that the ORCID connection has been successfully completed.

[![image.png](https://wiki.unil.ch/recherche/uploads/images/gallery/2026-02/scaled-1680-/Hjwimage.png)](https://wiki.unil.ch/recherche/uploads/images/gallery/2026-02/Hjwimage.png)

You will then be able to import your references from ORCID into your SNSF profile.

#### Importing ORCID References into the SNSF Portal

1. Go to the “Major Achievements” section. [![image.png](https://wiki.unil.ch/recherche/uploads/images/gallery/2026-02/scaled-1680-/i40image.png)](https://wiki.unil.ch/recherche/uploads/images/gallery/2026-02/i40image.png)
2. To import a reference into a new achievement, click “Add achievement”, then select “Add work from ORCID”.  
    If the achievement already exists, click directly on “Add work from ORCID” under the relevant entry. [![image.png](https://wiki.unil.ch/recherche/uploads/images/gallery/2026-02/scaled-1680-/90oimage.png)](https://wiki.unil.ch/recherche/uploads/images/gallery/2026-02/90oimage.png)
    
    [![image.png](https://wiki.unil.ch/recherche/uploads/images/gallery/2026-02/scaled-1680-/MF6image.png)](https://wiki.unil.ch/recherche/uploads/images/gallery/2026-02/MF6image.png)
3. Select the reference(s) you wish to import and click “Add”. [![image.png](https://wiki.unil.ch/recherche/uploads/images/gallery/2026-02/scaled-1680-/ny5image.png)](https://wiki.unil.ch/recherche/uploads/images/gallery/2026-02/ny5image.png)
    
    References added in this section allow you to highlight your most important work in your SNSF profile.

#### Editing or Deleting a Reference

After importing a reference, you can click “Edit” to adjust the information or delete the reference if necessary.

[![image.png](https://wiki.unil.ch/recherche/uploads/images/gallery/2026-02/scaled-1680-/yHTimage.png)](https://wiki.unil.ch/recherche/uploads/images/gallery/2026-02/yHTimage.png)

[![image.png](https://wiki.unil.ch/recherche/uploads/images/gallery/2026-02/scaled-1680-/oCIimage.png)](https://wiki.unil.ch/recherche/uploads/images/gallery/2026-02/oCIimage.png)

[![image.png](https://wiki.unil.ch/recherche/uploads/images/gallery/2026-02/scaled-1680-/Yolimage.png)](https://wiki.unil.ch/recherche/uploads/images/gallery/2026-02/Yolimage.png)

#### Source of References

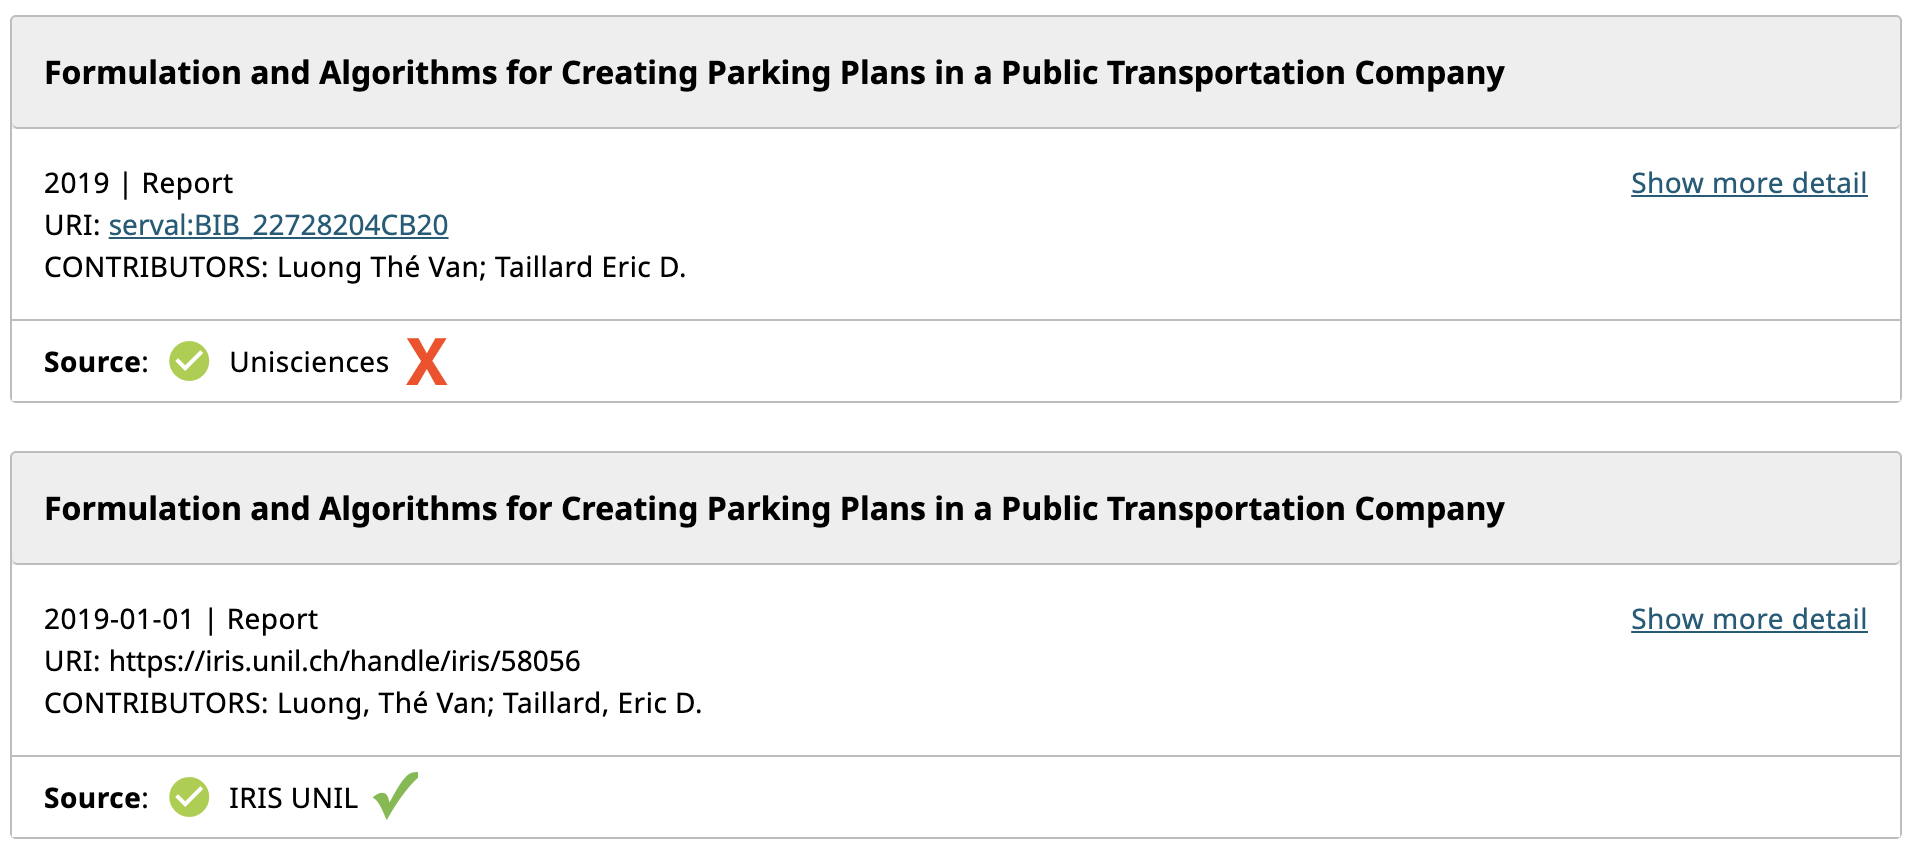
Among your ORCID references, only those whose source is IRIS can be imported correctly.

<p class="callout danger"><span style="color: rgb(224, 62, 45);">Older references containing Serval URLs will no longer be redirected. It is therefore essential to remove the “Unisciences” sources from your ORCID profile to avoid outdated links.</span></p>

[![image.png](https://wiki.unil.ch/recherche/uploads/images/gallery/2026-02/scaled-1680-/TDEimage.png)](https://wiki.unil.ch/recherche/uploads/images/gallery/2026-02/TDEimage.png)

If some references in your ORCID profile still originate from Unisciences:

- Delete them from your ORCID profile;
- [**Export**](https://wiki.unil.ch/recherche/books/user-guide/page/exporting-publications-from-iris-to-orcid) them again from IRIS to ORCID;
- You will then be able to import them into the SNSF portal.

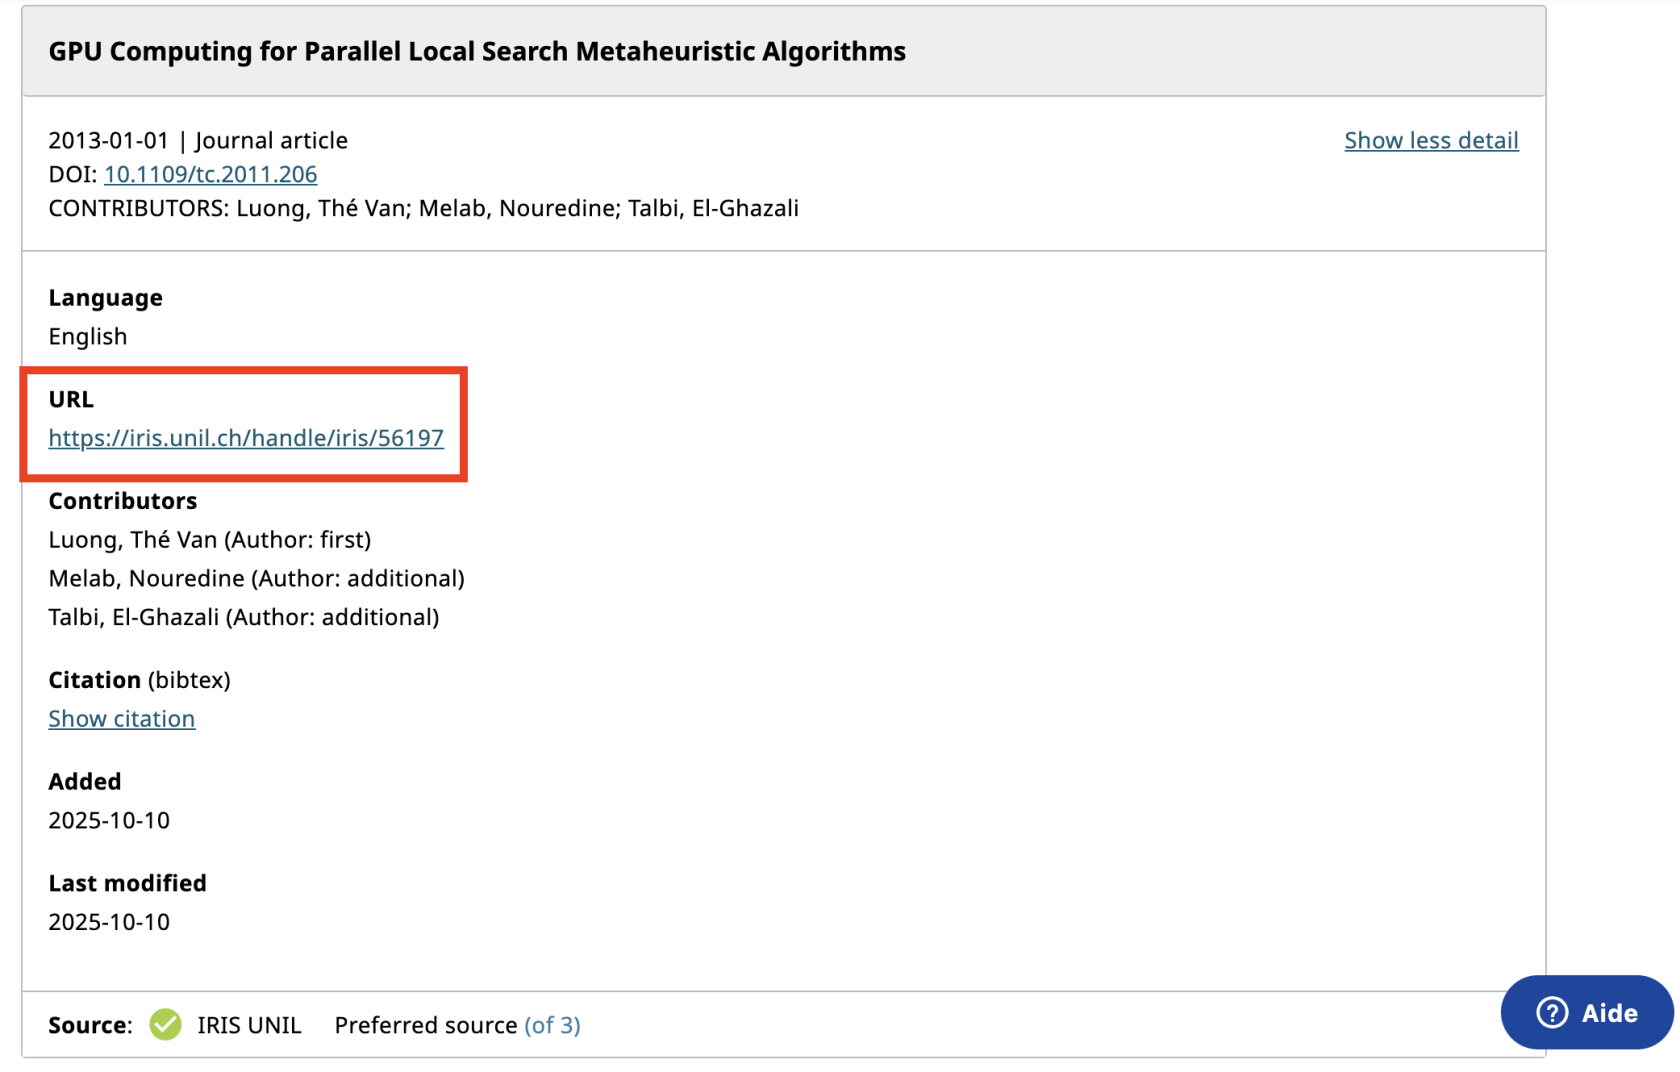
Please also ensure that the links associated with your references are correct.

[![image.png](https://wiki.unil.ch/recherche/uploads/images/gallery/2026-02/scaled-1680-/5D8image.png)](https://wiki.unil.ch/recherche/uploads/images/gallery/2026-02/5D8image.png)
#### Creating and Downloading Your CV in the SNSF Portal

The SNSF portal allows you to automatically generate an academic CV based on the information provided in your profile.

**Checking Data Completeness**

Before creating your CV:

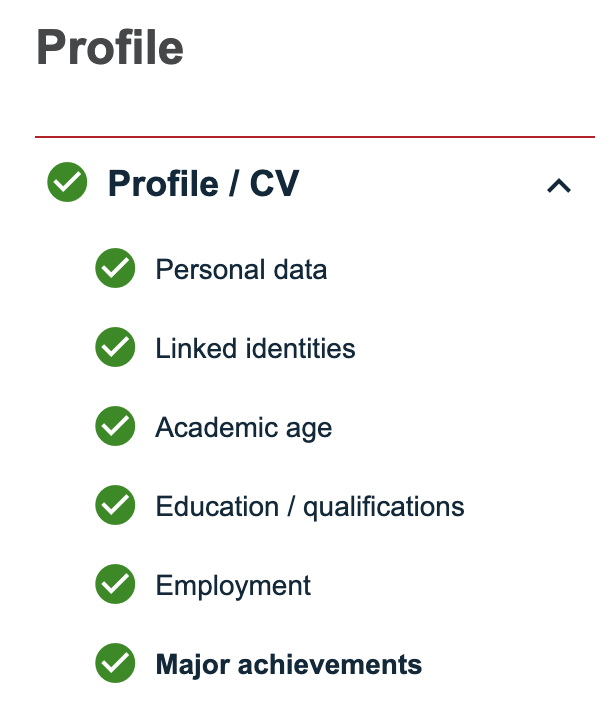
- Make sure all sections of your profile are complete.
- A green indicator appears next to correctly completed sections.
- If information is missing, the CV cannot be generated.

[![image.png](https://wiki.unil.ch/recherche/uploads/images/gallery/2026-02/scaled-1680-/0nsimage.png)](https://wiki.unil.ch/recherche/uploads/images/gallery/2026-02/0nsimage.png)
**Generating Your CV**

Once your profile is complete:

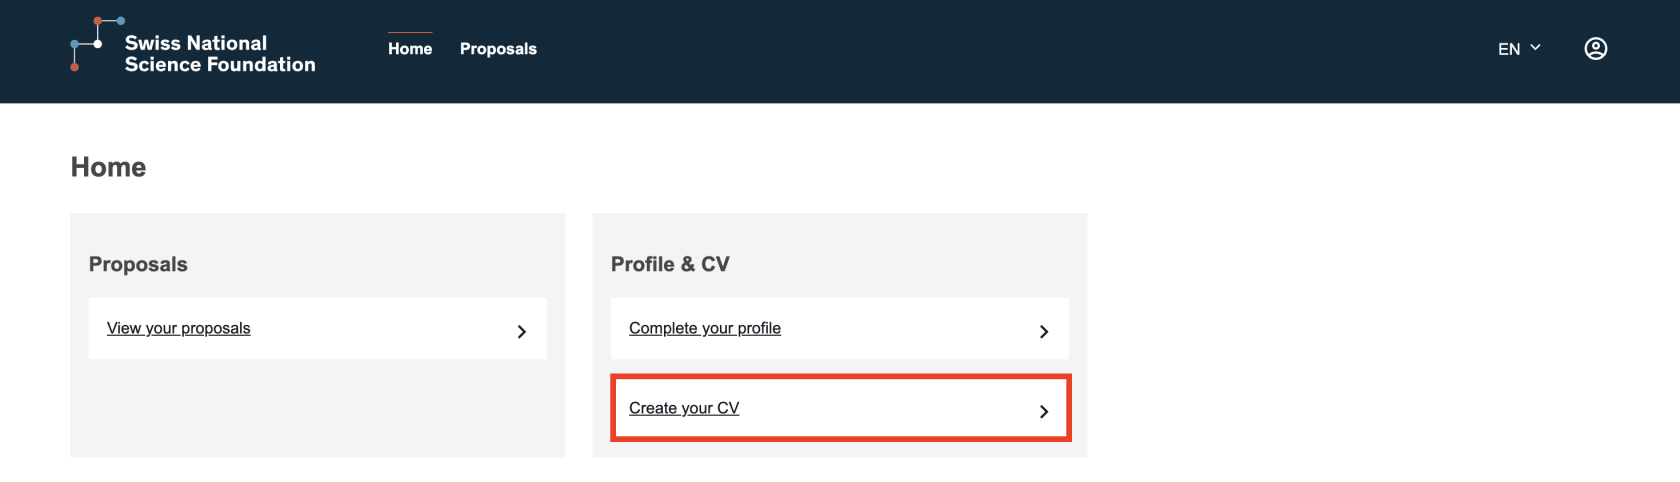
1. Click “Create your CV” from the homepage or from your personal data page.
    
    [![image.png](https://wiki.unil.ch/recherche/uploads/images/gallery/2026-02/scaled-1680-/NjAimage.png)](https://wiki.unil.ch/recherche/uploads/images/gallery/2026-02/NjAimage.png)
    
    [![image.png](https://wiki.unil.ch/recherche/uploads/images/gallery/2026-02/scaled-1680-/pCJimage.png)](https://wiki.unil.ch/recherche/uploads/images/gallery/2026-02/pCJimage.png)
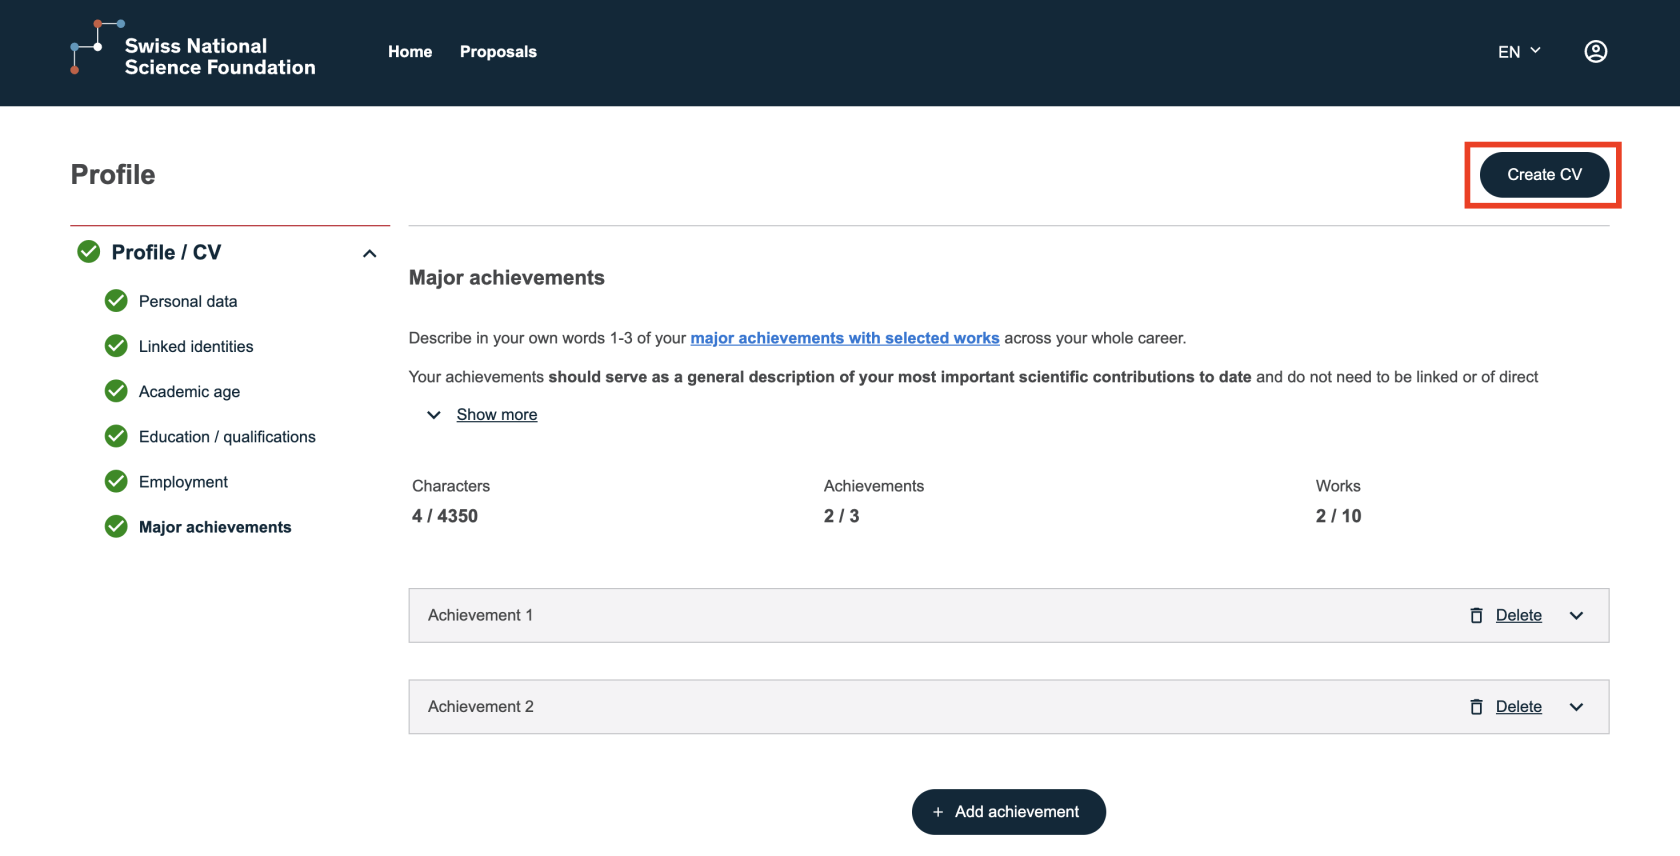
2. Click “Download CV”.
    
    [![image.png](https://wiki.unil.ch/recherche/uploads/images/gallery/2026-02/scaled-1680-/UzYimage.png)](https://wiki.unil.ch/recherche/uploads/images/gallery/2026-02/UzYimage.png)
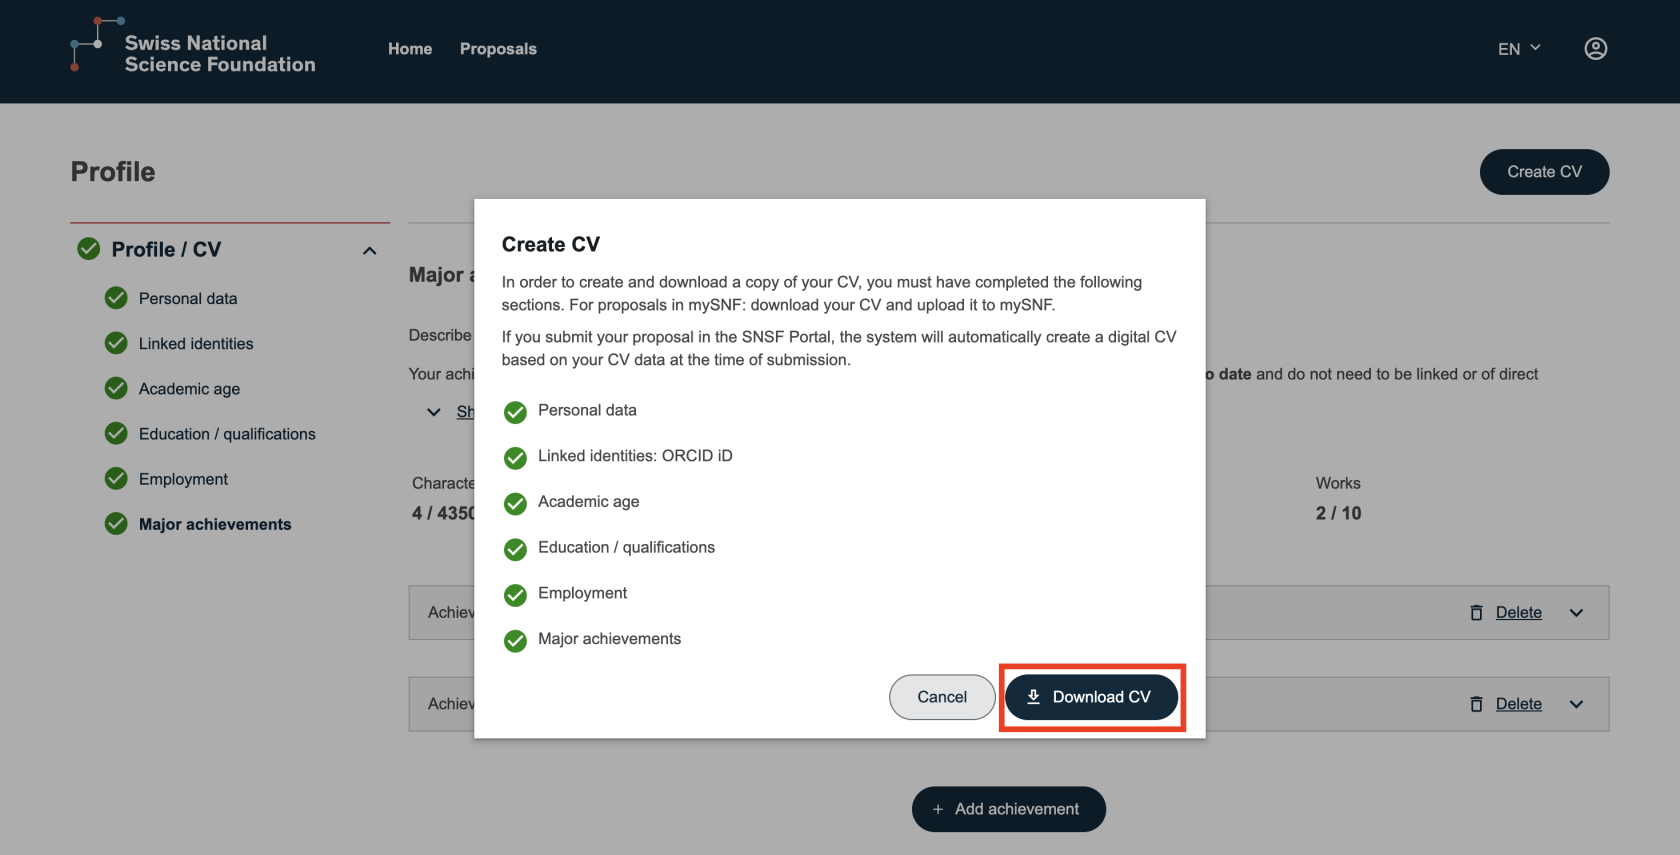
3. Select “Confirm and download CV”.
    
    [![image.png](https://wiki.unil.ch/recherche/uploads/images/gallery/2026-02/scaled-1680-/ISGimage.png)](https://wiki.unil.ch/recherche/uploads/images/gallery/2026-02/ISGimage.png)
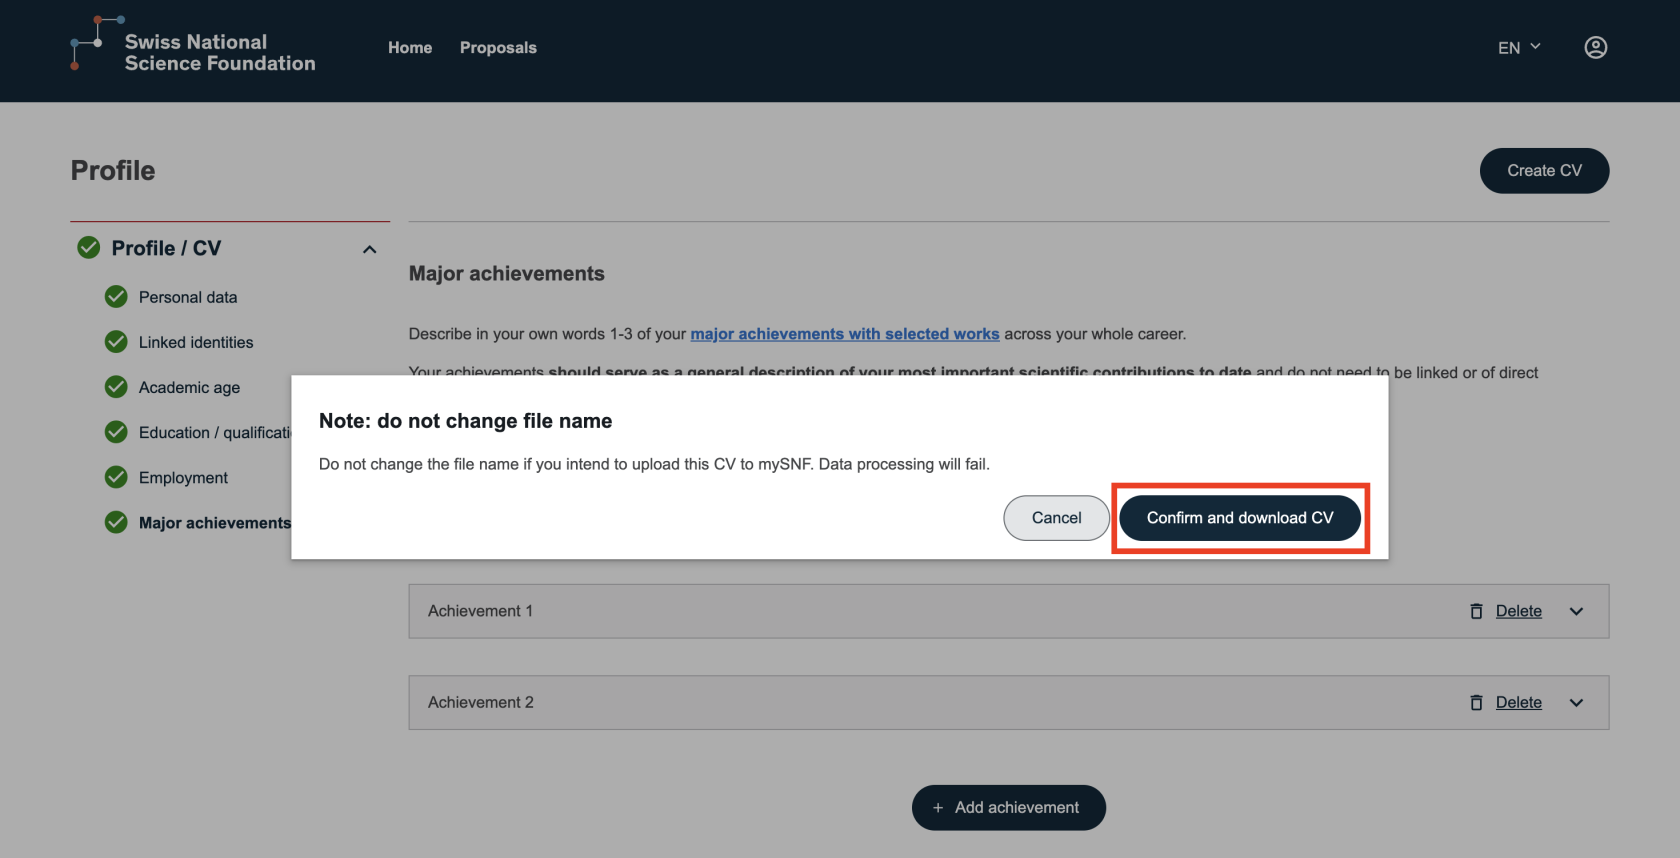
The document will then be downloaded automatically.

**Updating Your CV**

If you modify your personal data, these changes will automatically be reflected in your CV.  
Simply download it again to obtain the updated version.