AccèsExchange web Exchangewebmail
OWA
![]()
- owa.unil.ch
accèsaccessà tous lesall modulesdepuisfromunanavigateurwebinternet)browser):calendriercalendarscontactsaddress booktâchestasks- notes
Aide OWA(Outlook Web App) en PDF
Exchange suron votreyour ordinateur,computer, smartphone ouor tablettetablet
macOS

- Configuration
OSonXmacOScalendriercalendarscontactsaddress bookrappelsreminders- notes
ArchiverHowsesto archive e-mailssuron Mac
Configuration on macOS
LeThe Ci recommandestrongly d'utiliserrecommends lesthe logicielsuse livrésof avecthe macOS.native macOS apps.
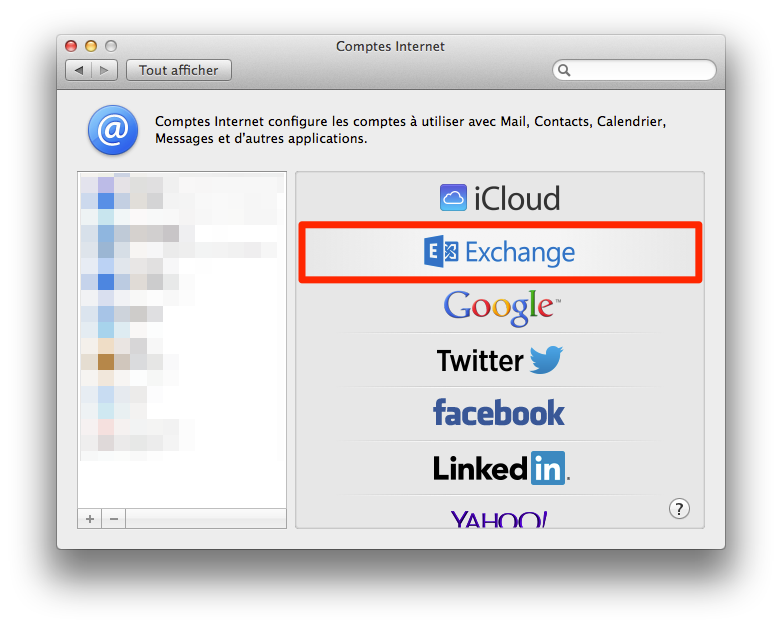
1. DepuisIn l'application Mail, aller dans le menuthe "Mail" etmenu, ouvrirselect "Comptes.Accounts..."
2. AppuyerClick surthe "Exchange"“Exchange” icon
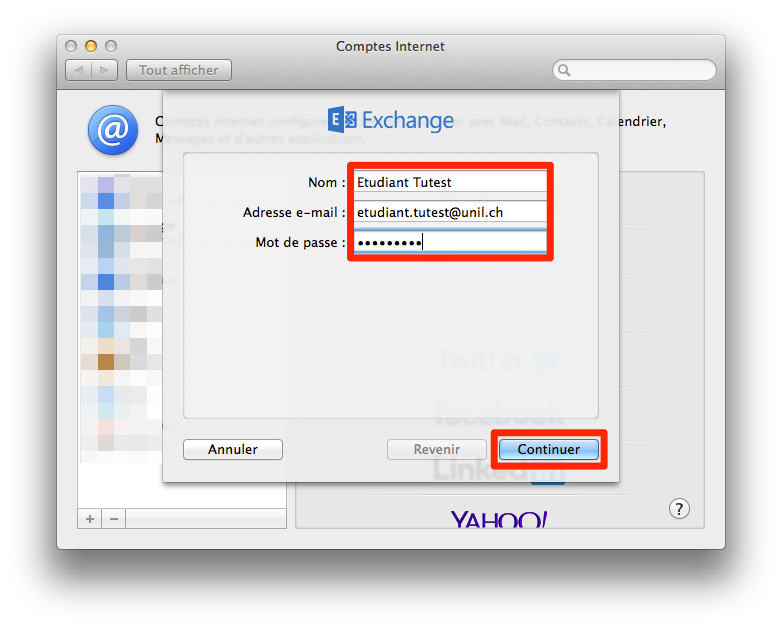
3. CompléterFill lesin champsthe fields with the required information (Nom, Adressename, e-mail etaddress Motand depassword) passe)and etclick appuyer sur "Continuer"“Continue”
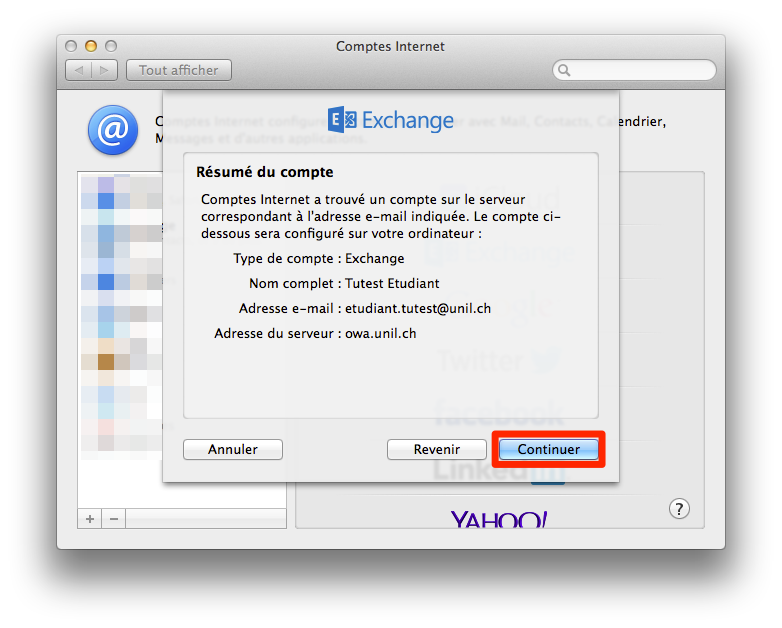
4. AppuyerClick à“Continue” nouveauonce sur "Continuer"again
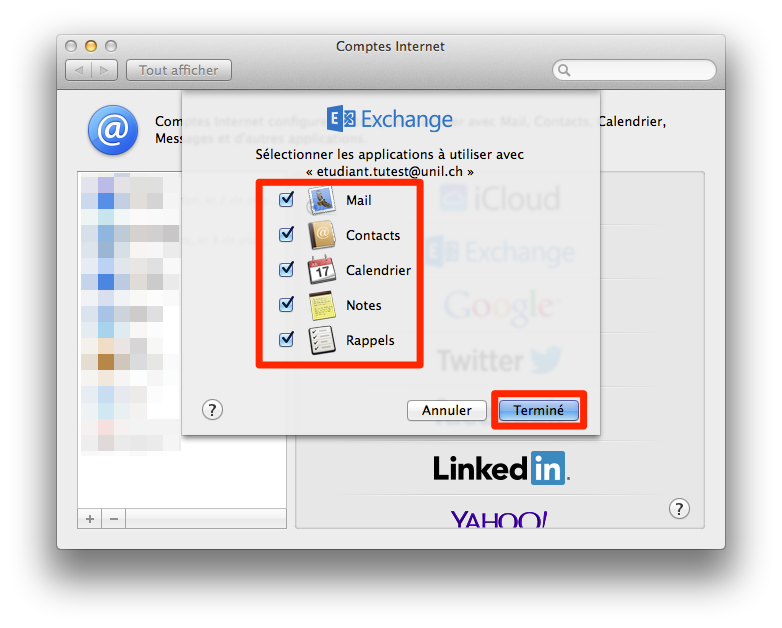
5. SélectionnerSelect lesthe Exchange services Exchangeyou quewish vousto souhaitezactivate activerand etclick "Terminé"“Done” lato finish the configuration
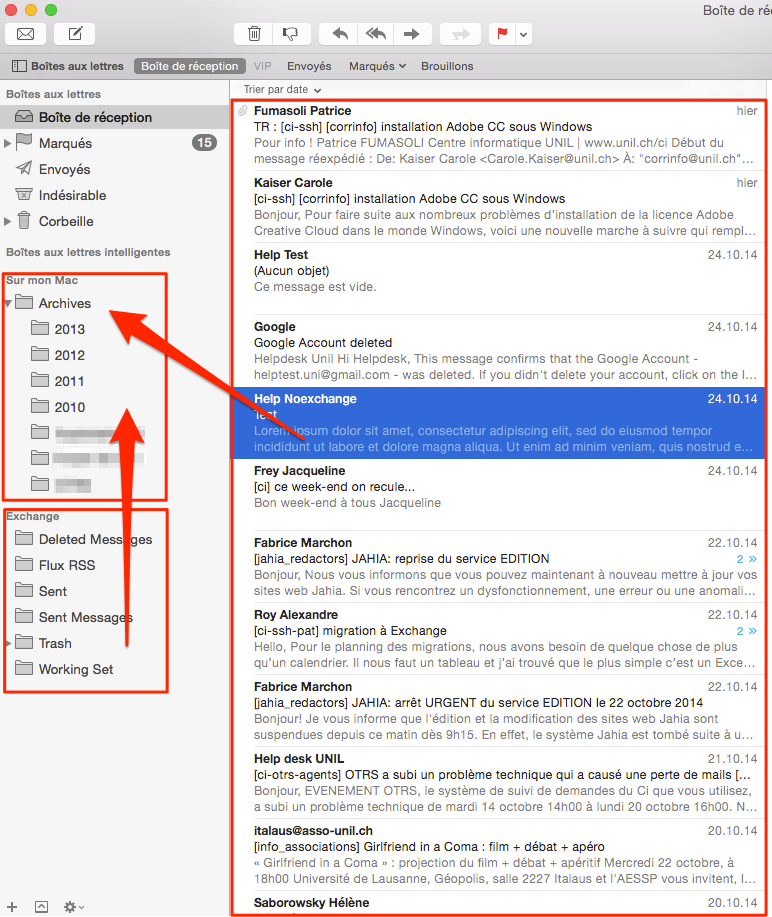
ArchiverHow sesto archive e-mails suron sonyour Mac
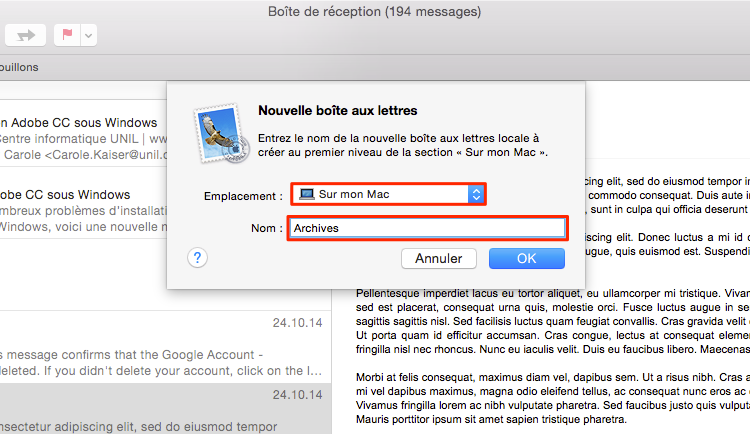
OuvrirOpenl'applicationthe"Mail"“Mail” application.AppuyerClicksurthele“+”boutonbutton"+"onenthebasbottomàleftgauchepartdeoflathefenêtre,windowpuisandsurselect"Nouvelle“Newboîte aux lettres..."Mailbox.”
SousUnder"Emplacement"“Location,”sélectionnerselect"Sur“OnmonMyMac",Mac.”sousFill"Nom"intaperthepar“Name”exemplefield"Archives"with,etforappuyerexample,sur“Archive”"OK"and then click “OK.”
DéplacerMovedesmessagesmailsorouentiredesmailboxesboîtesfromauxyourlettres de votre compteUNIL ExchangeUNILaccountdansbyvotredraggingboîteandauxdroppinglettresthemd'archives.toAttentionyour:newsilocalvousarchivedéplacezmailbox.plusYoudecan't archive more than 1'000 mailsvousinrisquezaderowperdre(youdesmaydonnéesloose=>someprocédezmailsparinpaquetsthedeprocess).1'000Don'tmails.hesitateN'hésiteztopascontactà appeler notreour help deskenifcasyoudehavedoutes.any questions.
Windows
ConfigurationOutlookOutlookconfiguration
calendriercalendarscontactsaddress booktâchesreminders- notes
ArchiverHowsesto archive e-mailssuron WindowsAide Outlook(PDF)
ConfigurationOutlook Outlookconfiguration
LeThe Ci recommandestrongly d'utiliserrecommends the use of Outlook.
1. OuvrirOpen Outlook
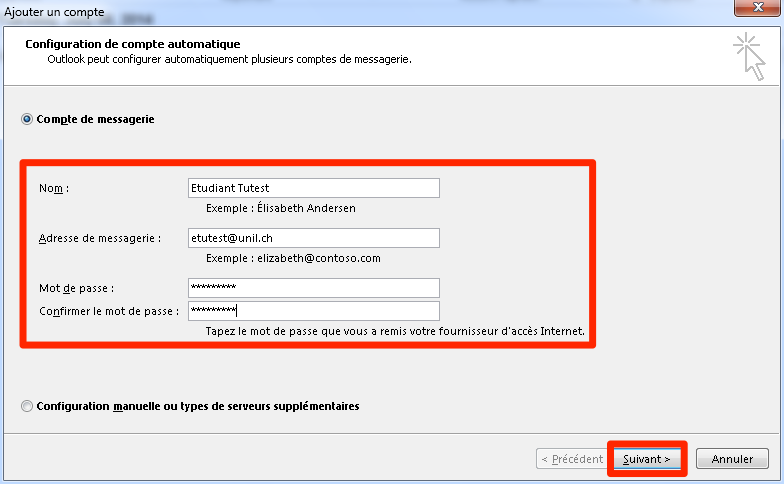
2. AllerGo dansto lethe “File” menu "Fichier",and puisclick appuyeron sur“Add "Ajouteran un compte"account”
3. CompléterFill lesin champsthe fields with the required information (Nom,name, Adressee-mail deaddress, messagerie,password Motand deconfirm passepassword) etand Confirmerclick le mot de passe) et appuyer sur "Suivant"“Next”
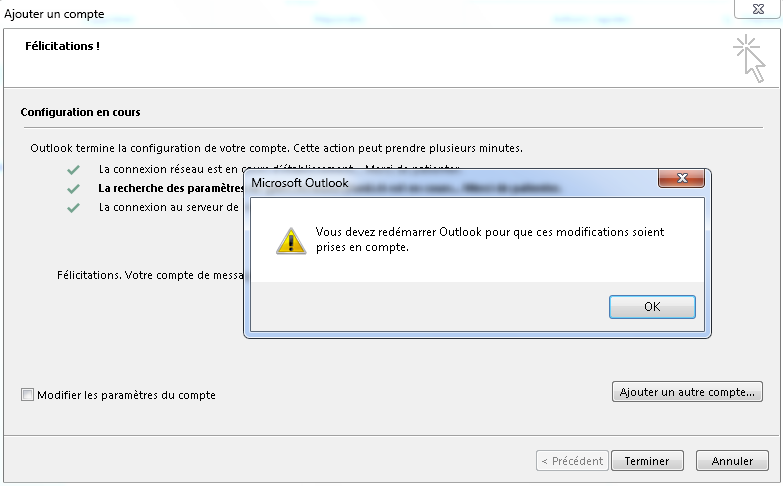
4. AppuyerClick sur“End” "Terminer"once unethe fois laautomatic configuration automatiqueis achevéedone
5. RedémarrerRestart Outlook
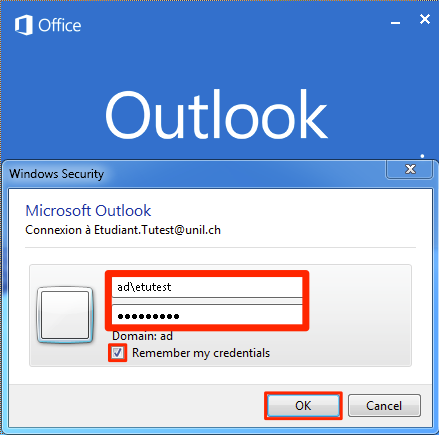
6. AuWhen lancement d'Outlook unelaunches fenêtreitself d'authentificationan apparaît,authentication entrerwindow lewill nomappear; d'utilisateurenter sousyour lausername formeas "“ad\username"username” etand votreyour mot de passepassword
7. CocherCheck lathe case“Remember pourmy retenircredentials” lebox motand declick passeon et appuyer sur "OK"“OK”
ArchiverHow sesto archive e-mails suron sonyour ordinateurWindows computer
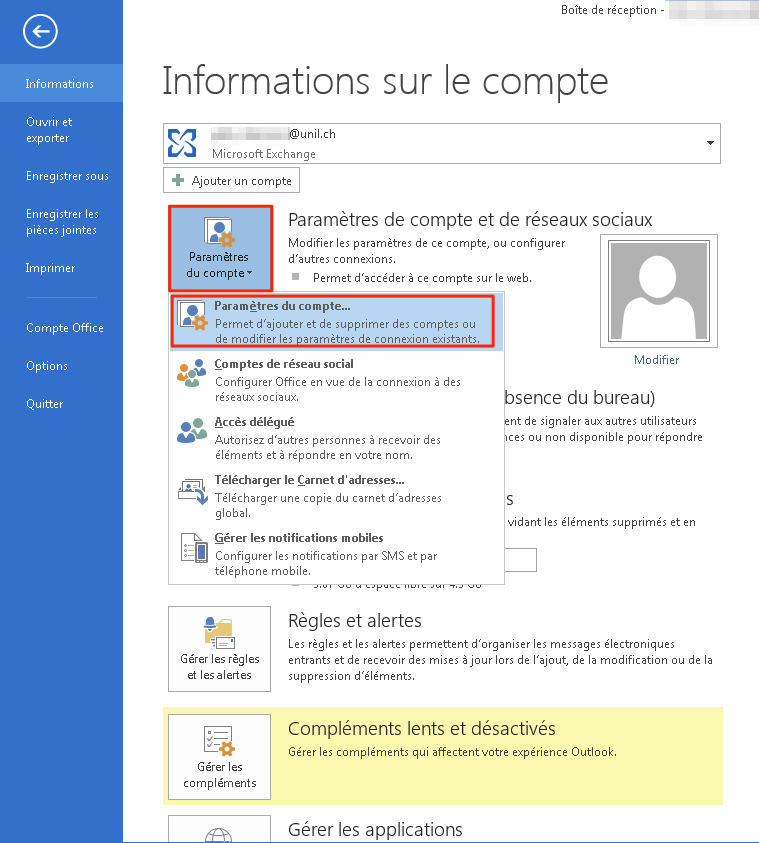
OuvrirOpen OutlookAllerGodans l'ongletto "Fichier"File"AppuyerClicksuron "ParamètresAccountduSettings"compte", puis à nouveau surand "ParamètreAccountdu compte.Setings..."
AppuyerClicksuron "FichiersDatadeFiles"données", puis surand "Ajouter.New..."TaperEnterunanomfiledenamefichierandetclickappuyer suron "OK"
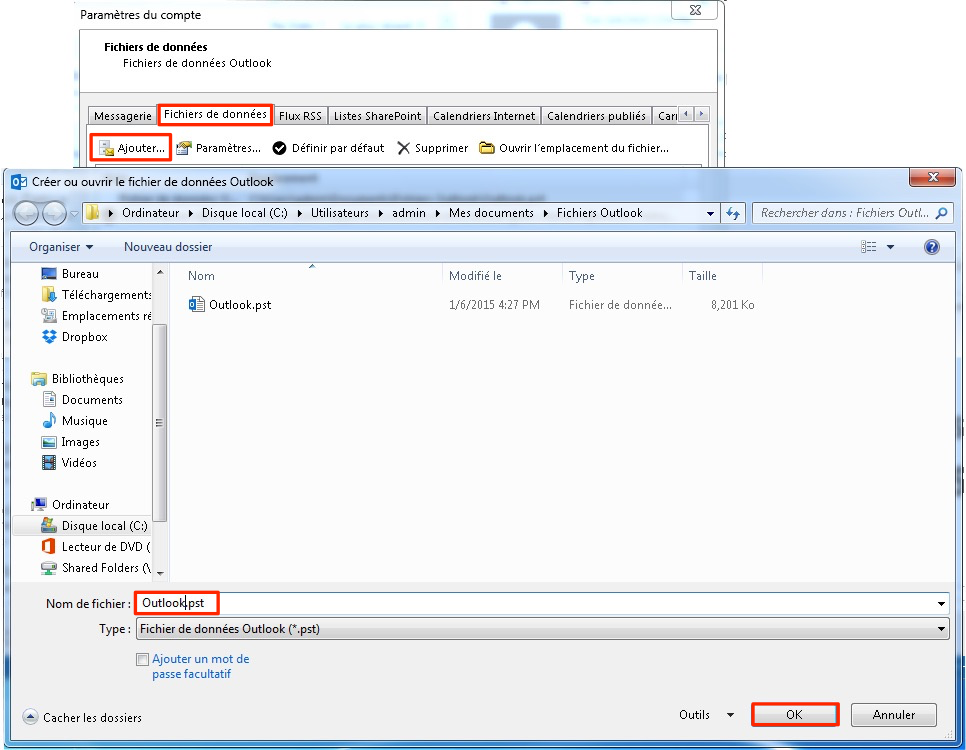
RevenirGosurbackvotretomessagerieyour e-mailFaireRightunclickclic“OutlookdroitDatasurFile,”"Fichieranddeselectdonnées“NewOutlook", puis sélectionner "Nouveau dossier..."Folder…”
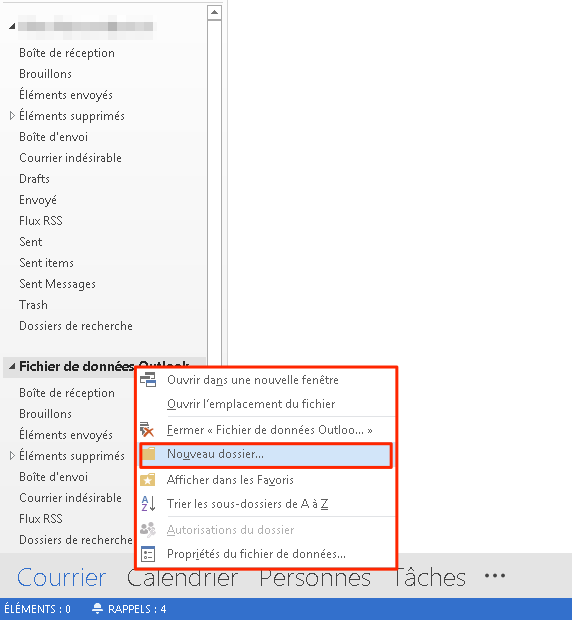
NommerNamelethedossierlocallocal,folderpar“Archive,”exemplefor"Archives"exampleDéposerMovedesmessagesmailsorouentiredesmailboxesboîtesfromauxyourlettres de votre compteUNIL ExchangeUNILaccountdansbyvotredraggingdossierandd'archivesdropping them to your new local archive mailbox.

iOS (iPhone/iPad/iPod Touch)
Configuration
- iOS configuration
-
calendriercalendarscontactsaddress bookrappelsreminders- notes
ConfigurationiOS iOSconfiguration
LeThe Ci recommandestrongly d'utiliserrecommends lesthe logicielsuse livrésof avecthe iOS.native iOS apps.
PourFor dessecurity raisonsreasons, de sécurité, l'applicationthe Outlook pourapp for iOS n'estis pasblocked autoriséon àour l'UNIL.servers. VousYou trouverezcan plusfind d'informations more information icihere (in French).
1. AllerGo dansto les "Réglages"“Settings”
2. SélectionnerChoose "“Mail, Contacts, Calendrier"Calendars”
3. AppuyerClick suron "Ajouter“Add un compte"Account”
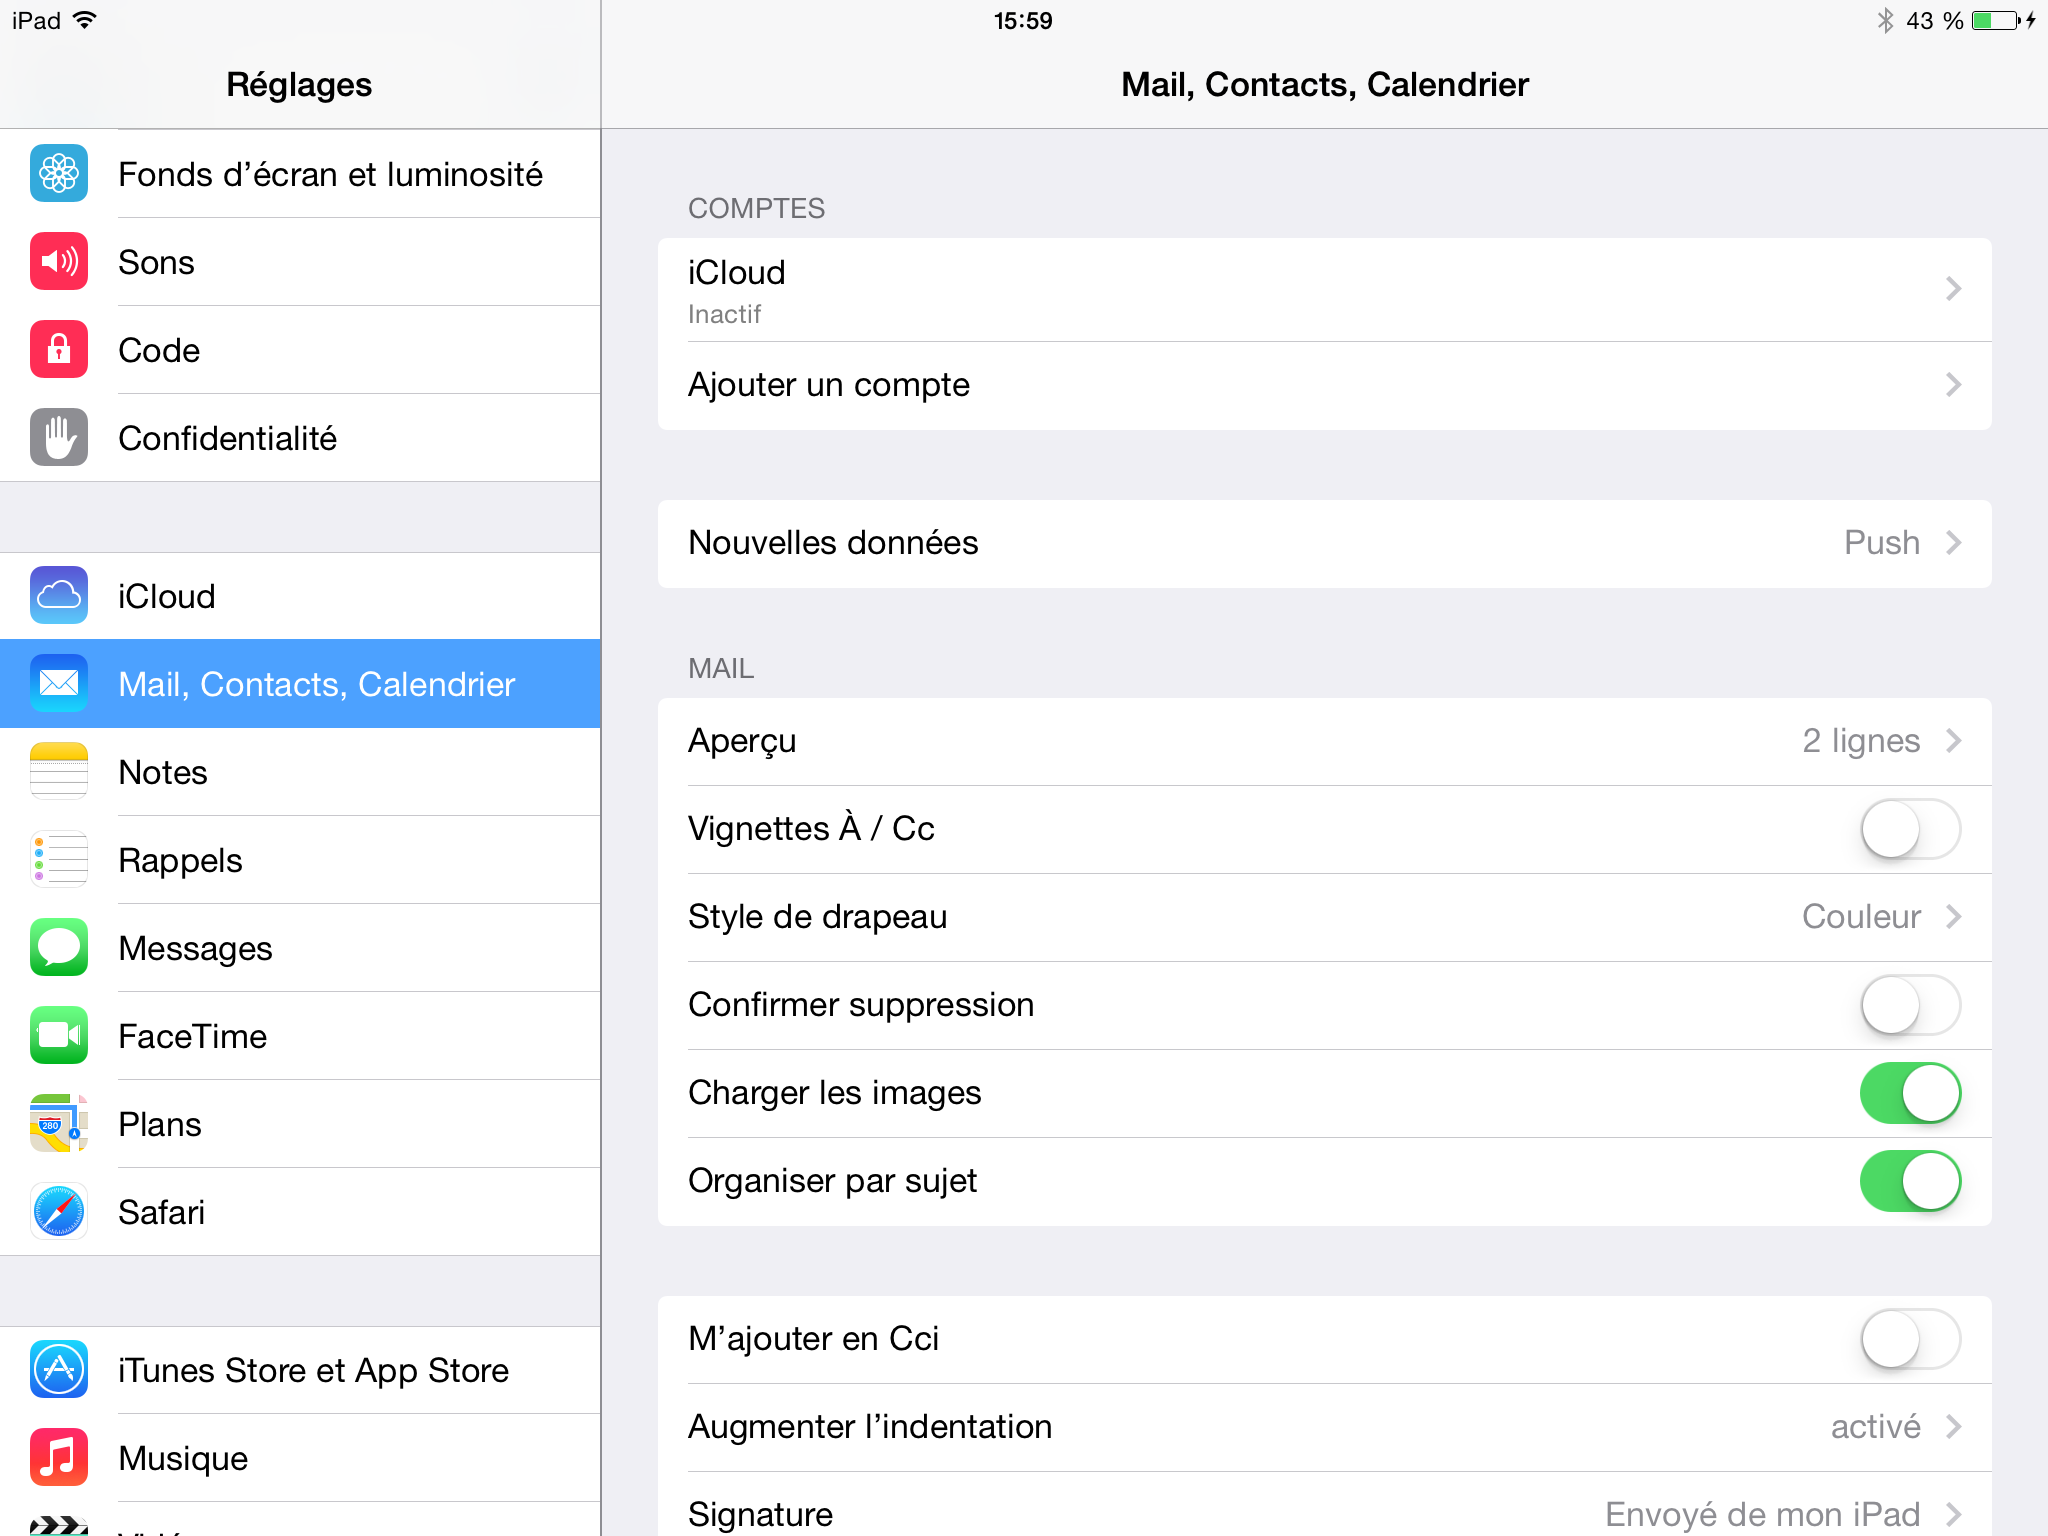
4. AppuyerClick surthe "Exchange"“Exchange” icon
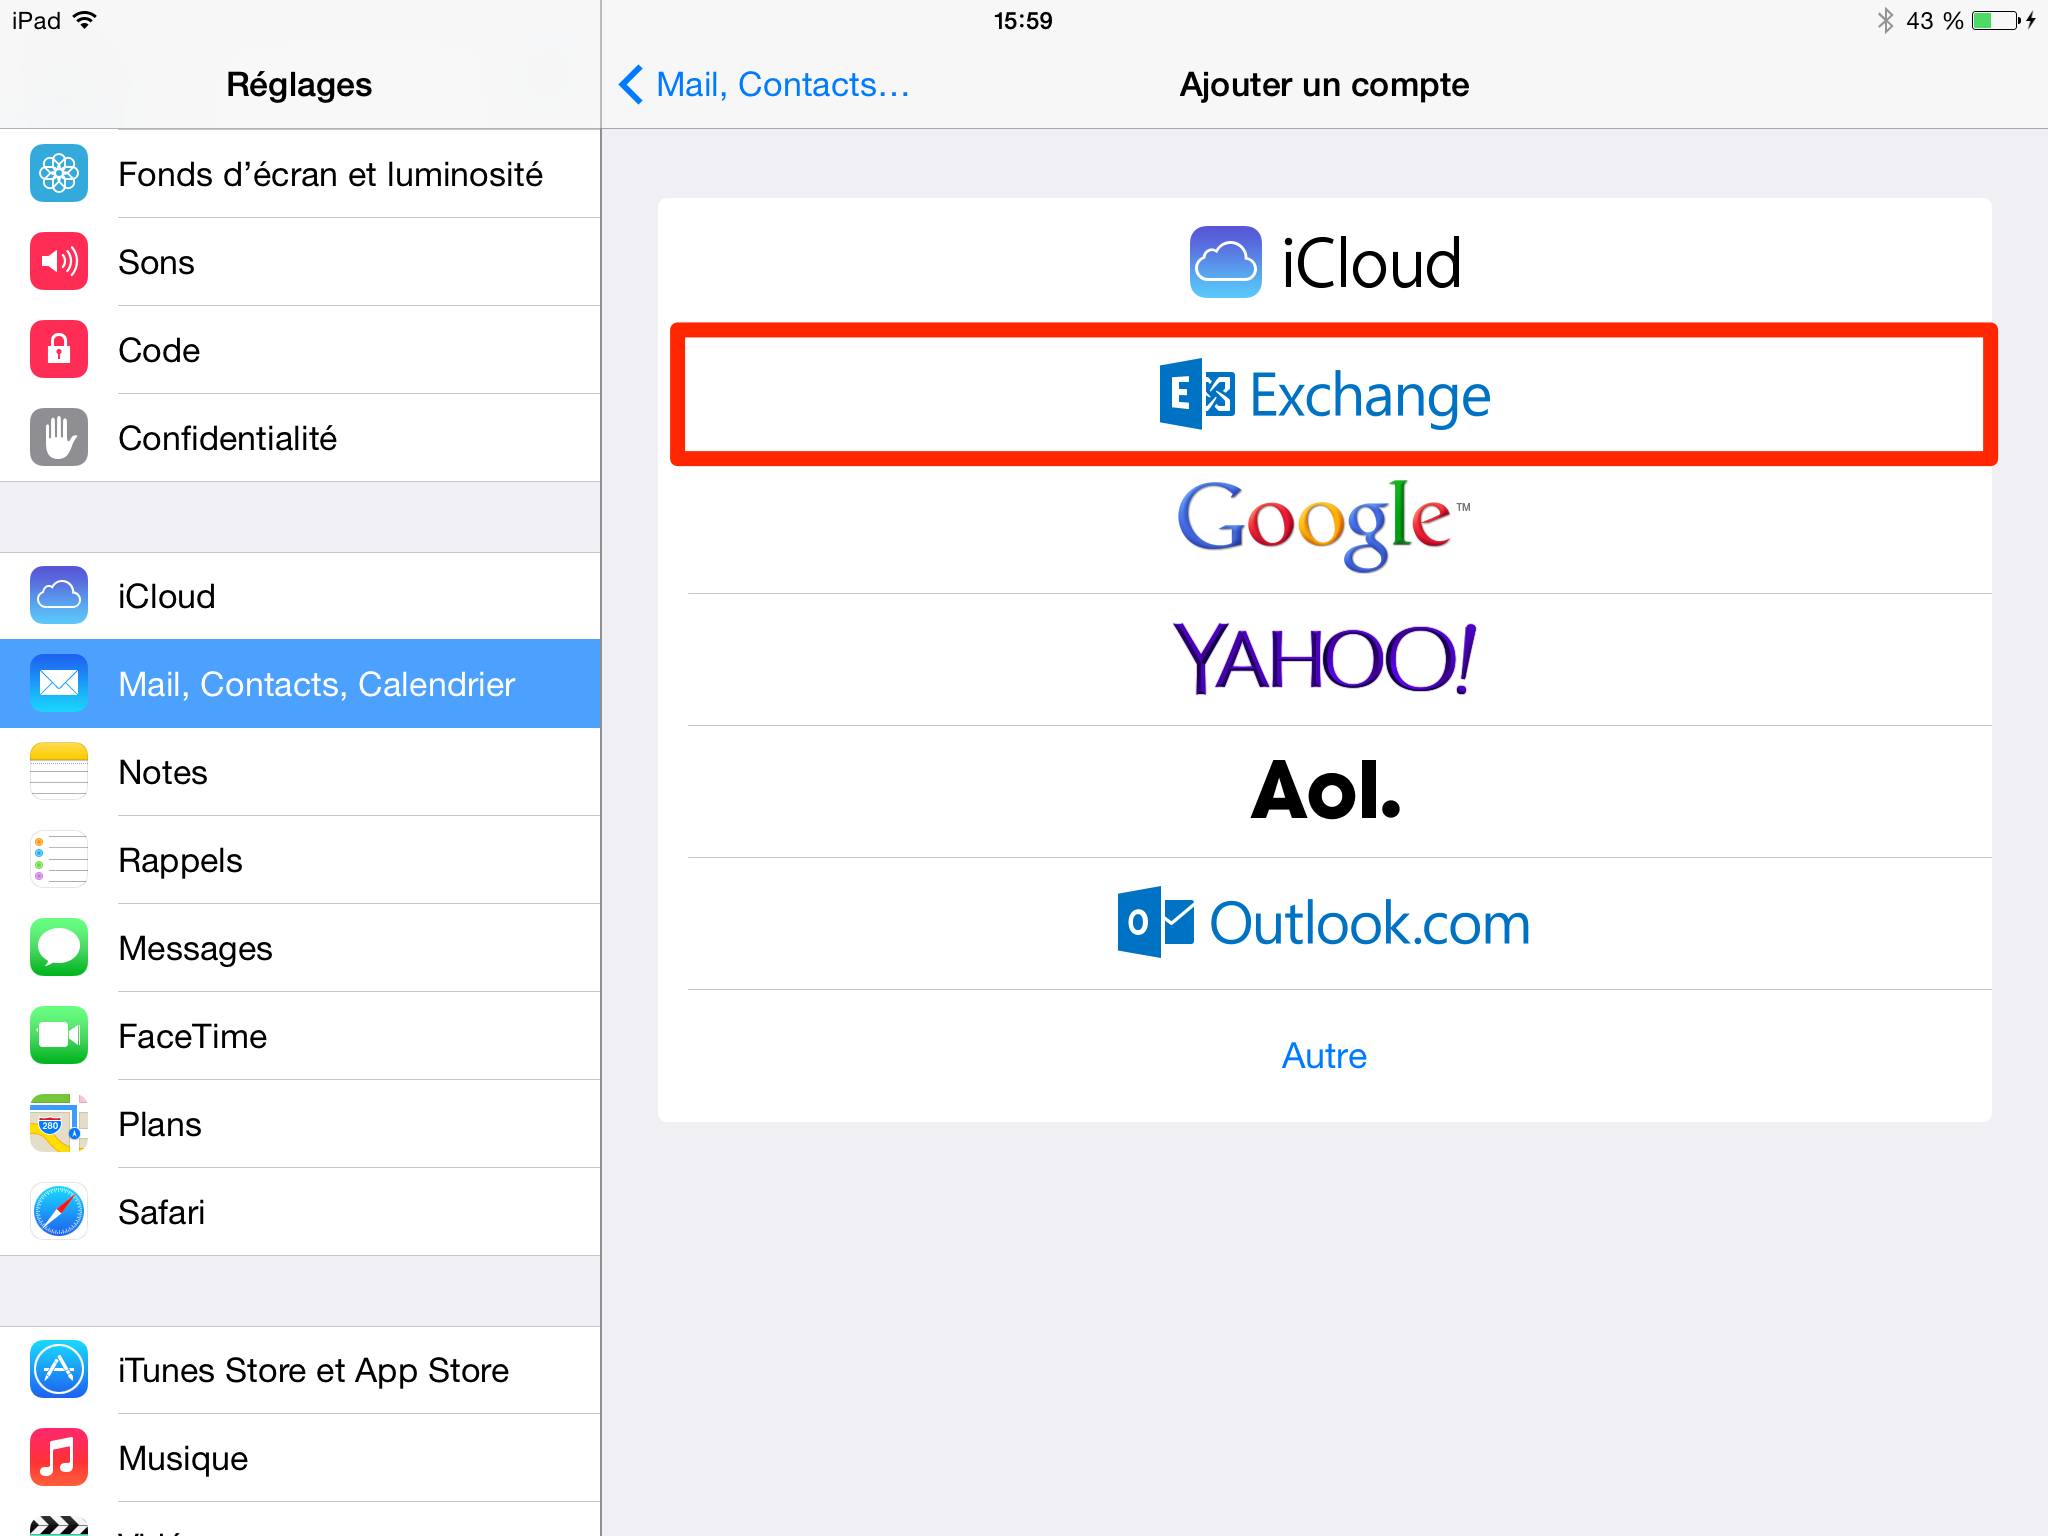
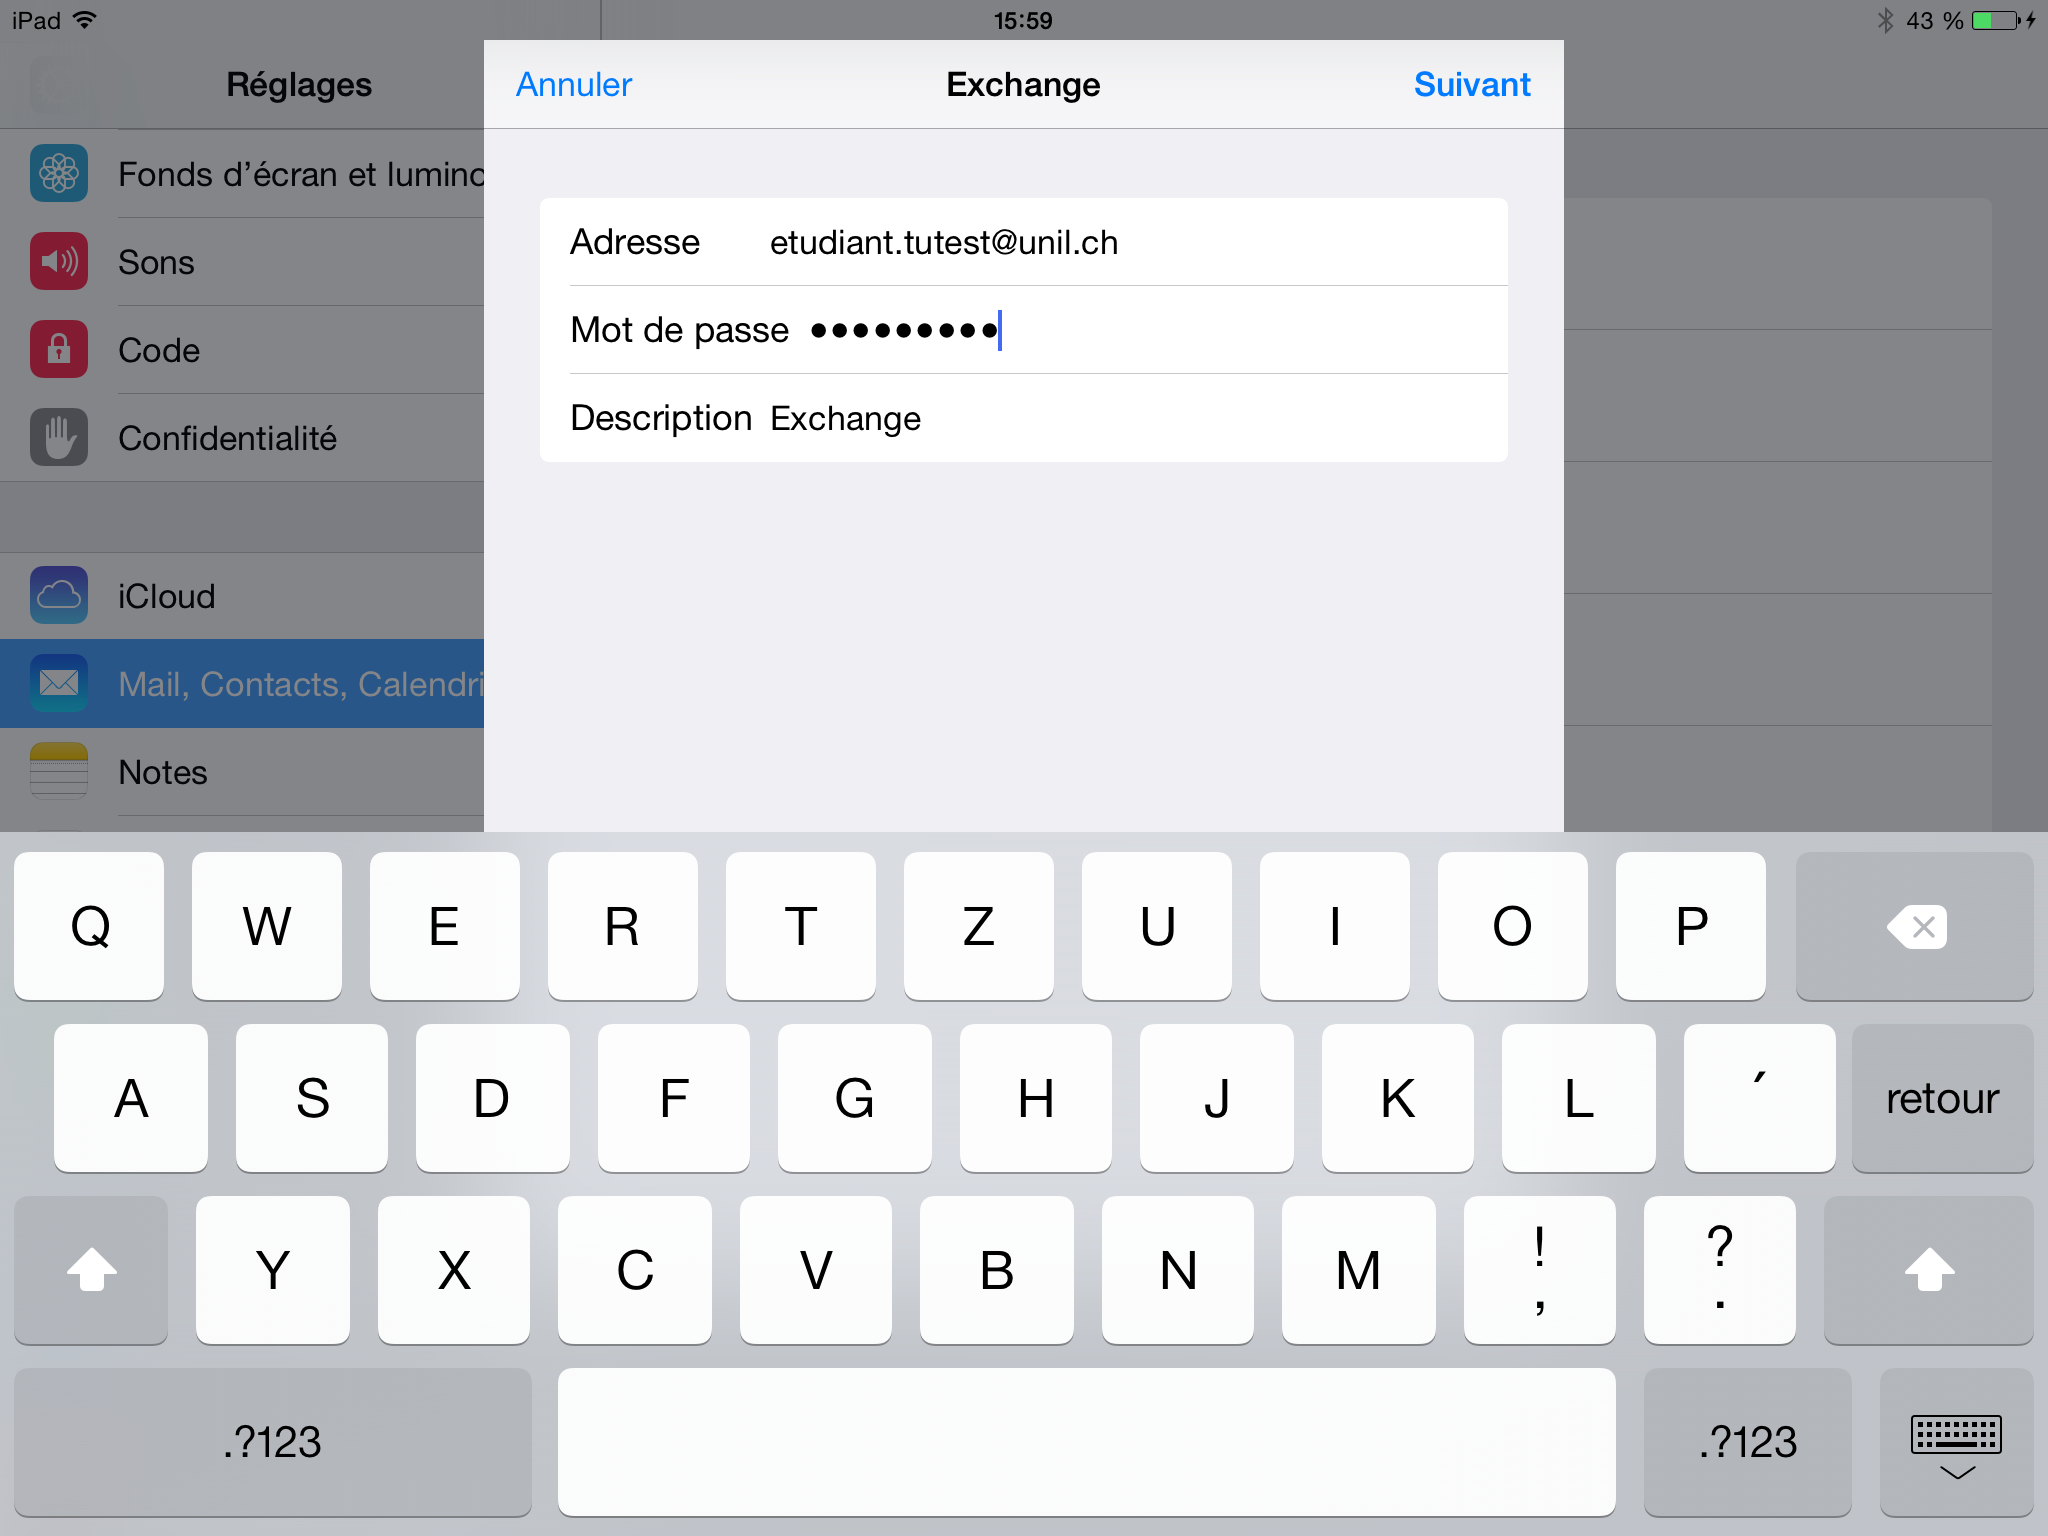
5. CompléterFill lesin champsthe fields with the required information (Adresse,address, Motpassword deand passedescription) etand Description)click eton appuyer sur "Suivant"“Next”
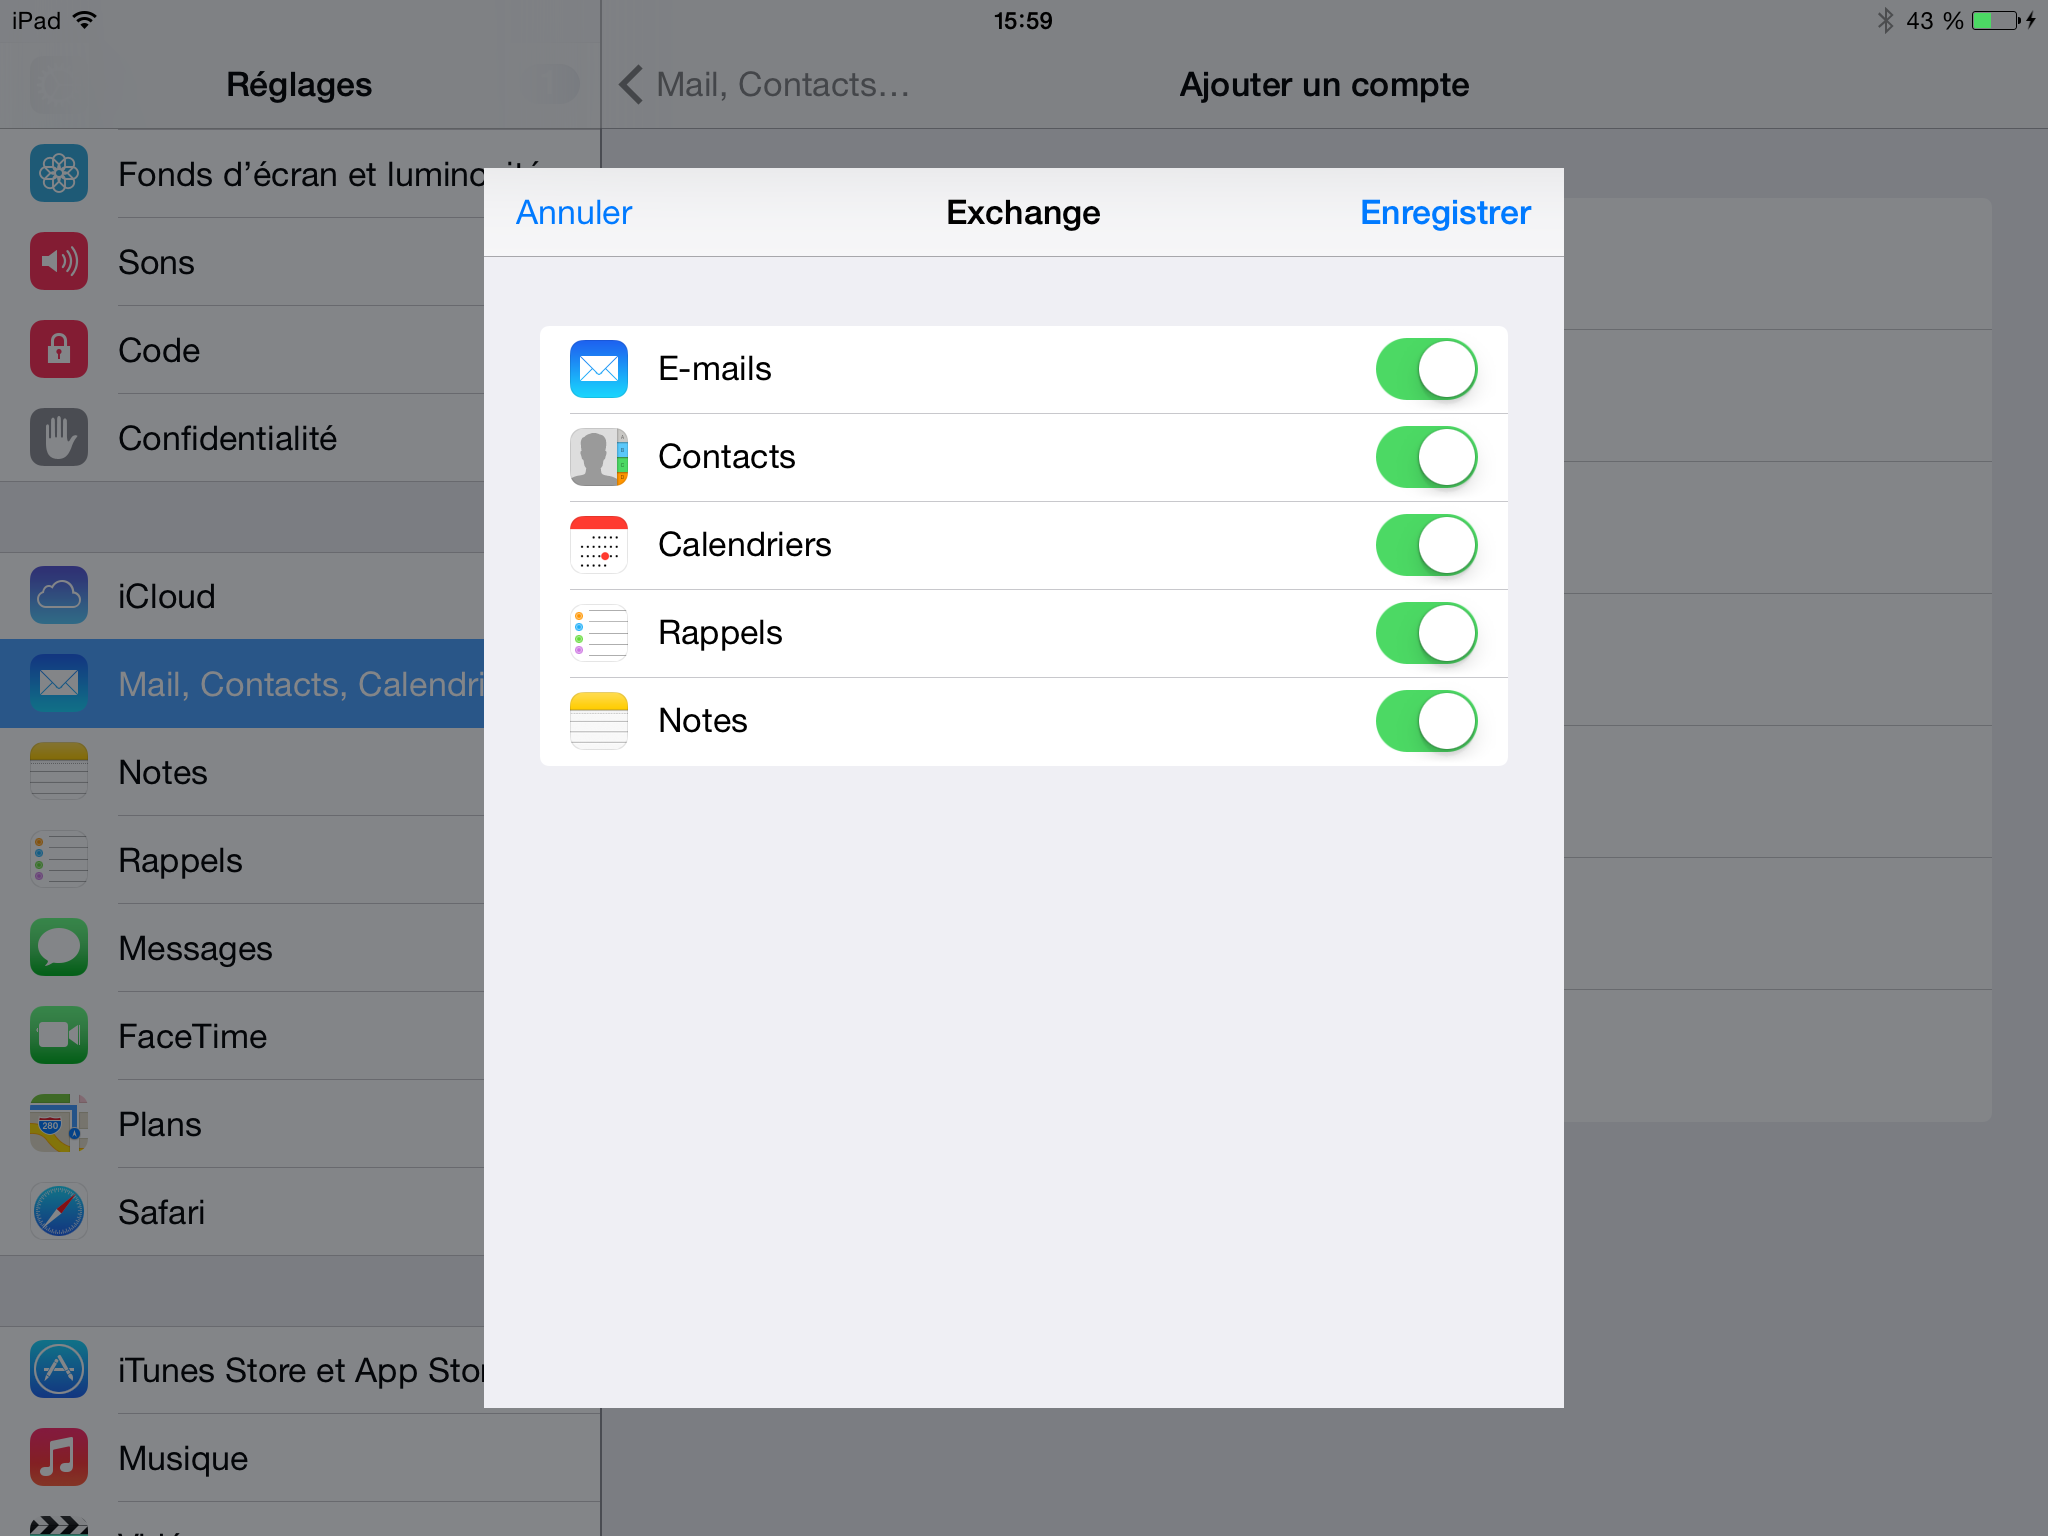
6. SélectionnerSelect lesthe Exchange services Exchangeyou quewish vousto souhaitezactivate activerand etclick "Enregistrer"“Save” lato finish the configuration
Android

- Android Configuration
calendriercalendarscontactsaddress book- (
tâchestasks::thirdapplicationpartytierceapprequise)required) - (
notesnotes::thirdapplicationpartytierceapprequise)requiered)
ConfigurationHow d'to set Exchange surup on an Android device (version 4 etand supérieur)up)
LeThe Ci recommandestrongly l'utilisationrecommends desthe applicationsuse nativesof the native Android apps (toutesall lesfunctions fonctionnalitésoffered d'by Exchange neare sonthowever pasnot disponibles)available).
PourFor dessecurity raisonsreasons, de sécurité, l'applicationthe Outlook pourapp for Android n'estis pasblocked autoriséon àour l'UNIL.servers. VousYou trouverezcan plusfind d'informations more information icihere (in French).
1. AllerGo dansto "Paramètres",“Settings,” puisand appuyerthen surclick "Ajouteron un“Add compte"account”
2. ChoisirChoose "Entreprise"“Entreprise”
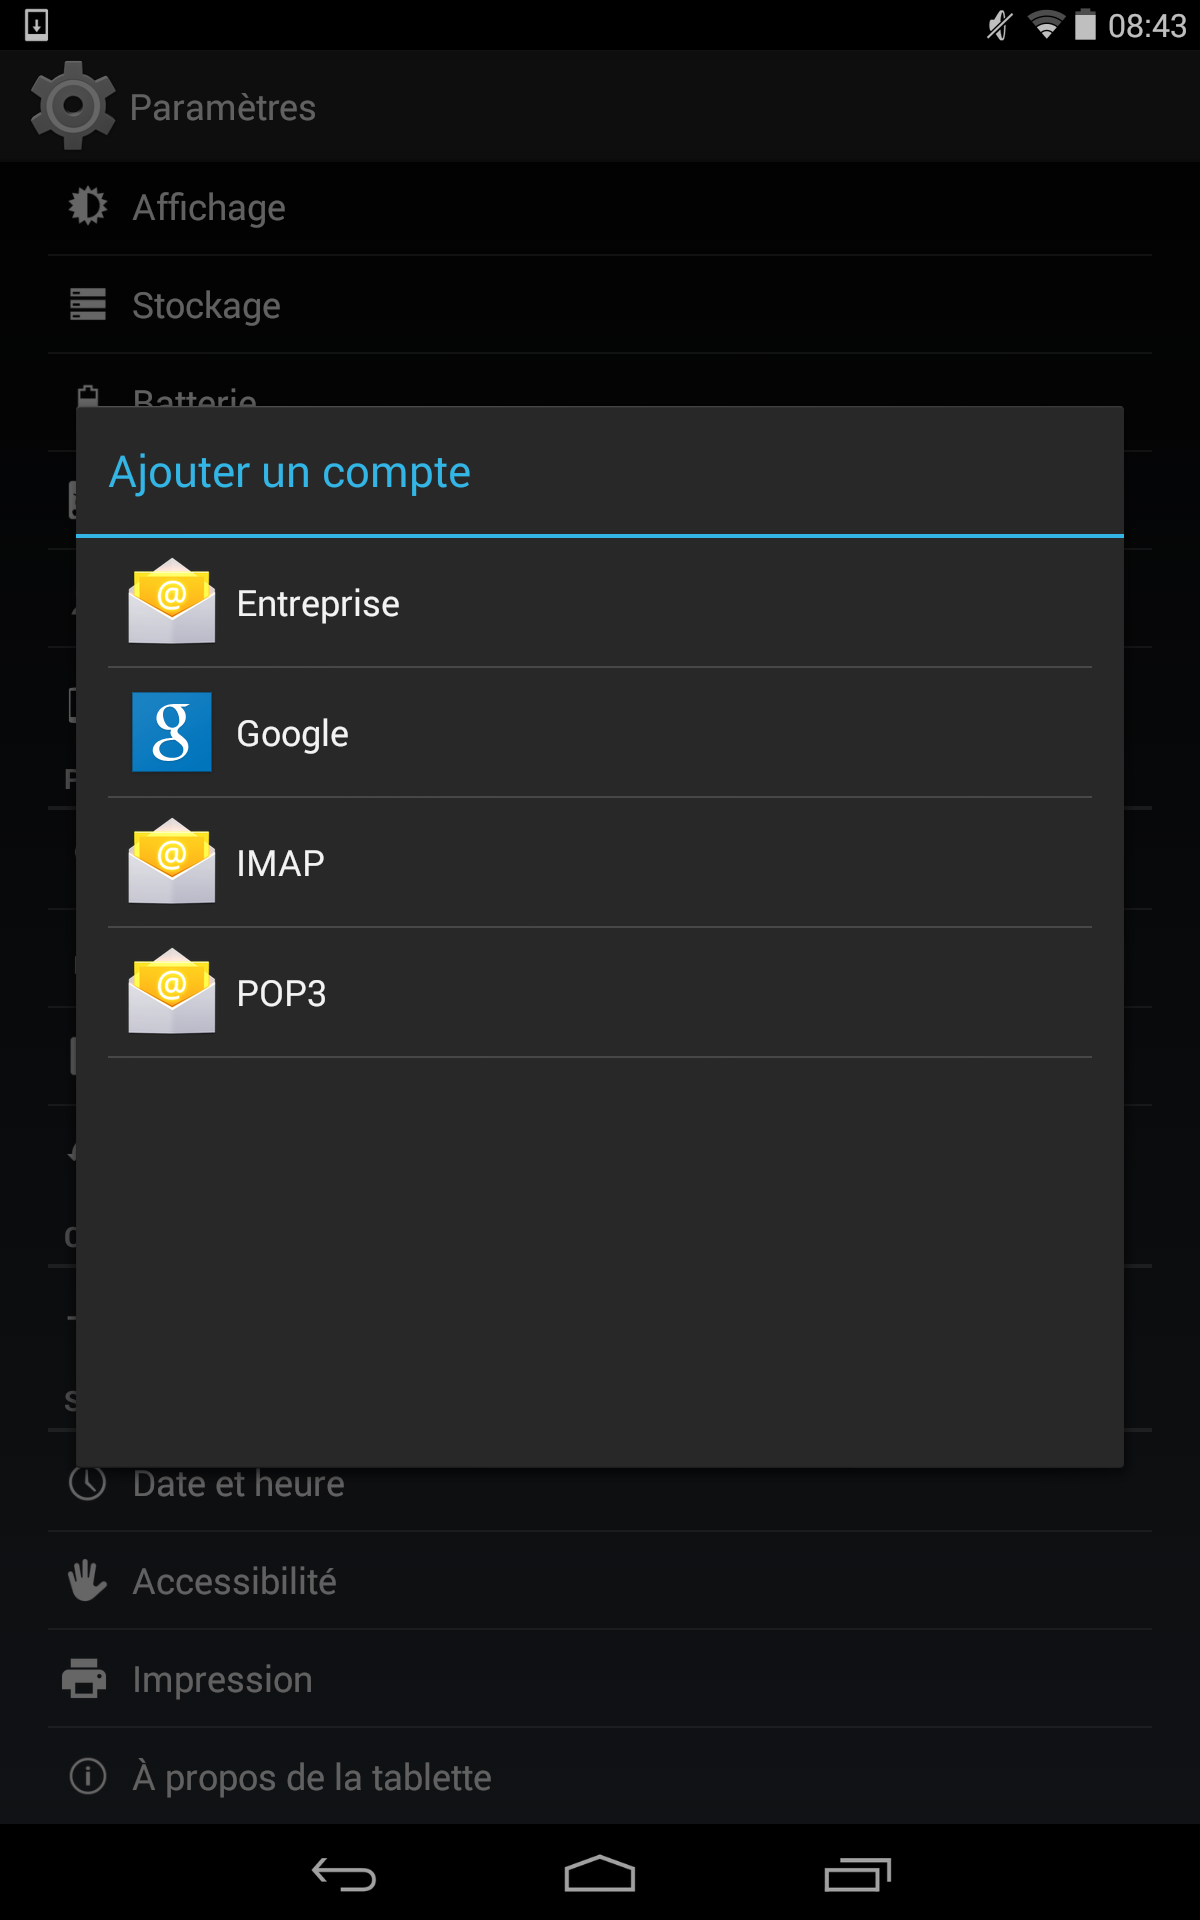
3. CompléterFill lesin champsthe "Adresse“E-mail e-mail"address” etand "Mot“password” de passe"fields
4. AppuyerClick surthe "Suivant"“Next” (en cas d'erreur, cliquez ici)button
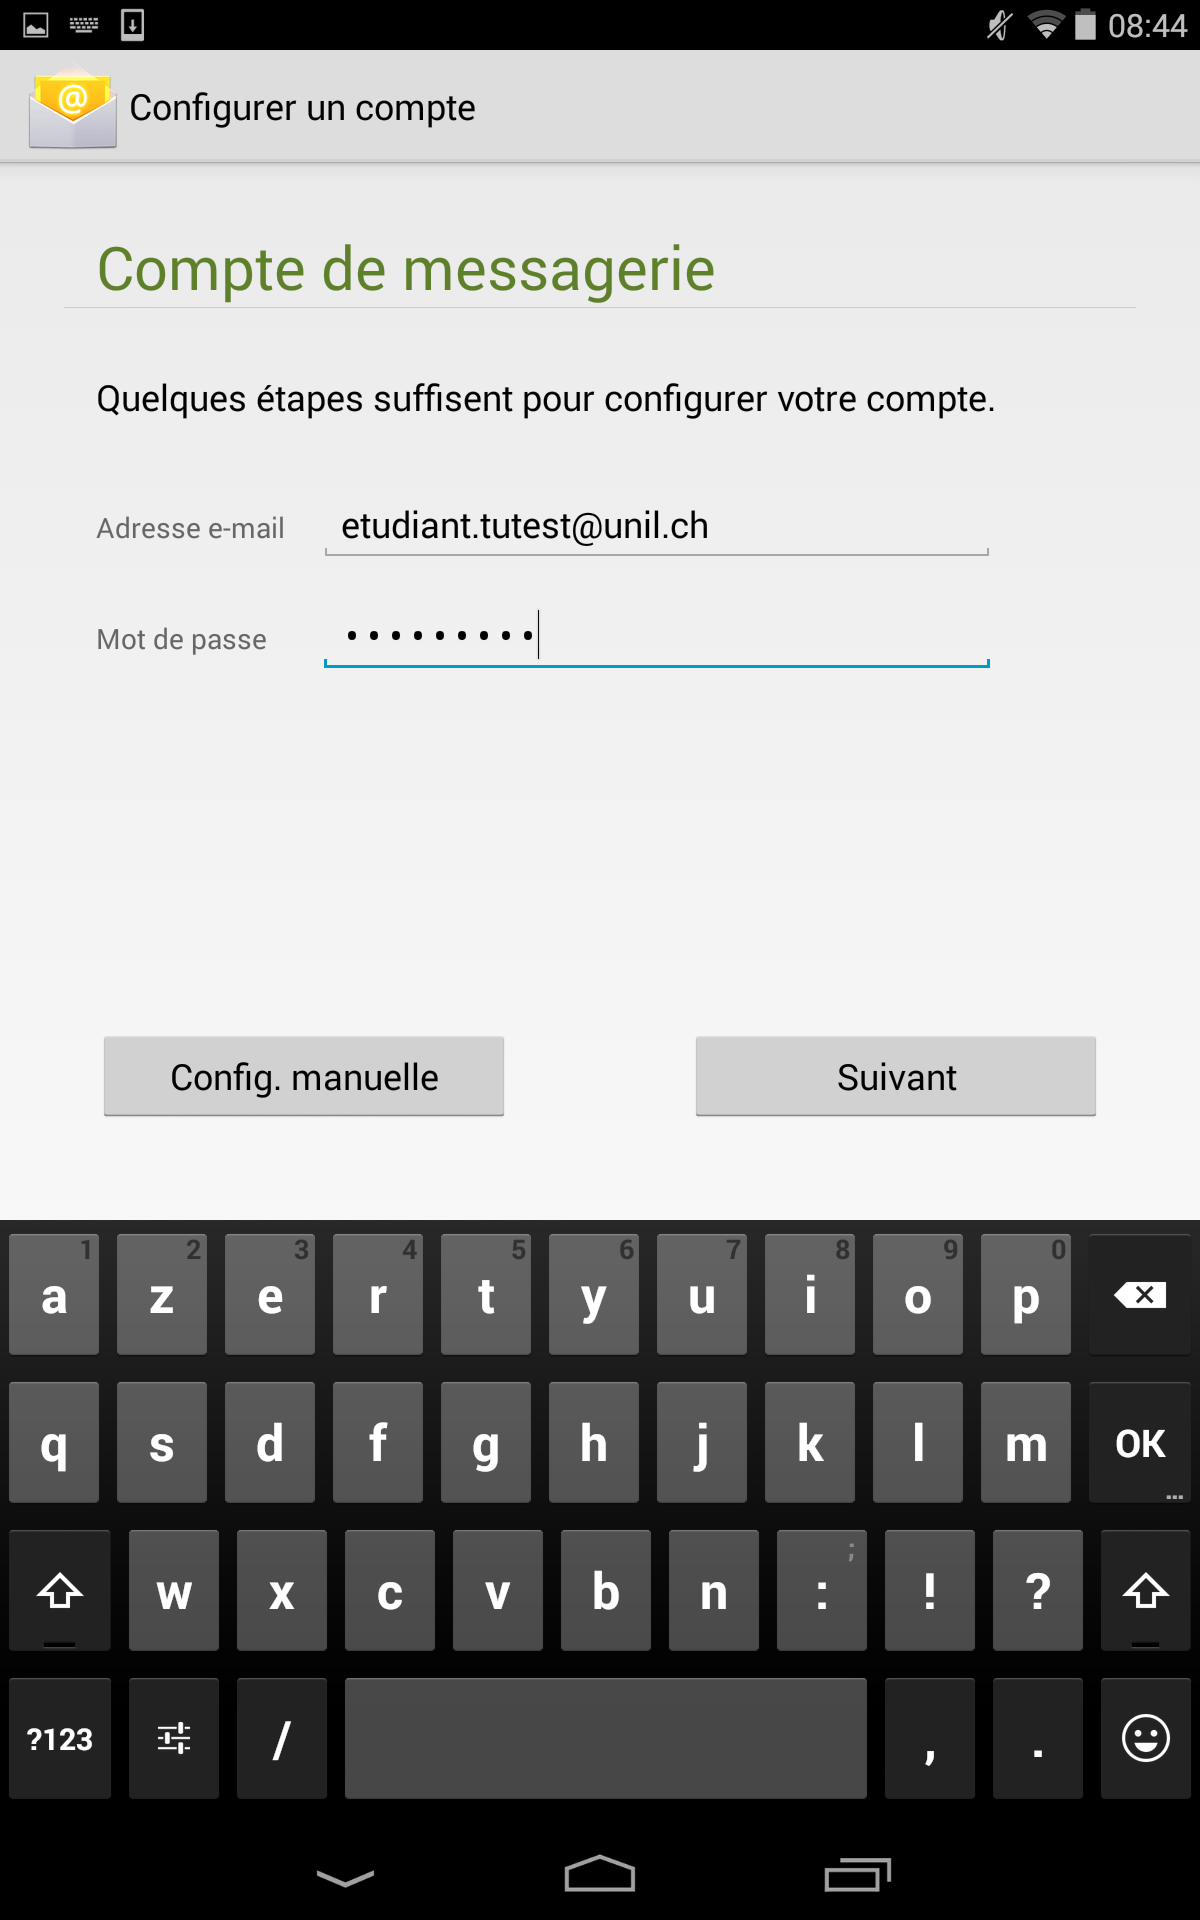
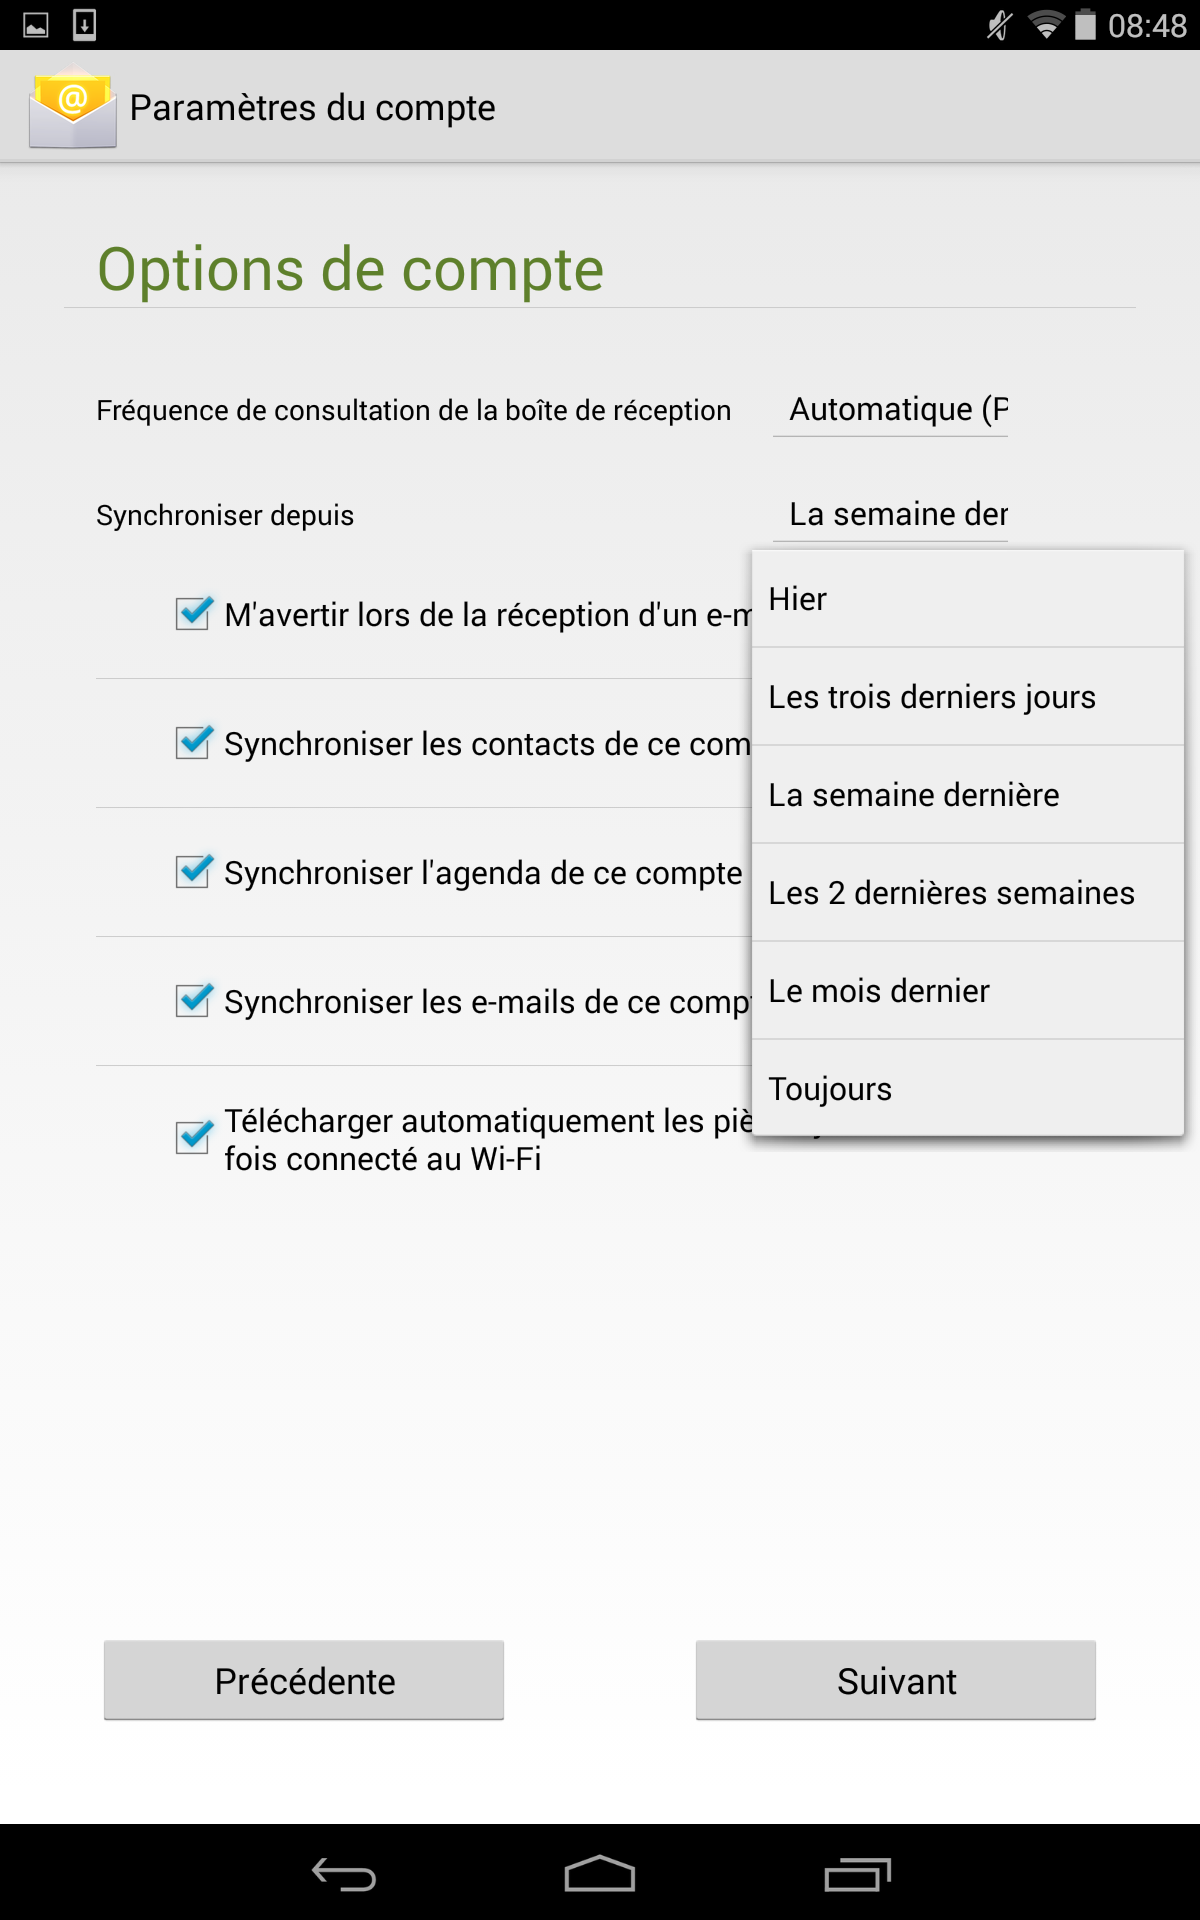
5. SélectionnerSelect lesthe options etand lasynchronisation périodeperiod deyou synchronisation souhaitéeswant
6. AppuyerClick sur "Suivant"“Next”
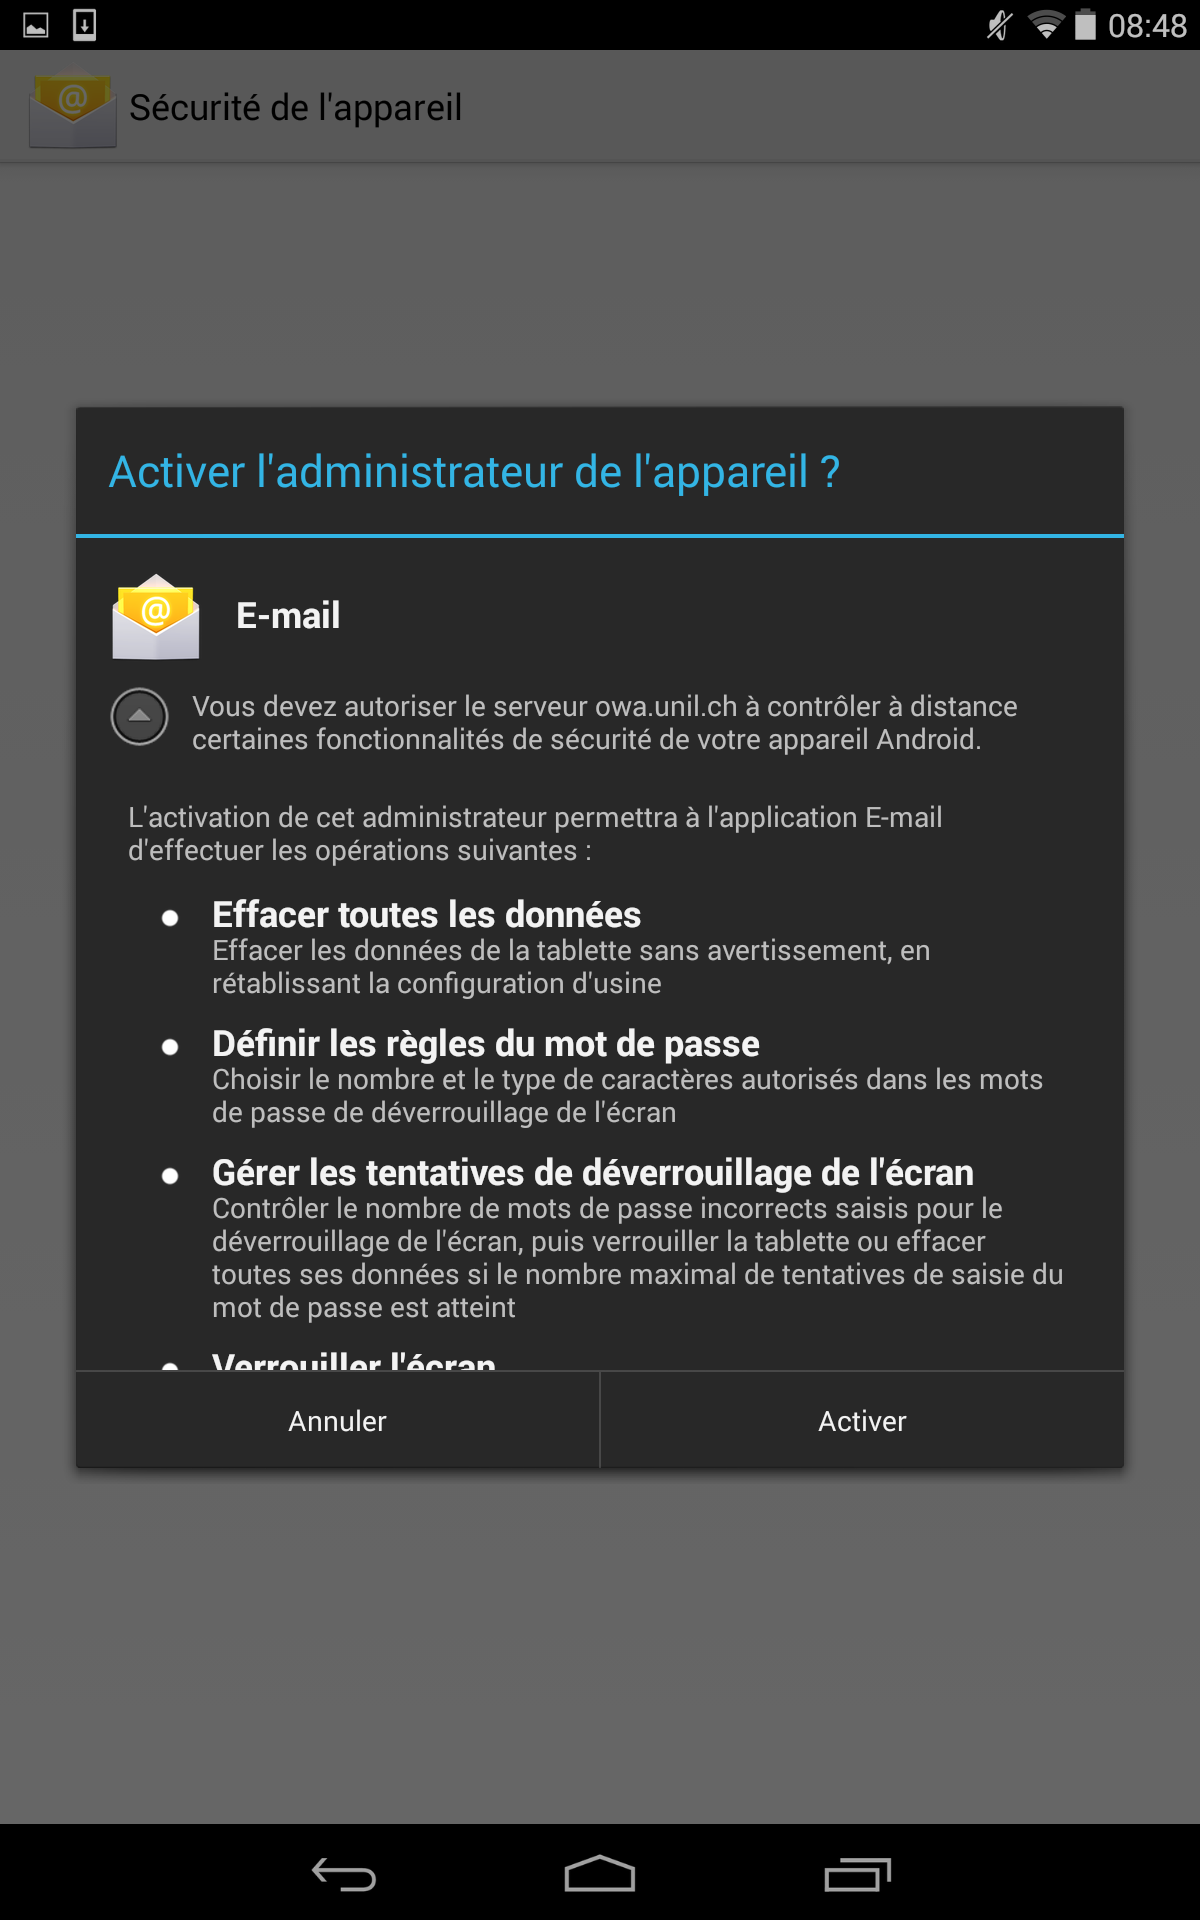
7. AutoriserAllow le serveurthe Exchange commeserver administrateuras enadministrator appuyantby surclicking "Activer"the “Activate” button (vousthis offrelets layou fonctionnalité,remotely enerase casyour dedevice pertein oucase vol,you d'effacerlose àit distanceor votreit appareil)gets stolen)
ConfigurationManual manuelleconfiguration
SiIf lathe automatic configuration automatiquedoes n'estnot passucceed fonctionnelle,you vouscan pouvezfollow suivrethe lasame procédureprocedure jusqu'auup pointto N°step 4 etand appuyezclick surthe le“Manual boutonconfiguration” "Config.button. manuelle".You Vousnow devrezhave ensuiteto compléterfill lesin champsthe avecfields leswith informationsthe ci-dessousfollowing :information:
NomUsername:d'utilisateur :ad\votre_username_unilyour_unil_usernameMot de passePassword :votre_password_unilyour_unil_passwordServeurServer :CocherCheck:theUtiliserUse secured connexionsécurisée(SSL) box
Limitations d'due to Android & solutionsworkarounds
Android ais pourfor l'instantthe lestime limitationsbeing suivanteslimited parin rapportits àsupport of the Exchange :services:
unethereseuleiscouleuronlypouronelescolourcalendriersfor calendarspastheredeis no supportdesoftâchestaskset desand notes systems
These
L'applicationyou suivanteto permetwork dearound comblerthese certaines de ces lacunesissues (lethe Ci nedoes garantithowever pasnot songuarantee bonthat fonctionnementthey etwork n'assureand aucunoffers support)no support whatsoever for them):
AutresOther

ConfigurationSetup for generic e-mail clientsmails génériques
ClientsGeneric e-mail génériquesclients
CesThis informationsinformation sontis destinéesmeant àfor dessoftware logicielsthat nedoes supportantnot passupport Exchange etand sesits fonctionnalitésmore avancéesadvanced functions (calendrier,calendars, contacts,address tâches,book, tasks and notes)
-
serveurIncomingde réceptionmail server-
imapx.unil.ch
-
port 993
-
SSL/TLS
-
authentificationauthenticationparwithmot de passepassword
-
-
serveurOutgoingd'envoimail server-
smtpauth.unil.ch
-
port 587
-
STARTTLS
ouorsimplementsimply TLSselondependingleon your client -
authentificationauthenticationparwithmot de passepassword
-
MailUNIL e-mail with your private e-mail address
Use your UNIL avec votre messagerie privée
Utiliser le e-mail dewith l'UNILyour avecprivate votreemail messagerie privéeaddress
PourOnly lesfor étudiants uniquement!students!
EnIf utilisantyou lachoose configurationto proposéedo ici,so, vousyou confiezare vosentrusting donnéesyour àown desdata sociétésto externescompanies àthat l'UNIL.are C'estexternal pourquoito lethe UNIL; this is why the Centre informatique n'offre aucundoes not offer any support pourregarding l'the utilisation deof cesthese siteswebsites web etand necan peutin enno aucunmeans casbe êtreheld tenuresponsible responsablefor pourany toutkind typeof dedamage dommagethat survenuwere lorsto dehappen l'utilisationdue deto cesyour sites.use of these websites.ConcernantConcerning lesthe employés,university l'utilisationstaff, d'unusing an external service externemay peutgo alleragainst à l'encontrethe desinternal UNIL directives de l'UNIL.
Transfer Redirigeryour les e-mails versto uneanother autree-mail adresse de messagerieaddress
1. SeLog connecter sur into https://owa.unil.ch avec leswith identifiantsyour UNIL.UNIL credentials.
2. AllerGo dansto lethe “Options” menu "Options"

3. DansUnder "Règlesthe de“Organize boîteemail” desection réception",click appuyeron sur le "“+"”
4. SélectionnerSelect "Créer“Create unea règlenew pourrule lesfor messagesarriving entrants..."messages”
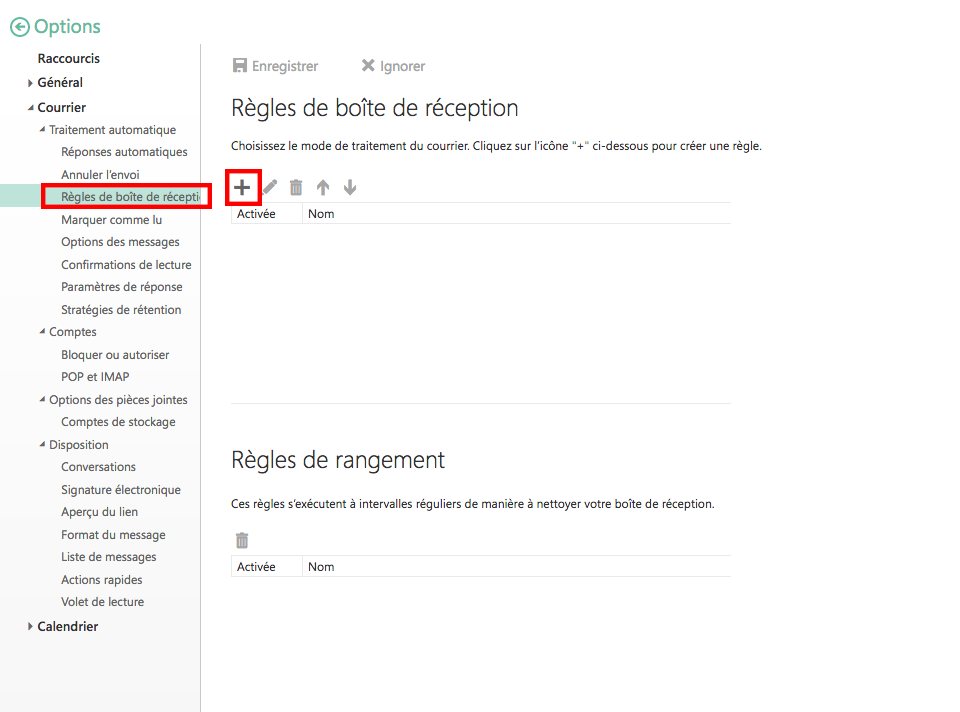
5. NommerName lathe règle,rule, choisirchoose "Appliquer“Apply àto tousall lesmessages” messages"and et“Redirect "Transférer lethe message à..."to…”
6. EntrerType votrein adressethe deprivate messageriee-mail privéeaddress pouryou lewant transfertto use for the transfer
7. AppuyerClick suron "enregistrer"the “Save” button
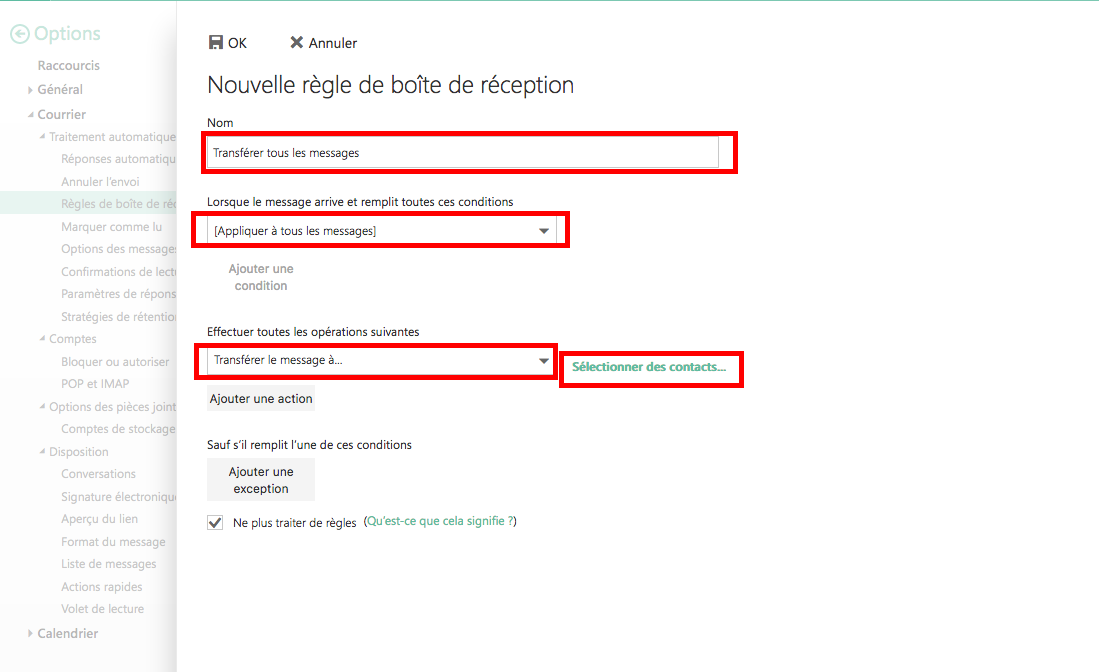
8. TerminerFinish enthe acceptantprocedure lesby avertissementsaccepting the warning message