Introduction, search and navigation
This section guides you through your first steps on IRIS, introducing you to the general interface, the main menus and the navigation tools. You will learn how to carry out an effective search, filter the results and quickly access relevant content.
- Overview
- Special rights
- Access your researcher profile
- Searching IRIS
- Advanced search
- Search and filter faculty publications
- My workspace
Overview
The voice in this video was generated by artificial intelligence.
Introduction
Before you start working with IRIS, it is important to become familiar with four key concepts.
Workspace: it mainly allows you to view the records you have created and to create new ones. To explore its features in detail, visit this page.
Researcher profile: it provides an overview of your academic and personal data. To explore its features in detail, visit this page.
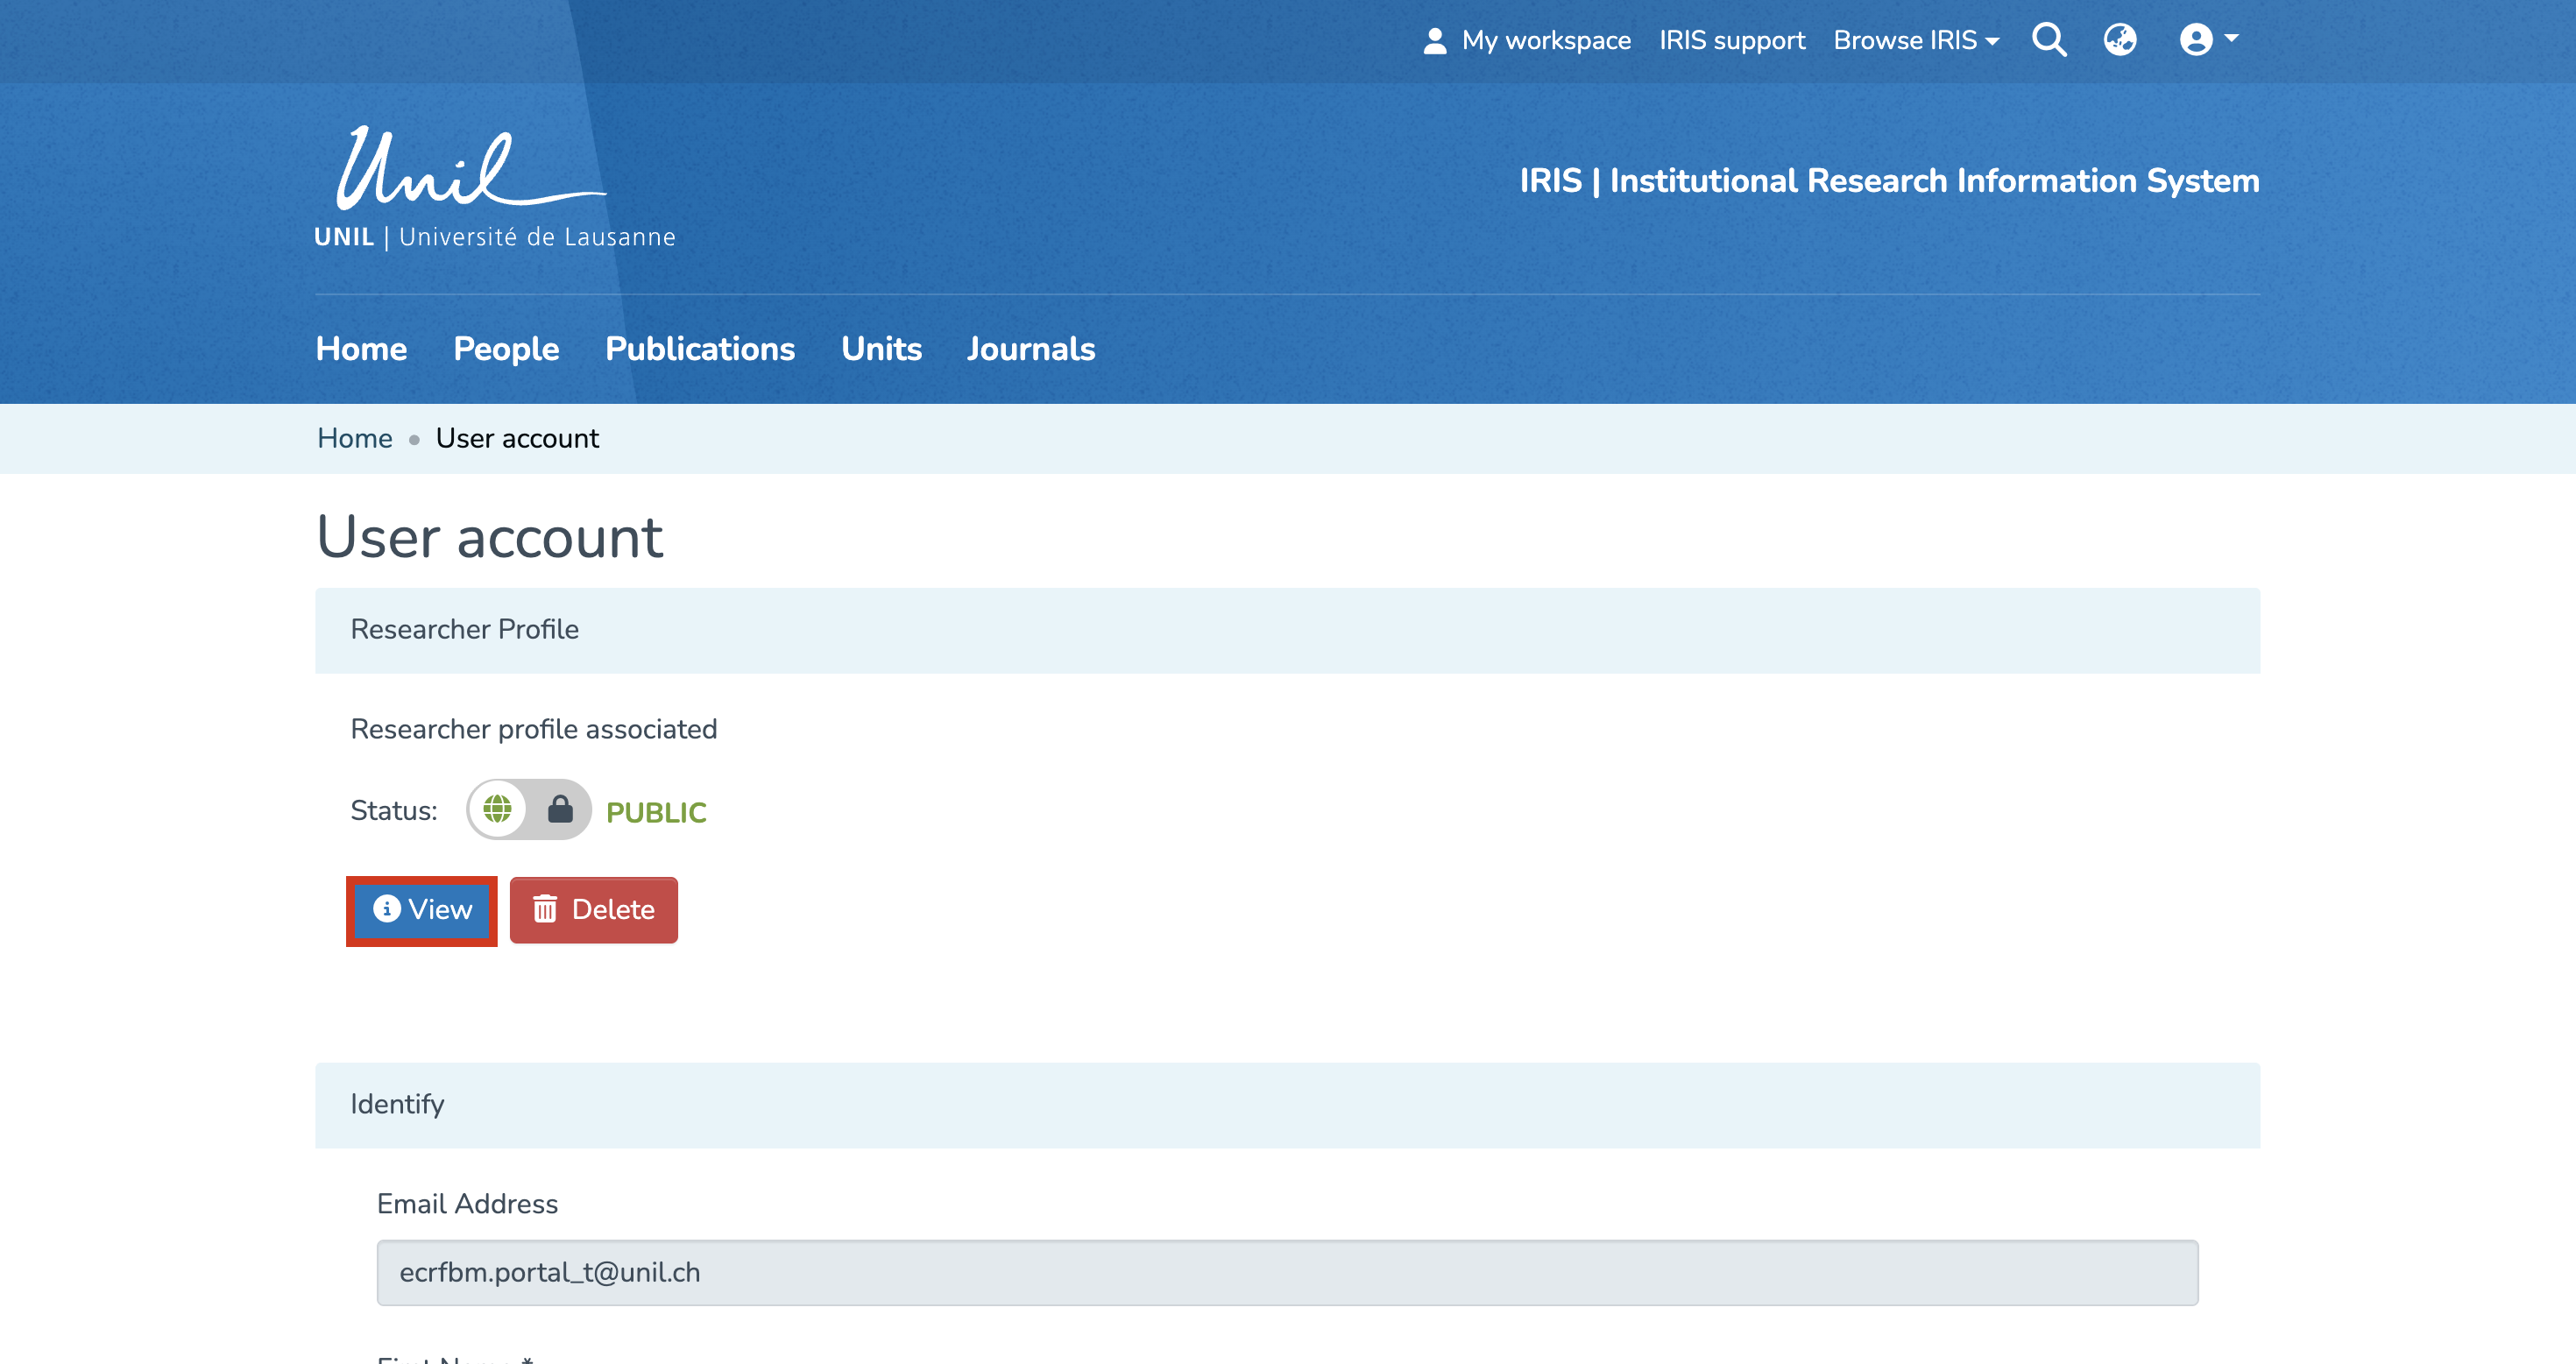
User account: here, you can check your account settings as well as your personal information, and update your profile. To access it, click on the login menu at the top right.
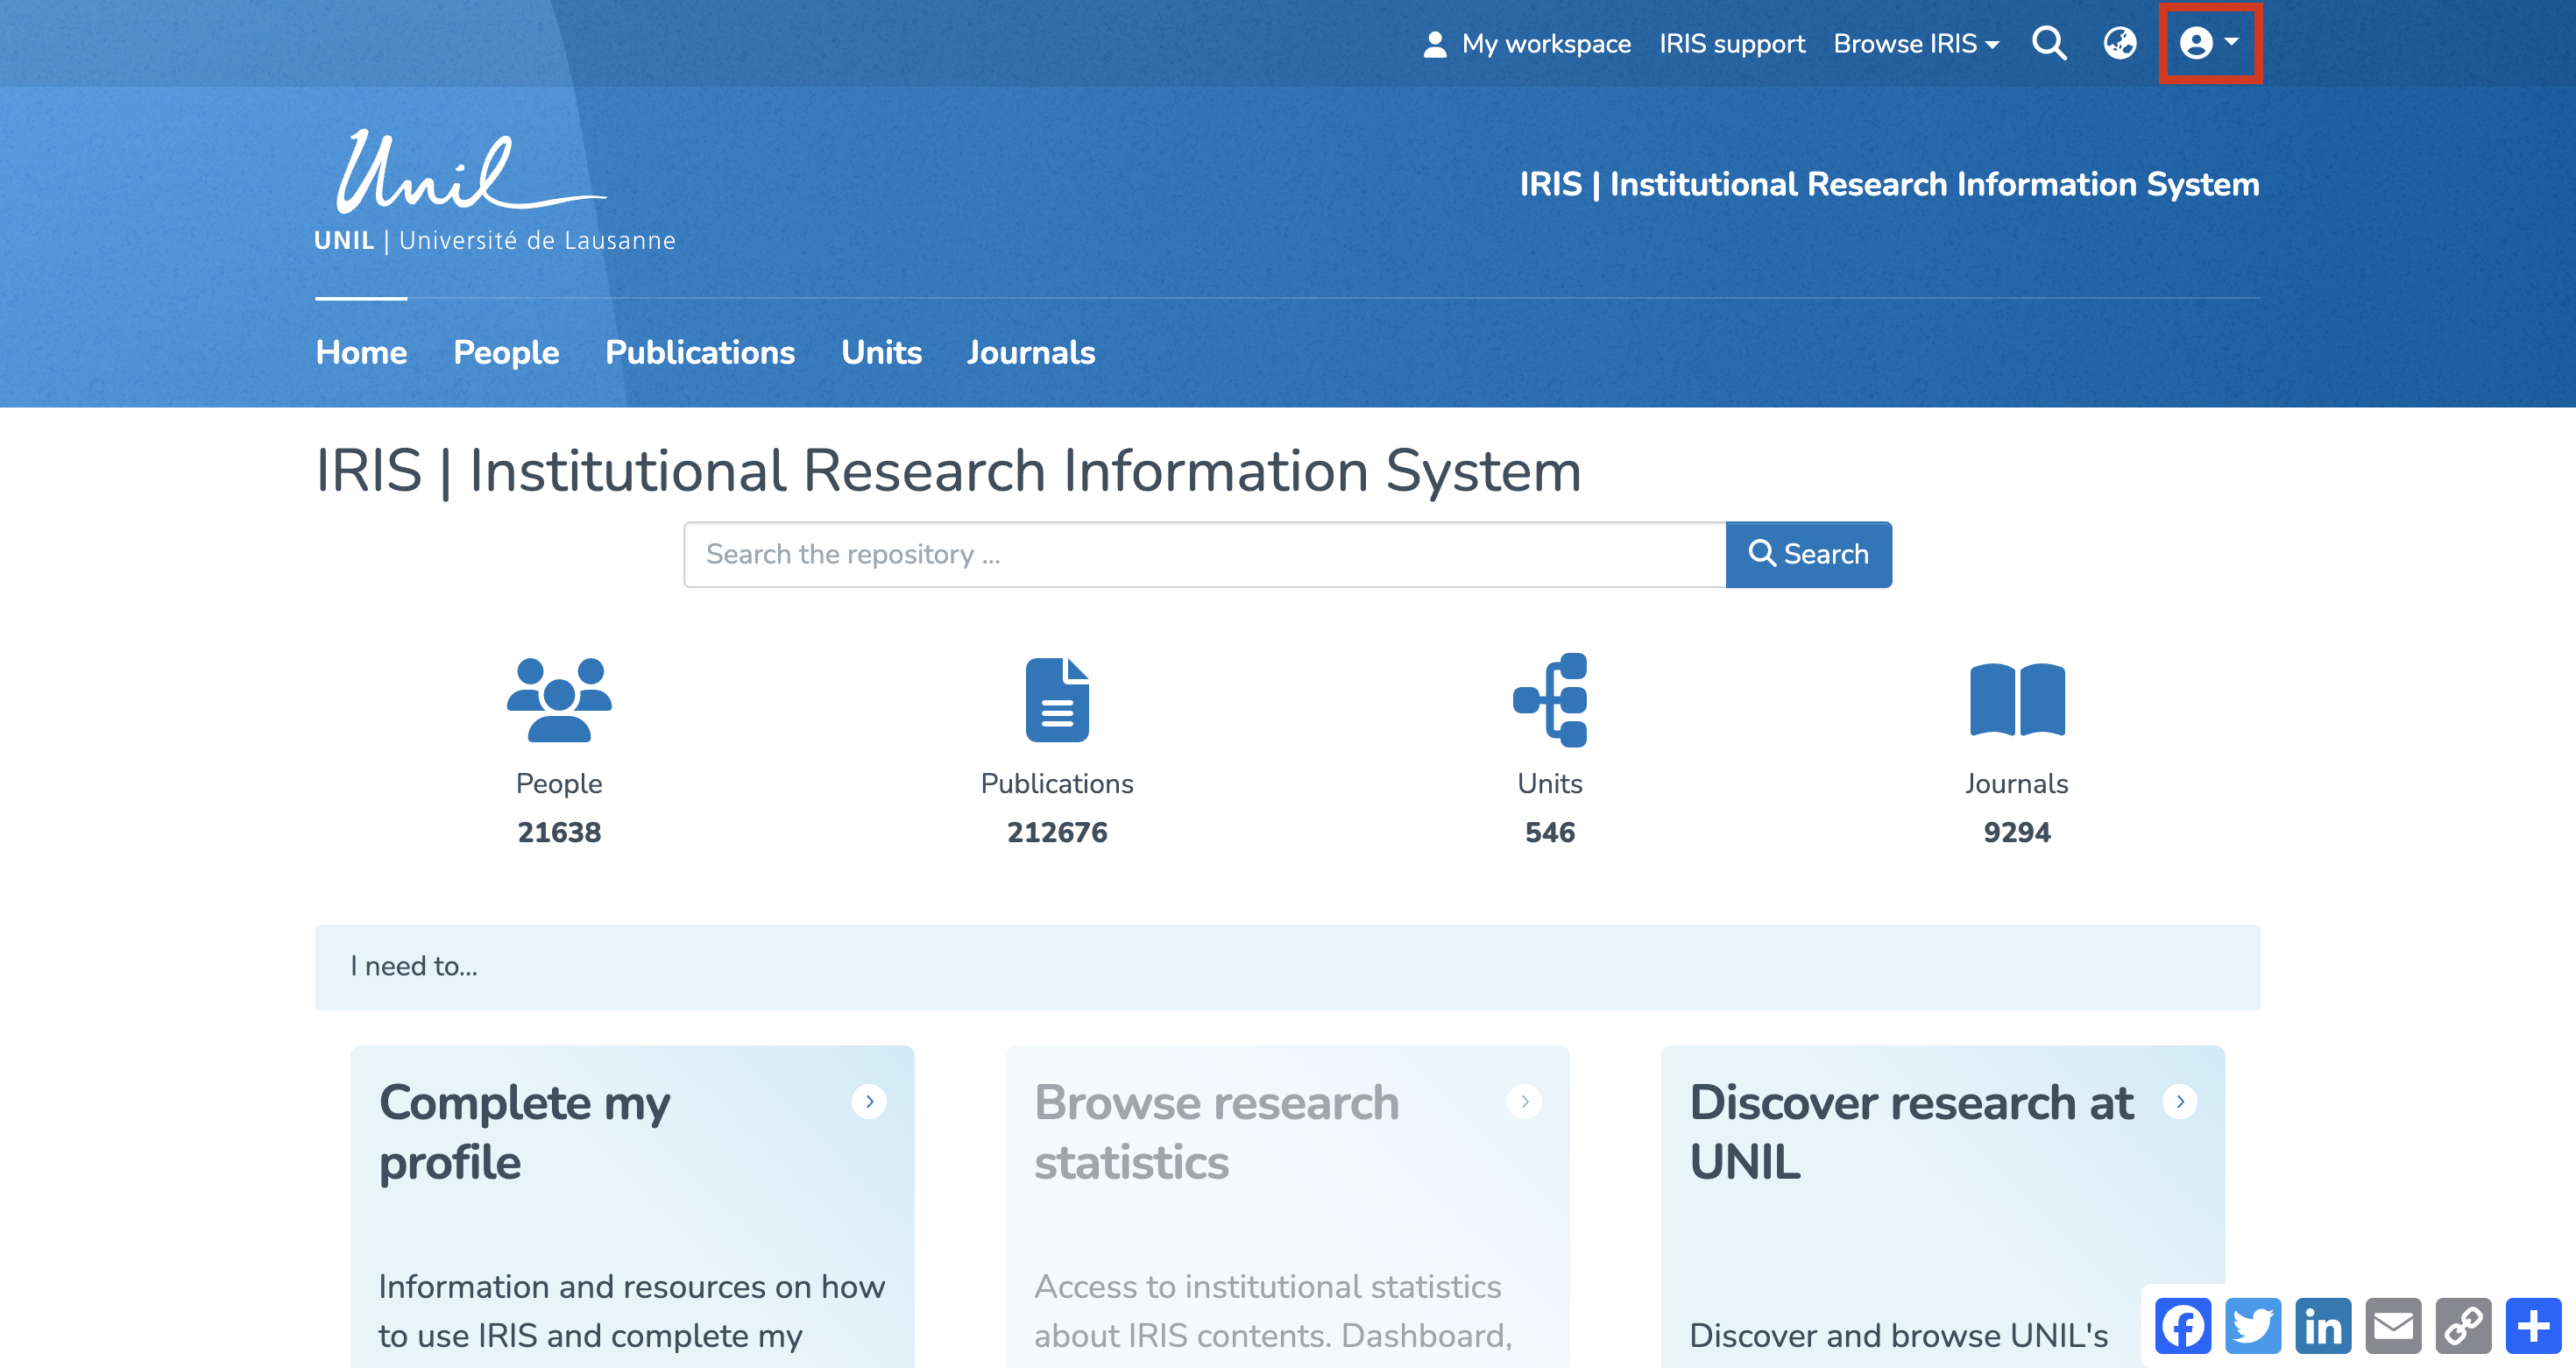
In the drop-down menu, select the option "My account and profile".
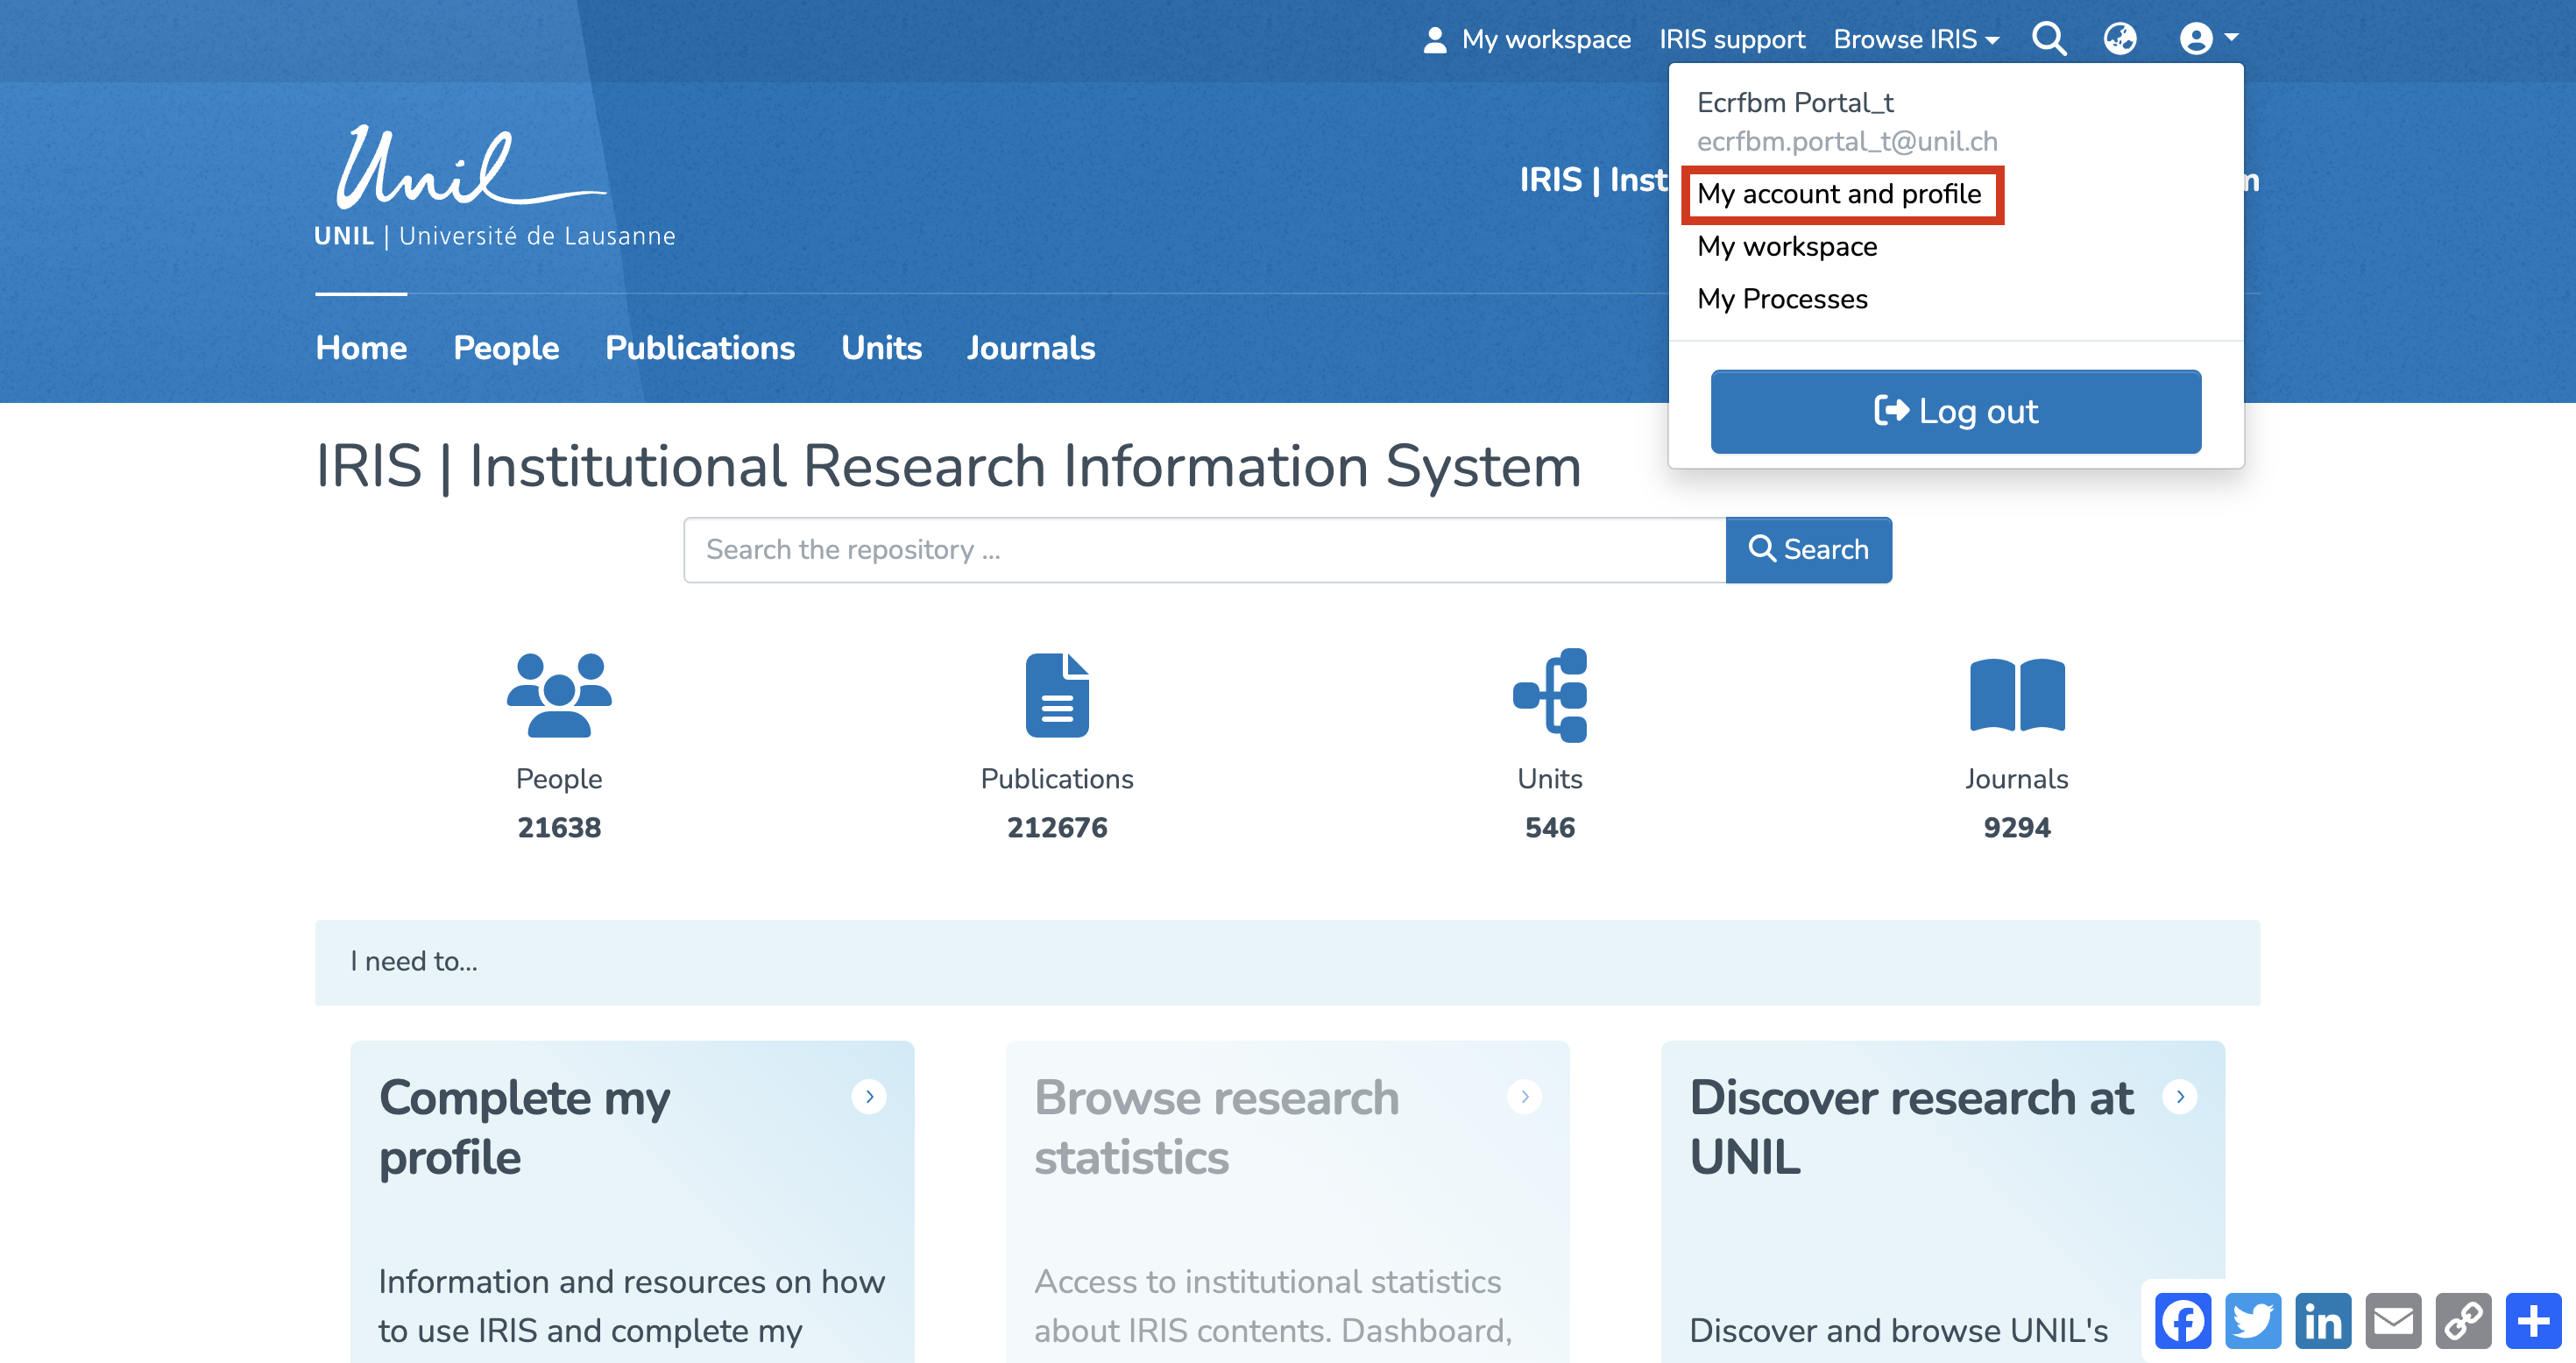
You will then be redirected to your user account. From this page, you can also access your researcher profile by clicking on "View".
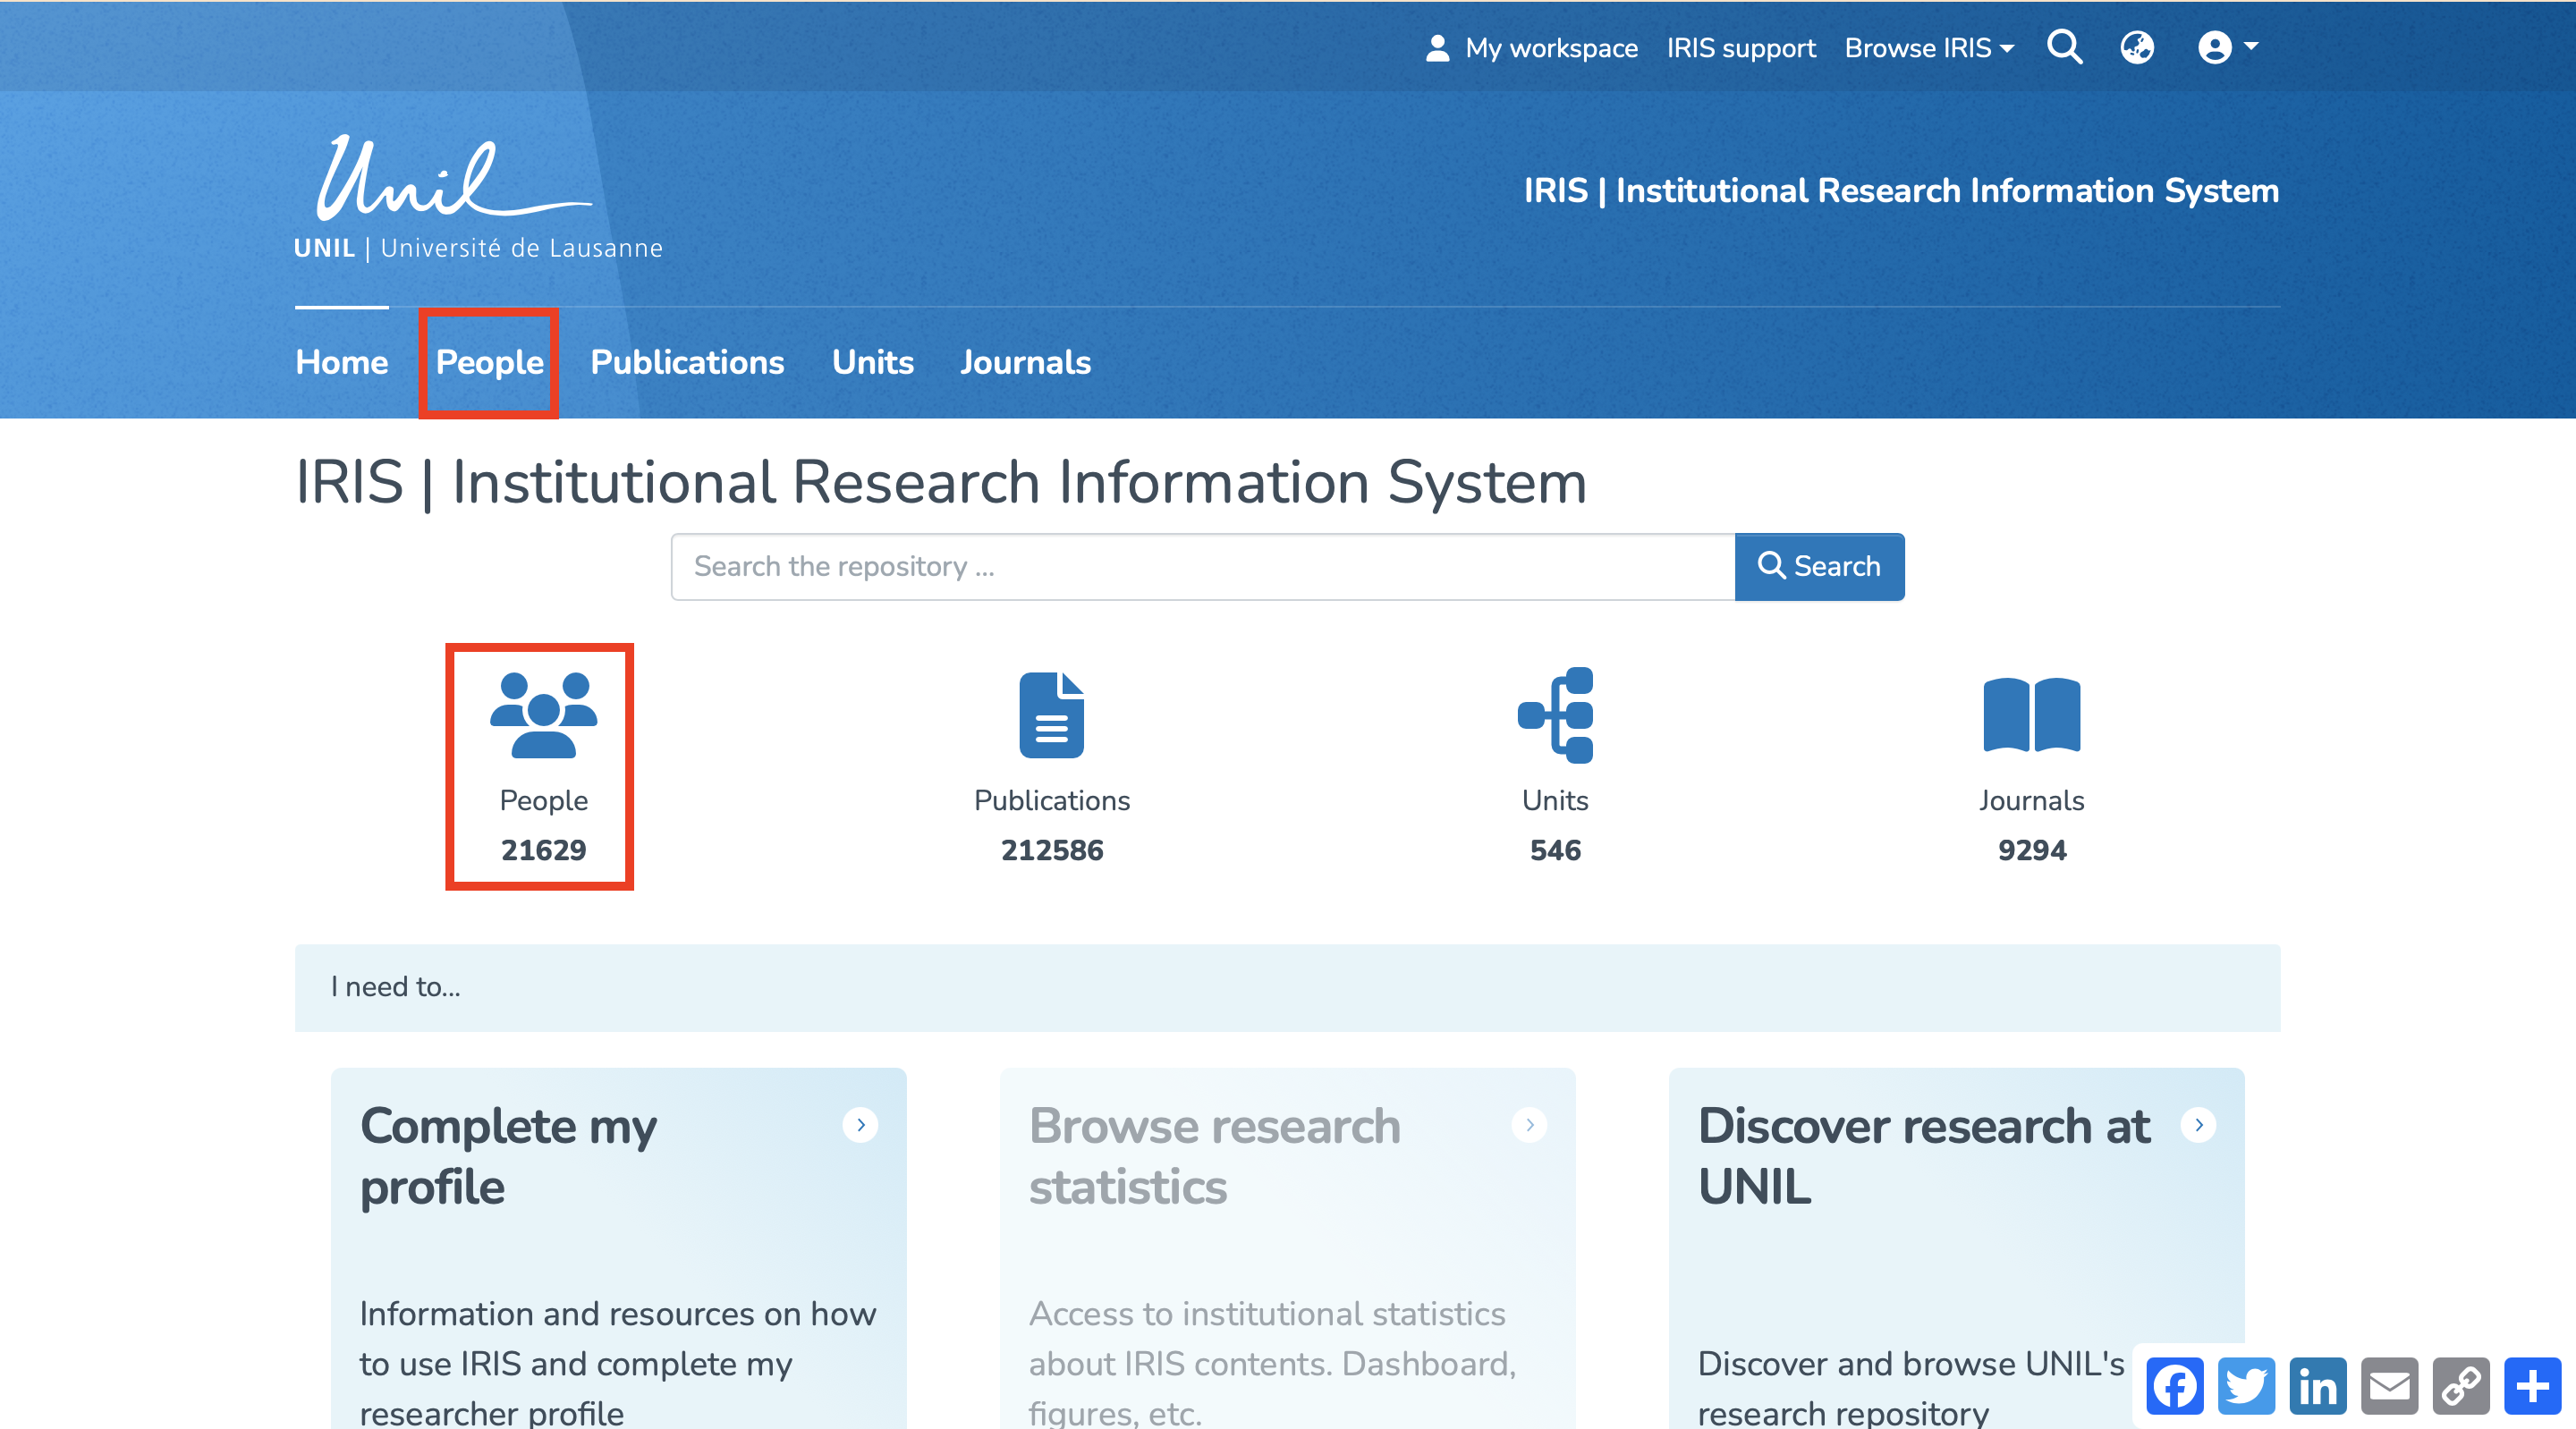
Collections: each collection represents a specific category of research-related data, such as collaborators, publications, units, and journals. There are four collections in IRIS:
-
People: this collection includes the collaborators in IRIS. You can search for repository members and view their researcher profiles.
-
Publications: this section gathers all deposited works and provides access to their metadata.
-
Units: this collection lists the research units. It also allows you to access their profiles to view their information and related publications.
-
Journals: in this section, you will find all journals and periodicals linked to a publication in the repository.
Initial Features
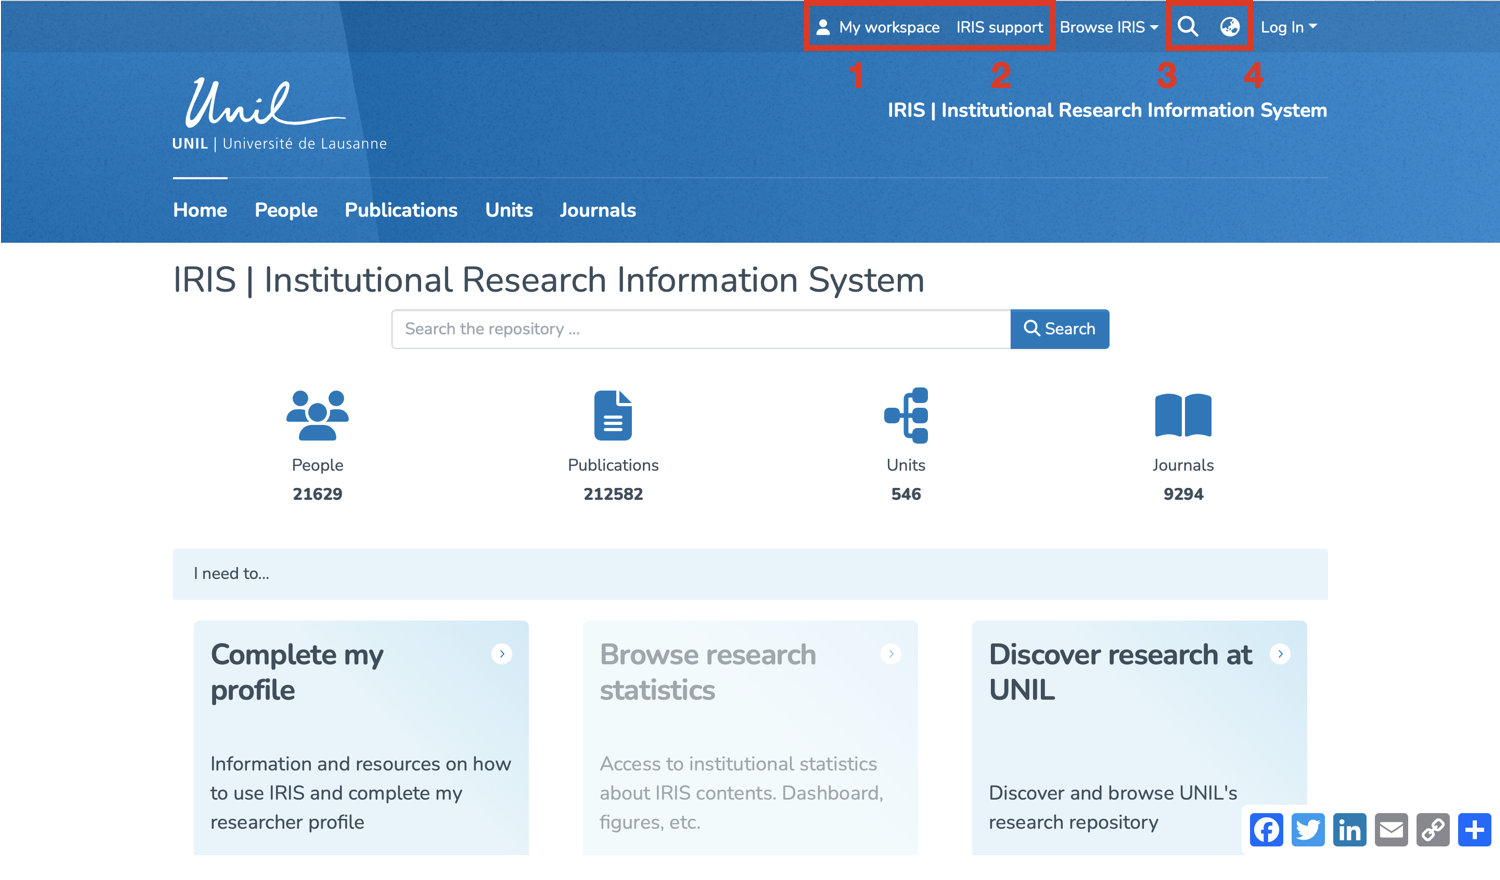
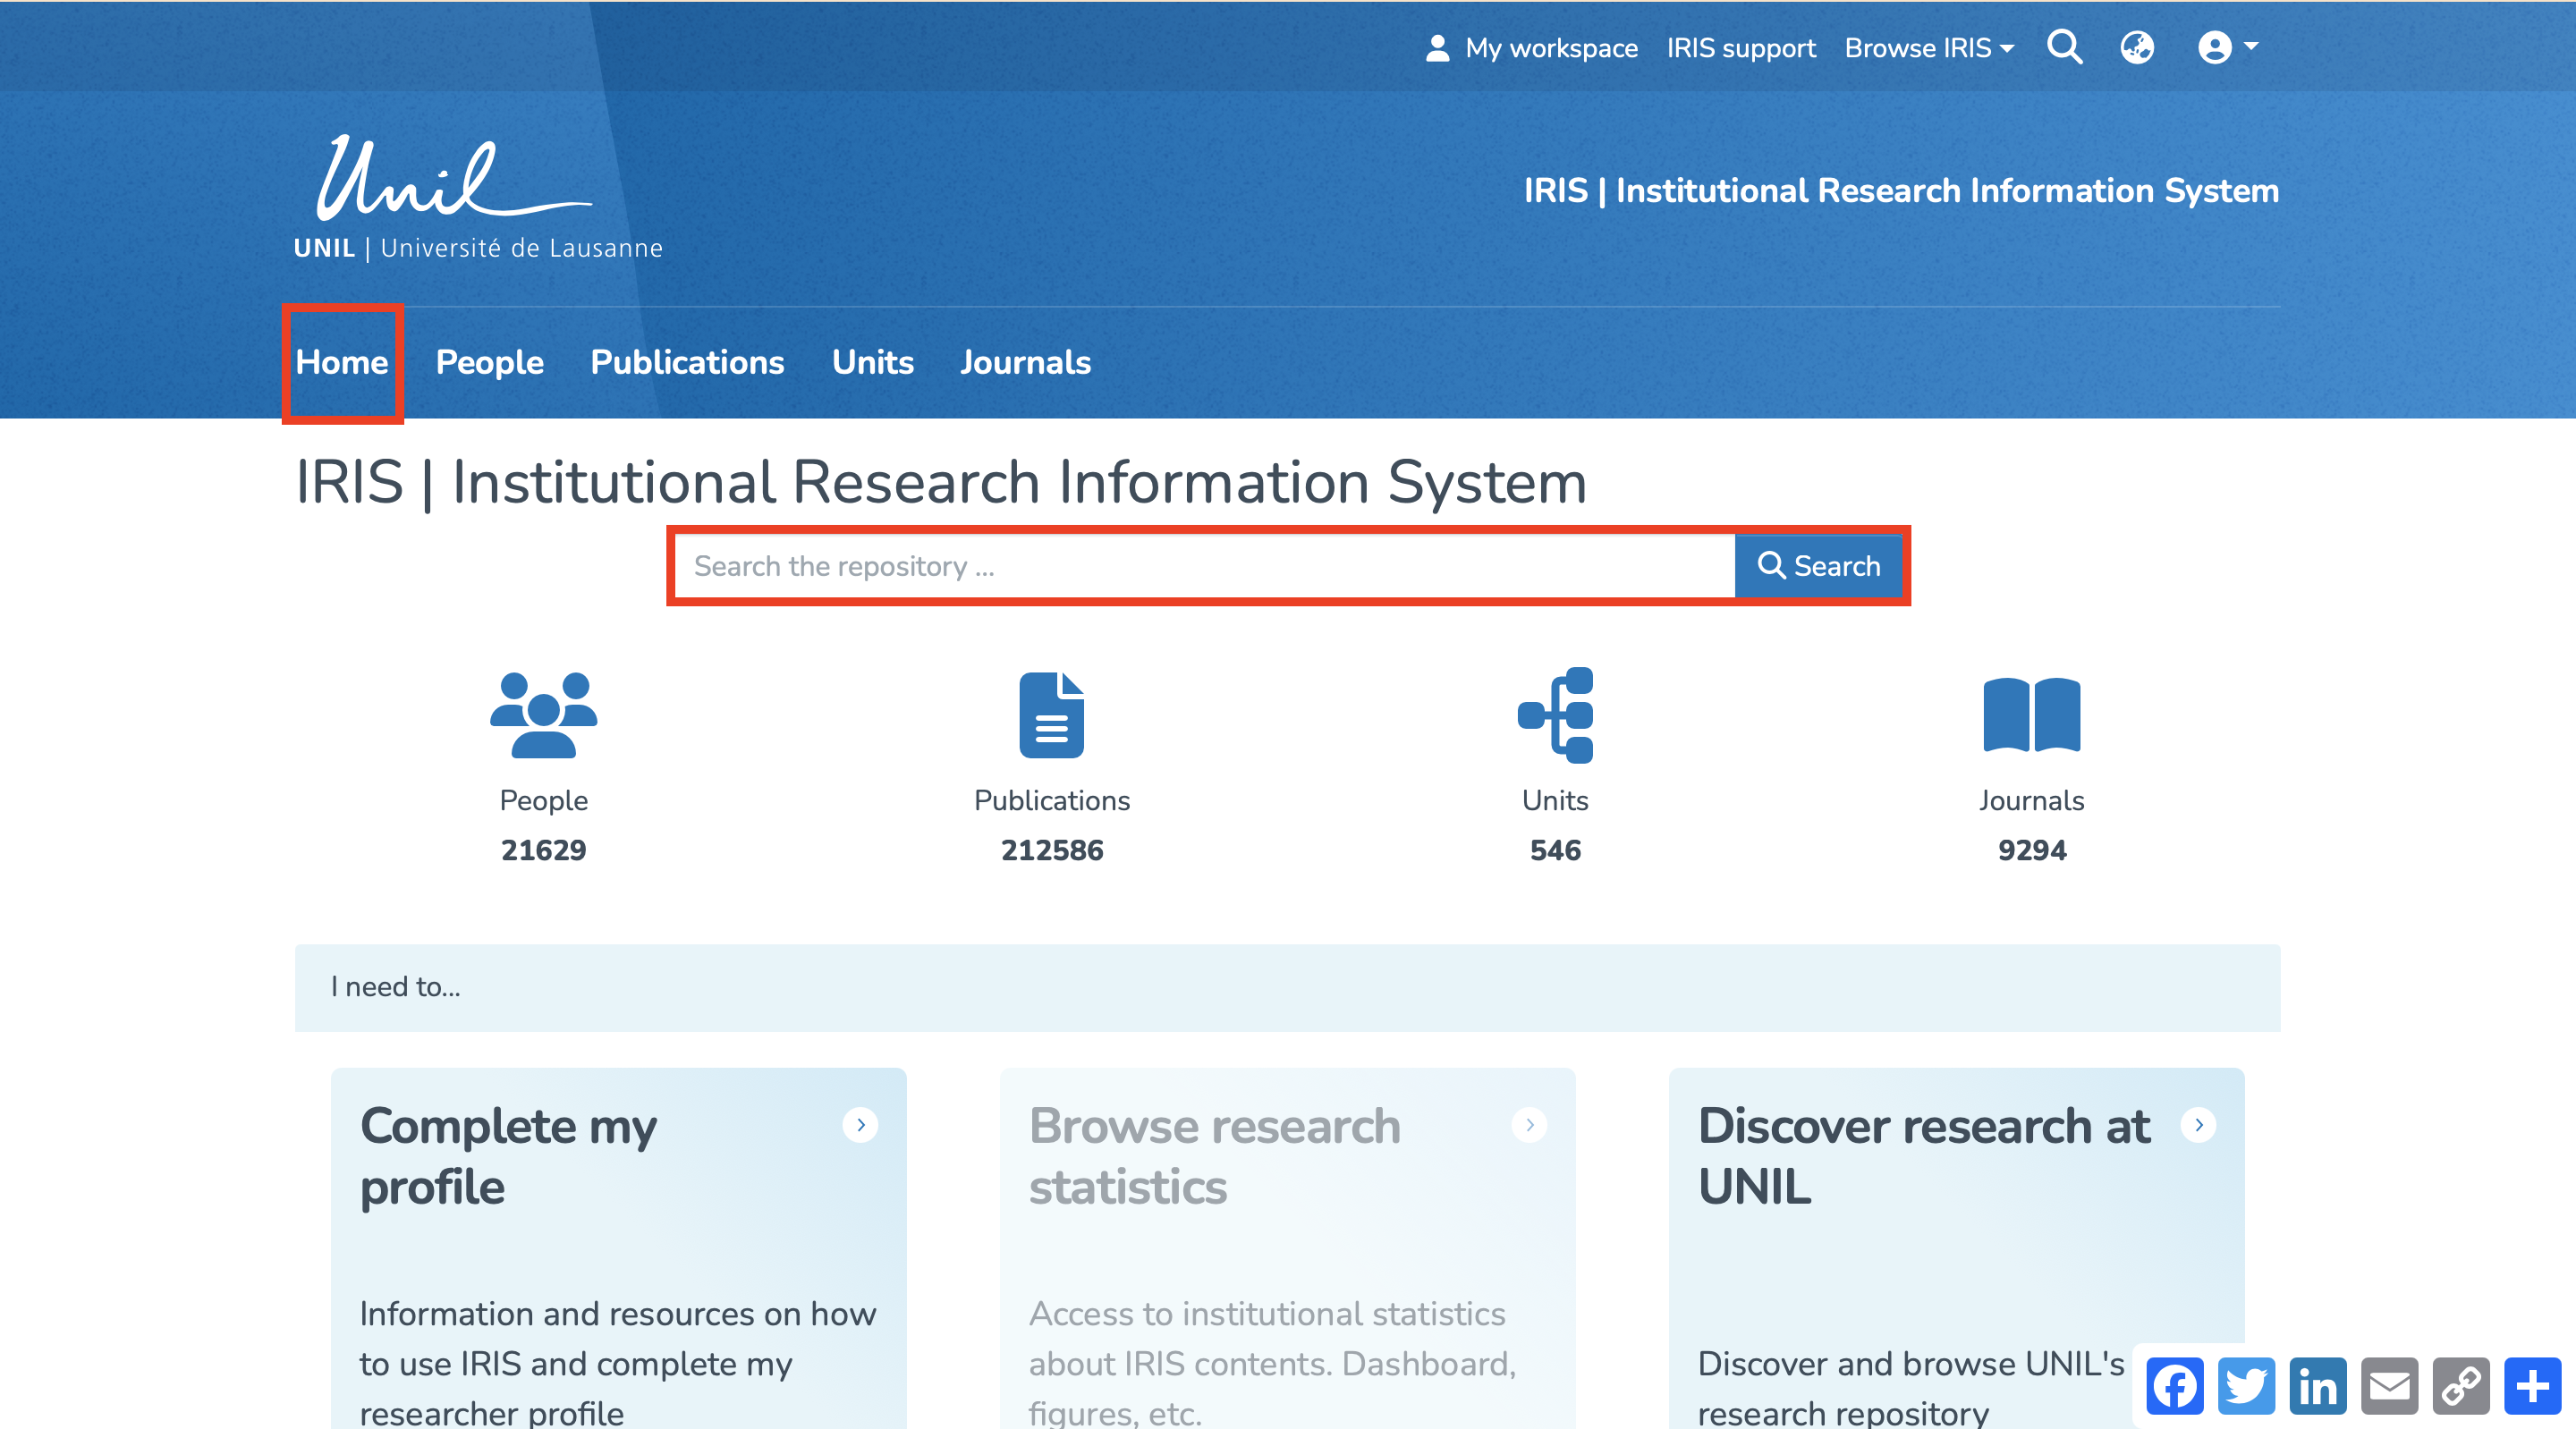
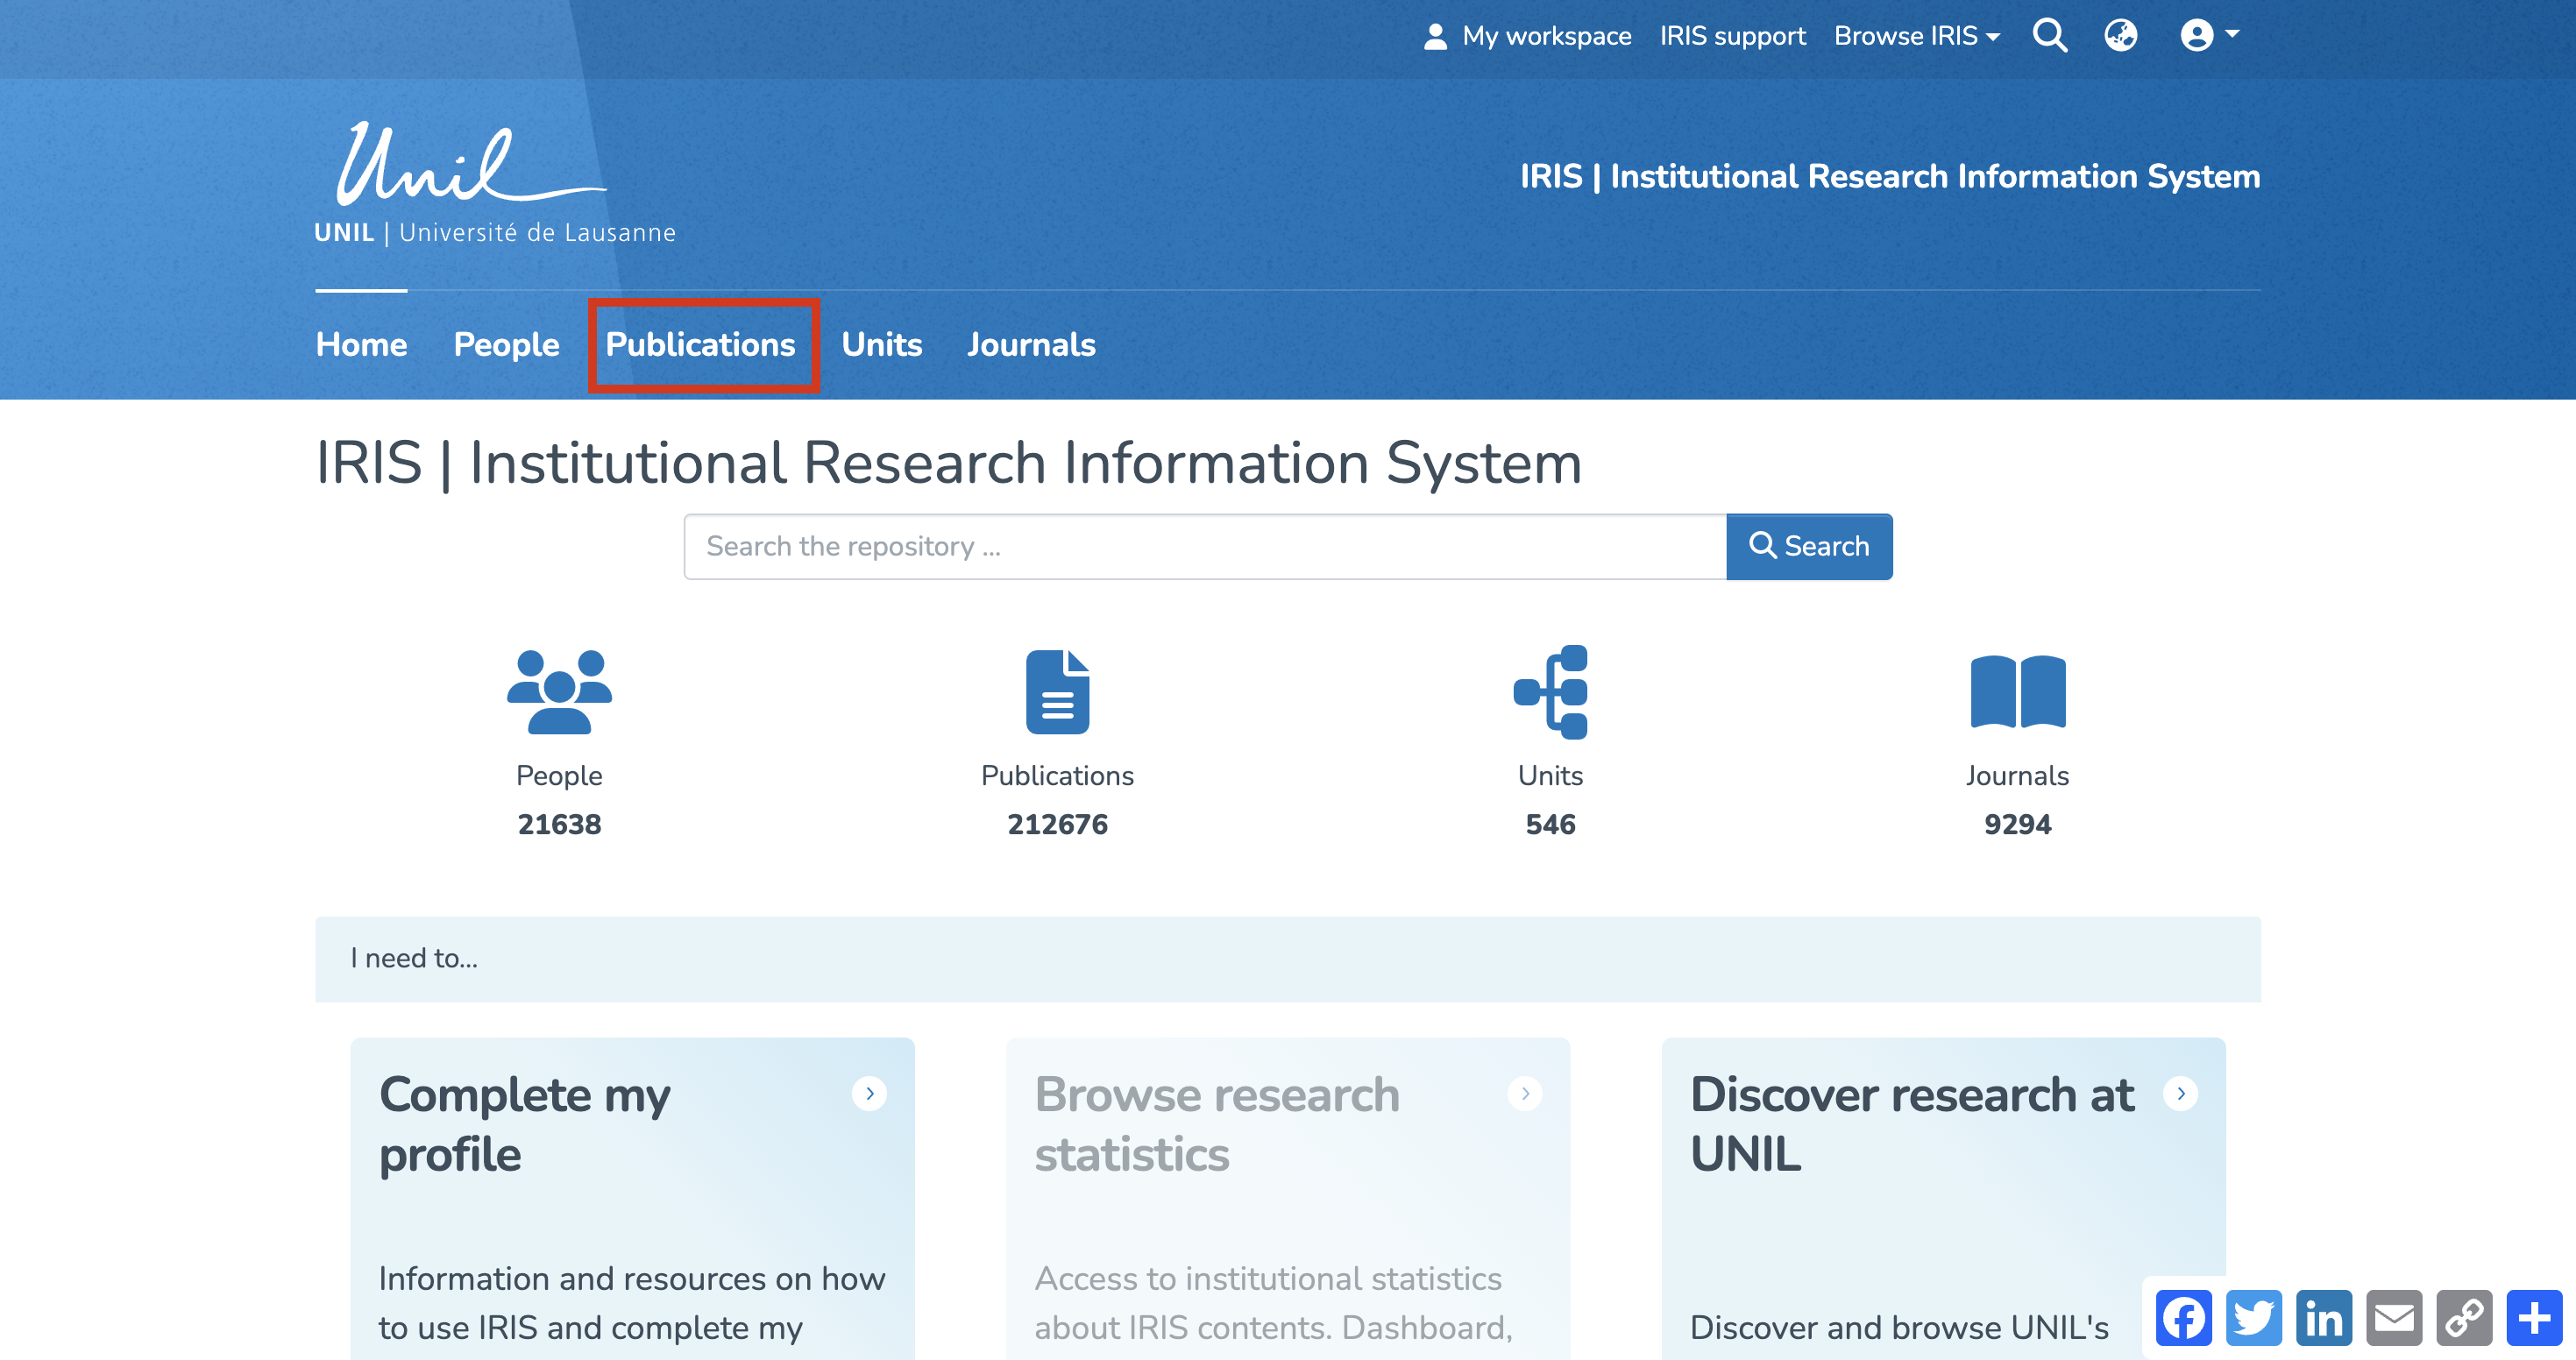
Once you are logged in, you will be redirected to the IRIS homepage. In the top-right corner of this page, you will find the following features:
1. My Workspace: This section allows you to view the records you have created and to create new ones.
2. IRIS Support: Access IRIS support and related documentation.
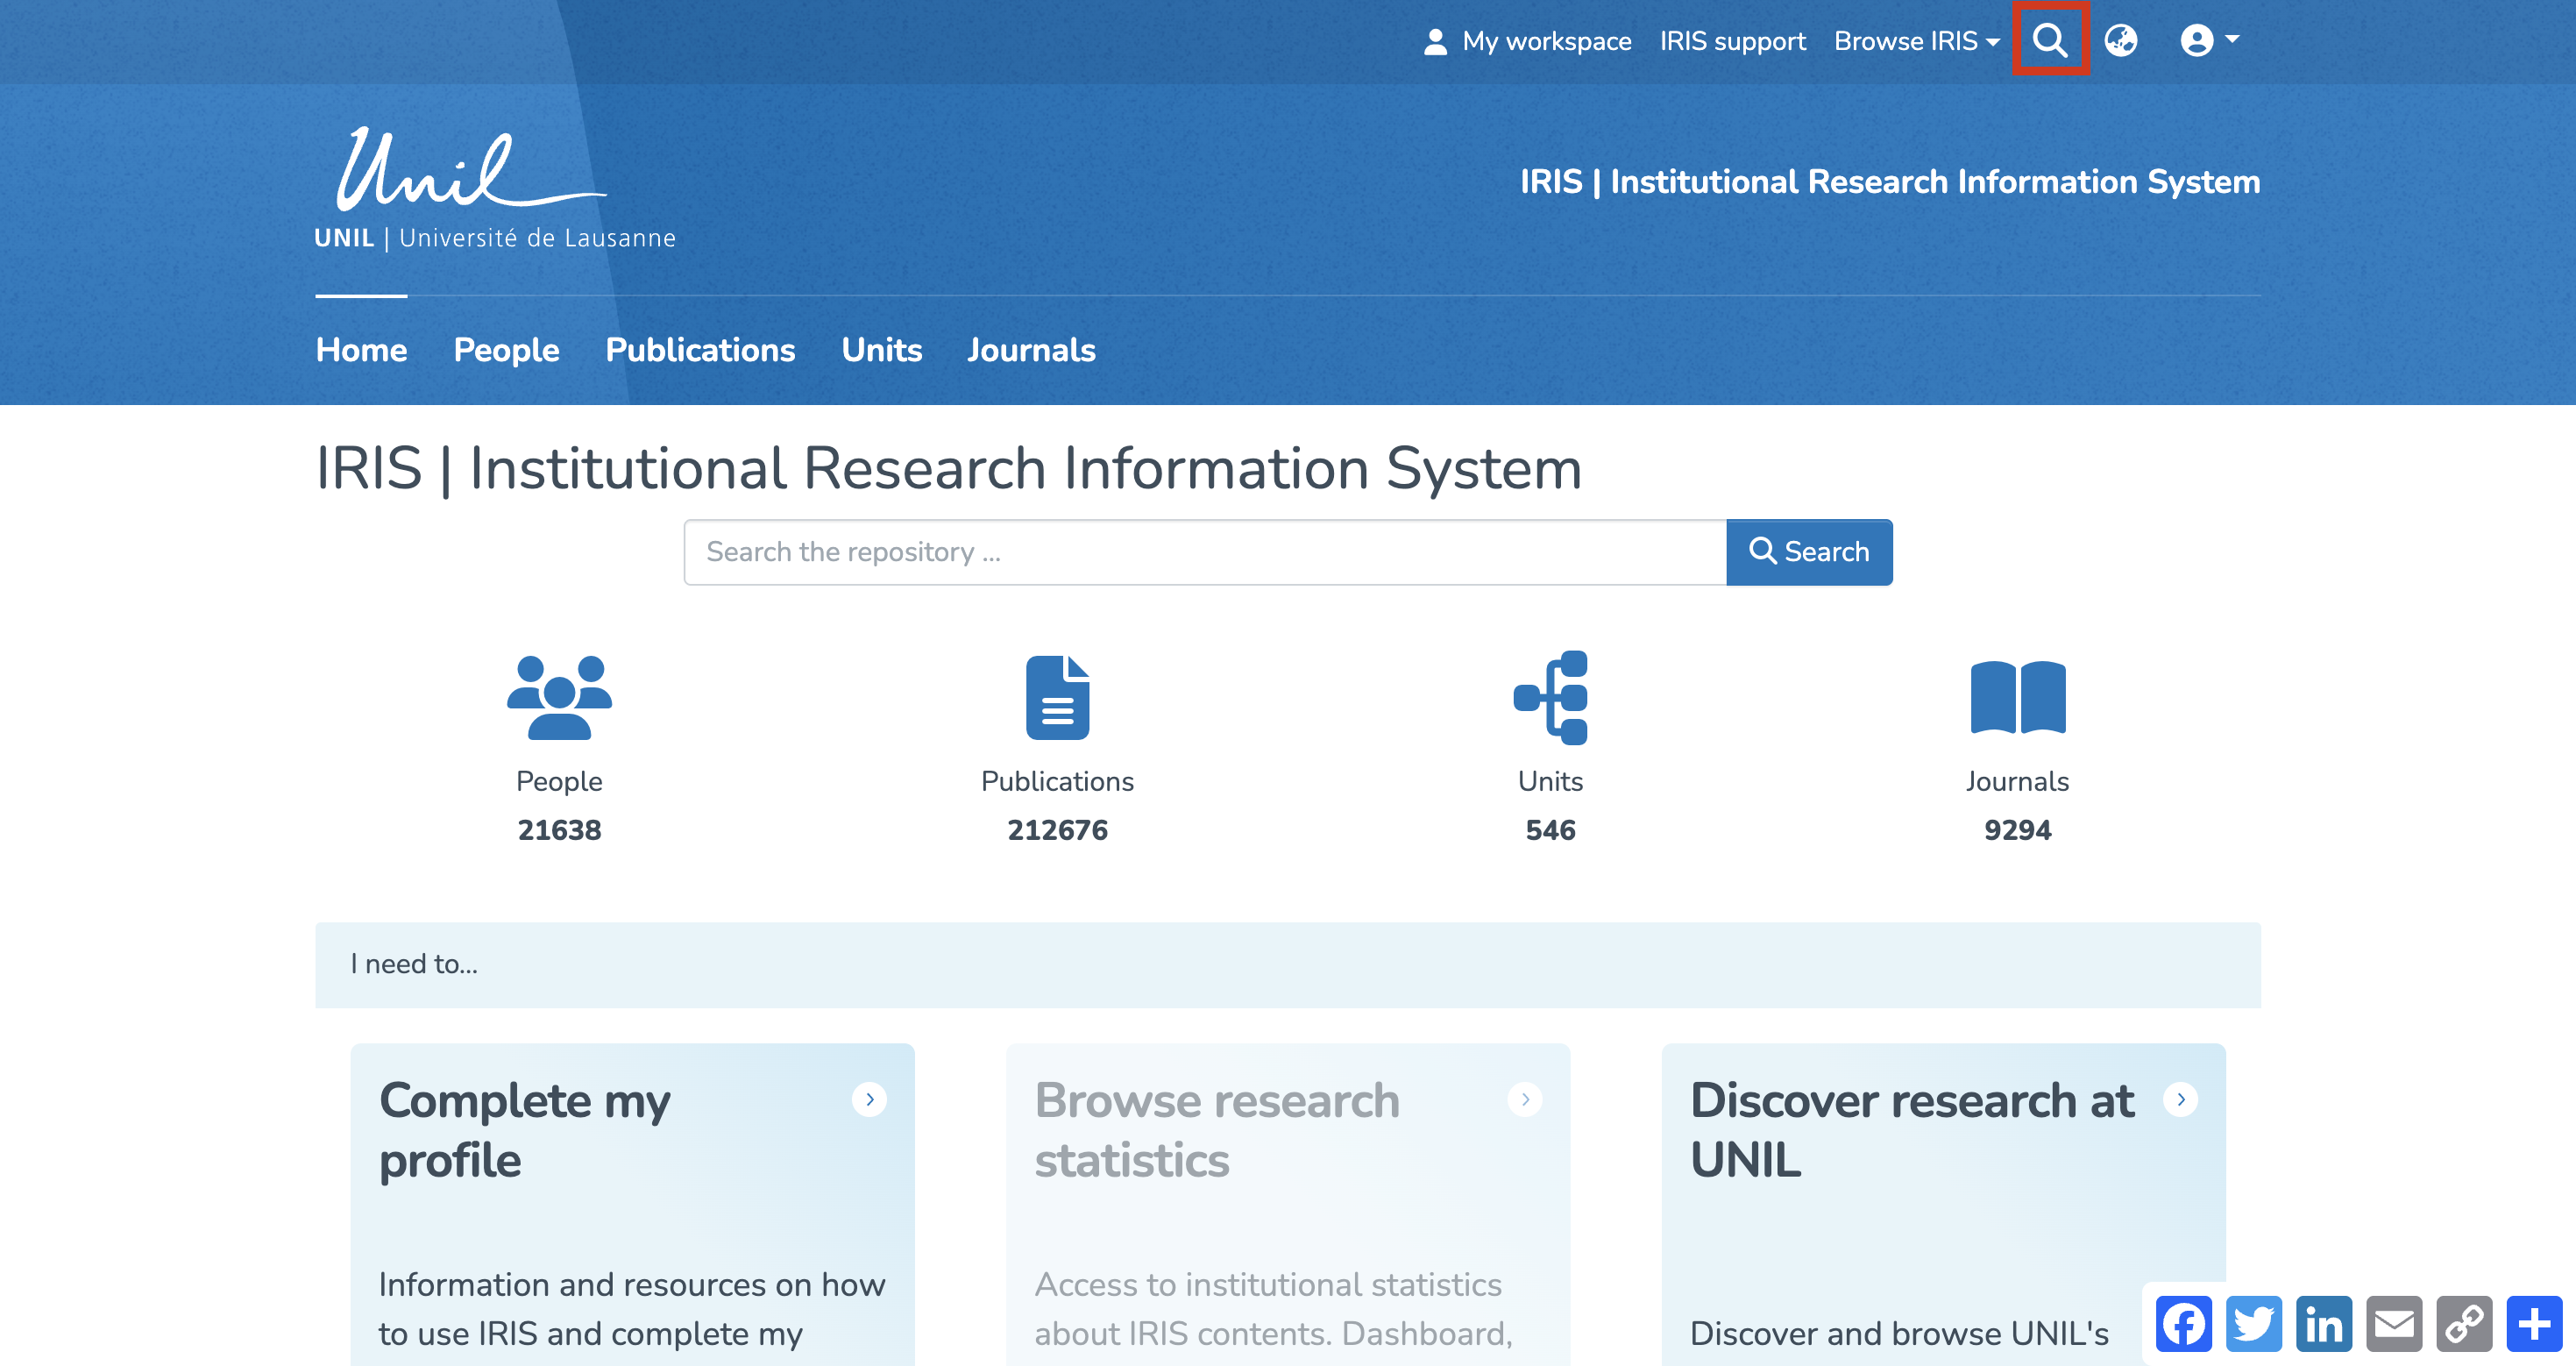
3. Search the entire repository.
4. Select the interface language (French/English).
Search
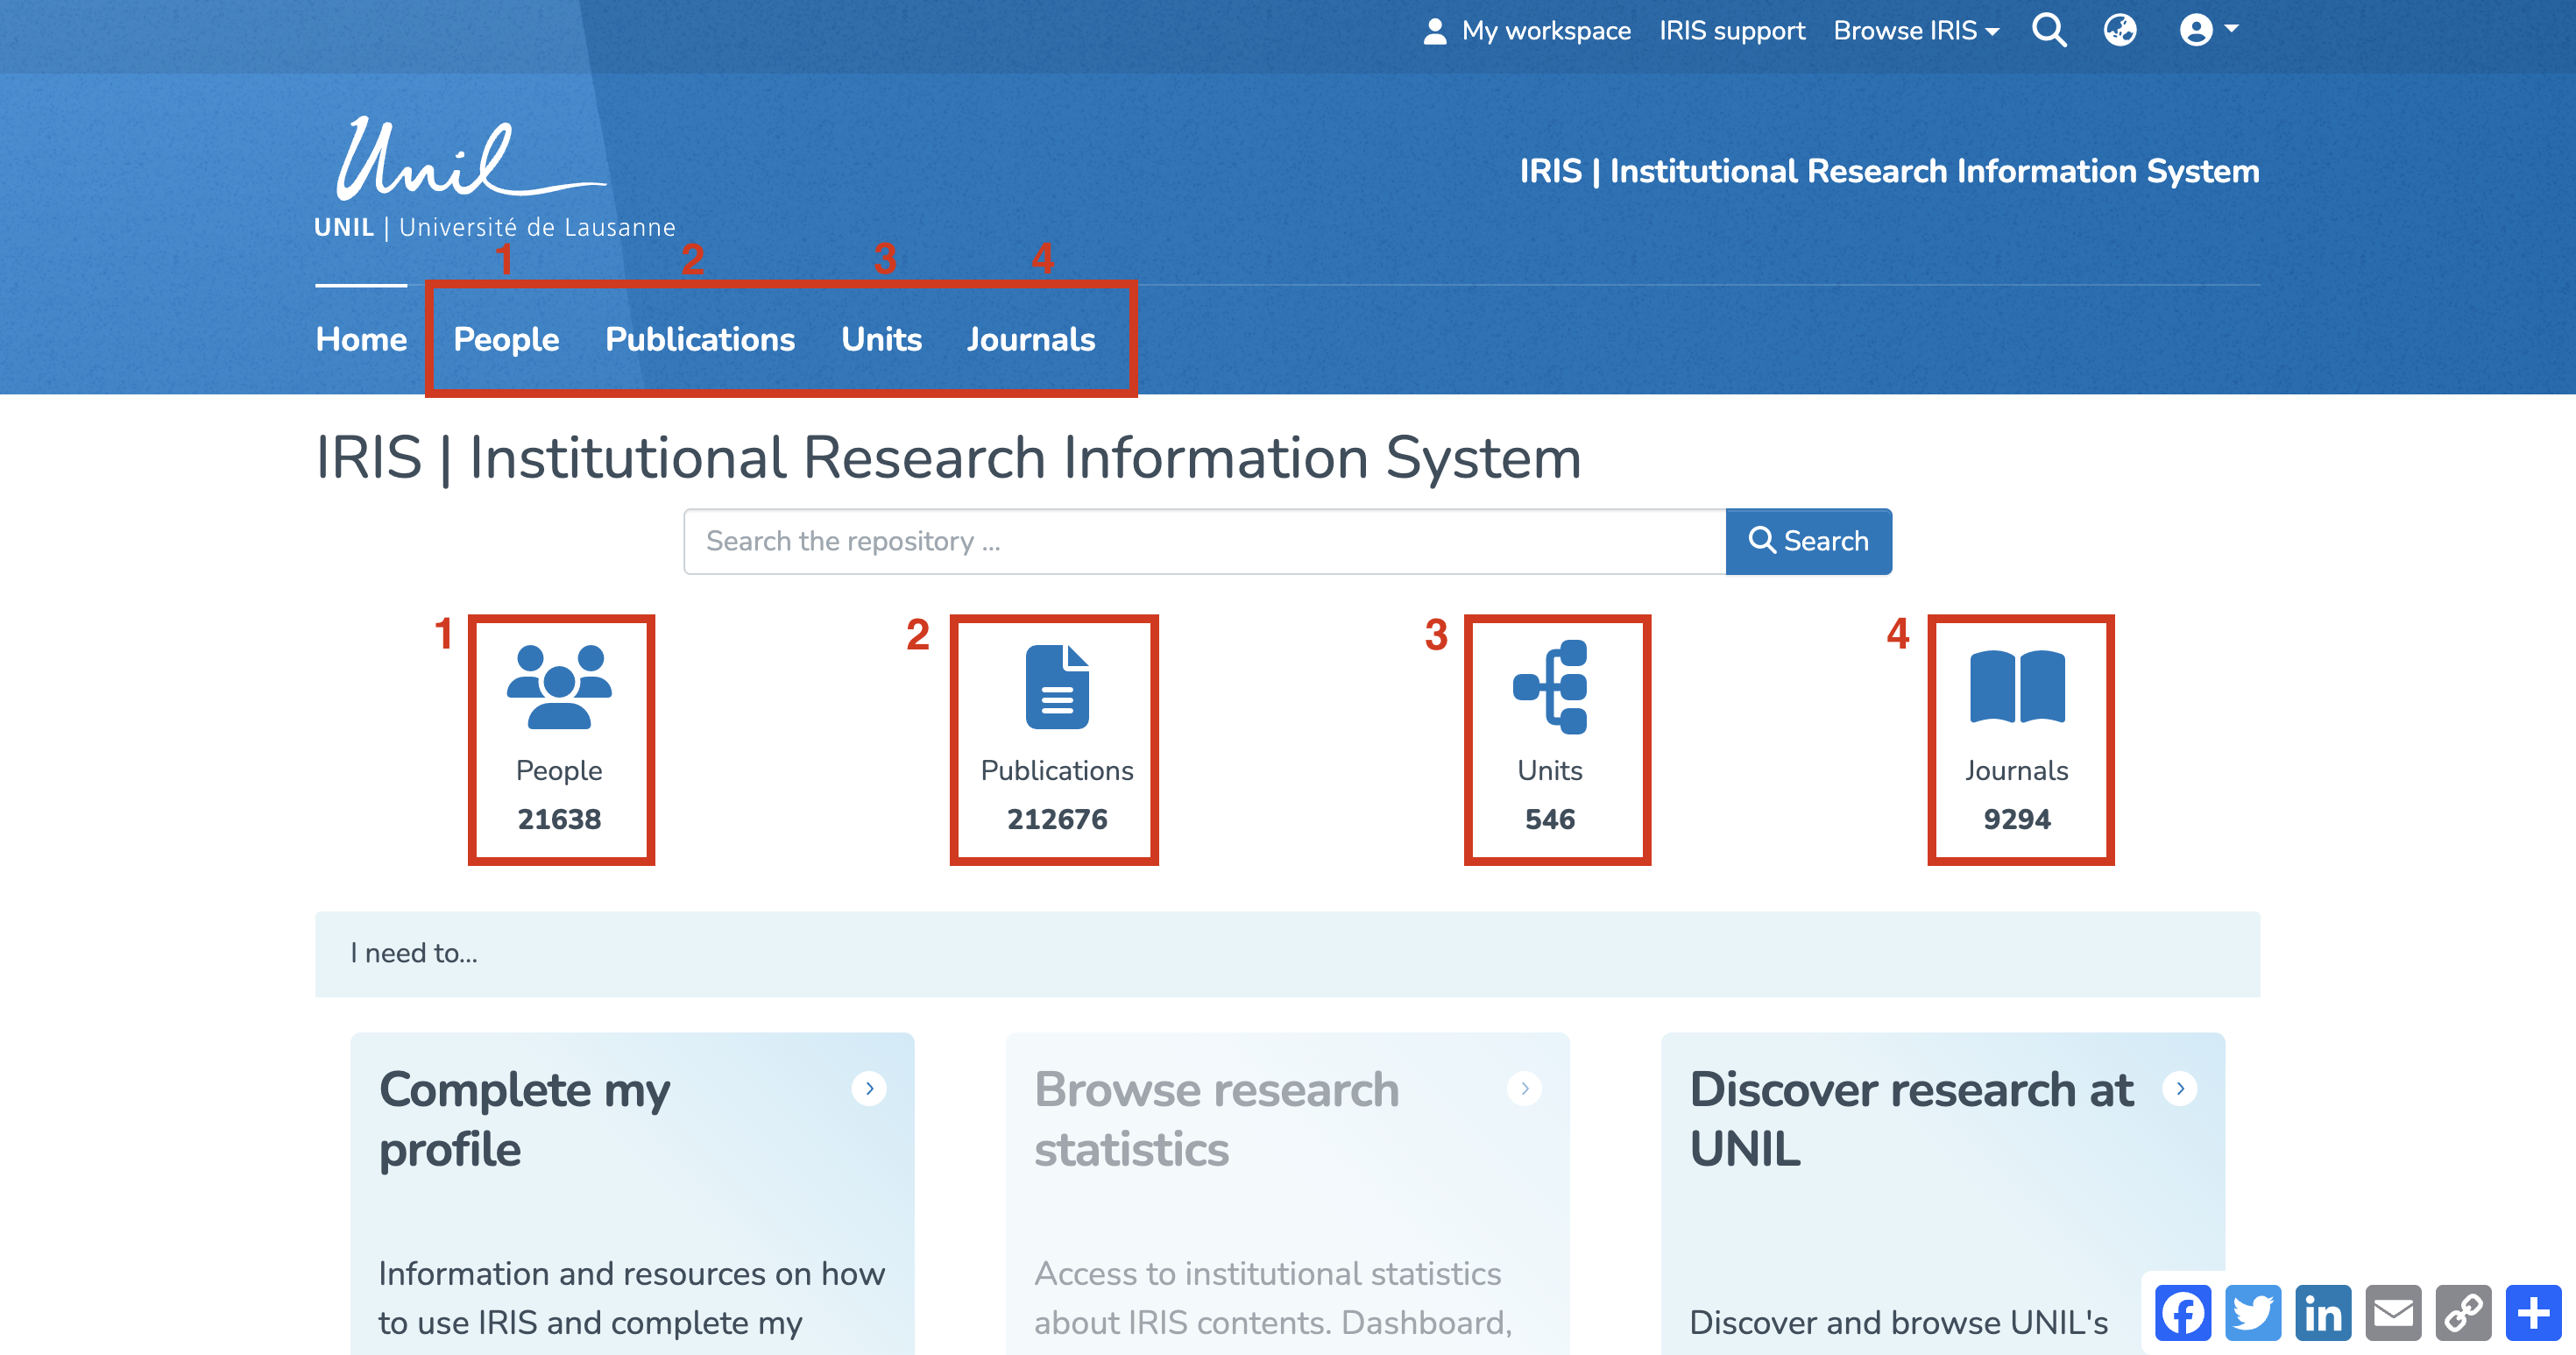
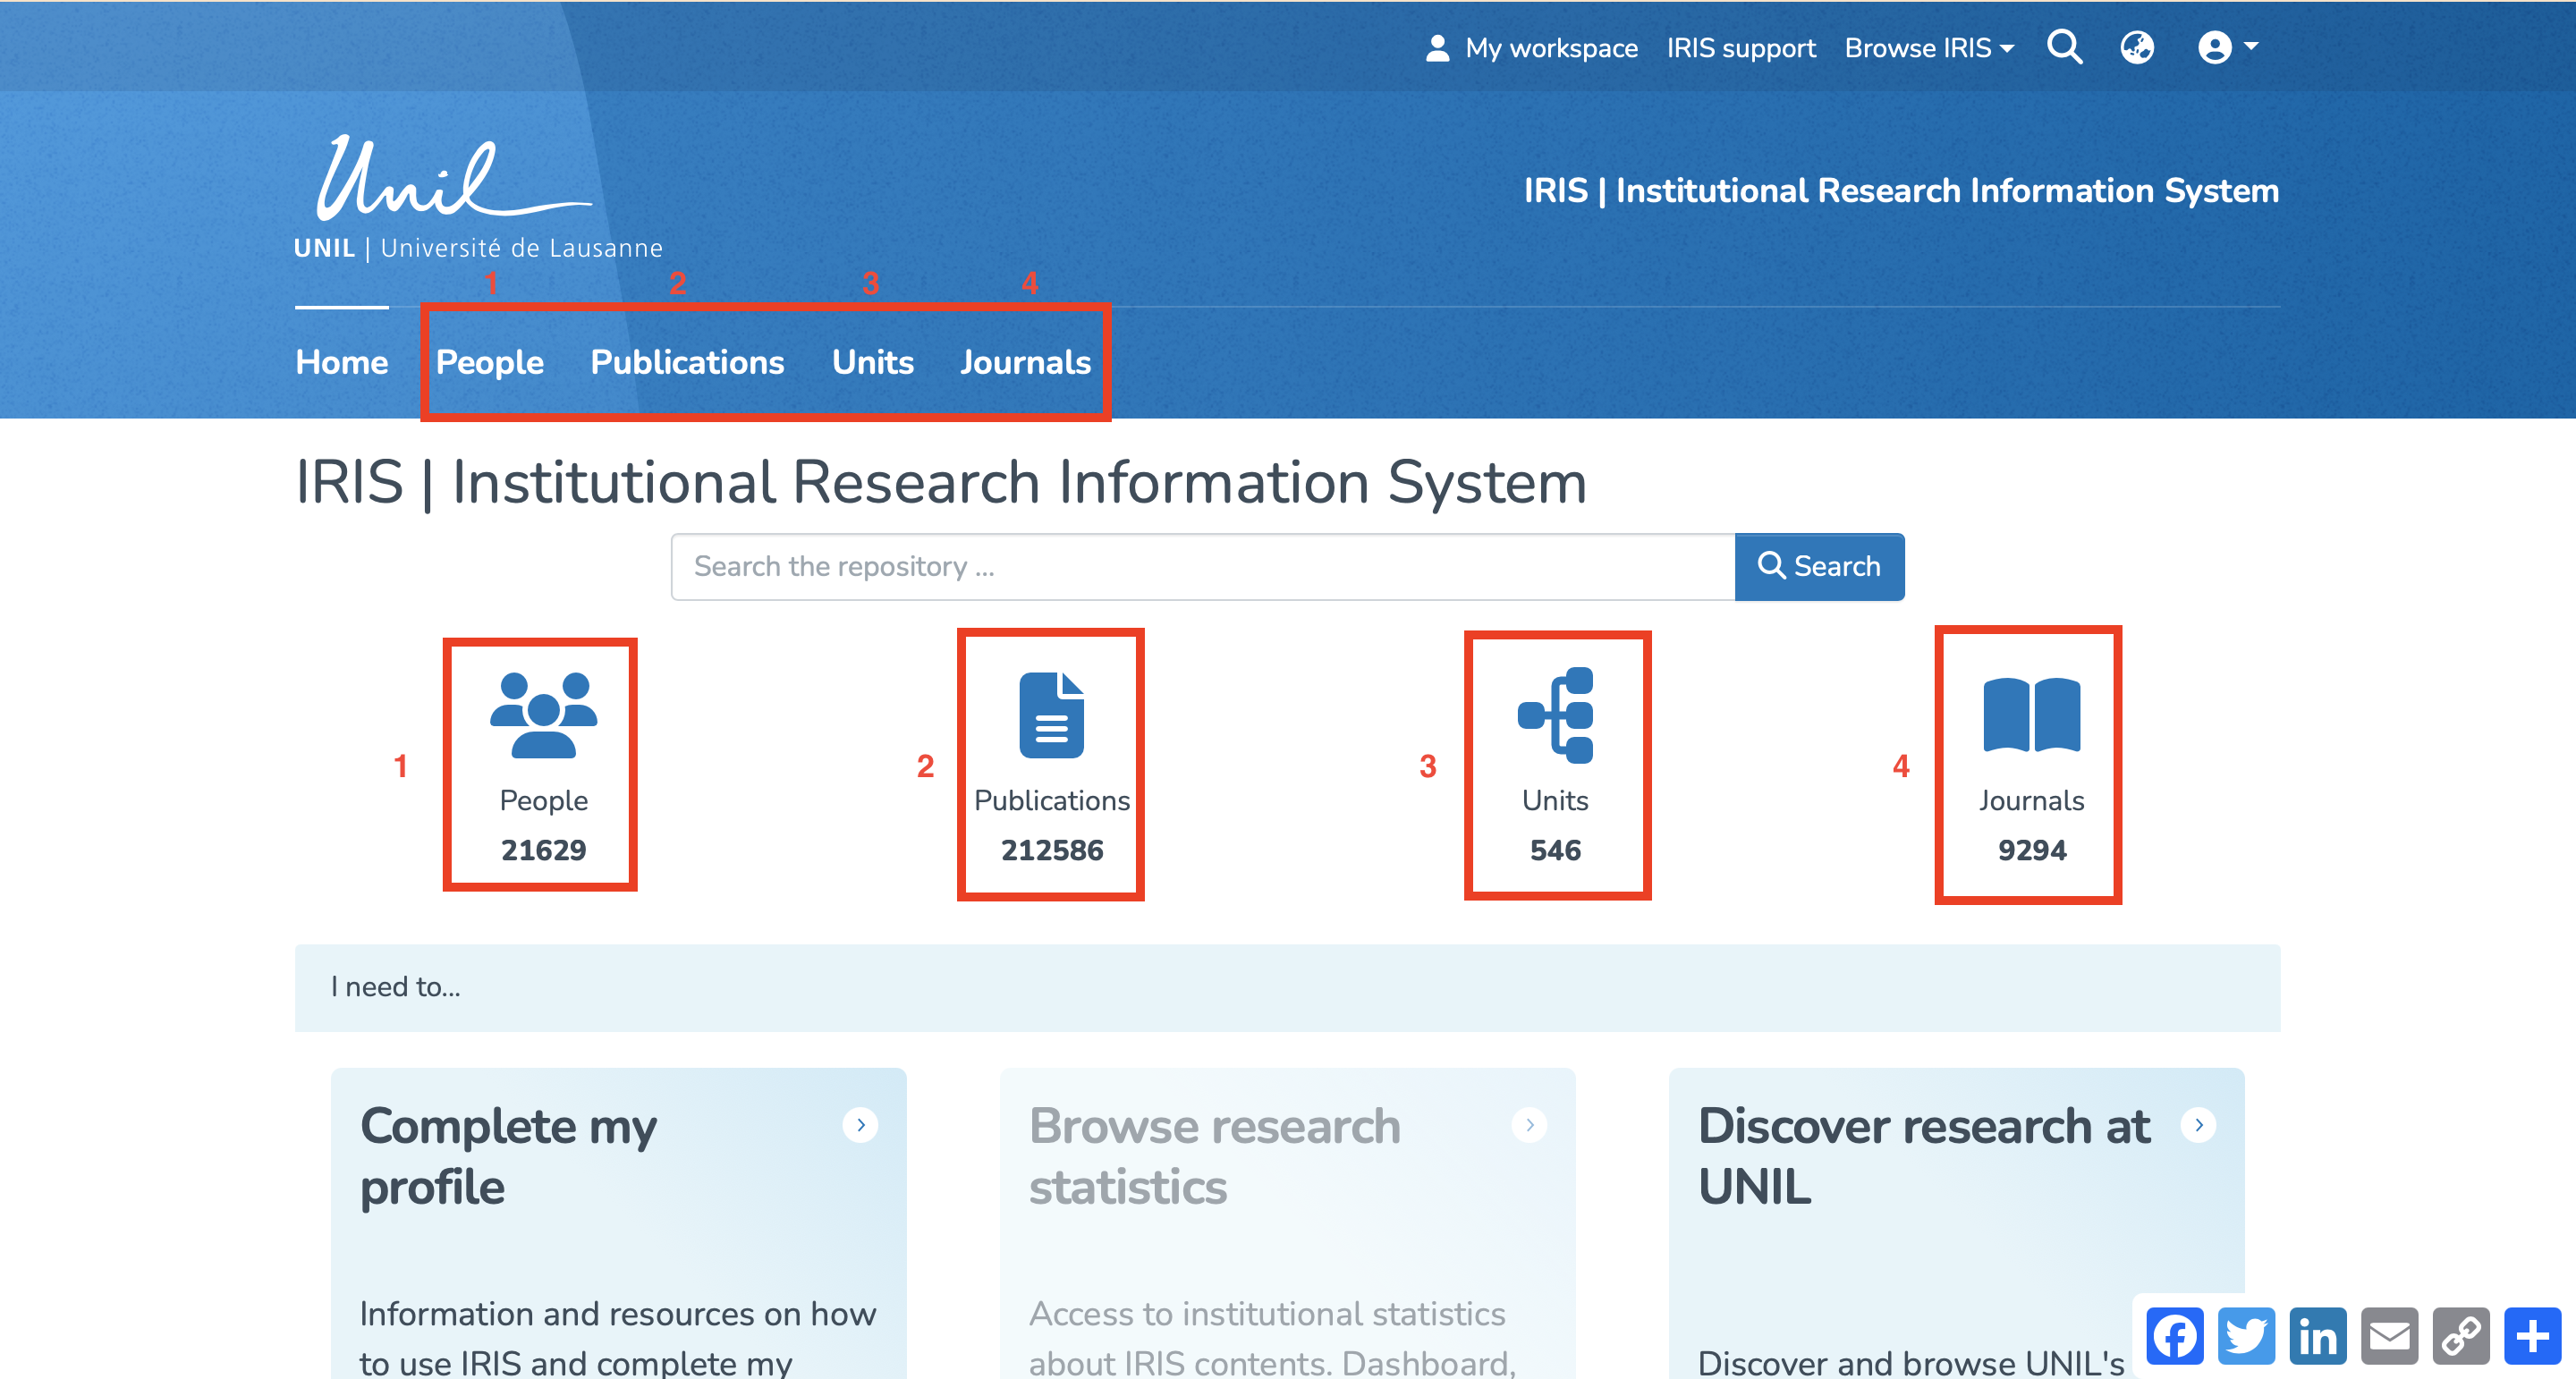
You can also browse the platform by People (1), Publications (2), Units (3), or Journals (4) by clicking on the button corresponding to the desired collection.
An advanced search can be performed using the search bar on the homepage.

For more details about searching, please refer to the page https://wiki.unil.ch/recherche/books/user-guide/page/searching-iris.
Browse
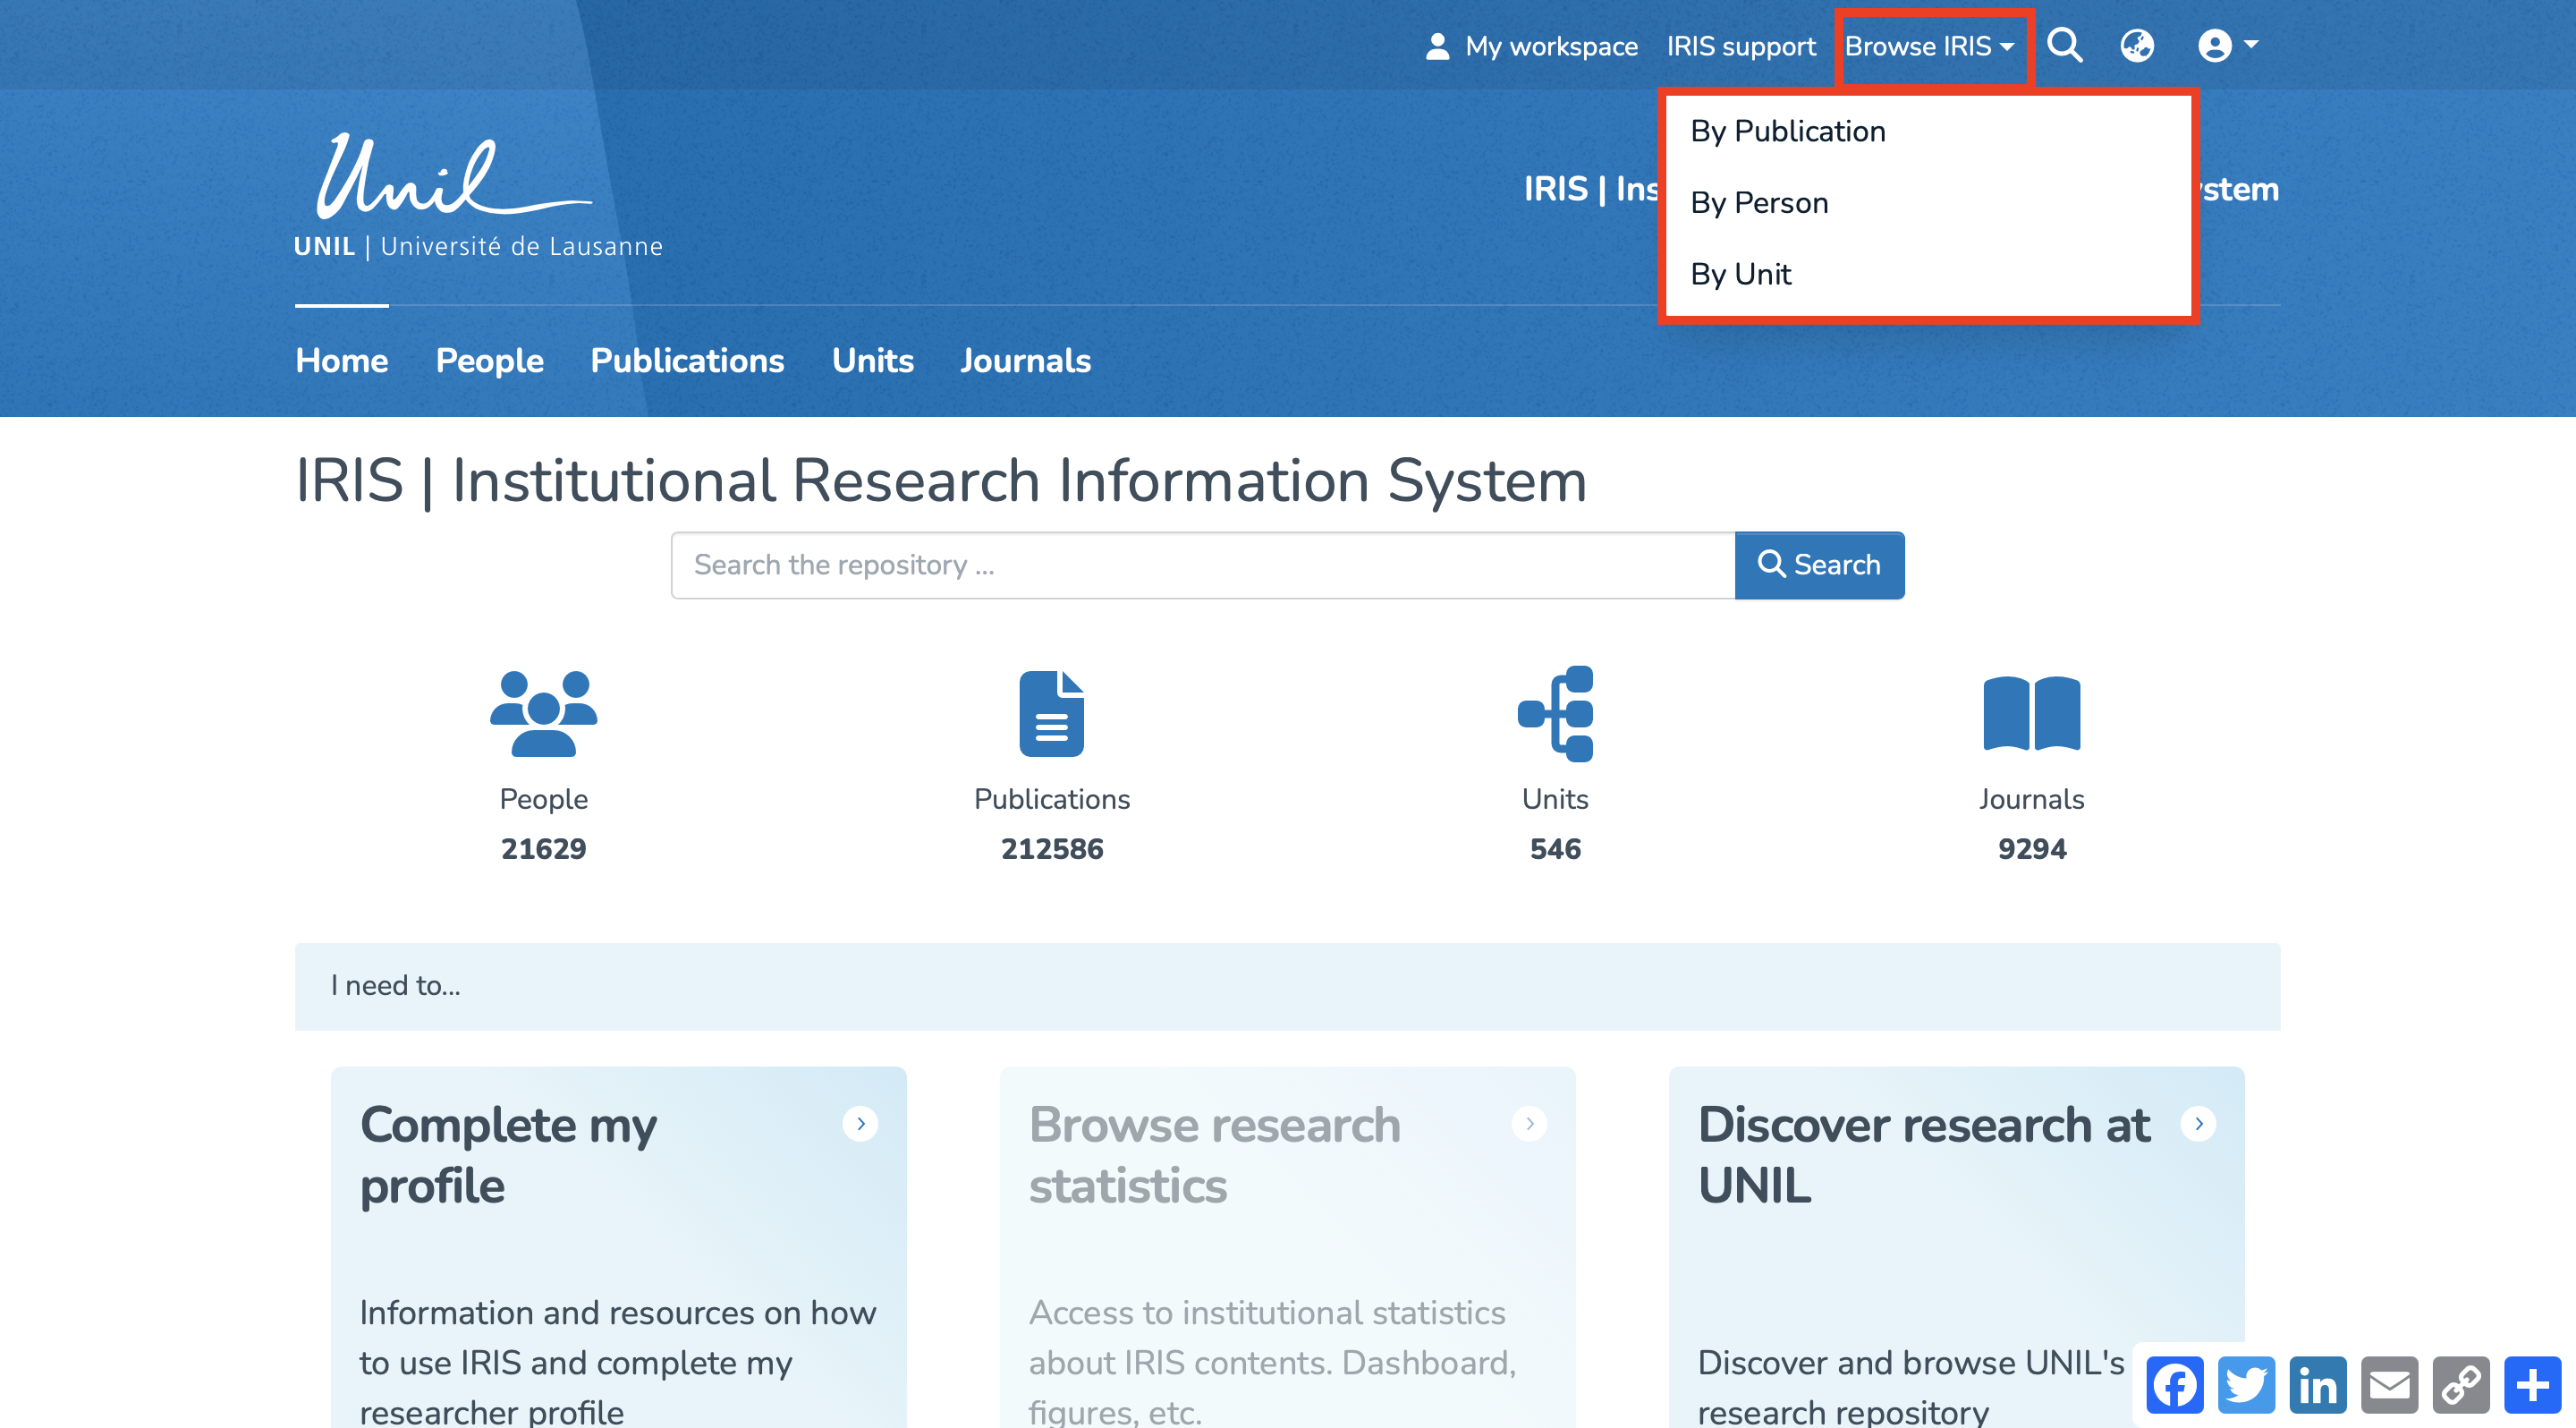
To browse the platform, click on “Browse IRIS.” You will then be able to browse by Publication, Person, or Unit.
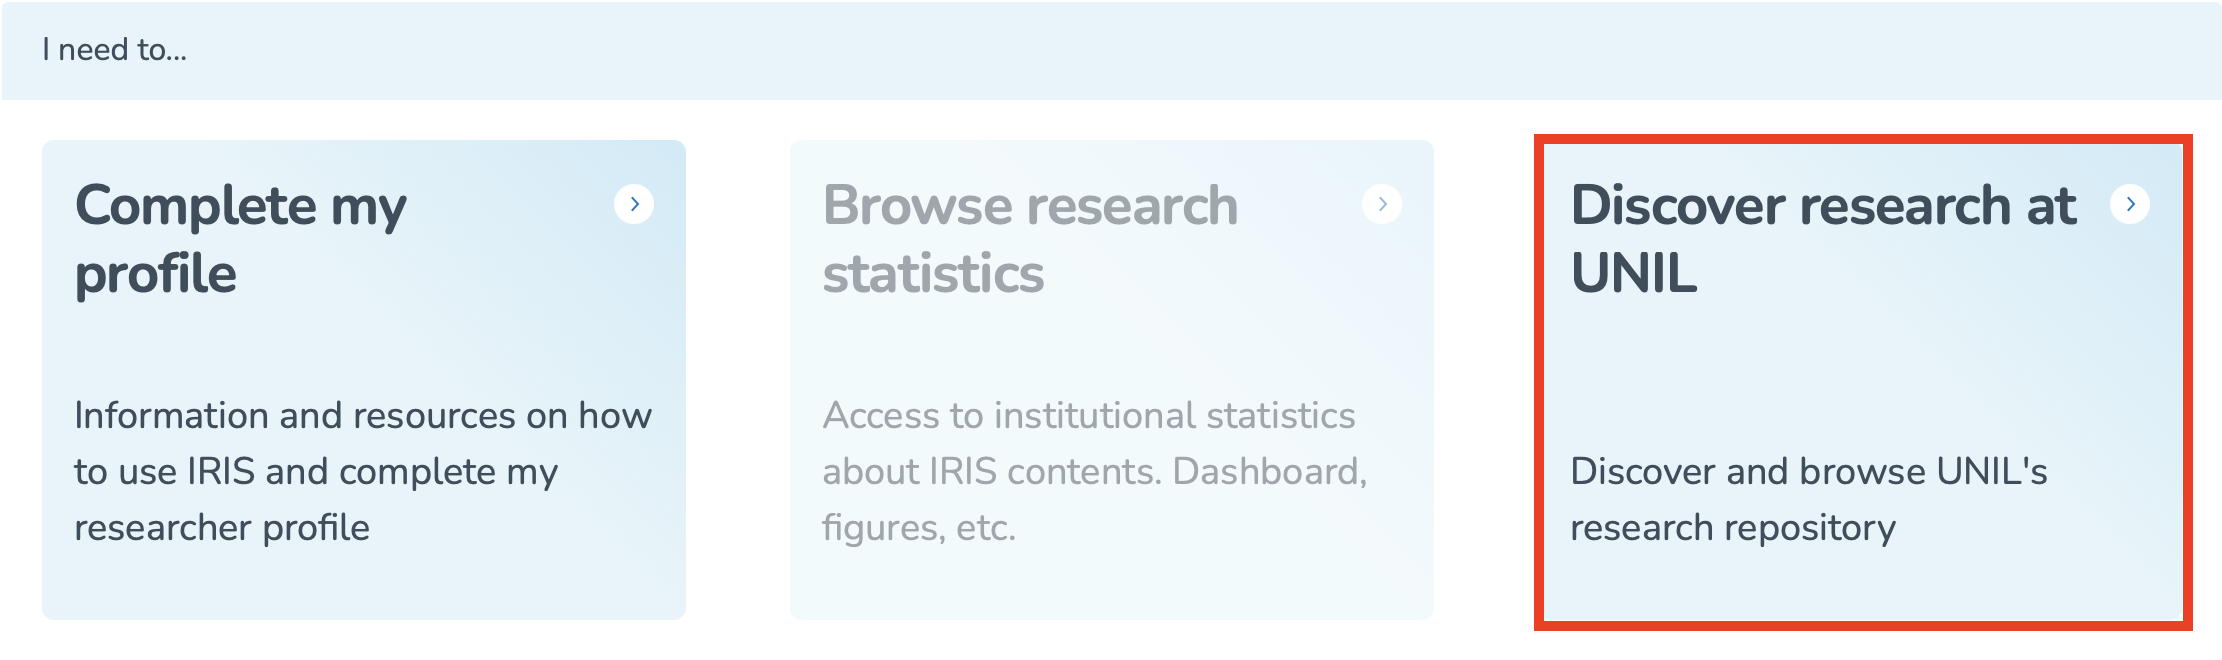
Another way to browse the platform is by clicking on “Discover Research at UNIL” in the “I need to…” window.
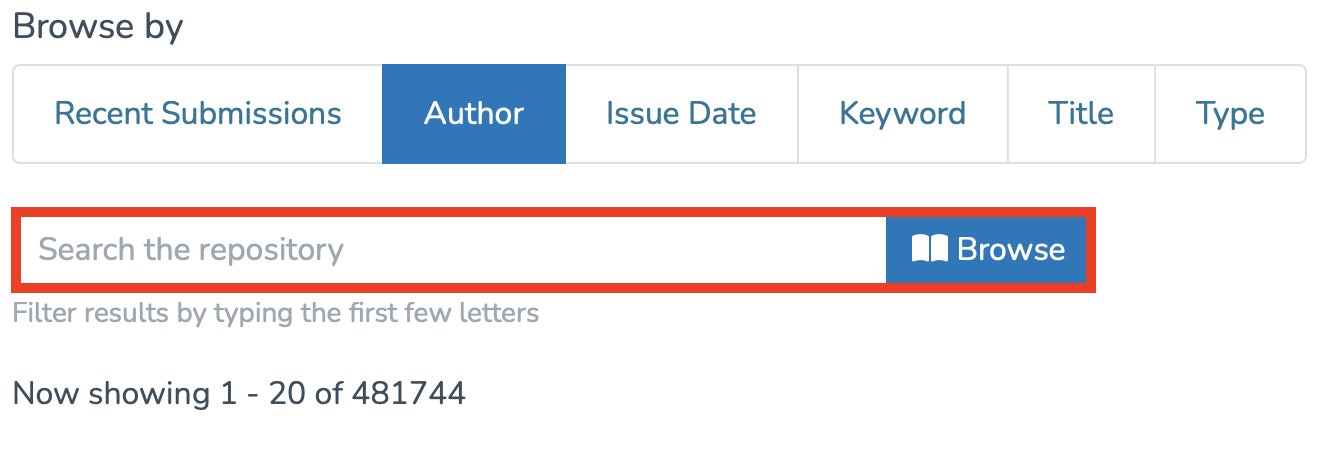
You will then be redirected to a page displaying all publications in the repository. On this page, you can browse publications by:
- Recent Submissions
- Author
- Issue date
- Keyword
- Title
- Type
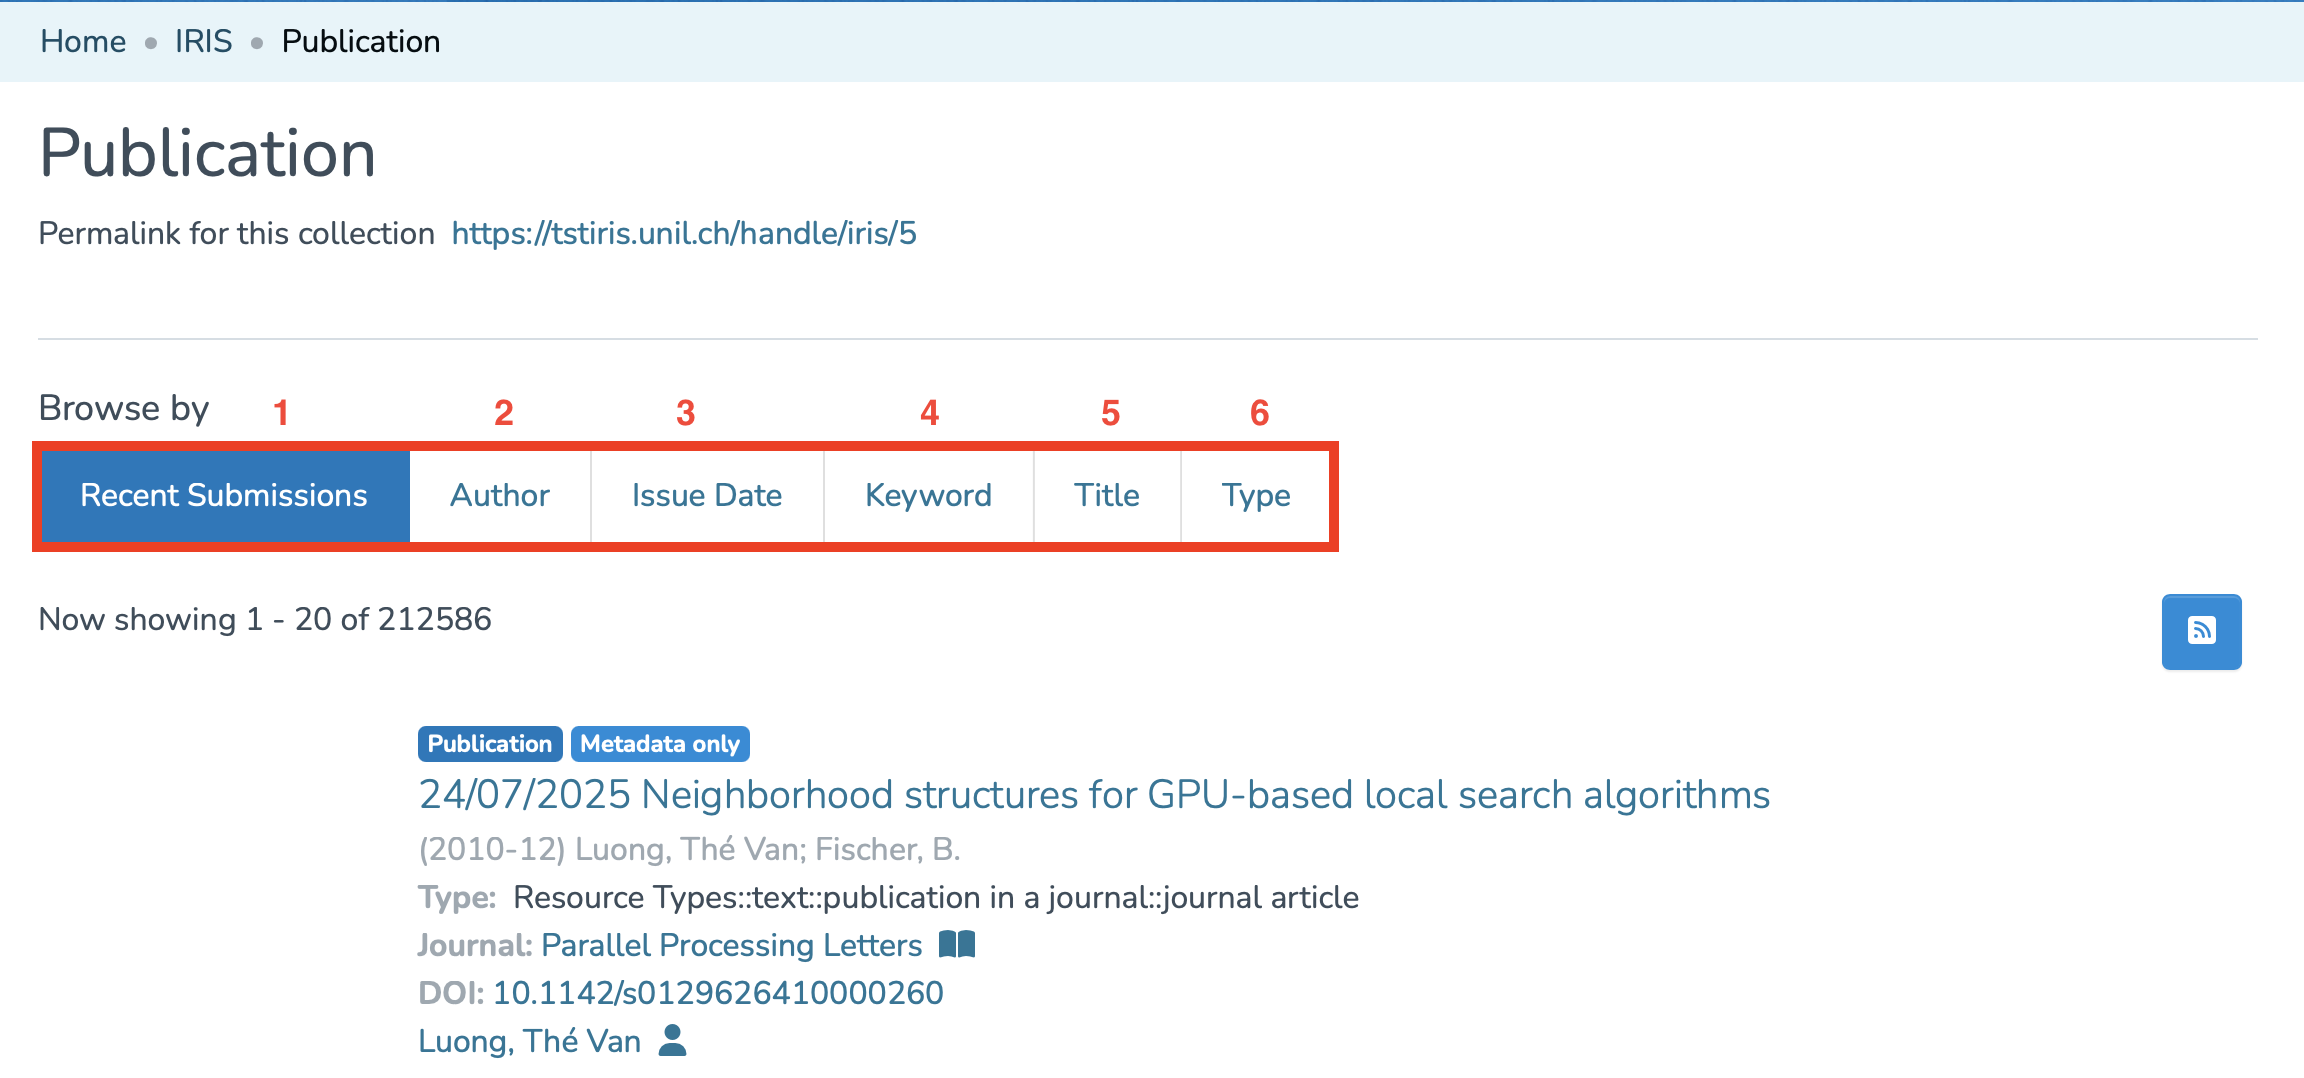
For all these categories (except recent deposits), you can filter the results using the search bar.
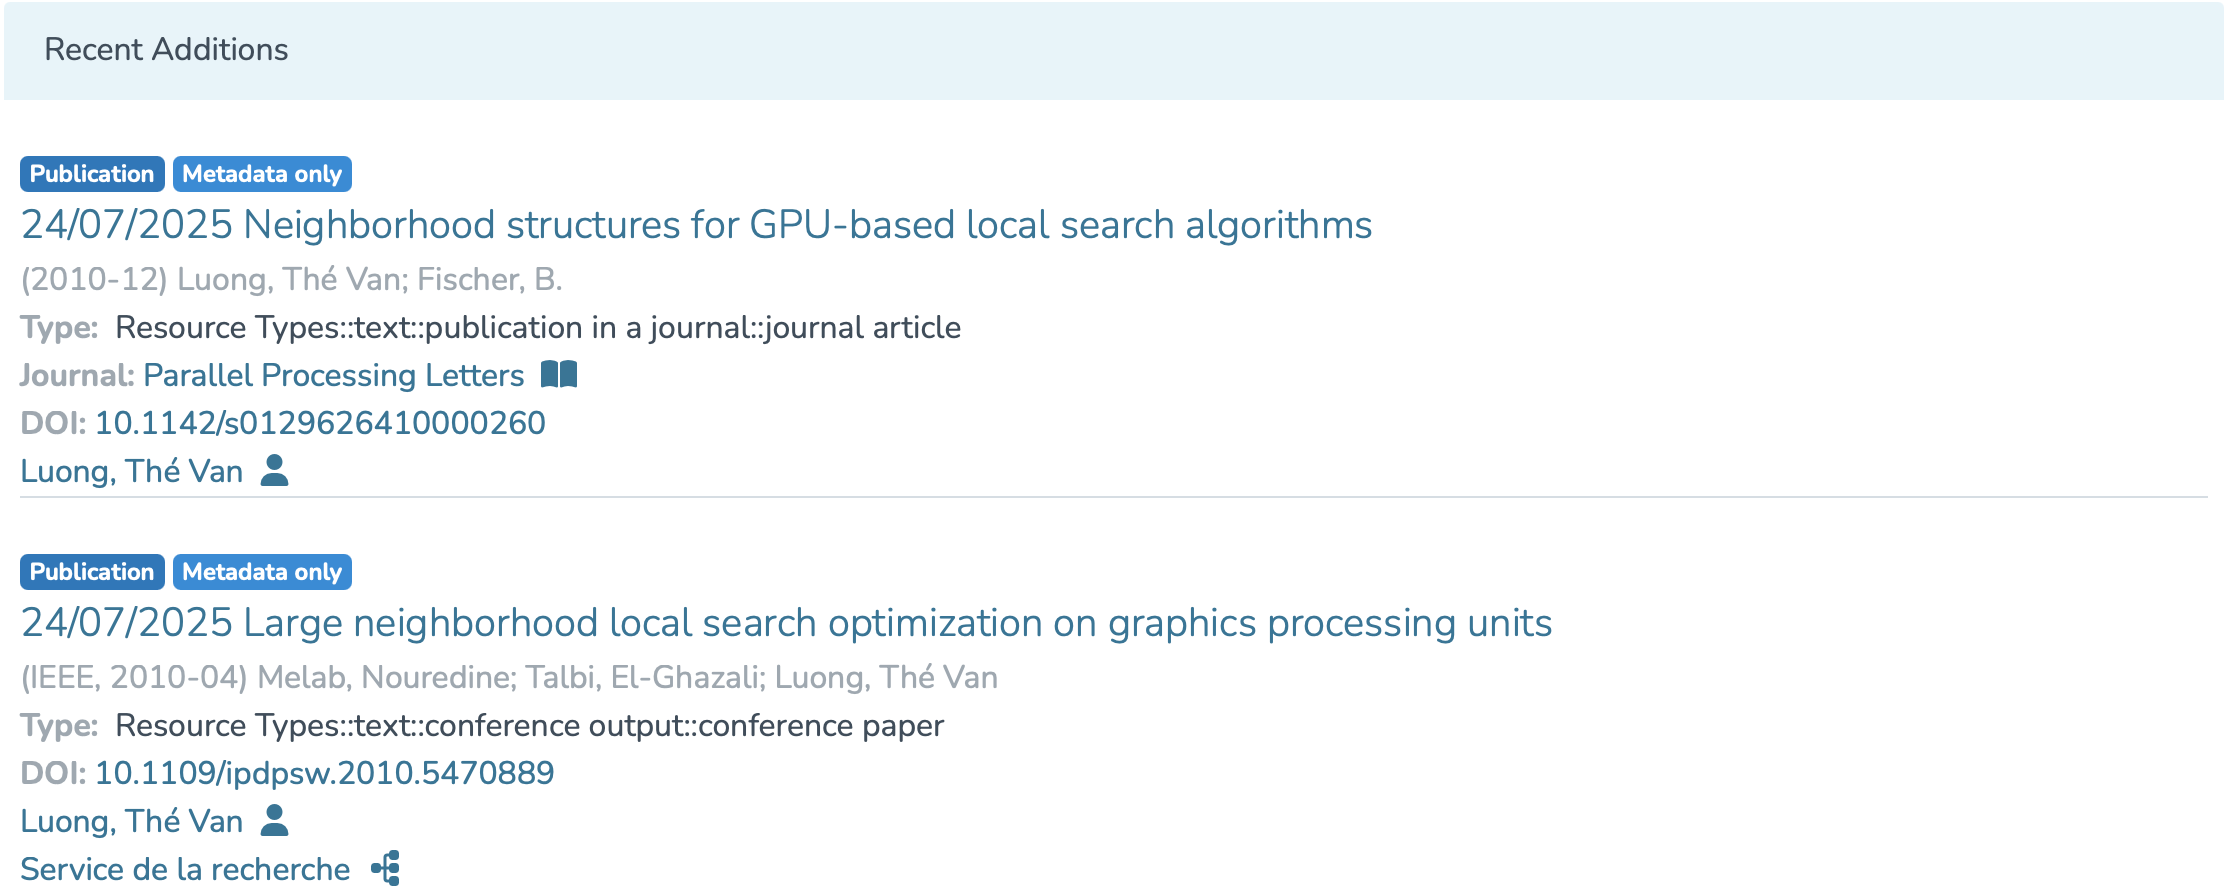
You can also view the Recent Additions at the bottom of the page.
At any time, you can return to the homepage by clicking on “Home.”

Special rights
If you require specific rights in IRIS:
- Collection administrator
- Data entry agent
- Thesis validator
please complete the form available via this link.
Access your researcher profile
The voice in this video was generated by artificial intelligence.
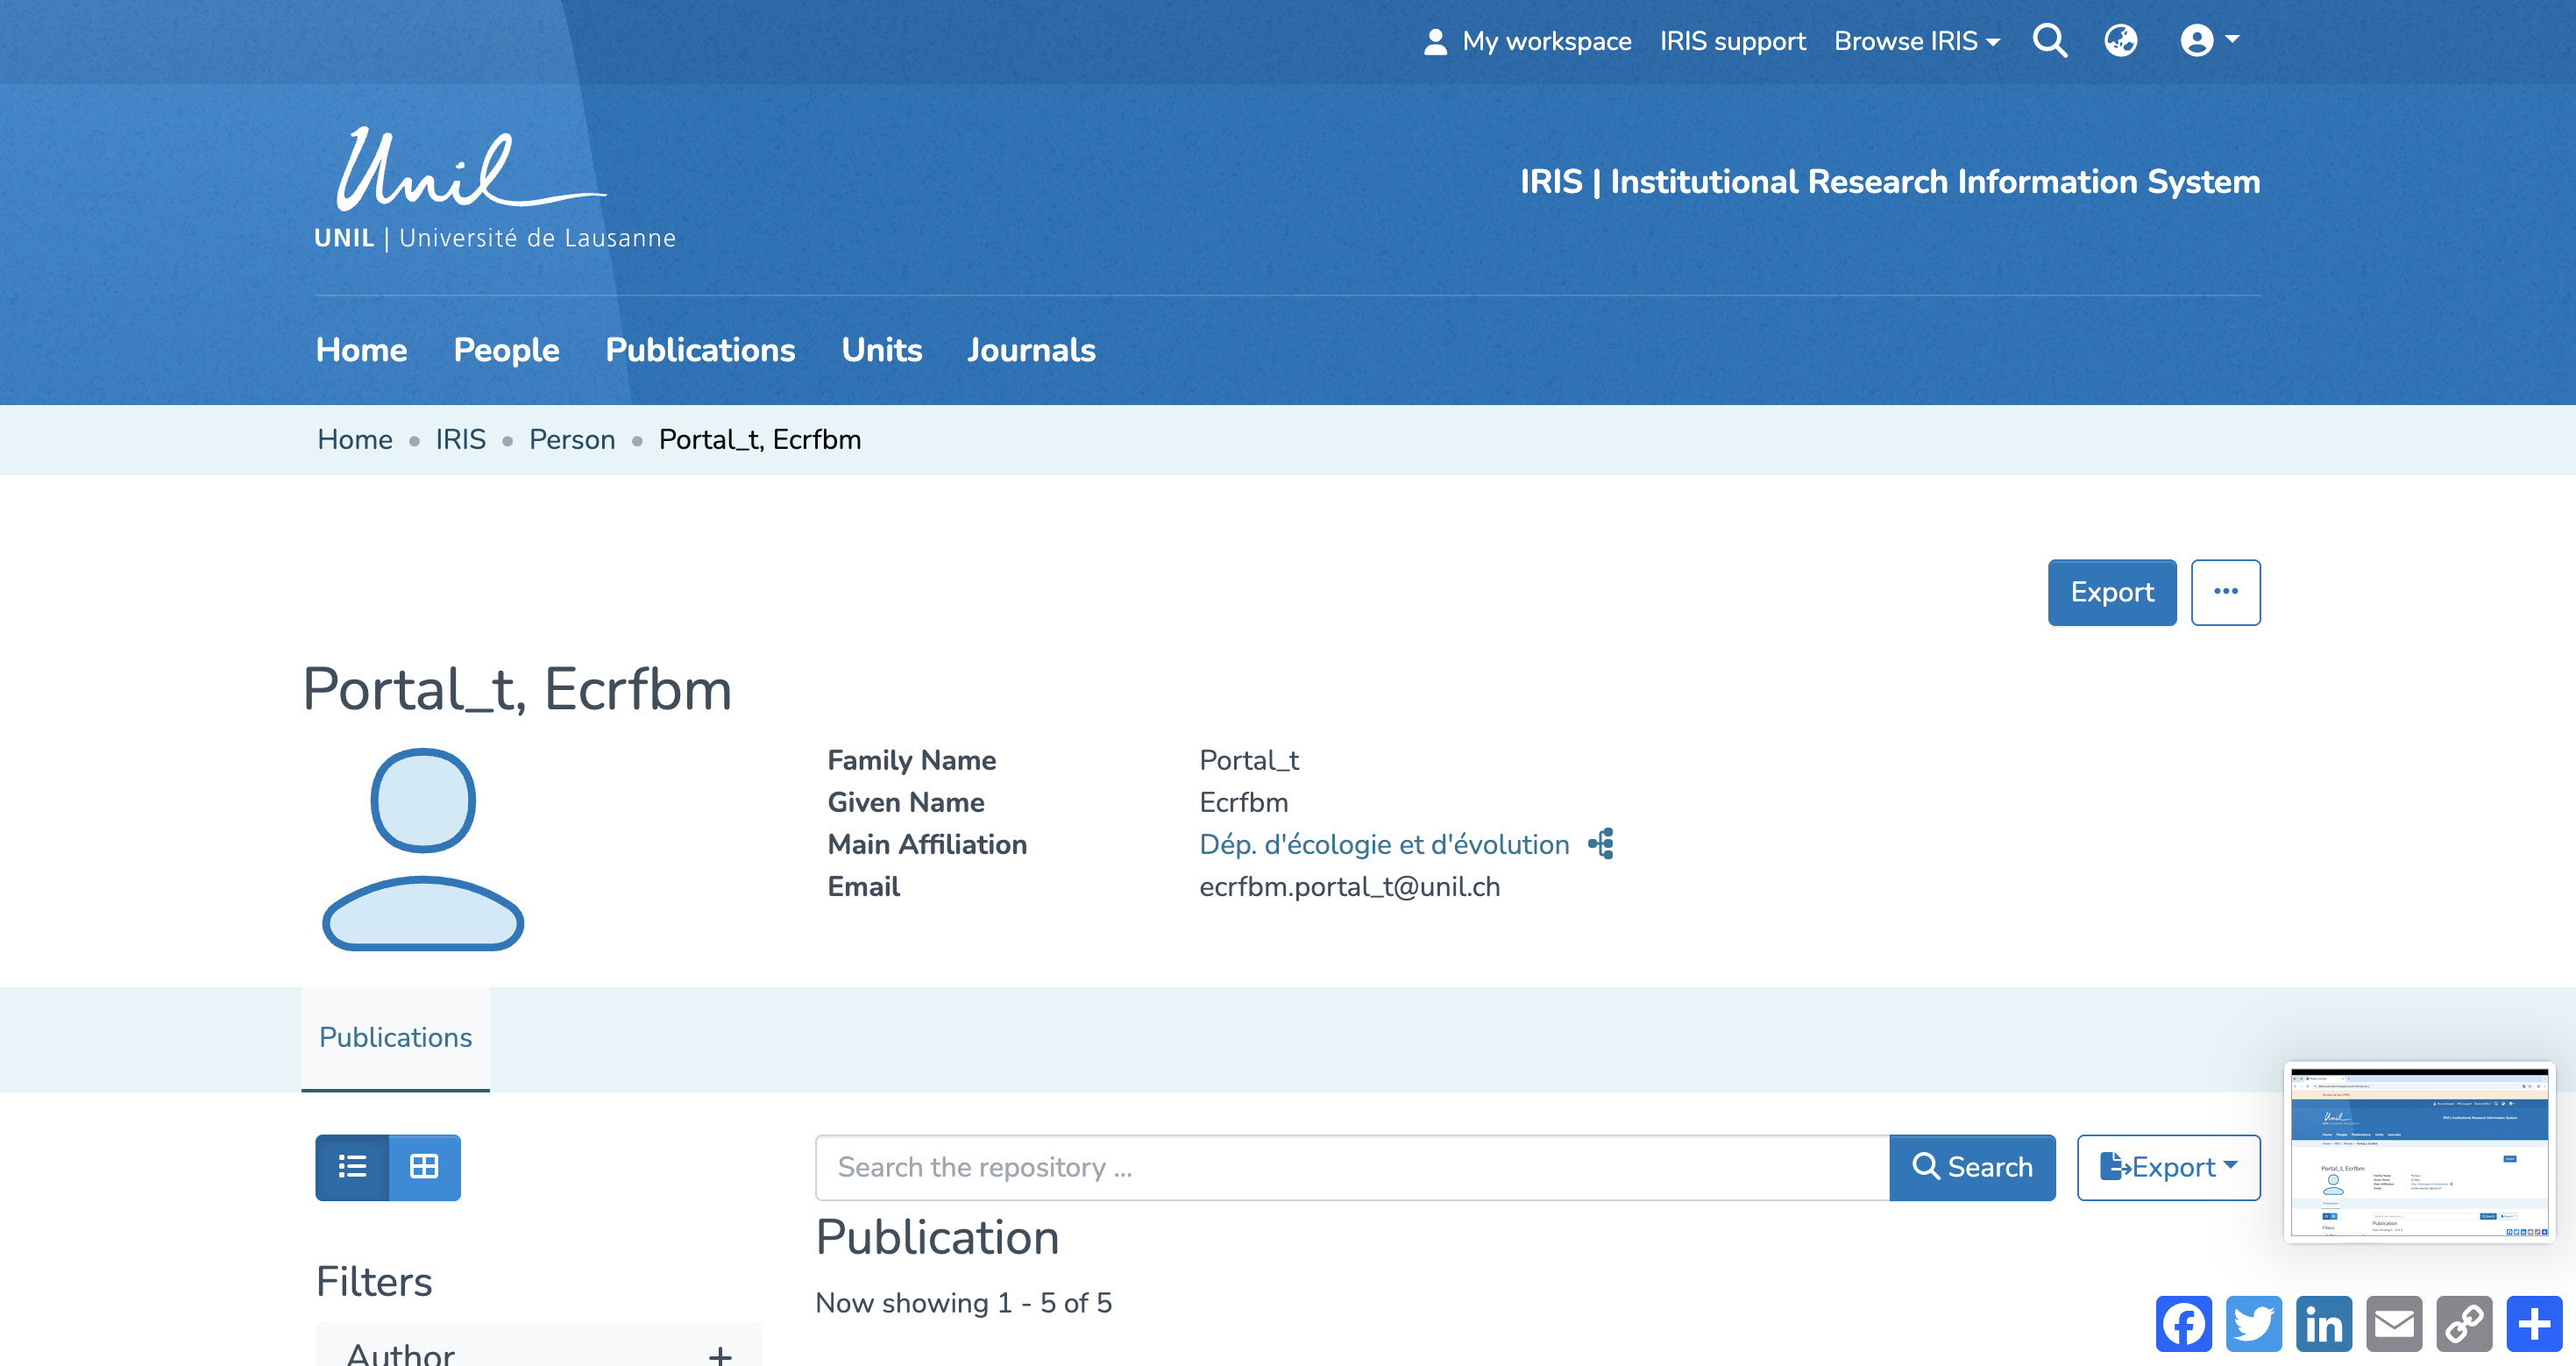
Accessing your researcher profile
Your researcher profile gives you an overview of your personal and academic information. From this space, you can:
- View and edit publications you’ve created, as well as those you’re linked to.
- Access your ORCID settings page.
There are two ways to access your researcher profile in IRIS:
Accessing Your Profile via the Login Menu
- From the IRIS homepage, click on the login menu.

- In the dropdown menu, select “My account and profile.”

- You’ll be redirected to a page titled “User account”. Click on “View” to open the full version of your profile.

- You will then be directed to your researcher profile.


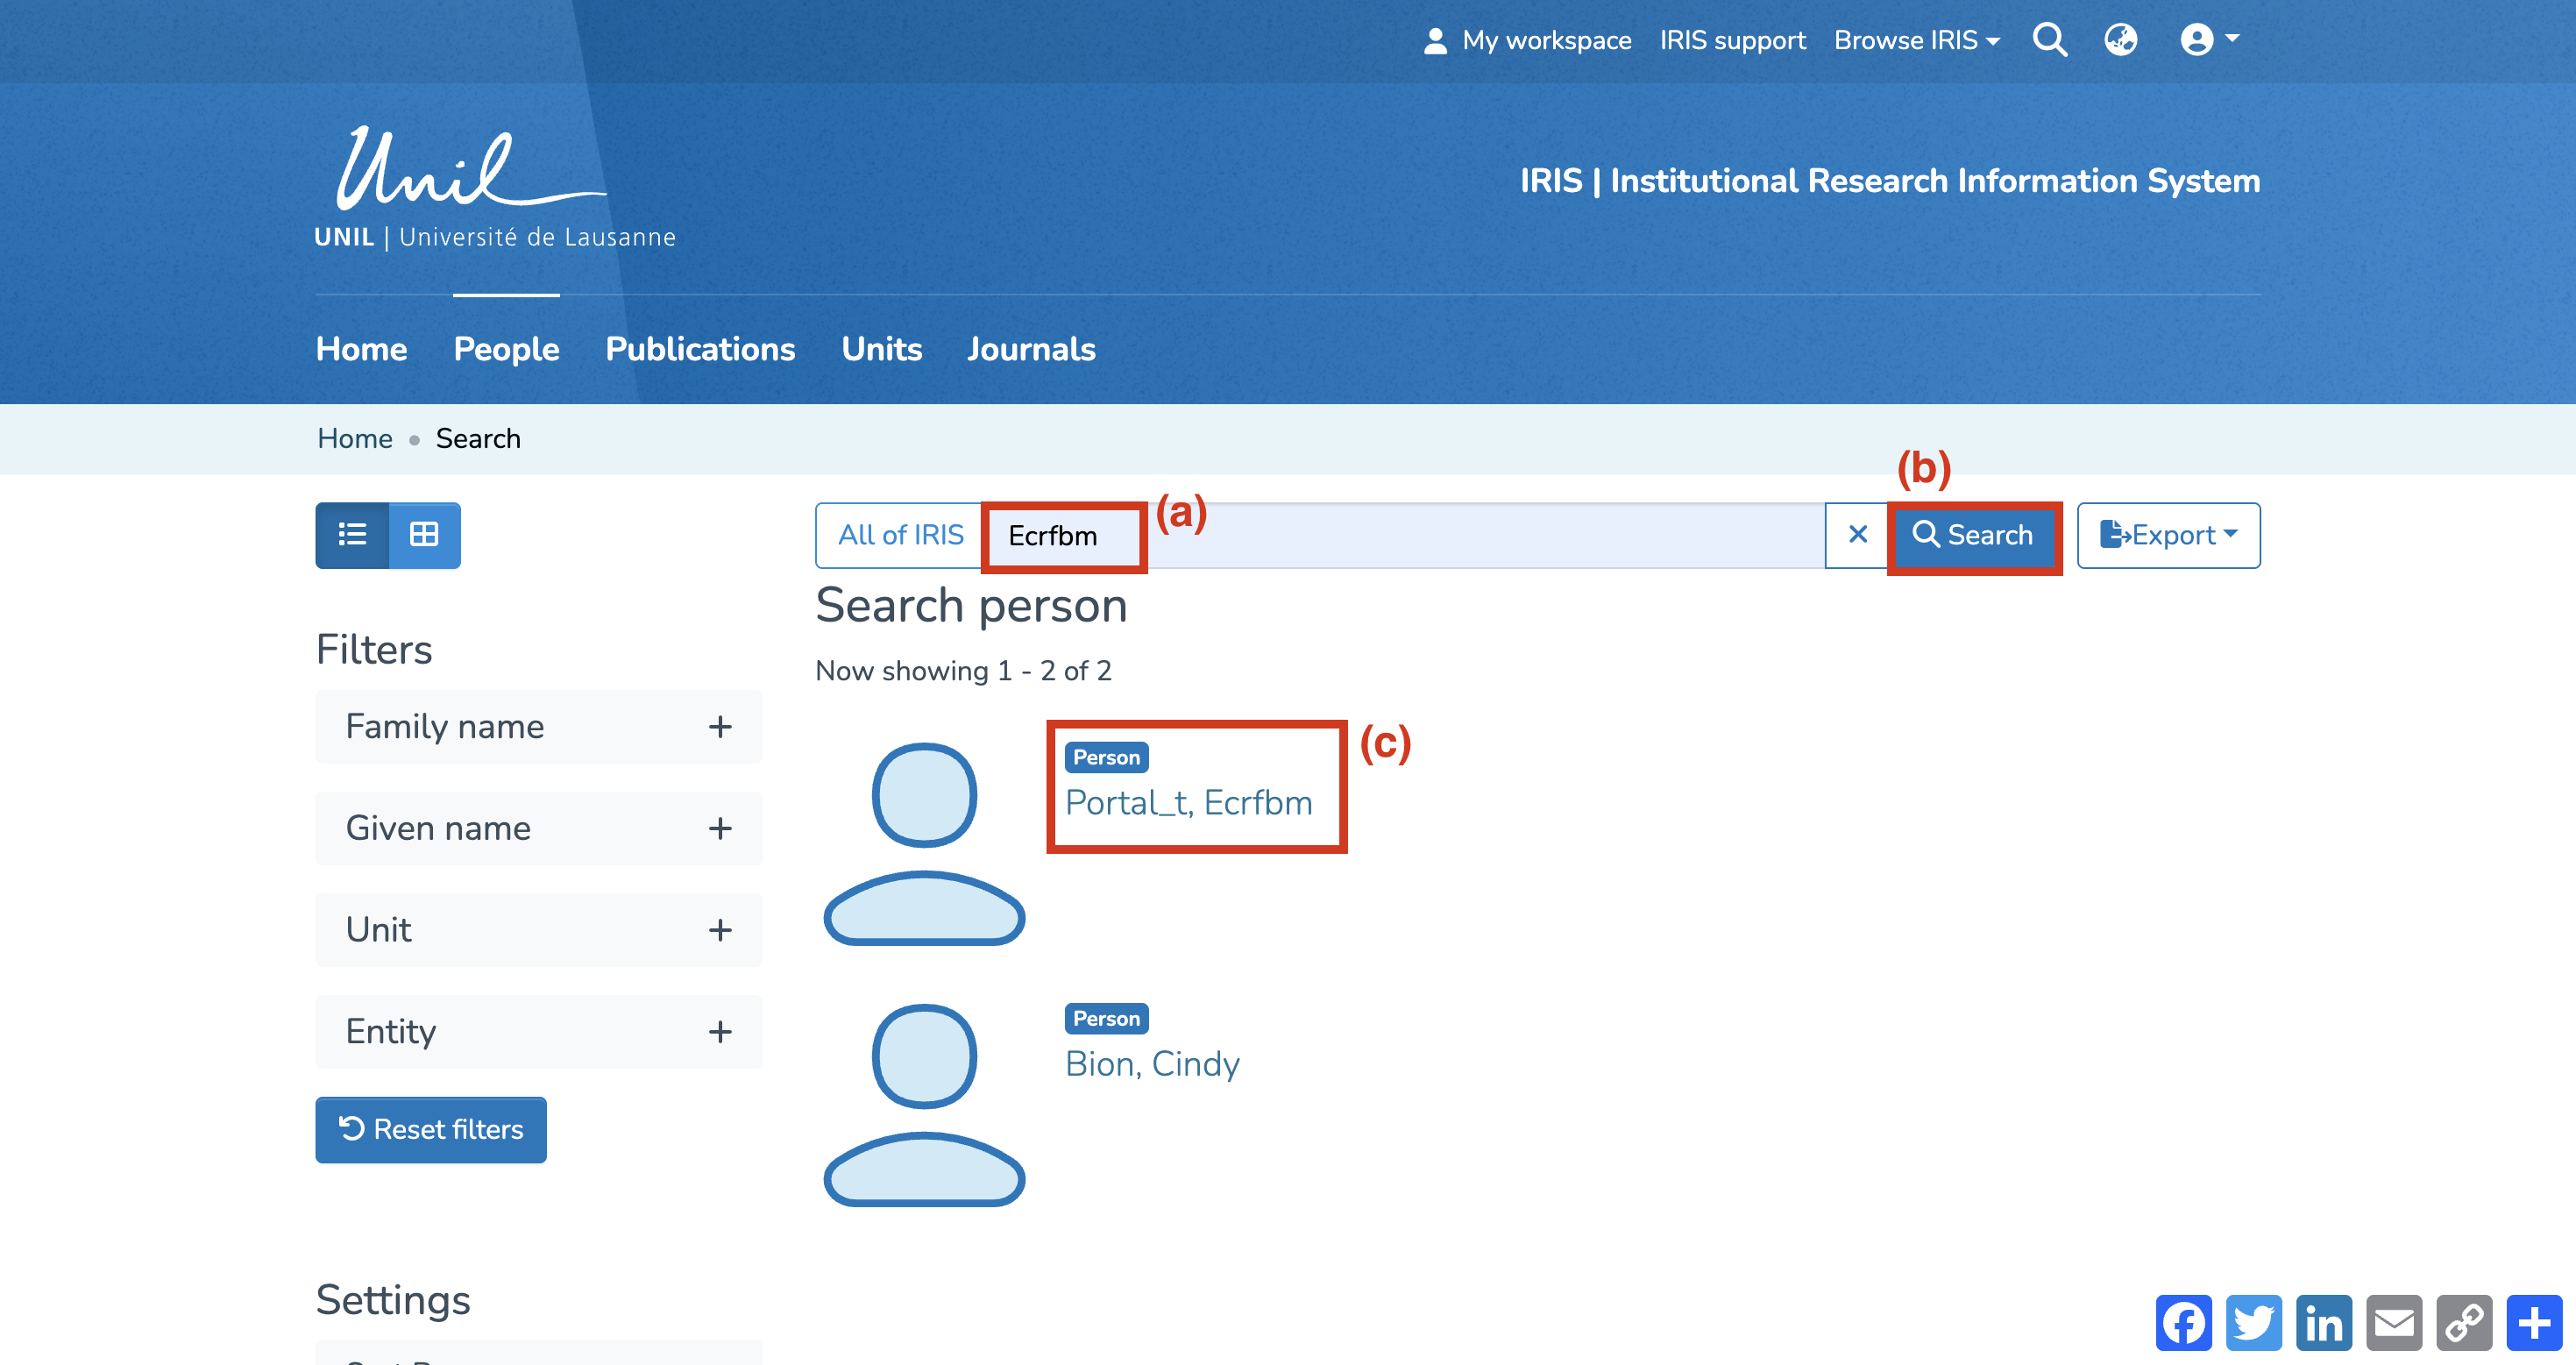
Accessing Your Profile via Search
- From the IRIS homepage, click on “People.”

- In the search bar that appears, enter your name (a), then click “Search” (b).
- Once the search is complete, your profile will appear in the results. Click on your name (c).


- You will then be directed to your researcher profile.

Searching IRIS
The voice in this video was generated by artificial intelligence.
Start your search
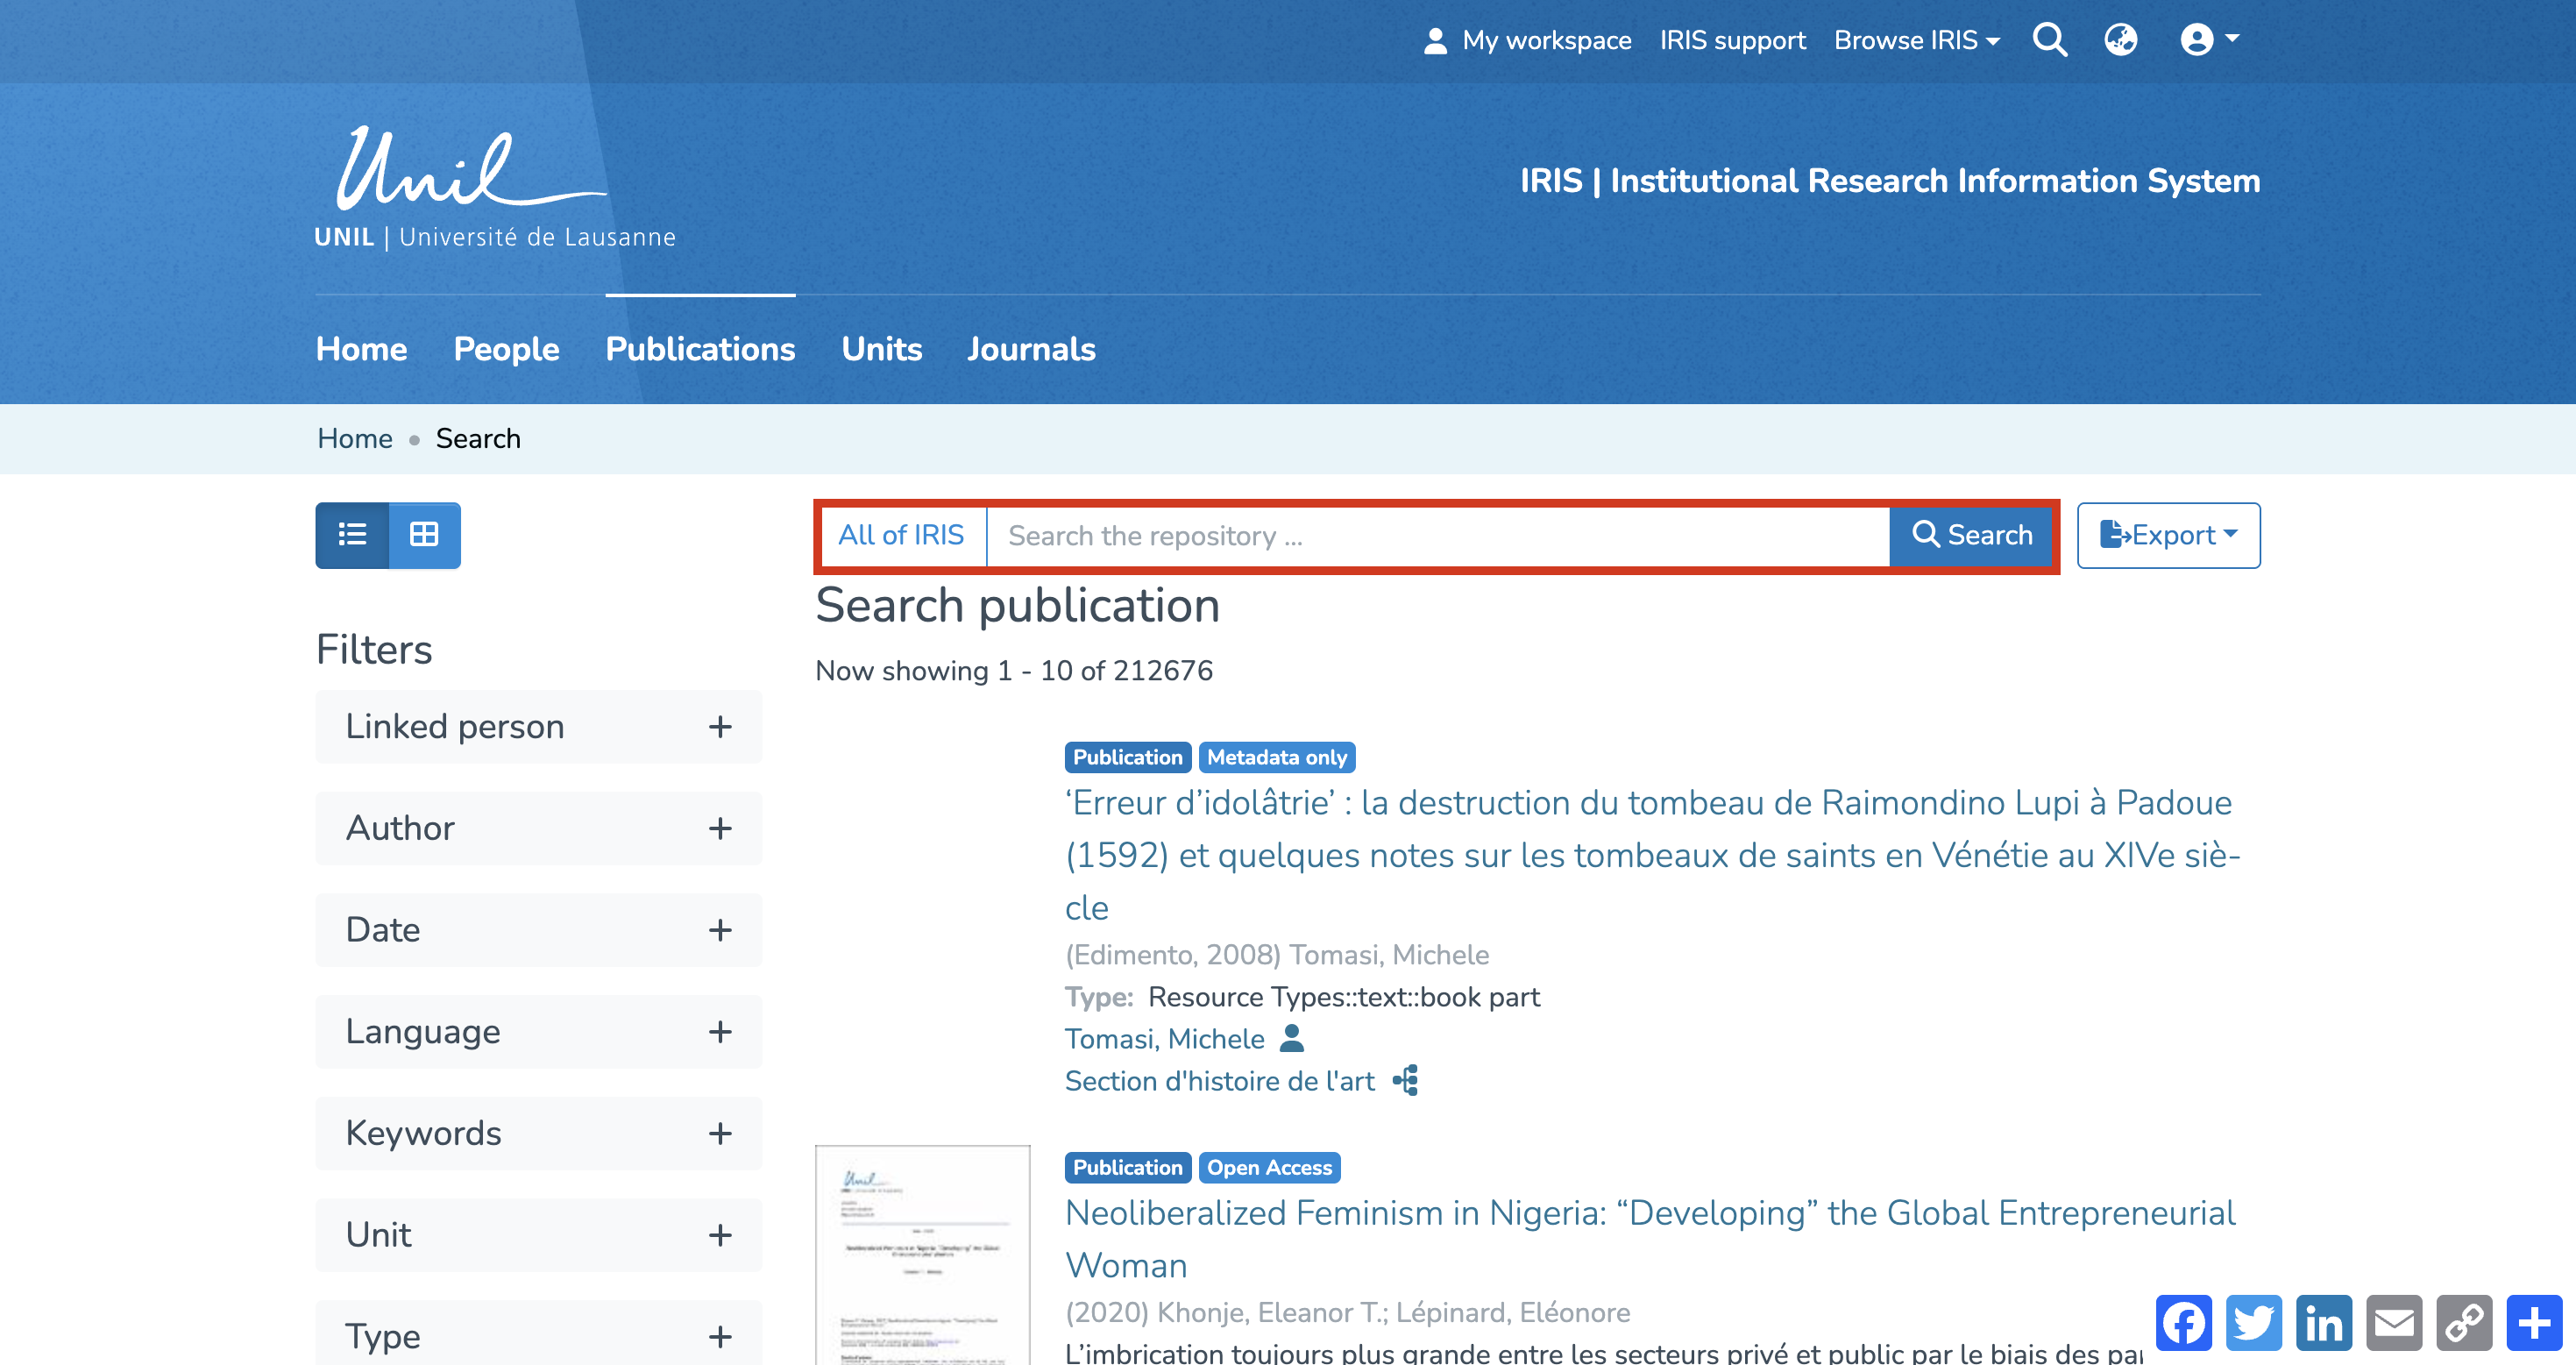
From the IRIS homepage, you can begin a search in two ways:
- By clicking the search icon: type your keyword and press the Enter key on your keyboard. Note: This option is available from any page within IRIS.

- By clicking directly into the search field: enter your keyword, then click “Search.”

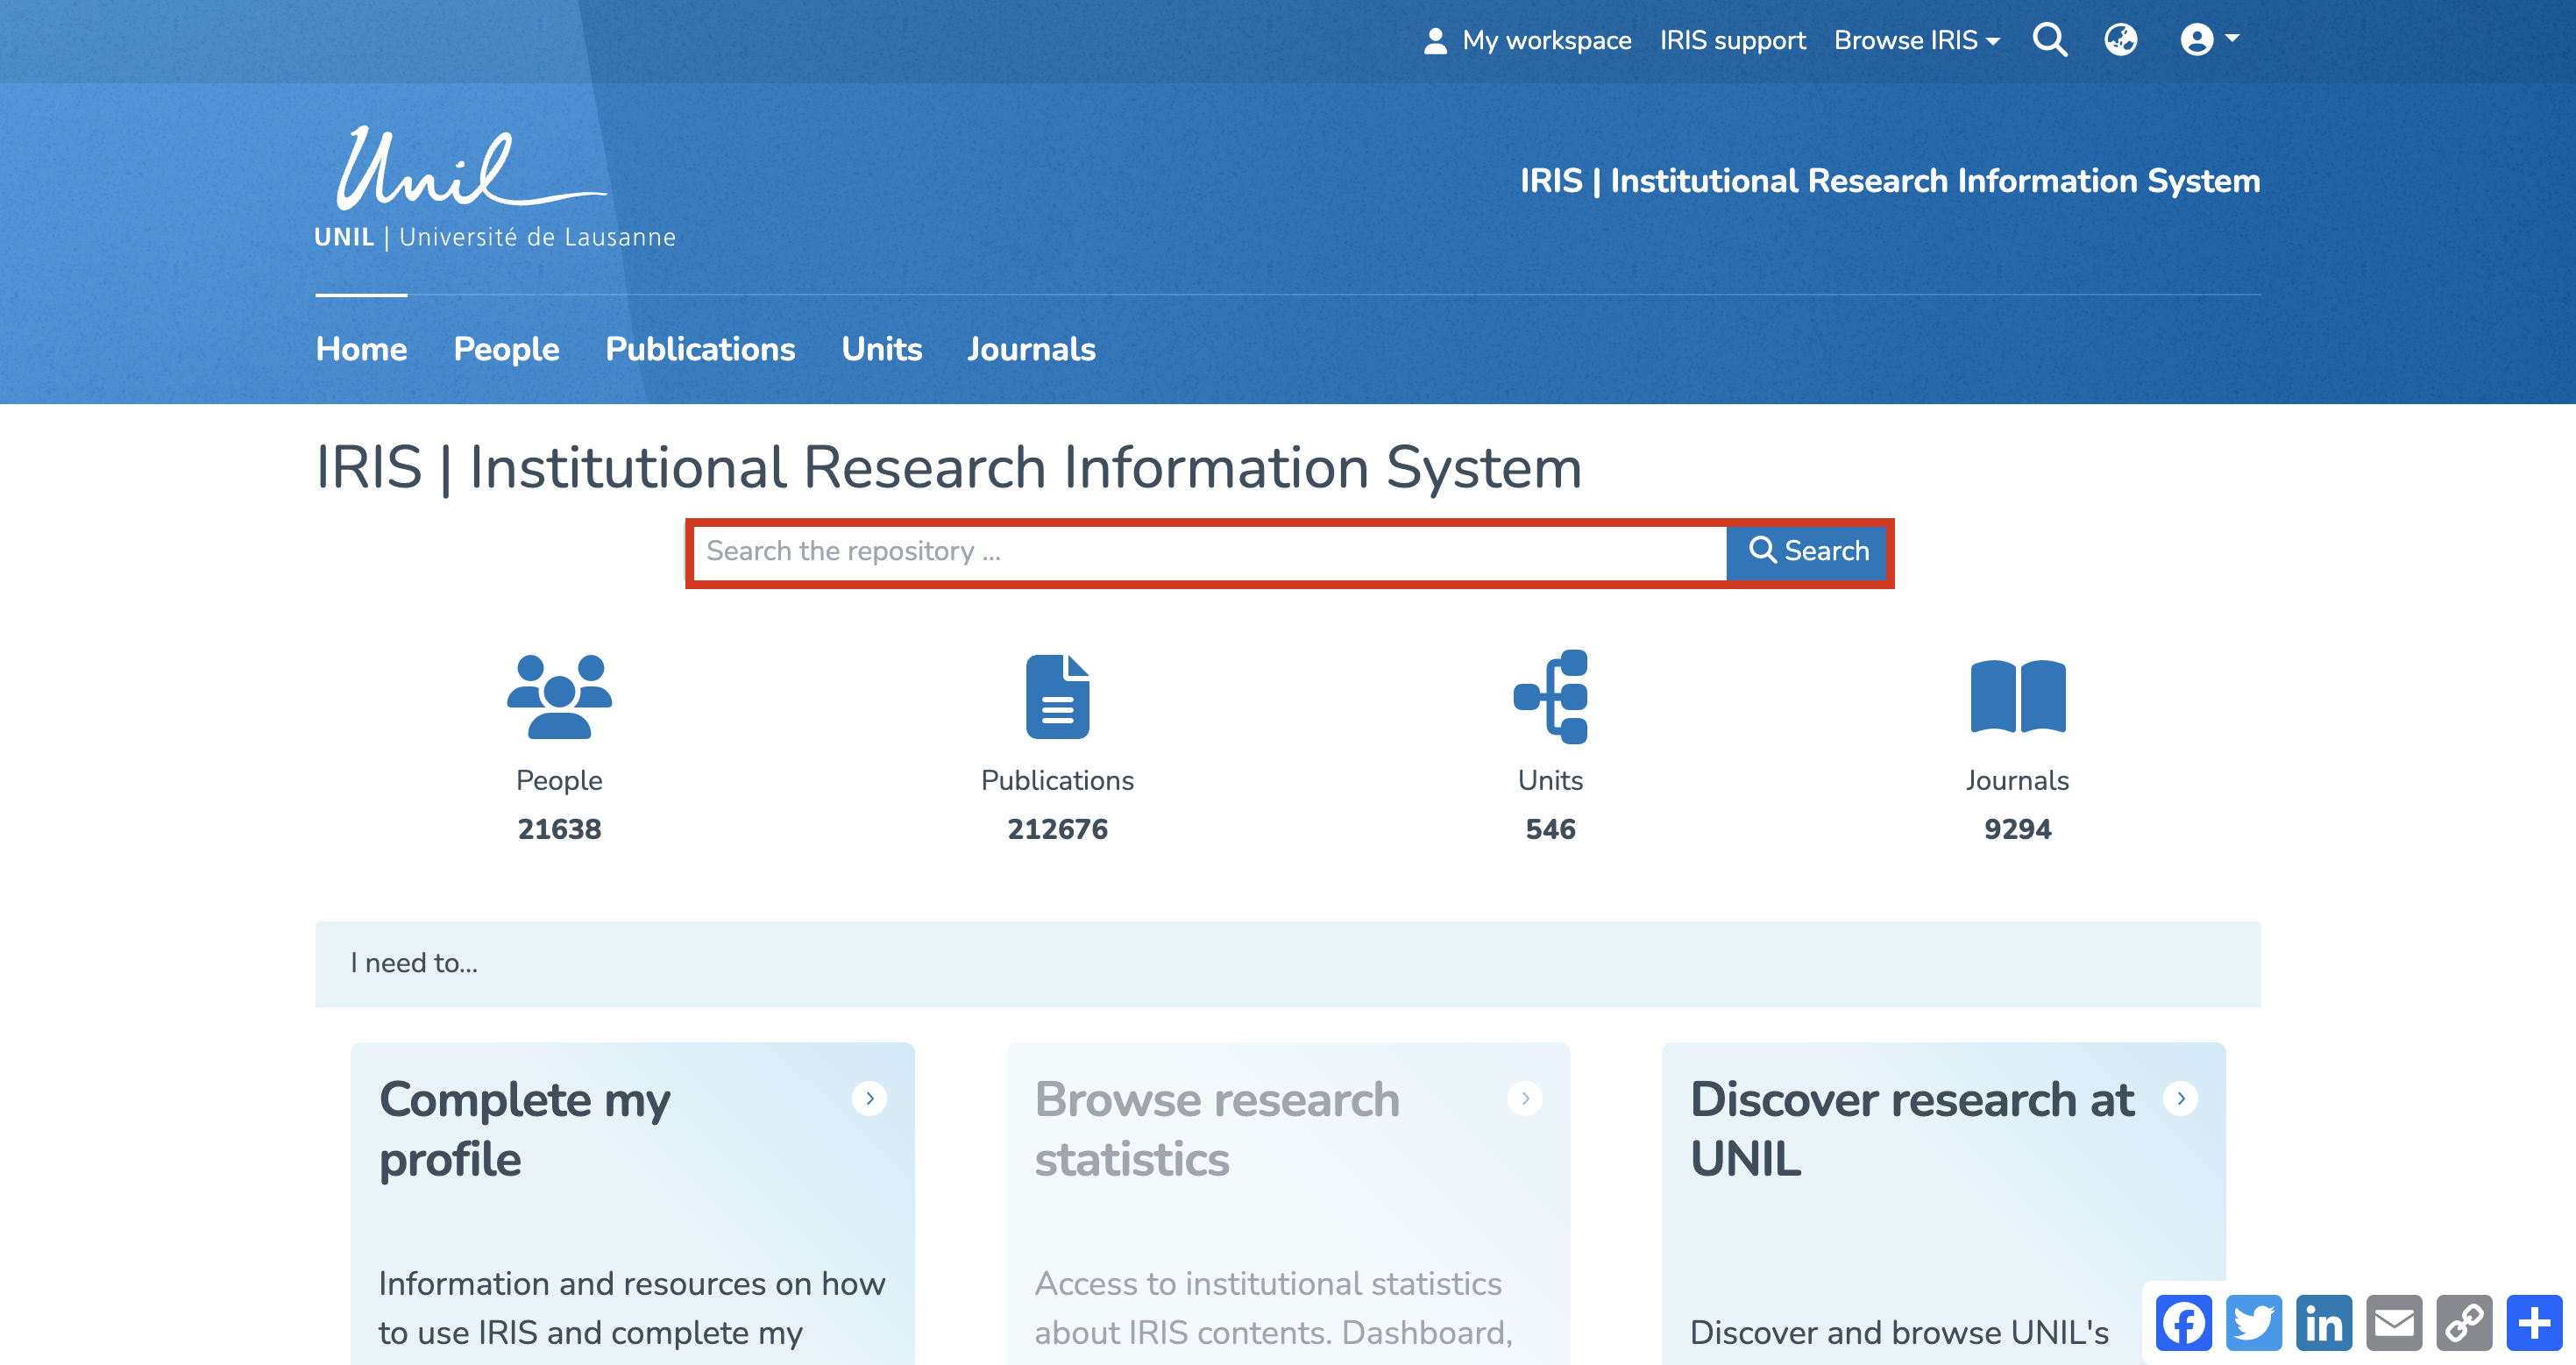
Both methods allow you to search across the entire repository, covering all entities (people, publications, units, and journals).
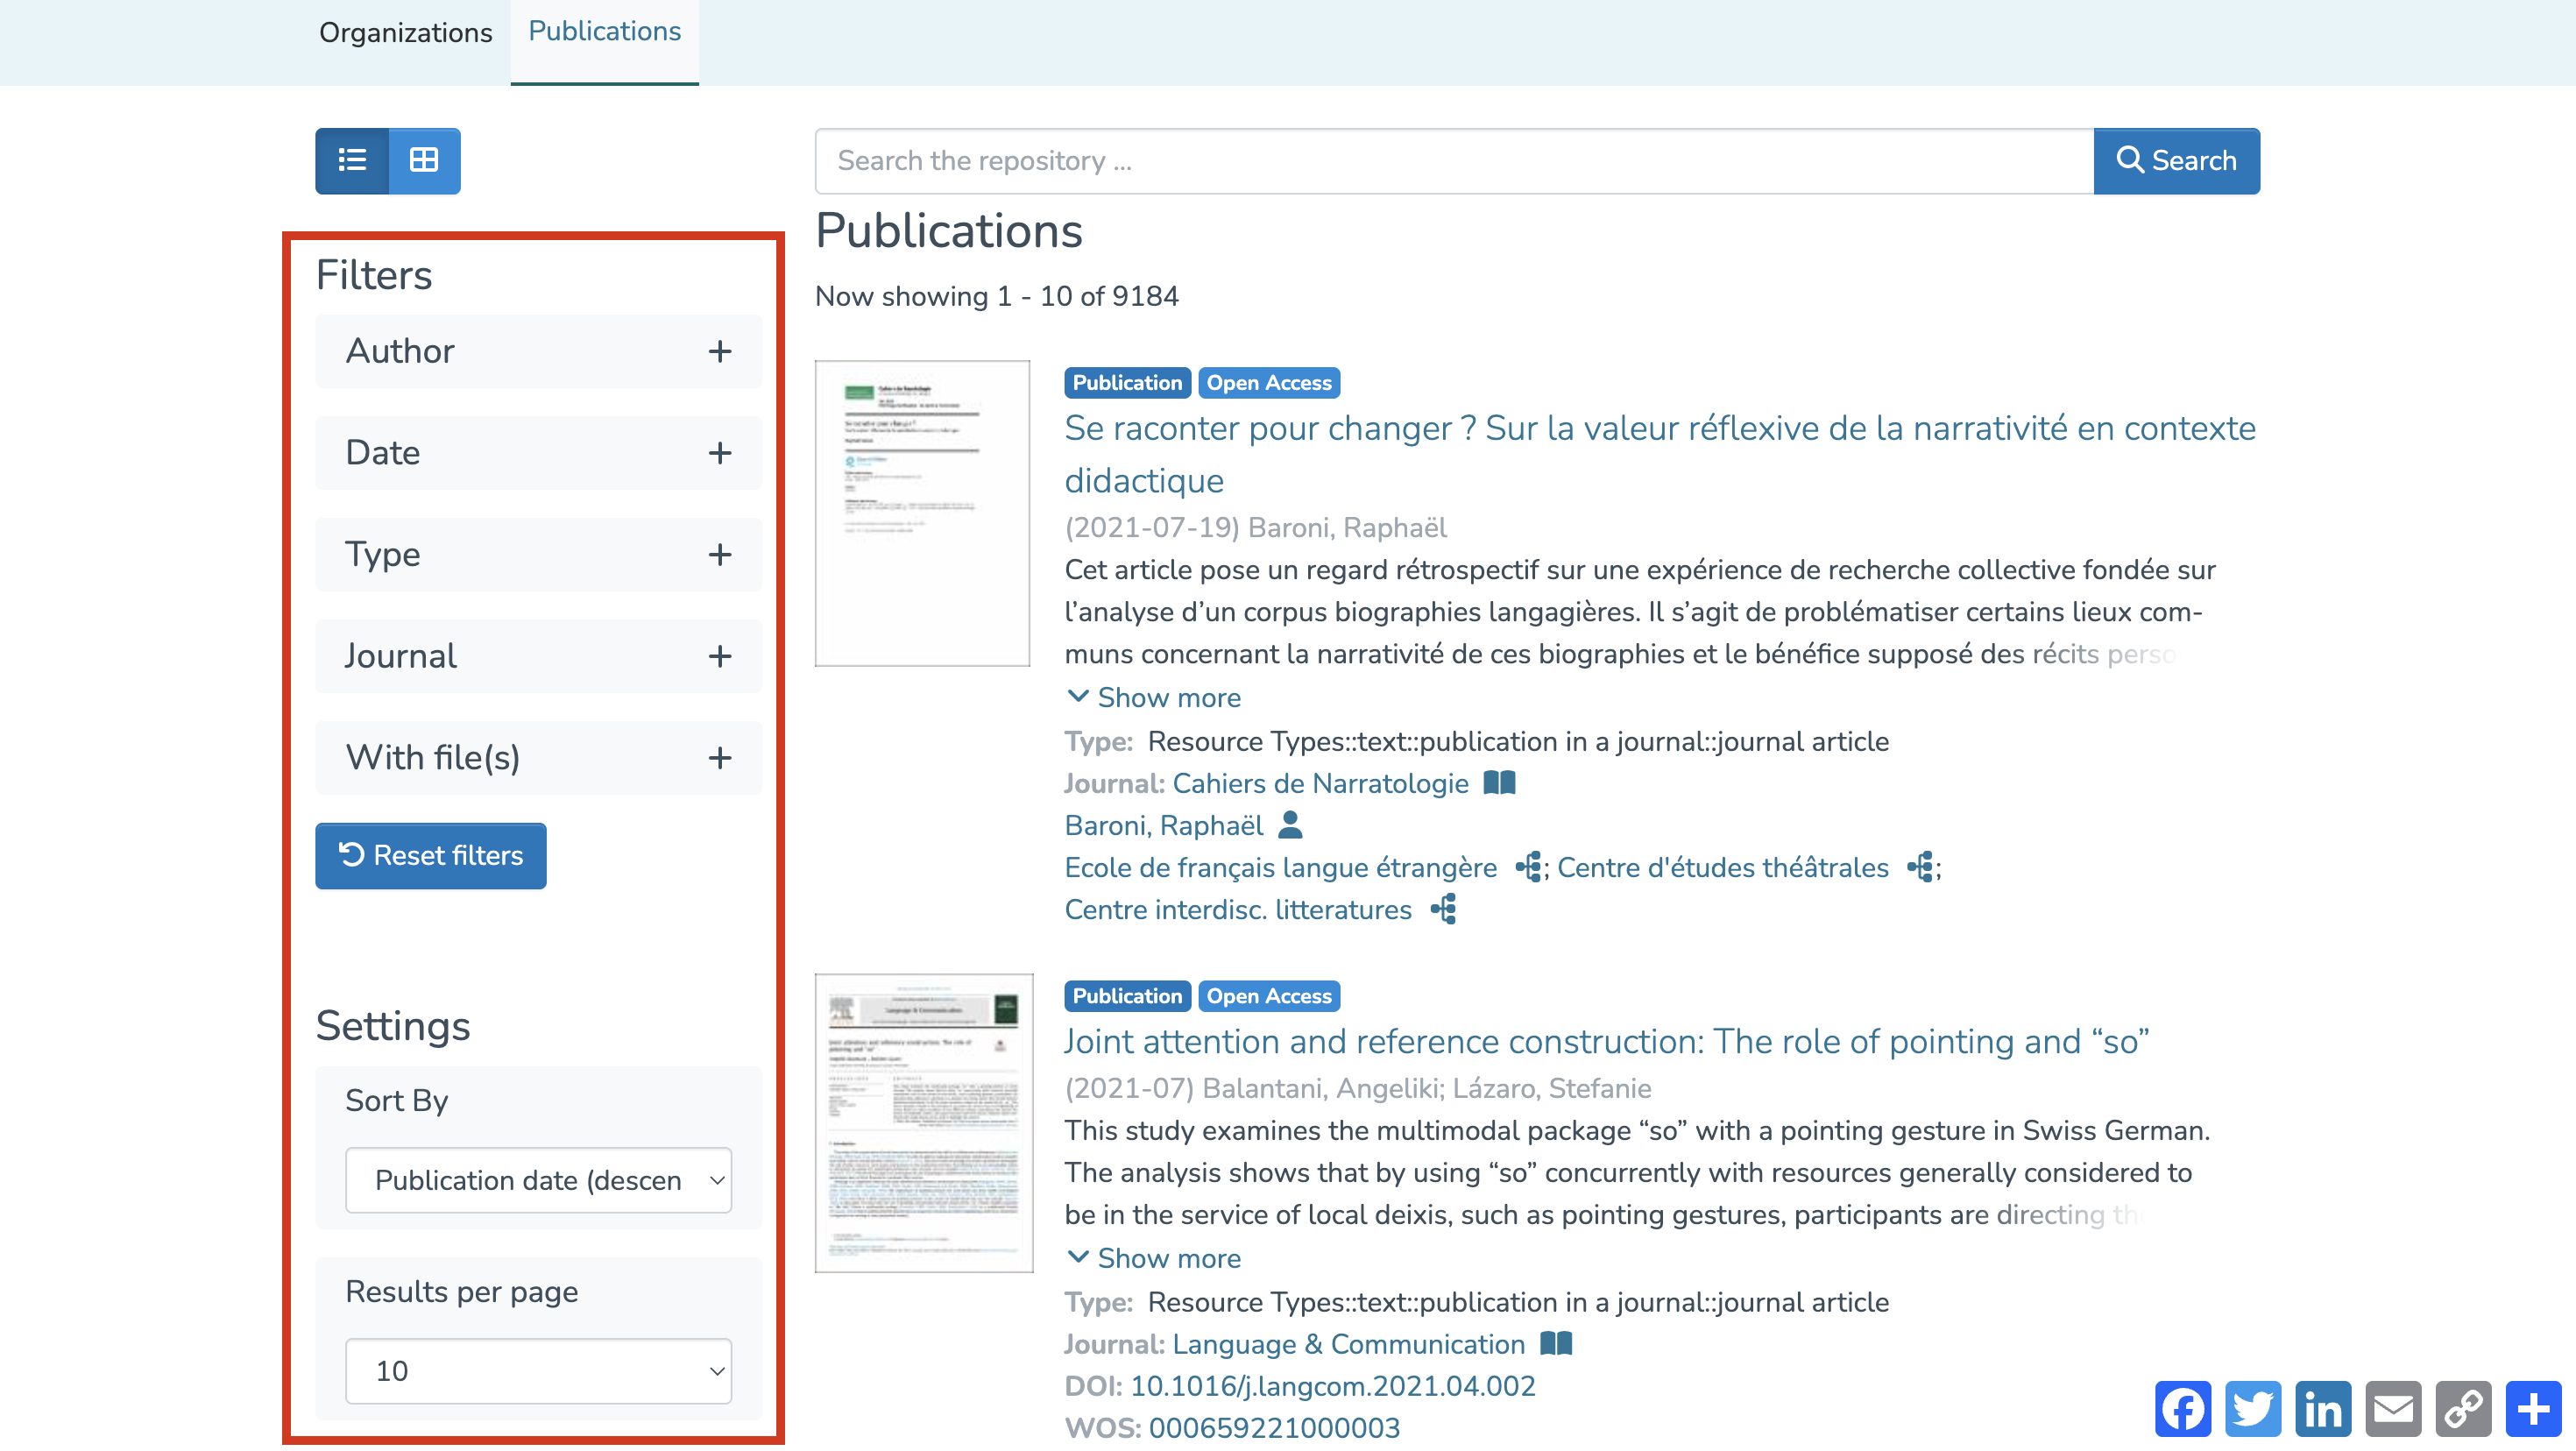
Filters and settings
Once your search is launched, you'll automatically be redirected to the search results page. A series of filters allows you to narrow down the results, including:
- Entity: people, publications, units, or journals
- Linked person: a person associated with the publication (not necessarily the author)
- Author
- Publication date
- Type of publication
- Journal or magazine name
- File presence: with or without
- Language of the publication
- Keywords
- Linked unit
- Institution: UNIL/CHUV/Unisanté + partner institutions or external


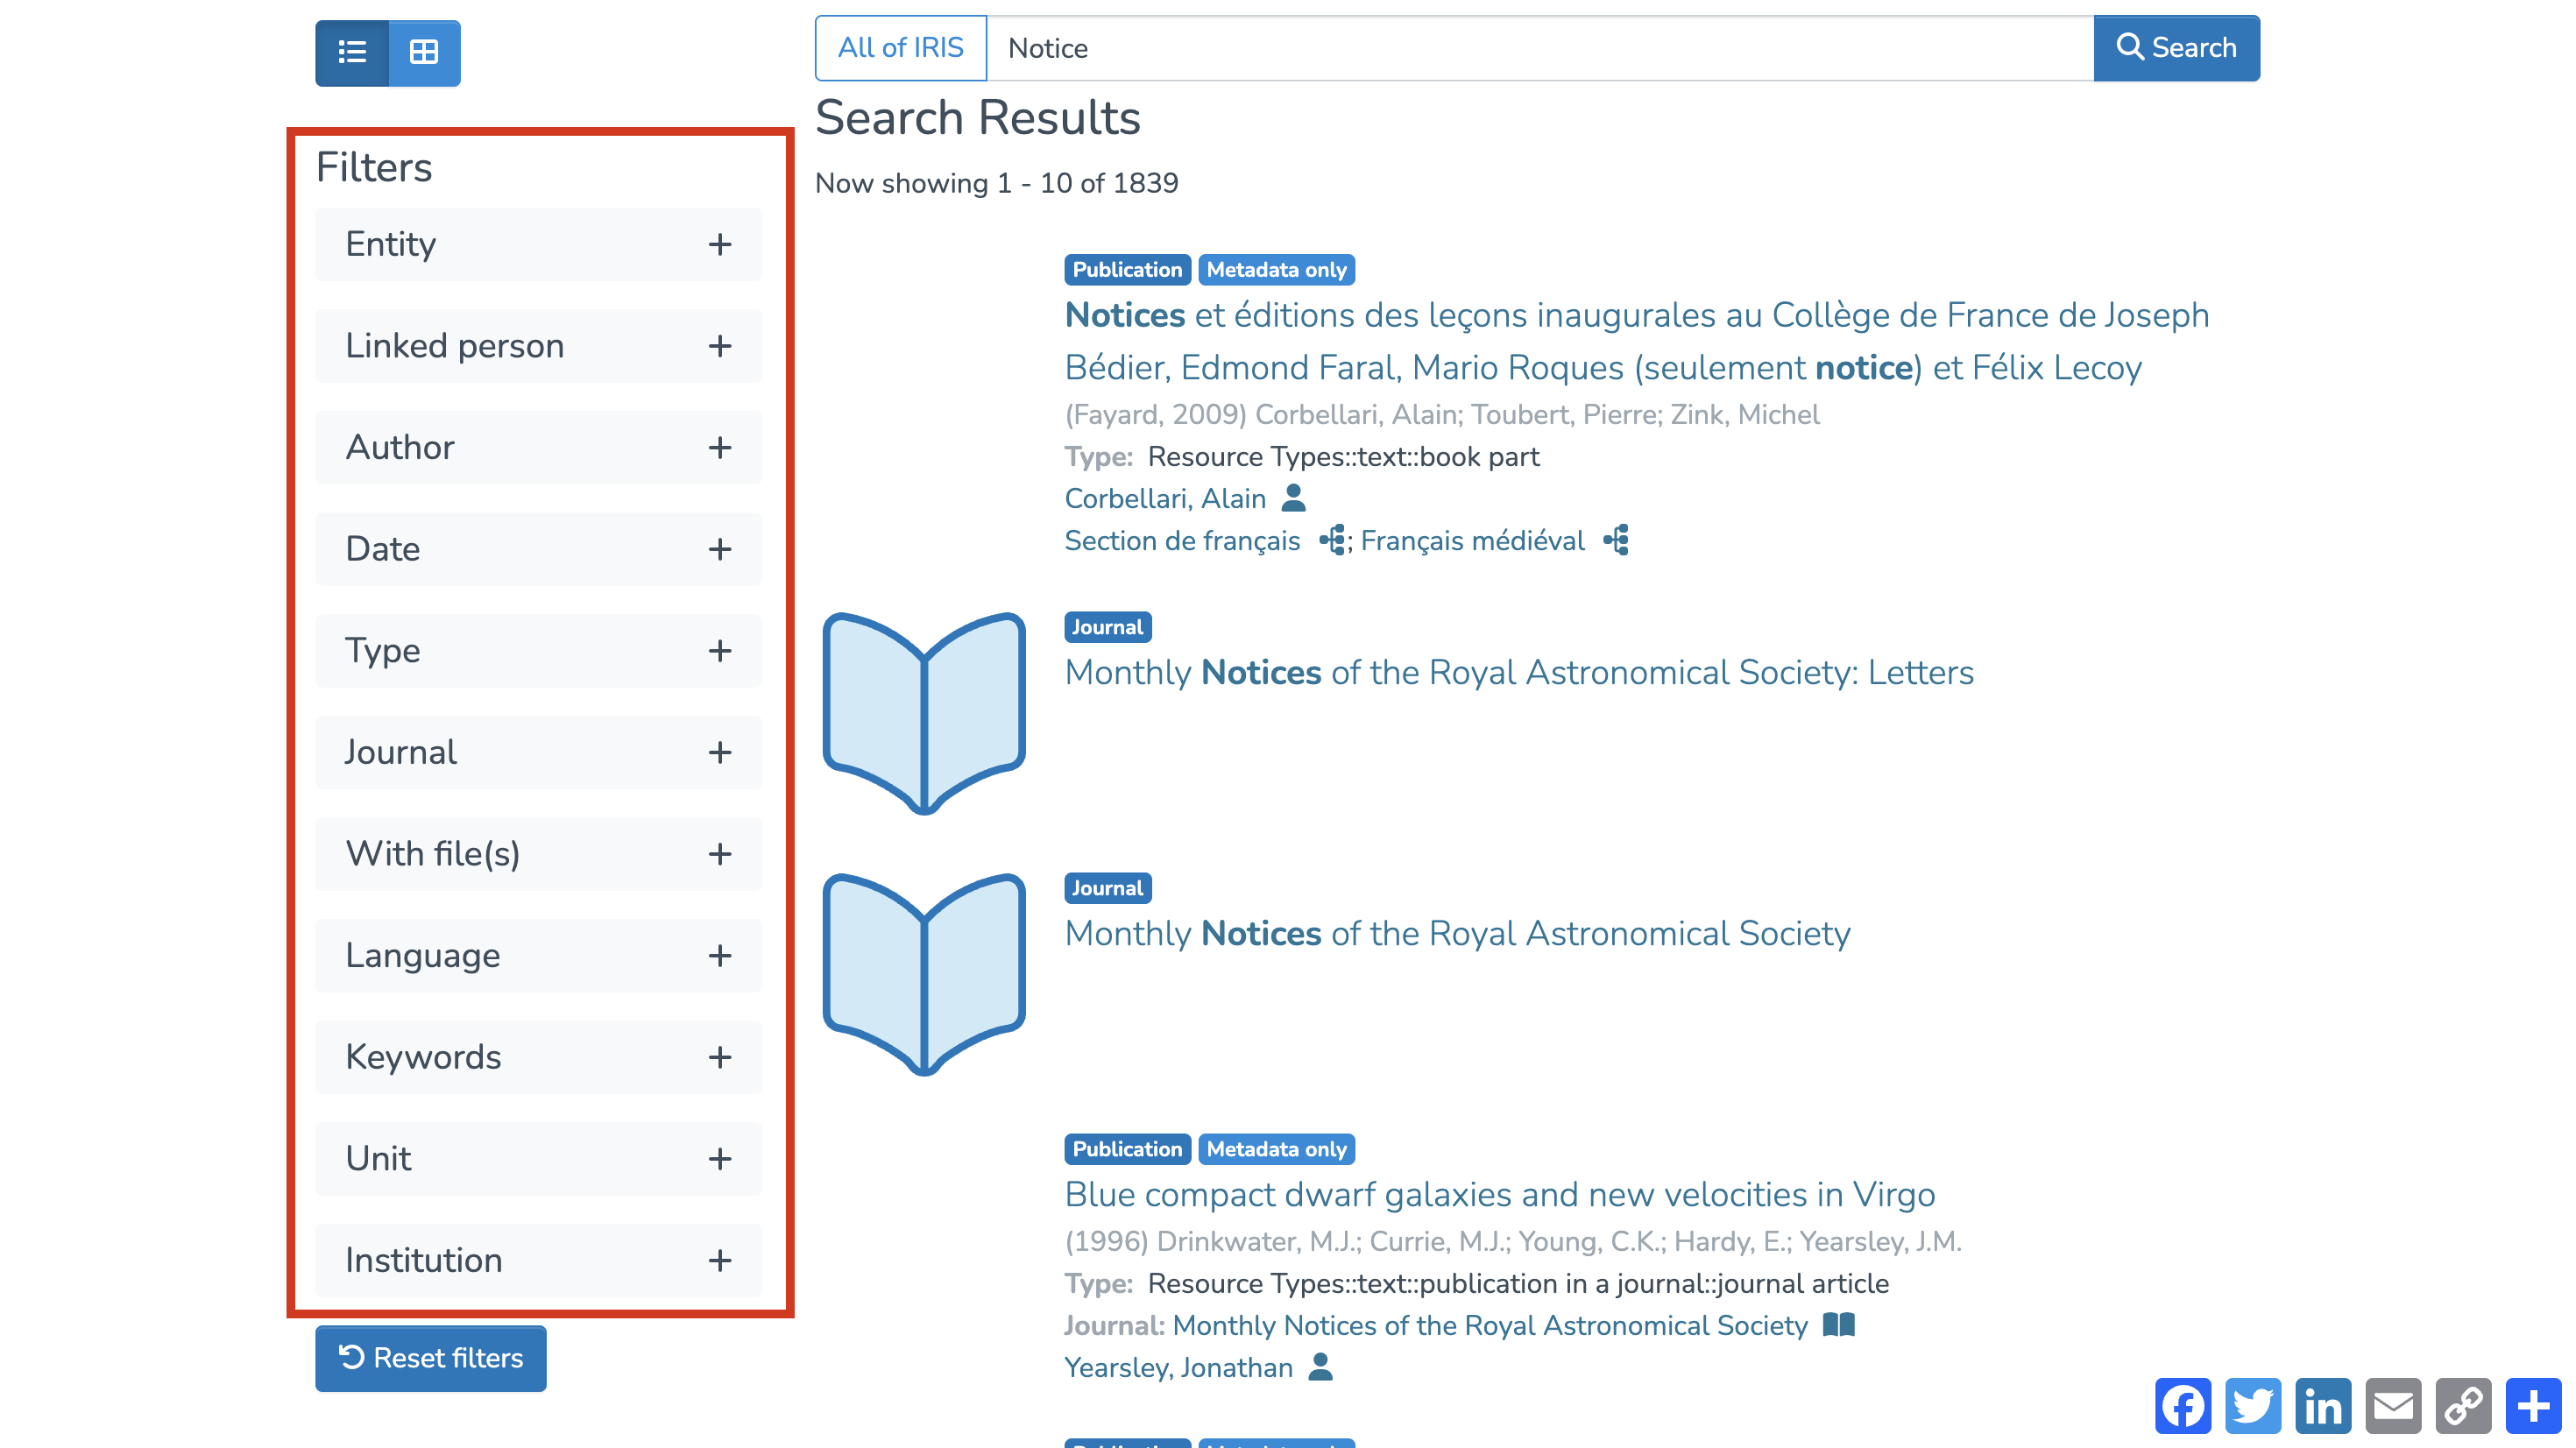

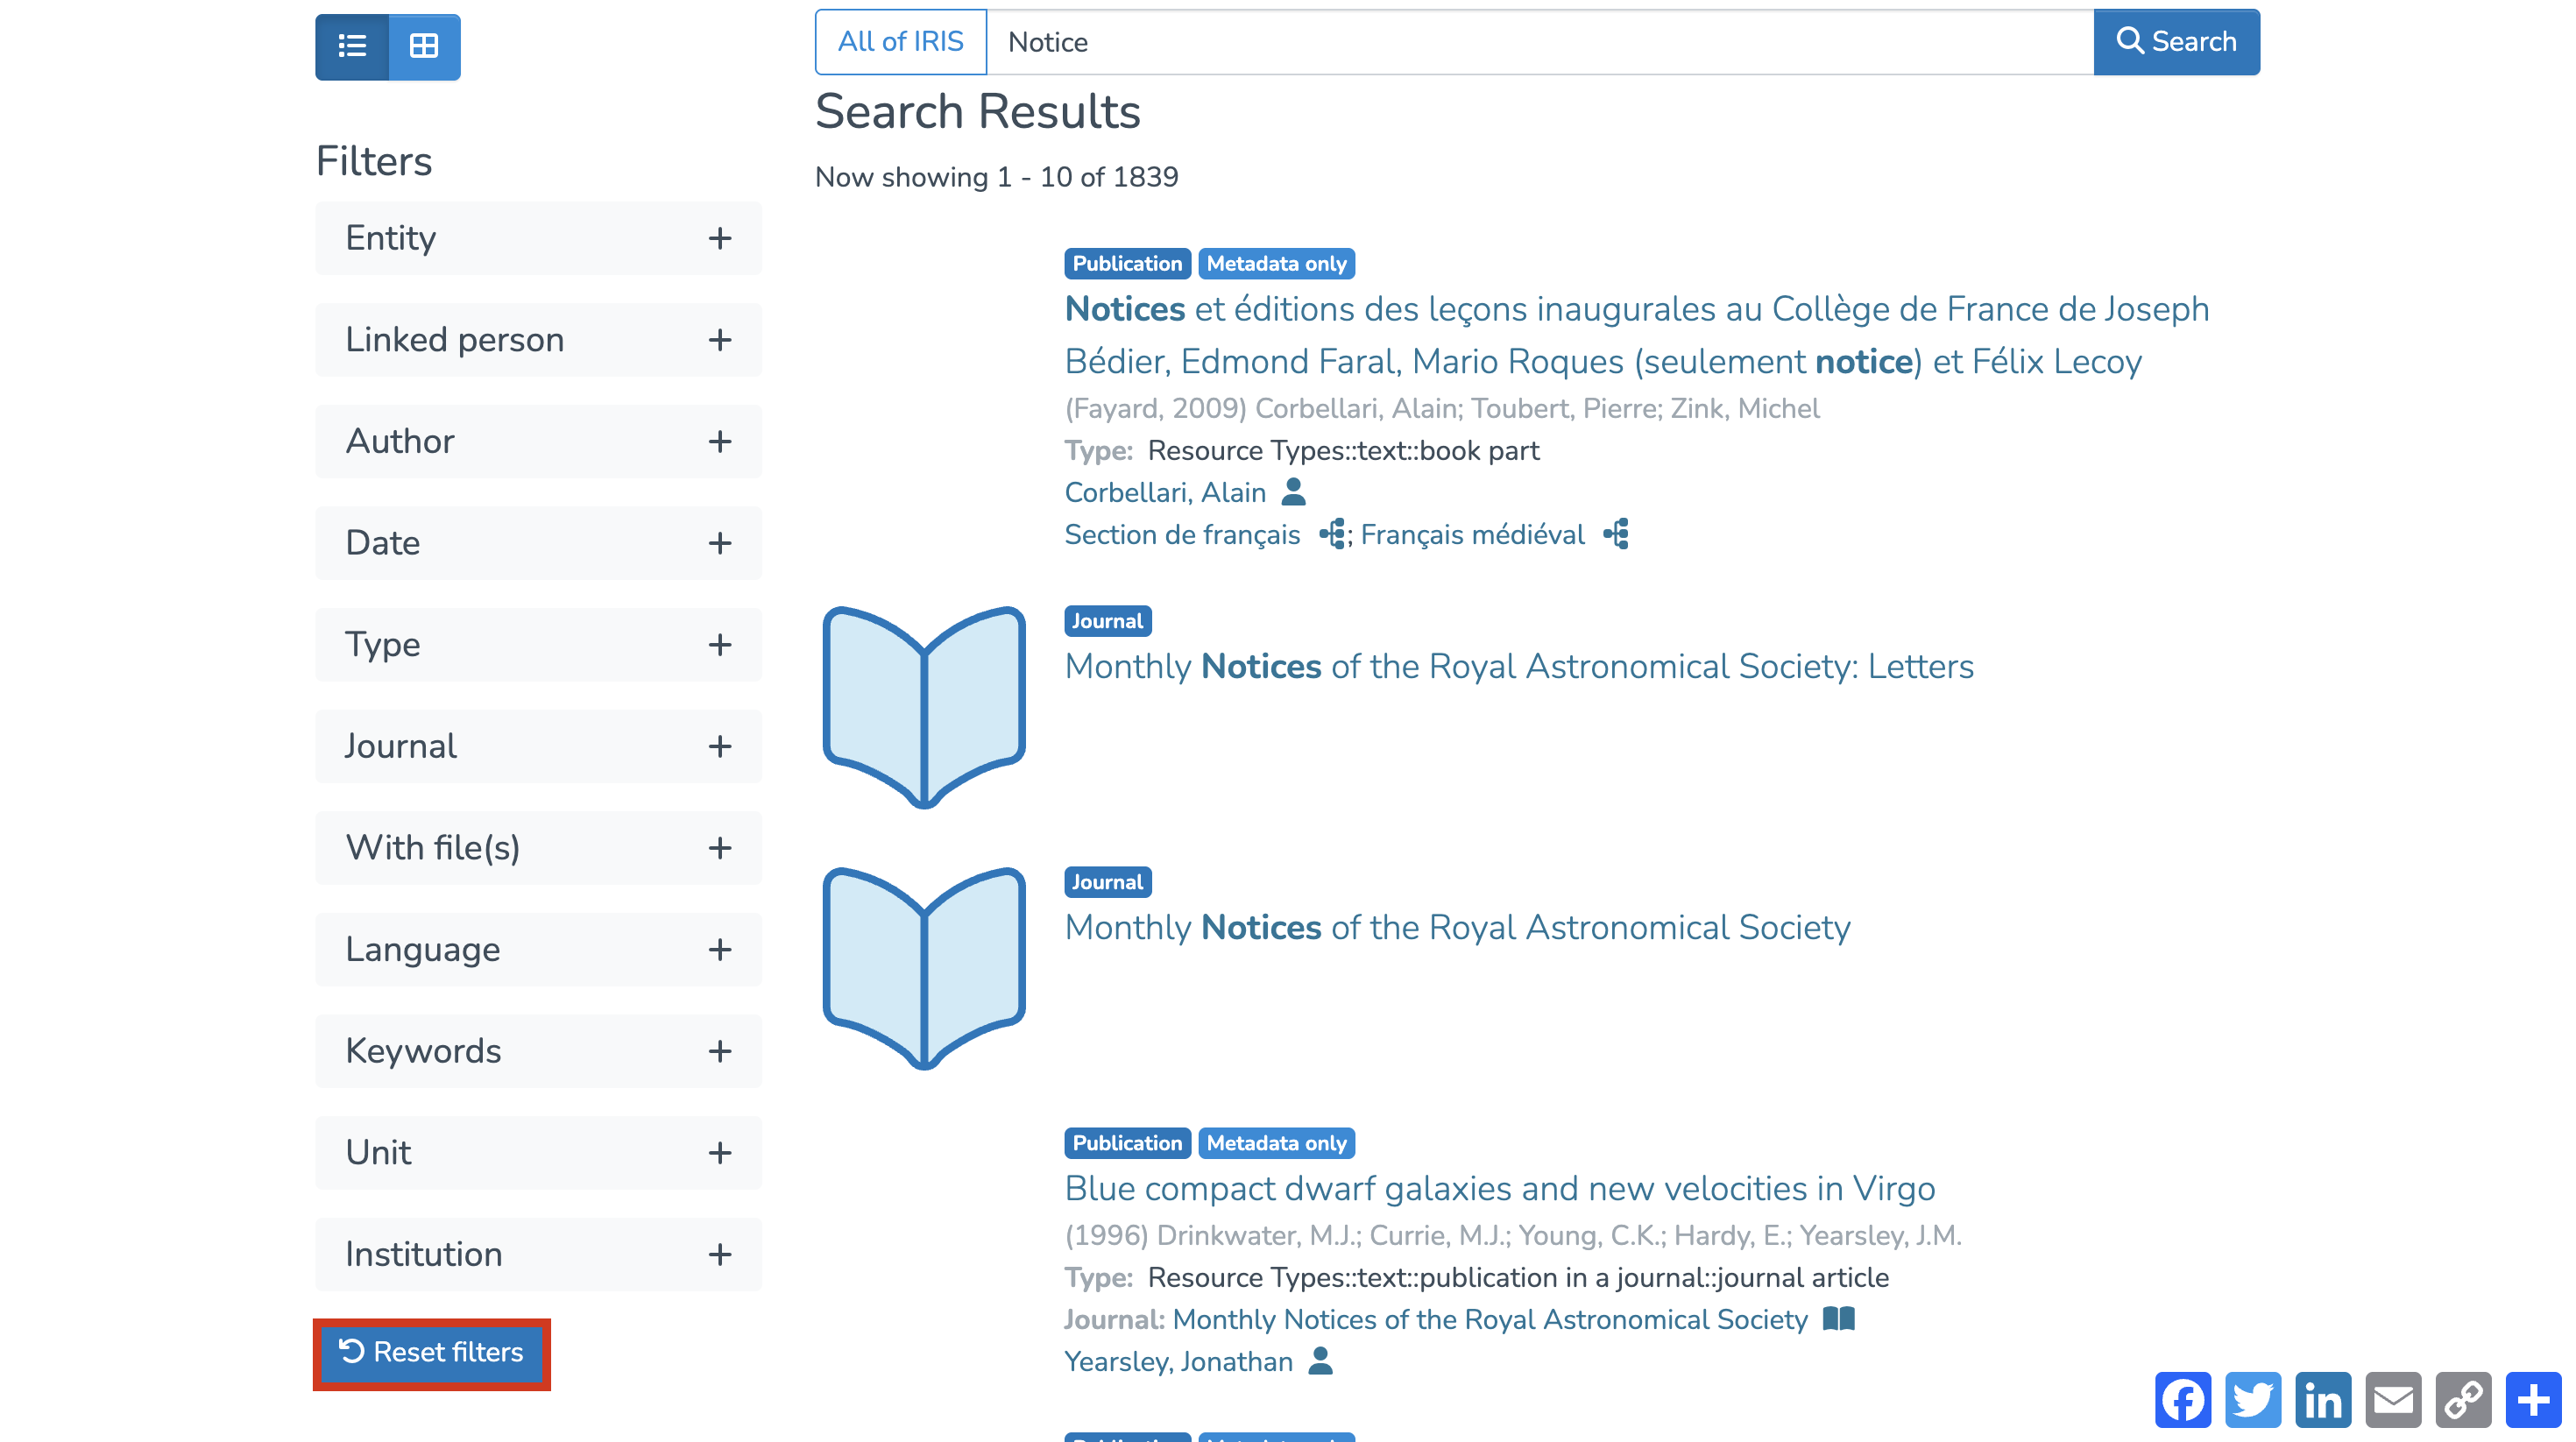
To reset the filters, simply click “Reset filters.”
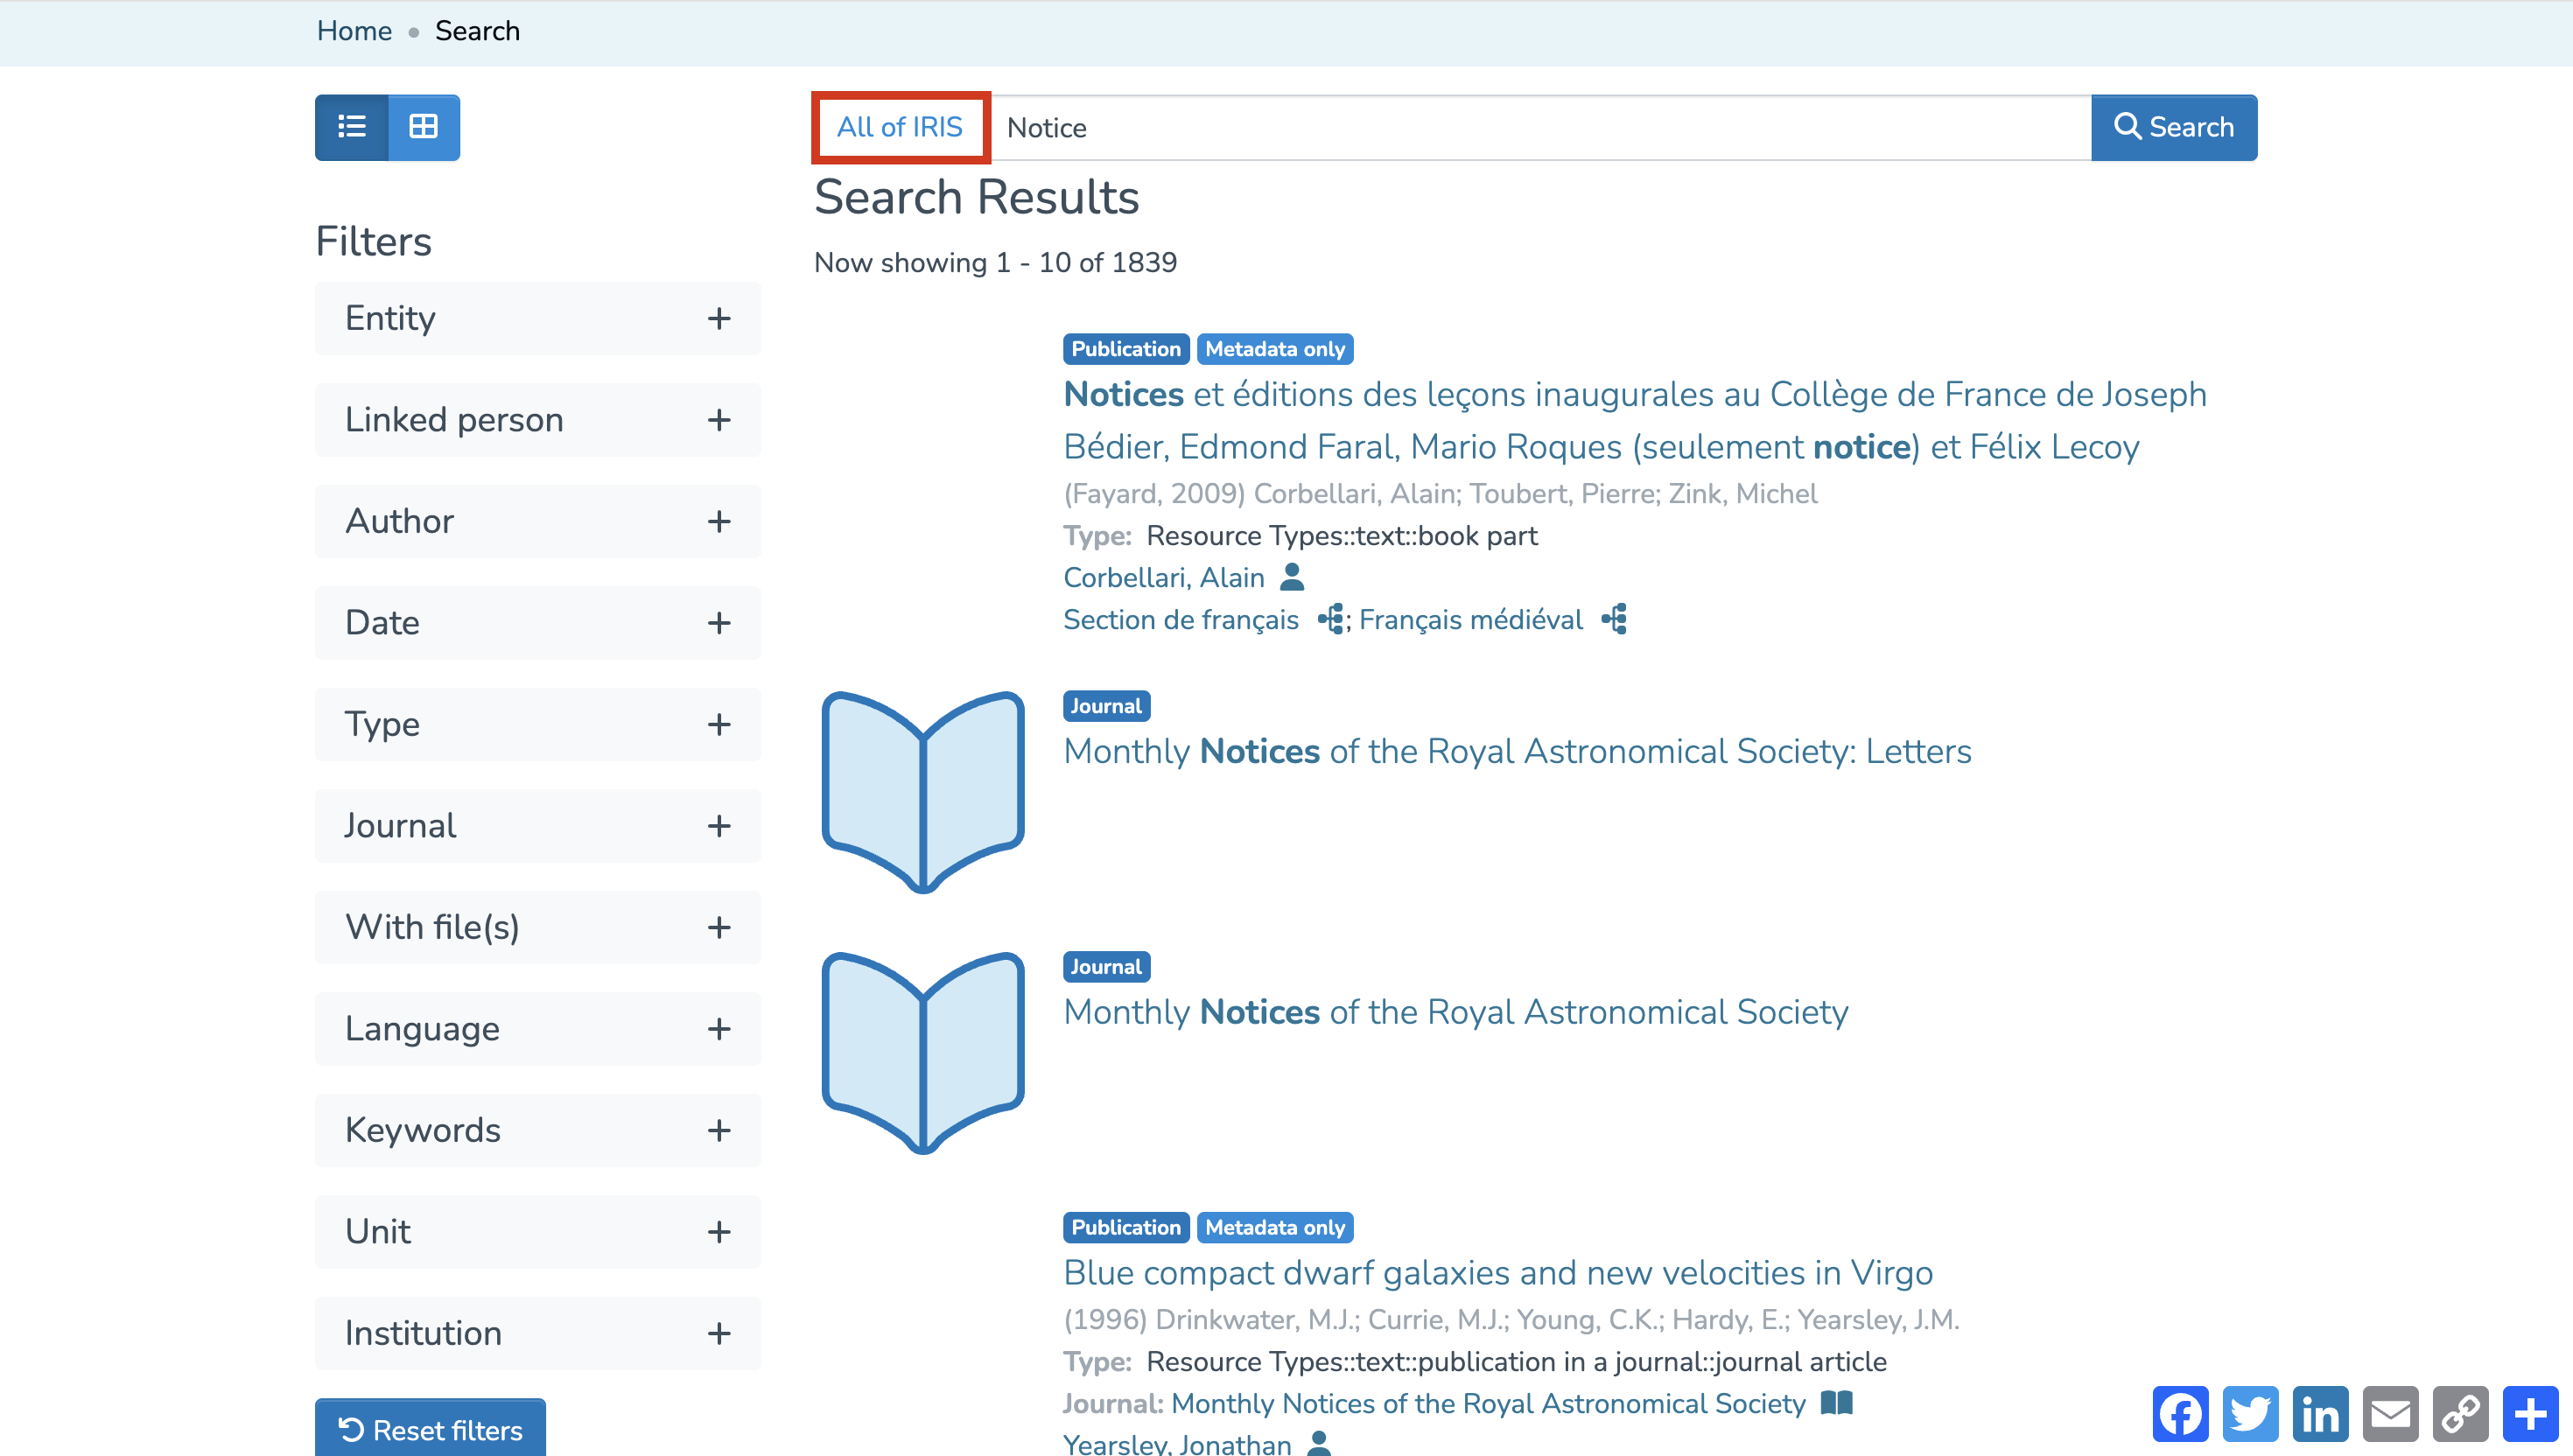
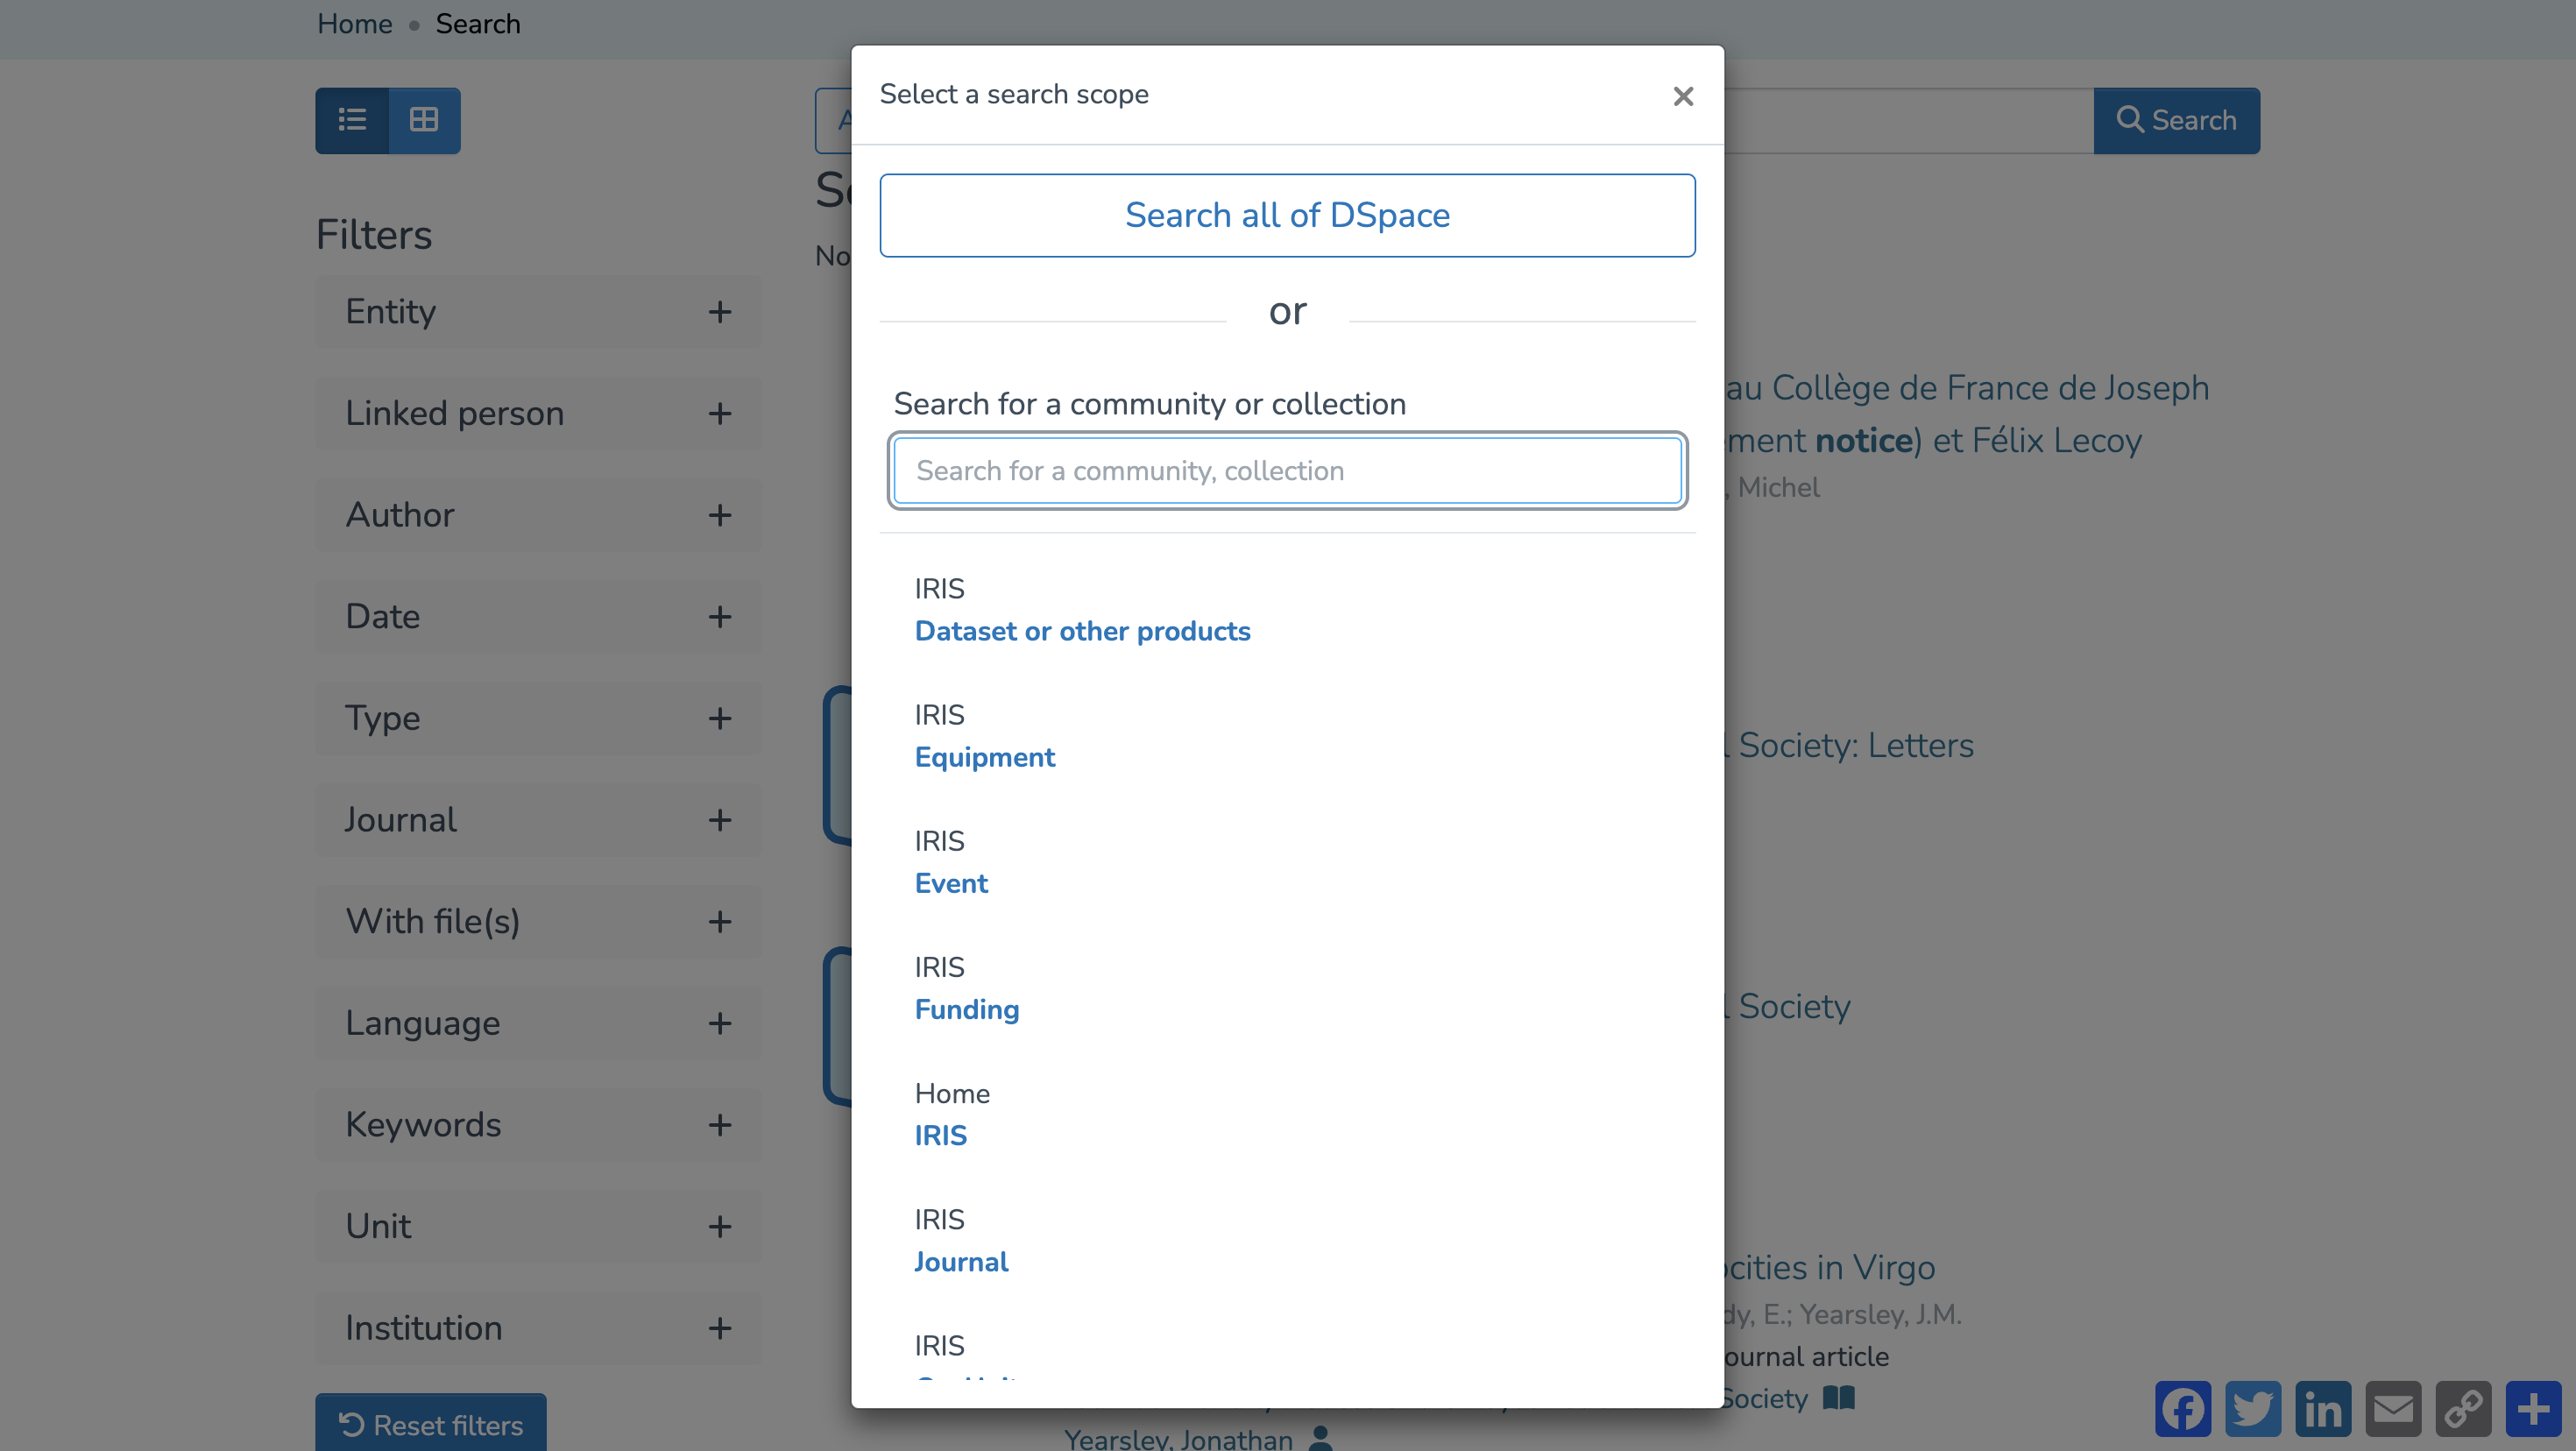
You can also choose to limit your search to a specific collection. To do so, click into the search bar and select the desired collection.
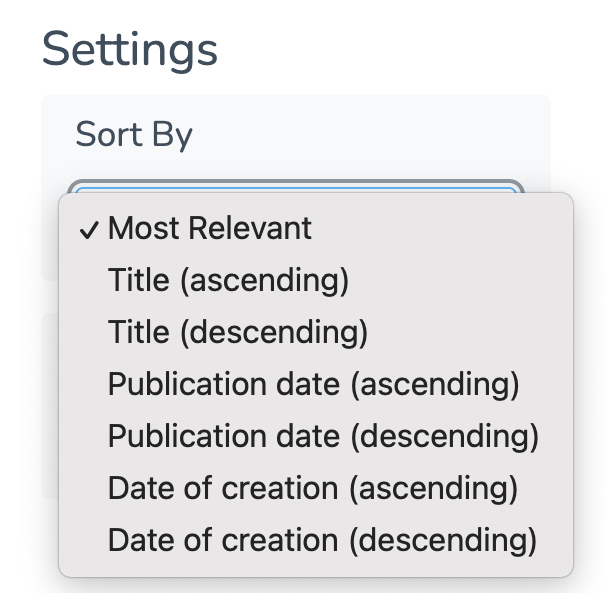
Sorting settings are available to help organize your results as you prefer.
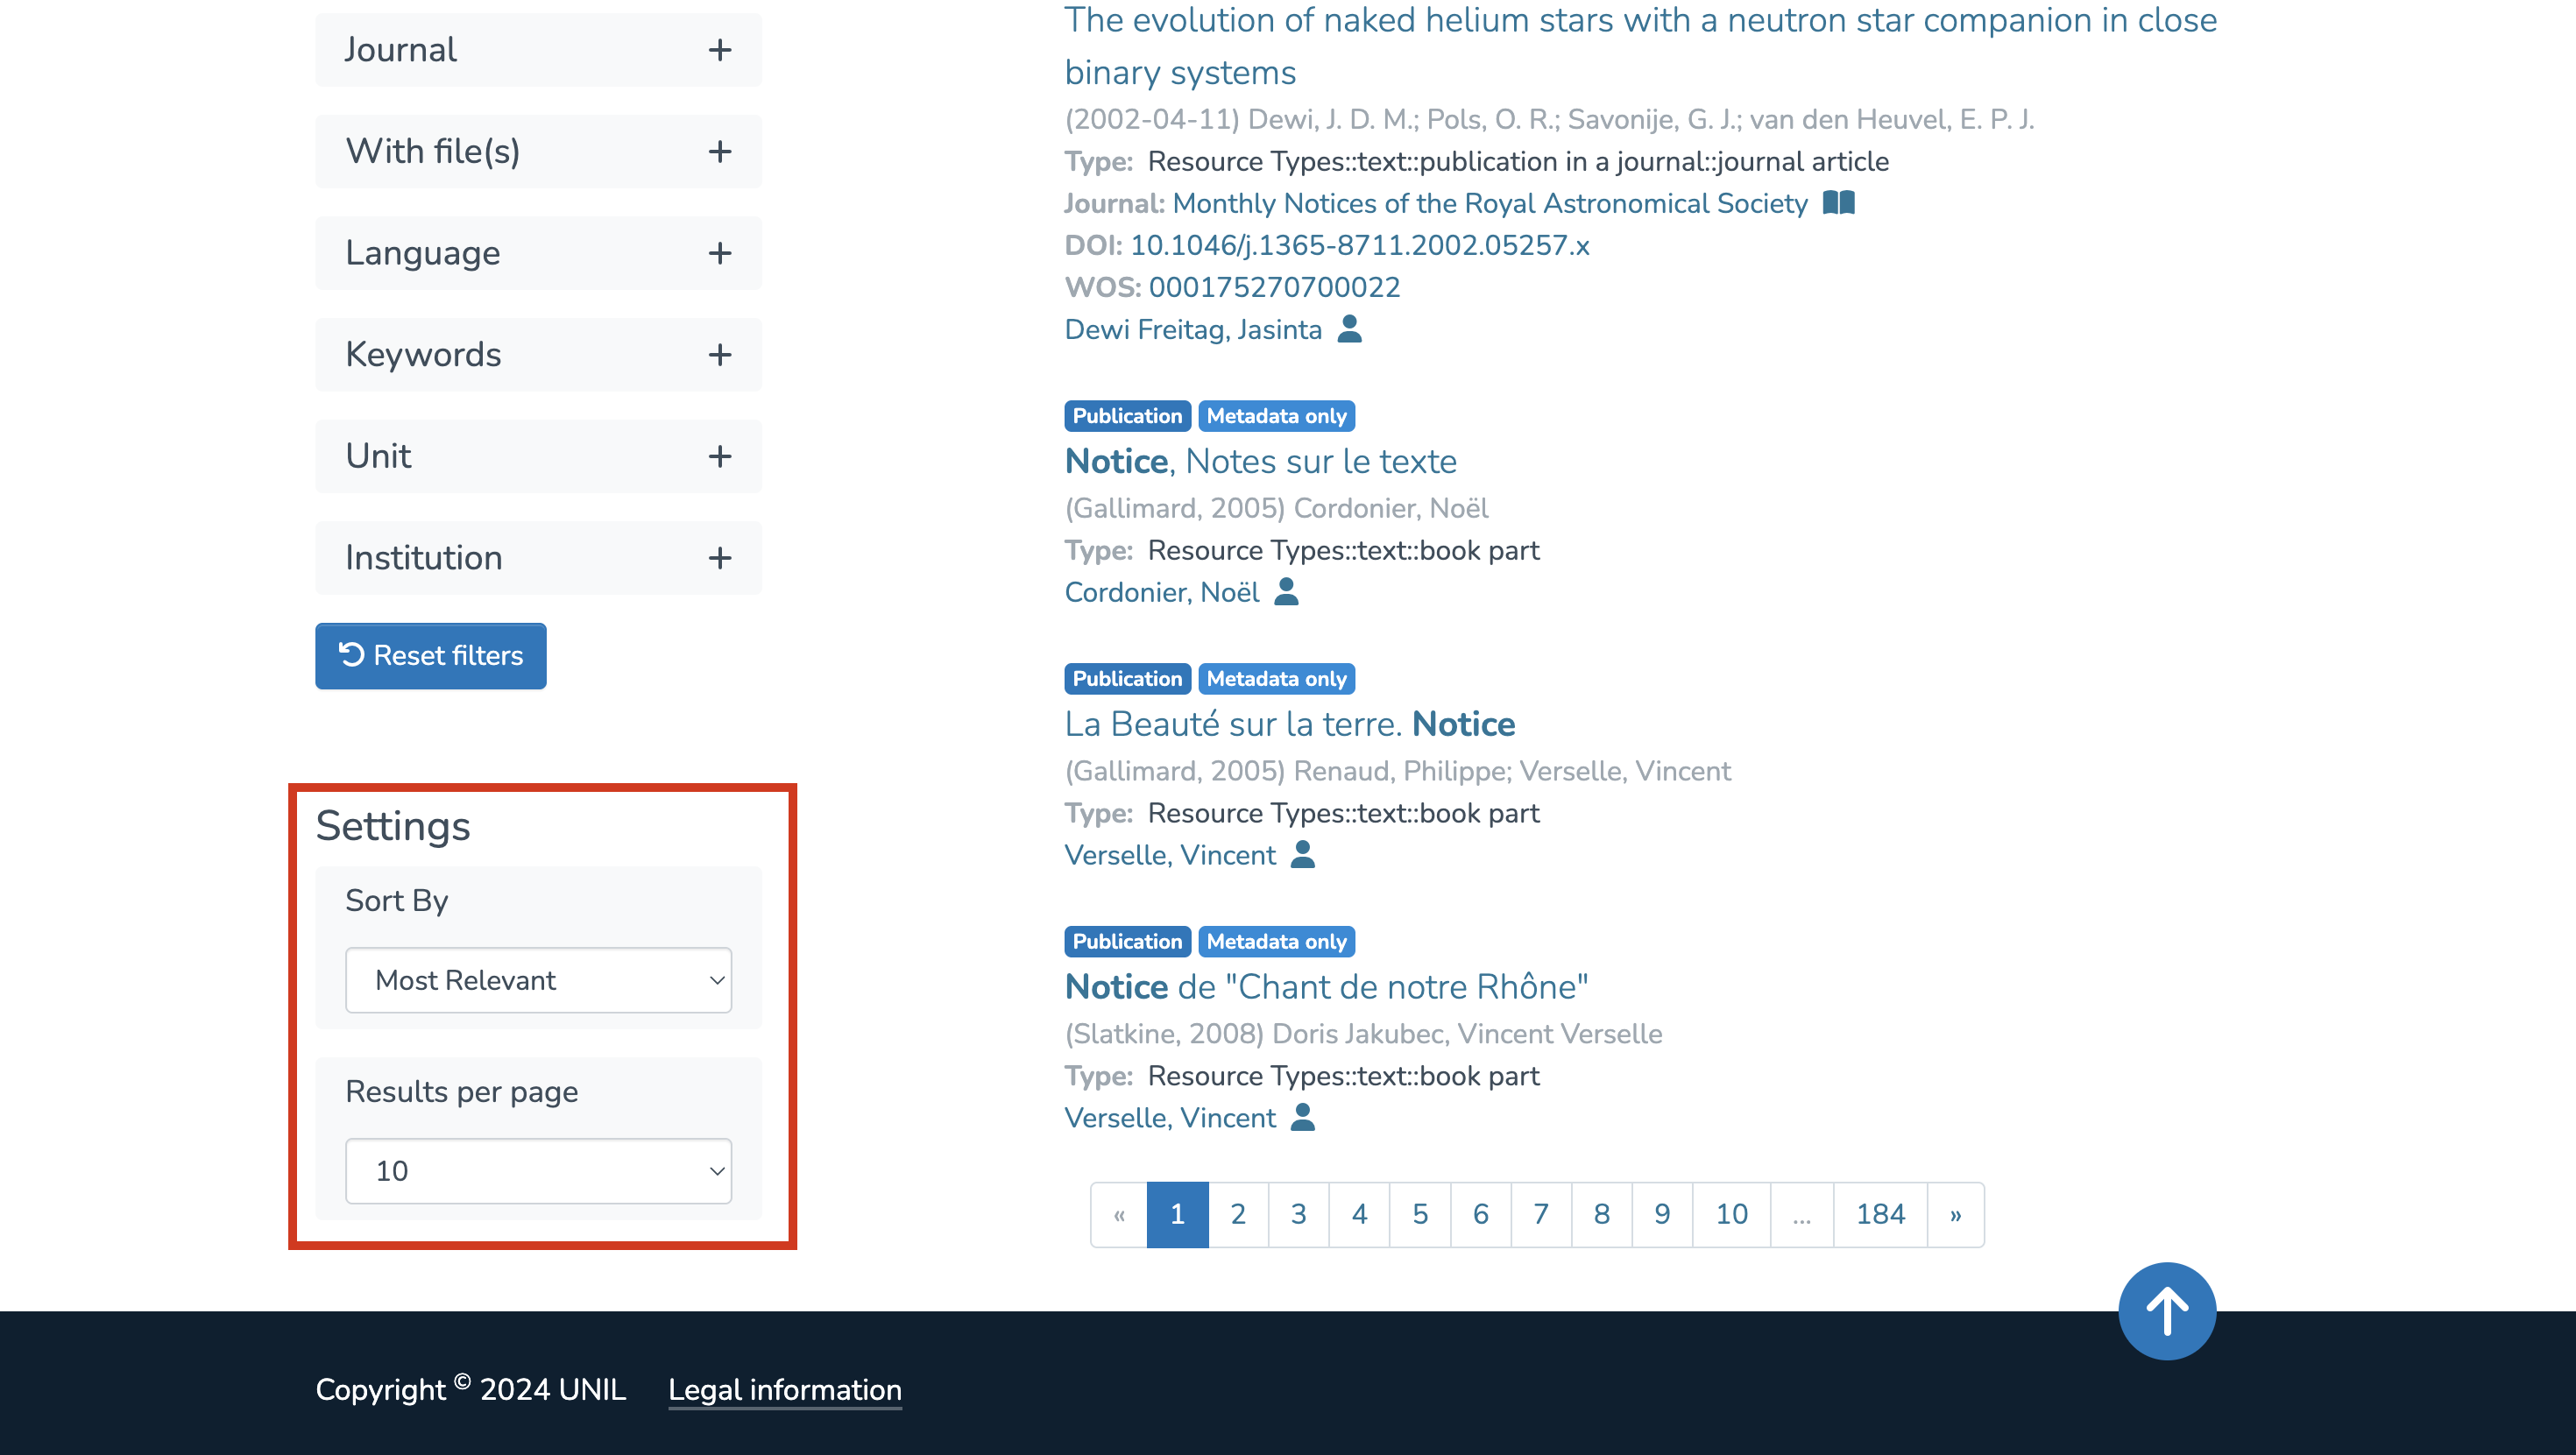
You can sort by:
- Relevance
- Title
- Publication date
- Date of creation
Each of these can be sorted in ascending or descending order.
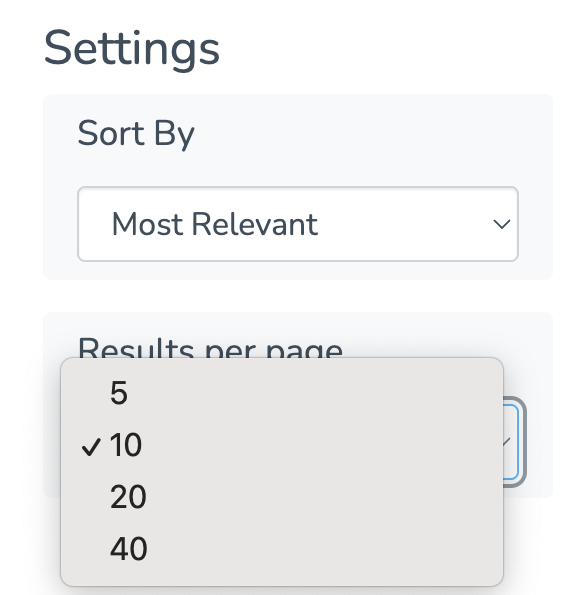
You can also adjust the number of results displayed per page.
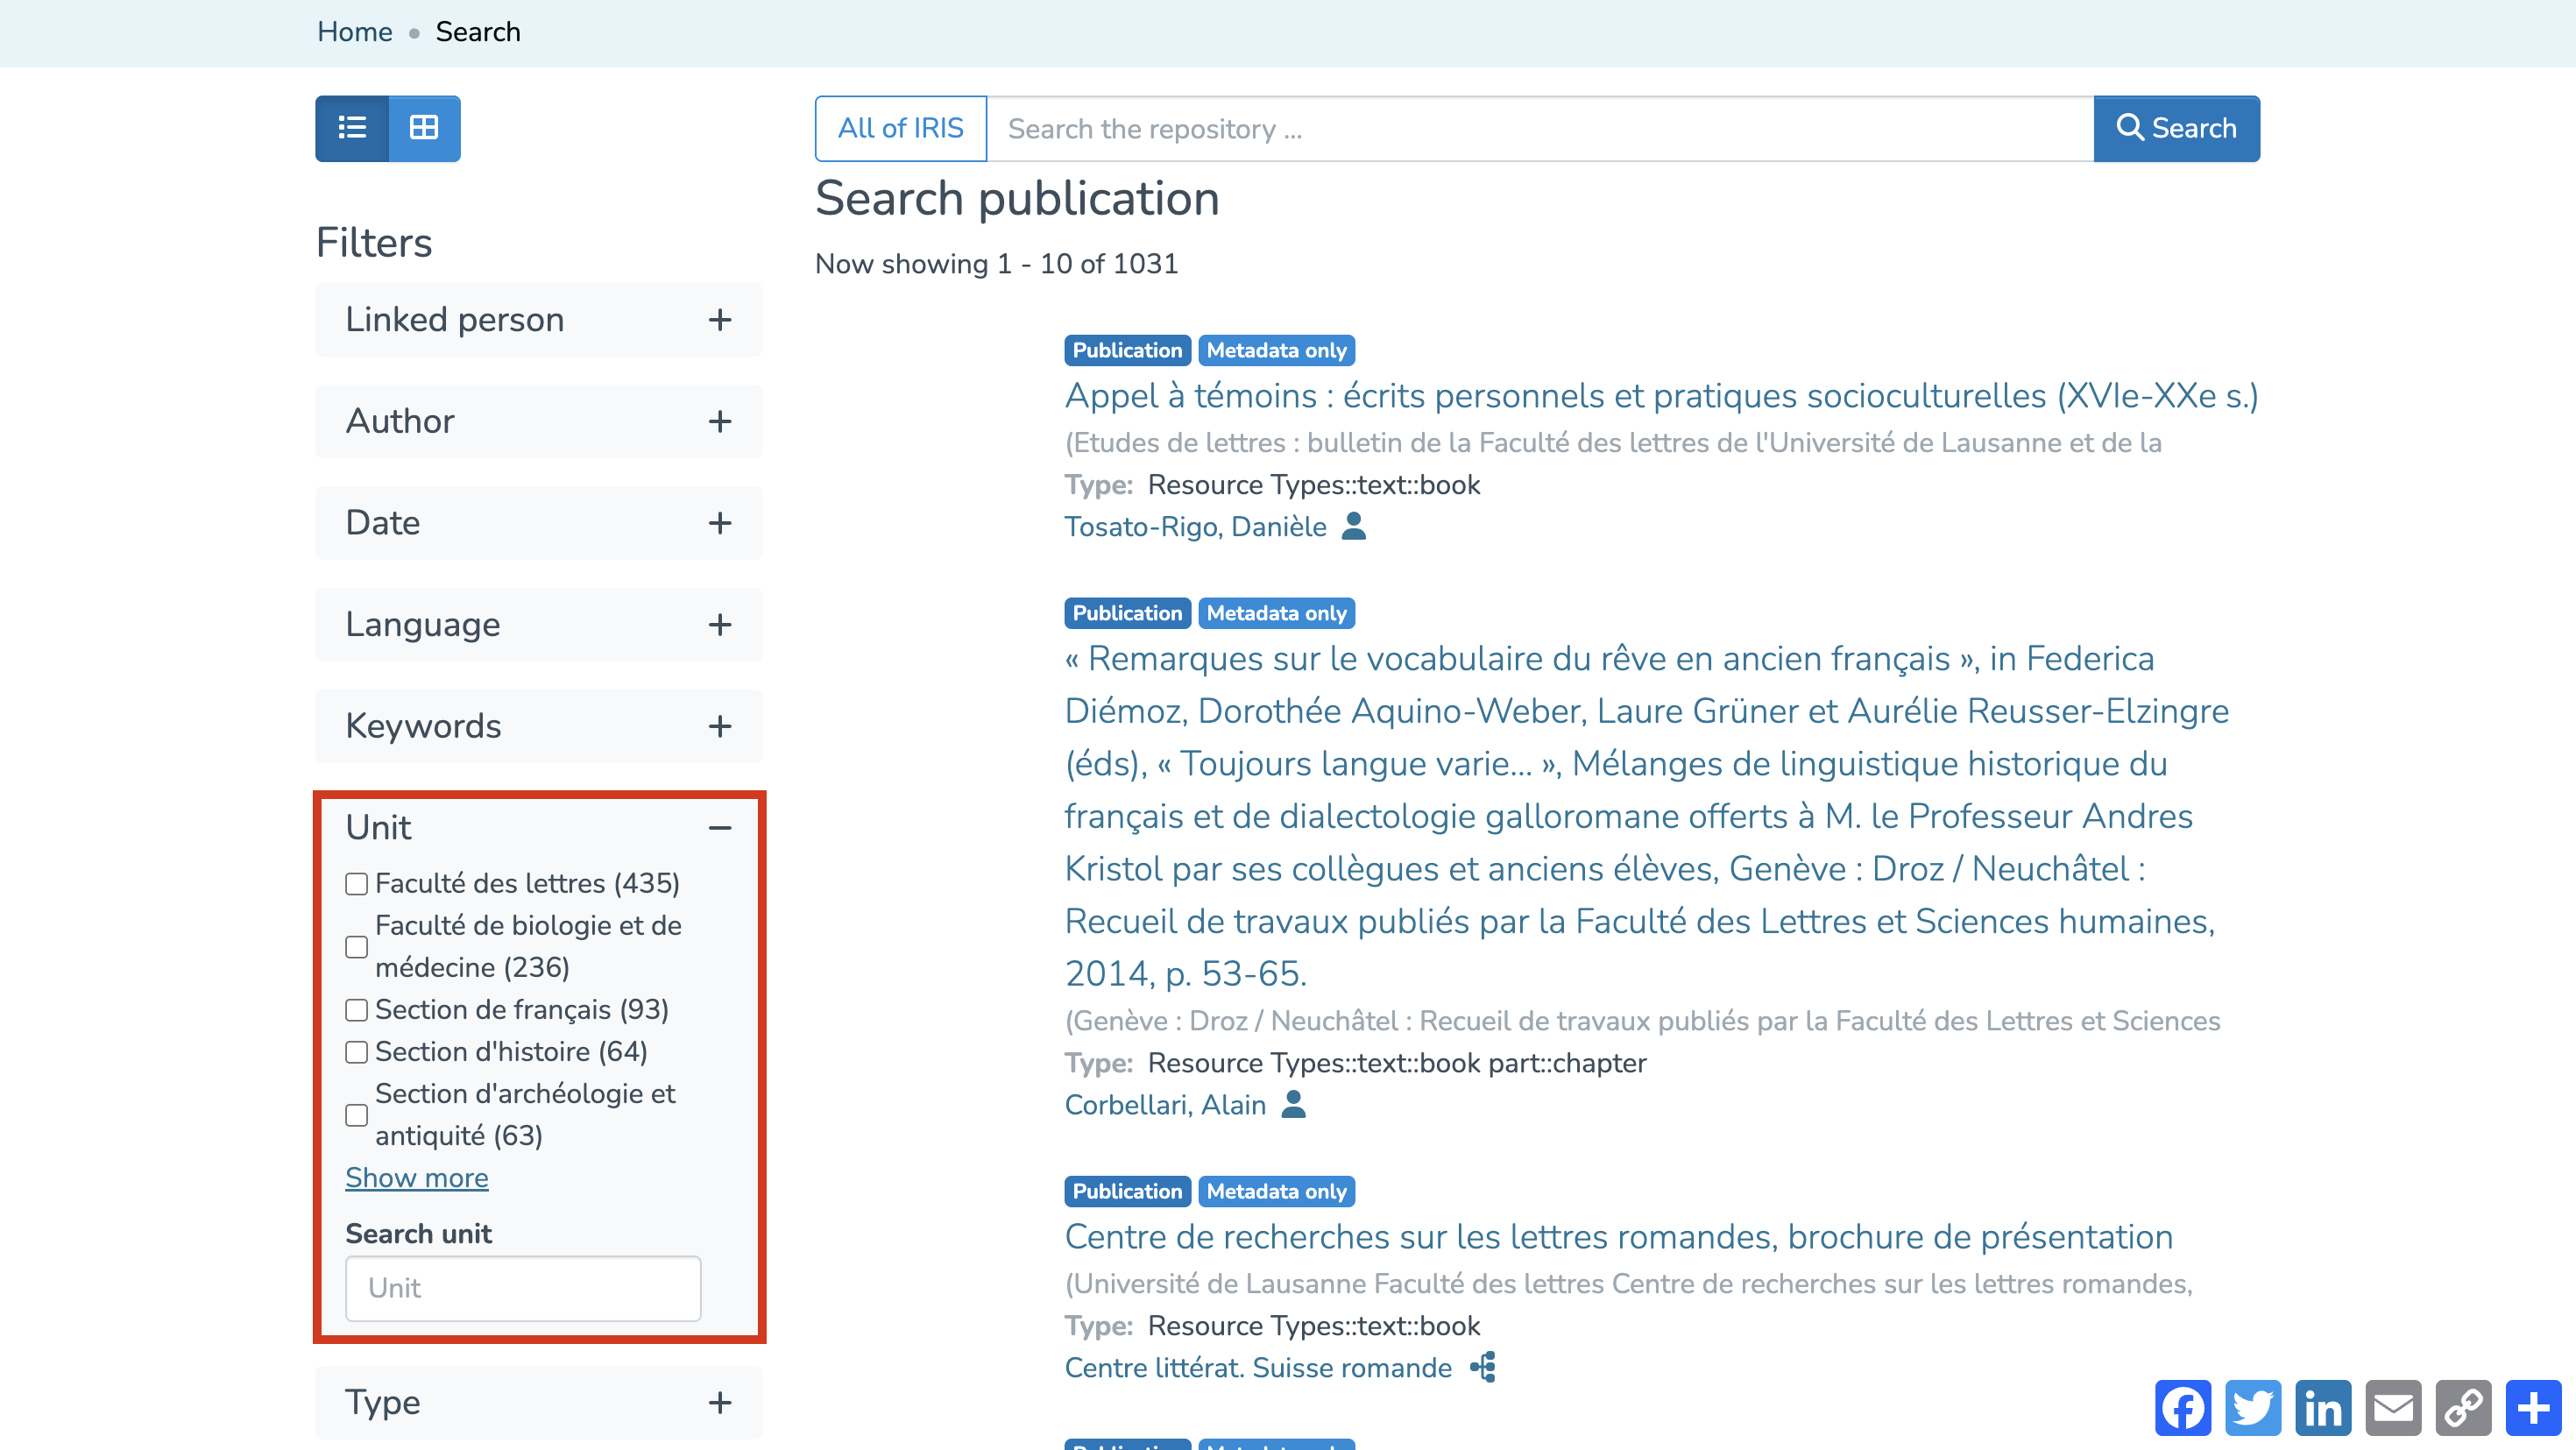
Search by collection
Another way to refine your search is to start directly from a specific collection. From the homepage, click on the collection you’re interested in.

You’ll then be redirected to the collection-specific search page, where you can enter your keyword in the search field.
The search results page will look similar, but the filters displayed will vary depending on the selected collection.
Advanced search
The voice in this video was generated by artificial intelligence.
Search
To launch an advanced search, click on “Search the repository” from the homepage:
Advanced Search using metadata
Before getting started, it is important to know where to find the metadata linked to the entities, as these will be necessary for your advanced searches.
First, click on the title of the publication:
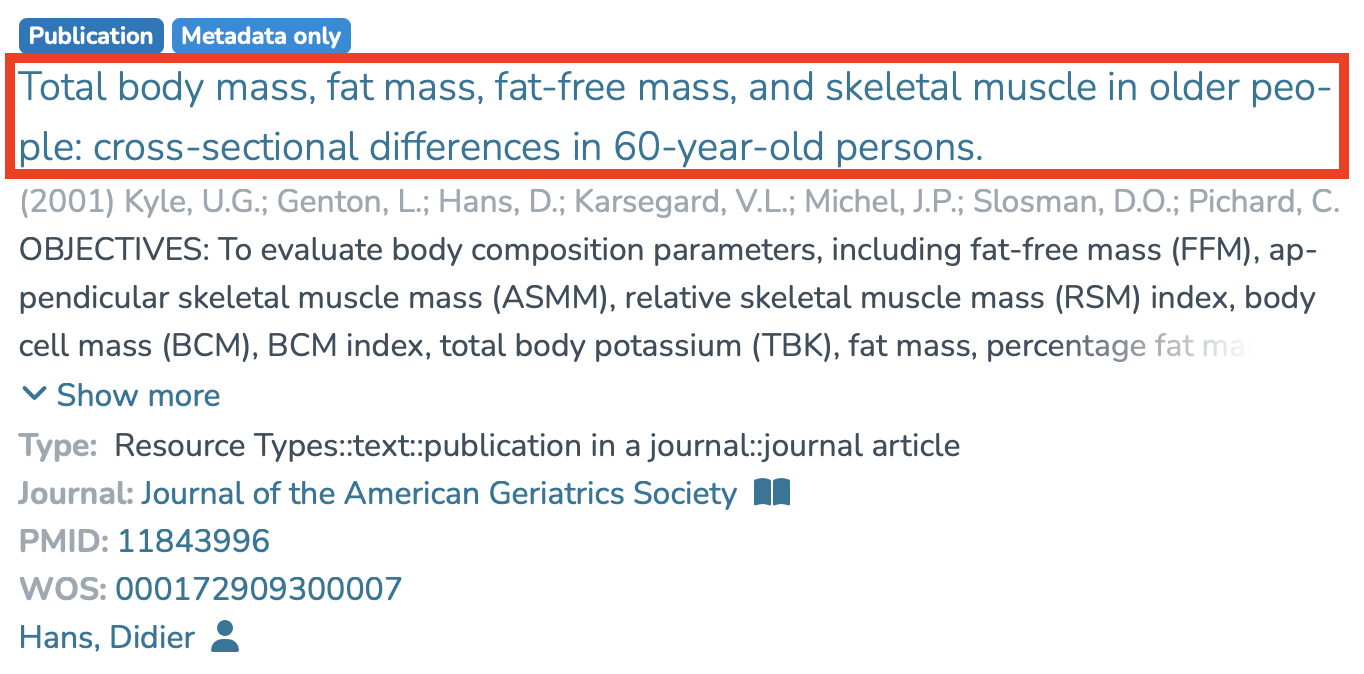
You will then arrive on the publication detail page:
-
Click on the three-dot icon.
-
Click on “Show all metadata.”
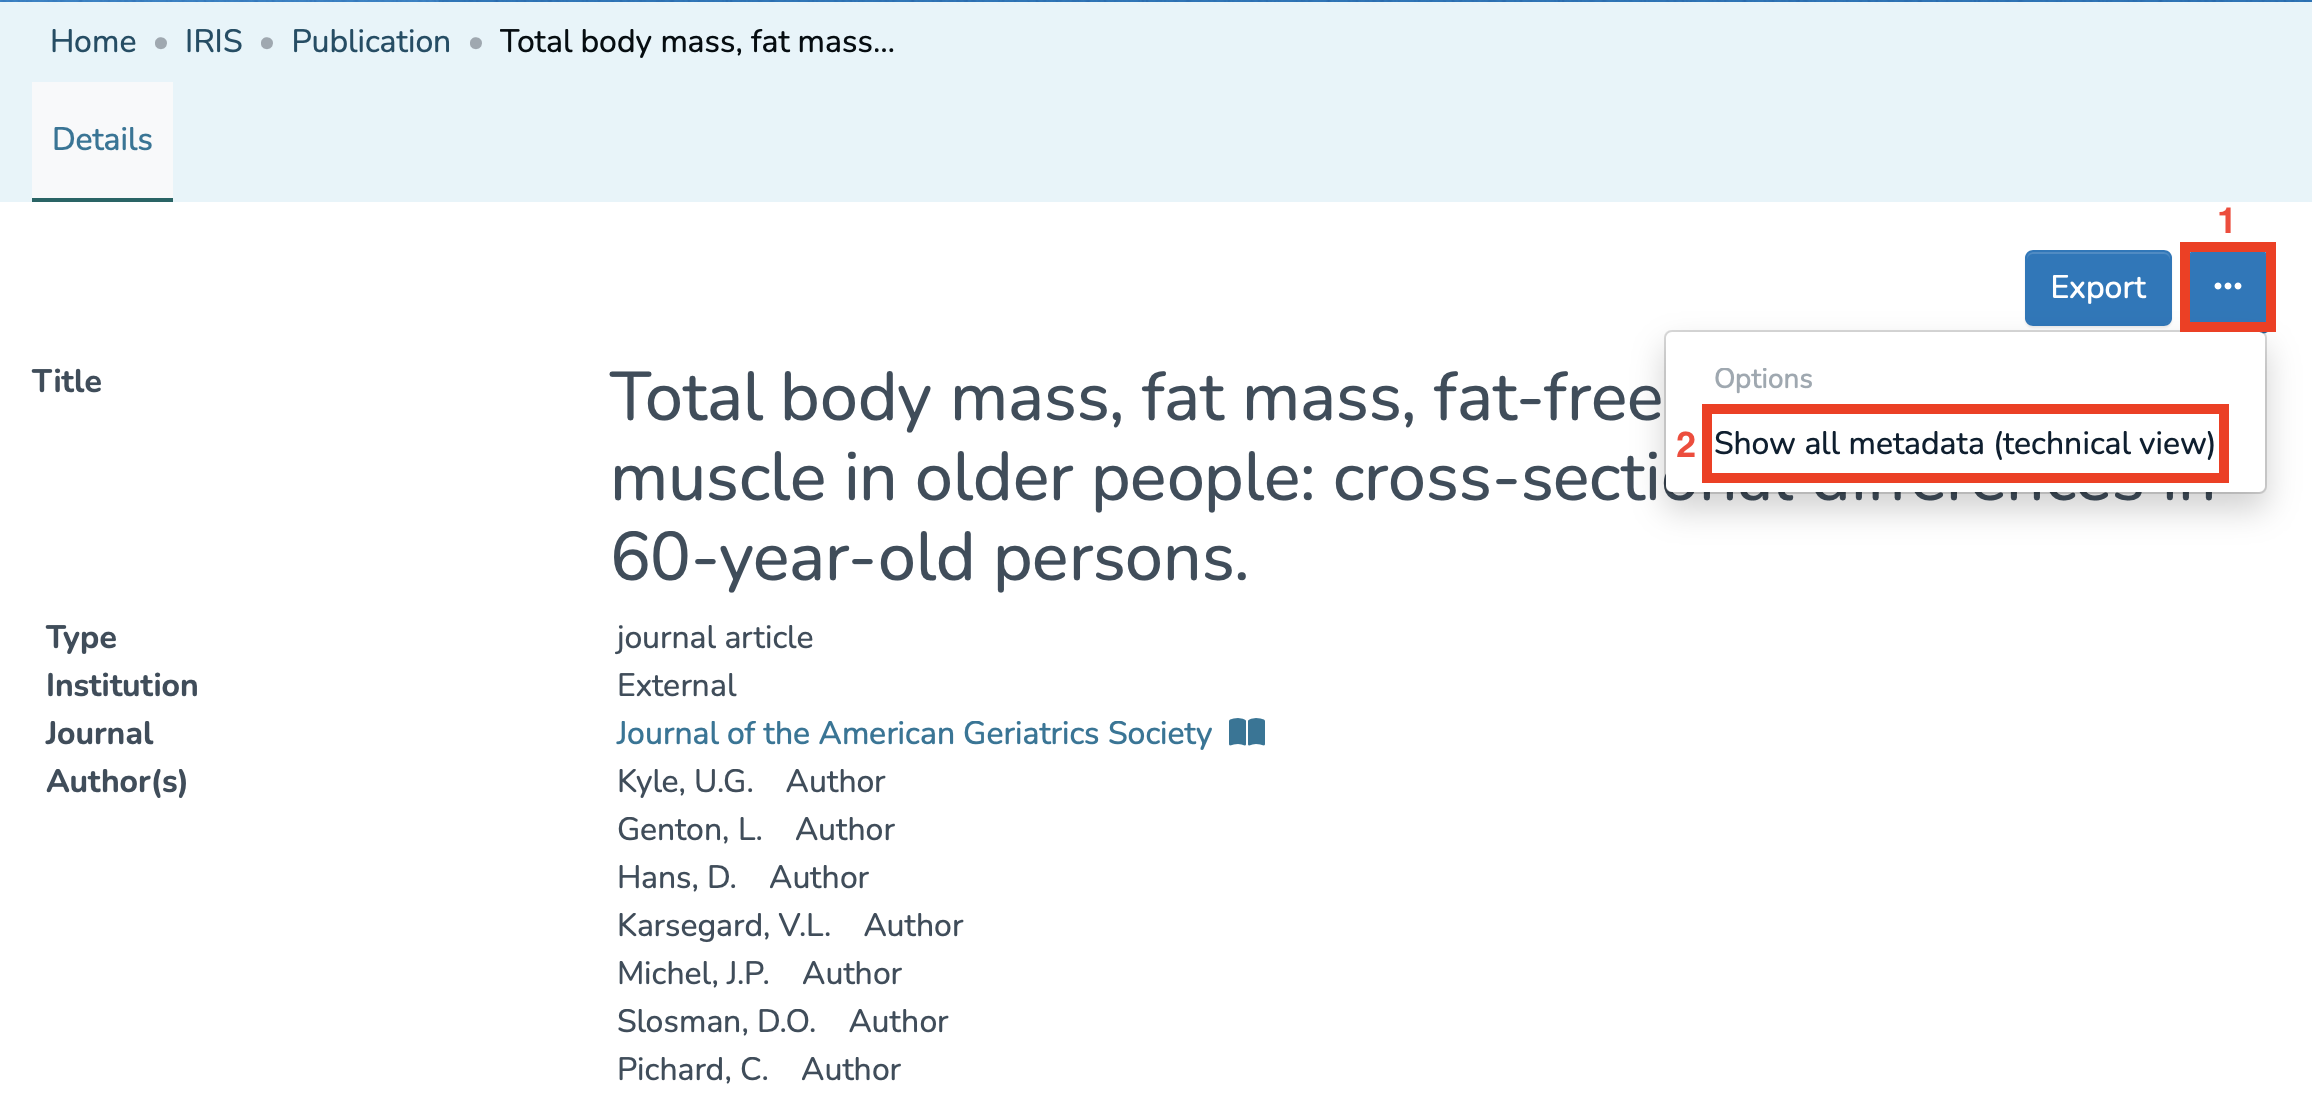
You will then have access to all the metadata of the entity and will be able to use them to choose the fields you are interested in.
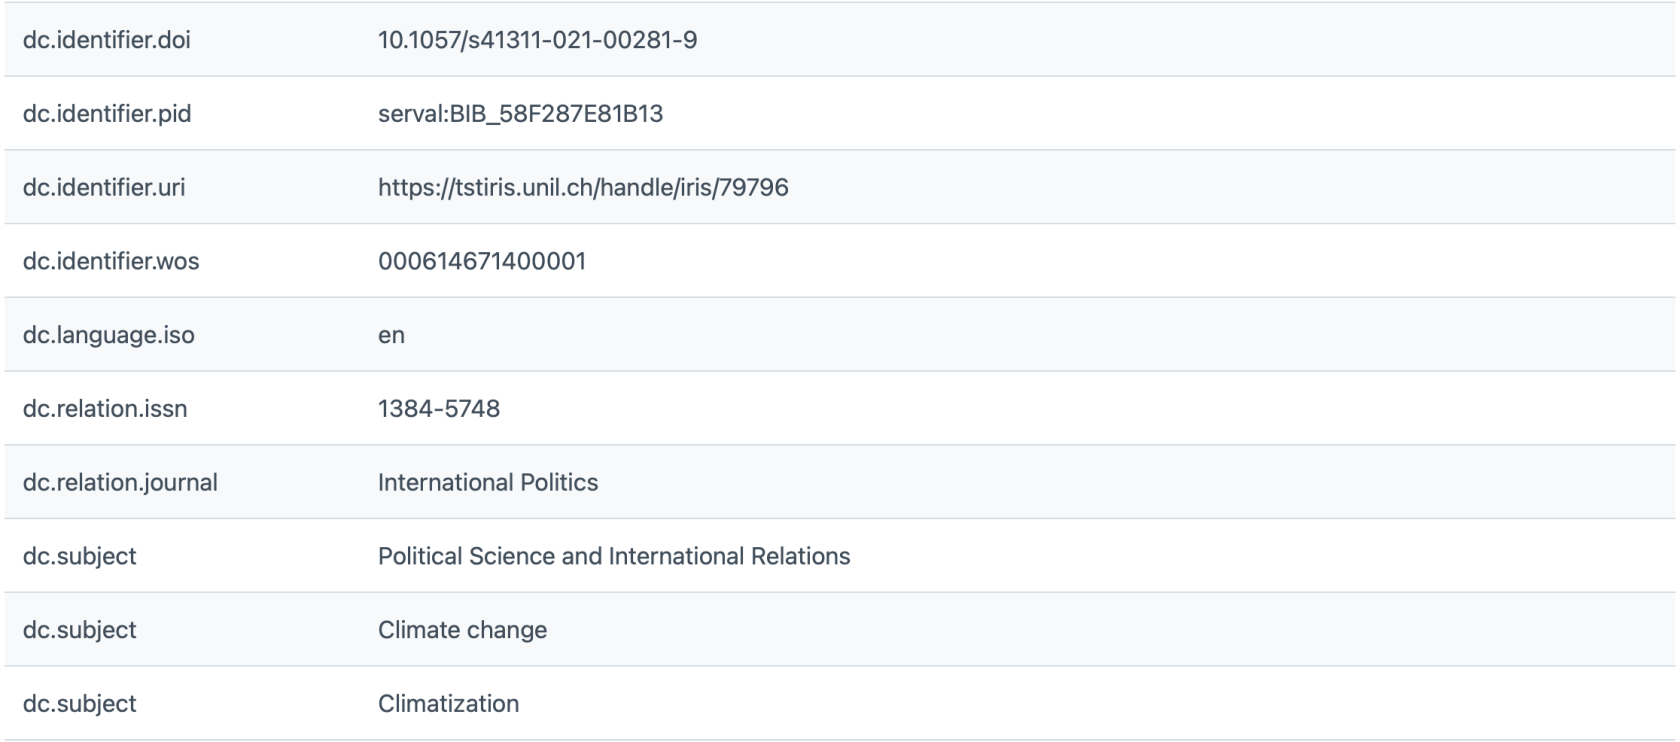
Advanced search can be performed in several ways depending on the metadata you use and with several operators. It can be useful when you want to search with criteria that are not included in the filters available in the basic search.
The syntax field :* allows you to search for all items where the specified field contains any value, meaning it is not empty.
Note : Searching for a title that contains quotation marks
When the title or reference you want to search for contains quotation marks, the search may fail.
This is because quotation marks are normally used by the system to indicate the beginning and end of an exact phrase. They must therefore be distinguished from the quotation marks that are part of the title itself. The solution is simply to add a backslash (\) before every quotation mark inside the title. This tells the search engine that these quotation marks belong to the title and should be included in the search.
Example : dc.relation.ispartofseries:"Rapport de recherche \"Développement, sociétés, environnements\""
1. To search, for example, for a publication on the topic “Climate Change,” you can write:

2. To search, for example, for a publication containing a PMID, you can write:

3. To search, for example, for a publication containing a DOI, you can write:

4. To apply several criteria at once, you can use the three Boolean operators below:
-
AND: For example, to find all items having both a DOI and a PMID, you can proceed as follows:

-
OR: For example, to find all items having a DOI or a PMID, you can proceed as follows:

-
NOT: For example, to find all items having a DOI and NOT a PMID, you can proceed as follows:

5. To set a publication date range, you can proceed as follows:

6. To search for all records that have been accepted, including those accepted in press, you can proceed as follows:
unil.editorialstate:"accepted"

However, if you wish to search only for records that have been accepted but not accepted in press, you should proceed as follows: unil.editorialstate:"accepted" AND NOT unil.editorialstate:"accepted_in_press"

You can also combine multiple search criteria as follows:
dc.contributor.author : Lucile AND (dc.title : council OR dc.title : climat) AND dc.date.issued : [2020 TO 2024]
This search will return a publication where the author’s name contains “Lucile,” the title contains (“council” OR “climat”), and the publication date is between 2020 and 2024.
Advanced search without using metadata
1. For fields containing dates in ISO-8601 technical format, you must use the technical version of the metadata field. For example, to filter all publications created in IRIS between two dates, several methods can be used:
- Inclusive format (i.e., the end date is included in the interval):
dc.date.accessioned_dt:[2025-08-18T00:00:00Z TO 2025-08-26T23:59:59Z]

- Exclusive format (i.e., the end date is not included in the interval):
dc.date.accessioned_dt:[2025-08-18T00:00:00Z TO 2025-08-27T00:00:00Z}

- To filter all publications created in IRIS between a specific date and now:
a) dc.date.accessioned_dt : [2025-08-18T00:00:00Z TO NOW]

b) dc.date.accessioned_dt : [2025-08-18T00:00:00Z TO *]

2. If you wish to filter records based on their recent modification date (rather than through standard metadata fields), here are some additional advanced queries. These filters apply to the discovery index, not to the record metadata.
a) lastModified:[NOW/DAY TO NOW] → all records modified today (since midnight)

b) lastModified:[NOW-2DAYS/DAY TO NOW] → all records modified in the last two days (since midnight two days ago)

c) lastModified:[NOW-2DAYS TO NOW] → records modified in the last 48 hours exactly (rolling window)

⚠️ Limitation: It is not possible to distinguish between system-generated modifications (e.g., embargo, author links, etc.) and user-made modifications.
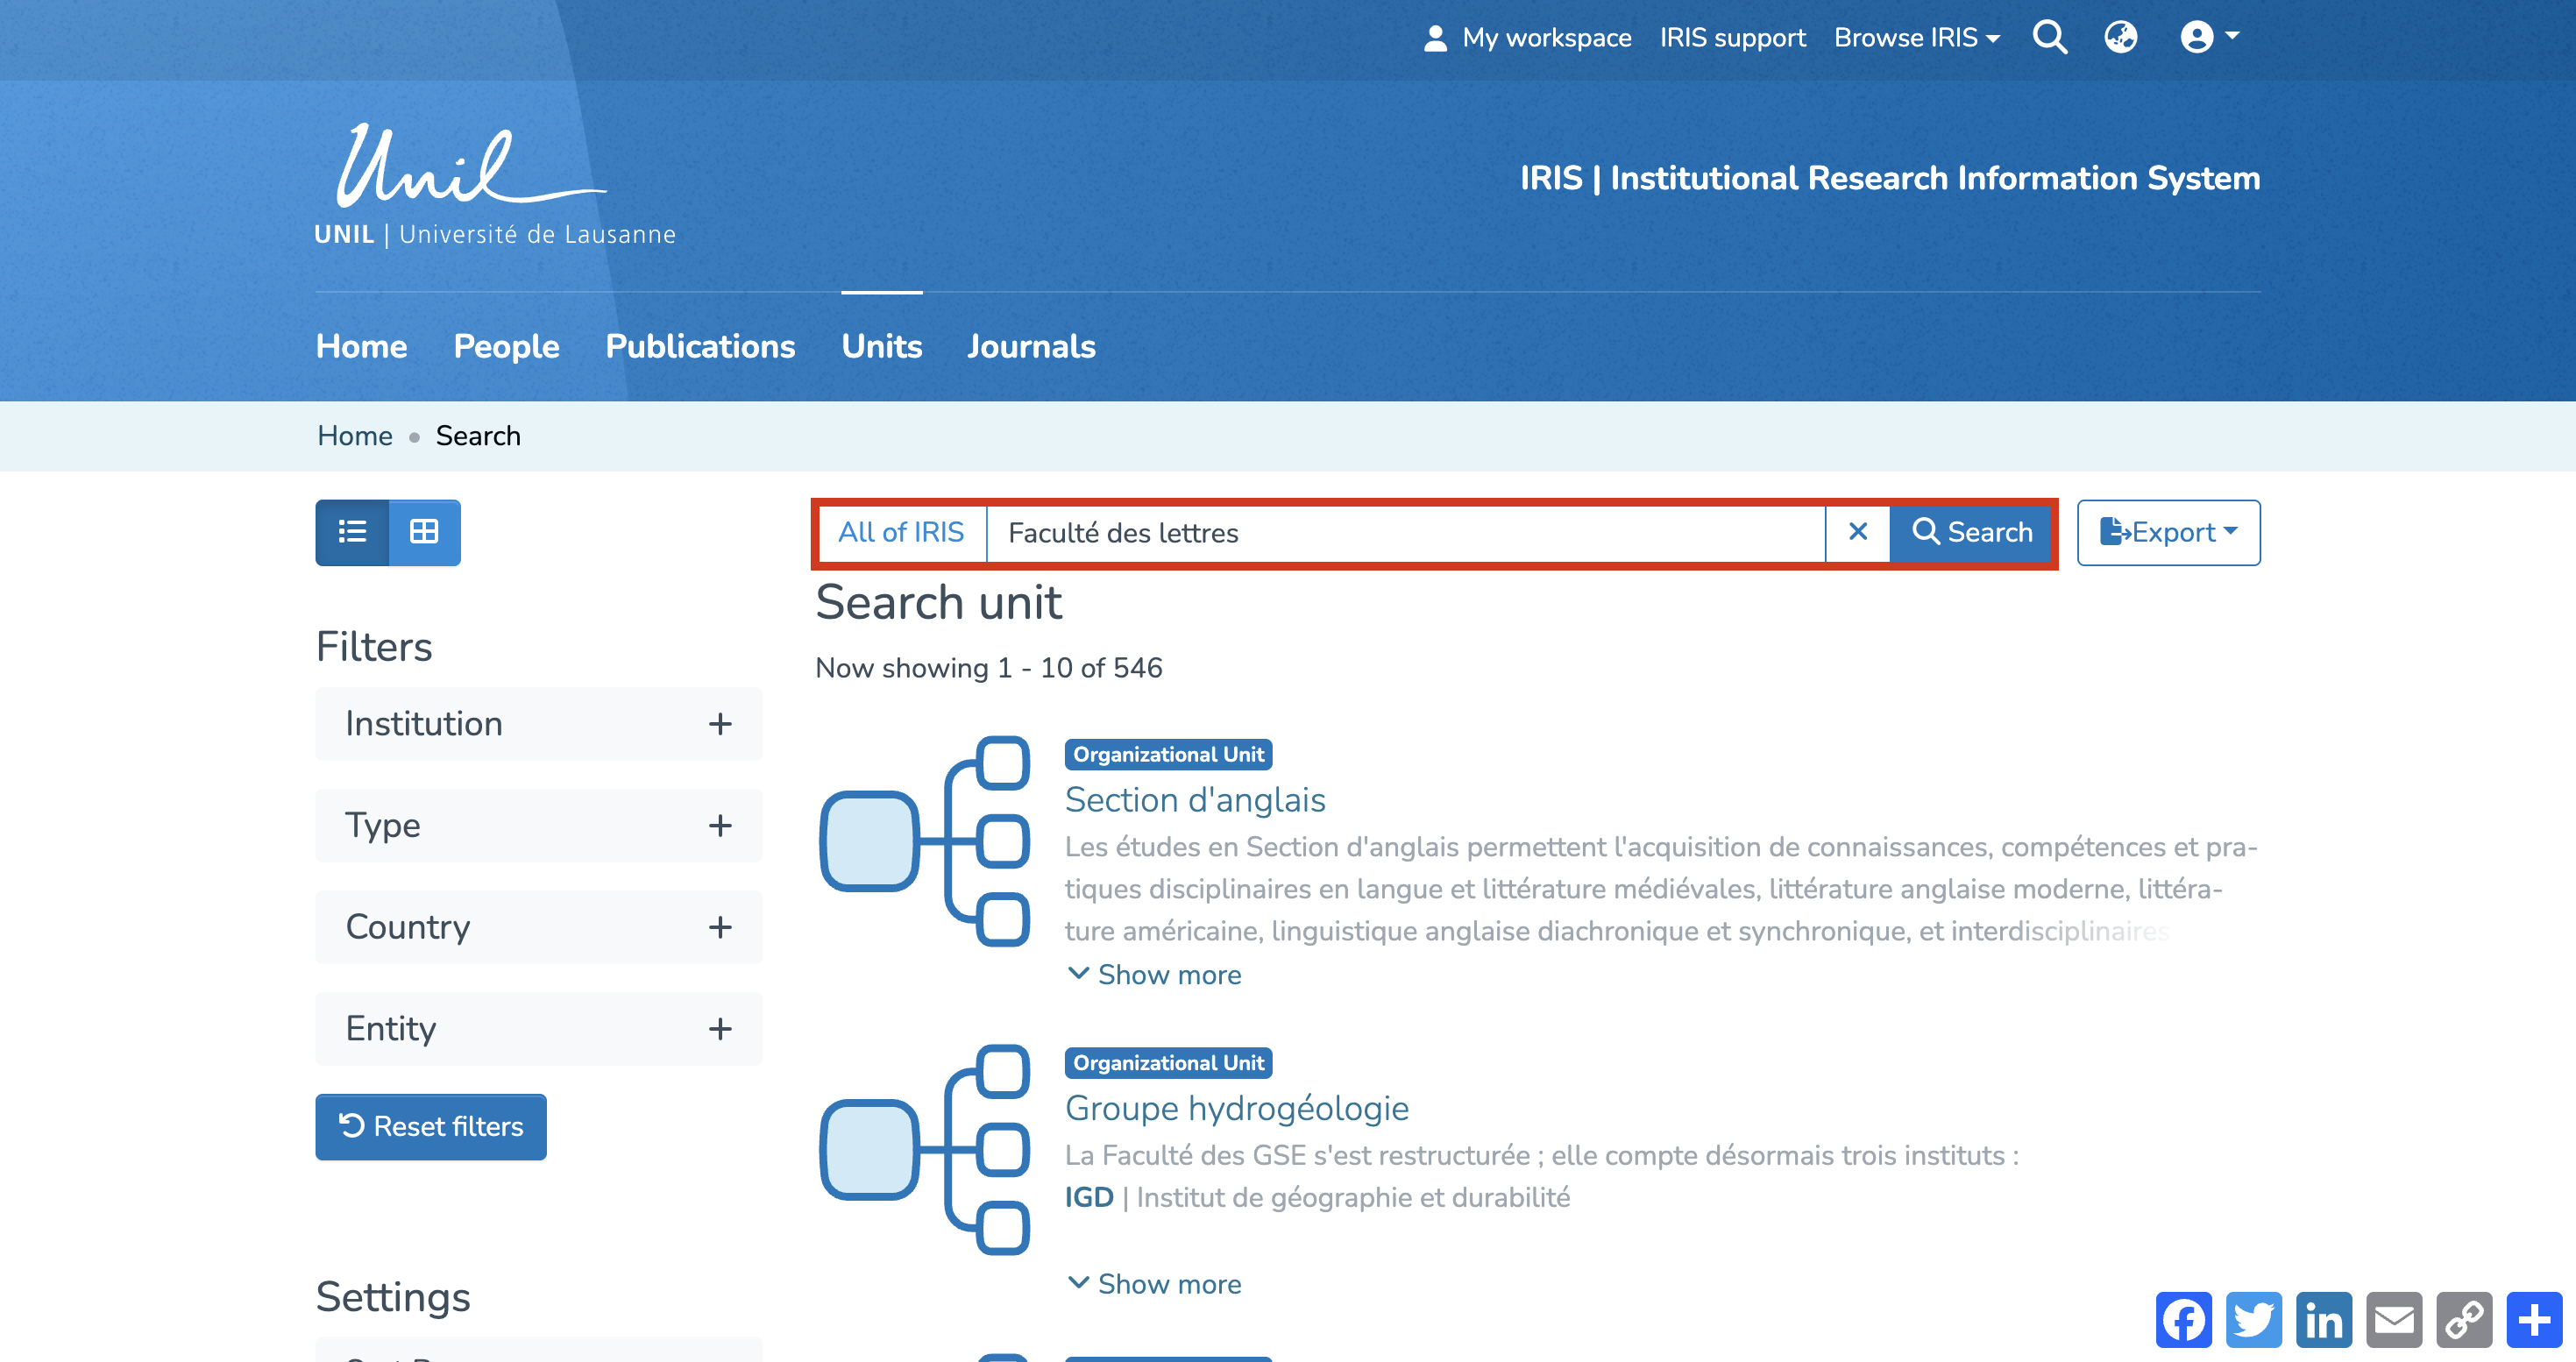
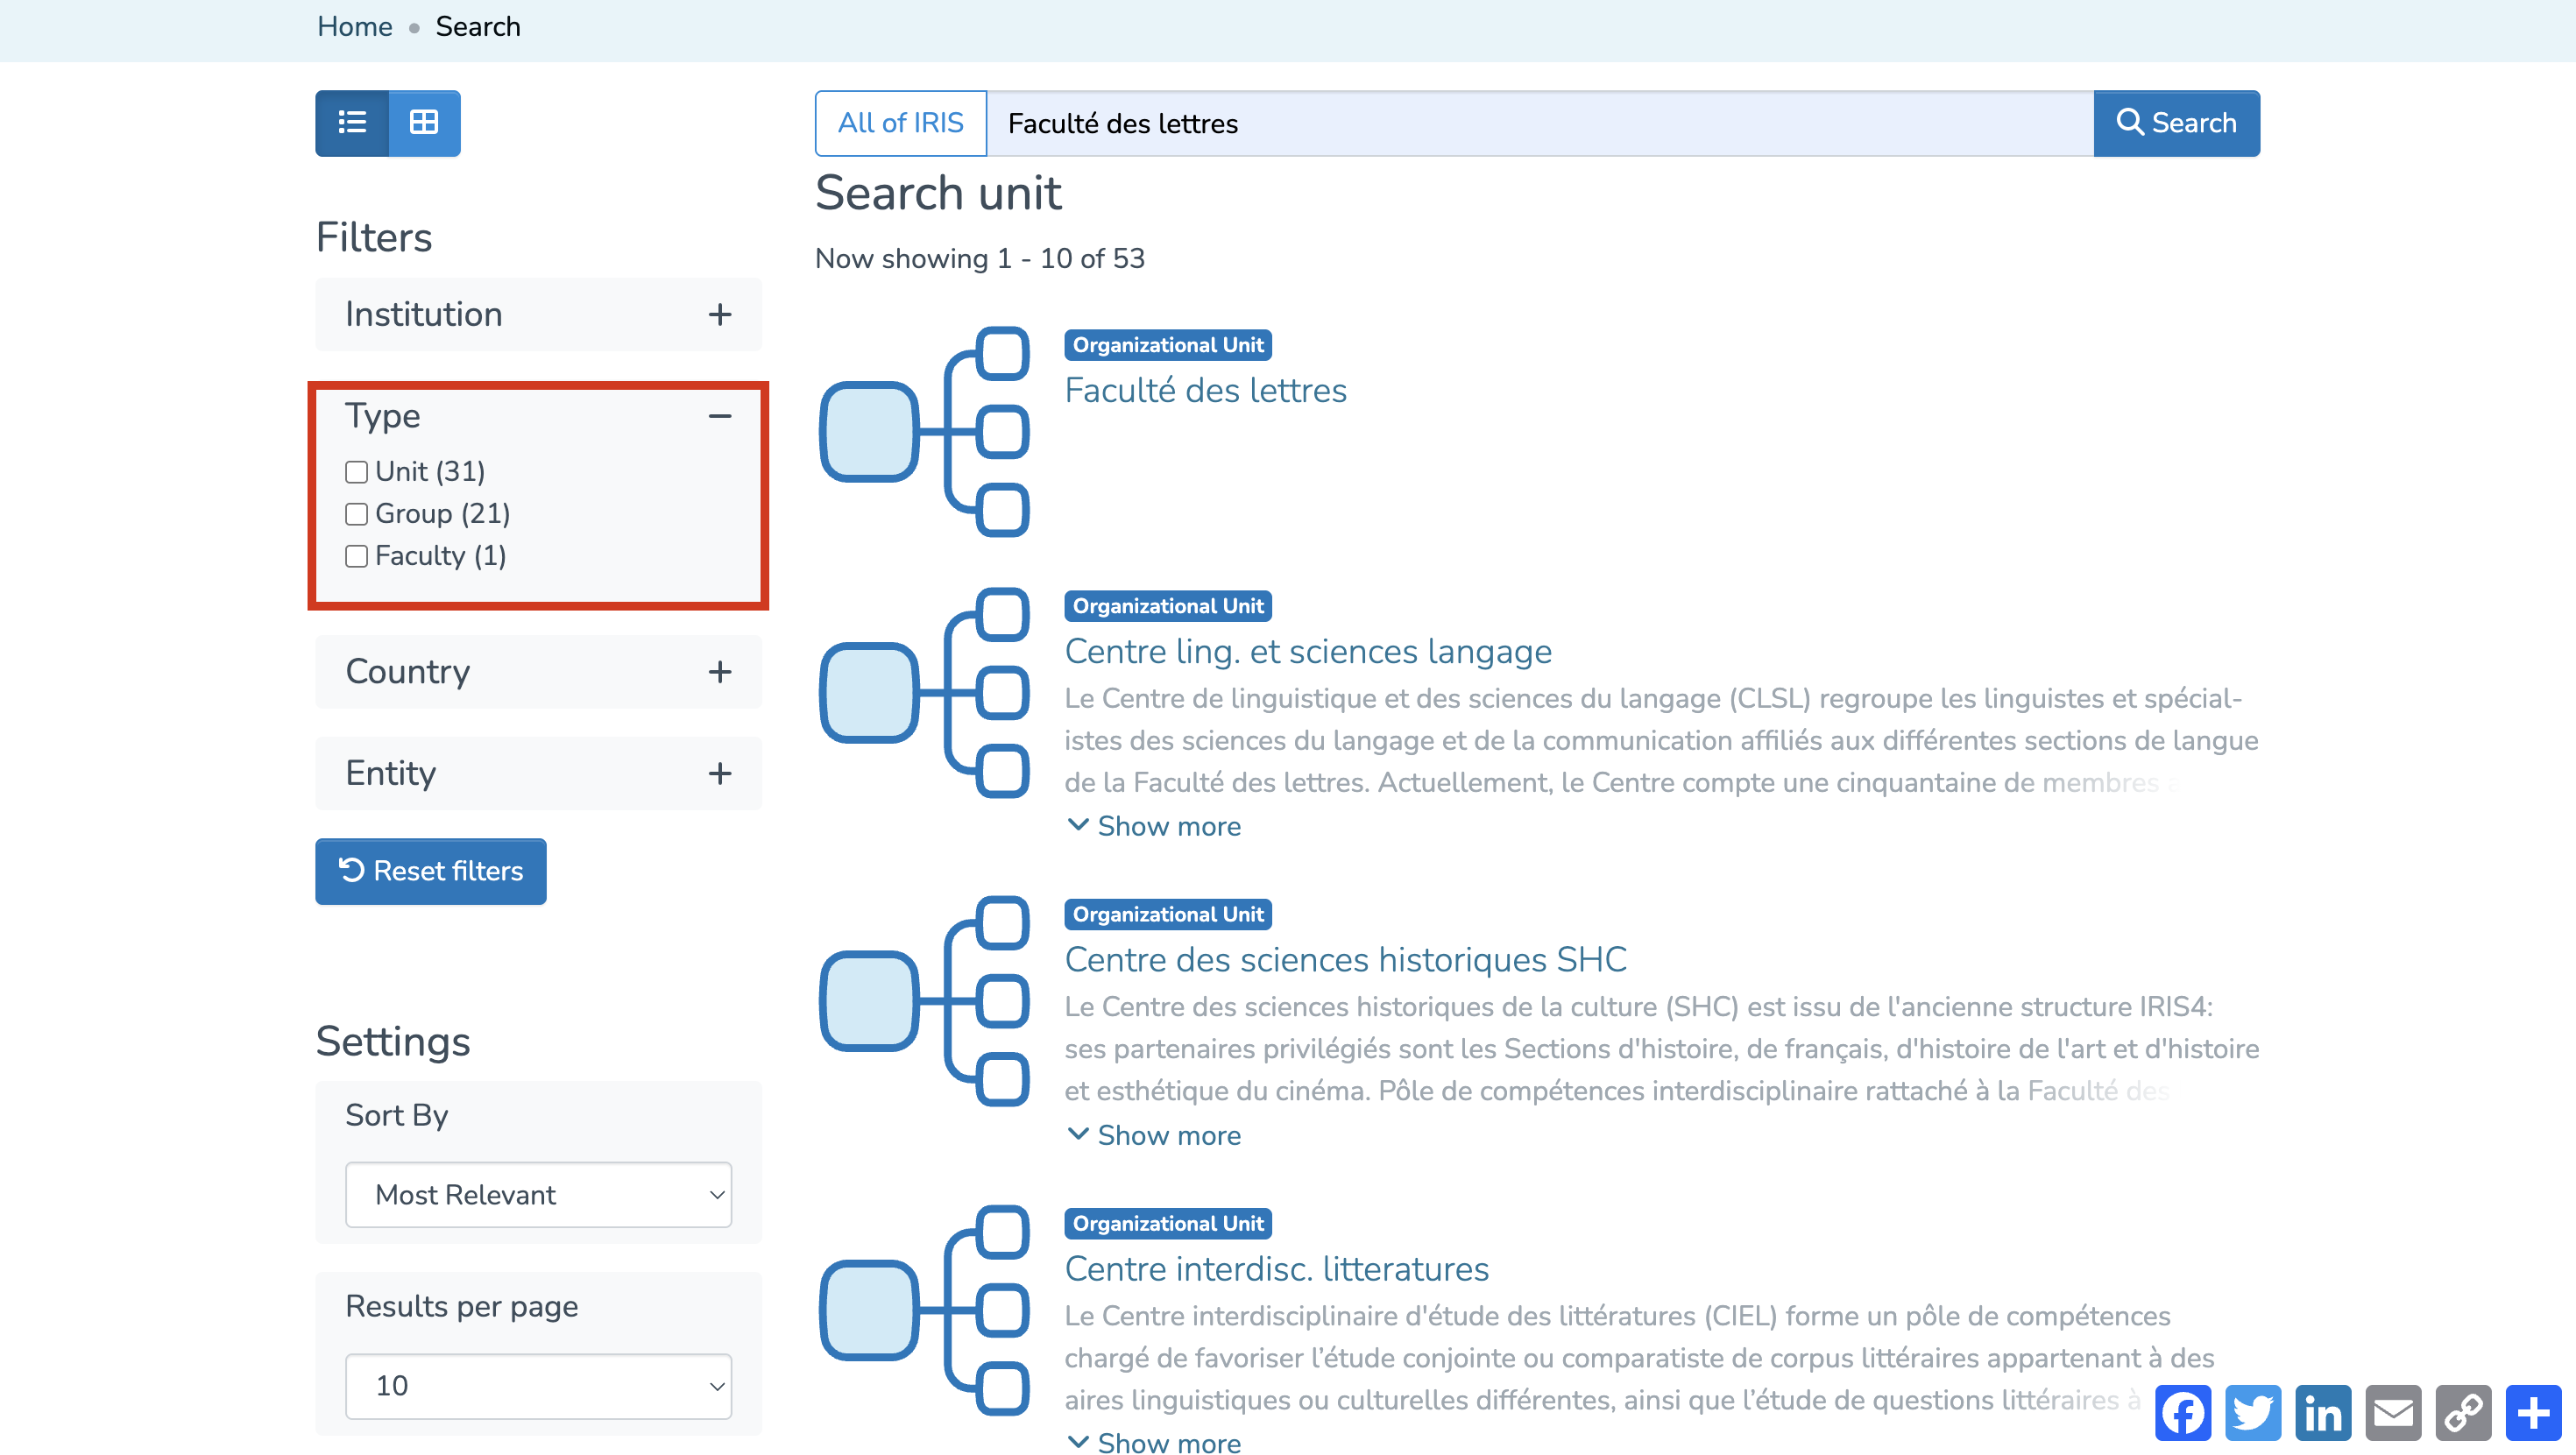
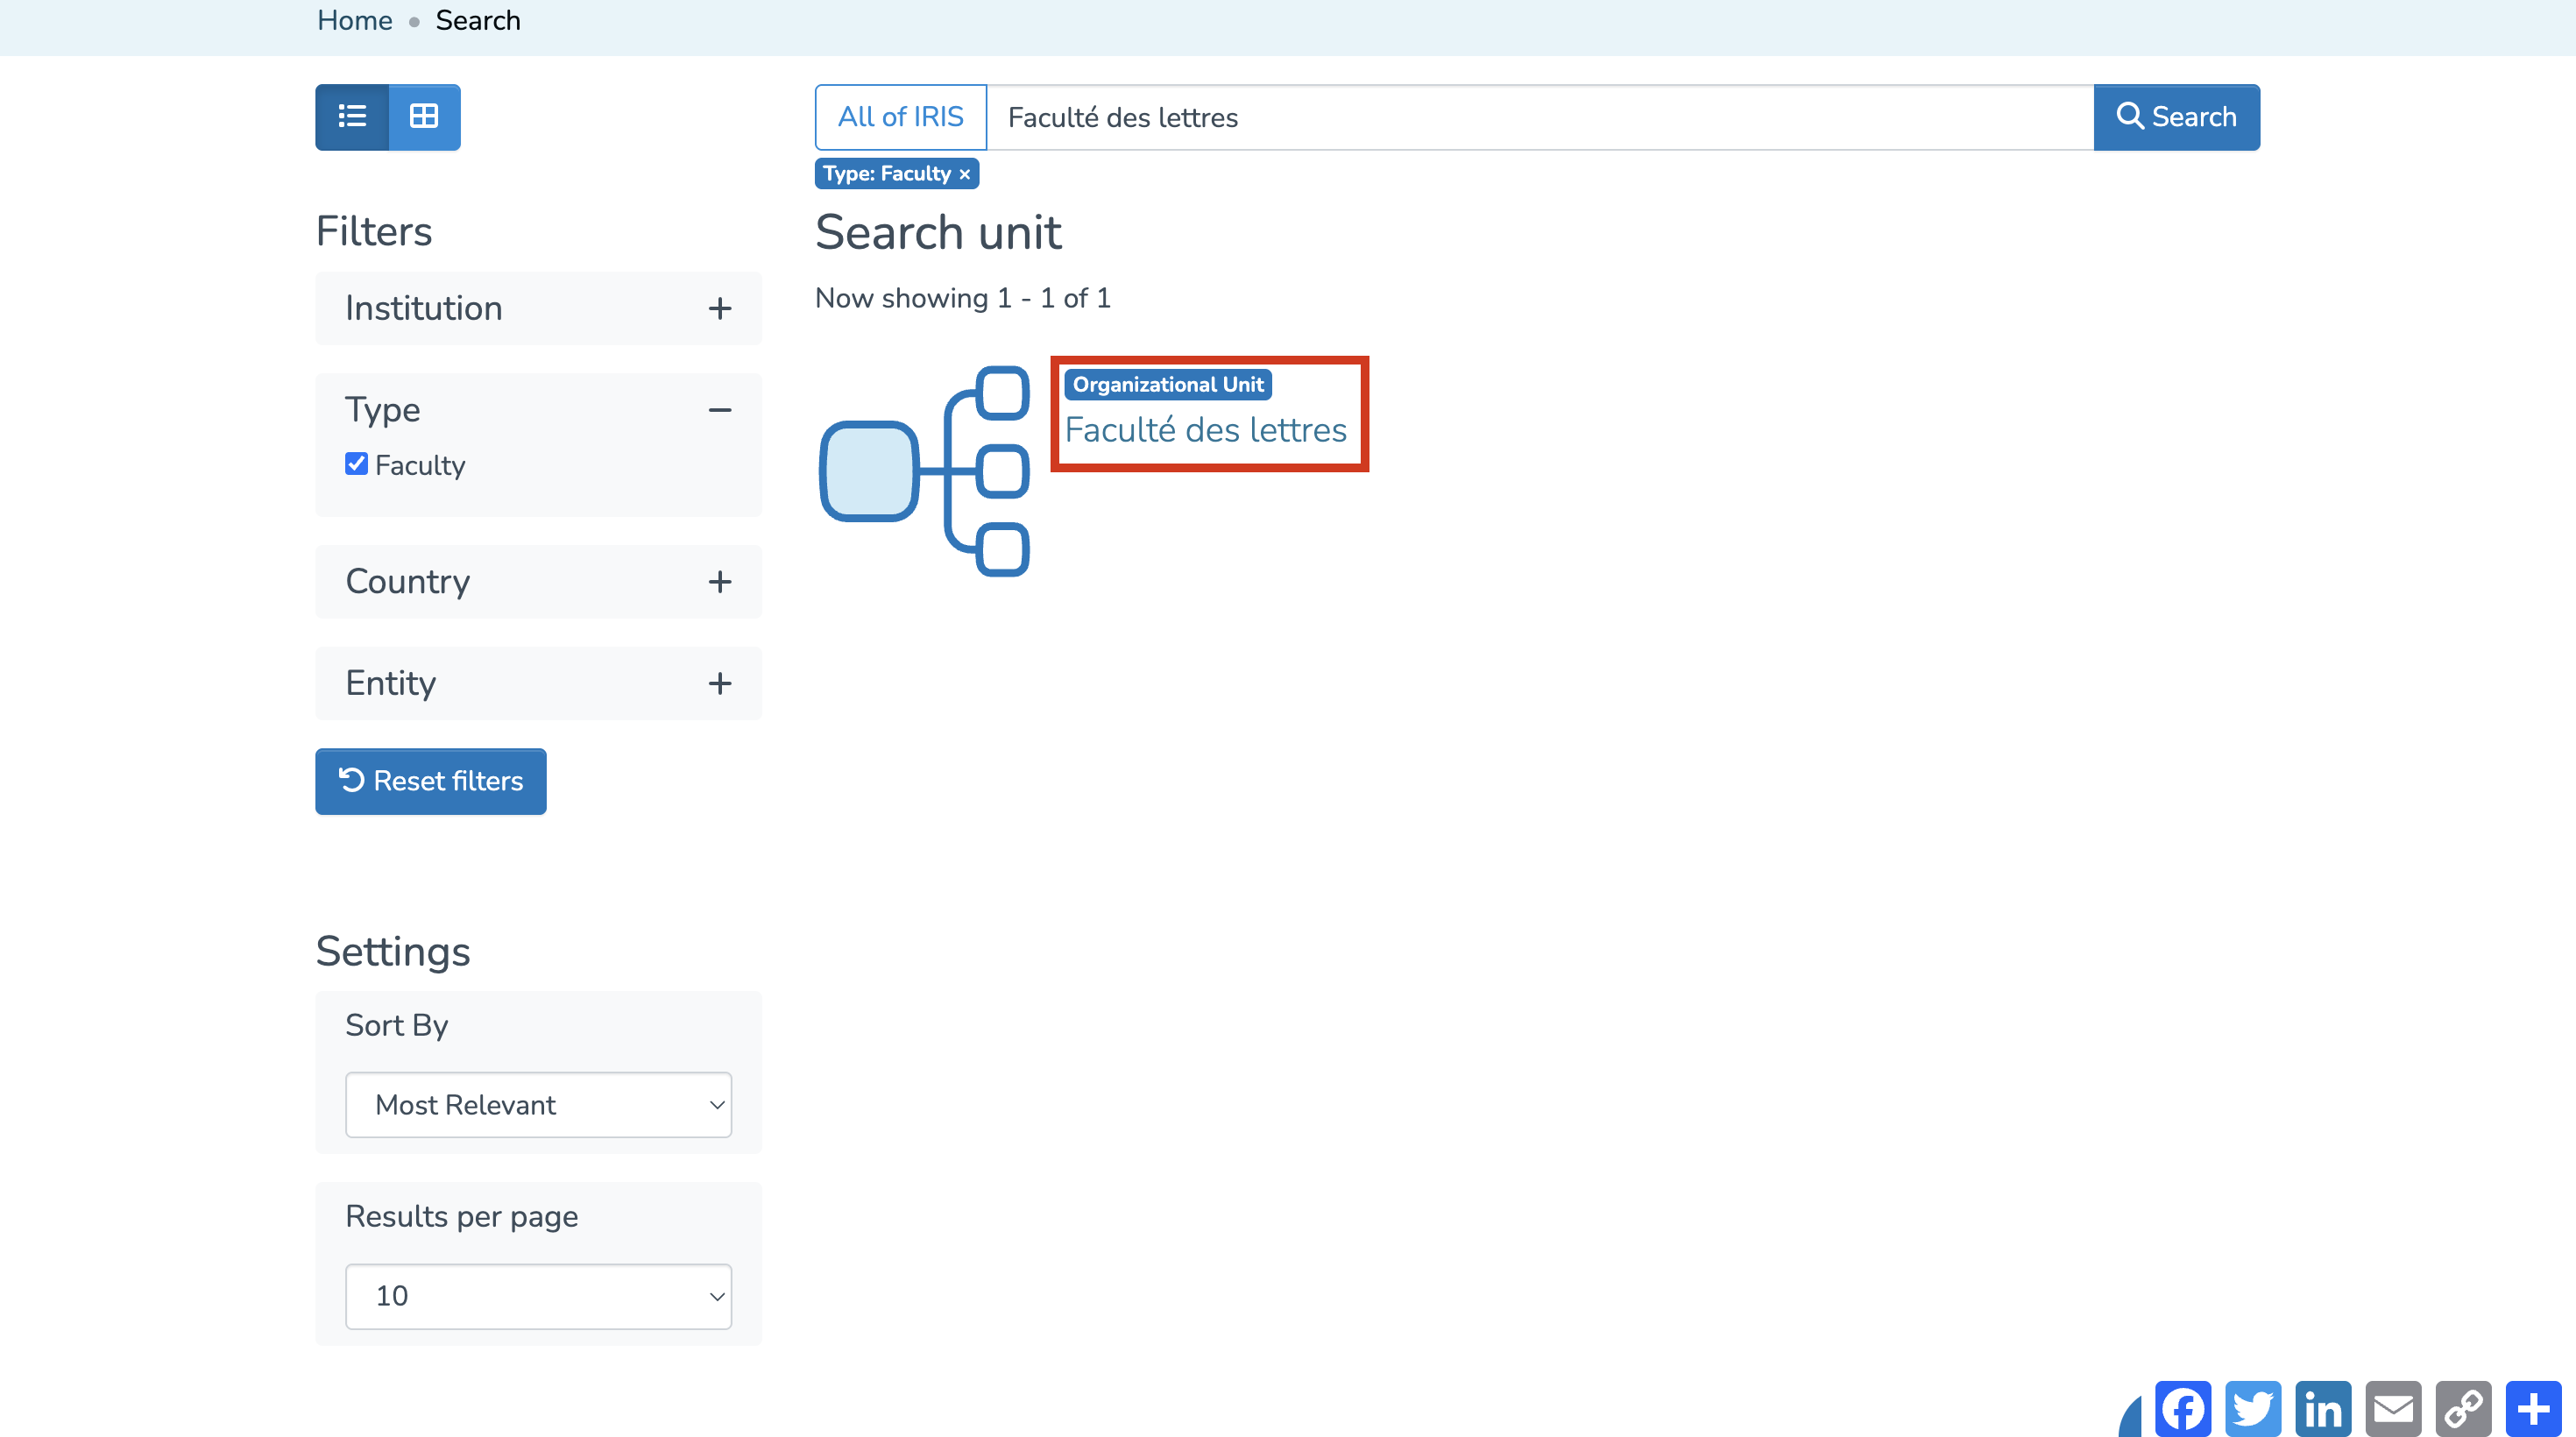
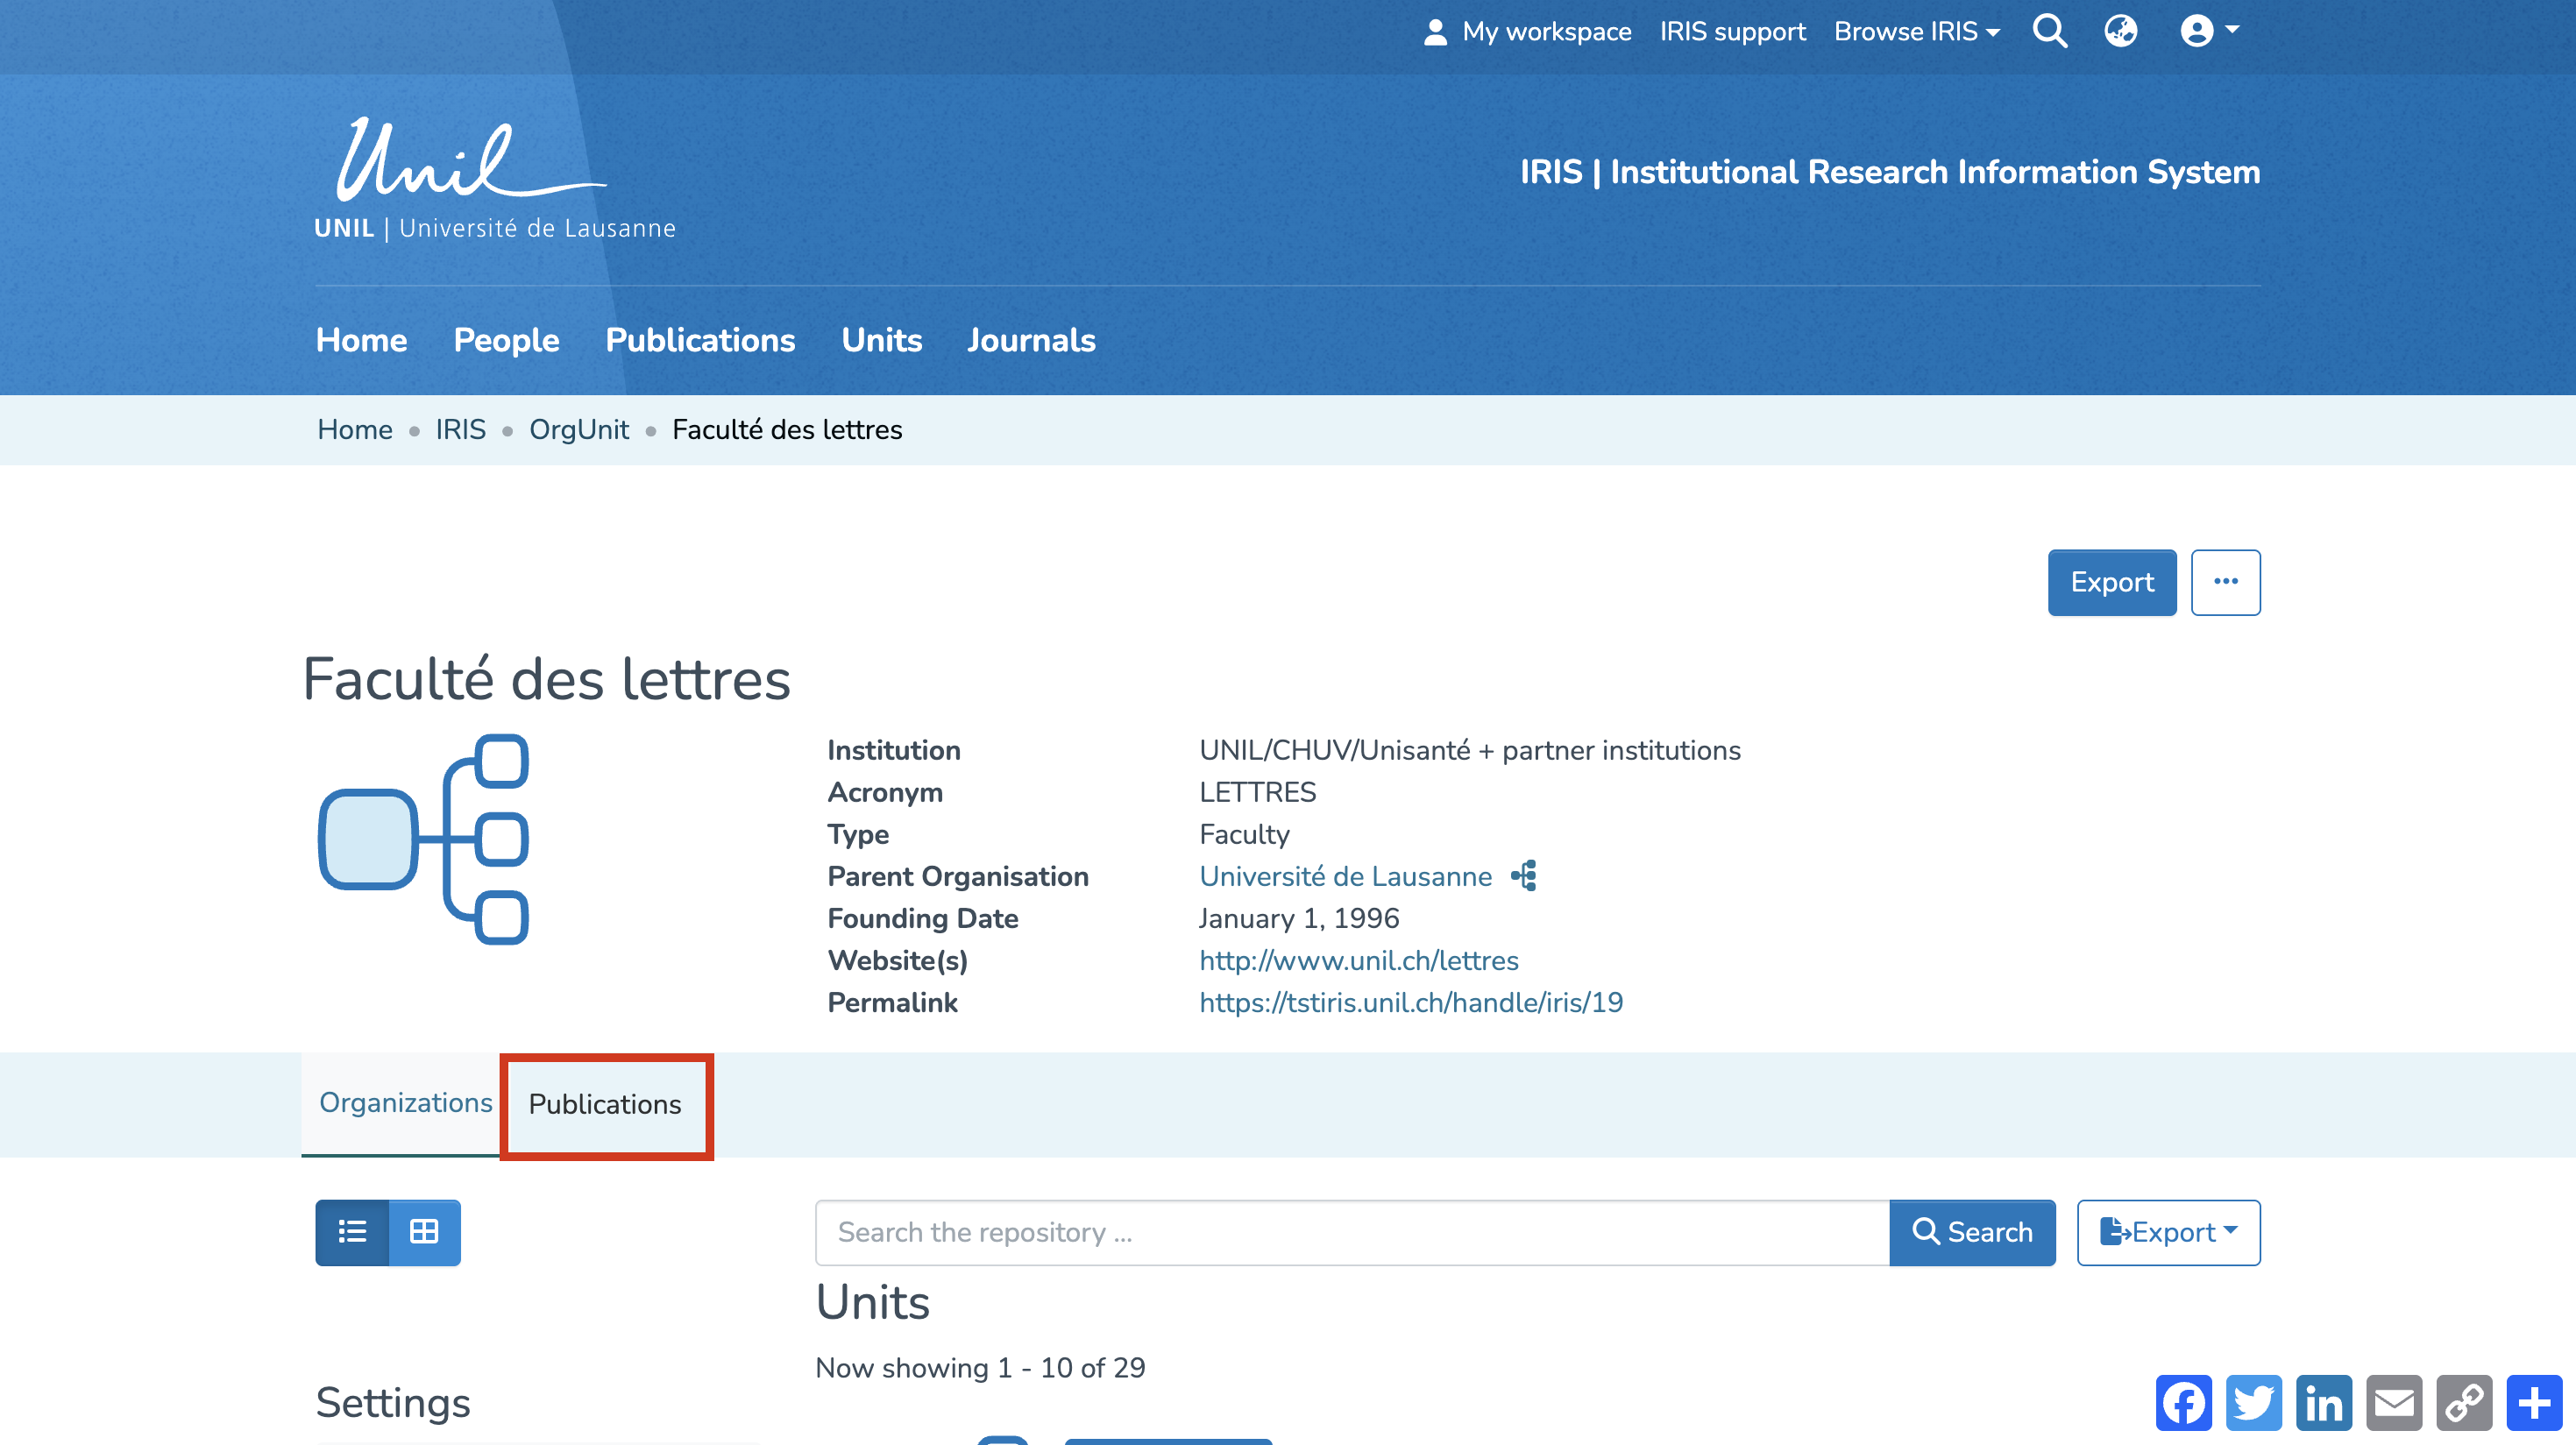
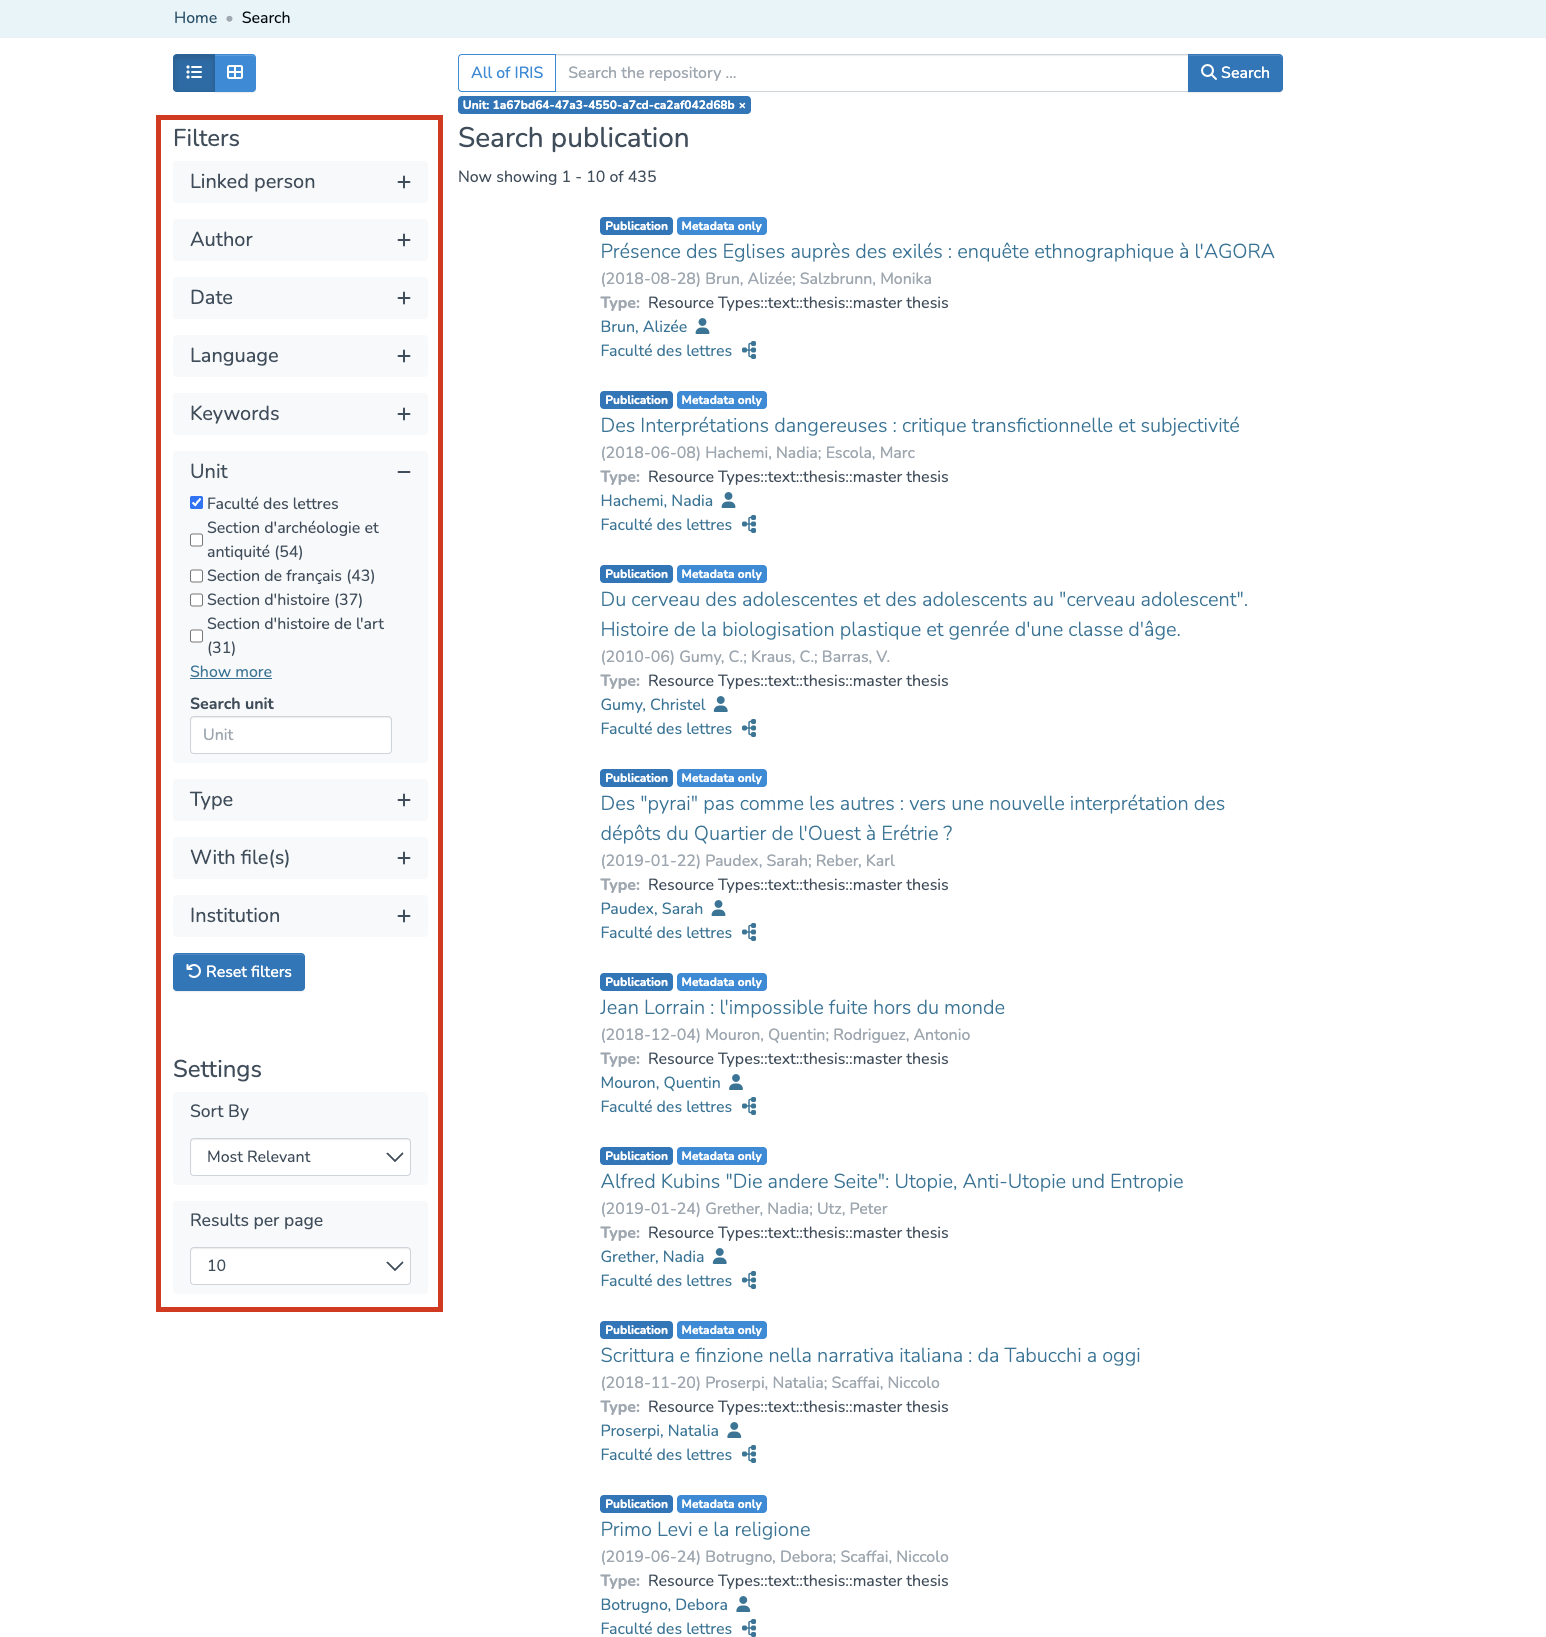
Search and filter faculty publications
The voice in this video was generated by artificial intelligence.
There are two main ways to view a faculty’s publications in the repository.
From the "Units" tab
- From the homepage, click on “Units.”

- Type the name of the faculty into the search bar, then click “Search.” The results will display the faculty itself, along with its associated organizations.

- To show only the relevant faculty, click on the “Type” filter and select “Faculty.”

- Click on the faculty’s name.

- Once on the faculty’s page, click on the “Publications” tab.

- You will now see all publications from the faculty and its organizations.
- You can use the available filters and settings to refine the results (by date, publication type, etc.).


From the "Publications" tab
Unlike a search performed through the “Units” section, a search in the “Publications” section targets only the publications of the faculty itself, without including those of its associated organizations.
- From the homepage, click on “Publications.”

- To display publications specific to the relevant faculty, click on the “Unit” filter. You can either type the name of the faculty directly into the search bar, or scroll through the list by clicking “Show more” and selecting it manually.

- The page will automatically refresh and display only the publications of the selected faculty, excluding those from its associated units, unlike the results shown when searching through the “Units” tab.
- You can further refine the results using the other available filters and settings.

My workspace
The voice in this video was generated by artificial intelligence.
Access
You can access your workspace directly from the main menu by clicking on “My Workspace.”

You can also access it by clicking (1) on your profile icon, then (2) on “My Workspace.”

Overview
The workspace is displayed as follows. From here, you can create, import, visualize, modify and export records.
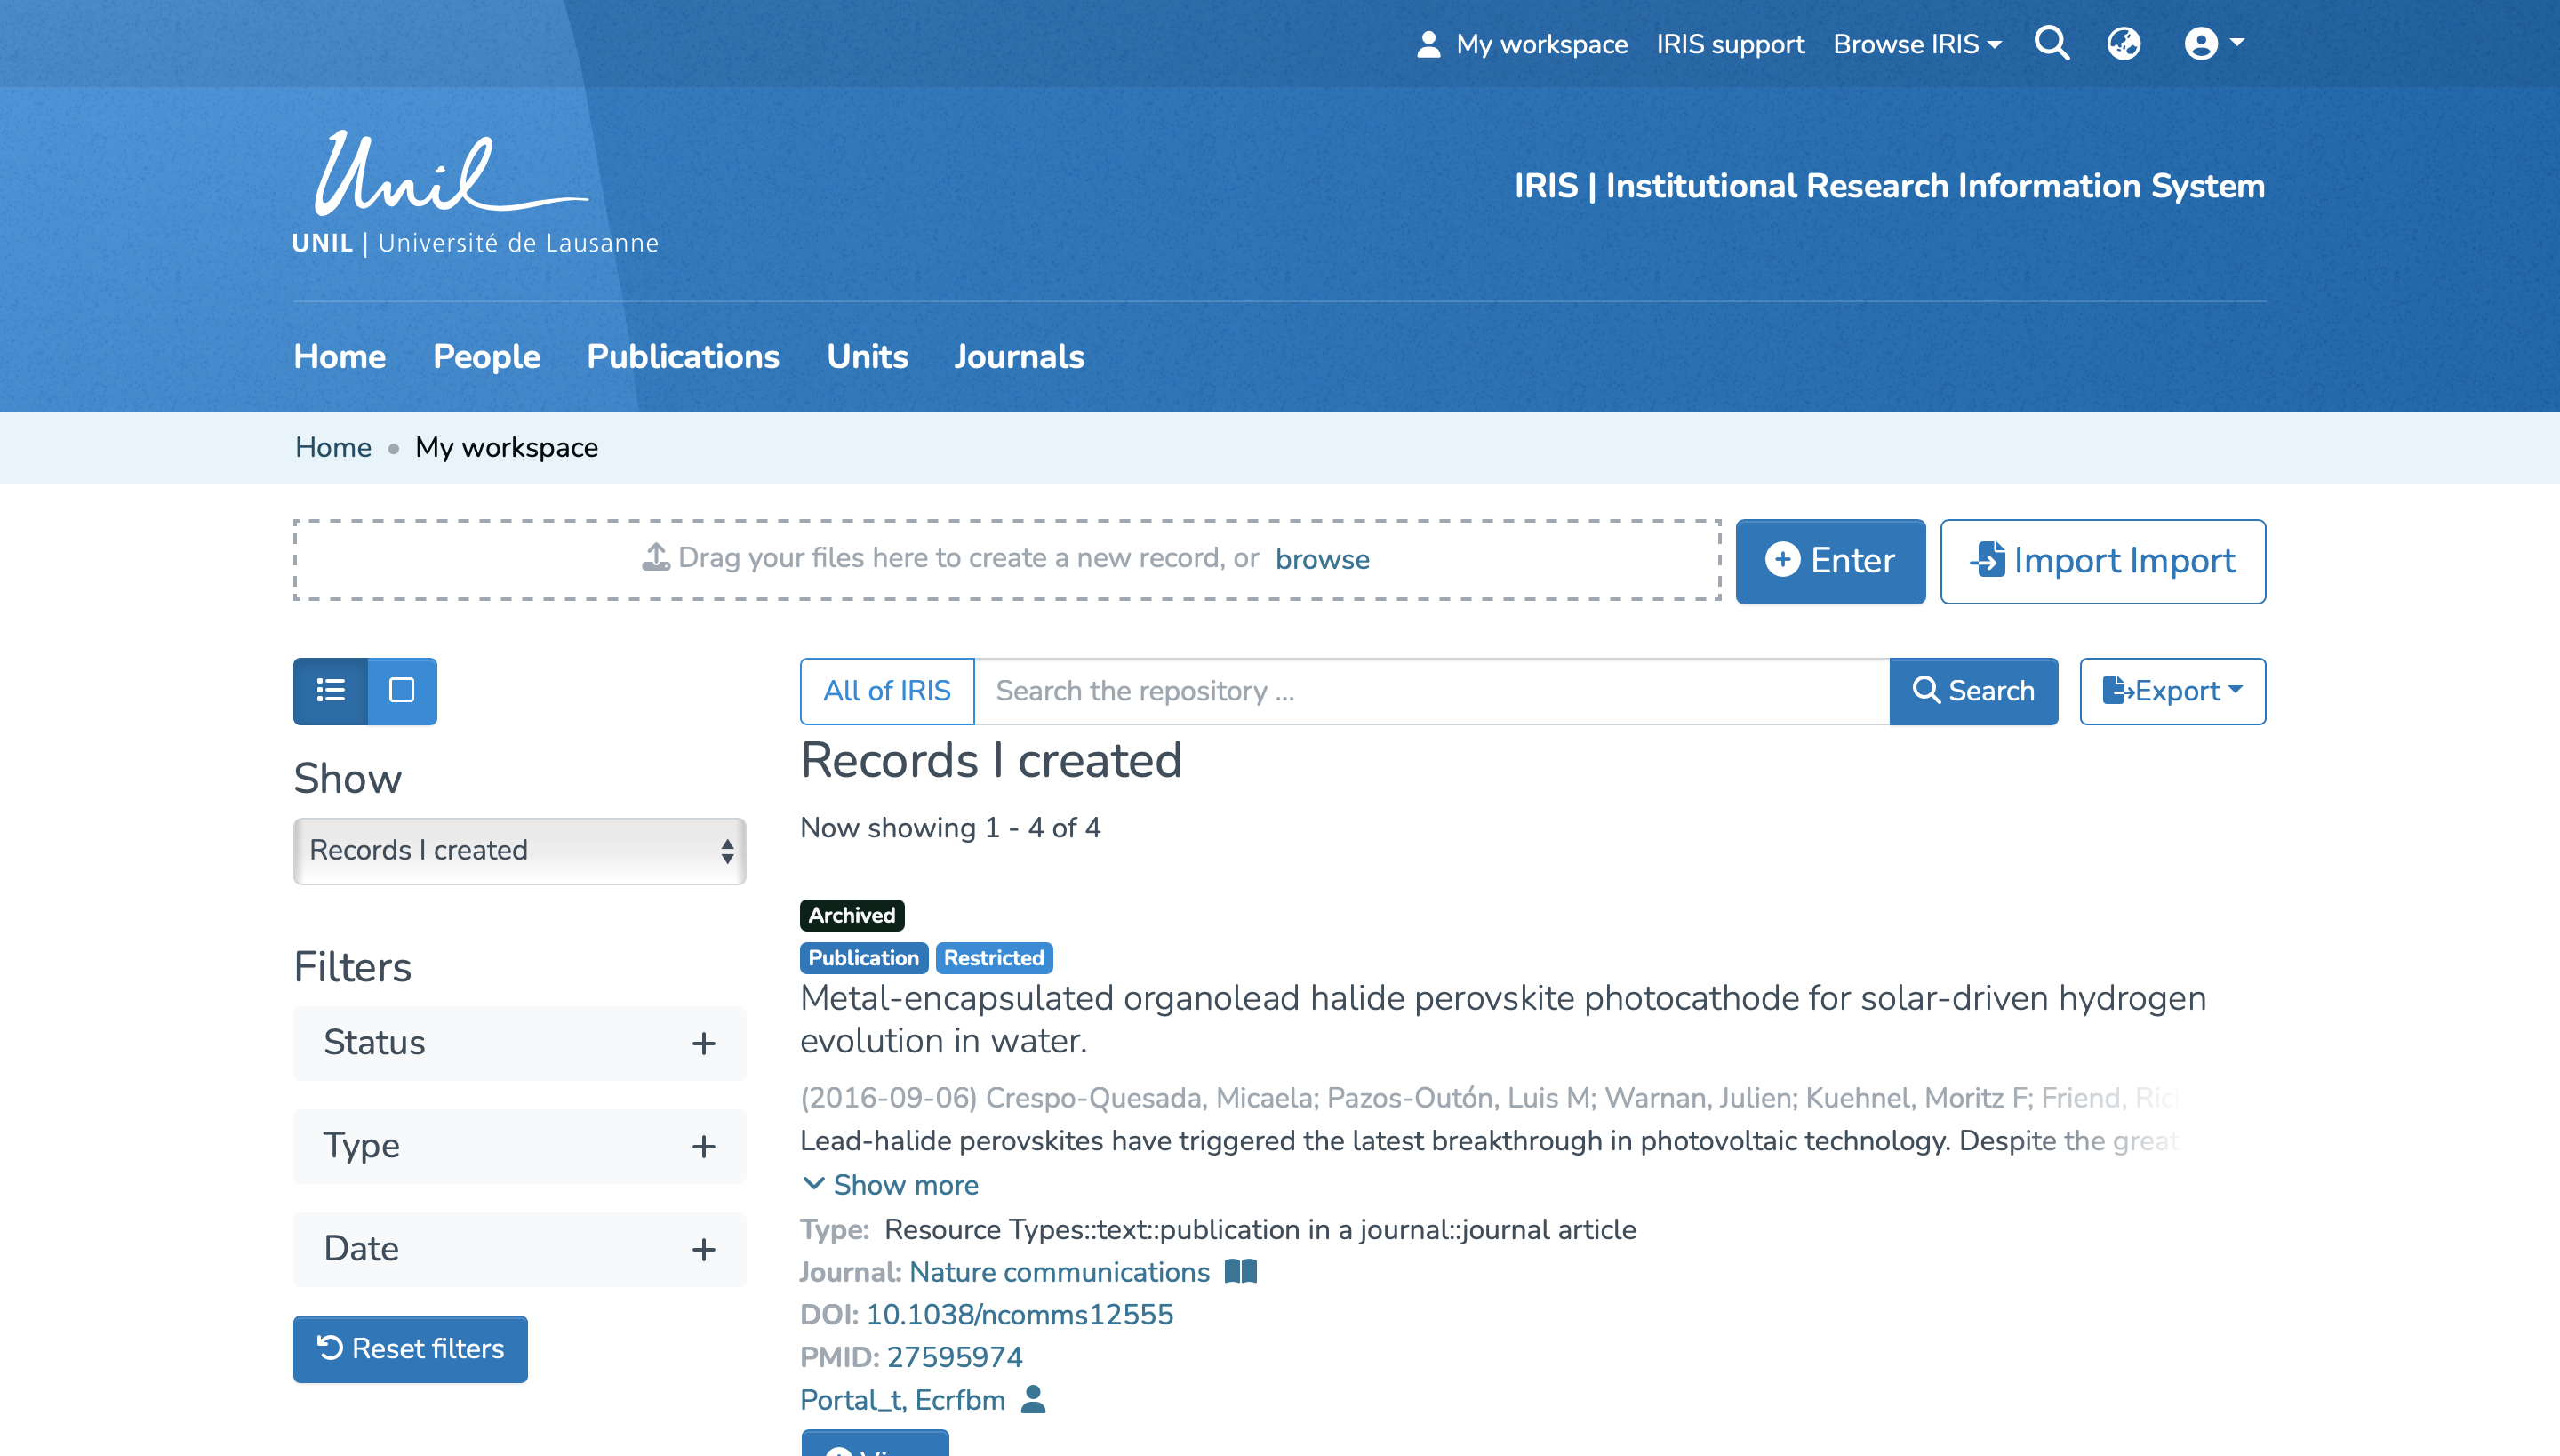
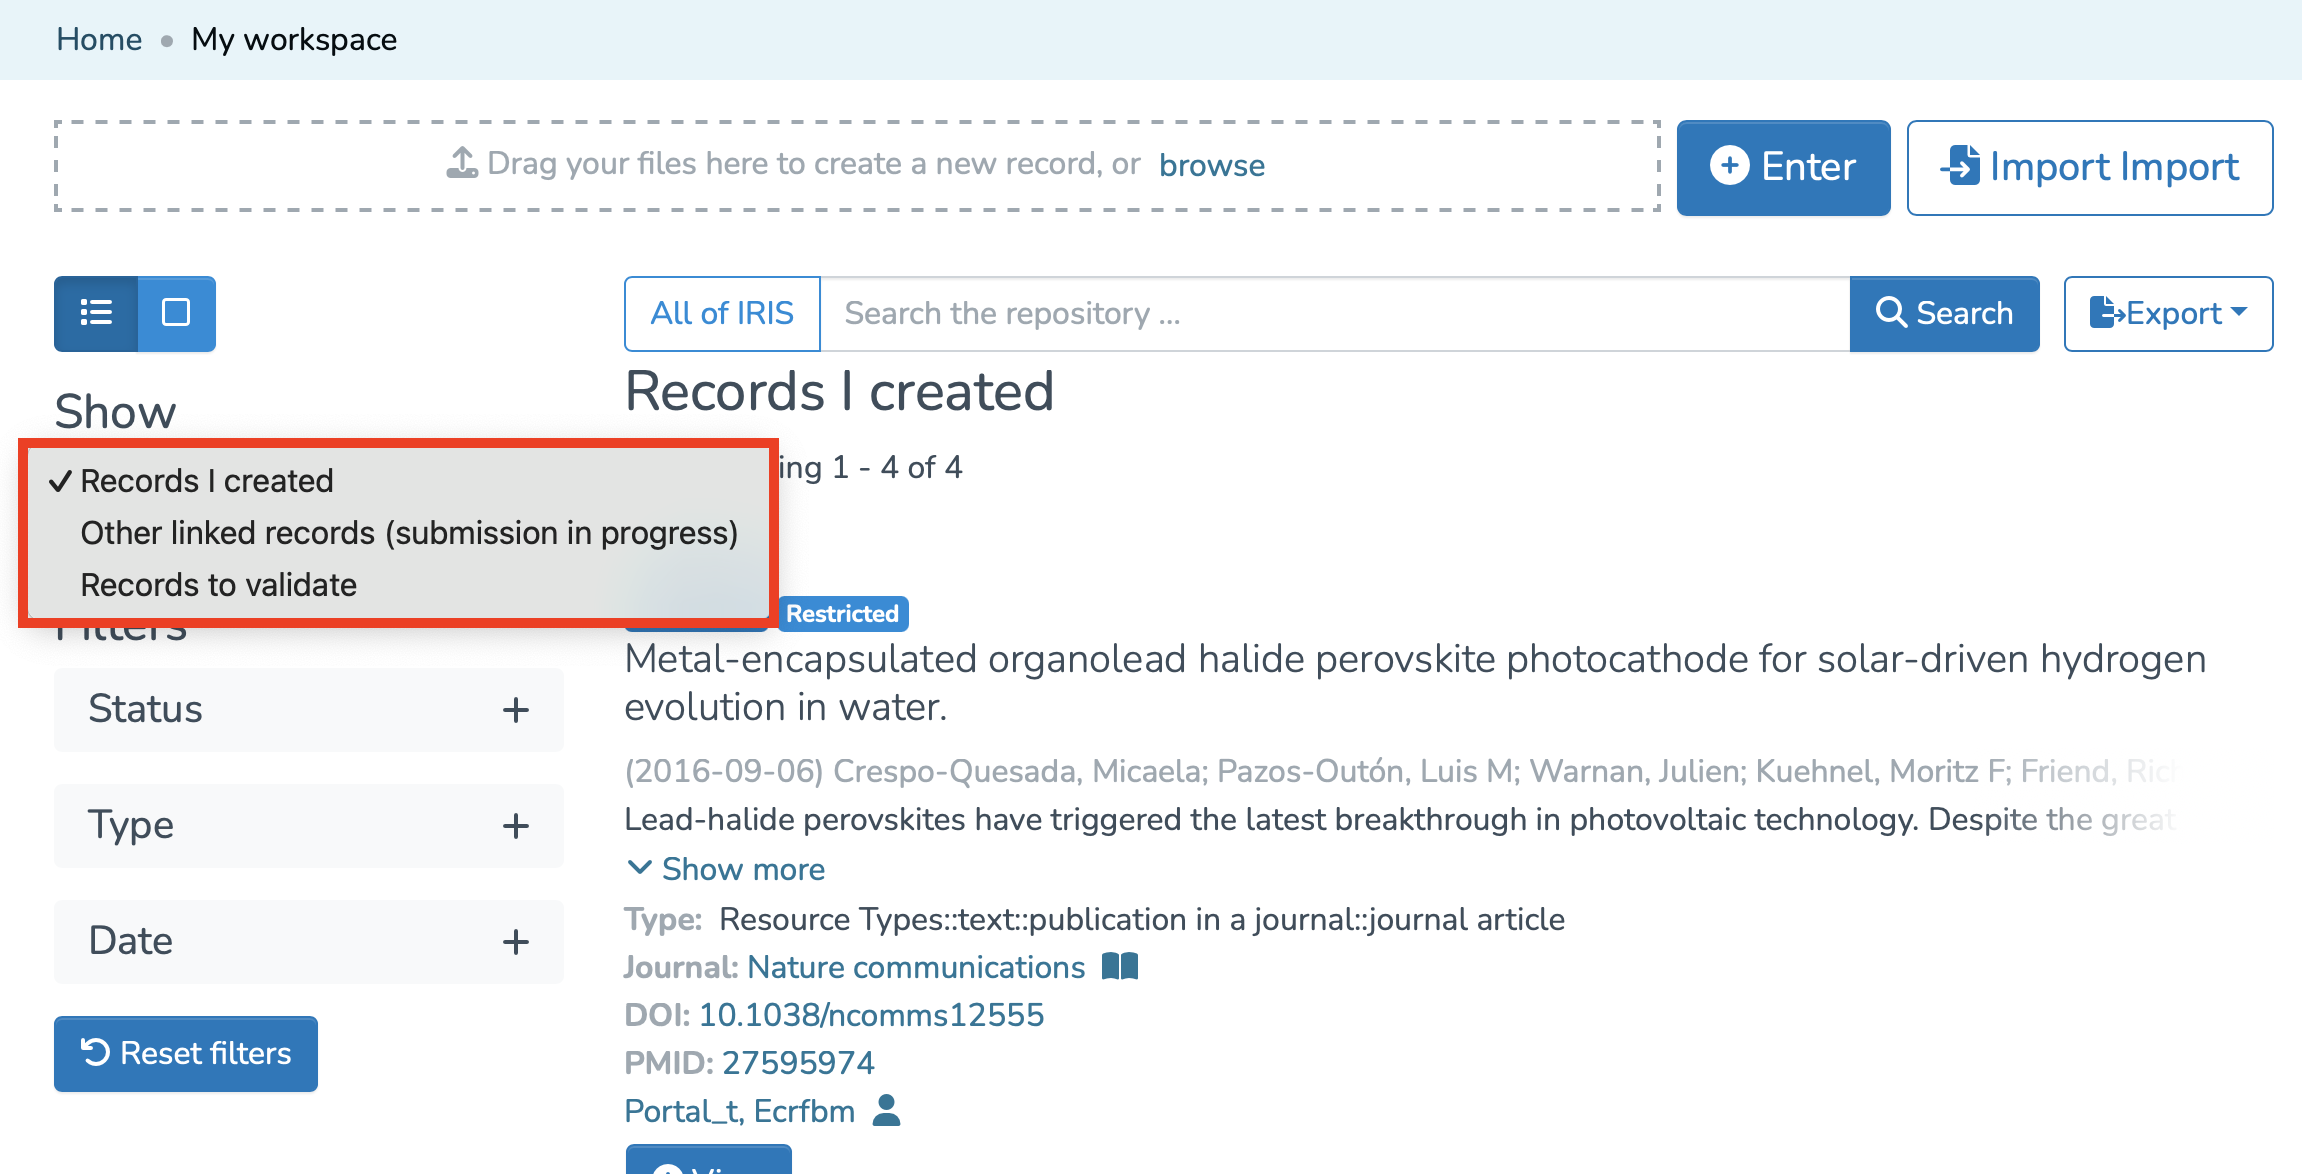
It is divided into three sections:
1. Records I created: This view includes only the records you have entered yourself. You will find records at all stages (draft, in progress, archived), which you can edit, complete, or track.
2. Other linked records (submission in progress): This section displays only records currently in progress to which you are linked, but which you did not create yourself. Records that have already been archived do not appear here.
3. Records to validate: If you are a validator, this section lists the records awaiting your review. You can take them in charge, edit them, approve them, or reject them, as needed.
To display all records you are linked to that are in archived status, you need to access your researcher profile.