Calendars
Basic Exchange tips
- outlook.office.com, "Microsoft Outlook" on Windows and Mac,
and "Calendar" on Macare the only supported apps by the Centre informatique, regarding the use of the Exchange calendar. - Use only one calendar, the one named "Calendar", to enter your events
- If you consider an event as private, use the checkbox "Private" that will appear when creating the said event
- Do not display more than 5 shared calendars in the app you are using to display the Exchange calendar.
Sharing your calendar
-
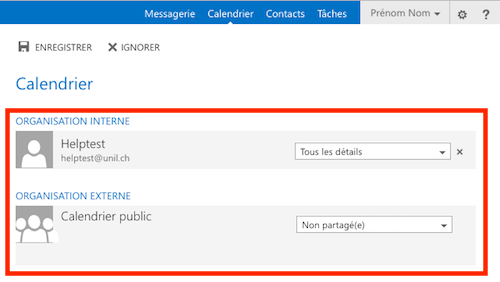
Choose the appropriate type of share
| Type of permissions | Use | Name used on Exchange |
|
Read |
Gives the beneficiary rights to read events of the shared calendar. |
Full details |
|
Read + write |
Gives the beneficiary rights to read and write events in the shared calendar. Caution: every user with such rights could delete any event in the shared calendar without its owner knowing it. |
Editor |
|
Full access |
Gives the beneficiary full rights to control the shared calendar (read and write events, respond to invitations, send invitations) To be used in only one situation: complete delegation of a head of department's agenda to its secretary |
Delegate |
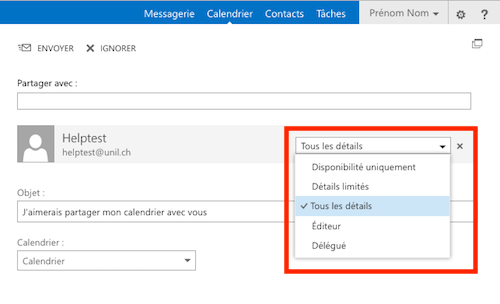
NB: Two more types of permissions are available in Exchange: ”Availability only" and ”Limited details". Using any of those two options is not recommended at the UNIL, as they are not correctly processed by mac computers.
-
Sharing your own calendar
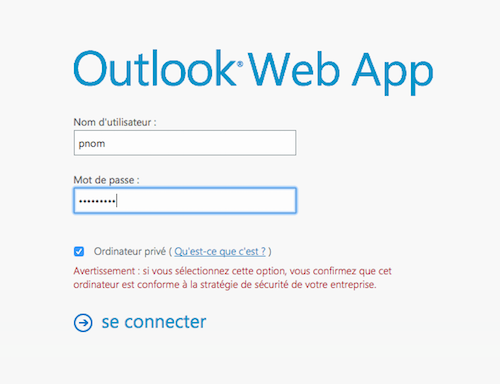
- Connect to https://outlook.office.com
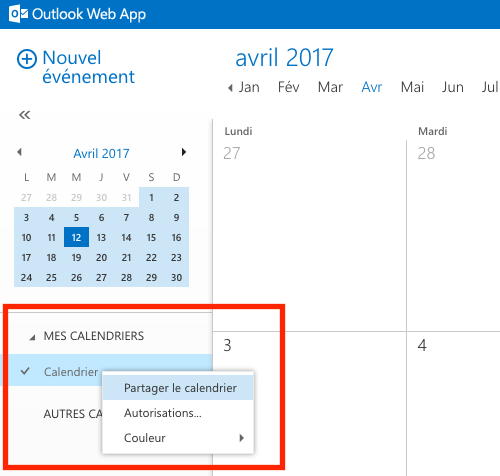
- Click on Calendar

- Right-click on the calendar named "Calendar" and click on "Share calendar"
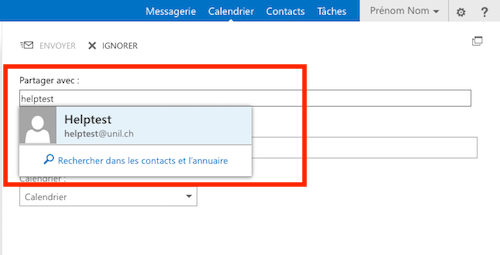
- Start typing the name of the person you would like to share your calendar with. If it does not show automatically, use the "Search contacts and directory" button.
-
Select the type of share you would like to use (recommended: "Full details")
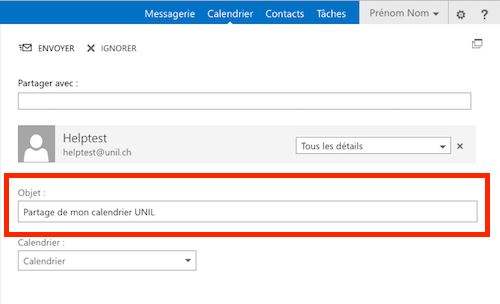
- (Optional) Once the share type is defined, you can can change the subject of the email sent to the beneficiary.
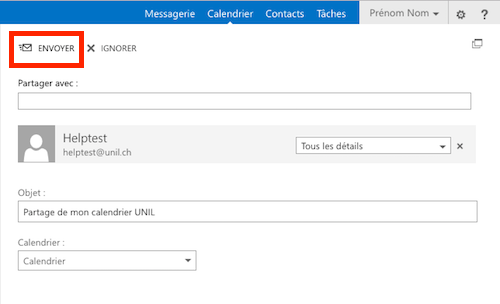
- Click on ”Send"

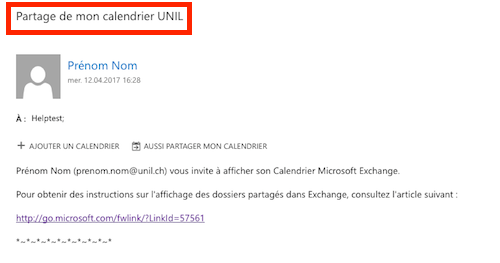
- The beneficiary of the shared calendar will receive a standard email, saying that the calendar has been shared with him/her.


-
(optional) Check permissions on the shared calendar
- Right-click on "Calendar" and click on "Permissions"

- Permissions list then appears


Display a shared calendar
Web (outlook.office.com)
- Connect to https://outlook.office.com with your UNIL username/password
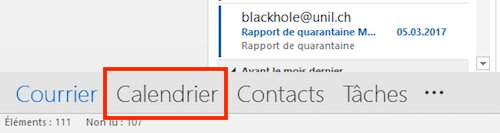
- Click on ”Calendar"
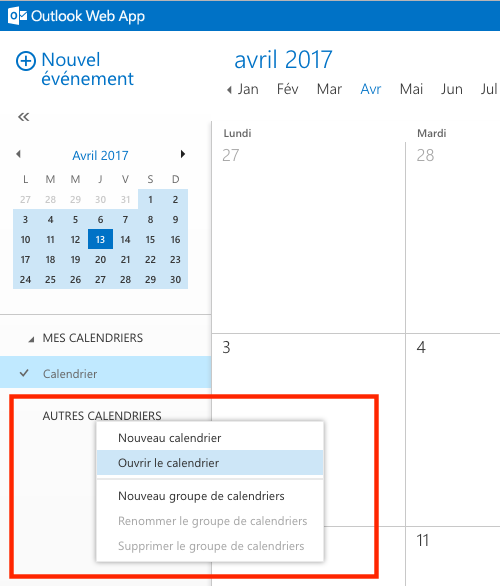
- Right-click on "Other Calendars" and click on "Open calendar"

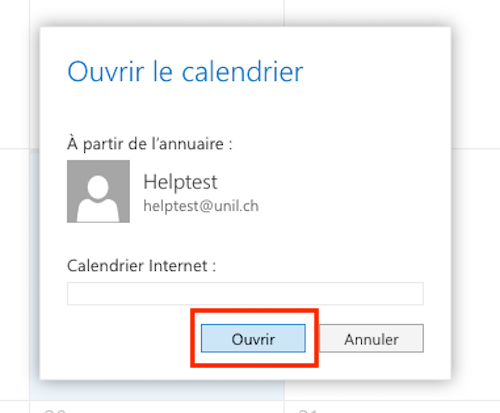
- Type in the name of the person who shared their calendar
Please note: In the case of a group calendar (created upon request by the Ci), it is necessary to precede the name of the calendar with the mention "cal." (Example: cal.name_of_group_calendar)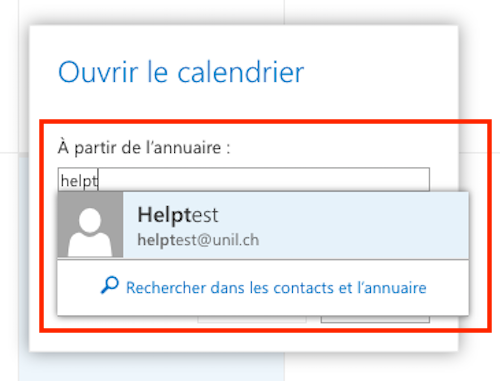
- Click on "Open"

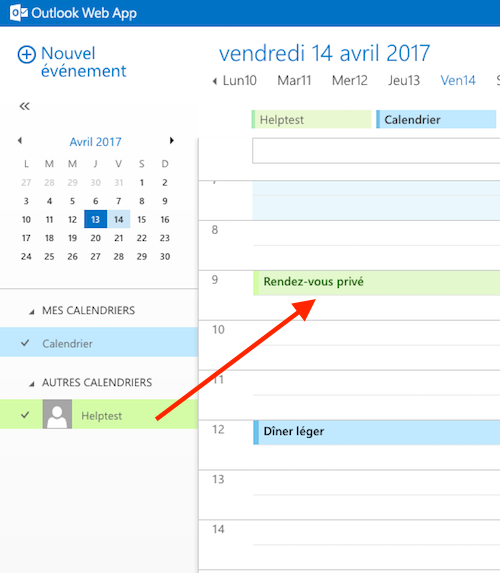
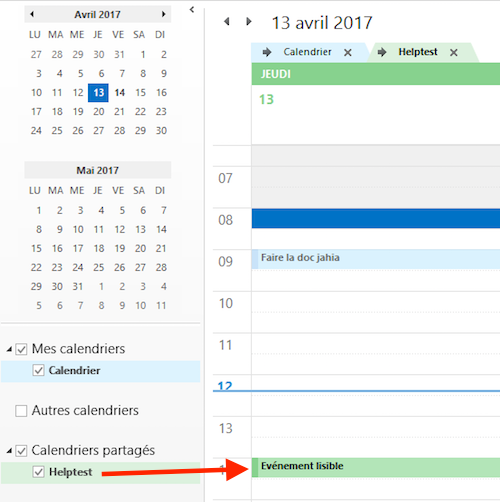
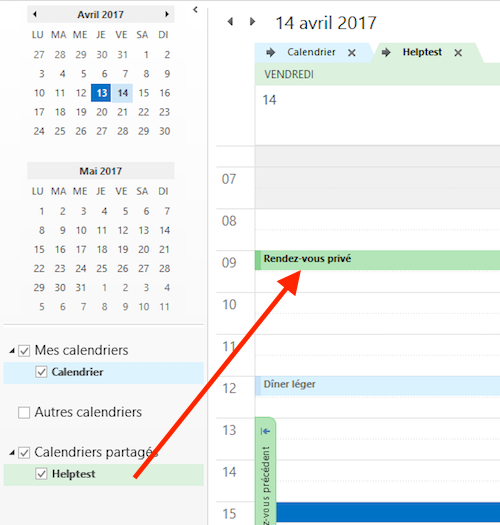
- The shared calendar appears in the "Other calendars" section. In the example below, helptest's shared calendar is the green one.
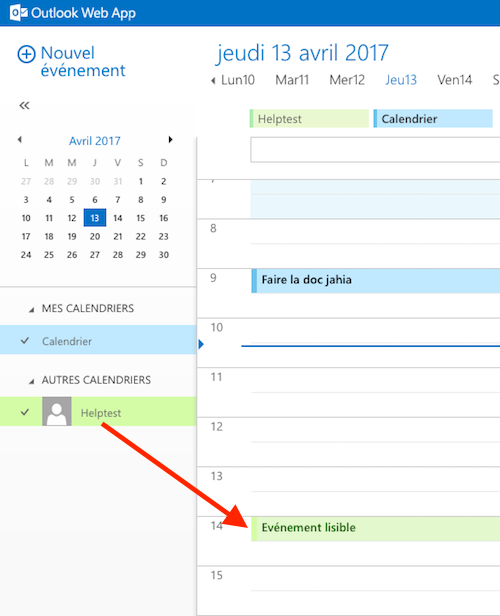
- The example below shows how a private event displays in helptest's shared calendar. The beneficiary of the shared calendar will only see a "Private event" mention.


Windows
- Open Microsoft Outlook
- Click on Calendar

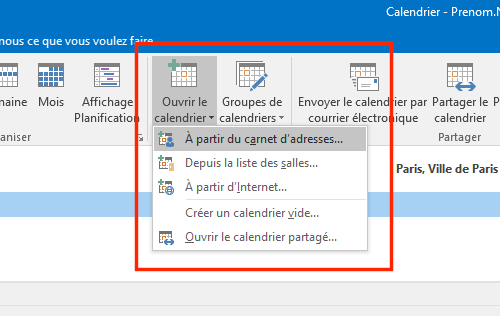
- Click on "Open calendar", then on "From Address Book..."

- Type the name of the person sharing their calendar, select them in the list, click on "Calendar" then on "OK".
Please note: In the case of a group calendar (created upon request by the Ci), it is necessary to precede the name of the calendar with the mention "cal." (Example: cal.name_of_group_calendar)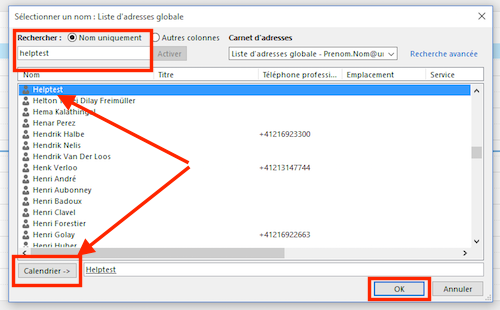
- The shared calendar appears in the "Shared calendars" section. In the example below, helptest's shared calendar is the green one.
- The example below shows how a private event displays in helptest's shared calendar. The beneficiary of the shared calendar will only see a "Private event" mention.


Mac
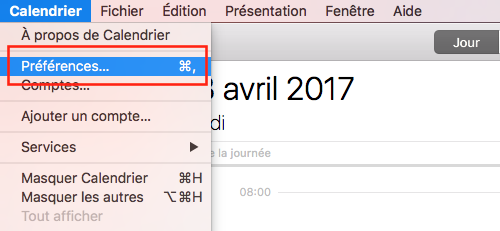
- Open the Calendar app

- (Optional) Click on "Calendars" to display a list of all Calendars

- In the "Calendar" menu, click on "Preferences"
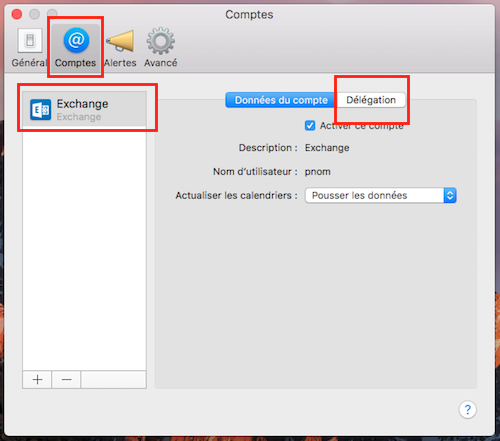
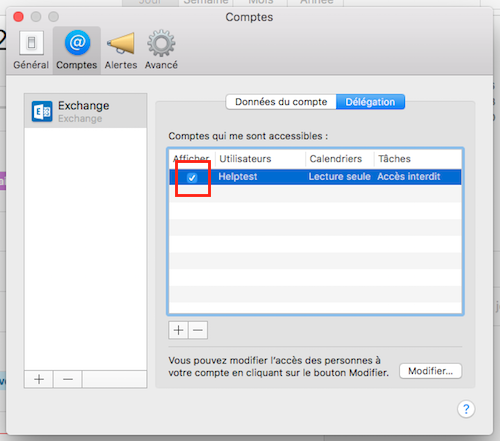
- Click on "Accounts", then on ”Exchange", then on "Delegation"
- Click on the "+" button, then start typing the name of the person who shared their calendar. Select the right name in the displayed list.
Please note: In the case of a group calendar (created upon request by the Ci), it is necessary to precede the name of the calendar with the mention "cal." (Example: cal.name_of_group_calendar)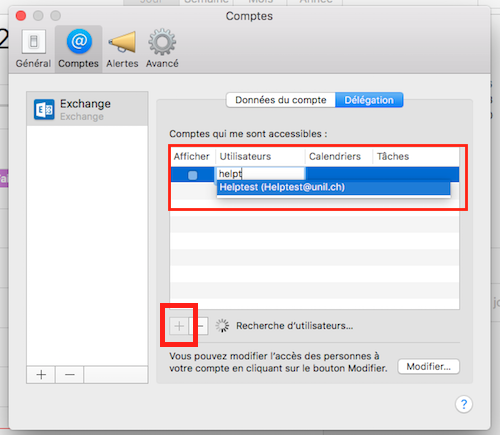
- Check the "Show" box and close the window.

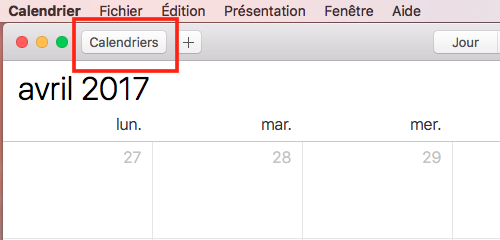
- The shared calendar appears in the "Delegates" section. In the example below, helptest's shared calendar is the blue one.

- The example below shows how a private event displays in helptest's shared calendar. The beneficiary of the shared calendar will only see a "Private event" mention.


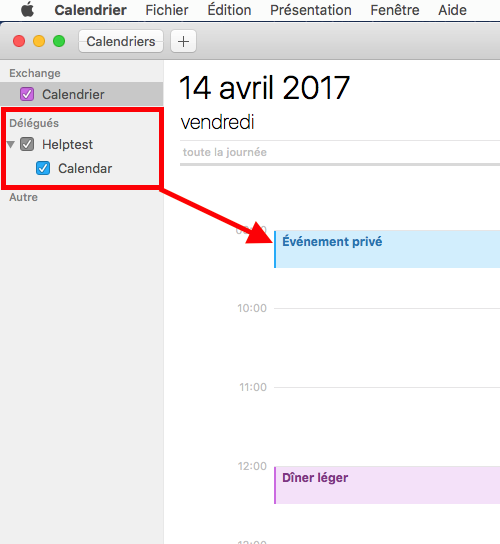
NB: Display of private events does not function starting from MacOS Sierra (10.12.x). Please use the "Scheduling assistant", or display the calendar in Outlook Online or Outlook.
Create an invitation
(IMPORTANT) Please read this
The "Create an invitation" section explains how to create an invitation to an event using Microsoft Exchange's scheduling assistant. Please consider the following "best practices":
- Not every user enters all their events in the Exchange calendar. This means that a user could easily decline an invitation even if the scheduling assistant shows that he or she is available at the time planned for the event
- Use a planning tool (such as Doodle, Framadate, etc.) when planning an event with more than 2 attendees. The goal is to set a relevant date for the event.
- With less than 2 attendees, the use of a planning tool might not be necessary
Web (outlook.office.com)
- Connect to https://outlook.office.com with your UNIL username/password
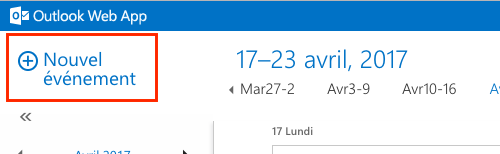
- Click on ”Calendar"
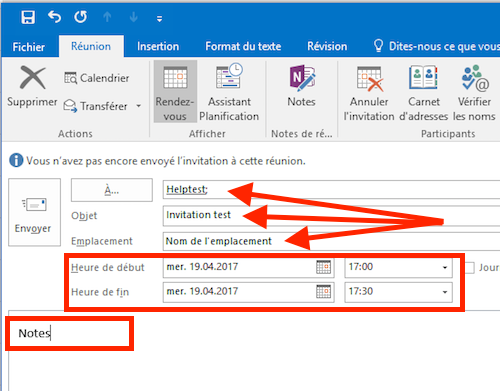
- Click on "New event"

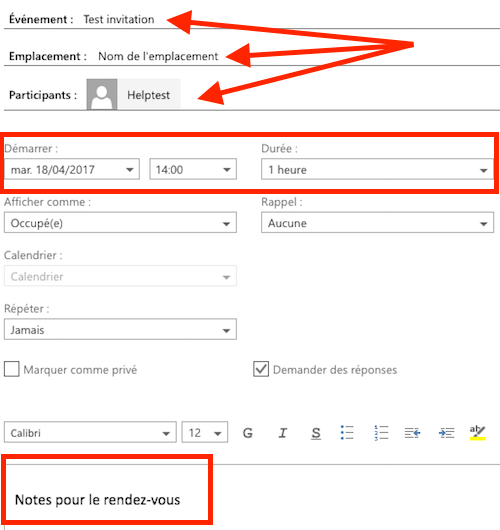
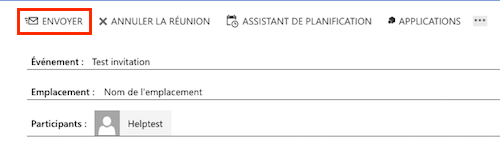
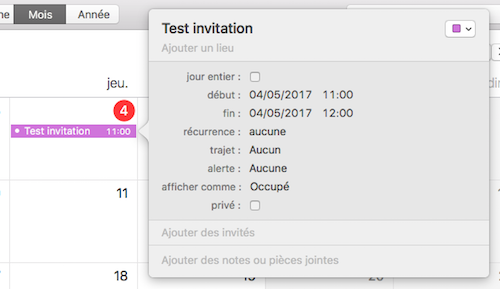
- Add an event name, an event place (if known), the name of the attendees, choose a date and add notes (if wanted).
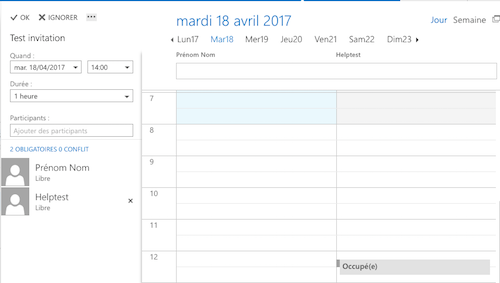
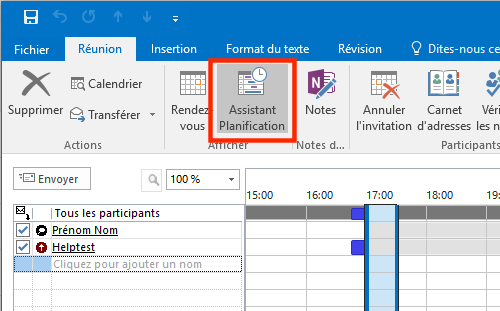
- (optional) Click on "Scheduling assistant" to check availability.
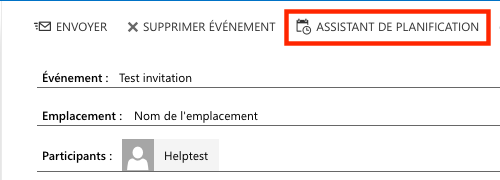
- (optional) Check availability of attendees and modify the date and/or hour of the event if needed.

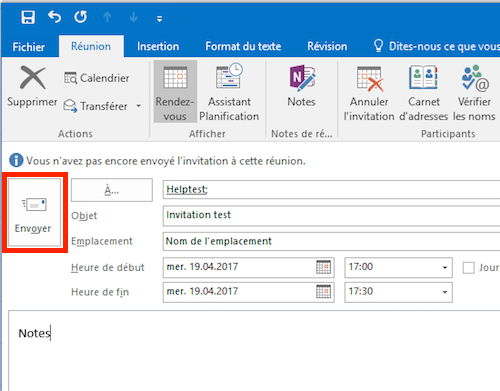
- Click on "Send"


Windows
- Open Microsoft Outlook
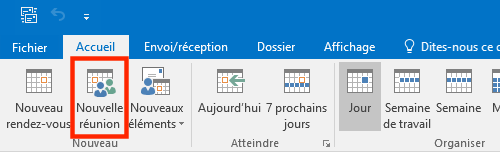
- Click on "Calendar"
- Click on "New meeting"
- Add an event name, an event place (if known), the name of the attendees, choose a date and add notes (if wanted).
- (optional) Click on "Scheduling assistant", check availability of attendees and modify the date and/or hour of the event based on the results.

- Click on "Send"


Mac
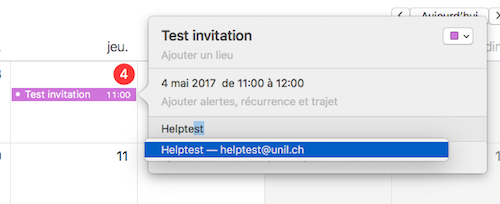
- Open the Calendar app
- Create an event with a double-click at the planned date. Enter a name for the event and set the planned date and hour.
- In the "Add invitees" section, enter the name of the invitees.
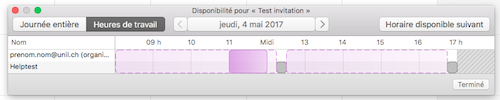
- (optional) Click on "Check Availability...".
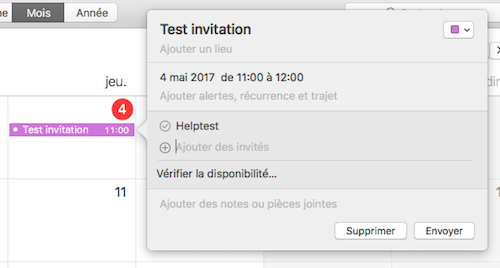
- (optional) Check availability of your invitees and modifiy planned date and/or hour of the meeting if needed. Click on "Next available time" if you want Exchange to search for the next availability shared by every invitee.
- Click on "Send"


Corrupt calendar events
Verify in Calendar (Mac)
If you find a calendar named Doublons_calendrier_A_VERIFIER, it means our monitoring has detected corrupt events in your Exchange calendar. These events can cause issues when sharing your calendar with other users: the synchronisation will fail on these items.
We moved these problematic items to a separate calendar named Doublons_calendrier_A_VERIFIER. Please take a while to go through these events to make sure nothing important was moved.
The quickest way to check is to:
- Select only the calendar named Doublons_calendrier_A_VERIFIER
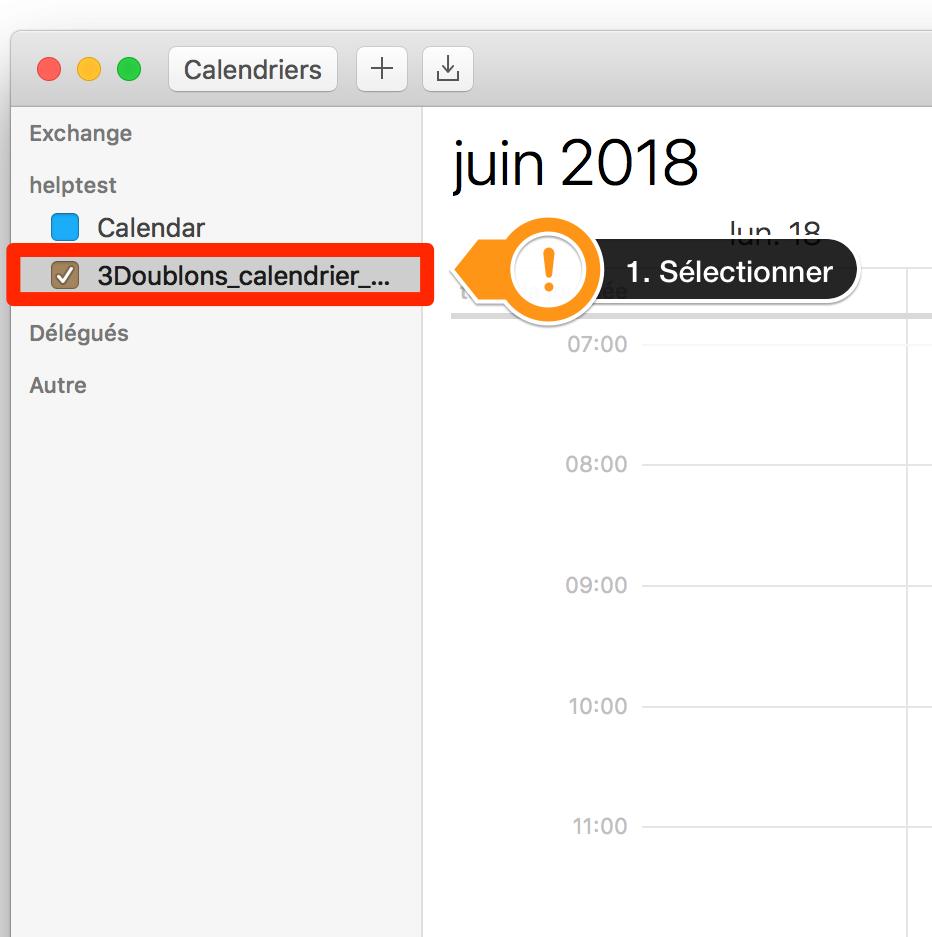
- Search by entering two double quotes "". This will display all the calendar's events
- Check and recreate (do not copy!) important items to your main calendar if needed and not already present


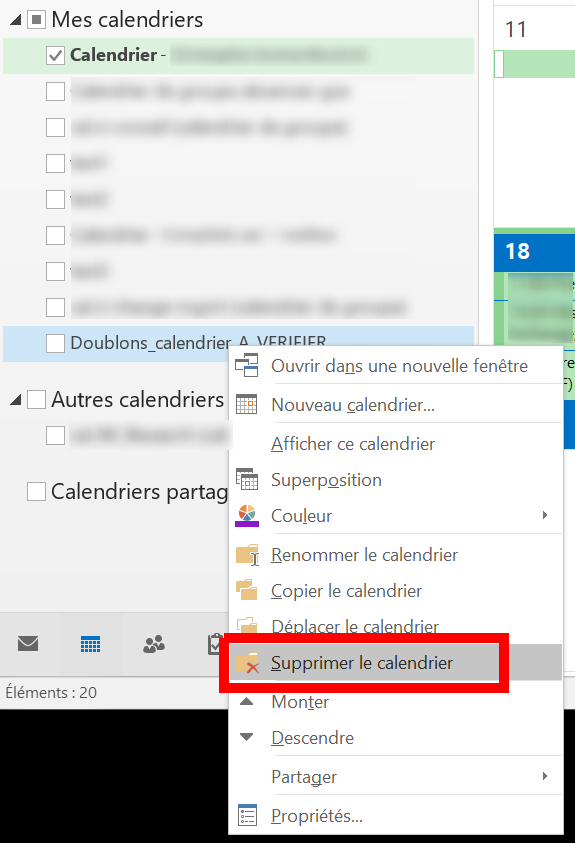
Once finished, you can delete Doublons_calendrier_A_VERIFIER by right clicking and choosing Delete.

Verify in Outlook (Windows)
If you find a calendar named Doublons_calendrier_A_VERIFIER, it means our monitoring has detected corrupt events in your Exchange calendar. These events can cause issues when sharing your calendar with other users: the synchronisation will fail on these items.
We moved these problematic items to a separate calendar named Doublons_calendrier_A_VERIFIER. Please take a while to go through these events to make sure nothing important was moved.
The quickest way to check is to:
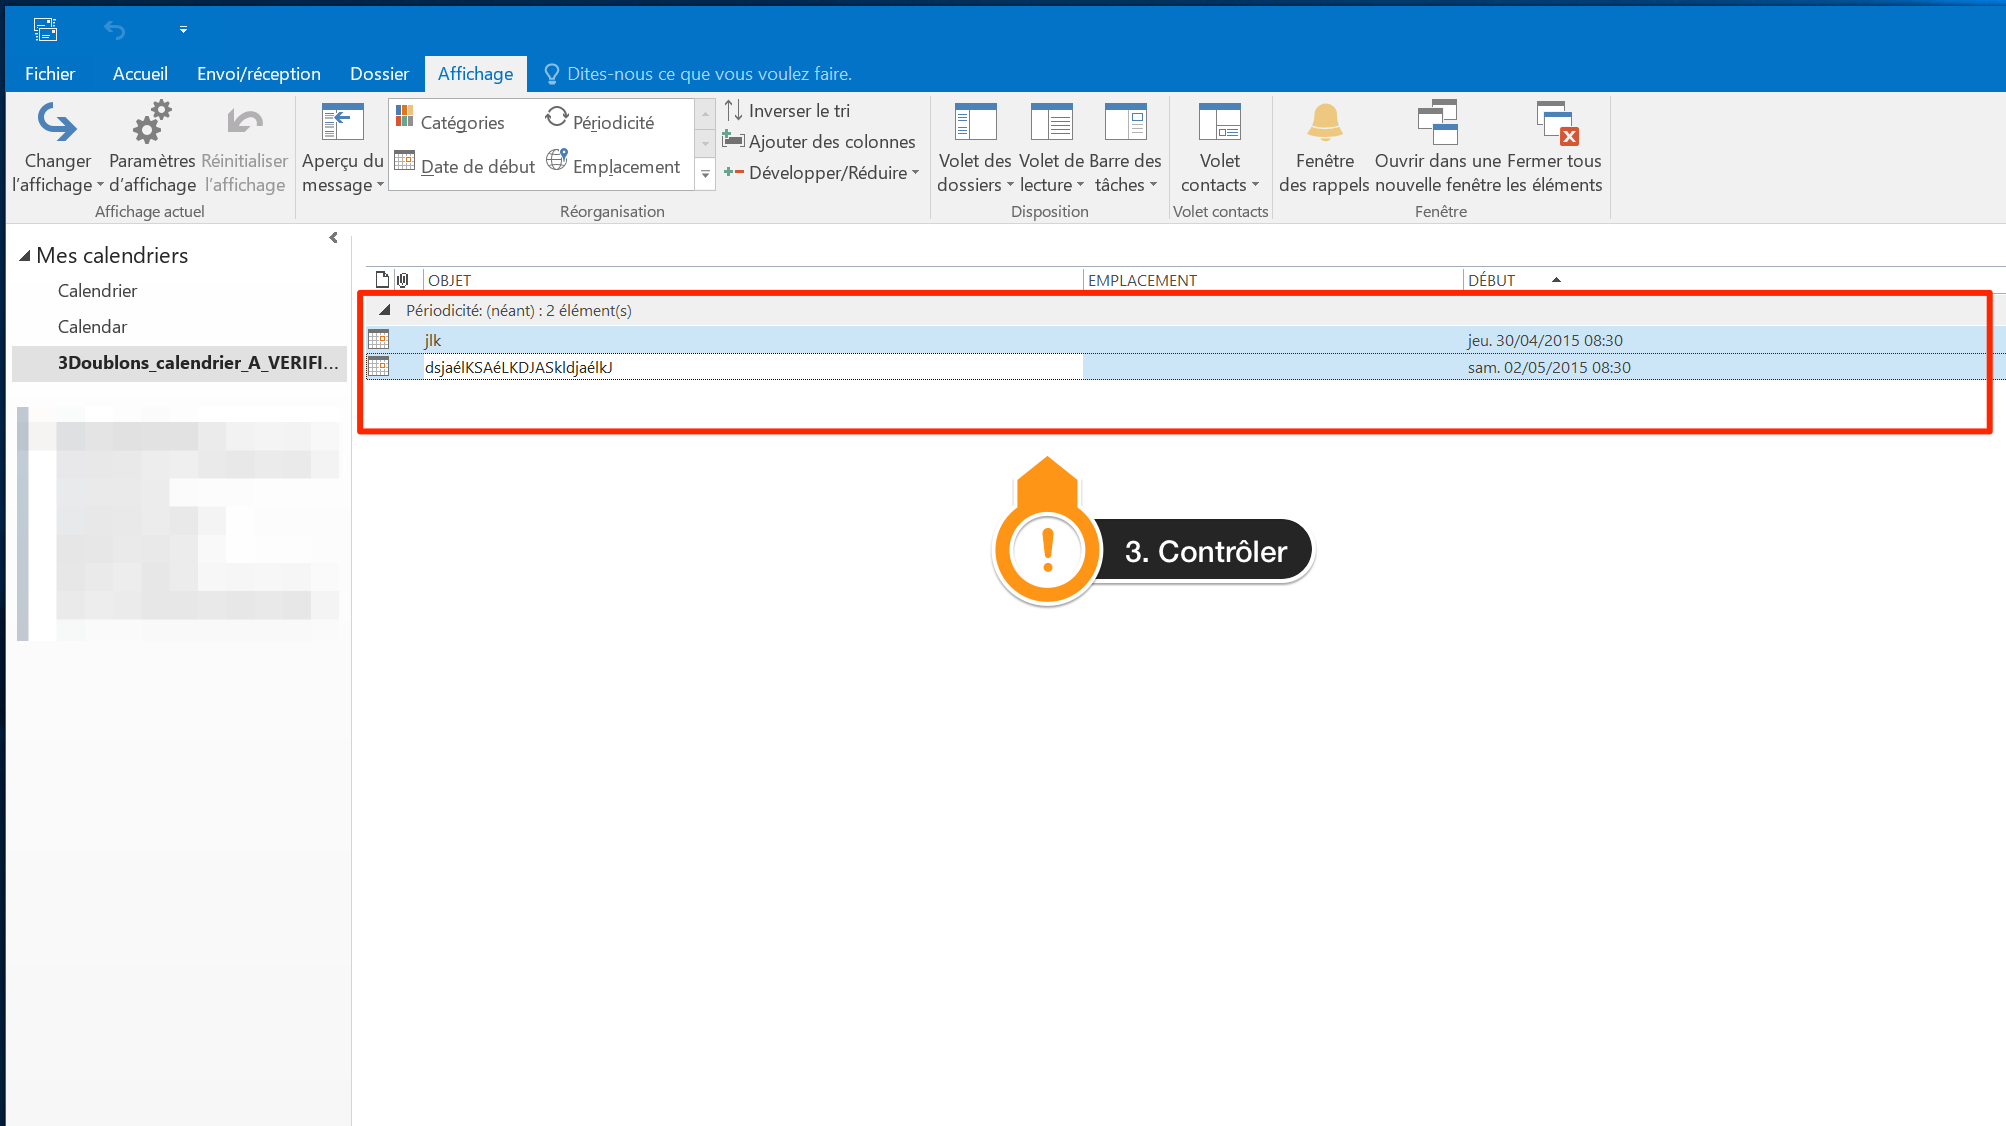
- Select only the calendar named Doublons_calendrier_A_VERIFIER
- Click on Change view and choose List
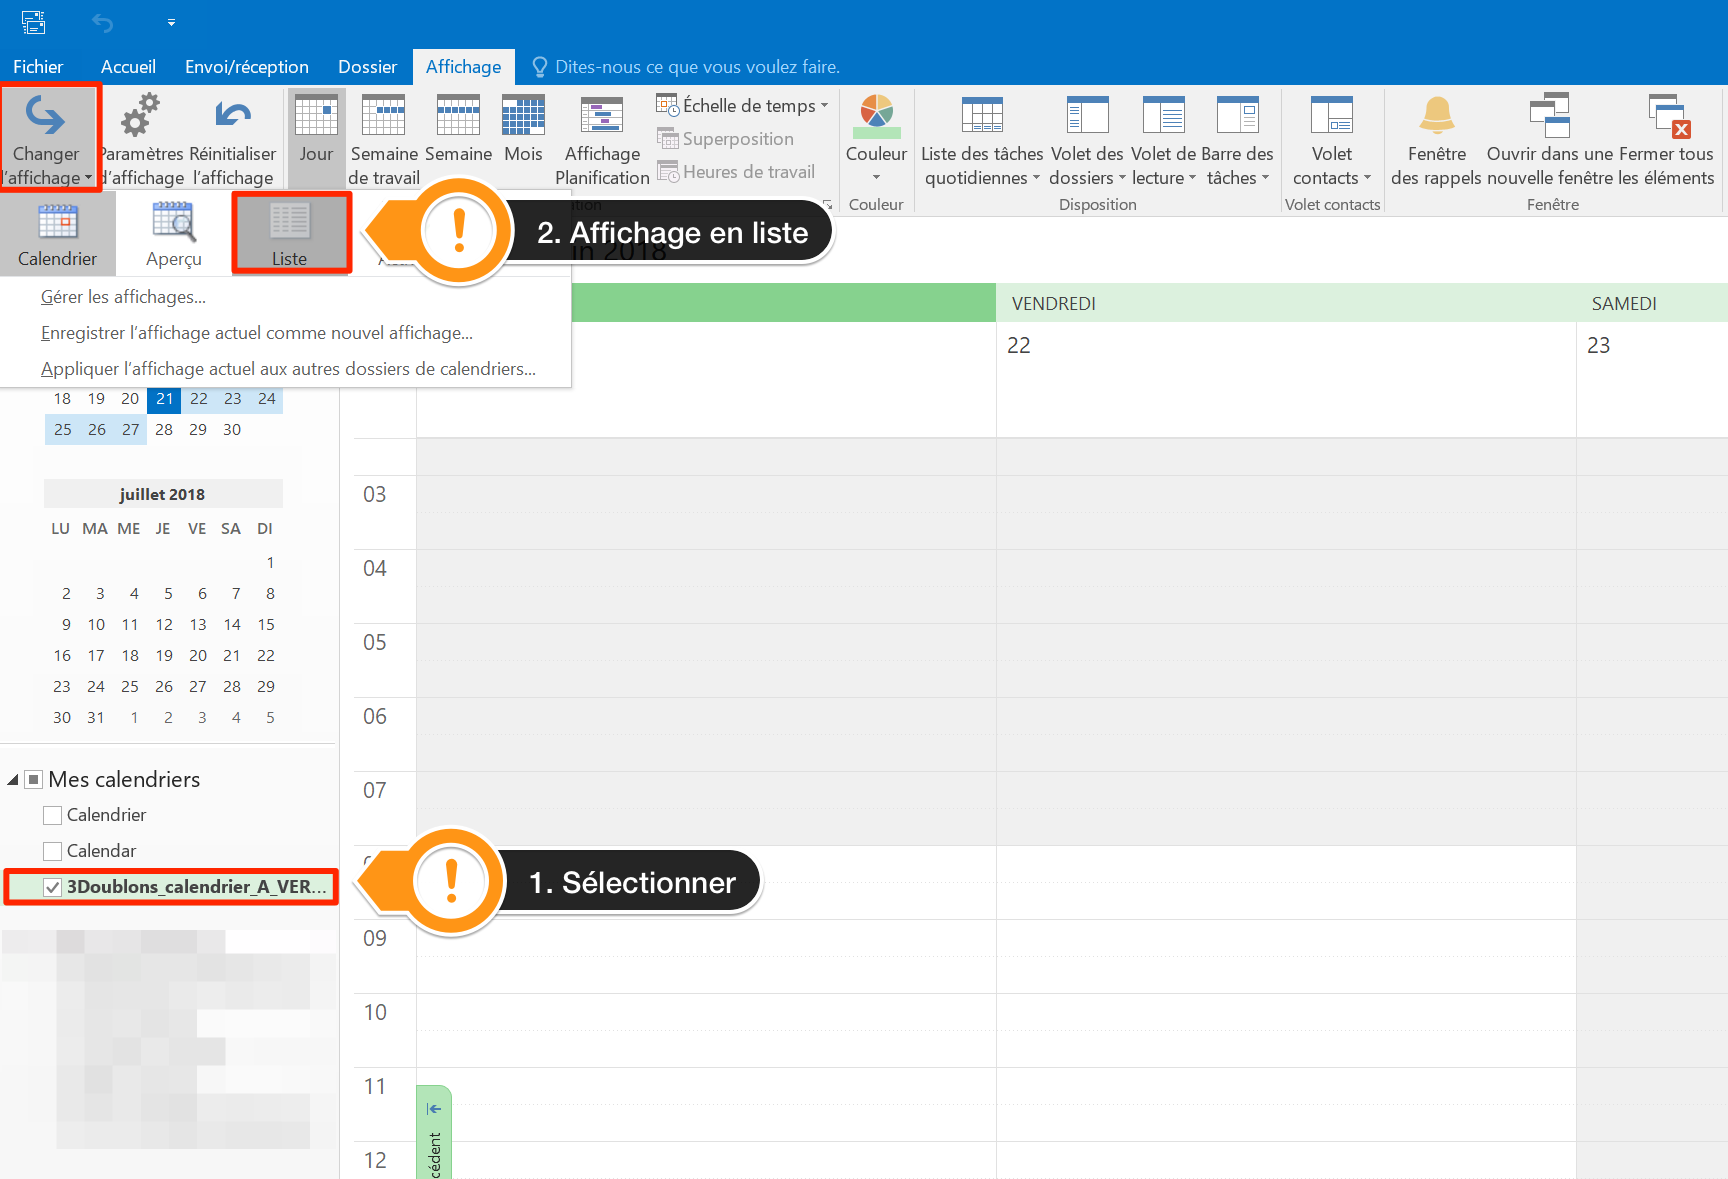
- Check and recreate (do not copy!) important events in your main calendar if needed


Once finished, you can delete the calendar by right clicking and choosing Delete the calendar.
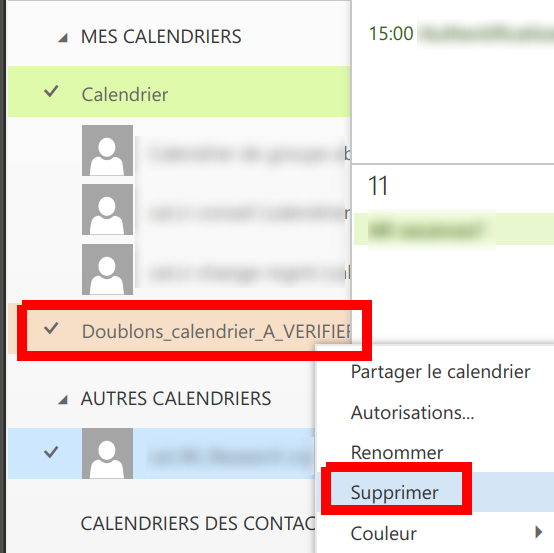
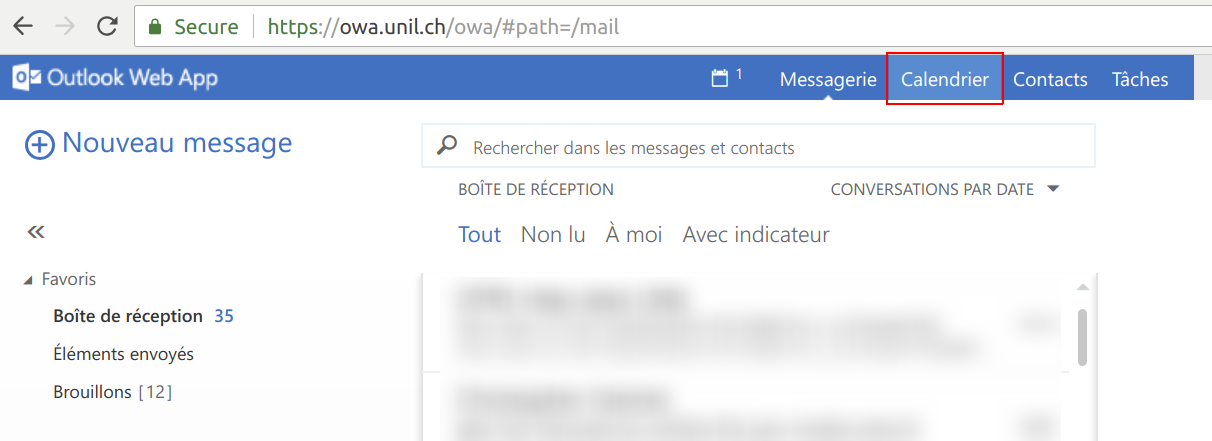
Verify in Outlook Online (web)
If you find a calendar named Doublons_calendrier_A_VERIFIER, it means our monitoring has detected corrupt events in your Exchange calendar. These events can cause issues when sharing your calendar with other users: the synchronisation will fail on these items.
We moved these problematic items to a separate calendar named Doublons_calendrier_A_VERIFIER: to view it, log on to https://outlook.office.com and click on the Calendar tab.
Please take a while to go through these events to make sure nothing important was moved. You can then delete this calendar by right-clicking on it and choosing Delete.