If you haven't logged into your email for some time and are facing issues, the documentation about our recent migration to Exchange Online is available here. The owa.unil.ch website has been phased out, and cannot be used to access your email.
This article ishas currentlyrecently underbeen reviewupdated. andIf goingyou throughfind changes.any The information might be out of out-of-date or inaccurate.incorrect Doinformation, not hesitate to contact us at helpdesk@unil.ch or by phone forso morethat information.we may fix it.
The macOS sectionarticle has been fully updated. Its contents are now up to date, and you may follow the instructions within to access your Unil email account on macOS.account.
Access via web browser (Firefox, Safari, Edge, Chrome, ...)
Outlook Online
![]()
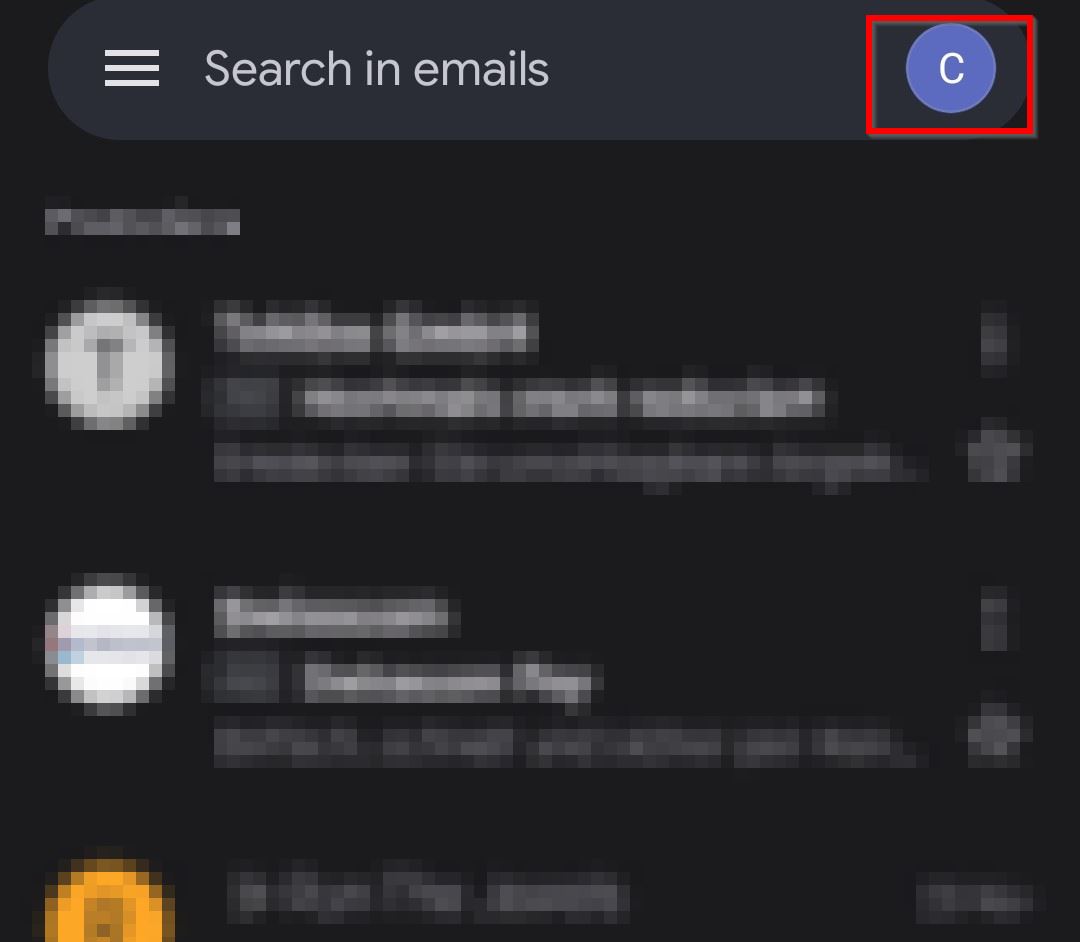
- Go to outlook.office.com
- Log in using your UNIL email address and password
- You now have access to all the functionalities provided by your Exchange account; e-mails, calendars, contacts, tasks, notes, etc.
Access by application (computers, tablets, smartphones)
 macOS
macOS
The CI recommends using Outlook instead of Apple Mail, especially for UNIL employees. Using Apple Mail on mailboxes containing more than a few thousands of emails may lead to data corruption and loss.
Outlook Exchange account setup (email, calendards,calendars, etc.)
Before starting, ensure that an up to date version of Outlook is installed. To do so, open the Outlook menu and click on About Outlook. If you are using the 2019 or 2016 version of Outlook, you will have to uninstall it and install the latest version (french).
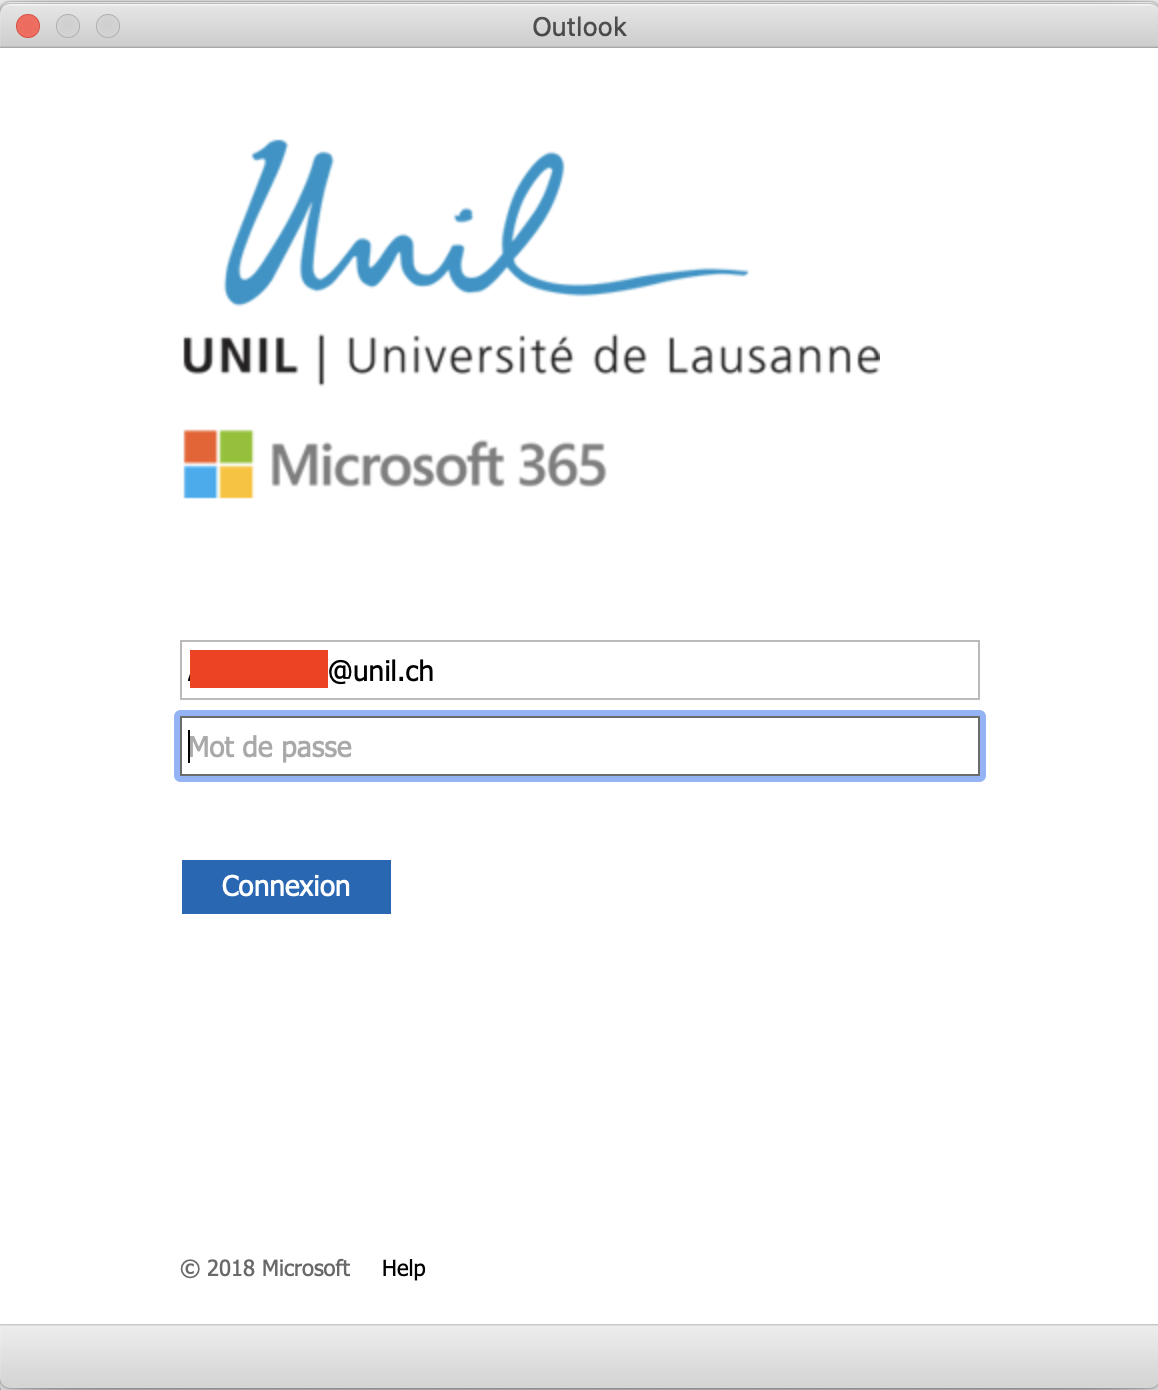
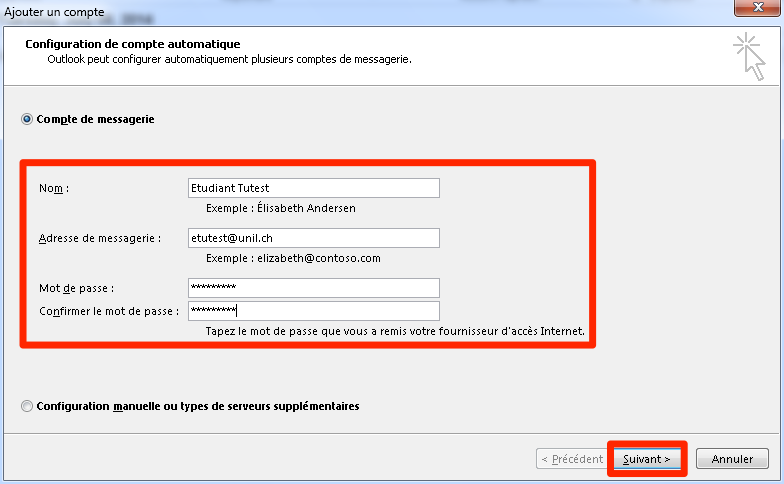
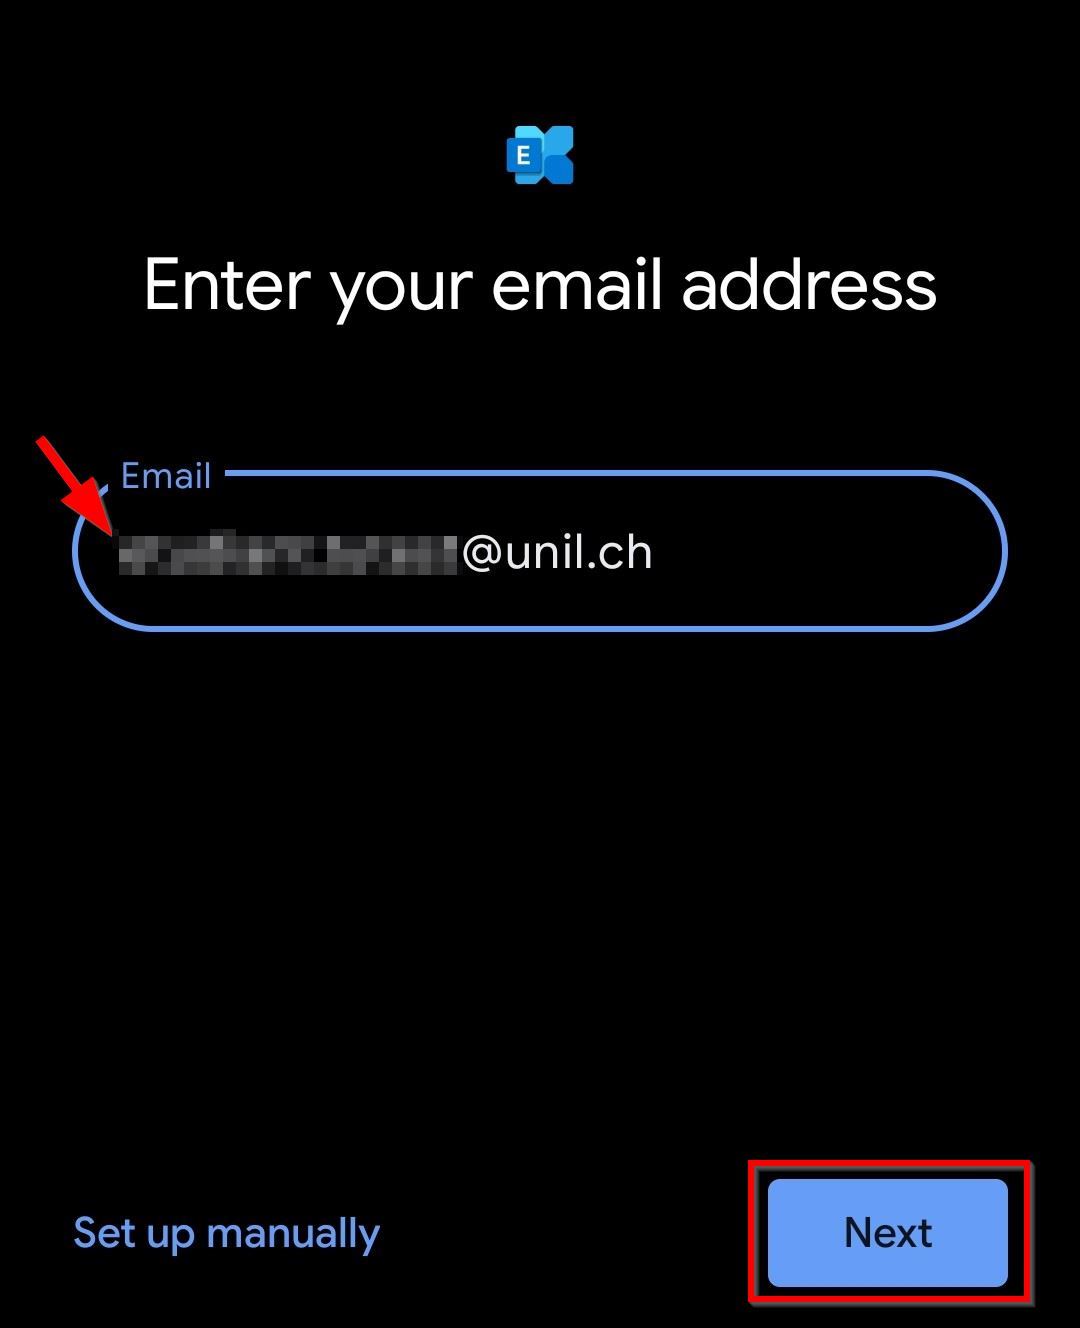
- Open Microsoft Outlook and enter your @unil.ch email address
- A window opens
ansand prompts you for your UNIL password- If you have already logged into another Microsoft product, your email account should be automatically added

- If you have already logged into another Microsoft product, your email account should be automatically added
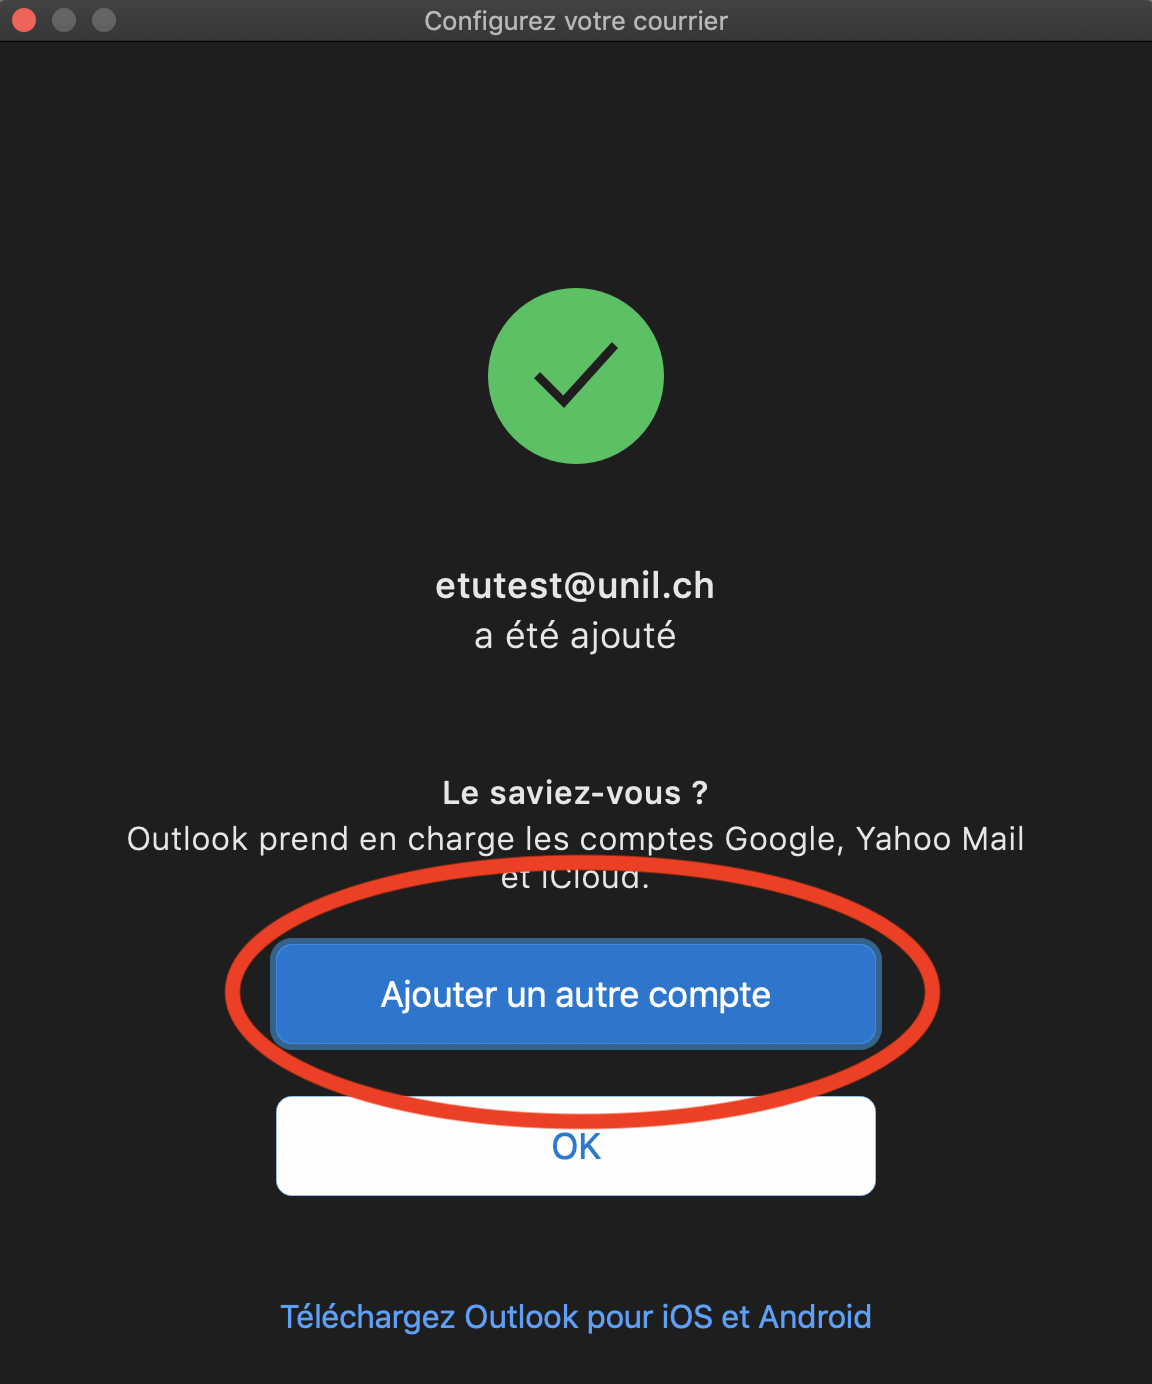
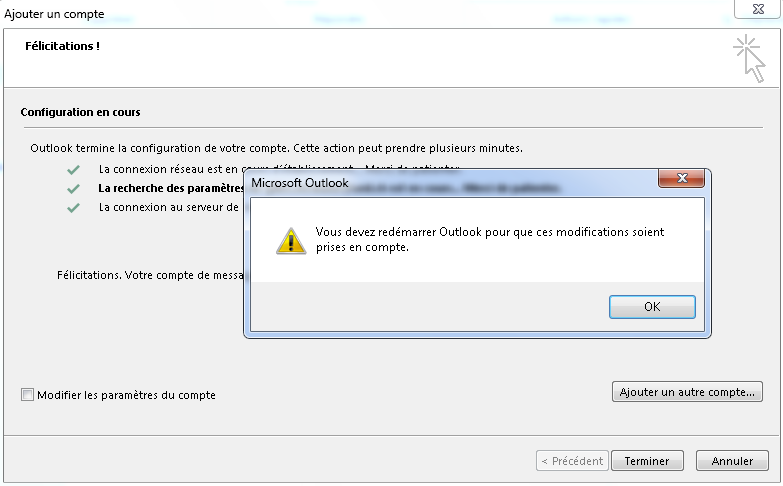
- After logging in, the email account should be automatically added and set up. You should see a confirmation window.
- If desired, you may add another email account by clicking the following button:
[Outlook] Connecting additional Exchange accounts
Before starting, ensure that an up to date version of Outlook is installed. To do so, open the Outlook menu and click on About Outlook. If you are using the 2019 or 2016 version of Outlook, you will have to uninstall it and install the latest version (french).
- Open the Outlook app
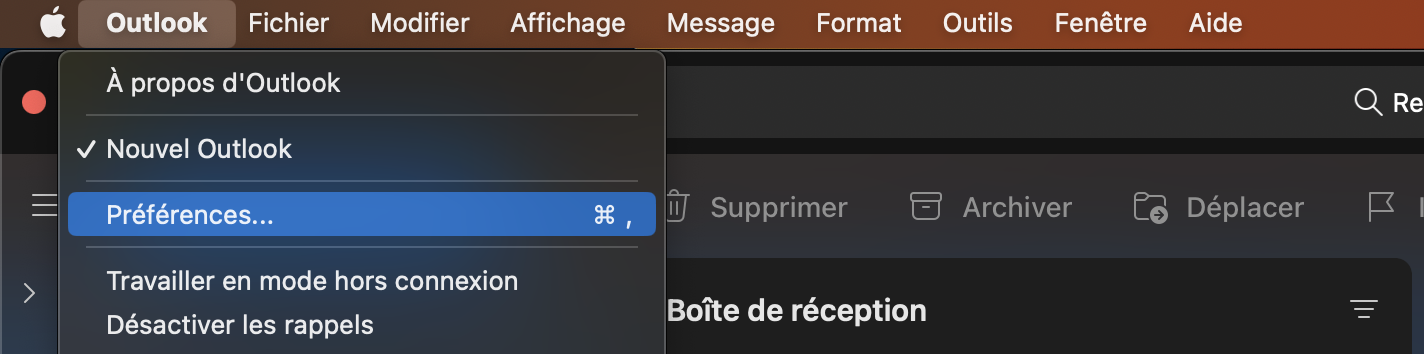
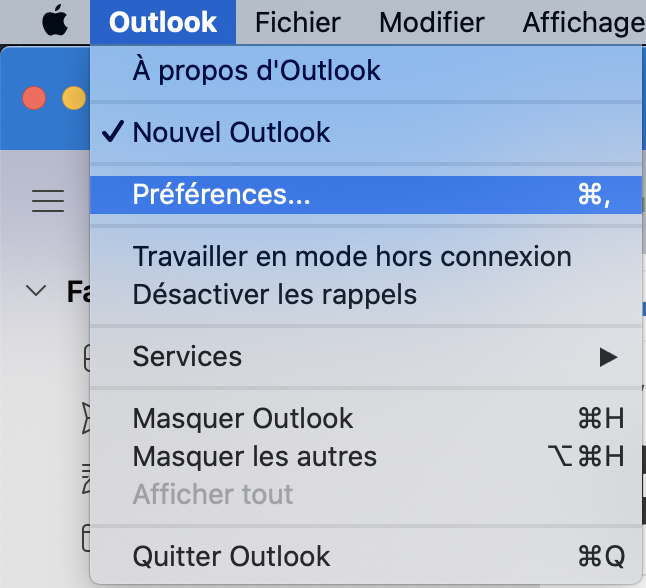
- On the top left of the display, click on the Outlook menu then Settings...
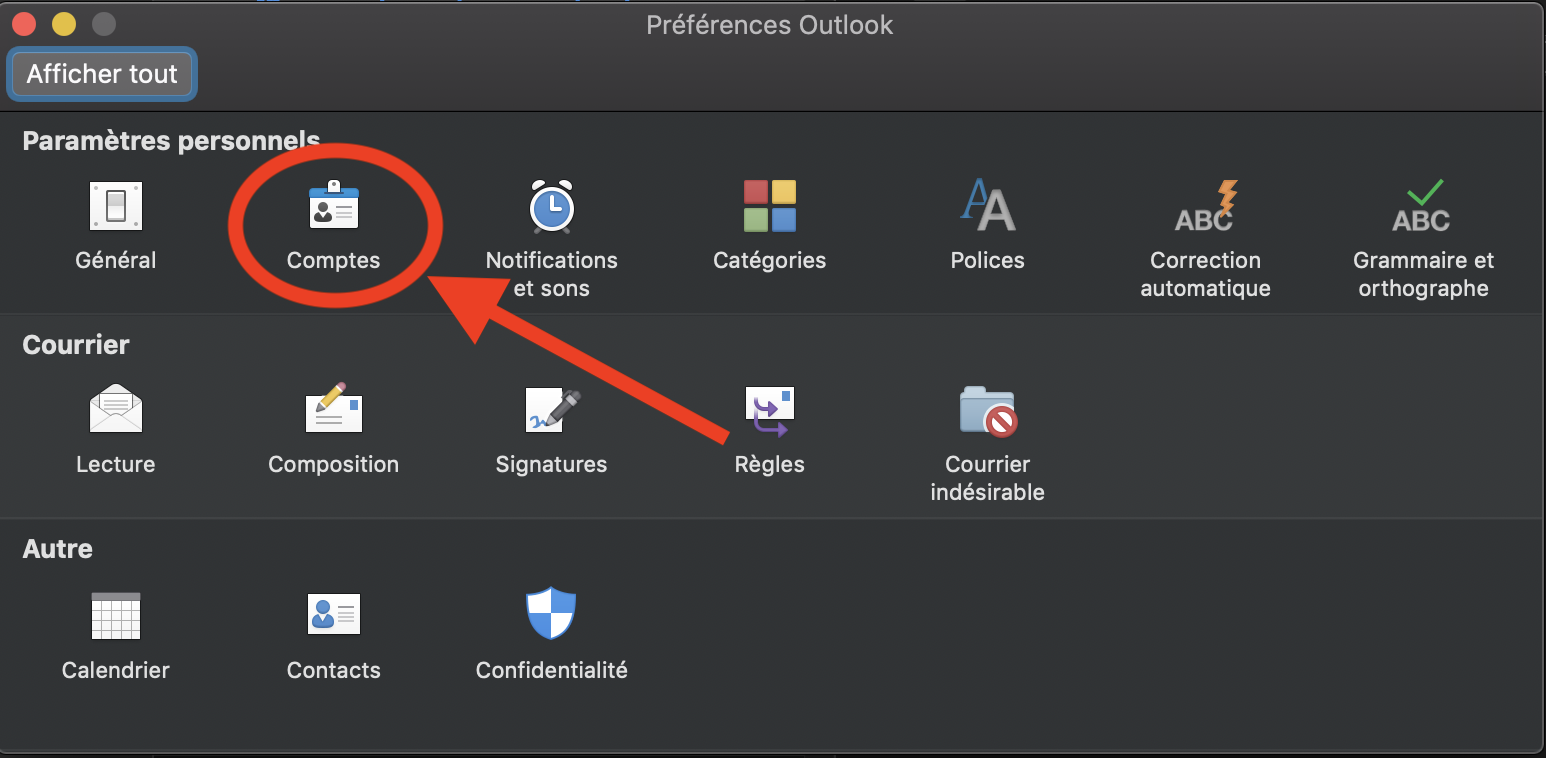
- Click on the Accounts icon
- Click on the
+symbol, then New account...
- Follow the standard Exchange account setup process referenced above
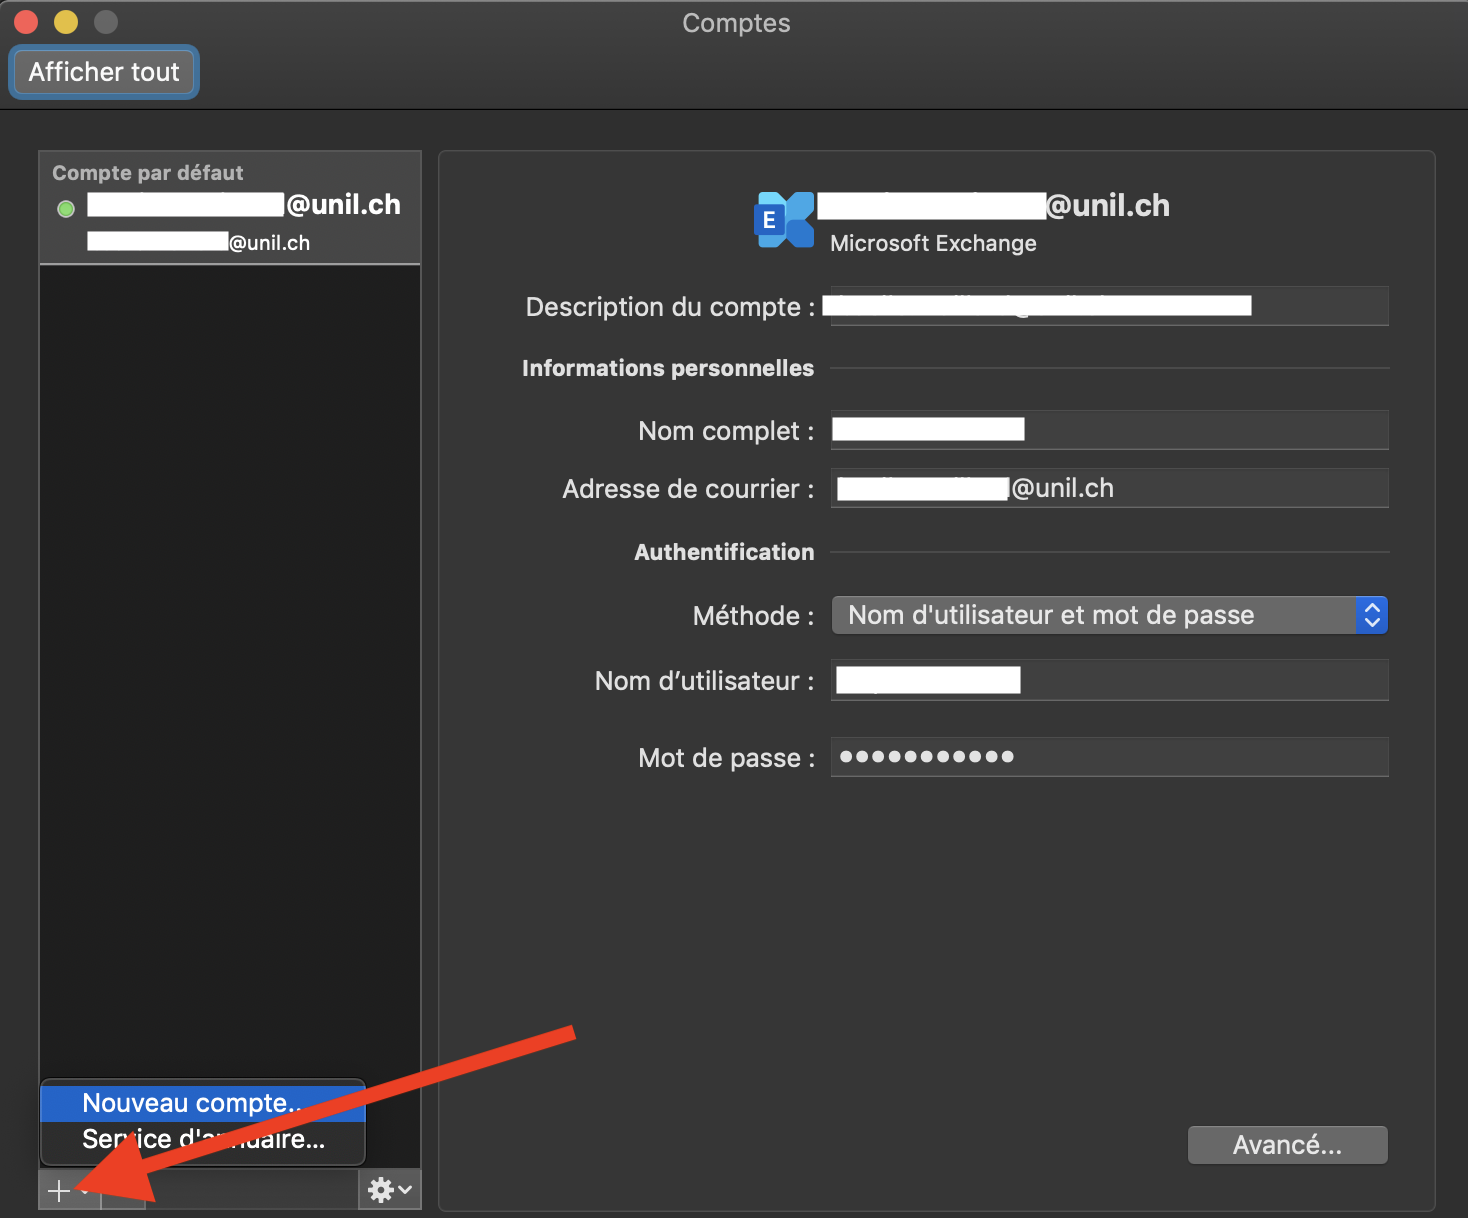
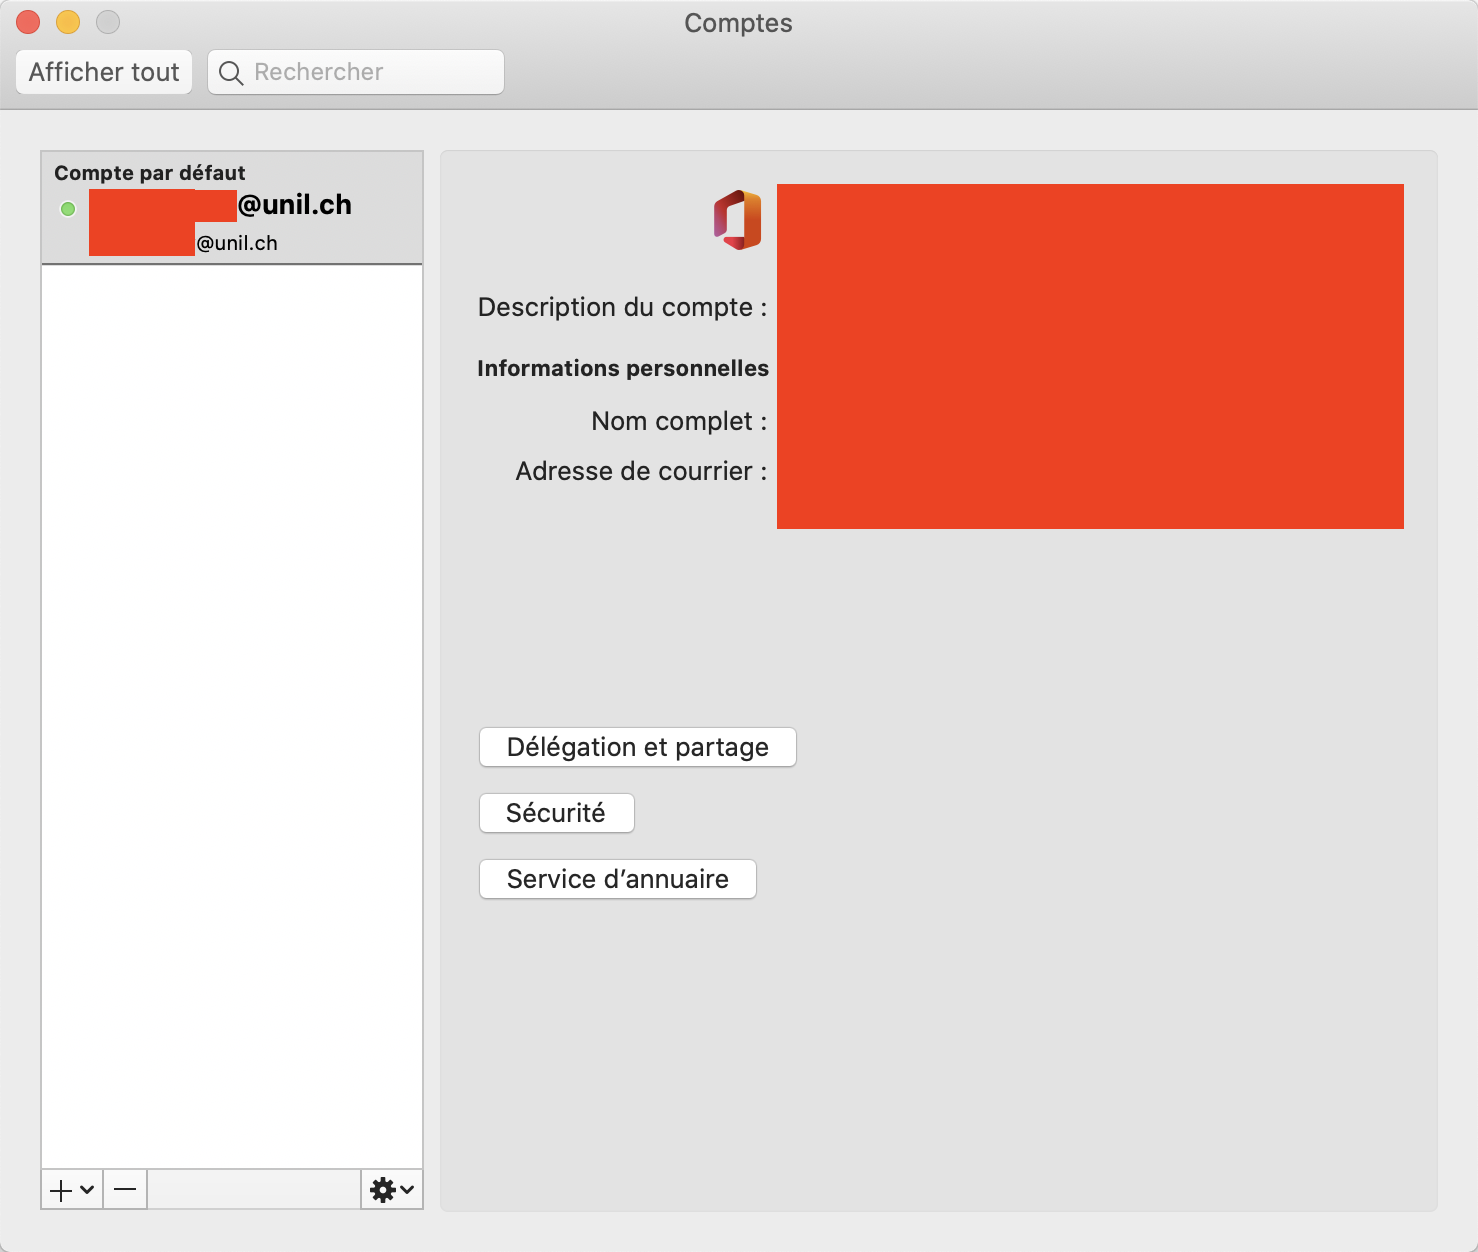
[Outlook] Add a mailbox that is shared through your Unil account
These instructions are for the newly introduced shared mailboxes that do not possess their own credentials but are instead accessed by a person's own Unil account. If you would like to add a shared mailbox with its own credentials, you can follow the procedure for standard Exchange accounts above.
Shared mailboxes cannot be added to Apple Mail. They are only available on Microsoft Outlook.
Before starting, ensure that an up to date version of Outlook is installed. To do so, open the Outlook menu and click on About Outlook. If you are using the 2019 or 2016 version of Outlook, you will have to uninstall it and install the latest version (french).
- Open the Outlook app
- On the top left, click on Outlook right next to the Apple icon, then Settings...
- Select your personal account in the list on the left, then click on Delegating and sharing

- Open the Shared with me tab and click on the
+on the bottom left
- Write the name of your shared mailbox in the search field. For example, if you would like to add
boite-mail-partagee@unil.ch, look forboite-mail-partagee) and double-click it - The shared mailbox should now appear in Outlook's main window.

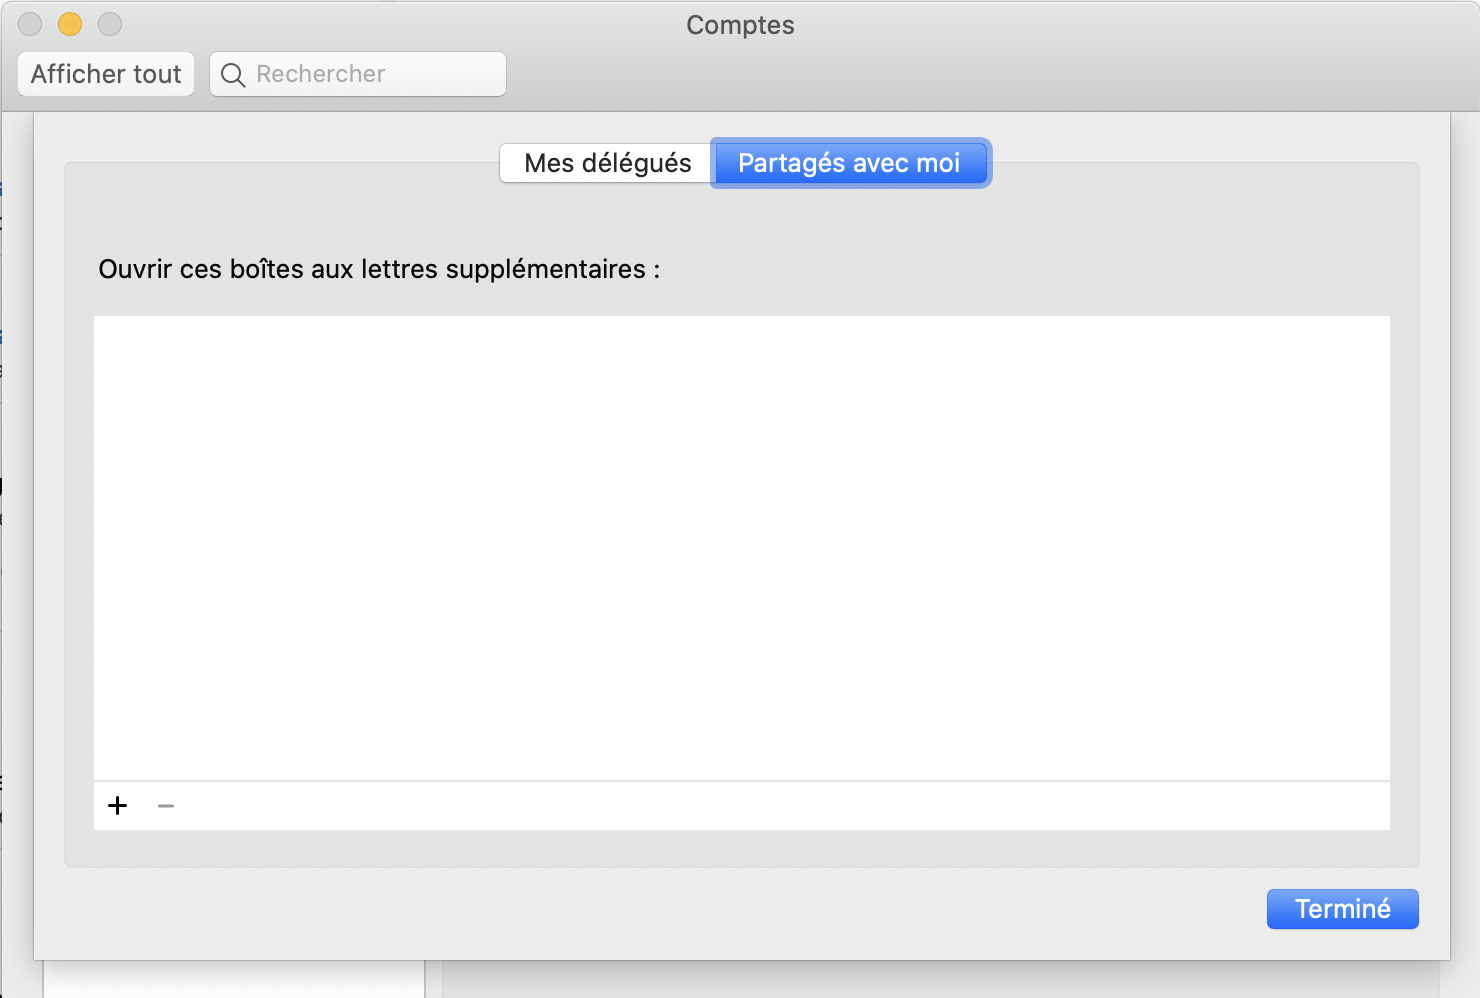
If an error message pops up, please check with the person reponsible for the mailbox that your permissions have been granted properly then wait a moment before trying again. If the problem persists, please reach out to the helpdesk.
Apple Mail
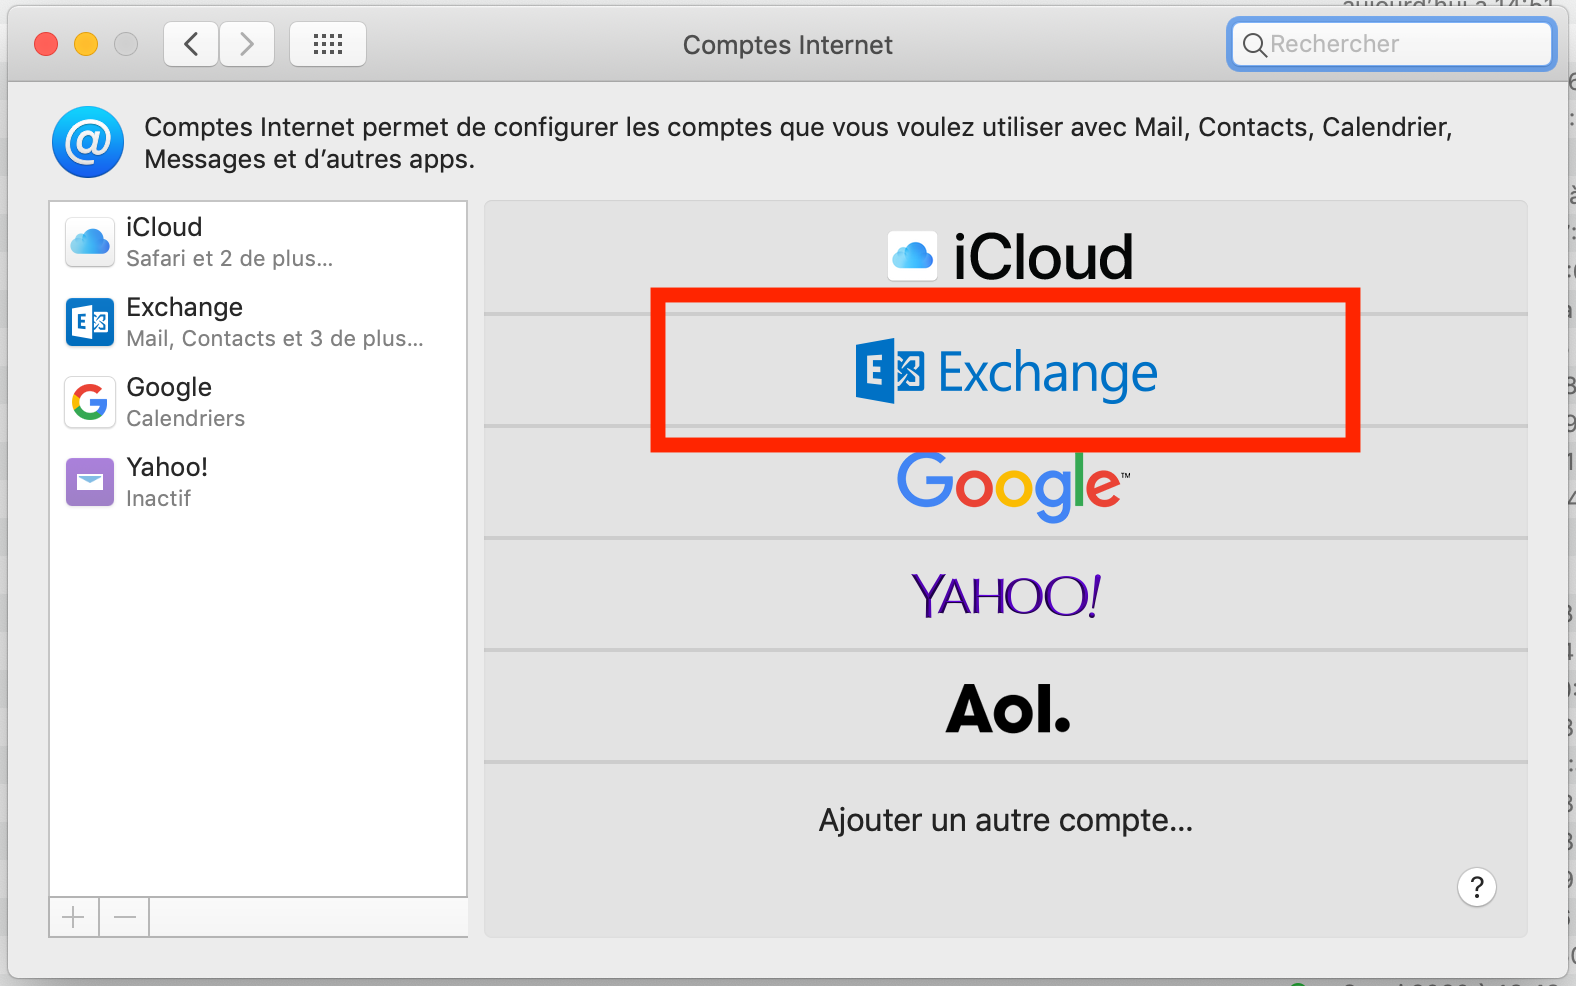
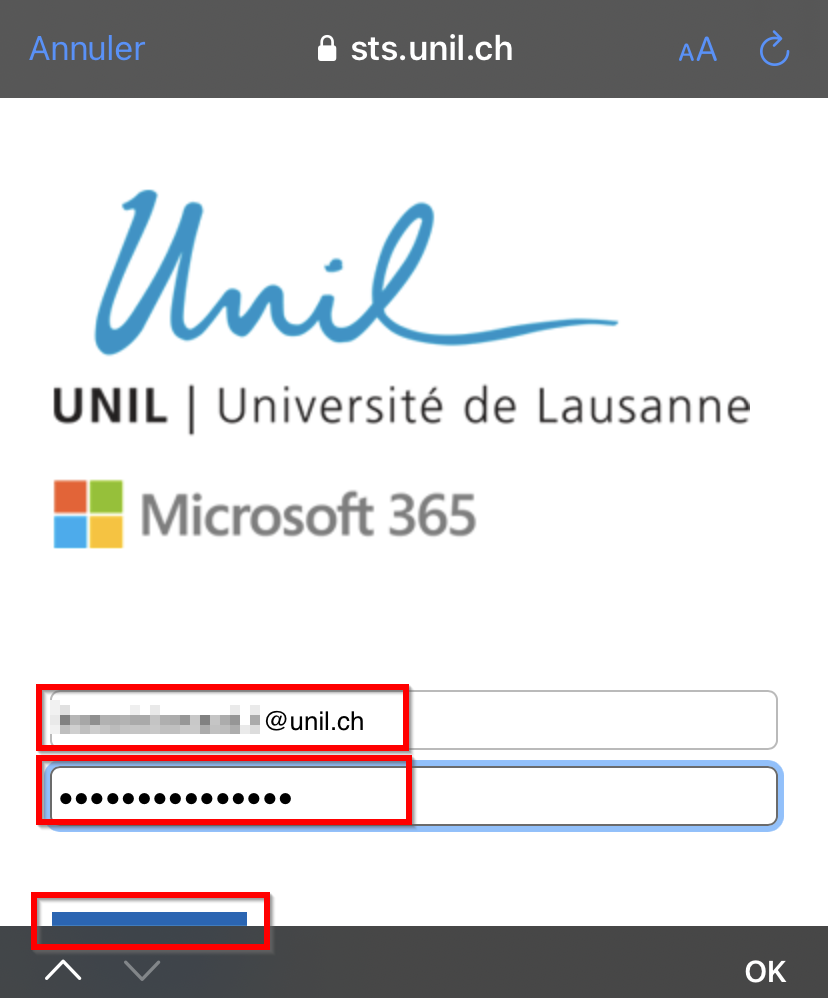
[Apple Mail] Connecting an Exchange account
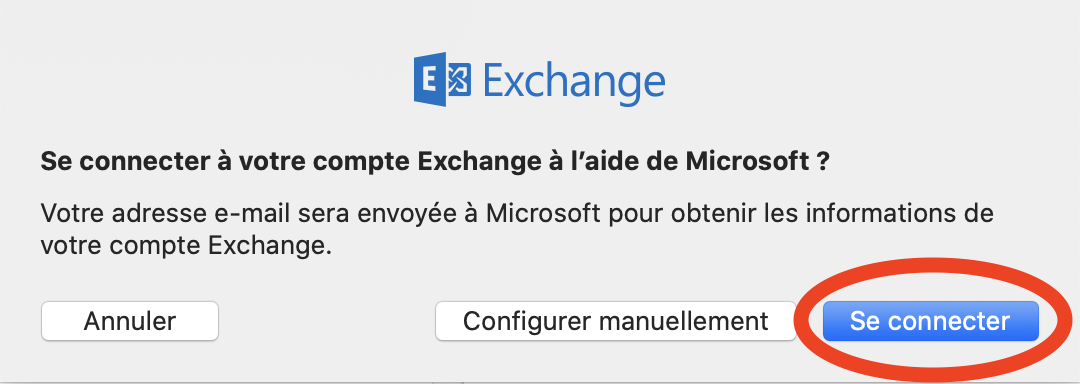
- Open the Mail app
- On the top left, click on Mail then Accounts...
- Select Exchange
- Fill in the Name and e-mail address fields, then click on the blue button
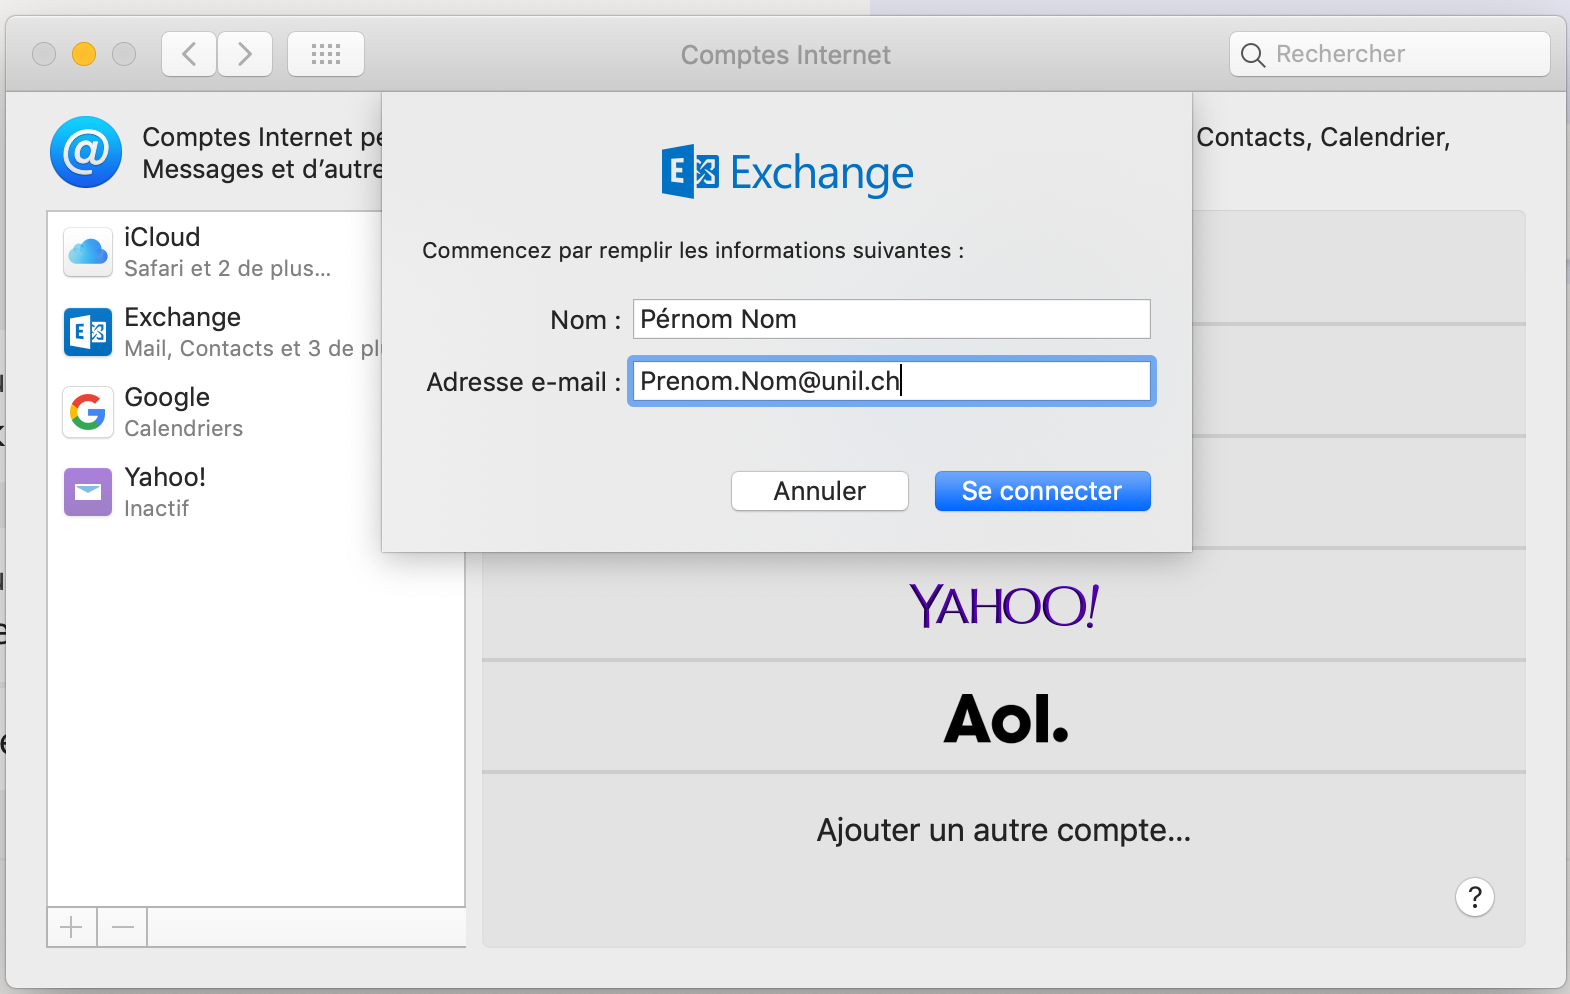
- Select the blue button again. Manual configuration does not work since the migration to Exchange Online.

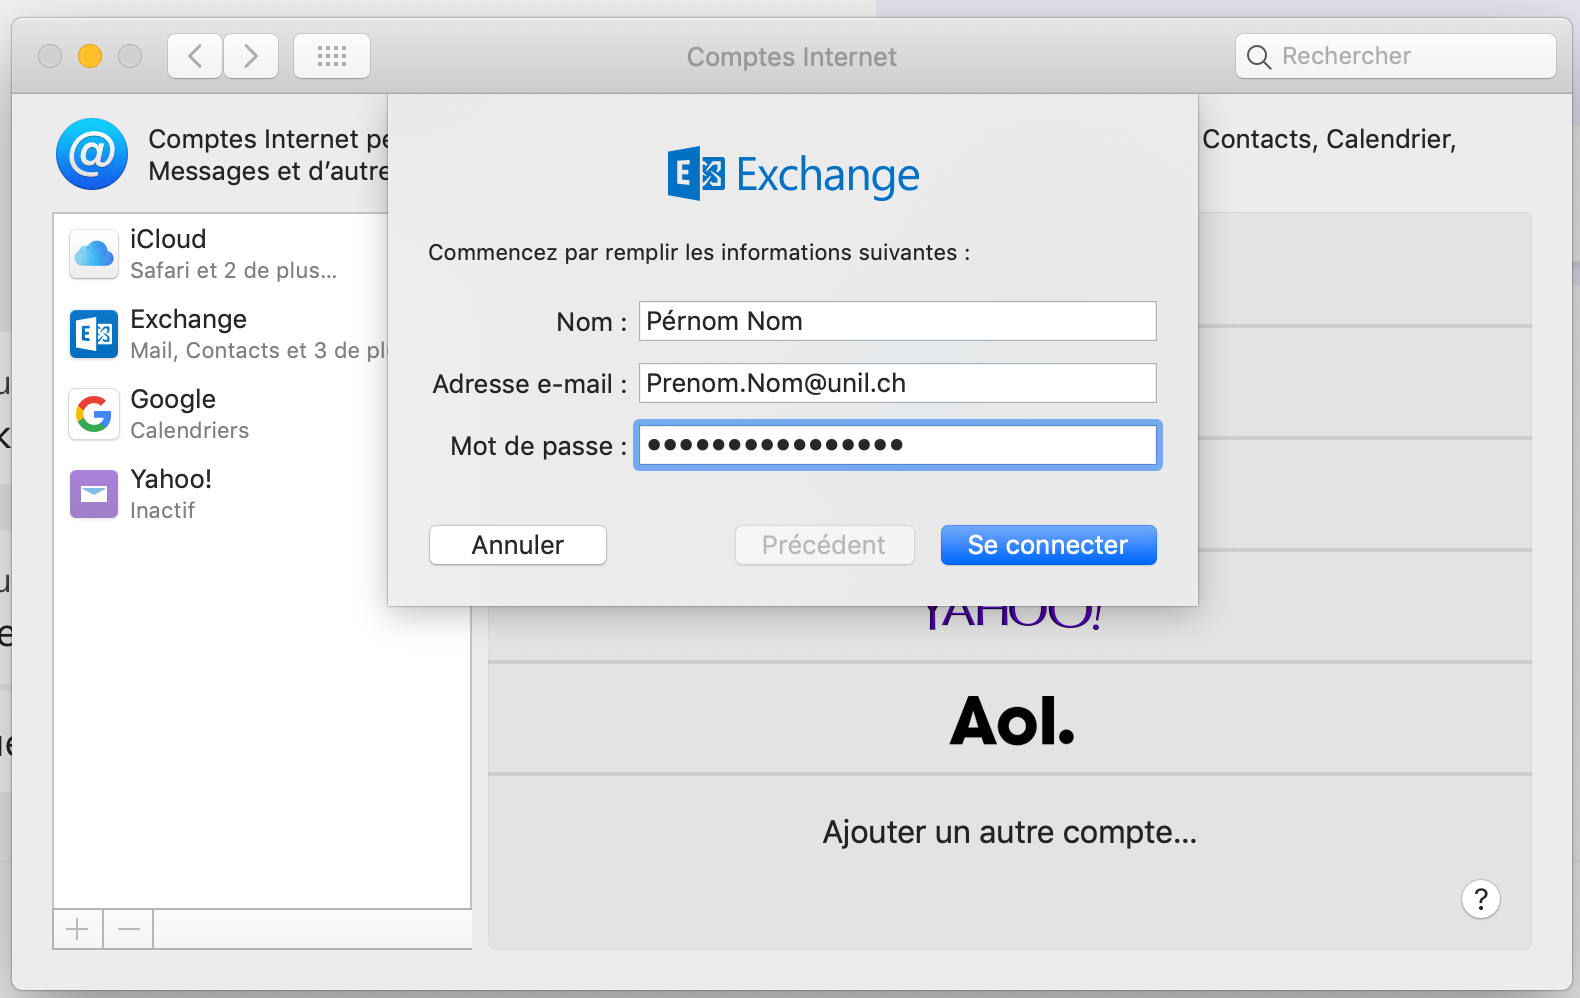
- Enter your Unil account password, then continue
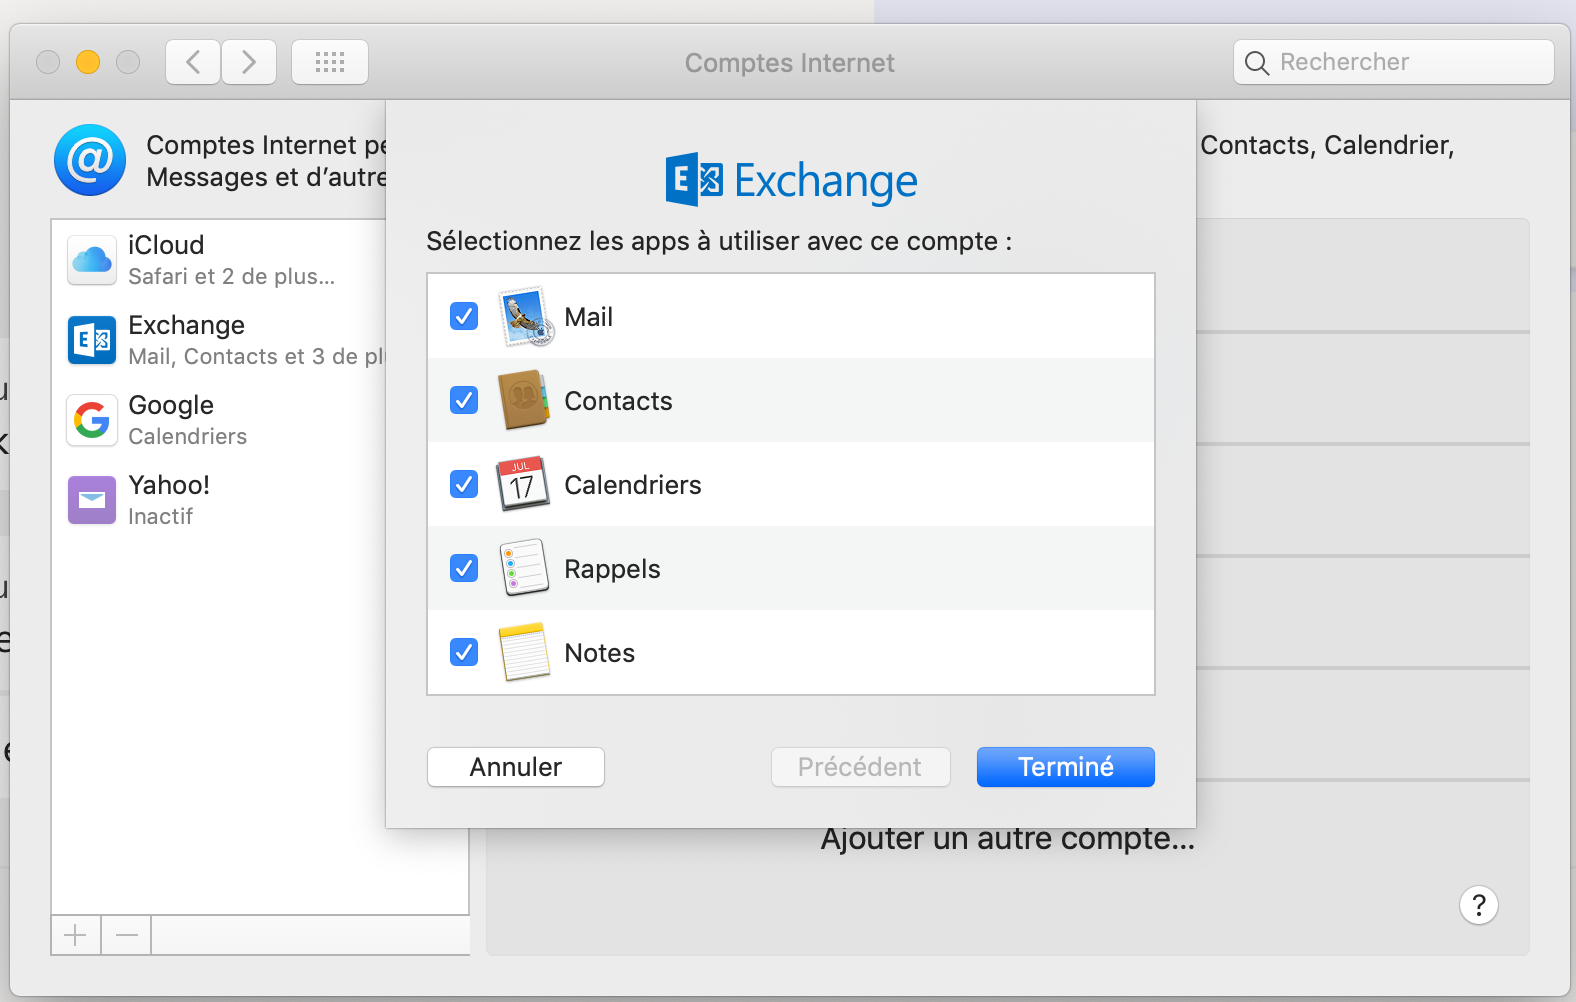
- Select the Exchange services you would like to enable, then click on Finish


[Apple Mail] Archiving emails on macOS
- Open the Mail app
- Click on the
+button on the bottom left of the main window, then select New mailbox...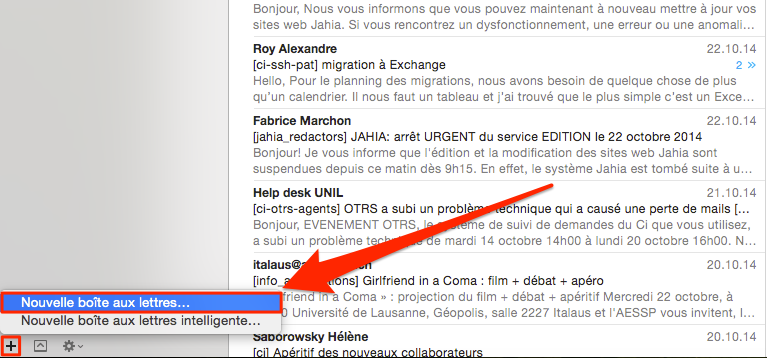
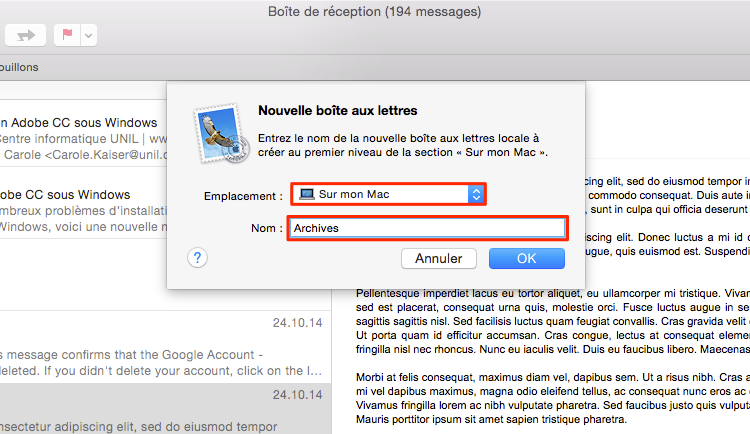
- Under Location, select On my mac. Under Name, type in something like "Archives" and click on OK
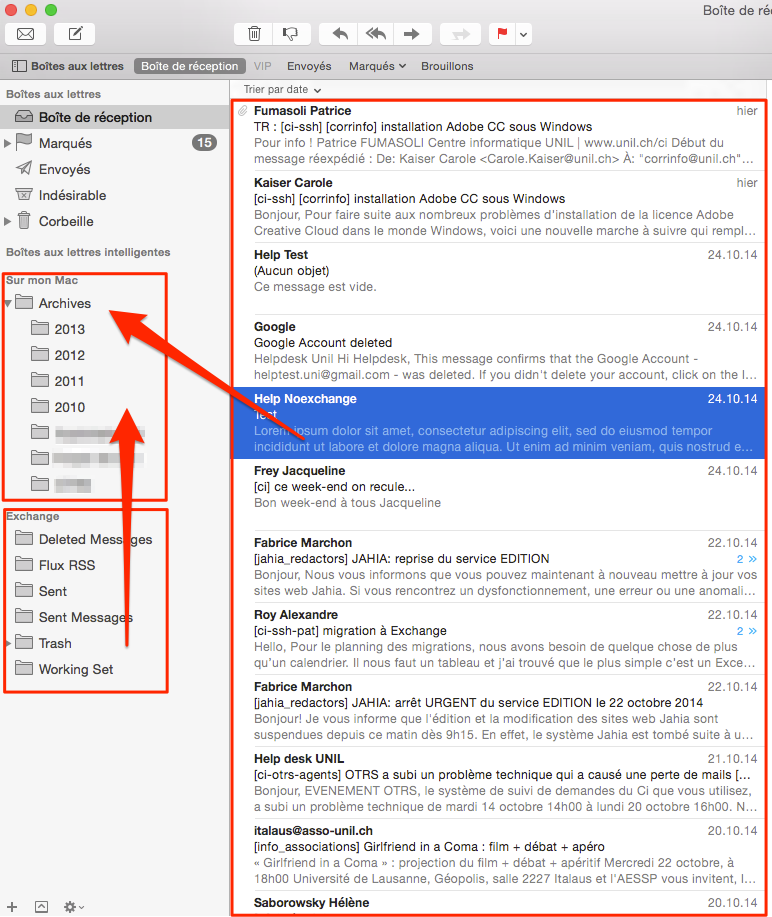
- Move emails or mailboxes from your Exchange account into the new Archives mailbox
Do not move more than a thousand emails at a time. Doing so might cause loss of data and potential mailbox corruption. Do call the helpdesk if you are feeling unsure or have sudden doubts about what you are attempting to do.
 Windows
ThisThe partUnil ofCentre theInformatique articlerecommends isusing severelyMicrosoft outdated.Outlook Weto areaccess workingyour Unil email mailbox on updatingWindows. it.

- Open Outlook
configuratione-mail
calendarsaddress bookremindersnotes
[Outlook] Exchange account setup (mail, calendars, etc.)
Outlook configuration
The Ci strongly recommends the use of Outlook.
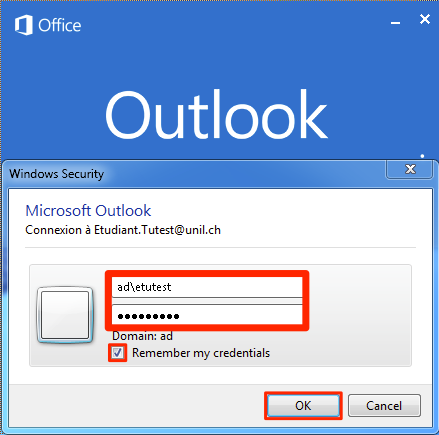
1. Open Outlook2. Go to the “File”File menumenu, then Account settings and clickfinally on “Add an account”account3.
4.
6. When Outlook launcheshas itselfstarted, anyou authenticationshould windowget willa appear;login enterprompt. Fill in the first field with ad\ followed by your usernameusername. asFor “ad\username” and your password7. Checketutest, the “field would look like ad\etutest

HowOK to archiveproceed
[Outlook] Archiving emails on your Windows computer
- Open Outlook
- Go to
"File"Files
- Select Account settings, then Account settings...

- Click on
"AccountData Settings"files andthen "Account Setings.Add..."
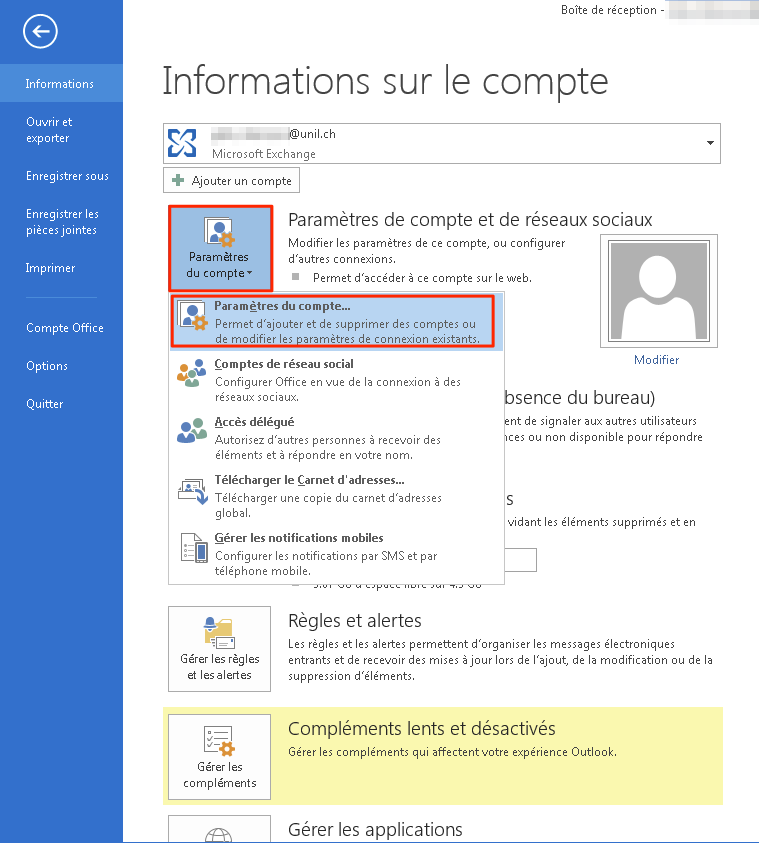
Click on "Data Files" and "New..."EnterSelect a filelocation for your archive, then give your archive a name and click on "OK"
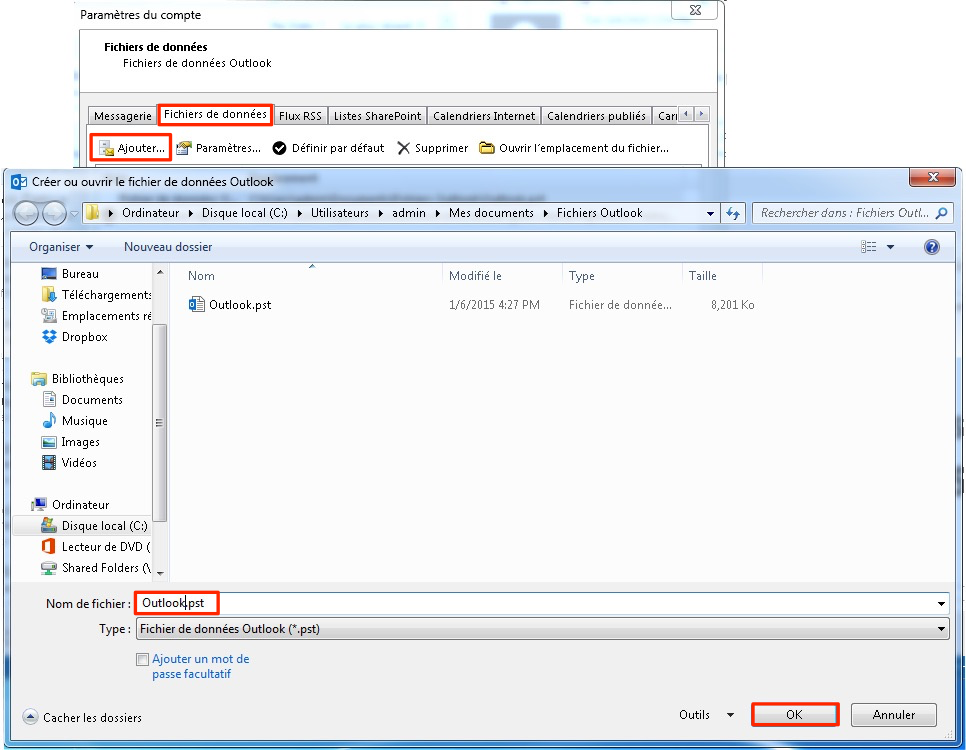
Select OK, then 
Gogo back to your e-mailOutlook mailbox
- Right click
“Outlook Data File,”Files., andthen select “New Folder…”folder...
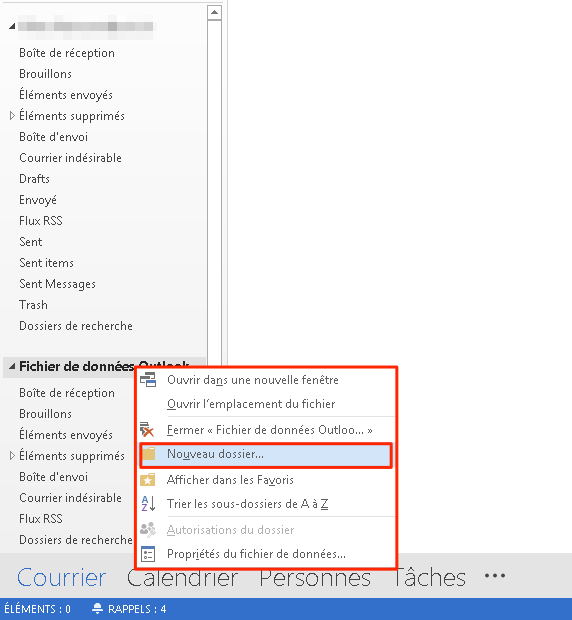
- Input the name you previously picked for your archive
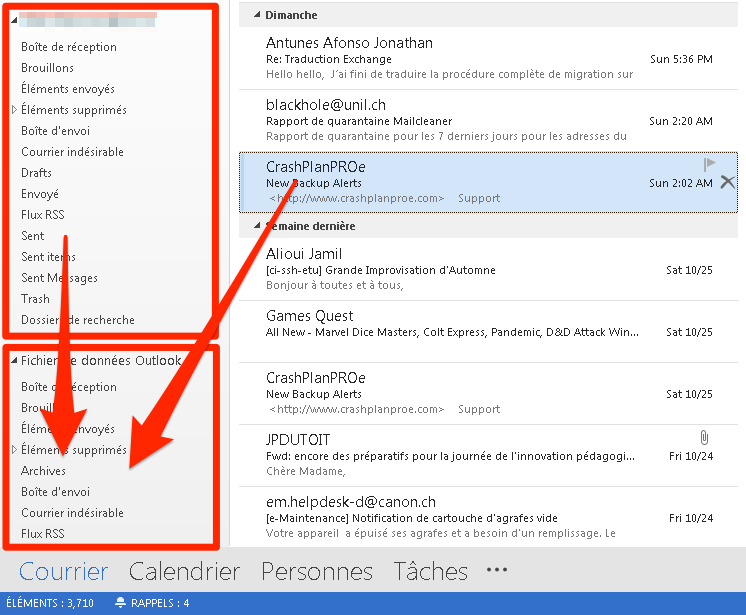
- You may now move emails or mailboxes into the archive folder


Name the local folder “Archive,” for example
Move messages or entire mailboxes from your UNIL Exchange account by dragging and dropping them to your new local archive mailbox.
- Open Outlook
- Go to
"File"Files - Select Account settings, then Account settings...
- Click on
"AccountDataSettings"filesandthen"Account Setings.Add..."
Click on "Data Files" and "New..."EnterSelect afilelocation for your archive, then give your archive a nameand click on "OK"
Gogo back to youre-mailOutlook mailbox- Right click
“Outlook DataFile,”Files.,andthen select“NewFolder…”folder... - Input the name you previously picked for your archive
- You may now move emails or mailboxes into the archive folder
Name the local folder “Archive,” for exampleMove messages or entire mailboxes from your UNIL Exchange account by dragging and dropping them to your new local archive mailbox.
iOS (iPhone/iPad/iPod Touch)

iOSAvailableconfigurationoptionscalendarscalendaraddress bookcontacts- reminders
- notes
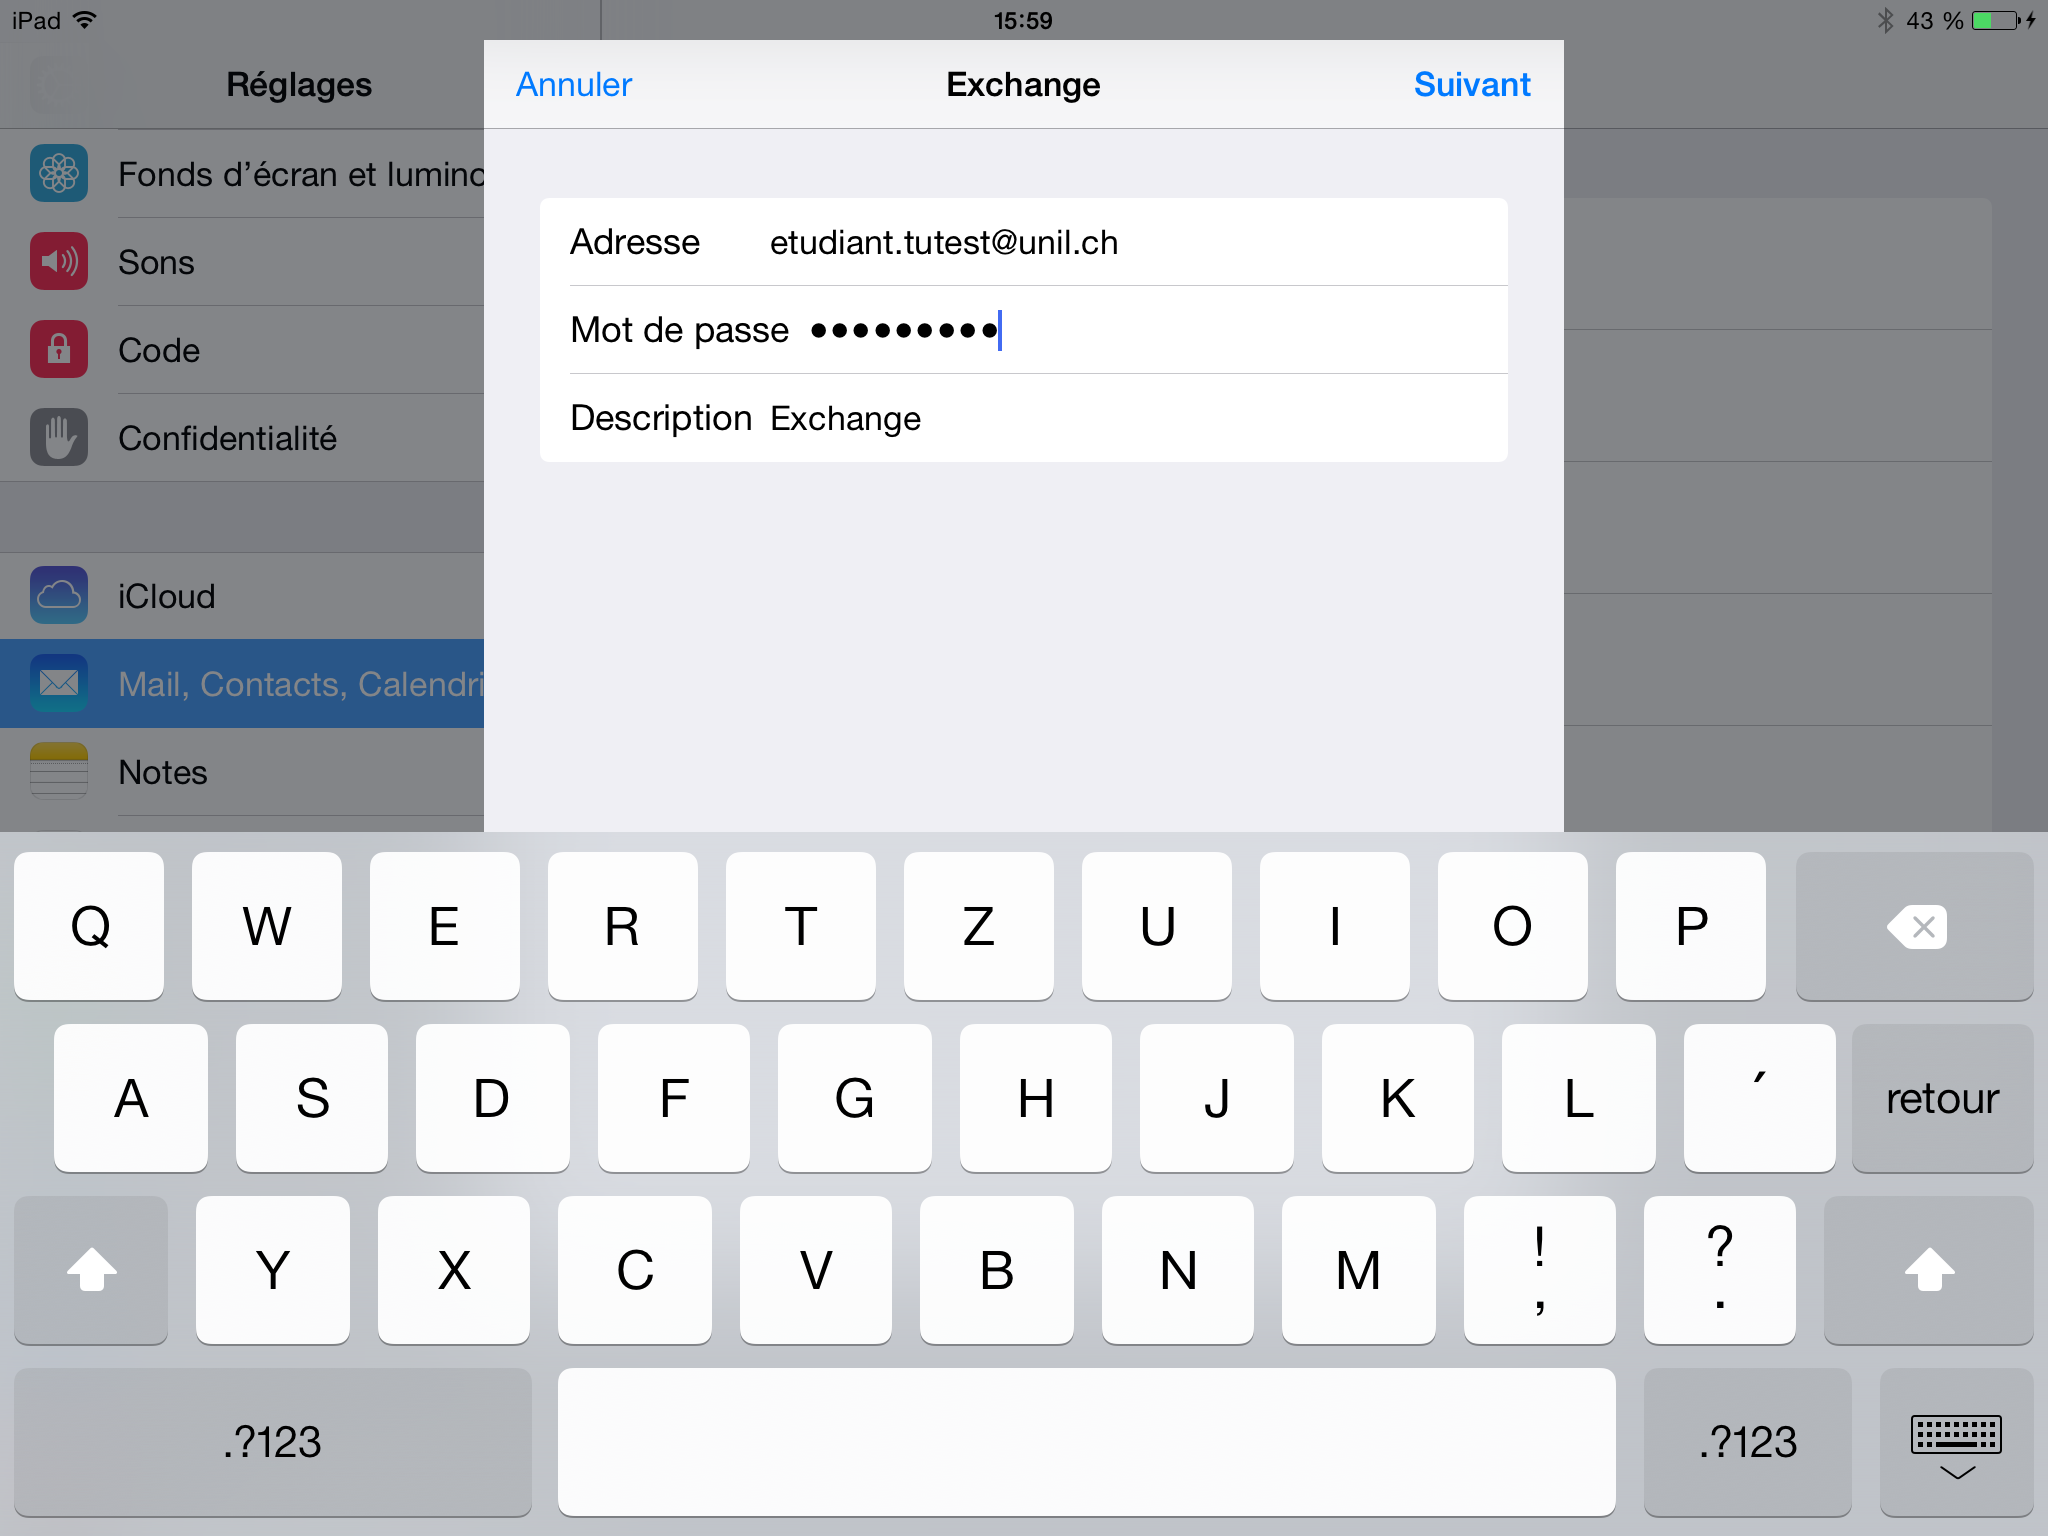
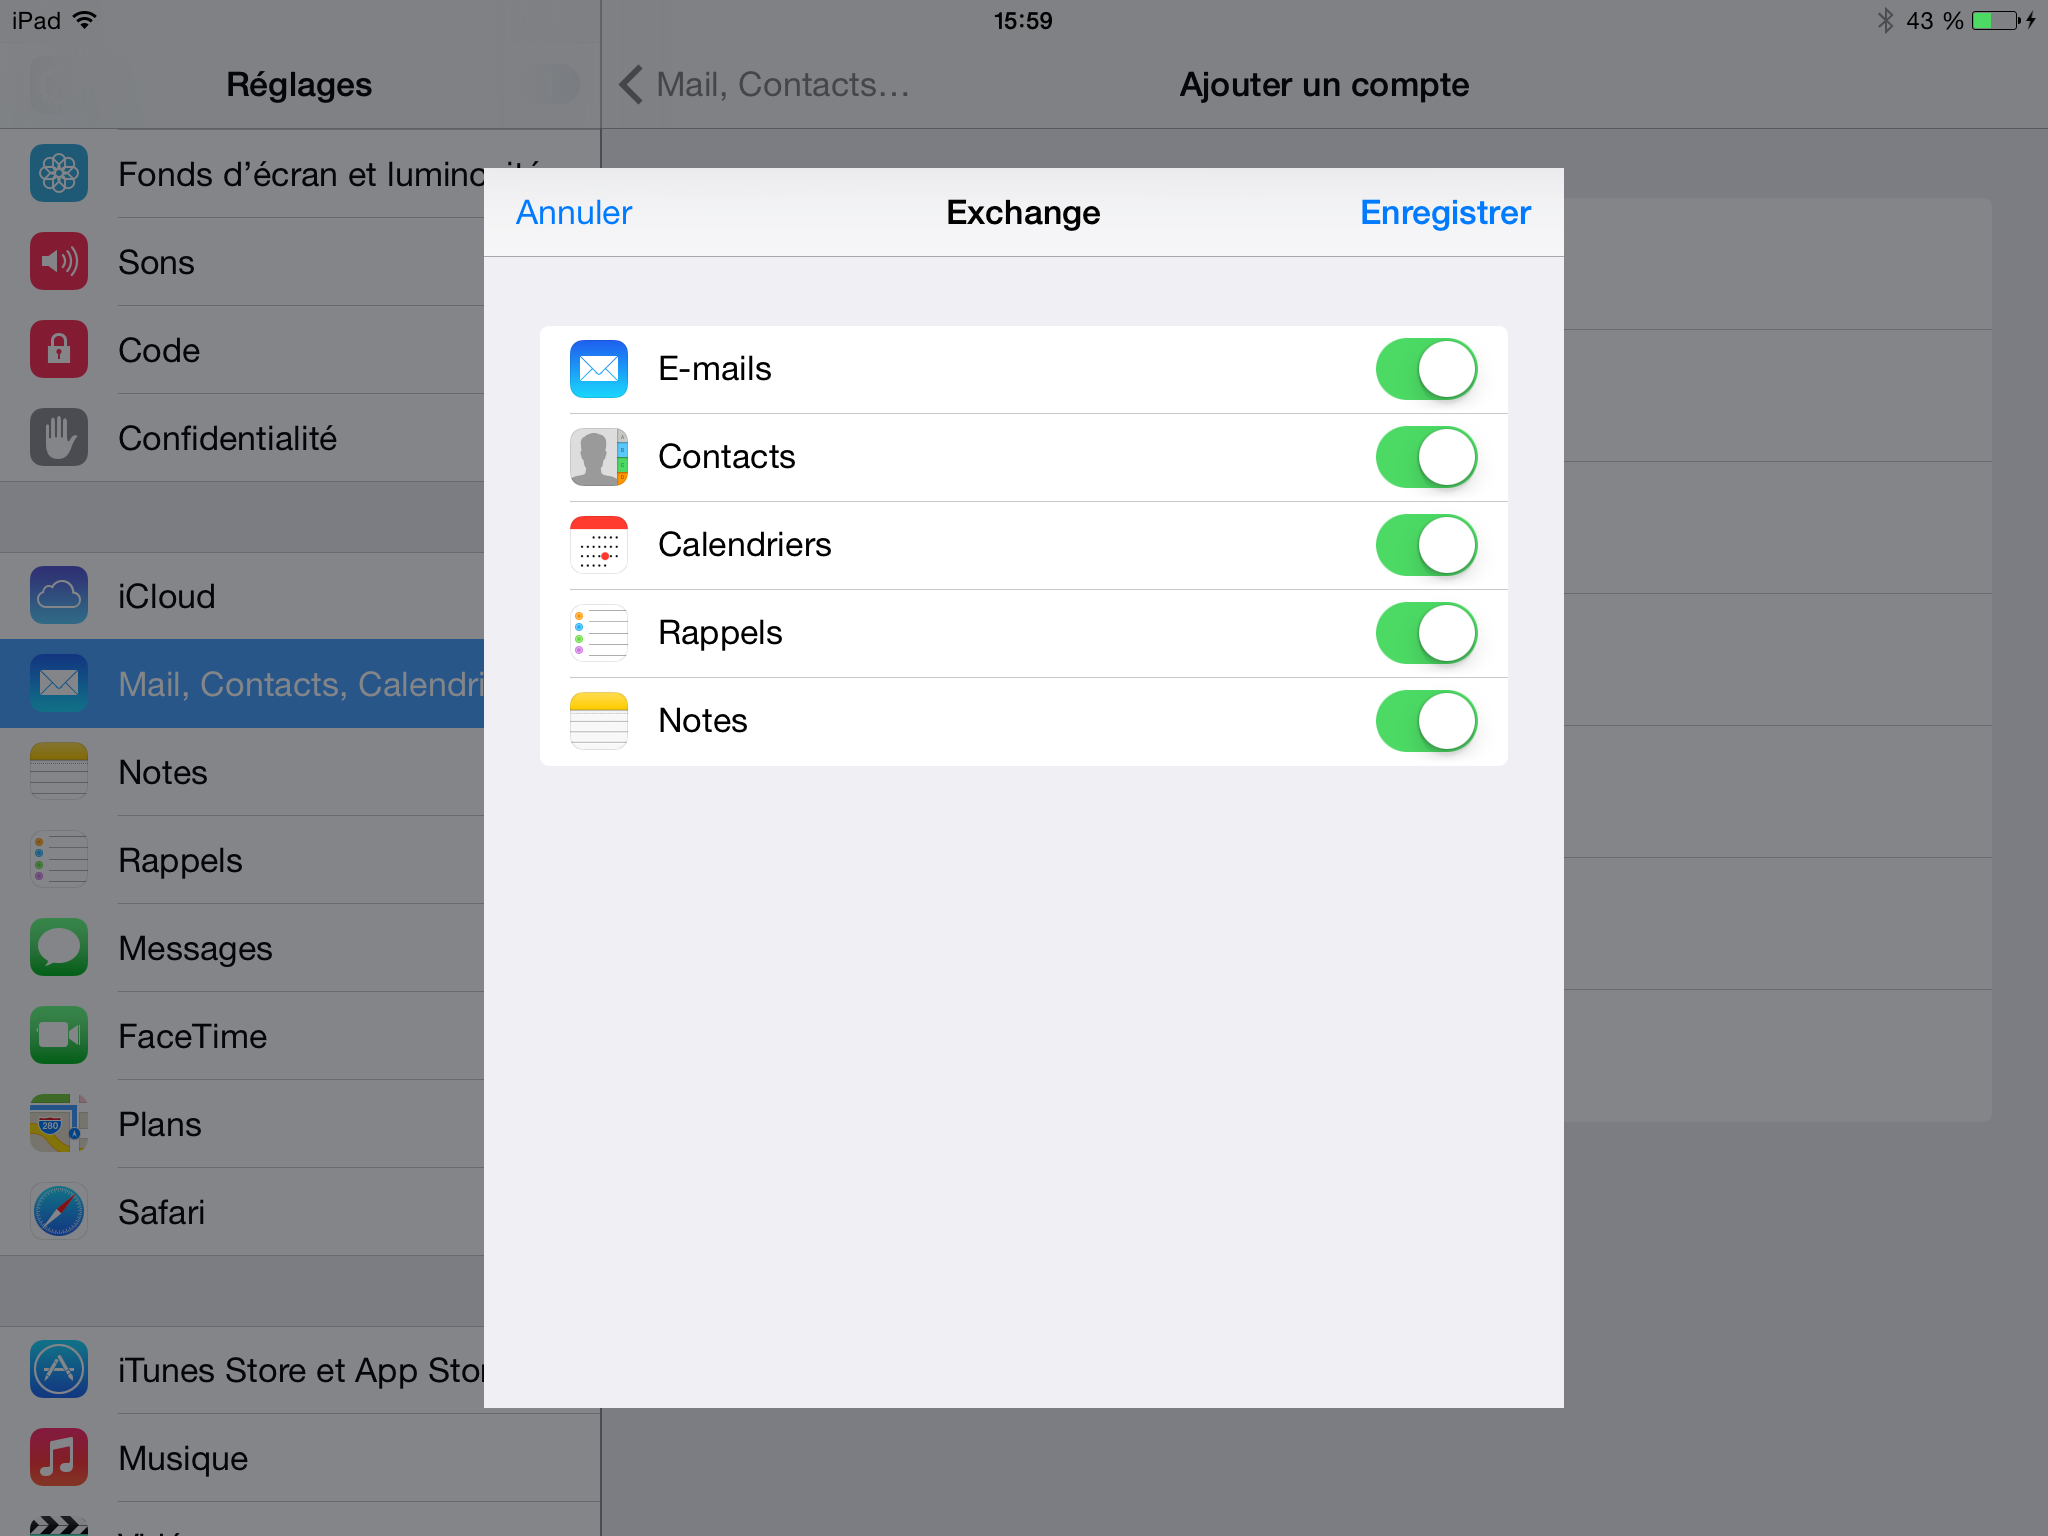
Mail iOS configurationExchange account setup (mail, calendars, etc.)
The Ci strongly recommends the use of the native iOS apps.
For security reasons, the Outlook app for iOS is blocked on our servers. You can find more information here (in French).
1.
- Go to
“Settings”Settings2. - Select
“Mail,Mail
- Select
Calendars”Accounts3.
- Select
on “AddAccount”an
account

- Select
ClickMicrosoft Exchange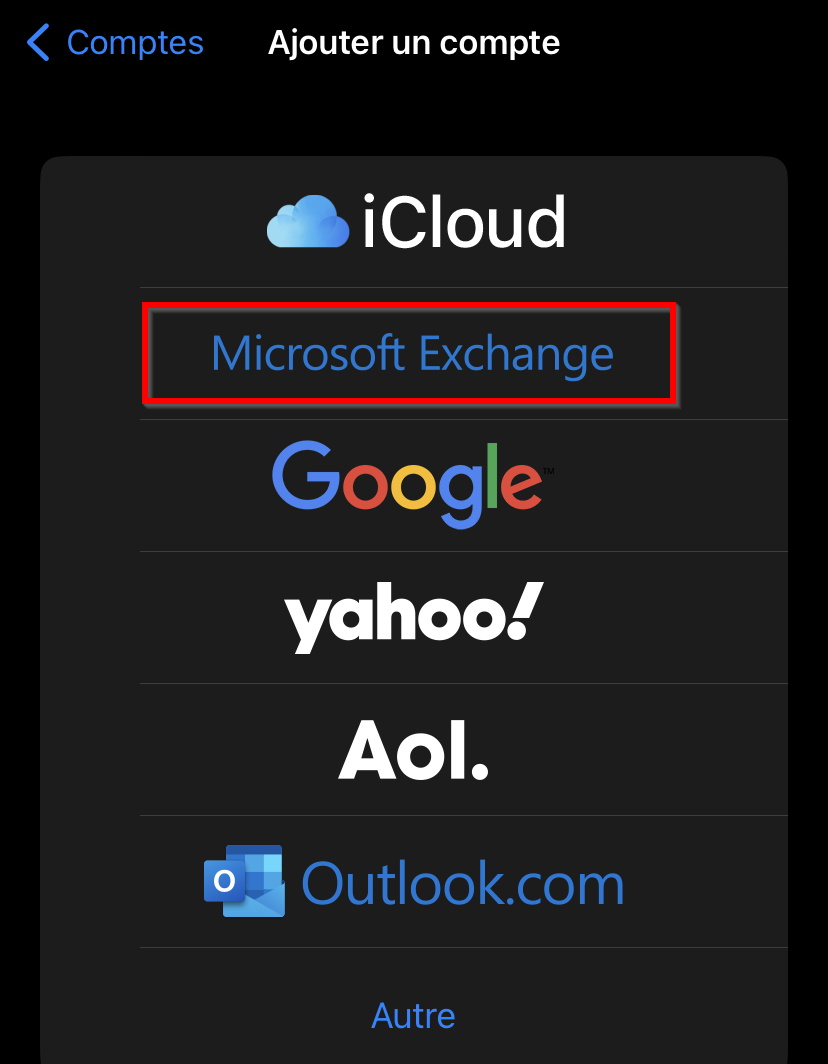
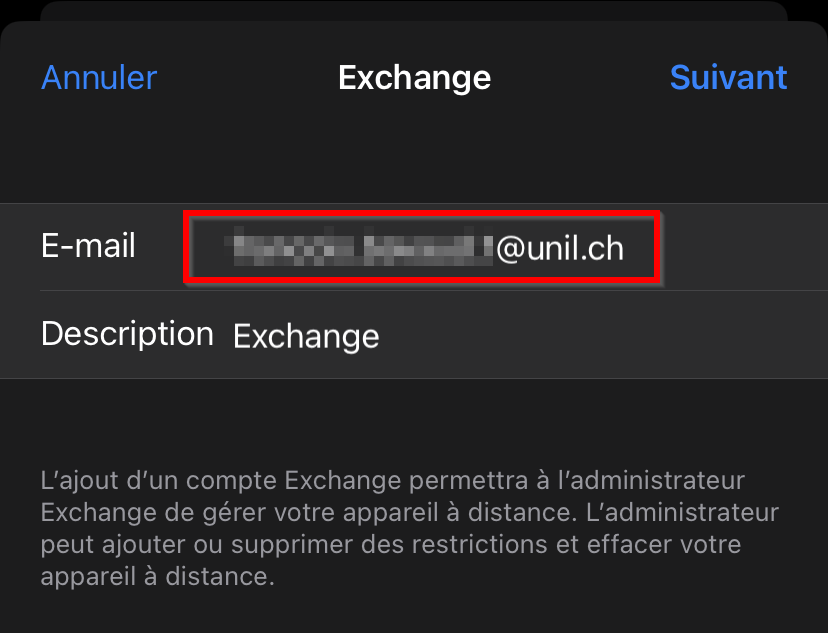
- Enter your @unil email address and a description
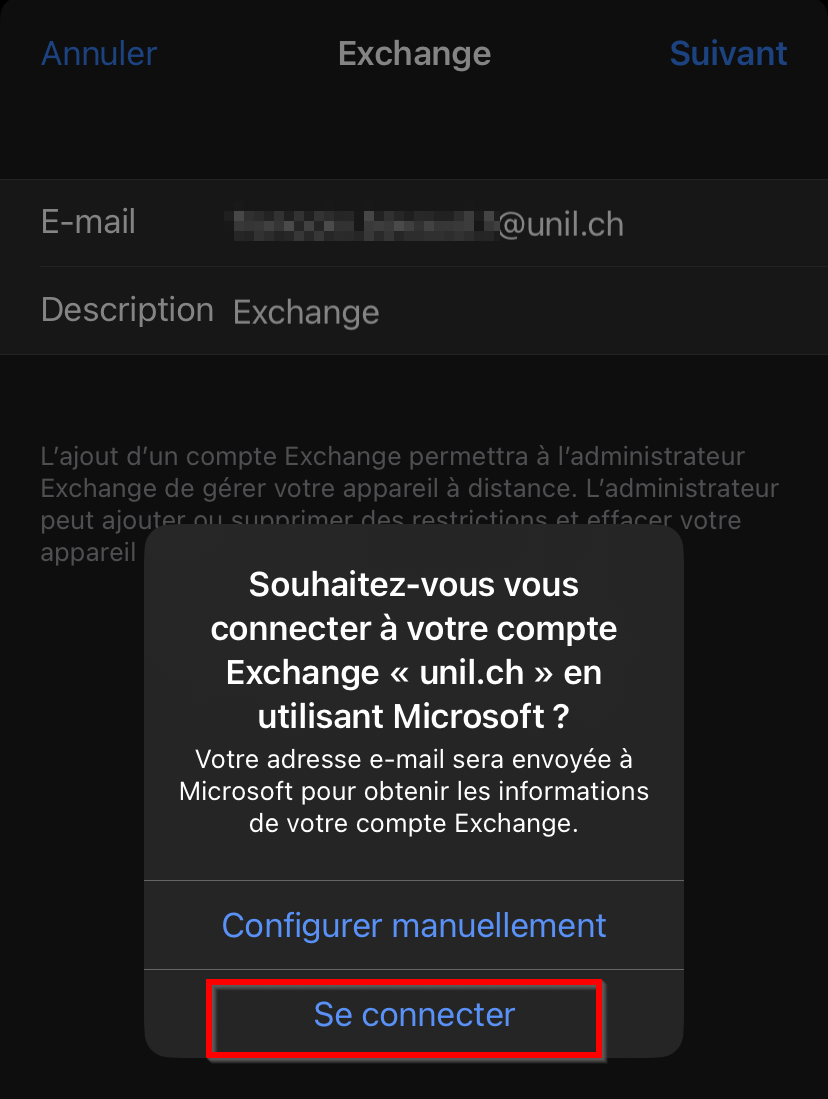
- Select Connect
- If the
“Exchange”fieldiconhasn't
been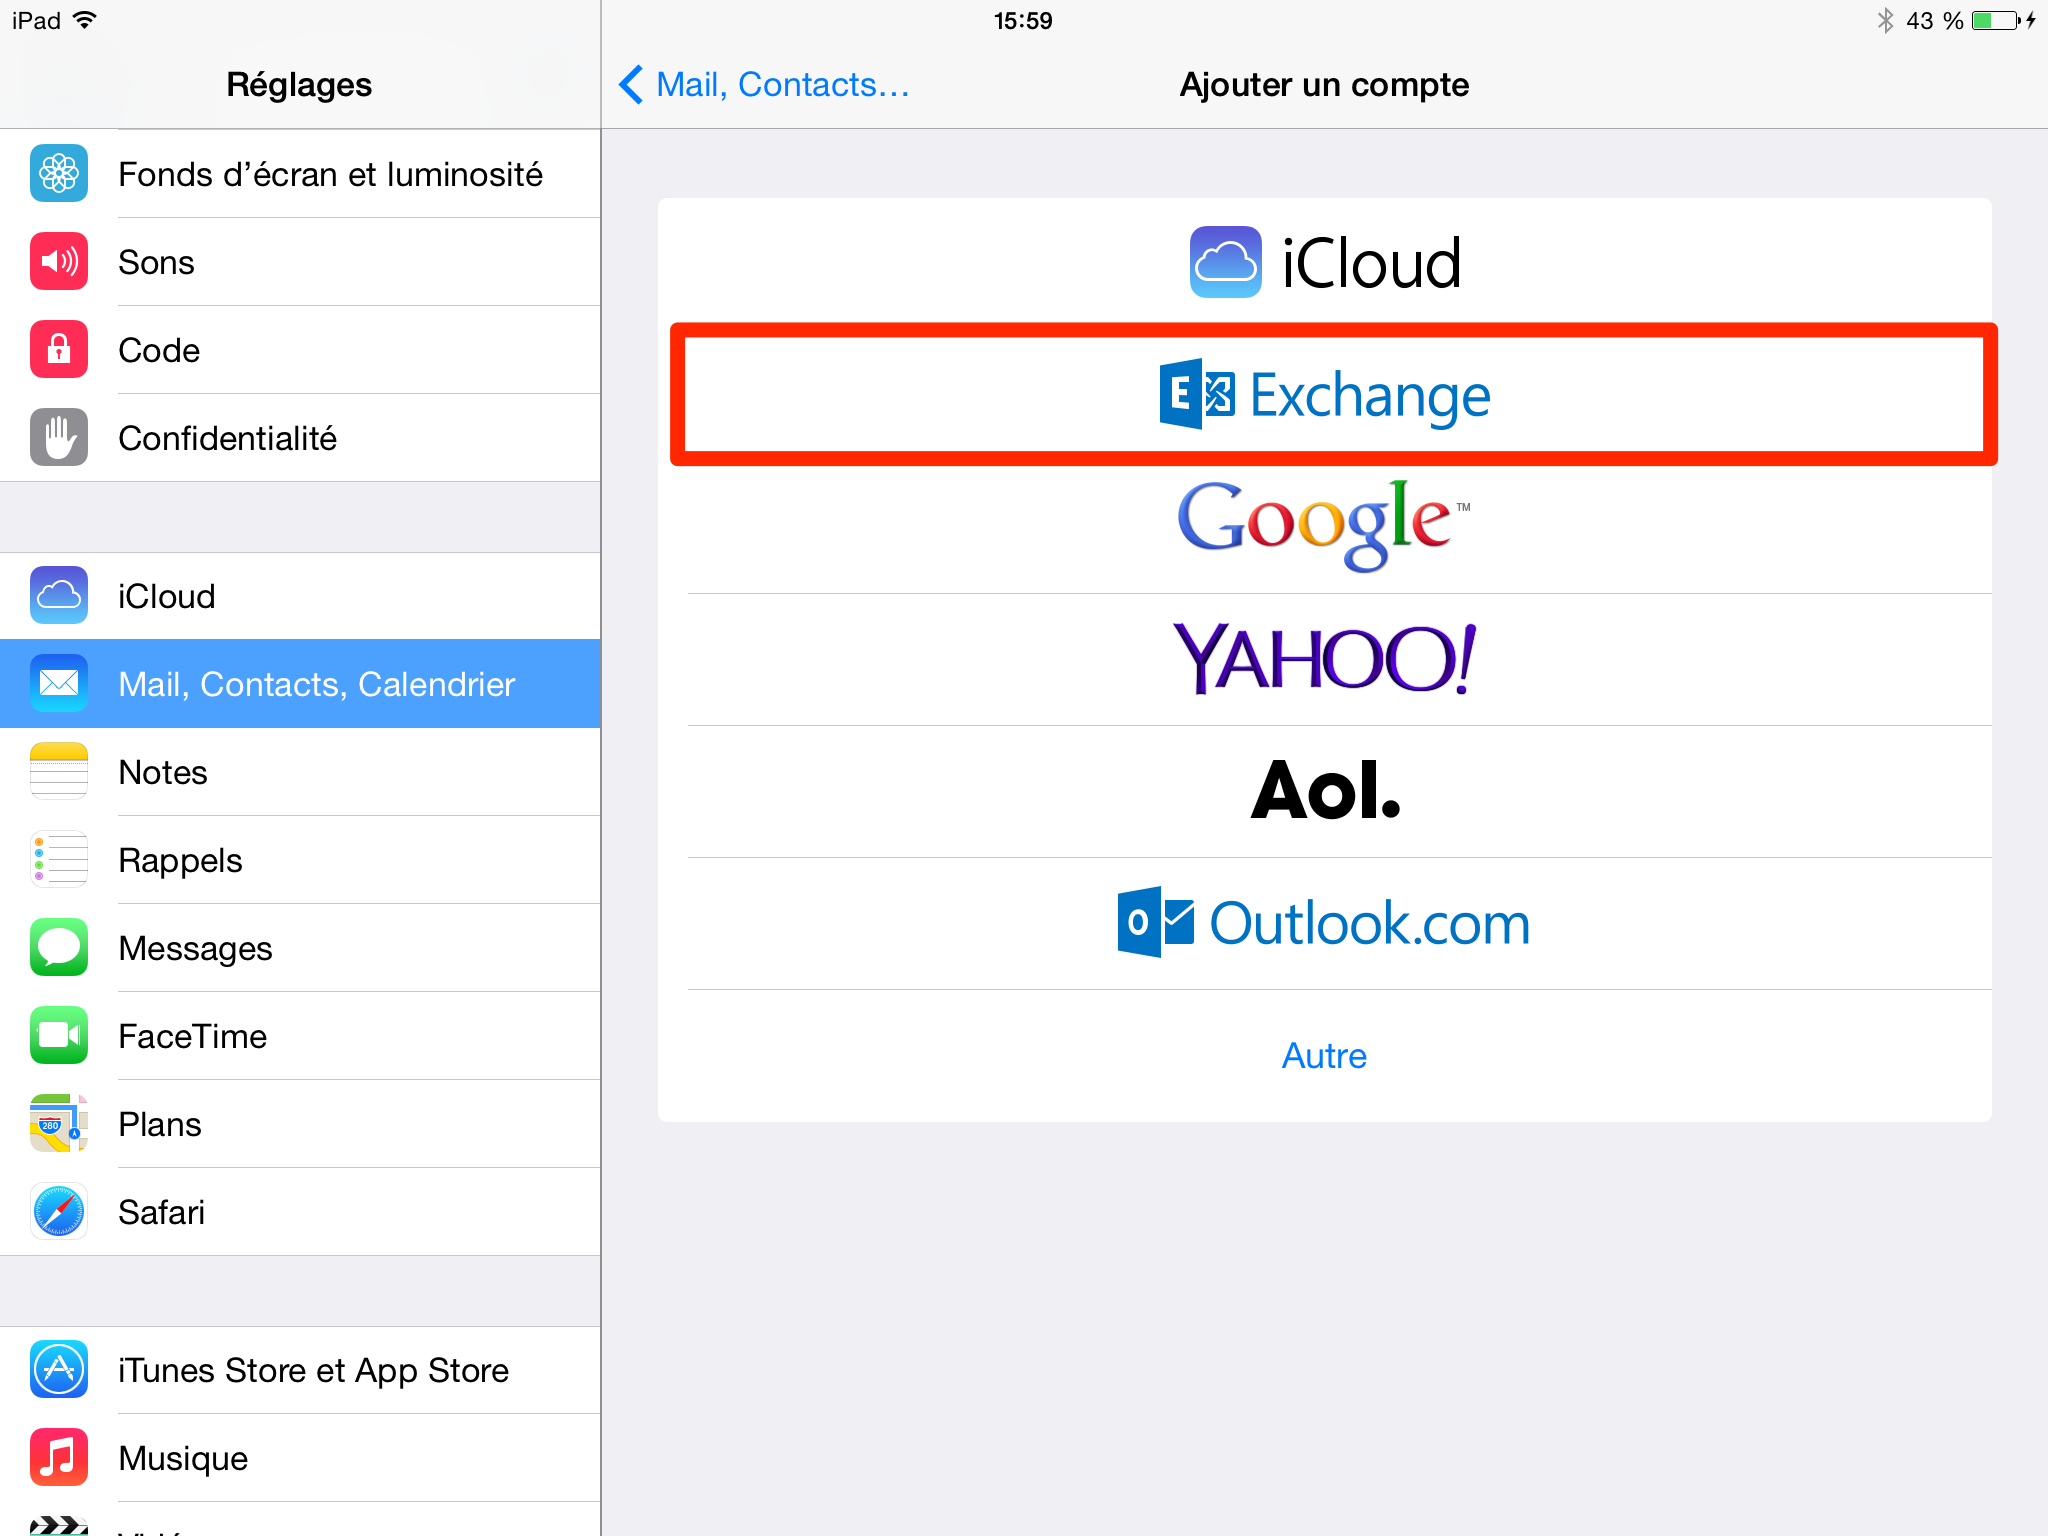
5.automaticallyFillfilled,inentertheyourfieldsUnilwithemailtheaddressrequiredagain,informationfollowed(address,by your password
- Select the Exchange services you
wishwould like toactivatetoggleandonclickor“Save”off,tothenfinishSave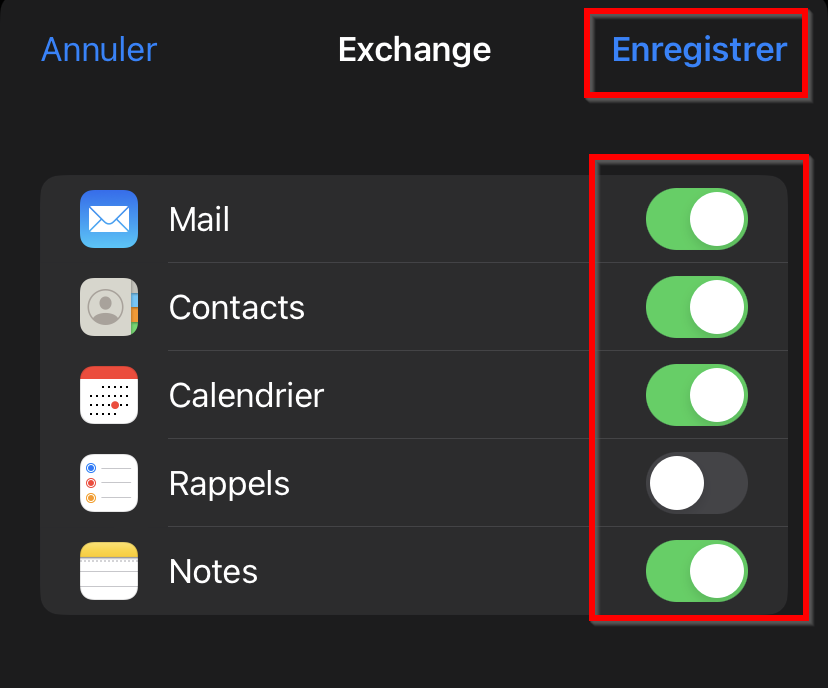

4.


6.

Android

Android Configuratione-mailcalendarsaddress book(tasks: third party app required)(notes: third party app requiered)
How to set Exchange up on an Android device (version 4 and up)
The Ci strongly recommends the use of the native Android apps (all functions offered by Exchange are however not available). The Outlook app works as well.
For
- Android
reasons,options- calendars
- address book
- tasks: third party app required
- notes: third party app required
Mail Android Exchange account setup (mail, calendar, etc.)
- Launch the
OutlookMail appforandAndroid is blocked on our servers. You can find more informationhere(in French).1. Gonavigate to“Settings,”theandsettings
- Select
click on “Addaccount”2.anotherChoose “Entreprise”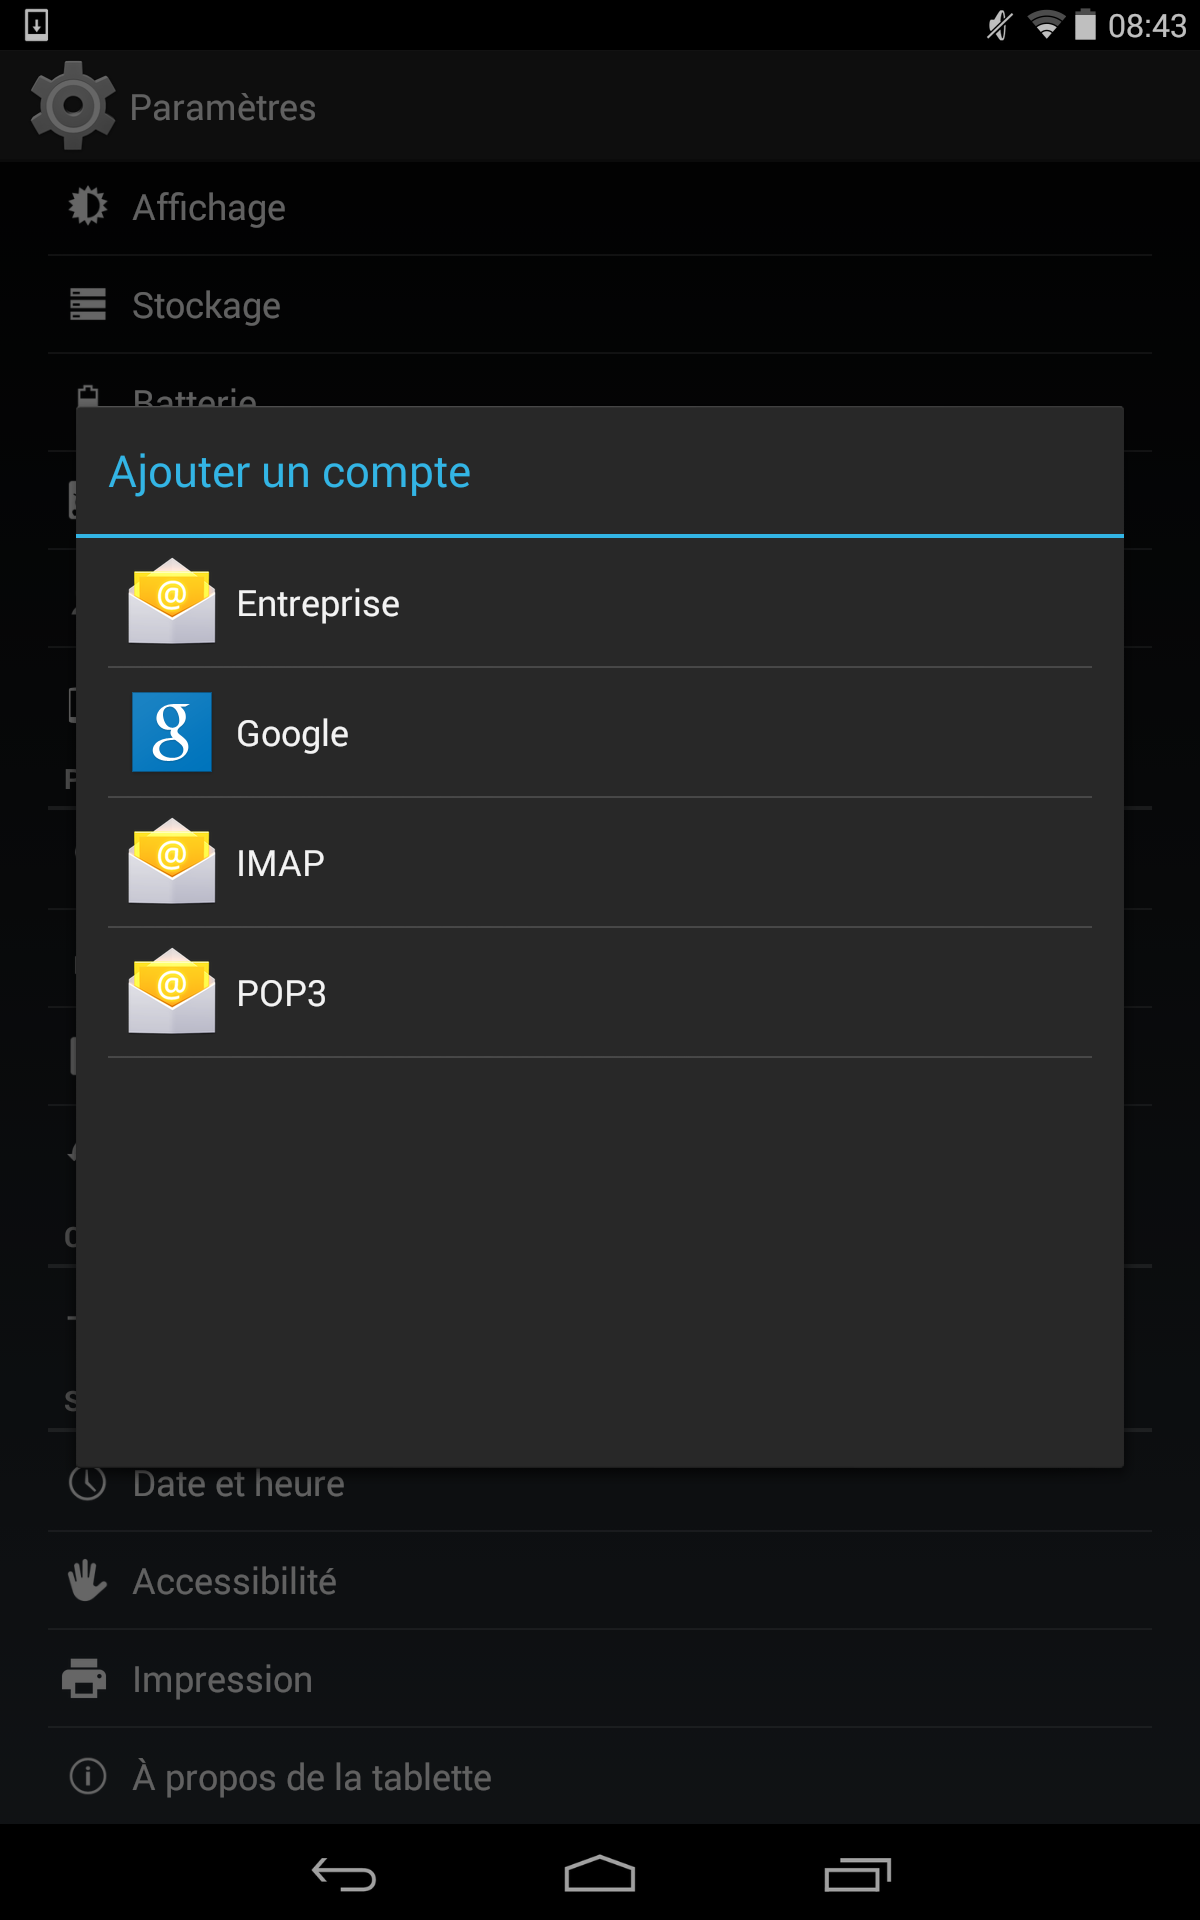
3.
- Select Exchange et Office 365 or Microsoft 365, whichever appears
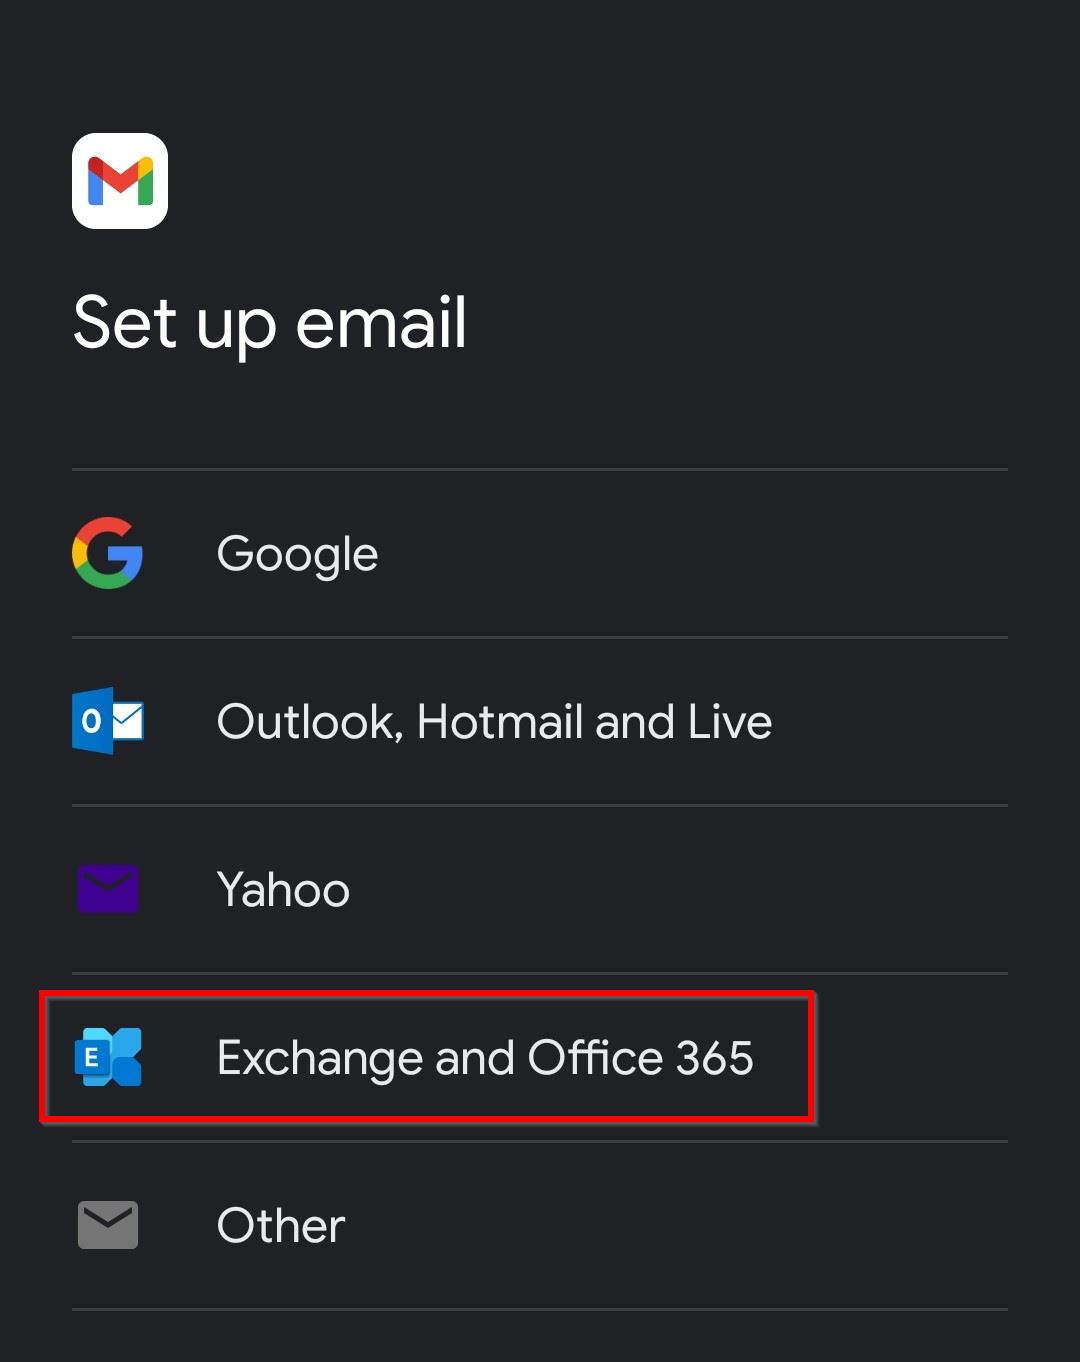
- Fill in the
“E-mailemailaddress”field with your Unil email address and“password”selectfieldsNext4.
- Input your Unil password

- Select Next
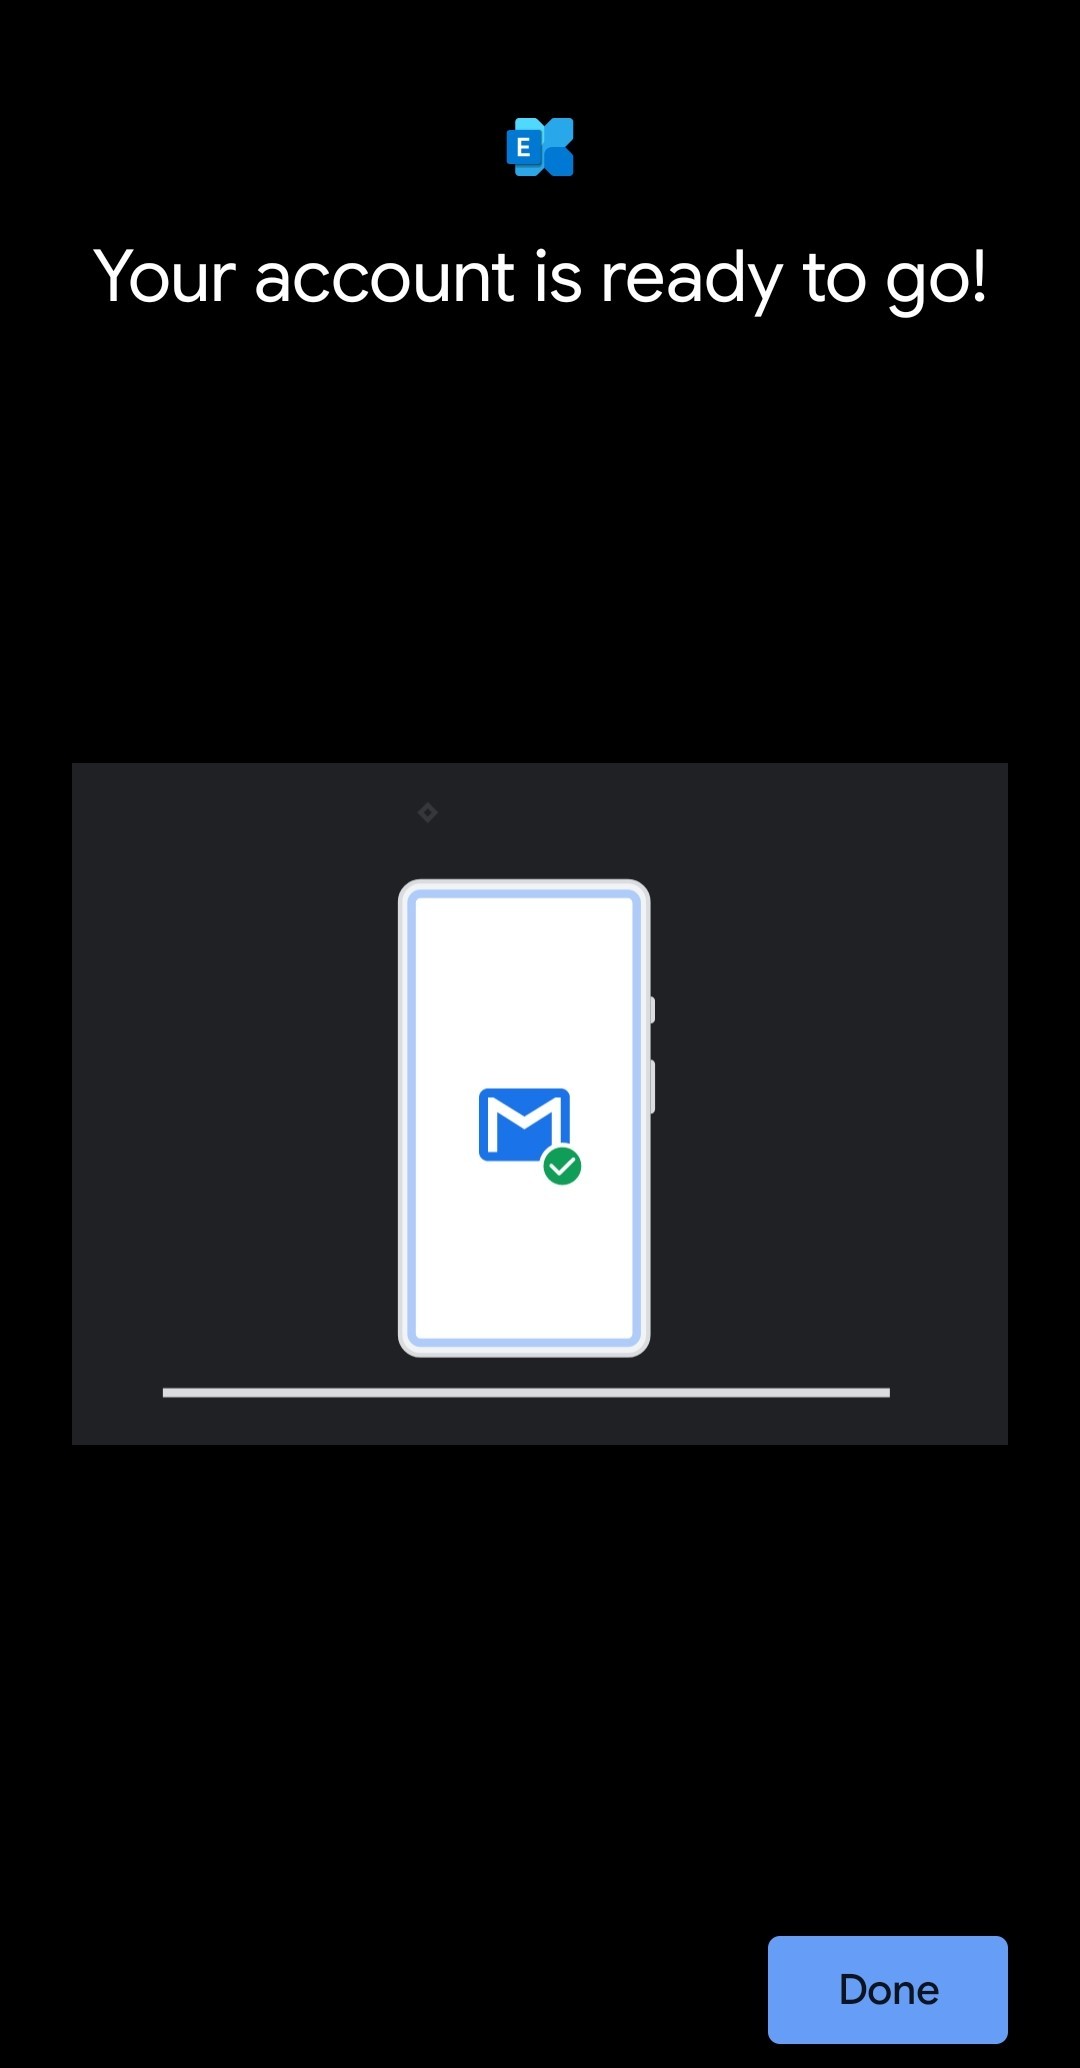
- If you are using an up to date version of Android, the
“Next”setupbuttonis
now
5.complete. - On older Android versions, you may have to select the sync frequency and period:
- Select the preferred options and
synchronisationsync period - Select
wantNext6.
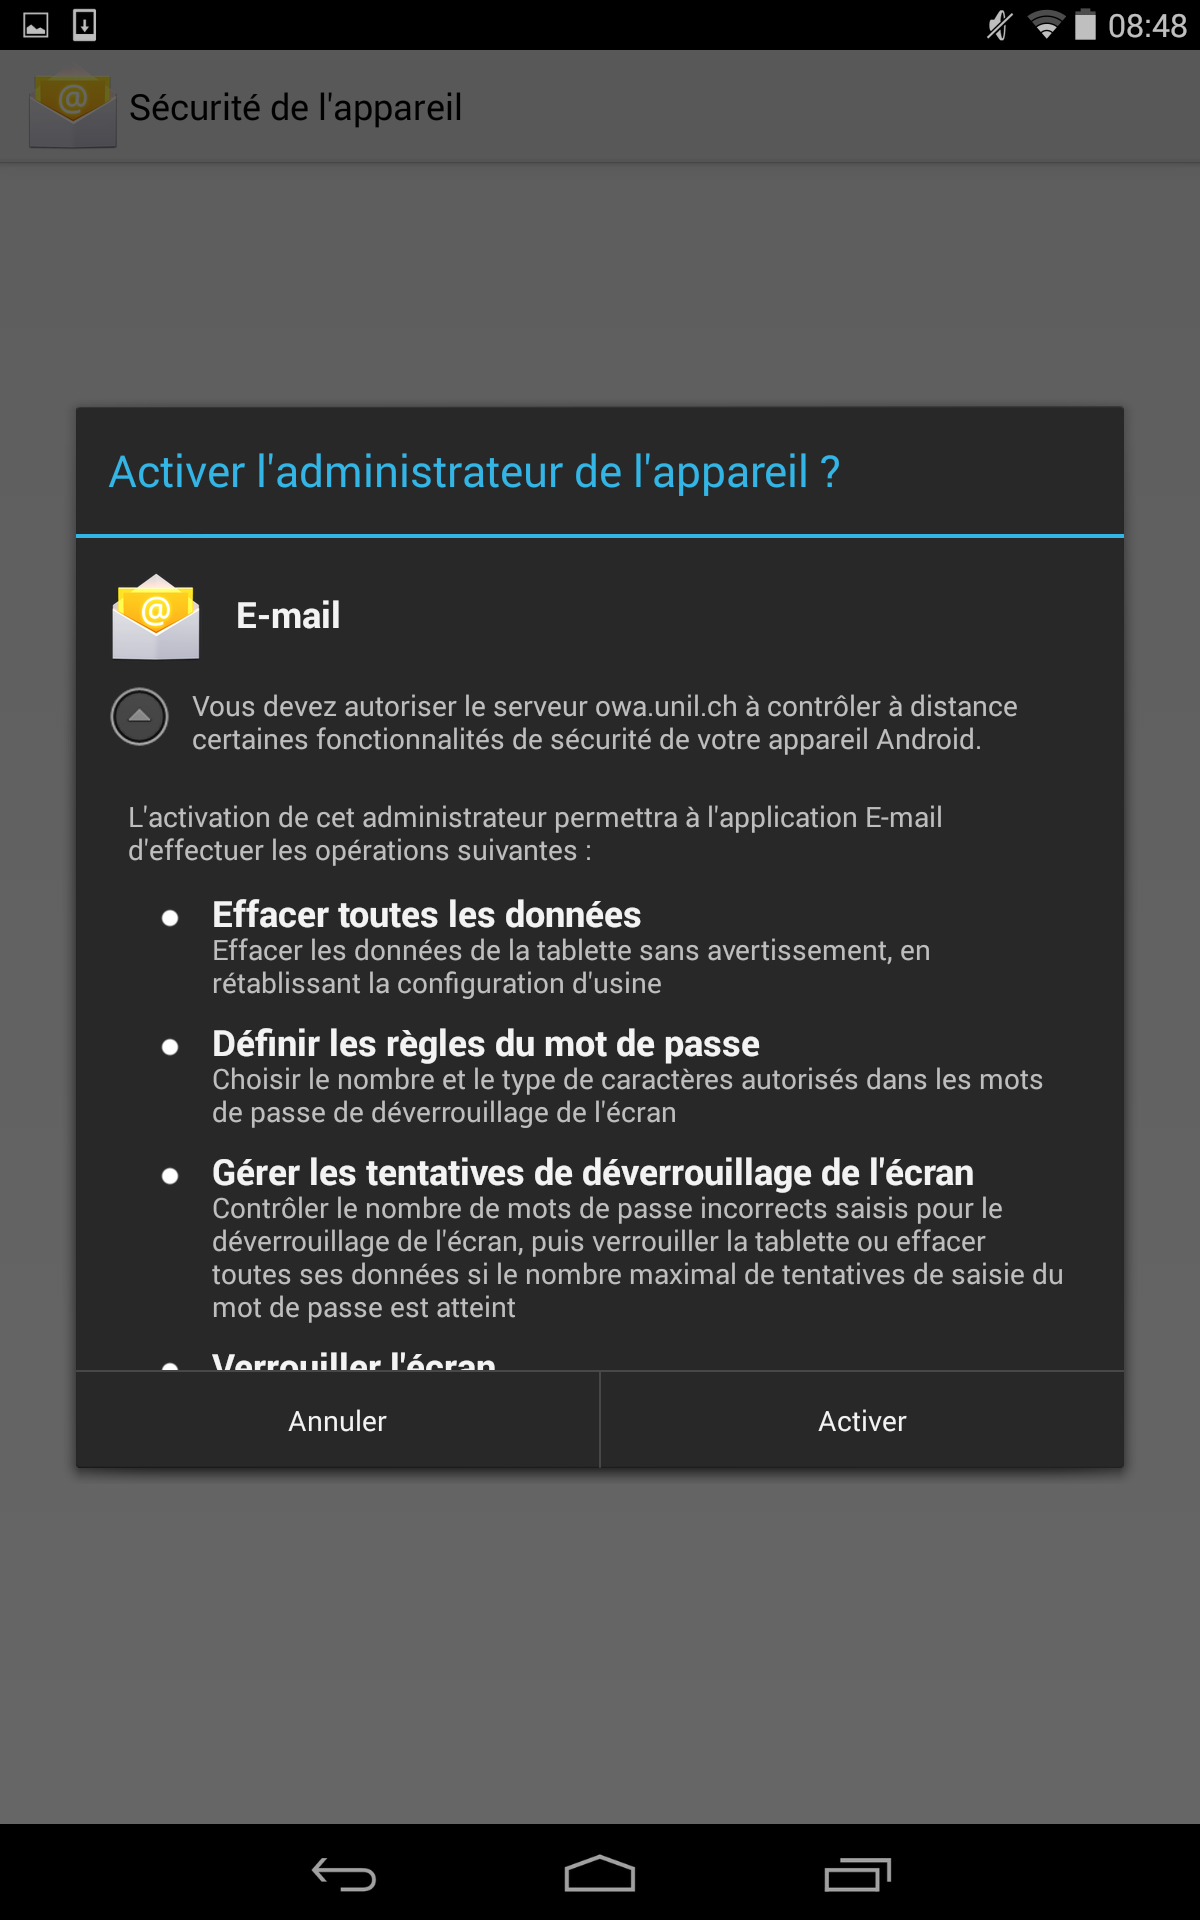
- Allow the Exchange server
astoadministratoradministratebyyourclickingdevice.theThis“Activate”optionbutton (this letsallows you to remotelyerasewipe and lock your device in caseyouoflosetheft.it
youClick “Next”
7.or - Select the preferred options and


Limitations due to Android &limitations and workarounds
Android is forhas the timefollowing beinglimitations limitedwhen init its support of the Exchange services:
there is only one colour for calendarsthere is no support of tasks and notes systems
These applications allow youcomes to workExchange around these issues (the Ci does however not guarantee that they work and offers no support whatsoever for them):mailboxes:
TasksOnly&oneNotescalendar color- No support for
MStasksExchangeand notes
The Microsoft Outlook app comes with the aforementioned functionalities.
Other mail clients

Setup for generic e-mail clientsOptions
Generic
From authentication Microsoft Ensure that your Thunderbird client accepts the cookies mandatory for OAuth2 connection: full Unil email ( Port If an "User is authenticated but not connected" type of error appears, try: Access to a mailbox via POP3 should only be used as a last-resort option. full Unil email ( Port username (e.g. If you are 1. Log into https://outlook.office.com with your UNIL credentials. 3. Under the 5. Name the rule, choose 8. Finish the procedure by accepting the warning message Désactiver la correctionSuggestions Premium Désactiver la correctionSuggestions e-mail2023 clientsonwards, ThisMicrosoft informationwill iscease meantsupport for and stop providing Exchange access to software thatusing doesthe not"Basic supportAuth" Exchange and its more advanced functions (calendars, address book, tasks and notes)
Incoming mail server
imapx.unil.ch
port 993
SSL/TLS
withprotocol. passwordOutgoingto mailuse server
or
smtpauth.unil.ch
port 587
STARTTLSOutlooksimplyApple TLS dependingMail on your clientdevices. If this is not an option for you, third-party software using the OAuth2 authentication protocol may still be used.
[Thunderbird & Third parties] Exchange account setup
1. Go to Settings > Security and Confidentiality > Web Content
2. Turn on Accept Cookies
3. Under the option Allow third-party cookies, select Always
Once these steps done, you may follow the instructions below.authenticationIf withyour Sent Messages do not appear after the setup, try sending yourself an e-mail. IMAP Configuration
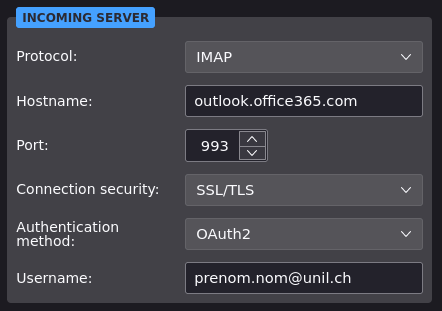
IMAP server
outlook.office365.comIMAP username
nom.prenom@unil.ch)Authentication method
OAuth2
993Connection security
SSL/TLS
1. Going to Settings > General > Configuration editor
2. Enter network.dns.dis in the search field
3. Enable the first option, network.dns.disableIPv6 so that it is set to TruePOP3 Configuration
IMAP server
outlook.office365.comIMAP username
nom.prenom@unil.ch)Authentication method
OAuth2
995Connection security
SSL/TLSSMTP Configuration (send-only)

SMPT Server
smtpauth.unil.chPOP3 Username
nprenom for Nom Prenom)Authentication method
Normal passwordPort
587Connection security
STARTTLS (or SSL/TLS if STARTTLS unavailable)UNIL e-mail with your private e-mail address
Use your UNIL e-mail with your private email address
OnlyFor forstudents students!only!IfBy youredirecting chooseyour Unil emails to doyour so,private, external mailbox, you are entrusting your own data to companies that aretrusting external toentities thewith UNIL;their thiscontents. isTherefore, why the Centre informatiqueInformatique does not offerprovide any support regarding the utilisationkind of thesesupport websitesfor external email providers and canwill innot noand meanscannot be held responsible for any kindprejudice ofand damage thatcaused wereby to happen due to yourthe use of thesethe websitesaforementioned orexternal emailsemail thatproviders. donotemployed redirected toby the destination mailbox. What arrives in your UNIL mailbox is what counts.Concerning the university staff,university, using an external service may go against the internal UNIL directives.Transfer your e-mails to another e-mail address
2. Go to the “Options”Options menu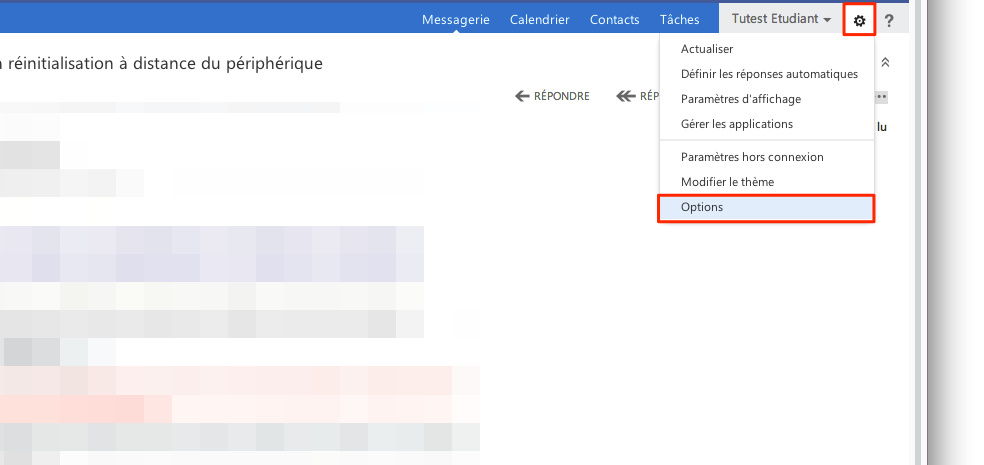
“Organize email”email sectionsection, click on “+”
4. Select “Create a new rule for arriving messages”messages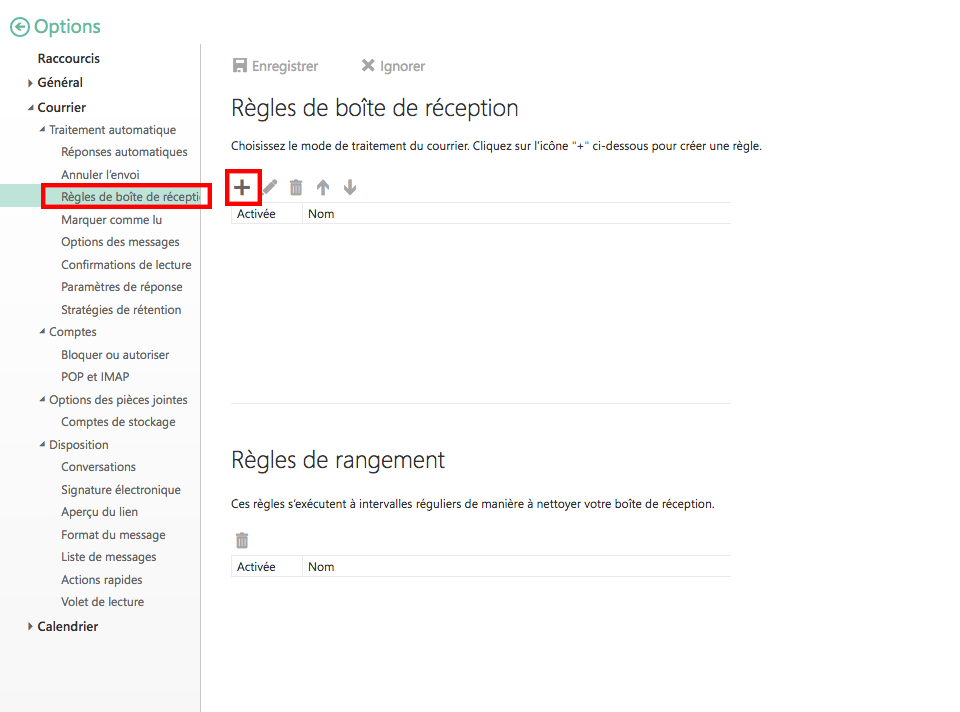
“Apply to all messages”messages and “Redirect the message to…”
6. Type in the private e-mail address you want to use for the transfer
7. Click on the “Save”Save button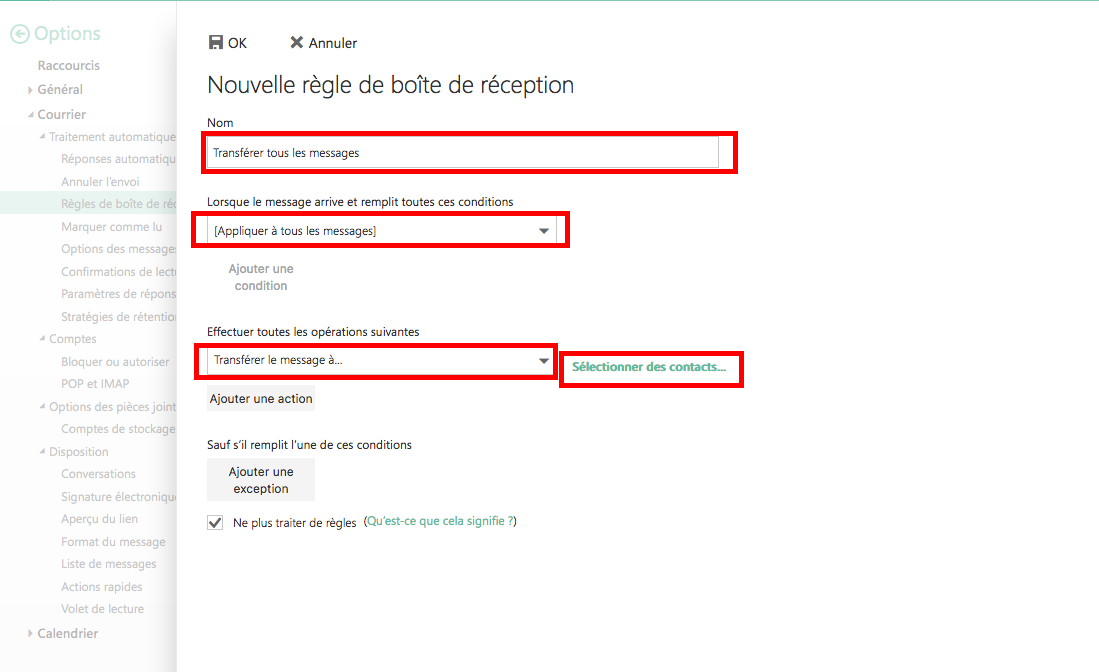
PremiumPremium✖
Désactiver la correctionSuggestions Premium
Désactiver la correctionSuggestions Premium
Désactiver la correctionSuggestions Premium